In this chapter, we will cover:
Creating a realistic pebble material using procedural textures and node materials
Creating a gray limestone pebble
Creating the quartz pebble material
Creating an opalescent quartz material
Creating a mask to represent the quartz veins
Combining two materials, to make a third, using nodes
Creating a large rock material using procedural, and node textures
Creating a texture node to simulate seaweed at the base of a rock
Creating a large rock face using photo reference
The surface of a natural material may seem one of the easiest to reproduce in a 3D suite such as Blender. However, natural surfaces can be quite complex in their appearance. Color, specularity, and reflection can organically change across a surface as a result of location, climate interaction, and variations in the natural substance. In many ways simulating natural objects in Blender will require more complex materials and textures than man-made objects to make them look convincing. Fortunately, learning how to create believable natural surface materials will help you in the development of many other material types. After all, most manufactured objects are created from, or based on, natural materials.
Blender offers a vast array of material and texture tools to aid you in the creation of natural-looking surfaces. Because of this there are many ways to produce similar, and equally pleasing, results. However, there are approaches that will speed material creation and make the process easier, adaptable, and more enjoyable.
Although there are no prerequisites to using the recipes for this first chapter it would be useful for you to know how Blender materials are organized and the various methods of mapping them to mesh objects. If these concepts are unfamiliar, or new to you, visit the free support documentation at the BlenderWiki: http://wiki.blender.org/index.php/Main_Page
At the time of writing most of this documentation is based on prior versions of Blender. However, I can recommend the Blender Summer of Documentation section on Materials and Procedural Textures written by me in 2006.
http://wiki.blender.org/index.php/Doc:Tutorials/Materials/BSoD
Although utilizing images from the 2.49 series of Blender it still covers many of the basic principles of material creation.
This book, however, will take you beyond the basics and into the new Blender v2.5 materials and textures interface.
When trying to simulate any surface, your eyes will be your greatest asset. Carefully observing either the real material, or good reference photos, will make the task of simulation in Blender much easier. This is particularly important with natural materials, which have complex structures giving fine variation in surface color, specularity, and texture. Understanding what these details are will make any material simulation easier and give the viewer the correct visual clues so that they know what they are meant to be looking at. Even if you intend to represent a surface in a non-photo-realistic manner it is important to provide the viewer with some essential surface properties that will give them the visual essence of a surface.
The good thing is that natural materials are usually easy to study because we can pick them up around us. If the natural object you are trying to create isn't at hand, then use the Internet to look for photo references.
http://uk.images.search.yahoo.com
Alternatively, try to take your own photo reference shots by carrying a digital camera around with you. Even a mobile phone camera can be good enough to take reference photos.
Another useful tool is a magnifying lens. Being able to closely study the real surface that you are trying to simulate, can aid your perception of the detailed color variations and surface texture of a natural object. Just using your eyes should give you enough information about a natural surface to enable you to simulate it in Blender.
It is also a good idea to set up the default scene in Blender to provide better lighting for material and texture creation. You will need to regularly render the objects you are creating textures for, just to see a more accurate example of a materials effect. Improving the lighting, from that given in the factory settings, will aid you in that process.
You will find a recipe in Chapter 4, Setting a default scene for materials creation, that provides a better materials setup.
For this first recipe we will create a realistic-looking pebble based on one that could found on many beaches across the world.

The previous screenshot shows three pebbles, one that mostly comprises hard gray sandstone, another consisting of quartz, and a third that has both types of rock fused in layers. The pen is shown to provide a sense of scale for these pebbles.
Although all three recipes are designed to simulate a surface when dry, it can be useful to know what it looks like when wet. For instance, the gray sandstone will look much darker when wet because light will be spread less across its surface. In contrast, quartzrock will hardly alter at all when wet because its surface is much more reflective anyway. Knowing these surface properties will aid you in your simulation.
To start off this exercise we are going to create a simple pebble-like mesh on a white plane background and then apply a pebble material, based on our observations of the reference photo, to the pebble mesh. We are not going to create the exact pebble as shown in the reference photo, but the essence of such a surface that could be applied to any shaped pebble mesh.
The easiest way to create a simple pebble shape is to use the default cube and:
subdivide, in edit mode by three to four subdivisions, to give you a few more vertices to play with
make the mesh smooth from the tool shelf
add a Subdivision Surface modifier at about level 3
then move vertices around in proportional edit mode until you get a reasonable pebble like shape. I scaled my cube by about 150 percent during this process
You could also use the Multiresolution modifier, and the Sculpt tool to achieve a similar effect.

Also create a simple plane below the pebble mesh and scale this until it is larger than the camera view. This will give a surface on which to display our pebble.
Save your work as pebble-00.blend.
One of the simplest materials to create is a gray sandstone pebble using just procedural textures. We will apply this material again in other recipes that follow so the naming of each material will become clearer as you work your way through each recipe. If you start any of the recipes out of order you can still complete them by downloading the named blendfiles of any of the uncompleted preceding recipes.
You will need to have created the base mesh as described above. However, you can also download a starting blendfile from the Packt Publishing website.
We
will take the base blendfile and create a new material that will simulate gray sandstone. So, open up the saved pebble-00.blend file, or one downloaded earlier.
With the pebble mesh selected, select the Materials button from the Properties tab.

On the Materials properties editor panel click the + button to create a new material. Name this
Surface-Color.Change the Diffuse color to a lighter gray. If you click on the color box, a color selector appears where you can change the R(ed), G(reen), and B(lue) values to specific settings. Use
0.750for R, G, and B.You can also change the color value by H(ue), S(aturation), and V(alue) as well as Hex values. You can, of course, judge the color, saturation, and lightness by directly manipulating the color wheel marker and lightness slider with the mouse. Change the Specular settings to type Wardiso, Intensity value to
0.411, and Slope to0.400.
The Wardiso specular setting allows finer control over the specular light across a surface. It suits the spread of specular light found on dry pebble surfaces. You will find that all the specular and diffuse shading methods have different characteristics that may be suited to specific surface types. Experiment to find out their benefits as well as drawbacks.
All that we have done here is create the basic surface properties of color and specularity. To make the material more believable it is necessary to add textures to give variety to the surface color, bumpiness, and specularity. Save your work at this stage, naming the file pebble-01.blend.
Select the Texture panel.
Add a new Texture (the + button) of type Clouds, and name the texture Clouds.
Under the Clouds settings make sure that Grayscale and Soft are selected and alter the Size to
0.05and Depth to5.Under Influence/diffuse settings select Color and set to
0.686.Select Intensity under Specular and set its value to
-1.000.Also select Normal under Geometry and set its value to
0.500.In the Blend settings change the blend type to Mix and in the color selector create a darker gray than the base color by changing each of the RGB sliders to
0.46. Alter the DVar value to0.484.Finally, check the Old Bump Mapping checkbox to make sure we are using the original Blender Normal method.
Note
Blender 2.5 comes with an improved Normal method but you can still employ the older method if that suits the material. Basically, the newer method provides a more detailed bump from a grayscale texture. However, the Blender old, or original, method, is more subtle and ideal for this recipe. We will meet the newer method later in this chapter.
We have produced a varied gray stone-like surface with a few bumps and a slight specular reflection across the surface, indicating that the pebble has reflective crystals embedded in its surface. Now let's add some surface wear to indicate damage as the sea water bashes the pebble about. Once again, save the blendfile, incrementing the filename, to
pebble-02.blend.Create a new texture of Type Distorted Noise. Name it
DistNoise.In the Distorted Noise settings tab set Distortion to
1.00and Size to0.25.Under Influence/Geometry select Warp and set to
0.040. This should be the only setting selected under Diffuse, Shading, Specular, or Geometry.Ensure that RGB to Intensity, Negative, and Stencil are selected.
The stencil setting will not visibly change the surface but it will affect the texture that follows.
Create a new texture of Type Musgrave, and name it Musgrave.
Under the Musgrave tab set Dimension to
0.441, Lacunarity to2.00, Octaves to6.358, and Intensity to1.660. Also set the Size to0.64.In the Colors tab Adjust the Brightness to
0.411and the Contrast to2.469.In the Influence tab select Color and set to
0.191. Then under Geometry select the Normal setting it to-1.00.Set the Blend type to Mix and from the color selector create a darker gray with values RGB of
0.14. Check the Old Bump Mapping checkbox as we will be using the original Blender Normal method for this texture.
Save your work as pebble-03.blend before rendering an image of your gray sandstone pebble. Regularly saving as you progress through any project will mean you can at least recover back to the last save.

What you have produced is a good approximation of a gray sandstone pebble surface.
In the
Blender Material panel you are apparently only offered three color settings; Diffuse, Specular, and Mirror. These set the overall color for each surface property. However, the parameters of each type of shader, Diffuse, Specular, and Mirror can radically alter the way the shader reacts to light and displays the surface. In our case we have set a gray color for the diffuse setting, and a simple white color for specularity. However, we have altered the specular shader to Wardiso, which offers a wider degree of light spread via its Slope setting. In fact, we have set it to 0.400, which will give the widest specular spread using Wardiso. The color settings for specular and mirror can be altered to any color. However, in the majority of cases they can be left at the default white setting as in the pebble example.
To add variety to the diffuse color we need a texture mixed in some way to simulate the surface color variations. Blender allows a large number of textures to be added to a material. The total number seems to increase each year. However, I have never needed to use any more than 16 textures in any material that I have ever produced. Learning how to economically apply textures is a skill that can only improve with practice but try to keep it down to a more manageable number. Your material solution will be much clearer when you view it, maybe several months later.
When you add a texture to a material try to name it immediately. The defaults Tex.001, Tex.002, etc will become confusing, especially if you have to create your material over several days.
In our case we added a texture of type Clouds. There are many other texture types available, ranging from procedural, mathematically produced random types, through to images, such as photographs or drawn images. All Blender textures have settings to alter their properties, such as color and scale, as well as how the texture will be mapped to a material, and what influence it will have.
Procedural textures are mostly grayscale but can be applied via Mix, Add, Multiply, Screen, etc to alter the underlying material colors. These blend types work in a similar way to those found in paint packages, such as Gimp . In this pebble recipe we have used relatively simple mix methods to simulate a complex surface. Later recipes will show the effect of the other blend types available.
In this recipe we have used a number of textures to vary the color across the surface, as well as altering both the bumpiness (the normal) and specularity. Employing textures to add these variations is the way complex surfaces can be synthesized in Blender. We have used a variety of procedural textures to affect color, specularity, and normal. In fact, the first texture, Clouds, affects all three of these settings. Blender allows you to use any texture to change these and other settings with values that are controllable for each influence you wish to use. Here we used the Clouds texture to alter the color, specularity, and bump of the pebble material. However, the second texture, DistNoise, does not affect any of the influence settings of the material; its only task is to warp the texture that follows it. Using a texture to do this is a great way of changing the appearance of a procedural texture. The variation avoids repetition in the surface, which can be a problem if you employ procedural textures many times in a scene. Here it is used in a subtle way with a low Warp setting of 0.040. Another important setting here is the RGB to Intensity from the Influence tab. This will ignore the color values of the texture, which are not needed when applied to several of the influence types. In our case the Distorted Noise texture is grayscale anyway, but getting into the habit of checking this setting will avoid problems when using a color texture for such influence examples.
We also set Stencil in the Influence tab. This fascinating setting uses the texture to mask following textures. We can use it to allow the following textures to affect the surface (any white areas of the texture), partially affect the surface (any gray areas of the texture), or obscure following textures surface influences (any black areas of the texture). We can reverse that effect by selecting the Negative setting above it. Masking is one of the fundamental techniques to create a good texture. The stencil setting is extremely effective at giving that facility. However, it will only work with grayscale textures or with the RGB to Intensity set.
The third texture, Musgrave, adds further levels of color and bump variation. In the Musgrave tab we have altered the settings to produce distinct bump maps to create the kind of dents found when pebbles crash in the surf. Having several textures affecting the normal of a surface means we can simulate complex bump structures using simple procedural textures. By varying the contrast of a texture, we can limit and increase the edge detail of a bump quite simply. Here we did not set the RGB to Intensity under the Influence tab as the texture is already grayscale. If you want, set that now and render again and see if there is any difference.
Exploring the settings for any texture can be one of the most creative and stimulating exercises in 3D design. Finding the right settings will become easier as you explore Blender but experimenting as the accidental breakthrough may be the answer to your next material simulation.

Quartz is an extremely common type of stone that is usually layered inbetween other rock types. However, pebbles on beaches where this type of rock is common often break off from the layers and are tossed in the sea to form pebbles. The second pebble we will create is based on such a variety of rock.
If you have completed the previous recipe load up the saved pebble-03.blend file.
Alternatively, you can download a pre-created file from the following location the Packt Publishing website.
Let's
create a new material to represent the quartz pebble. To do so we need to have the pebble object selected and temporarily unlink the Surface-Color material, giving a clean surface upon which to design our quartz material. However, once you unlink a material from an object it will only be available for reuse during your current working session. As soon as you close that Blendfile, even if you have saved it, the material will be lost. Blender normally only saves materials assigned to objects. However, we can fix a material or texture by clicking the F button to the right of the material or texture name.
With the pebble object selected click the F button, next to the material name in the Material properties panel, to fix the material into the blendfile. Then click the X button to unlink it from the Materials panel.
If you hover over X it will display unlink datablock. You will notice that if you Shift-click the X you will permanently remove the material the next time you save. So be careful as we only want to temporarily remove the link to our Surface-Color material, while we create the quartz material.
Click the New tab to create a new blank material and name it
Quartz.We can keep all the default material properties set apart from the Diffuse color. So change this to pure white or RGB
1.00.Switch to the Textures panel and add a new texture of Type Clouds and name it
QuartzClouds.Under the Clouds tab set Grayscale and Soft, Size to
0.36, and Depth to 2.0.Under Influence only have Normal selected and set to
-1.00and under Blend type Screen. Select RGB to Intensity, Negative, and Stencil. Also check Old Bump mapping. Finally, change the color selector to R, G, B0.700.That has created a slight bump map to the texture and a stencil, of which only some of the following textures will appear through.
In the Texture properties select the next free texture slot and create a new texture of type Musgrave, and name it
QuartzMusgrave.Under the Musgrave tab set the type to Multifractal, and Basis Voronoi F1 with Size
0.05.Under the Colors tab set Adjust/ Brightness to
0.467and Contrast to5.000.Under Influence select Diffuse Color set to
1.00and Geometry Normal to10.00. Set the Blend type to Screen and adjust the color picker to R and G to0.84and B to0.68. Also select Old Bump Mapping.
This will give a weathered and slightly dirty appearance to our quartz material. The quartz in the pebble example is contaminated with other rock fragments. Something that only becomes apparent when you look through a magnifying lens at the real material. If you were to render at this point, then you have a texture that could be used as a pebble material as it is. But we can take it further by varying the worn surface across the pebble.
Select an empty texture slot below the
QuartzMusgravetexture. However, rather than creating a new texture we will load up the sameQuartzMusgravetexture into the new slot but make some modifications to how it is used in our material.Select the checkered icon that precedes the texture name shown in the following screenshot:

From the displayed list select
QuartzMusgrave. The number 2 should appear just past the texture name to show that this texture is used twice.Under Influence and Geometry change the Normal value to
5.00, the Blend value to Screen, and change the color selector to black (RGB values to0.00).
Save
your work so far, incrementing the filename to pebble-04.blend, and perform a test render.

We have produced a surf-damaged pebble showing the effect of being crashed across other pebbles as the tide ebbs and flows.
The second material that we created was to simulate the quartz veins in the pebble. Each of the textures used in this material produce a surface, in much the same way as the first. Procedural textures vary in the surface color and normals (bump) to produce the desired effect. However, there are several special techniques used that are worth highlighting as they can add a little bit of magic to a surface simulation task.
The first texture is named QuartzClouds and this has only been used to influence the normal of the material. However, you will notice that under the Influence/Blend setting Negative, RGB to Intensity, and Stencil have all been checked.
Negative will reverse the effect of the texture. This is an overall setting and any of the set influences will be affected. In our case only normal is set.
RGB to Intensity will internally convert the image to grayscale, so that only those intensity values affect any of the other influence settings. If the color intensity had been set the default magenta color would have been mixed with the material color based on the proportions of gray in the texture. We can therefore even add color with a black and white texture. In our case color influence is not used so we can ignore this effect. However, although the default color is magenta we can alter this color using the color picker within the Influence tab.
Stencil creates a mask, or stencil, to filter all following textures in the material.
However, Stencil will only work if RGB to Intensity is set, even if it's just a grayscale texture, such as cloud.
Quartz is a crystal and as a result tends to spread any light falling on it, producing a kind of opalescence that almost makes the surface glow. We can add additional textures, to our previously created quartz material, to recreate this opalescence thus producing a third pebble material.
If you have created the previous recipe, reload the pebble-04.blend blendfile. You can also download a pre-created file from the Packt Publishing website.
With
the pebble-04.blend open reselect the pebble mesh object and move to the Texture panel. Rather than creating an entirely new material from scratch we will amend the quartz material created in the last recipe. However, you will see later that you will still have access to that other pebble material for use in any Blender project.
Select the second of the
QuartzMusgravetextures and in the Influence tab, select Stencil.Select the next empty texture slot and choose New and name the texture
Opalescence. Make it Type Clouds. Set Hard, Size0.03, Depth6.Under Influence select Color and set to
1.00, and select Emit and set to1.00. Set the Blend type to Mix with the color selector set to R1.000, G0.730, and B0.160.

Ensure that you save the blendfile, incrementing the filename to pebble-05.blend.
These three simple steps modify the material to produce quite a difference in the quartz simulation.
When
we added the stencil setting to the QuartzMusgrave, we had two stencil textures, now limiting the effect of the last texture slot that we named Opalescence.
Stencil is one of the most underrated of the Blender material tools, providing a means of controlling where textures are applied to a surface. It will be used many times in the recipes of this book.
Note
There is one disadvantage to this method of stenciling one texture after another. Once a stencil has been set all following textures will be affected within the material. You cannot turn it off in later textures, so that it no longer has an effect. That means you will have to think carefully about where within a material you set any stencil. There are techniques using Node materials that can be applied to circumvent this problem.
The last texture in the quartz material we called is Opalescence and if you examine its Influence settings you will observe that not only Color has been set but also Emit.
Note
Blender 2.5 introduces a new texture influence called indirect lighting. It also employs the Emit influence. However, objects and textures can directly illuminate the surrounding scene. Although that type of physical simulation is beyond the scope of this book, it does provide increased methods of simulating illuminated surfaces.
Why use Emit here? Well, some materials are quite difficult to simulate because of the way light spreads through the surface. Quartz has a generally white but translucent surface that spreads through the material. This is often called Sub Surface Scattering. Blender has very good sub-surface scattering controls but these can be render-intensive to use for all materials. This Emit trick can be used with very little overhead on render time and therefore is worth using in our example. However, use it with caution if your object is meant to be seen in different light levels, especially an animated change in illumination, as the surface may give the impression of glowing under certain low light conditions.
The layered quartz is quite common in gray sandstone and can be found in many pebbles scattered across a beach. The layers of quartz were laid down over the millennia, sometimes in thick layers, and sometimes thin. Earthquake movement altered the angles of the rock layers as these quartz deposits were being laid. As a result the quartz layers are occasionally at varying angles to each other. The quartz layers also have flecks of broken rock, some containing iron or sulphur deposits, which give a slightly yellow color variation.
The quartz part of these pebbles is worn more because its density is lower than the gray sandstone in which it is encased. Because the pebble has been tossed and polished by the sea, the quartz veins run right through the pebble, sometimes at strange angles.
We have produced a gray sandstone, and quartz material in previous recipes. We can combine them then using a mask to represent the veins as might be seen in real pebbles of this type. So this recipe provides a way of producing a mask ready for combination in the final material of this section.
Reload the pebble-05.blend saved at the end of the last recipe. If you haven't completed that recipe you can download a pre-created one from the Packt Publishing website.
As in previous recipes we will have to temporarily clear the material last created so we have a clean slate to create this new mask material. However, we also need to fix that last material, so that we don't lose it if we need to split this exercise into several days.
With the pebble object selected click the F button, next to the material name
Quartzin the Material panel. Then click the X button to unlink datablock. As in previous recipes, we only want to temporarily unlink the material so that we can create a new one.In the Materials panel create a new material and name it
QuartzMask.Set the Diffuse color to black RGB
0.00, and under Shading set Shadeless.You now have a purely black material, so let's add some purely white veins to complete the mask.
From the Texture properties panel create a new texture of Type Marble, and name it
QuartzThick.Under Marble, set Sharper and Tri, and Noise to Soft. Set Size to
0.91, Turbulence to7.04, and Depth to2.Under Colors/Adjust set Brightness to
0.556and Contrast to5.000.Under Mapping set Size X to
1.30, Y to-0.77.Under Influence set Color to
1.00, and Blend to Screen. Change the color selector to R G B0.000, black.If you perform a quick test render at this point you will see that thick veins have been produced. This will act as the start of our quartz veins to which we will add some thinner veins as seen in the reference photo.
Select the next free texture slot in the Textures properties panel and create a new Marble texture with the name
Quartzthin1.In the Marble tab select Sharper and Tri, and under Noise select Soft. Set Size
1.18, Turbulence2.53, and Depth6.Under the Colors tab set Adjust/Brightness
1.711, and Contrast2.773.Under the Mapping tab, set Size Y
-2.09(X and Z remain the default1.00).Under the Influence tab, set Color to
1.00and Blend to Screen. Alter the color selector to R, G, B0.000, black.You could once again test render after you have saved, but we shall move on to add a final thin vein on our mask material.
Select a free texture slot and create a new texture of type Marble and name it
Quartzthin2.Under Marble tab select Sharper and Tri, and Noise Soft. From the Basis menu select Improved Perlin. Set Size to
0.88, Turbulence to1.93, and Depth to4.Under the Colors tab set Adjust/ Brightness to
2.000and Contrast to5.00.Under the Mapping tab set Size Y to
-1.48and Z to0.86.Finally, under the Influence tab set Diffuse/Color to
1.00, and Blend to Screen.
Save the blendfile, incrementing the file name to pebble-06.blend, and render the QuartzMask material.
This material is not designed to be used as a direct pebble-like texture. Its purpose is to act as a mask when we mix the other pebble type created in earlier recipes.
The third material created is a mask to use within a material node setup. The idea being that it will combine the two material types by the amount of black, controlling the gray surface material, or white, controlling the quartz material. Since this material has no surface features, other than color, it's a lot easier to create.
Under the Material panel the Shading/Shadeless setting has been checked and the Diffuse color is set to completely black. This ensures that its light level will not be affected by shadows or scene lighting. In other words, the mask will work across the entire objects surface.
Three textures have been used to create the vein-like strata through the pebble shape. These are all based on the Marble procedural texture type but with varied settings. Apart from the Marble type settings there are two areas that are vital to the way each texture is applied and positioned onto our pebble.
This setting under Colors/Adjust/Brightness and Contrast has been employed to alter the thickness and sharpness of the simulated quartz veins. In most cases, the Contrast has been set quite high, while the Brightness has been varied to give different results.
Under Mapping/Size the X, Y, Z values have been changed for each of the three vein textures. This scaling can be used to both alter the rotation of where the marble texture veins will appear, as well as alter the space between the veins. Obviously, if you reduce the scale too much, the texture will appear to become just streaks across the surface and therefore rather unnatural. Because procedural textures are mathematically generated they appear to occupy the whole 3D space. Therefore, because they are mapped to our pebble mesh they look as though they travel right through the surface.
This technique of using scale to rotate a procedural texture is useful in other circumstances and will therefore be used in future recipes. There are also other techniques that can be used to scale and rotate textures without the inherent distortion that this scaling can sometimes give. These will also be explored in future recipes.
You may wonder why we have created this third material when it could have been created with Node textures directly within the node tree. When creating any texture, it's a good idea to see exactly how it will map to the mesh surface. Creating within its own material means we can just see where the veins will be and how they mix with each other. It can be very difficult to conceptualize a surface material without constant test renders. It is faster to render a single material than a complex node setup when you are at the development stage. It is a bit like getting your ingredients correct before baking your perfect cake.
We will create a node material made up from the three materials created in the previous recipes. One representing the base gray sandstone texture, another representing the quartz layers, and a third that will act as a mask to mix the final result.
To help manage material node creation, it is a good idea to rearrange the interface as shown below. This gives a large Node editing window with the Material and Texture properties conveniently on the right of the screen. It provides a camera view and an Image editor with the render result. If you don't feel confident about setting this up yourself refer to Chapter 4, Managing Blender Materials, which includes a simple recipe for creating such a view.
Load u
p the pebble-06.blend saved at the end of the last recipe. Should you have not completed that recipe you can download it from the Packt Publishing website.
To create a node material we should have the object selected and ideally start with the main material selected. In our case, it is the Surface-Color material created at the beginning of the first recipe in this section.
With the pebble object selected change the Node type to Material in the Node editor.

Now select the Surface Color material using the Browse ID data button from the Materials panel in the header. That's the little material icon next to the material name.

This selector is the same as that in the Materials properties panel but more convenient when we are working with nodes.
Finally, select the UseNodes check-box to enable the Node editor.
A blank Material node linked to an Output node should be displayed.
In the Material node choose the SurfaceColor material created earlier.
If you render at this point the pebble would display the SurfaceColor material because that's the only node material being fed to the Output node. It's time to add our
Quartzmaterial to the node tree.Ensure your mouse cursor is within the Node editor view and press the keyboard shortcut Shift+A, and from the displayed list add another Material node.
Depending on what node is selected, before you added this new node, Blender will attempt to make a link automatically. This may not be what you need. To remove an incorrect link, just drag the link away from the input it may have incorrectly attached to. You can learn all about node editing from the BlenderWiki.
http://wiki.blender.org/index.php/Doc:Manual/Materials/Nodes/Usage
In this Material node, choose the
Quartzmaterial created earlier.Press SHIFT+A and add a Mix node from the Color menu. Link the Color output socket from the SurfaceColor material node to Color1 input, and the Color output socket from the
Quartzmaterial node to Color2 input. Change the mix type to Screen.Add a new Input/Material node, and select material
QuartzMask. Connect its Color output to the Mix/Fac input node.
Save your
work as pebble-07.blend and render to view your simulated quartz-veined pebble material.
Blender Node editor is incredibly useful in combining materials in all kinds of new ways. It allows multiple materials to be combined on single objects. We have employed a simple mask here to accurately combine totally different materials onto our pebble simulation. In a sense we have created a new form of stencil to mix different textures controlled by a mask material. The difference with a node material is that the mask is much more flexible than the texture example we used in the individual materials.
Of course, that is not the only thing that material nodes can achieve. However, it is a very useful technique simply achieved using three materials and an uncomplicated mixing method.
Material nodes in Blender are one of the unique features that make it such a versatile 3D suite. Nodes can be used to create really detailed and interesting materials, something that is not possible with materials alone. We have used it here to mix two separate materials, using a third to filter the mix result. Later, we will examine more complex examples of node tree set ups. However, it's important to realize that a good node material does not have to be complex to work.
You may have noticed that your renders are not quite the same as those illustrated in this book. That is because I have set up some variations in the lighting and rendering options to produce a better quality render. This is not necessary while you are developing a material solution as it will increase the render times for all test renders. However, if you would like to know how to duplicate the look of the renders in this chapter there is a recipe included in Chapter 4, Managing Blender Materials.
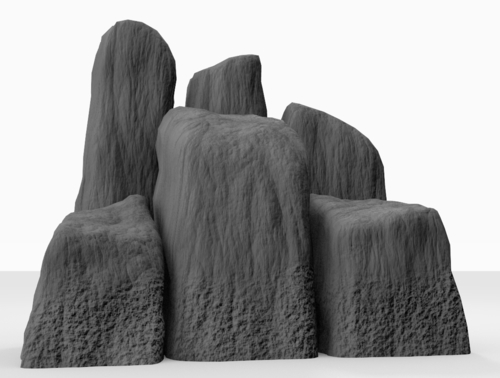
Larger rock materials, for boulders, stone statues, or Stone Age circles, follow many of the principles learned in the previous pebble recipe. The main difference is one of scale and learning to obtain the correct scale for any object is an important step to producing good textures.
Although procedural textures can be used to create any scale rock occasionally, we will require photo reference to aid the organic structure that defines many rocks. We might not have ready access to larger rock formations for either direct observation or taking photo reference. While there are references available on the Internet, their resolution can be too low to use within a material. We will, therefore, also discuss other methods of creating images for larger rock formations. The approach with these recipes is not to create a finished image but rather explore approaches that can be applied to any larger rock surface.
Preparation for this recipe involves creating a simple scene comprising several box-like shapes subdivided a few times and tweaked in mesh edit to vary their shape. A simple plane is created to represent the ground and the two default lights adjusted to cast interesting shadows across the rock surface. Increase or decrease their intensity to obtain the best contrast in your render. You should be setting the lights up to aid your material creation at this stage rather than for a final render. You can also move the camera for a better angle if you like. The mesh needn't be complex; the one I created is just a few simple cubes subdivided with some added edge loops (Ctrl+R in mesh edit mode). Set your mesh to smooth shading and add a sub-surface modifier. To aid the process of shaping the mesh, ensure the Apply modifier to editing cage during Editmode button is selected.

To give the scene a pleasant and more seaside/desert/planet surface-like quality, you might want to change the world background and add a plane from which the rocks appear to project. A simple sky blend background, from a yellowish white at the horizon to a light blue in the sky, will silhouette the darker rocks against the light background.
It is a good idea to apply any scaling to the object using the Ctrl+A keyboard shortcut. This will ensure that the scaling will apply to the mesh, making the mapping of the material and textures consistent.

Save this as a blendfile, naming it rock-default.blend. This default scene, with no materials created, can then be used with each of the following rock recipes.
Should you wish to use the same mesh as I have used you can download it from the Packt Publishing website.
This is a simple scene with no materials created. However, you will see that Blender will still render the scene, making surfaces visible with specularity together with shadows giving some idea as to the shape of our created mesh. Blender has a default material that is light gray in color with a small specular setting that makes the surface look like plastic. When creating an animation it can be useful to test render complex scenes without textures applied to speed the process of animation blocking. Once happy with the movement you can go on to create spectacular materials to bring the scene alive. We will use this Blender scene in each of the following recipes creating those spectacular materials.
Rocks on the sea edge are always fascinating. They are pounded at least twice a day through tides and storms. Life clings to them where it can and, apart from the natural elements that shape its surface, they are textured by birds and other transitory creatures that leave their mark on its surface.
You will need to load the rock-default.blend blendfile created earlier. Or if you have not been able to complete the previous recipe you can download the file from the Packt Publishing website.
Because we will be using this same blendfile for other recipes in this section you are advised to save it immediately after loading, and rename it Sea-Rock-00.blend.
Let' add an initial material to our rock mesh. To do so make sure the object is selected.
Click the + button in the materials panel to create a new material and name it
Sea-Rock.Set Diffuse color to R to
0.237, G to0.234, and B to0.205.Set the Specular type to Wardiso, with Intensity set to
0.014and Slope to0.400.All other settings in the materials panel can stay at their default values.
Now, let's create some textures to define our sea rock surface.
Switch to the Texture panel and create a new texture of Type Clouds and name it cloud.
In the Clouds settings, ensure that Grayscale and Soft are selected as well as Basis of type Improved Perlin, Size of
0.60, and Depth of5.Under Colors set Adjust/Brightness to
1.000, and Contrast to3.500.Under Mapping set Size X to
1.00, Y to2.00, and Z to0.30.For the moment we will not use this texture to add any color, bump, or specular changes to our material. We will, however, use it to modify the shape of our rocks via the Modifiers panel. To use this ensure that your mesh has been set to Smooth shading and that you have a Subdivision Surface modifier already in the stack. The settings for this can be quite small at 2 Subdivision levels for View or Render.
Switch to the Modifiers panel and add a new modifier of type Displace.
Under Texture, click the checker icon and you should see your
cloudtexture as a selection. Select it and under Strength set the value to0.100.You should immediately see the mesh distort slightly. If it's too much, reduce the Strength value a little more.
Switch back to the Texture panel and deselect the
cloudtexture just created. The tick mark should be off. We will not be using this texture for any other purpose just yet.We could actually delete it here because that would only disconnect the texture from our material. It still exists because it's now being used by the Distort modifier. In fact, you may have noticed that a number has since appeared to the right of the texture name
cloud. This shows that this texture is being used that number of times. It should be 2, because it's in the modifier and in the Material, even if it's not turned on at the moment. It sounds quite confusing but you don't need to worry about it at this stage.Select the next clear texture slot and click the new button. Select the Clouds texture type and name the texture
rock-cracks.In the Clouds tab select Grayscale and Hard and set Depth to
6, and Size to0.250.Under the Mapping tab change the Size Z value to 0.20.
In the Influence tab change the Influence/Diffuse Color to
0.500. In the Geometry select Normal and set to-2.000.Under Blend, select type Multiply and check the Stencil checkbox. Finally, change the default color to R
0.05, G0.04, and B0.03.
Time
to save your work to ensure you don't lose anything should the unforeseen happen. Name your file Sea-Rock-01.blend.

A quick render produces a quite nice rock. Remember, the only thing adding those deep and complex cracks and the green growth streaks is a simple cloud texture.
Textures can be applied to an object in Blender other than via the materials settings. Here we used a texture that we temporarily loaded into a material texture slot and then applied it as a modifier to distort the mesh to give some variety to the surface. To use a texture for such purposes it must exist in the data structure of the blendfile. The easiest way to do this is to load it into a spare texture slot of a material, name it so it can be recognized, then use it with the modifier. Once that has been done you can 'unlink the datablock', from the material if you want. Alternatively, just leave the texture in the material but turn off its influence.
Employing a simple clouds texture to add vertical elongated cracks to our rocky surface is a really easy way to create larger rocks. Here we employed a scaled cloud texture to add both color and a bump to the surface. Procedural textures like cloud are ideal for this purpose as they are randomly generated just like the natural surface of rocks can be. However, cracks in large rocks tend to be in a certain direction and by rescaling in the Z axis we give the impression that the cracks are vertical striations. We had to reduce the Z scale to achieve this. Scaling below 1 will actually increase the stretch of a procedural texture. Scaling above 1 will squash the texture in the scaled axis.
Water can also play an important part in the surface properties, adding extra specularity and reflection at certain times of the day. We shall be dealing with water in later chapters, so for these recipes we will assume that the tide is out. We will combine future water exercises with some of these chapter rock recipes later.
In this recipe we will create a simulation of seaweed, or other living crustacean, that can be found on the sea washed base of rocks on the edge of a beach. We will explore texture nodes in this recipe, using some comprehensive texture node modifiers.
You will need to load the blendfile saved at the end of the last recipe. If you have not completed that recipe you can download a pre-created blendfile from the Packt Publishing website.
We can add more to bed our rock into the life rich environment of the seashore.
Select a free texture slot, below the last one created, and create a new node texture. Name it
NT-Blend-maskand delete the Checker input.Add a Blend texture with SHIFT+A (that is the 5th selection down on the Add menu, and the 2nd in the Textures sub menu). In future, you should know how to add a texture node using this key combination.
In its settings select type Easing and ensure it is a Horizontal blend. Now connect it to the Output node.
Blends are very useful to help mask parts of a texture. However, we can modify the blend to do much more than just go from black to white.
Create an Add/Color/RGB Curves node between the texture and output. Use your mouse to modify the curve to look something like in the following screenshot:

Change the default name of the Output node to
Vegetation-stencil.Back in the Texture panel let's set the way this texture will be applied to our material.
Below the texture name in the panel you will see that there is a new selector called Output: if you click on this a list of available outputs for that node texture will be shown. Select
Vegetation-stencil.It is possible to set up multiple named outputs that can individually be selected in the Texture panel. Each named output can have multiple nodes to control that output thus making a truly versatile texture tool.
Under Influence select Color and set to
0.420. Under Blend select Overlay, and Stencil, and finally select RGB to Intensity and set the color to R0.16, G0.10, B0.09.Select a free texture slot below the
NT-Blend-masktexture previously created. This time, rather than creating a new texture select from the list, click on the checker icon by the name and selectNT-Blend-mask. Yes, it's the same texture but we are going to add a new output after further modifying the Blend.Copy the RGB Curves node (select and Shift+D) and move it below. You could have just created a new node but sometimes it's quicker to copy one already in the node tree. Modify the curve so that it looks like the following screenshot.

Connect the Blend Color output socket to this new RGB Curves node input socket.
You can create a Viewer node and connect the Blend output socket to the Viewer node. This will enable you to see its output at this stage of the node tree.
Create a new Add/Textures/Clouds node and set to Grayscale Soft, Depth
2, and Size0.250.Create a Add/Color/Mix node and connect the second RGB Curves node to Color1 and the Clouds Texture node to Color2, and the Mix type to Overlay. You can feed its output socket to the Viewer node to see what it looks like.

Create, or copy, another RGB Curves node and connect it from the output socket of the Mix node. Modify the curve so that it looks like the following screenshot. You will see that the Viewer node has been moved to after the Mix node.

Feed its output socket to the Viewer node to see how that has altered the Blend.
You have three more jobs to do to complete this new output. Firstly, we will scale it slightly and then invert it, and finally create a new named output that we can use in the material.
Create an Add/Distort/Scale node connected from the last RGB Curves node. Set its scale as X to
0.70, Y to0.70, and Z to1.00.Create an Add/Color/Invert node from the Scale node.
Create a new Add/output node and name it
Water-stencil.
Switch back to the Texture panel, so that we can set the influence of this new modified texture node output.
Select the
Water-stencilOutput and in the Influence tab select RGB to Intensity and Stencil.As you can see, it has no visual impact on the material as yet. This node texture output has become an irregular mask for a texture we will create to simulate crustaceans, or seaweed growth on the base of the rocks.
Select the next free texture slot and create a new texture of type Clouds and name it
Limpets.Under Influence/Diffuse select Color and set to
0.345. Under Influence/Geometry select Normal and set to-2.000. Set Blend type to Mix, and RGB to Intensity and the color values to R0.00, G0.09, B0.01.Finally, under Clouds set GrayscaleGrayGrayscale, Noise Soft, Basis as Improved Perlin, Size
0.03, Depth2.
Save your completed blendfile, incrementing the filename. It's time for a final render.
This recipe has used the Texture node system to demonstrate the extraordinary capabilities now offered in the Blender 3D suite. Node textures enable any procedural or image texture to be filtered and modified in many exciting ways. Here we used it to create some quite complex stencils or masks. These were then used to mix and combine textures in quite subtle ways. However, there are only three textures used to produce this effect.
A texture node was created with two outputs, both acting as masks or stencils for the last texture. Although it is possible to create almost any texture variation with a node texture, we have actually covered those areas that are most frequently used. These include mixing methods, levels adjustment, and distortions.
A node texture can be used in both node and standalone materials. Here we used a standalone material but later we will take this same material and integrate it into a node material, adding extra details to simulate the progress of creatures on its surface.
Procedural textures are superb at simulating natural organic surfaces such as stone. However, you can also use real rock face photos to modify a surface. Used in combination with procedurals you can produce some stunning results.
When creating node textures one must be careful not to produce a loop in the node structure. It is currently possible to link an output back into itself. However, the connector will turn red, showing that you are creating a loop.
It is also possible to add the same named node texture back into itself via the Add/Input/Texture. In such a case the small view will turn bright red, as will the output. But the texture will still render, sometimes producing weird results. As Blender is in a constant state of development these easily avoided annoyances will be tidied up. You can keep up to date with all the developments by checking the Bug Tracker or joining one of the support forums.
Here are some really useful websites to help you get the best out of a constantly developing 3D graphics suite.
Graphical Org is the place to download the latest builds of Blender http://www.graphicall.org/builds/index.php.
CIA.vc is the open source version control informant for Blender http://cia.vc/stats/project/Blender.
The Blender Bug Tracker (you will need to register to submit a bug) https://projects.blender.org/tracker/?atid=498&group_id=9&func=browse.
The Blender release logs for all versions of Blender http://www.blender.org/development/release-logs/.
Rock faces are extremely dramatic structures shaped by tremendous forces, such as earthquakes, volcanic eruptions, and glacial erosion over millions of years. Trying to simulate that kind of surface history can be daunting. So far we have explored procedural textures for most of the rocks created. It's time to show how images can be employed to create variety over the standard procedurals available.
In my part of the world we have some very beautiful rocks called bluestone. They have a structure that the ancients believed were a direct map of the stars. Their blue surface, with lighter blue highlights, was so different from other rock types that they collected them into stone henges, transporting them many hundreds of miles across these islands at a time when there were no cranes or heavy transport vehicles. Outcrops of these natural rocks can be found on many of the hills surrounding me. In fact, the mesh we created earlier looks very much like these stones. So why not try to recreate a surface material of their beauty?

Carn Edward with view to Cerrig Lladron for SN0536 © Copyright ceridwen and licensed for reuse under a Creative Commons License.
Open the rock-default.blend blendfile you created in the Creating a large rock material using procedural, and node textures recipe earlier in this chapter. Or if you have not completed that exercise download a pre-created version from the Packt Publishing website.
Rename and save it as large-rock-blue-stone-01.blend. This will ensure that we can start working on this recipe without overwriting the default rock scene created earlier. You will learn in Chapter 5 how important it is to manage your files to help ensure you do not accidentally destroy, or radically alter, a previously created blendfile, material, or texture masterpiece.
You will also need to download an image PEMBROKESHIRE-CLIFF-ROCKS.png for use in this recipe from the Packt Publishing website.
Save it to the textures sub-directory below where you saved the blendfile.
With the rock mesh object selected create a new material in the Materials panel. Name it
Blue-Stone.Set the Diffuse color to R
0.173, G0.194, and B0.240. A nice gray/blue color.Under Specular set the specular type to Wardiso, with Intensity set to
0.083and Slope to0.400.Switch to the Textures panel and create a new texture of type Clouds in the first slot calling it
large-cloud.In the Clouds settings select Grayscale and Noise/Soft. Set Basis to Blender Original, Size to
0.40, and Depth to3.Under Colors set Adjust/Brightness to
1.100, and Contrast to1.300.Under Mapping set the Size X to
0.20.Under Influence select Diffuse/Color and set to
1.00, Geometry/Normal to3.142, and the Blend color to RGB0.05.Save your work and do a test render.

You will notice that the clouds texture has added a little normal and color variety to the surface. You might also notice that there is a little too much surface specularity in this render. We will create textures to tone that down a little in a moment. But if you turn specularity totally off it will look very flat and uninteresting. Even substances like black velvet, that absorb light very evenly, will show some specularity when they are creased.
It's time to add a photographic image that will add some natural looking stratification to this bluestone rock surface.
Select the next free texture slot and create a new texture and make it an Image or Movie node texture. Name it
Pembs-Cliff-Image.In the Image tab Open the
PEMBROKESHIRE-CLIFF-ROCKS.pngimage from your textures directory.Under the Image Sampling tab reduce the Filter Size to its minimum of
0.10.
The picture is quite large at 3,472 x 2,314 pixels. This means we can utilize all of its detail without worrying about aliasing and therefore reduce the filter size to its minimum. The image itself has been modified to even out the levels and also converted to grayscale.
In the Image Mapping tab change the Crop Mininum X and Y values to 0.350. Also change the Crop Maximum X and Y values to 0.650. This has enlarged and cropped the image to remove the sky in the top left of the original image. We could have done this in a paint program but it's quite possible directly in Blender.
Under the Influence tab select Geometry/Normal and set to
-2.500. Finally, select RGB to Intensity. Ensure all other influences are unselected.If you render now you will see an extremely worn rock surface. Although this might be OK for certain simulations we can map the image a bit more creatively.
In the 3D view set the cursor to the center, Shift+S, Cursor to Center, and create an Empty. Name it
rock-rotateand set its rotation as follows, X47.051, Y-19.503, and Z31.622. You can do this by pressing the N key while your cursor is in the 3D view. This will bring up the Transform pallet where you can enter the rotation amounts directly. While in this view alter the Location X value to-1.250. This will move the Empty to the left slightly.Select the rock mesh object again and in the Texture panel under Mapping/Coordinates select Object, and from the Object list select the
rock-rotateempty you just created.Render once more and you should see some better stratification across the rock surface. Now we will add the lighter blue strata in this bluestone simulation.
Select a free texture slot below the
Pembs-Cliff-Imageand add a new texture of type Image or Movie and name itBlue-stone-MASK.Under the Image tab click the image icon next to the New and Open button. This will display a list of images currently in Blender. Select the same image as before,
PEMBROKESHIRE-CLIFF-ROCKS.png.Although we are using the same image we will make some changes to the way it is used.In the Colors tab Adjust the Brightness to
1.100and the Contrast to its maximum of5.000.You should see in the preview that we have increased the contrast of our image, which we shall use to mask, or stencil, another material.
Under mapping select Coordinates/Object and select
rock-rotate, the empty we created earlier.In the Image Mapping change the Crop Minimum X and Y to
0.350and the Crop Maximum X and Y to0.650. This is the same cropping as the previous texture.Under Influence set RGB to Intensity and Stencil. Ensure no other settings are selected as this texture is only being used as a stencil. It will not contribute any color or bump to the material.
Select the next free texture slot and create a new texture of type Musgrave and name it
Small-Musgrave.Under the Musgrave settings select Type/Multifractal with Dimension
0.100, Lacunarity6.000, and Octaves8.000.Under Influence/Diffuse select Intensity with a setting of
1.00, and Color0.161. Under Geometry set Normal to1.195. Set the Blend type to Screen as well as RGB to Intensity, and a color of R1.00, G0.92, B0.93.
Do a final render to view our bluestone material simulation.

Images can be used in all kinds of ways within Blender. In this recipe we have taken a black and white image and mapped it to our surface, not worrying about repeats or seams in the image. We have used procedural textures to enhance and cover-up any inconsistencies that are certainly there. We have filtered the same image in the texture panel controls using cropping, contrast, and other object mapping to create a rescaled and improved contrast mask without having to resort to a paint program or load yet another memory-intensive image into Blender.
Blender's versatility, in what can be achieved using images, is almost unrivaled. You will see in future recipes how seams and repeats can be avoided and how to use paint programs to create better images for use in materials later.
Chapter 7, Applying UVs to create an accurate skin material
In that recipe, you will discover how to wrap images around a mesh using UV mapping. This is the preferred way when mapping to a mesh that must move and distort in an animation. Fortunately, our rock recipes do not bend or twist as a cartoon character might.