Download code from GitHub
Introducing Vue CLI 3
This book introduces you to Vue CLI 3 and answers questions such as how to use it, why to use it, the best practices, and what you'll get out of it.
In this chapter, we'll look at how to set up Vue CLI 3 on our system. We'll begin by checking to see whether Vue CLI 3 is already available, and we'll see the exact steps to take if we either need a fresh installation or an update from a previous version.
We'll then look at how to install the Node Version Manager (NVM), and why that is a better alternative than simply installing Node. We'll see how easy it is to get started with Vue CLI 3 in VS Code, and how to integrate all these tools by using our command line.
We'll also discuss why Vue CLI 3 is great to use and work with, and we'll see this in practice, by running a default Vue CLI 3 app, both from the command line and by using the built-in Vue CLI 3 UI functionality.
The topics we will cover in this chapter include the following:
- Setting up Vue CLI 3 on your system
- Installing Vue CLI 3
- Installing VS Code
- Using Vue CLI with no configuration
- The benefits of using Vue CLI 3
- Avoiding JavaScript fatigue with the default toolchain
We'll begin this chapter by setting up Vue CLI 3.
Technical requirements
There are only a few technical requirements that we need; they are as follows:
- A Windows installation (Windows 7 or greater)
- An installation of NVM for Windows (the specific steps for the installation are described in the chapter)
- An installation of VS Code (code editor)
Let's begin setting up Vue CLI 3 on our system.
Setting up Vue CLI 3 on our system
A common way to work with Vue CLI 3 is via a command-line app called the Command-Line Interface (CLI), where we run our Vue CLI 3 commands. Another prerequisite is to have Node.js installed on our machine.
If you are working on a shared computer, say, within a team of your fellow developers, the chances are that you already have all the prerequisites. In that case, you could just verify that you can start using Vue CLI 3 right away by running a couple of checks.
Is Vue CLI 3 already available?
To quickly check whether you can run Vue CLI 3 right now and skip all the installation steps, run the following command in your command-line app:
node --version
Also, check for Vue CLI 3 with this command:
vue -V
If you get back any version of Node above 8.9 (ideally, above 8.11.0), you're good to go. Obviously, for Vue CLI, you'd want any version above 3.0.0.
Additionally, if you have a version of Vue CLI lower than V3, or you'd like to update to the newest Vue CLI, such as 3.3.0, just run this command:
npm install @vue/cli
What if you don't have Node.js or Vue CLI installed?
We'll use nvm or nvm-windows for Node, and after that, we'll install Vue CLI 3.
Installing Node.js using Node Version Manager
What is the recommended version of Node.js we should be using? This information is available at the following link: https://cli.vuejs.org/guide/installation.html.
Currently, as of early 2019, to get the best results with Vue CLI, the minimum version of Node required is 8.11.0+, but you can kind of get by with 8.9 if you really have to.
This brings us to another important decision: the installation of NVM.
Why install NVM?
While it is not absolutely necessary to install NVM in order to run Vue CLI 3 on your system, installing NVM is desirable for a couple of reasons.
First, you never know when Node will get a recommended update with security fixes, which usually means you'd be better off installing the update on your machine.
Second, if you need to run a different technology, other than Vue, this other technology might also require a different version of Node. To easily switch between these required Node installations on your system, you can simply install NVM.
Installing NVM on Windows
You can download the NVM for Windows from this address:
https://github.com/coreybutler/nvm-windows/releases
Locate the nvm-setup.zip file, download and extract nvm-setup.exe from it, and then install it by following these installation steps:
- Open the Run prompt by pressing Windows + R. Type cmd into the prompt.
- While inside the prompt, press Ctrl + Shift + Enter. This will run Command Prompt with administrator privileges, which is required for the next step.
- Visit https://nodejs.org, and see the current Long-term Support (LTS) version number. For example, currently, on 64-bit Windows, the LTS version is 10.15.1.
- To install it, run the following command in Command Prompt with administrator privileges:
nvm install 10.15.1
- Command Prompt will log out the following message:
Downloading node.js version 10.15.1 (64-bit) ...
- Once the download is finished, we can use the downloaded version of Node. We do it with the following command:
nvm use 10.15.1
- Finally, you can verify whether the installation was successful by running the following command:
node --version
- If you're curious about the version of npm that came with your Node installation, simply run the following:
npm --version
Next, we'll install Vue CLI 3.
Installing Vue CLI 3
We can install Vue CLI 3 with either npm or yarn. Since npm comes bundled with the Node.js installation, we'll use npm:
npm install -g @vue/cli --loglevel verbose
The preceding command installs Vue CLI 3 globally. That's what the -g flag is for. The @vue/cli syntax is what we use in Vue CLI 3, and --loglevel verbose will log out the details of our installation, which is very useful, especially on slower connections and slower machines, where sometimes we could start wondering whether our console froze. With --loglevel verbose, there's more clarity, which is always good.
Once done, let's double-check the Vue CLI version installed by running this command:
vue --version
Here are a few other useful commands that you should try in your console:
vue -h
Note that vue -h is an alias for vue --help. I'm using the former as it's easier to type.
Also, note that you can run the -h flag on each individual vue command, for example:
vue create -h
vue add -h
vue invoke -h
vue inspect -h
vue serve -h
vue build -h
vue ui -h
vue init -h
vue config -h
vue upgrade -h
vue info -h
Running any of the preceding lines will return the usage instructions for the specific command, a description of what it does, and the options (the flags) to append to each individual command. Obviously, the -h flag is a great way to explore the capabilities of Vue CLI, and to refresh your memory on the fly, if need be.
Next, we'll install our code editor of choice, VS Code.
Installing VS Code
To install VS Code, simply navigate to https://code.visualstudio.com, and then download the appropriate version for your operating system.
wmic os get osarchitecture
The output will be OSArchitecture, and on the next line, either 32-bit or 64-bit.
Once VS Code is downloaded, simply install it by running the downloaded installation file and follow the installation instructions.
After you've installed VS Code, you'll get an additional command available via the command line, code.
The code command is very useful, as we'll see in the next section.
Using Vue CLI with no configuration
In this section, we'll see the quickest and the easiest way to start using Vue CLI. It includes no configuration whatsoever! The reason to use Vue CLI without configuration is to run some quick experiments without having to answer prompts about our project's configuration that Vue CLI normally asks when we run a project with configuration steps included (which is the default approach to building apps using Vue CLI).
To begin, hold down the Shift key and right-click on an empty area on your desktop. From the contextual menu that pops up, click the Open Command window here command.
Once open, type the following command:
mkdir noConfig
This will make a new directory called noConfig. Next, let's change into that directory with the cd command:
cd noConfig
Finally, start VS Code from Command Prompt with this command:
code .
The dot in the preceding command means open VS Code in the current folder. Feel free to close the Welcome tab.
Next, use the Alt + F keyboard shortcut to open the File menu, and press the N key to open a brand new file.
In the new file, which opens in the tab that reads Untitled-1, type the following code:
<template>
  <h1>What's up, Vue CLI 3?</h1>
  <hr>
</template>
Next, press the Ctrl + S keyboard shortcut, and save the file as App.vue.
VS Code will save the file. It will give a new icon, the Vue logo icon, a visual cue that the file you just saved is indeed a Vue file.
VS Code might also prompt you to install an extension, Vetur, with the following prompt:
The 'Vetur' extension is recommended for this file type.
Go ahead and install the extension by clicking the Install button at the bottom of the popup.
Now we can serve our Vue app by running vue serve. But, before we actually run the command, let's use the -h flag to see what we have available:
vue serve -h
This is what we'll get back:
Usage: serve [options] [entry]

serve a .js or .vue file in development mode with zero config

Options:
  -o, --open Open browser
  -c, --copy Copy local url to clipboard
  -h, --help Output usage information
Now that we know what to expect, let's serve our Vue app with the following command:
vue serve -o -c
So, as we can see as mentioned previously, this command will serve our Vue app and open it in the browser. It will also copy the served URL to the clipboard. This allows us to, for example, open a different, non-default browser, and easily paste in the URL in the browser's address bar, so that we can preview our app there as well.
However, we'll come across a minor stumbling block.
Instead of our Vue app being served, we'll get this notification in our command:
Command vue serve requires a global addon to be installed.
Please run npm install -g @vue/cli-service-global and try again.
This is an easy fix. Better yet, we'll extend the preceding command with --loglevel verbose:
npm install -g @vue/cli-service-global --loglevel verbose
After some time, depending on your download speed, you'll get the npm info ok message.
This means that you can now run the vue serve command again:
vue serve -o -c
This time it works! Kind of...
Now we get an error that reads Failed to compile with 1 errors. And then, further down, we see the root cause:
Component template should contain exactly one root element.
There are a few ways to solve this issue, but what it basically says is that we can wrap our h1 and hr tags inside a div tag, and we'll be good to go. So, let's update the App.vue file in VS Code to this:
<template>
  <div>
    <h1>What's up, Vue CLI 3?</h1>
    <hr>
  </div>
</template>
Make sure to save your changes, and now, finally, let's serve it again:
vue serve -o -c
You might get a bit of a surprise, because a new tab will open with the app loaded automatically, in your default browser.
Let's say that your default browser is Chrome. Let's open another browser (for example, Firefox), click inside the admin bar, and press the Ctrl + V shortcut to paste in the contents of the clipboard. Of course, it's going to be http://localhost:8080/.
The ease with which we've performed these repetitive tasks of opening our app in the browser and copying its URL with the help of -o and -c flags is just the tip of the iceberg. Vue CLI 3 has a lot more in store to help us code our apps faster and easier.
For example, let's get back to our code and erase the line with the hr tag, and then save the file. Look at your browser tab, the one with our Vue app open. It will auto-refresh, reflecting the changes in code. That's webpack in action, running under the hood of Vue CLI 3, watching for changes to our Vue files, and hot-reloading the app in the browser accordingly.
If you've been coding for more than a couple of years, you'll appreciate the ease of this workflow. In the past, we either had to set up our tools so that they performed the auto-refresh of our apps in the browser whenever we save our files, or we had to set up our IDE or code editor, or both. Even up until recently, we still had to tinker with webpack to automate this kind of a workflow, and this as with anything coding-related, sometimes did not go as smoothly as we'd hope.
With Vue CLI 3, this is all automated and made very simple.
Let's see some other ways in which Vue CLI 3 helps us code better and be more productive.
The benefits of using Vue CLI 3
When Vue CLI 3 came out, Evan You, the maker of Vue, listed these objectives for it:
- Avoid toolchain fatigue for frontend development by simplifying the setup
- Follow best practices in tooling
- Make these best practices the default in Vue apps
Besides these great objectives, Vue CLI came with a number of updates, such as the following:
- Preset webpack configuration
- ES2017 and Babel 7 support out of the box
- Excellent CSS support, including Sassy CSS (SCSS) and PostCSS support
- A number of integration options (TypeScript, PWA, web components, end-to-end testing, Jest, and so on)
That is a lot of functionality. The aim of this book is to go through all of the options and get you familiar with their inner workings.
Now, to wrap this chapter up, let's see how easy it is to set up a default app using the default options.
Default toolchain, fatigue level zero
In this section, we'll create a default boilerplate Vue app. Contrary to the previous section, in this section, we will actually build an entire app, properly. We'll use two approaches: Vue CLI 3 on the command line, and Vue CLI 3 with a GUI.
You might ask why we ran Vue CLI 3 with no configuration in the first place? The answer is, it might be useful for quick experiments, and to get started with some basic commands.
Vue CLI 3 default app via the command line
We create Vue CLI 3 apps with the vue create command. Let's see what options we have available:
vue create -h
This is what will get returned:
Usage: create [options] <app-name>

create a new project powered by vue-cli-service

Options:
-p, --preset <presetName> Skip prompts and use saved or remote preset
-d, --default Skip prompts and use default preset
-i, --inlinePreset <json> Skip prompts and use inline JSON string as preset
-m, --packageManager <command> Use specified npm client when installing dependencies
-r, --registry <rul> Use specified npm registry when installing dependencies (only for npm)
-g, --git [message] Force git initialization with initial commit message
-n, --no-git Skip git initialization
-f, --force Overwrite target directory if it exists
-c, --clone Use git clone when fetching remote preset
-x, --proxy Use specified proxy when creating project
-b, --bare Scaffold project without beginner instructions
-h, --help output usage information
Let's begin by skipping all the prompts and using the default option:
vue create -d first-default-app
Your console will display the following output:
Vue CLI v3.3.0
? Creating project in C:\...
? Initializing git repository...
? Installing CLI plugins. This might take a while...
And indeed it does take a while. Luckily, there's a visual cue, a progress bar that lets us know how far along we are in setting up our project.
Once ready, we'll simply run the following:
cd first-default-app
Once our console is pointing to the correct directory, we can run the app with the following:
npm run serve
And now we can view the default app in the browser:

As we can see, we have a welcome message, and then the page lists the installed CLI plugins. Obviously, the babel and eslint plugins come as defaults. Each of these links points to their respective sections inside the vue-cli repository on GitHub.
Next, we see some essential links and some links to get acquainted with the larger ecosystem of Vue.js (namely, the links to vue-router, vuex, vue-devtools, vue-loader, and awesome-vue).
Vue CLI 3 default app via the UI
To get started with the Vue CLI GUI, let's first stop the server that was running in the previous section, using the Ctrl + C shortcut keys. The console will respond with the following message:
Terminate batch job (Y/N)?
Type Y (capitalization is irrelevant) and press the Enter key.
This will give us back the control of our current console window and allow us to type new commands.
Let's first go one level up from the current directory in our console:
cd ..
Next, let's run this command:
vue ui -h
And we'll get the following output:
Usage: ui [options]

start and open the vue-cli ui

Options:
-H, --host <host> Host used for the UI server (default: localhost)
-p, --port <port> Port used for the UI server (by default search for available port)
-D, --dev Run in dev mode
--quiet Don't output starting messages
--headless Don't open browser on start and output port
-h, --help output usage information
This time, we'll run the command without any flags:
vue ui
We'll be greeted with the following output in the console:
? Starting GUI...
? Ready on http://localhost:8000
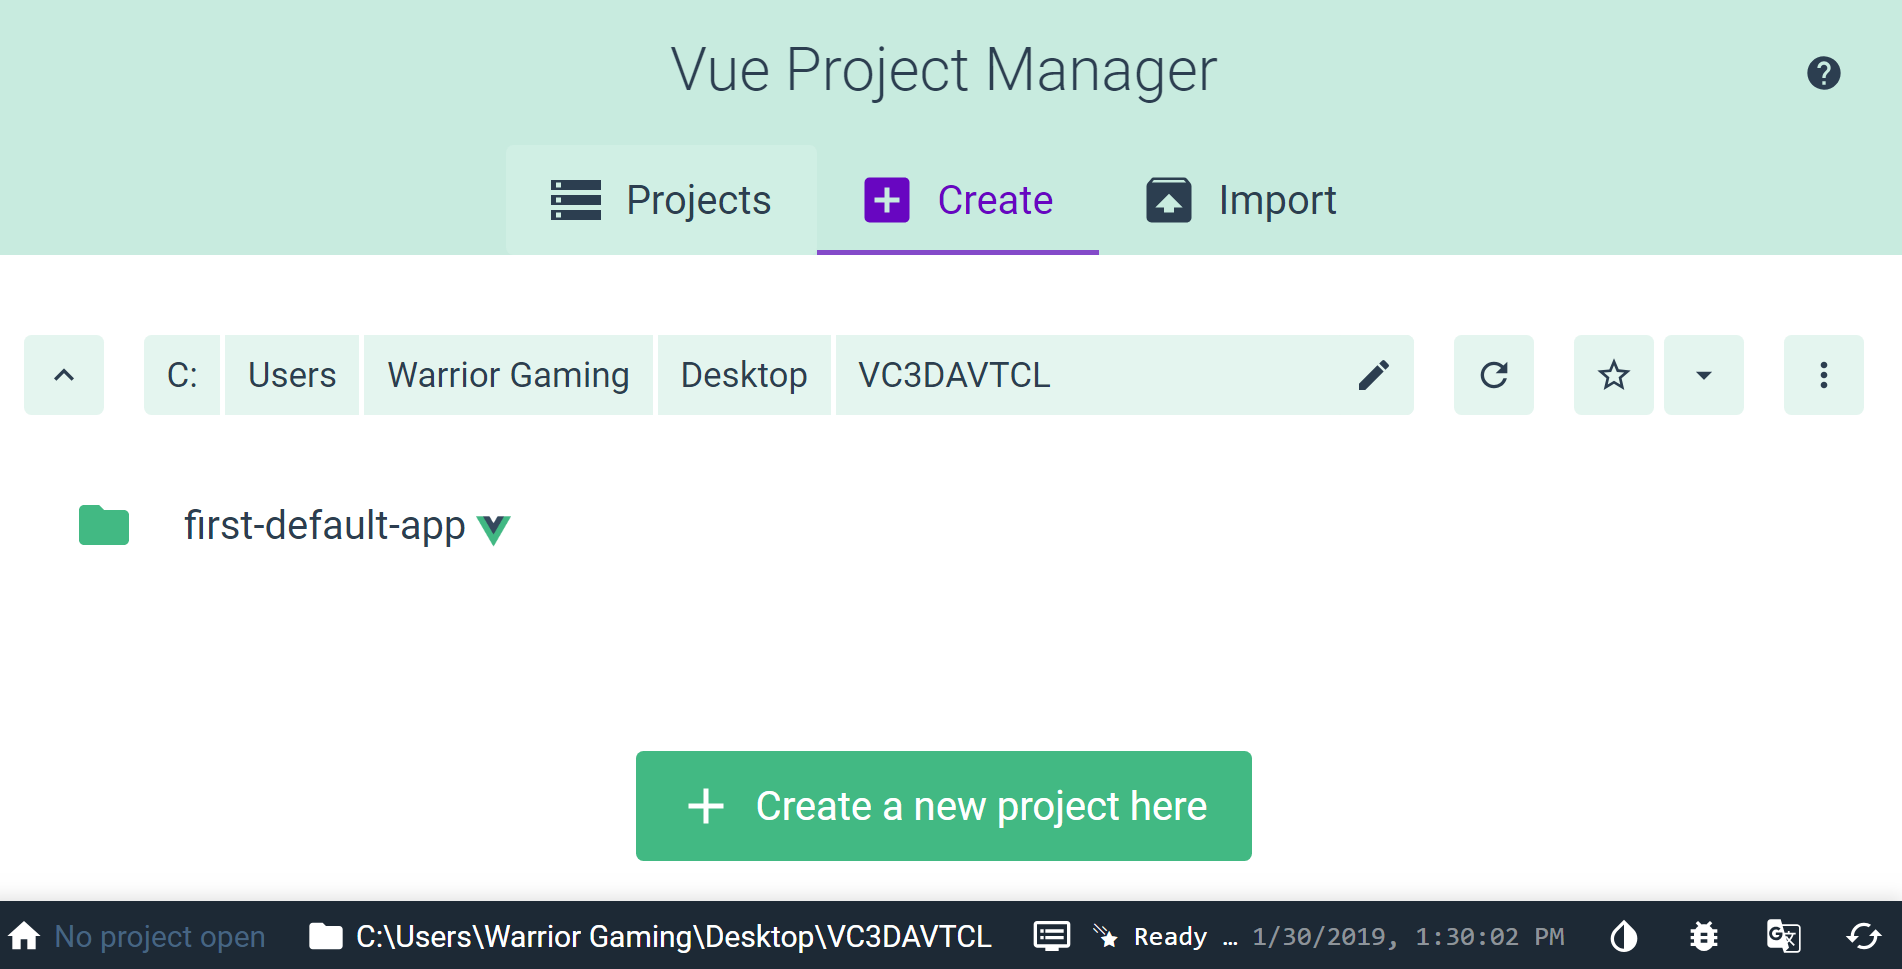
This time, we can create a project, visually. Initially, we see that there are no Vue projects in the current folder:

Let's create one by clicking the Create tab.
A new window will open, with a big button that reads Create a new project here:
As we can see in the preceding screenshot, there are also a number of other buttons and options that we can use. We will examine these in the chapters that follow; at this point, we are just getting familiar with the tool we're using:

As we can see from the previous screenshot, the Next button, at the bottom of the page, is currently disabled. To enable it, simply type the project folder name inside the top-most input. We'll call our folder second-vue-project. Now click Next.
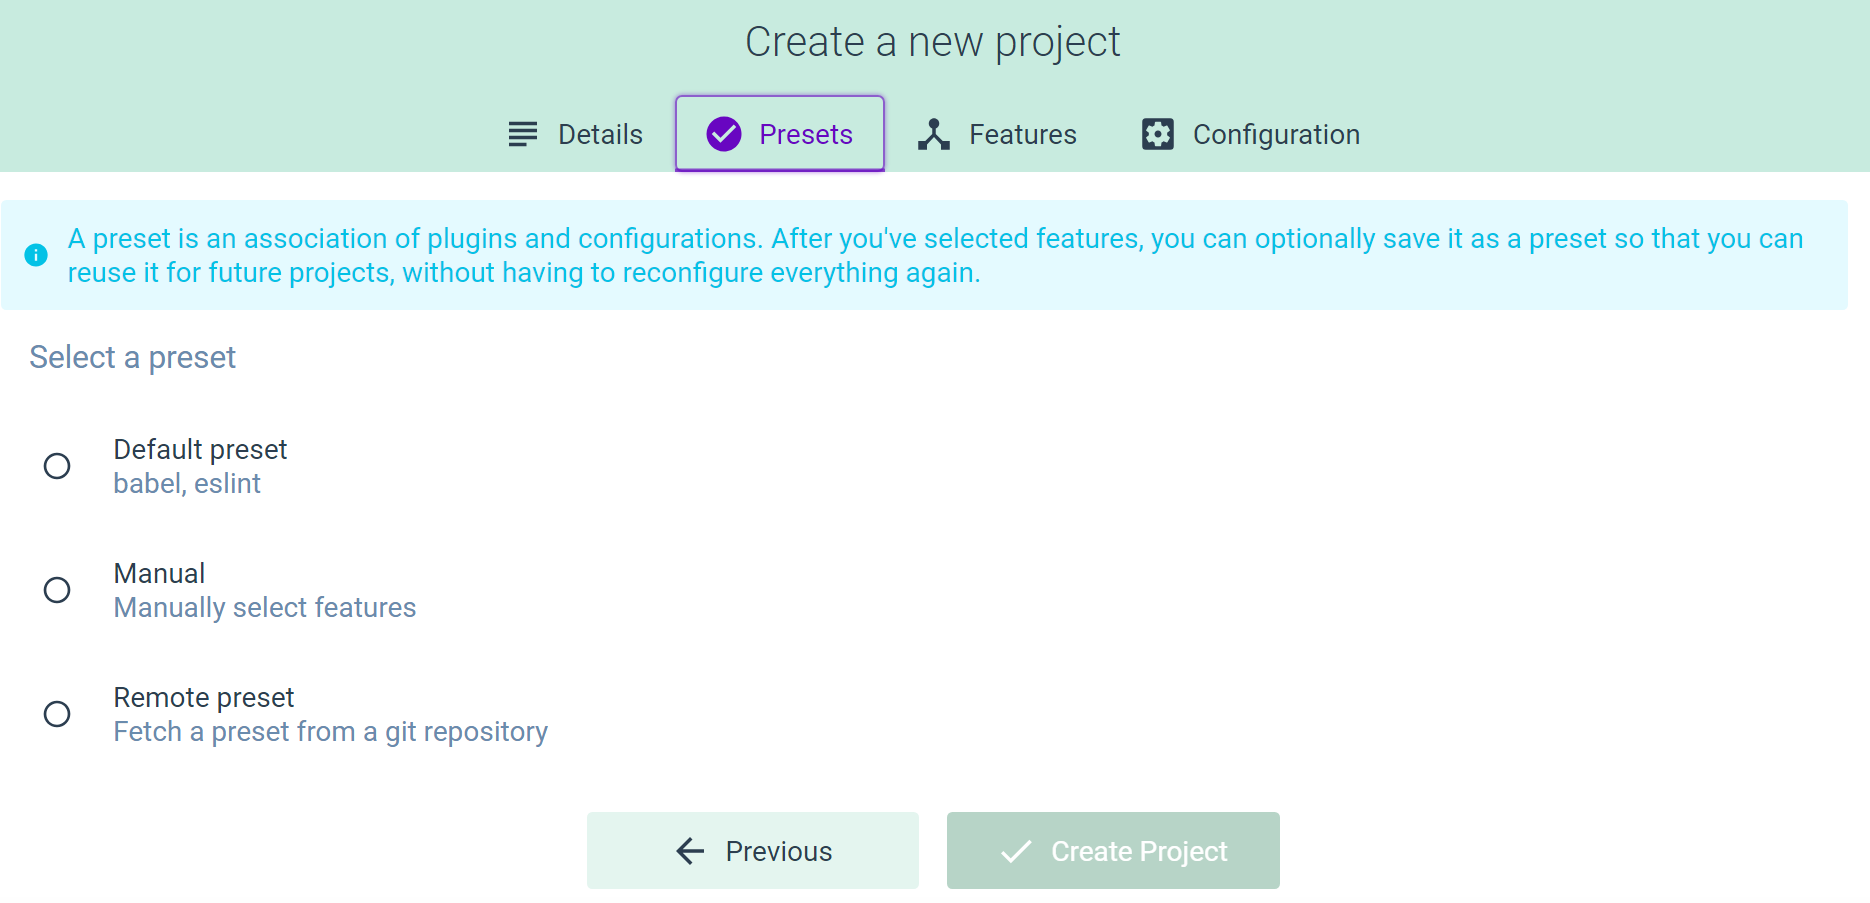
Inside the next window, you can choose a preset. Let's set it to Default preset:
Choosing a preset will make the Create Project button clickable. You'll see a loader icon in the center of the screen, with the following message:
Installing Vue CLI plugins. This might take a while...
You'll see a few other messages as the installation progresses. Finally, when done, you'll be greeted with the following window:
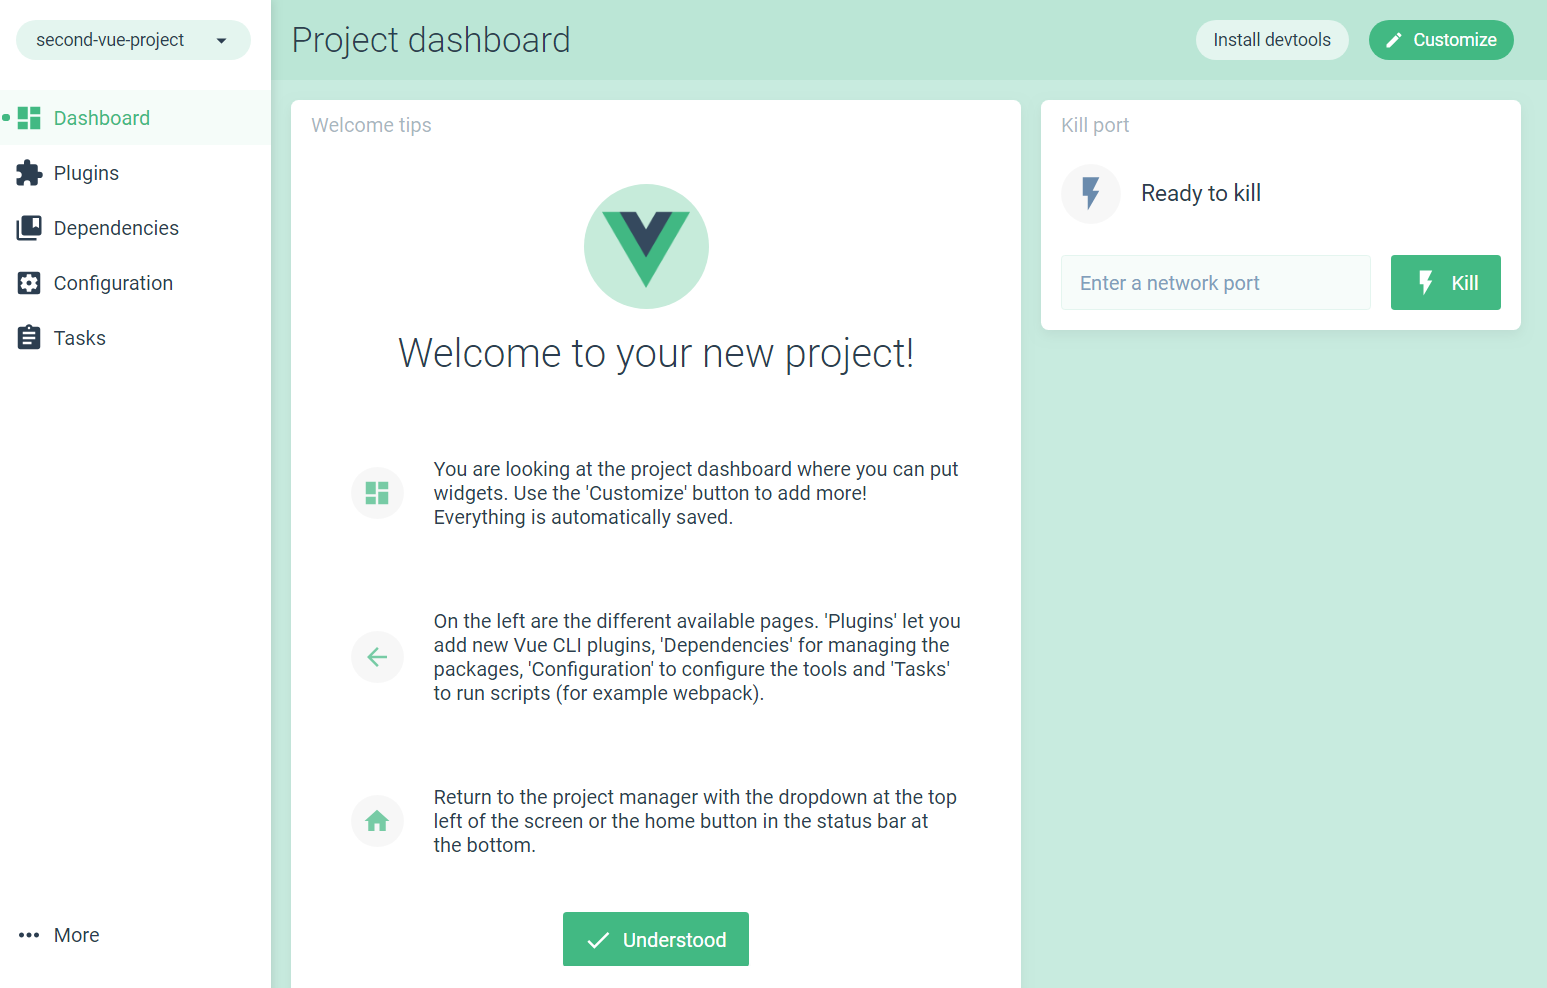
Our project is now ready to be worked on, which we'll do in the next chapter.
Summary
In this chapter, we looked at how to get started with the Vue CLI 3, both by using the command line and by using the Vue CLI UI.
We've seen how to install all the prerequisites, and we saw the suggested workflow and some basic pointers to get started easily. As a result of understanding how to use Vue CLI both on the command line and in the UI, we can now initialize Vue apps without any effort. We know what options are available to us when starting a new project. However, there are many more things that we need to understand the inner workings of Vue CLI.
In the next chapter, we'll look at improving our workflow further by focusing on webpack, the module bundler that sits at the core of Vue CLI 3.