


In this chapter we are going to take a step-by-step approach in the preparation of your Windows Server 2012 Remote Access servers for use with DirectAccess. By walking through the process of preparing your servers, we will have ample opportunity to discuss what the changes and options that you are choosing actually mean, and give a little insight as to whether or not you really want to choose them. There are numerous ways in which DirectAccess in Server 2012 can be implemented, and not all the options are created equally. We'll discuss which options are the best in terms of security, and I'll describe the steps to take to make sure your environment is running as efficiently and securely as possible. The topics covered in this chapter are relevant to the actual server itself, and not necessarily DirectAccess environmental practices, as we will discuss those topics in Chapter 2, DirectAccess Environmental Best Practices.
Here's the layout of what we are going to look at:
Preparing your Remote Access servers for DirectAccess
NIC configuration
NIC binding
MAC address spoofing for virtual machines
Adding static routes
Hostname and domain membership
Time for certificates
Adding the roles
Don't use the Getting Started Wizard!
Security hardening the server
We are first going to walk through some standard operating procedures that you will want to take on every one of your Windows Server 2012 servers that you are planning to turn into Remote Access / DirectAccess servers. Whether working on the first DirectAccess server in your entire environment, or preparing a second, third, or eighth node that will be joined to an existing DirectAccess load-balanced array, follow these steps to ensure those machines meet the requirements, and that you aren't going to run into messages or have to backtrack and adjust settings after running through the wizards to activate DirectAccess.
The vast majority of DirectAccess implementations will be of the two-leg fashion, with a Network Interface Card (NIC) for the external network, and another NIC for the internal network. This makes perfect sense, because this is your gateway into the corporate network from the computers in the wild; therefore, to most it is viewed as an edge device, and having separation of internal and external networks is a common network security best practice. So, just make sure my server has two network cards, plug them into the right switches, and configure IP addresses like I do on my desktop, right? No. In the Windows world, you need to take great care when defining your networking topology, particularly with the default gateway setting. If there is one thing that you can take away from this section of the book, it is this: the default gateway setting is only defined on the external NIC. This means that we will have to do some manual work to make sure that the server knows how to contact all the resources it may need to contact, but we'll get to that in a few minutes. First, let's take a look at the NIC configuration settings you will want in place to adhere to best practices. Whether you are new to DirectAccess or want to review an existing configuration that has been running for months, these steps are all relevant to you.
Let us go ahead and configure our internal interface first, because let's face it, you're already sick of standing in the elevated decibel level of the server room. Once you have the internal card configured with an IP address, assuming you have enabled RDP as on any other server of course, chances are you can run back to the comfort of your own desk and finish the job from there. Keep in mind that because we will NOT be defining a default gateway address on this NIC, you may not have access to this server over the network after simply defining an IP address.
You may have to add some routes before you can get to it from your desk, in which case you'll have to bunker down and endure console access for a little while longer, until we get through the section here about defining your static routes. In any case, before long you can stop sniffing the argon gas.
Tip
Name your NICs intuitively. If you rename your NICs to common-sense conventions like Internal and External instead of Local Area Connection 435, it will save you time during the wizards when you are defining which interface is which.
Open the Properties window of the internal NIC, and head into the Internet Protocol Version 4 (TCP/IPv4) Properties section, the same place where you would define an IP address on any computer. If you are using IPv6 inside your network, then you will be defining that instead, or in addition to IPv4 if you are running dual-stack. And if this is you, I applaud you immensely, because you are one of the very few, in my experience, who have taken this venture into IPv6 on your internal network. I say this only to point out that the overwhelming majority of internal networks are still IPv4, and so my examples and screenshots will be reflecting that scenario during the course of this book.

The fields in the previous window are as follows:
IP address: You, of course, need to assign your internal IP here.
Subnet mask: Please provide the appropriate mask; make sure it's accurate!
Default gateway: Leave this field blank. We will not be defining an internal gateway.
DNS servers: Yes, do provide your internal DNS server(s) here.
Now we head over to the same properties page on the external NIC, but before we start defining IP addresses, there are a couple of things we can uncheck as they are not necessary, and unbinding anything that is not necessary only helps to improve the security and performance of the solution.
On your external NIC properties page, try to mirror the following screenshot:

Mark the following checkboxes from the previous screenshot as shown:
Client for Microsoft Networks: Uncheck this box
File and Printer Sharing for Microsoft Networks: Uncheck this box
After unchecking these couple of boxes, head into the TCP/IPv4 properties, and enter your external IP address information.

The fields in this window are as follows:
IP address: Assign your primary external address here.
Subnet mask: Please provide the appropriate mask; make sure it's accurate!
Default gateway: Yes, we do need the public/external gateway address defined here. Take special care to ensure this too is accurate.
DNS servers: No, we do not define the DNS servers for the external connection, only the internal.
Note
The following steps will reflect the most common and recommended implementation path for DirectAccess, utilizing two public IP addresses on the external interface. Other installation scenarios such as single public IP or single private IP, or even for a single NIC implementation, would not require a second IP address to be added here.
Now click on the Advanced… button to open the Advanced TCP/IP Settings window where we will make a few more changes.
Assuming that you are taking the install path requiring two public IP addresses, go ahead and click on the Add… button to input your second IP address and Subnet mask. You are not required to input another default gateway, only the IP and mask.

Now head over to the DNS tab and uncheck the Register this connection's addresses in DNS checkbox.
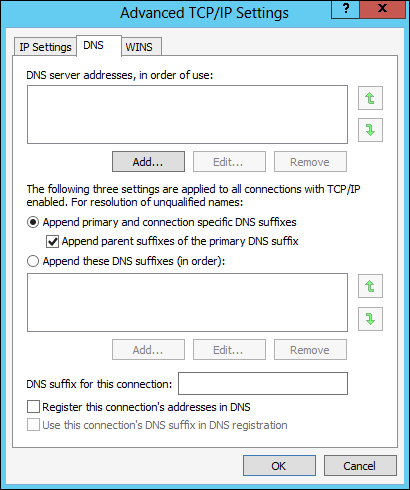
Finally, move one more tab over to the WINS tab and here you want to uncheck Enable LMHOSTS lookup and set the radio button for Disable NetBIOS over TCP/IP.

Now you can click on OK three times to bring you back to the Network Connections window where you are looking at your NICs. Before you leave this screen, you want to make sure and set your NIC binding appropriately.
To set this, while you are in the Network Connections screen, press the Alt key on your keyboard to bring up the menus on top of the window. Then head over to the Advanced menu and click on Advanced Settings… This will open the Adapters and Bindings section, and here we want to make sure that your Internal NIC is listed first, and that your External NIC is listed second. So, click on the names of the adapters, and use the arrows on the right side of the screen to move them up and down. If you have more NICs in your server, we don't necessarily care about the rest, as long as Internal is first, and External is second.

In fact, personally, I always disable any NICs on the system that are not in use by DirectAccess. Many folks come into preparing their server for DirectAccess thinking of it like a firewall, and on a firewall having too many NICs is always better than not having enough, but unfortunately DirectAccess cannot take advantage of more than two NICs. Rather, DirectAccess cannot take advantage of more than two "legs". You can do NIC teaming, but you still have the limitation of only working with one Internal and one External leg. So, determine which is your Internal and which is your External, name them, IP them, and bind them appropriately, and then you can go ahead and simply disable all of the rest of your NICs. This is not required, but I consider it a best practice in accordance with the idea of disabling anything that is not needed on a networking device.
Note
Many Network Cards now come with a feature named Receive Side Scaling (RSS). This setting is often beneficial to a DirectAccess server and should be enabled on your NICs. It is likely to be already enabled by default, but if you want to check, you can head back into the NIC properties and click on the Configure… button. Head into the Advanced tab and look for the RSS settings that are particular to your NIC.
If your DirectAccess server is a virtual machine, which doesn't necessarily line up with my idea of a best practice in any way, but I understand that many folks do it; make sure to set your NICs to allow MAC address spoofing. This will be particularly important if and when you decide to create any kind of arrays or load-balanced clusters, but I recommend always making this change right in the beginning, so that you are prepared for those situations and don't have to take troubleshooting steps down the road. To set this setting in Hyper-V, go into your Hyper-V Manager, right-click on your DirectAccess virtual machine, and click on Settings….
Find your network adapter listed on the left and click on the + symbol next to it to drop down some additional options. Click on Advanced Features, and then over on the right, check the checkbox for Enable spoofing of MAC addresses. Depending on your version of Hyper-V, the setting might be in a slightly different section of the network adapter's properties. For example, here it is on a Server 2008 R2 Hyper-V server.

You have to check this setting for both the network adapters that are being used by DirectAccess. Also, keep in mind that changing this setting requires the virtual machine to be turned off. If your MAC address spoofing option is grayed out, shut down the virtual machine and then check it again.
Whew, we're finally finished with all of the NIC configurations. Seems like a lot of text just to make sure something as simple as network settings was configured properly, but it is absolutely critical to make sure you have a solid networking baseline before you try to configure DirectAccess. If you do not, if any of the settings listed are not correct, if there is an incorrect subnet mask listed somewhere, if you have put a default gateway on the internal NIC, and the list goes on and on…if network settings are not configured properly, you will run into error messages, or maybe worse no error message but strange client behavior that can't be explained. Incorrectly configured networking settings can also cause a DirectAccess server to "lose itself", resulting in the console hanging and your only recourse to be a complete server re-prep so that you can start over. Make sure your NICs are configured correctly!
At this point, the astute among you are saying, "Wait a minute, we only put a default gateway on the External NIC, not on the Internal. My network is comprised of many internal subnets, and this server isn't going to be able to contact any of those subnets without a default gateway!" You are absolutely correct. Because we can only have one default gateway and it must go on the external interface, we have to define our internal network manually, through the use of the Windows routing table. Your server will automatically have access to resources that are in the same subnet that you are physically connected to, so if your IP address is 192.168.1.10 and your whole network is a flat 192.168.1.0/24, then there is nothing you have to do. The DirectAccess server will have access to everything in 192.168.1.x and you are all set. If, however, you have additional subnets, 192.168.2.0/24 for example, then at this point they are not contactable from this server and we need to make it so. You do this through the use of route commands, issued from either the Command Prompt or the PowerShell interface. I find that most folks are more familiar with Command Prompt, so let's use that to make our changes.
First we'll start with the example listed previously. Say my DirectAccess server is 192.168.1.10, but I have file servers that are sitting in 192.168.2.0/24, and those file servers must be contactable by the DirectAccess client computers. All we have to do is run a simple command on your DirectAccess server to make this happen. Here is an example of the syntax of that command:
Route add –p <subnet> mask <subnet mask> <gateway> IF <Interface ID>
The various components of this command are as follows:
-p: This makes the command persistent. Without –p, the next time the server restarts, the route would be lost.
<subnet>: This is the subnet ID you are adding, such as 192.168.2.0.
<subnet mask>: This is the mask for that subnet, such as 255.255.255.0.
<gateway>: This is the gateway of the subnet that you are currently plugged into, NOT the gateway of the subnet you are adding. Think of this as the "first hop" that you must cross in order to contact this new subnet. In our example, the gateway is 192.168.1.1.
<Interface ID>: This is an identifier for our Internal NIC that we will discuss in the next paragraph.
To be able to formulate that command correctly, we first need to identify the Interface ID number of your Internal NIC. Since we have dual network cards in this server, it is important that we are applying these route statements to the internal card. There is a flag that we will set at the end of our route commands that binds our route to a particular card, and most of the time Windows does a good job of assigning it to the correct one without validating this IF number, but I have seen a few cases where it didn't, so I always specify it as a best practice.
To discover your Interface ID number for the Internal NIC, open both the Network Connections screen, and a command prompt, and type route print. If you scroll up to the very top of your route print, you will see each network interface that is on the system listed, with an IF number listed to the left of the name. This typically two-digit number is the IF number for the NIC, and we just need to figure out which one is Internal. That is where the Network Connections screen comes in. If you take a look at the full name of the Internal NIC, match it up with the full name listed for one of the NICs in the route print; there you have it. Let's say, for example, that your Internal NIC is named Microsoft Hyper-V Network Adapter #2, and in your route print you see 13…00 15 5d fa 3e 32 ……Microsoft Hyper-V Network Adapter #2 listed, as shown in the following screenshot:
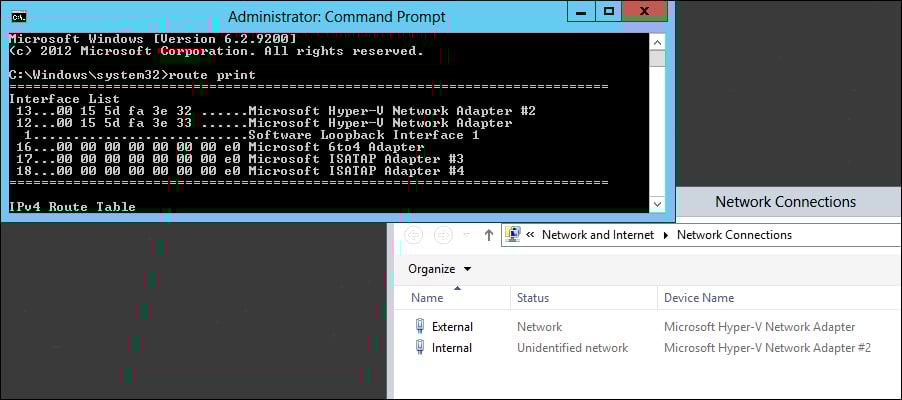
In this case, the IF number for your Internal NIC is 13, the number listed to the far left of that line. Taking that Interface ID number combined with the sample route statement above, let's go ahead and build the route statement that we would need to successfully grant access to the 192.168.2.0/24 subnet on your server by using the following command:
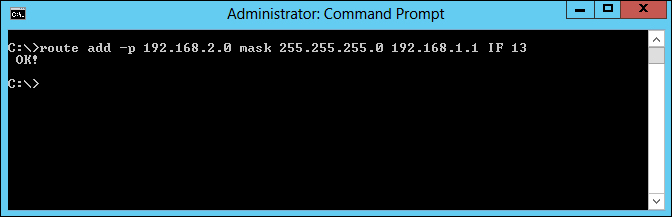
route add –p 192.168.2.0 mask 255.255.255.0 192.168.1.1 IF 13
If you have entered all of the information correctly, you should see the following OK! response:
Now, before you start dreading the huge script that you might be thinking about creating to include the potentially hundreds of route statements you may need in your network, read this first. Depending on the layout of your network, it may be possible to include a much broader route statement and cover all of your subnets in one fell swoop. Building on our previous example, what if your DirectAccess server was 192.168.1.10, and you had many subnets, all of them in the 192.168.x.x range? You could cover all of these subnets and tell them to all flow through the Internal NIC with the following single command:
route add –p 192.168.0.0 mask 255.255.0.0 192.168.1.1 IF 13
Or even broader. And by the way, this is of course not only limited to subnets starting with 192.168. Another example I can give which I have encountered numerous times in different customer networks is the following one:
route add –p 10.0.0.0 mask 255.0.0.0 10.1.1.1 IF 13
Note
Take care that you do not specify a route that is so broad that it encompasses the subnet of the External NIC. If you add a route to the Internal interface which includes the subnet for the External NIC, you will cause major confusion on the server and will almost certainly stop DirectAccess from working.
You should now have all the information you need to finalize your IP addressing and routing on your DirectAccess servers. These steps are necessary on each server. Just one more side note to add here; implementing DirectAccess in the single NIC configuration isn't something I see much in the wild, but in those cases you would not have to go through this process of adding routes. This is because in a single NIC configuration, you would be assigning a default gateway right on the single NIC that is in use, and that gateway is going to cover any routes that you may have to enter otherwise.
Now that our network traffic is flowing, we need to finalize a couple of other regular items on the DirectAccess server. First is setting the hostname. While this seems like a menial, regular task, don't take it lightly. It is recommended that once your hostname is set, it should not be changed in the future. So choose the name carefully, and choose a name that meets your naming standards. It is not recommended to change the hostname of a DirectAccess server, because there are items external to the server itself which are bound to that particular name, such as Group membership, Group Policy Objects (GPOs) filtering, and certificates. A change in the hostname of a DirectAccess server will result in a number of external factors needing to be changed, adjusted, or reissued, and there is a huge potential for problems. So all that to say—choose your name wisely and don't think you can name it DA-Test for now, and simply rename it later.
Once your name is set, it is time to join it to the domain. This is required for DirectAccess to work, as the solution is tightly integrated with Active Directory. You do not have to join it to the same domain as the rest of your internal network or the same domain as the DirectAccess client machines, but whatever domain you join it to must have a two-way trust to those domains, so that traffic can flow successfully between the DirectAccess server and the resources with which it is going to interact.
I highly recommend prestaging the computer account for your DirectAccess server(s) in Active Directory before you join them to the domain. This is not required, but I recommend it because I have seen many cases where upon joining the domain, a DirectAccess server had some existing GPOs applied to it which disabled items in Windows that are necessary for DirectAccess to function. What I see most often are GPOs in place on the network which disable or make changes to the Windows Firewall, and if any of these policies get applied to your DirectAccess servers, it will certainly interfere with operability.
Try your best to make sure that no existing polices get applied to the servers at all. It is best to create a separate Organizational Unit (OU) for them to reside in, which blocks the inheritance of existing policies. In the end, there are going to be policies that need to apply to them, the actual DirectAccess Server policy for example, but try to keep them as clean as possible from changes. Once you have DirectAccess connectivity established and working, you can try applying your policies one at a time if you so choose, but keep in mind that if a GPO gets applied and changes are made, then simply removing the device from that GPO's filtering doesn't always reverse the settings that were changed. It is possible that you could break the DirectAccess server to the point that the quickest resolution is to re-prep the server and start over, so tread lightly here.
Your server is almost ready to service DirectAccess connections! The last thing we want to do before adding the Remote Access role is to put all of our certificates into place on the server. We will talk more extensively about certificates and what options are available to us in Chapter 2, DirectAccess Environmental Best Practices, but in almost every implementation there are two certificates with which you want to be concerned at this point.
For the purposes of this book, we're not going to talk much about what IP-HTTPS is, but the key for this section is that we need an SSL certificate installed onto the DirectAccess server that is going to validate the connections coming in. Any time that you want to view, add, or change certificates on a DirectAccess server, you are best to do so using the Certificates snap-in for the Microsoft Management Console. Open the console on your DirectAccess server, and navigate to File | Add/Remove Snap-in…. Then choose the Certificates snap-in.

When you click on the Add button, you will be prompted to choose which certificate store you want to manage. We always want to choose Computer account when we are dealing with DirectAccess certificates.

And on the next screen, choose Local computer.

Now, if you navigate to Certificates | Personal, right-click and choose All Tasks | Import… and finish out the wizard to import the SSL certificate that you have acquired for the purposes of IP-HTTPS.

The other certificate that we want to make sure exists in this same certificate store on the DirectAccess server, in almost every DirectAccess implementation scenario, is a machine certificate that has been issued by your internal Certification Authority (CA) server. Many companies already have something called autoenrollment enabled in their network which automatically issues certificates to machines as soon as they join the domain. If this is the case, you will already see a (or many) certificate(s) listed inside the Personal certificate store. If this certificate was issued from the internal CA server and the subject name of the certificate matches the FQDN of the DirectAccess server, this certificate may work for IPsec authentication. You can take a look at the next chapter of this book for further details on what criteria the IPsec certificate needs to meet to be successful for DirectAccess. Otherwise, for this example, we will assume that you do not have an IPsec certificate already assigned to your server, and we will walk through the process of requesting one from your internal Public Key Infrastructure (PKI). Right-click on the Personal certificate store again, but this time navigate to All Tasks | Request New Certificate….

Click on Next, and then click on Next again on the screen that shows Active Directory Enrollment Policy. Nothing to change or adjust on this screen, simply click on Next.

This will poll your internal PKI for any certificate templates that are available to be issued. If your CA server is setup properly, you will see one or more options available to select, and hopefully one of these options is named Computer.

This is a predefined template that exists in Windows CA, and meets all the requirements for a successful IPsec authentication certificate to be used with DirectAccess. You may have also chosen to create a custom template on the CA server that is going to be used specifically for DirectAccess, as detailed in the certificate details section in Chapter 2, DirectAccess Environmental Best Practices, and if that is the case, then you would have that option available to you as well for issuance. Either way, simply select the certificate template from the list for which you would like to request a certificate, click on Next, and you will be issued a machine certificate from the internal CA server onto your DirectAccess server, and this certificate will show up in the Personal certificate store.
Now that we have all of our settings and prerequisites in place on the DirectAccess server, the last step before we can get into the actual configuration is adding the Remote Access role, and possibly the Network Load Balancing feature, depending on your plan for implementation. To do this, as with any other role or feature, simply launch Server Manager if not already running, and click on the Add roles and features link from inside the dashboard. Click on Next, then click on Next again choosing the default option for role-based or feature-based installation, and click on Next once more on the screen showing your server name selected in the list.
Click on the Remote Access role and click on Next.

You will now be prompted with a screen that shows some additional options that need to be enabled to support the Remote Access role. Go ahead and click on the Add Features button to continue.

Our next screen is for adding features to the server, and we may or may not have to do anything on this screen. If this is your one-and-only DirectAccess server, and you don't plan to ever have more, go ahead and simply click on Next. If you are interested in creating an array, or a cluster of DirectAccess servers in the future, or if this server is going to be an additional node to an existing array or cluster, then make sure to select the Network Load Balancing feature from this list before clicking on Next.

From here you will again be prompted that there are some additional items that need to be enabled to support this Network Load Balancing feature, go ahead and accept that screen to continue.

After clicking on Next a couple more times, you will be presented with an option on whether you want to utilize DirectAccess and VPN (RAS), or Routing, or both. In my opinion, a DirectAccess server should be a remote access platform and nothing else, so let's stick with the defaults, and choose only the DirectAccess and VPN (RAS) option.

Now simply finish out the wizard using all the default settings, and your server is officially ready for use with DirectAccess!
This ends the section of steps that you want to take on each of your servers to prepare them for use with DirectAccess. After adding the roles, you are now ready to either start actual DirectAccess configuration if this is your primary server, or ready to add this server to your array if this is an additional server that you are adding to an existing DirectAccess environment.
For the purposes of this book, I do not have plans to walk through all of the configuration wizards and explain each and every step that will be taken while walking through those wizards. What I do want to accomplish is to take a minute and point out one critical note. Many of the DirectAccess "walk-through" or "Test Lab Guide" documents that exist will tell you at this point in the process to run the Remote Access Management console and launch that great Getting Started Wizard. You know, the one where you can "install DirectAccess in 3 clicks!" Please don't do this! I understand why they included this option, so that literally anybody with a mouse could get some semblance of DirectAccess up and running, but running this wizard follows zero best practices, and I would hope that anyone reading this guide about best practices in your DirectAccess environment would have no interest in taking shortcuts during your install.
I have spoken with many new DirectAccess administrators who didn't actually know they had a choice. It's pretty easy to glaze over the option and just follow whatever quick-start guide you are using and choose the Getting Started Wizard. So, I want to point out the way to launch the real wizards instead. After you add the Remote Access role, your next step is configuring DirectAccess. To do that, while you are still inside Server Manager, you can navigate to the Tools menu and choose Remote Access Management from the menu.

The first screen you encounter here is your fork in the road. Clicking the top link here obviously launches the Getting Started Wizard. The second link listed under it, Run the Remote Access Setup Wizard, is the link that takes you into the full configuration wizards, and is absolutely the way that you want to go.

I cannot tell you to stay away from the Getting Started Wizard without backing that up with a little bit of data, so let's talk about some of the reasons that I recommend handling this wizard with a ten-foot pole.
Hopefully, now that you have read the beginning of this chapter, you know that you should input your certificates onto the server before you even add the roles. Unfortunately, most DirectAccess admins are not aware of this, and so the roles get added and the wizards run before the certificate is in place. When you run the Getting Started Wizard, if your certificate for IP-HTTPS is in place, it will recognize and use it, but if you do not have a valid certificate in place, it will generate and use a self-signed certificate for this purpose. The wizard will also generate and use a self-signed certificate for the Network Location Server (NLS) website. Using self-signed certificates is fine for a Proof-of-Concept or a Test Lab, but they are obviously a very bad practice for a production environment. Using a self-signed certificate means that your DirectAccess server can be easily spoofed, and the old 1024-bit key length used by self-signed certificates is no longer considered to be strong enough.
As we will discuss more in Chapter 3, Configuring Manage Out to DirectAccess Clients, a DirectAccess environmental best practice is to host the NLS website externally to the DirectAccess server. When you use the Getting Started Wizard, for the sake of saving mouse clicks, it assumes that you want to host the NLS website on the DirectAccess server. It also issues a self-signed certificate for this site.
Running the Getting Started Wizard also assumes that you are not interested in using any transition protocol other than IP-HTTPS, and disables them. We will talk some more shortly about the reasons that you want Teredo available to you if possible in your environment, so this again works against best practices in an effort to make implementation as automated as possible.
Yikes! If you have ever run through the real DirectAccess wizards, or have been through the UAG DirectAccess wizards, you know that the client-side GPO settings are filtered out to only the actual DirectAccess client computers by way of Active Directory group membership. During the wizards, we define the group or groups in Active Directory that are going to contain our DirectAccess client computers, and the wizard defines security filtering on the client-side GPO, so that those settings only come down to the actual DirectAccess computers. This is a great idea! You, of course, don't want a bunch of remote access connectivity settings distributing themselves around your internal desktop computers, or worse yet servers in your network. The Getting Started Wizard has the potential to do just that. When you click on this mini-wizard, it flags the GPO to apply to all domain computers. Now, it does set a WMI filter on this so that it only applies to mobile computers as defined in the Windows WMI filter, so chances are that if you have already run the Getting Started Wizard in your network, at least these settings aren't running rampant, but those WMI filters are far from 100 percent accurate, and I just dread thinking about all of those networks out there where the link in their DirectAccess GPO right now says "Domain Computers".
This one is pretty obvious, but I'll state it nonetheless. If you run the Getting Started Wizard, you won't encounter all of the optional settings that DirectAccess has available, so you may miss out on some advanced implementation of which you want to make use. If you have already implemented DirectAccess by using the Getting Started Wizard and are in production and don't want to start over on your configuration, you can still make adjustments to your settings and overcome the limitations that were put into place by the wizard. Inside Remote Access Management, you can head into the Configuration section and gain access to the individual steps of the real wizard here to make adjustments after the fact. Keep in mind though, that you do not have the option to change GPOs afterwards, and that running the Getting Started Wizard disables Teredo at a lower level that cannot be overcome by the wizards. You must use PowerShell to enable it, and that process is detailed in the last chapter of this book, when we discuss some specific troubleshooting scenarios.
Most network administrators view the DirectAccess server, rightfully so, as an "edge" device. Because this device is going to sit on the edge, or so close to it, there is a lot of sense in locking down security in whatever ways you can. You could, of course, take the route of purchasing a prebuilt security appliance for running DirectAccess instead of using your own server. Full disclaimer here; I do work for one of the appliance manufacturers who builds and installs DirectAccess Concentrators every day, but I bring this up only because it is a legitimately secure and performant way to implement DirectAccess in any environment. There are substantial advantages that appliances hold over regular servers, but there is, of course, cost also involved with the purchase of the appliance.
When configuring your own server for DirectAccess, try to think of this device as a single-purpose server. Don't put other roles or features or install applications other than what are necessary for DirectAccess, and consider disabling services that are not going to be needed. I can't create a comprehensive list of exactly what should be buttoned down, because it could be different for each network, but run through the list of items that are installed or running on the device and try to decide whether or not they are necessary to be running on this server. A security best practice that goes back to the beginning of time is to lower your potential threat footprint by disabling services that are unnecessary, and that is a good practice here as well.
It is recommended to install antivirus onto the DirectAccess server, as with any other server, but it is important that you do not install an antivirus that includes its own firewall, which may manipulate or squash the Windows Firewall. Windows Firewall with Advanced Security, or WFAS, that is built into Windows is essential to the operability of DirectAccess and cannot be turned off. WFAS needs to be active on your DirectAccess server.
Windows Firewall is much more comprehensive than it used to be, and can be used for making additional lockdowns on your device as well. For example, in the instance where you have the DirectAccess server installed directly onto the public Internet, by default when you enable Remote Access (RDP) to the server, it enables for all firewall profiles. This means that port 3389 is opened to the outside world as well as the inside. It is a common best practice to either adjust the RDP rule in WFAS, or to create a new deny rule in WFAS that blocks port 3389 for the Public and Private firewall profiles, which would be the potential active profiles on the external connection. This way you would only be allowing RDP access to the server from the Domain profile, or inside of your network. You could also increase the security of RDP access in general by requiring Network Level Authentication (NLA) from inside the remote settings for Windows.
My hope with this chapter is to provide a concise, comprehensive walk-through of the steps that any DirectAccess administrator should take on any DirectAccess server. Completing these steps will serve as an excellent baseline for making sure that your server complies with best practices for DirectAccess, and following this guide will minimize your chances for running into unexpected errors or messages when you get further along into the DirectAccess configuration. Our next chapter should also be read in combination with this one to fully understand the scope of best practices available within DirectAccess, but this first chapter is definitely the hands-on input that you need to get started configuring it for yourself!