


In this book, we will help you build, scale, and manage production-ready Kubernetes clusters. Each section of this book will empower you with the core container concepts and the operational context of running modern web services that need to be available 24 hours of the day, 7 days a week, 365 days of the year. As we progress, you'll be given concrete, code-based examples that you can deploy into running clusters in order to get real-world feedback on Kubernetes' many abstractions. By the end of this book, you will have mastered the core conceptual building blocks of Kubernetes, and will have a firm understanding of how to handle the following paradigms:
- Orchestration
- Scheduling
- Networking
- Security
- Storage
- Identity and authentication
- Infrastructure management
This chapter will set the stage for why Kubernetes? and give an overview of modern container history, diving into how containers work, as well as why it's important to schedule, orchestrate, and manage a container platform well. We'll tie this back to concrete objectives and goals for your business and product. This chapter will also give a brief overview of how Kubernetes orchestration can enhance our container management strategy and how we can get a basic Kubernetes cluster up, running, and ready for container deployments.
In this chapter, we will cover the following topics:
- Introducing container operations and management
- The importance of container management
- The advantages of Kubernetes
- Downloading the latest Kubernetes
- Installing and starting up a new Kubernetes cluster
- The components of a Kubernetes cluster
Believe it or not, containers and their precursors have been around for over 15 years in the Linux and Unix operating systems. If you look deeper into the fundamentals of how containers operate, you can see their roots in the chroot technology that was invented all the way back in 1970. Since the early 2000s, FreeBSD, Linux, Solaris, Open VZ, Warden, and finally Docker all made significant attempts at encapsulating containerization technology for the end user.
While the VServer's project and first commit (running several general purpose Linux server on a single box with a high degree of independence and security (http://ieeexplore.ieee.org/document/1430092/?reload=true)) may have been one of the most interesting historical junctures in container history, it's clear that Docker set the container ecosystem on fire back in late 2013 when they went full in on the container ecosystem and decided to rebrand from dotCloud to Docker. Their mass marketing of container appeal set the stage for the broad market adoption we see today and is a direct precursor of the massive container orchestration and scheduling platforms we're writing about here.
Over the past five years, containers have grown in popularity like wildfire. Where containers were once relegated to developer laptops, testing, or development environments, you'll now see them as the building blocks of powerful production systems. They're running highly secure banking workloads and trading systems, powering IoT, keeping our on-demand economy humming, and scaling up to millions of containers to keep the products of the 21st century running at peak efficiency in both the cloud and private data centers. Furthermore, containerization technology permeates our technological zeitgest, with every technology conference in the world devoting a significant portion of their talks and sessions devoted to building, running, or developing in containers.
At the beginning of this compelling story lies Docker and their compelling suite of developer-friendly tools. Docker for macOS and Windows, Compose, Swarm, and Registry have been incredibly powerful tools that have shaped workflows and changed how companies develop software. They've built a bridge for containers to exist at the very heart of the Software Delivery Life Cycle (SDLC), and a remarkable ecosystem has sprung up around those containers. As Malcom McLean revolutionized the physical shipping world in the 1950s by creating a standardized shipping container, which is used today for everything from ice cube trays to automobiles, Linux containers are revolutionizing the software development world by making application environments portable and consistent across the infrastructure landscape.
We'll pick this story up as containers go mainstream, go to production, and go big within organizations. We'll look at what makes a container next.
Containers are a type of operating system virtualization, much like the virtual machines that preceded them. There's also lesser known types of virtualization such as Application Virtualization, Network Virtualization, and Storage Virtualization. While these technologies have been around since the 1960s, Docker's encapsulation of the container paradigm represents a modern implementation of resource isolation that utilizes built-in Linux kernel features such as chroot, control groups (cgroups), UnionFS, and namespaces to fully isolated resource control at the process level.
Containers use these technologies to create lightweight images that act as a standalone, fully encapsulated piece of software that carries everything it needs inside the box. This can include application binaries, any system tools or libraries, environment-based configuration, and runtime. This special property of isolation is very important, as it allows developers and operators to leverage the all-in-one nature of a container to run without issue, regardless of the environment it's run on. This includes developer laptops and any kind of pre-production or production environment.
This decoupling of application packaging mechanism from the environment on which it runs is a powerful concept that provides a clear separation of concerns between engineering teams. This allows developers to focus on building the core business capabilities into their application code and managing their own dependencies, while operators can streamline the continuous integration, promotion, and deployment of said applications without having to worry about their configuration.
At the core of container technology are three key concepts:
- cgroups
- Namespaces
- Union filesystems
cgroups work by allowing the host to share and also limit the resources each process or container can consume. This is important for both resource utilization and security, as it prevents denial-of-service (DoS) attacks on the host's hardware resources. Several containers can share CPU and memory while staying within the predefined constraints. cgroups allow containers to provision access to memory, disk I/O, network, and CPU. You can also access devices (for example, /dev/foo). cgroups also power the soft and hard limits of container constraints that we'll discuss in later chapters.
There are seven major cgroups:
- Memory cgroup: This keeps track of page access by the group, and can define limits for physical, kernel, and total memory.
- Blkio cgroup: This tracks the I/O usage per group, across the read and write activity per block device. You can throttle by group per device, on operations versus bytes, and for reads versus writes.
- CPU cgroup: This keeps track of user and system CPU time and usage per CPU. This allows you to set weights, but not limits.
- Freezer cgroup: This is useful in batch management systems that are often stopping and starting tasks in order to schedule resources efficiently. The SIGSTOP signal is used to suspend a process, and the process is generally unaware that it is being suspended (or resumed, for that matter.)
- CPUset cgroup: This allows you to pin a group to a specific CPU within a multi-core CPU architecture. You can pin by application, which will prevent it from moving between CPUs. This can improve the performance of your code by increasing the amount of local memory access or minimizing thread switching.
- Net_cls/net_prio cgroup: This keeps tabs on the egress traffic class (
net_cls) or priority (net_prio) that is generated by the processes within the cgroup. - Devices cgroup: This controls what read/write permissions the group has on device nodes.
Namespaces offer another form of isolation for process interaction within operating systems, creating the workspace we call a container. Linux namespaces are created via a syscall named unshare, while clone and setns allow you to manipulate namespaces in other manners.
Note
unshare() allows a process (or thread) to disassociate parts of its execution context that are currently being shared with other processes (or threads). Part of the execution context, such as the mount namespace, is shared implicitly when a new process is created using FORK(2) (for more information visit http://man7.org/linux/man-pages/man2/fork.2.html) or VFORK(2) (for more information visit http://man7.org/linux/man-pages/man2/vfork.2.html), while other parts, such as virtual memory, may be shared by explicit request when creating a process or thread using CLONE(2) (for more information visit http://man7.org/linux/man-pages/man2/clone.2.html).
Namespaces limit the visibility a process has on other processes, networking, filesystems, and user ID components. Container processes are limited to seeing only what is in the same namespace. Processes from containers or the host processes are not directly accessible from within this container process. Additionally, Docker gives each container its own networking stack that protects the sockets and interfaces in a similar fashion.
If cgroups limit how much of a thing you can use, namespaces limit what things you can see. The following diagram shows the composition of a container:

In the case of the Docker engine, the following namespaces are used:
pid: Provides process isolation via an independent set of process IDs from other namespaces. These are nested.net: Manages network interfaces by virtualizing the network stack through providing a loopback interface, and can create physical and virtual network interfaces that exist in a single namespace at a time.ipc: Manages access to interprocess communication.mnt: Controls filesystem mount points. These were the first kind of namespaces created in the Linux kernel, and can be private or shared.uts: The Unix time-sharing system isolates version IDs and kernel by allowing a single system to provide different host and domain naming schemes to different processes. The processesgethostnameandsethostnameuse this namespace.user: This namespace allows you to map UID/GID from container to host, and prevents the need for extra configuration in the container.
Union filesystems are also a key advantage of using Docker containers. Containers run from an image. Much like an image in the VM or cloud world, it represents state at a particular point in time. Container images snapshot the filesystem, but tend to be much smaller than a VM. The container shares the host kernel and generally runs a much smaller set of processes, so the filesystem and bootstrap period tend to be much smaller—though those constraints are not strictly enforced. Second, the union filesystem allows for the efficient storage, download, and execution of these images. Containers use the idea of copy-on-write storage, which is able to create a brand new container immediately, without having to wait on copying out a whole new filesystem. This is similar to thin provisioning in other systems, where storage is allocated as needed:

Copy-on-write storage keeps track of what's changed, and in this way is similar to distributed version control systems (DVCS) such as Git. There are a number of options available to the end user that leverage copy-on-write storage:
- AUFS and overlay at the file level
- Device mapper at the block level
- BTRFS and ZFS and the filesystem level
The easiest way to understand union filesystems is to think of them like a layer cake with each layer baked independently. The Linux kernel is our base layer; then, we might add an OS such as Red Hat Linux or Ubuntu.
Next, we might add an application such as nginx or Apache. Every change creates a new layer. Finally, as you make changes and new layers are added, you'll always have a top layer (think frosting) that is a writable layer. Union filesystems leverage this strategy to make each layer lightweight and speedy.
In Docker's case, the storage driver is responsible for stacking these layers on top of each other and providing a single pane of glass to view these systems. The thin writable layer on the top of this stack of layers is where you'll do your work: the writable container layer. We can consider each layer below to be container image layers:

What makes this truly efficient is that Docker caches the layers the first time we build them. So, let's say that we have an image with Ubuntu and then add Apache and build the image. Next, we build MySQL with Ubuntu as the base. The second build will be much faster because the Ubuntu layer is already cached. Essentially, our chocolate and vanilla layers, from the preceding diagram, are already baked. We simply need to bake the pistachio (MySQL) layer, assemble, and add the icing (the writable layer).
What's also really exciting is that not only has the open source community embraced containers and Kubernetes, but the cloud providers have also deeply embraced the container ecosystem, and invested millions of dollars in supporting tooling, ecosystem, and management planes that can help manage containers. This means you have more options to run container workloads, and you'll have more tools to manage the scheduling and orchestration of the applications running on your clusters.
We'll explore some specific opportunities available to Kubernetes users, but at the time of this book's publishing, all of the major cloud service providers (CSPs) are offering some form of hosted or managed Kubernetes:
- Amazon Web Services: AWS offers Elastic Container Service for Kubernetes (EKS) (for more information visit https://aws.amazon.com/eks/), a managed service that simplifies running Kubernetes clusters in their cloud. You can also roll your own clusters with kops (for information visit https://kubernetes.io/docs/setup/custom-cloud/kops/). This product is still in active development:

- Google Cloud Platform: GCP offers the Google Kubernetes Engine (GKE) (for more information visit https://cloud.google.com/kubernetes-engine/), a powerful cluster manager that can deploy, manage, and scale containerized applications in the cloud. Google has been running containerized workloads for over 15 years, and this platform is an excellent choice for sophisticated workload management:

- Microsoft Azure: Azure offers the Azure Container Service (AKS) (for more information visit https://azure.microsoft.com/en-us/services/kubernetes-service/), which aims to simplify the deployment, management, and operations of a full-scale Kubernetes cluster. This product is still in active development:

When you take advantage of one of these systems, you get built-in management of your Kubernetes cluster, which allows you to focus on the optimization, configuration, and deployment of your cluster.
ThoughtWorks defines Continuous Integration as a development practice that requires developers to integrate code into a shared repository several times a day. By having a continuous process of building and deploying code, organizations are able to instill quality control and testing as part of the everyday work cycle. The result is that updates and bug fixes happen much faster and the overall quality improves.
However, there has always been a challenge in creating development environments that match those of testing and production. Often, inconsistencies in these environments make it difficult to gain the full advantage of Continuous Delivery. Continuous Integration is the first step in speeding up your organization's software delivery life cycle, which helps you get your software features in front of customer quickly and reliably.
The concept of Continuous Delivery/Deployment uses Continuous Integration to enables developers to have truly portable deployments. Containers that are deployed on a developer's laptop are easily deployed on an in-house staging server. They are then easily transferred to the production server running in the cloud. This is facilitated due to the nature of containers, which build files that specify parent layers, as we discussed previously. One advantage of this is that it becomes very easy to ensure OS, package, and application versions are the same across development, staging, and production environments. Because all the dependencies are packaged into the layer, the same host server can have multiple containers running a variety of OS or package versions. Furthermore, we can have various languages and frameworks on the same host server without the typical dependency clashes we would get in a VM with a single operating system.
This sets the stage for Continuous Delivery/Deployment of the application, as the operations teams or the developers themselves can focus on getting deployments and application rollouts correct, without having to worry about the intricacies of dependencies.
Continuous Delivery is the embodiment and process wherein all code changes are automatically built, tested (Continuous Integration), and then released into production (Continuous Delivery). If this process captures the correct quality gates, security guarantees, and unit/integration/system tests, the development teams will constantly release production-ready and deployable artifacts that have moved through an automated and standardized process.
It's important to note that CD requires the engineering teams to automate more than just unit tests. In order to utilize CD in sophisticated scheduling and orchestration systems such as Kubernetes, teams need to verify application functionality across many dimensions before they're deployed to customers. We'll explore deployment strategies that Kubernetes has to offer in later chapters.
Lastly, it's important to keep in mind that utilizing Kubernetes with CI/CD reduces the risk of the many common problems that technology firms face:
- Long release cycles: If it takes a long time to release code to your users, then it's a potential functionality that they're missing out on, and this results in lost revenue. If you have a manual testing or release process, it's going to slow down getting changes to production, and therefore in front of your customers.
- Fixing code is hard: When you shorten the release cycle, you're able to discover and remediate bugs closer to the point of creation. This lowers the fixed cost, as there's a correlation between bug introduction and bug discovery times.
- Release better: The more you release, the better you get at releasing. Challenging your developers and operators to build automation, monitoring, and logging around the processes of CI/CD will make your pipeline more robust. As you release more often, the amount of difference between releases also decreases. A smaller difference allows teams to troubleshoot potential breaking changes more quickly, which in turn gives them more time to refine the release process further. It's a virtuous cycle!
Because all the dependencies are packaged into the layer, the same host server can have multiple containers running a variety of OS or package versions. Furthermore, we can have various languages and frameworks on the same host server without the typical dependency clashes we would get in a VM with a single operating system.
The well-defined isolation and layer filesystem also makes containers ideal for running systems with a very small footprint and domain-specific purpose. A streamlined deployment and release process means we can deploy quickly and often. As such, many companies have reduced their deployment time from weeks or months to days and hours in some cases. This development life cycle lends itself extremely well to small, targeted teams working on small chunks of a larger application.
As we break down an application into very specific domains, we need a uniform way to communicate between all the various pieces and domains. Web services have served this purpose for years, but the added isolation and granular focus that containers bring have paved the way for microservices.
A definition for microservices can be a bit nebulous, but a definition from Martin Fowler, a respected author and speaker on software development, says this:
In short, the microservice architectural style is an approach to developing a single application as a suite of small services, each running in its own process and communicating with lightweight mechanisms, often an HTTP resource API. These services are built around business capabilities and independently deployable by fully automated deployment machinery. There is a bare minimum of centralized management of these services, which may be written in different programming languages and use different data storage technologies.
As the pivot to containerization and as microservices evolve in an organization, they will soon need a strategy to maintain many containers and microservices. Some organizations will have hundreds or even thousands of containers running in the years ahead.
Life cycle processes alone are an important piece of operation and management. How will we automatically recover when a container fails? Which upstream services are affected by such an outage? How will we patch our applications with minimal downtime? How will we scale up our containers and services as our traffic grows?
Networking and processing are also important concerns. Some processes are part of the same service and may benefit from proximity to the network. Databases, for example, may send large amounts of data to a particular microservice for processing. How will we place containers near each other in our cluster? Is there common data that needs to be accessed? How will new services be discovered and made available to other systems?
Resource utilization is also key. The small footprint of containers means that we can optimize our infrastructure for greater utilization. Extending the savings started in the Elastic cloud will take us even further toward minimizing wasted hardware. How will we schedule workloads most efficiently? How will we ensure that our important applications always have the right resources? How can we run less important workloads on spare capacity?
Finally, portability is a key factor in moving many organizations to containerization. Docker makes it very easy to deploy a standard container across various operating systems, cloud providers, and on-premise hardware or even developer laptops. However, we still need tooling to move containers around. How will we move containers between different nodes on our cluster? How will we roll out updates with minimal disruption? What process do we use to perform blue-green deployments or canary releases?
Whether you are starting to build out individual microservices and separating concerns into isolated containers or you simply want to take full advantage of the portability and immutability in your application development, the need for management and orchestration becomes clear. This is where orchestration tools such as Kubernetes offer the biggest value.
Kubernetes is supported on a variety of platforms and OSes. For the examples in this book, I used an Ubuntu 16.04 Linux VirtualBox (https://www.virtualbox.org/wiki/Downloads) for my client and Google Compute Engine (GCE) with Debian for the cluster itself. We will also take a brief look at a cluster running on Amazon Web Services (AWS) with Ubuntu.
Note
To save some money, both GCP (https://cloud.google.com/free/) and AWS (https://aws.amazon.com/free/) offer free tiers and trial offers for their cloud infrastructure. It's worth using these free trials for learning Kubernetes, if possible. Most of the concepts and examples in this book should work on any installation of a Kubernetes cluster. To get more information on other platform setups, refer to the Kubernetes getting started page, which will help you pick the right solution for your cluster: http://kubernetes.io/docs/getting-started-guides/.
We have a few options for setting up the prerequisites for our development environment. While we'll use a Linux client on our local machine in this example, you can also use the Google Cloud Shell to simplify your dependencies and setup. You can check out that documentation at https://cloud.google.com/shell/docs/, and then jump down to the gcloud auth login portion of the tutorial.
Getting back to the local installation, let's make sure that our environment is properly set up before we install Kubernetes. Start by updating the packages:
$ sudo apt-get updateYou should see something similar to the following output:
$ sudo apt update
[sudo] password for user:
Hit:1 http://archive.canonical.com/ubuntu xenial InRelease
Ign:2 http://dl.google.com/linux/chrome/deb stable InRelease
Hit:3 http://archive.ubuntu.com/ubuntu xenial InRelease
Get:4 http://security.ubuntu.com/ubuntu xenial-security InRelease [102 kB]
Ign:5 http://dell.archive.canonical.com/updates xenial-dell-dino2-mlk InRelease
Hit:6 http://ppa.launchpad.net/webupd8team/sublime-text-3/ubuntu xenial InRelease
Hit:7 https://download.sublimetext.com apt/stable/ InRelease
Hit:8 http://dl.google.com/linux/chrome/deb stable Release
Get:9 http://archive.ubuntu.com/ubuntu xenial-updates InRelease [102 kB]
Hit:10 https://apt.dockerproject.org/repo ubuntu-xenial InRelease
Hit:11 https://deb.nodesource.com/node_7.x xenial InRelease
Hit:12 https://download.docker.com/linux/ubuntu xenial InRelease
Ign:13 http://dell.archive.canonical.com/updates xenial-dell InRelease
<SNIPPED...>
Fetched 1,593 kB in 1s (1,081 kB/s)
Reading package lists... Done
Building dependency tree
Reading state information... Done
120 packages can be upgraded. Run 'apt list --upgradable' to see them.
$
Install Python and curl if they are not present:
$ sudo apt-get install python
$ sudo apt-get install curl
Install the gcloud SDK:
$ curl https://sdk.cloud.google.com | bashConfigure your GCP account information. This should automatically open a browser, from where we can log in to our Google Cloud account and authorize the SDK:
$ gcloud auth loginNote
If you have problems with login or want to use another browser, you can optionally use the --no-launch-browser command. Copy and paste the URL to the machine and/or browser of your choice. Log in with your Google Cloud credentials and click Allow on the permissions page. Finally, you should receive an authorization code that you can copy and paste back into the shell, where the prompt will be waiting.
A default project should be set, but we can verify this with the following command:
$ gcloud config list projectWe can modify this and set a new default project with the following command. Make sure to use project ID and not project name, as follows:
$ gcloud config set project <PROJECT ID>Note
We can find our project ID in the console at the following URL: https://console.developers.google.com/project. Alternatively, we can list the active projects with $ gcloud alpha projects list.
You can turn on API access to your project at this point in the GCP dashboard, https://console.developers.google.com/project, or the Kubernetes script will prompt you to do so in the next section:
Next, you want to change to a directory when you can install the Kubernetes binaries. We'll set that up and then download the software:
$ mkdir ~/code/gsw-k8s-3
$ cd ~/code/gsw-k8s-3
Installing the latest Kubernetes version is done in a single step, as follows:
$ curl -sS https://get.k8s.io | bashIt may take a minute or two to download Kubernetes depending on your connection speed. Earlier versions would automatically call the kube-up.sh script and start building our cluster. In version 1.5, we will need to call thekube-up.shscript ourselves to launch the cluster. By default, it will use the Google Cloud and GCE:
$ kubernetes/cluster/kube-up.shIf you get an error at this point due to missing components, you'll need to add a few pieces to your local Linux box. If you're running the Google Cloud Shell, or are utilizing a VM in GCP, you probably won't see this error:
$ kubernetes_install cluster/kube-up.sh...
Starting cluster in us-central1-b using provider gce
... calling verify-prereqs
missing required gcloud component "alpha"
missing required gcloud component "beta"
$
You can see that these components are missing and are required for leveraging the kube-up.sh script:
$ gcloud components list
Your current Cloud SDK version is: 193.0.0
The latest available version is: 193.0.0
┌─────────────────────────────────────────────────────────────────────────────────────────────────────────────┐
│ Components │
├───────────────┬──────────────────────────────────────────────────────┬──────────────────────────┬───────────┤
│ Status │ Name │ ID │ Size │
├───────────────┼──────────────────────────────────────────────────────┼──────────────────────────┼───────────┤
│ Not Installed │ App Engine Go Extensions │ app-engine-go │ 151.9 MiB │
│ Not Installed │ Cloud Bigtable Command Line Tool │ cbt │ 4.5 MiB │
│ Not Installed │ Cloud Bigtable Emulator │ bigtable │ 3.7 MiB │
│ Not Installed │ Cloud Datalab Command Line Tool │ datalab │ < 1 MiB │
│ Not Installed │ Cloud Datastore Emulator │ cloud-datastore-emulator │ 17.9 MiB │
│ Not Installed │ Cloud Datastore Emulator (Legacy) │ gcd-emulator │ 38.1 MiB │
│ Not Installed │ Cloud Pub/Sub Emulator │ pubsub-emulator │ 33.4 MiB │
│ Not Installed │ Emulator Reverse Proxy │ emulator-reverse-proxy │ 14.5 MiB │
│ Not Installed │ Google Container Local Builder │ container-builder-local │ 3.8 MiB │
│ Not Installed │ Google Container Registry's Docker credential helper │ docker-credential-gcr │ 3.3 MiB │
│ Not Installed │ gcloud Alpha Commands │ alpha │ < 1 MiB │
│ Not Installed │ gcloud Beta Commands │ beta │ < 1 MiB │
│ Not Installed │ gcloud app Java Extensions │ app-engine-java │ 118.9 MiB │
│ Not Installed │ gcloud app PHP Extensions │ app-engine-php │ │
│ Not Installed │ gcloud app Python Extensions │ app-engine-python │ 6.2 MiB │
│ Not Installed │ gcloud app Python Extensions (Extra Libraries) │ app-engine-python-extras │ 27.8 MiB │
│ Not Installed │ kubectl │ kubectl │ 12.3 MiB │
│ Installed │ BigQuery Command Line Tool │ bq │ < 1 MiB │
│ Installed │ Cloud SDK Core Libraries │ core │ 7.3 MiB │
│ Installed │ Cloud Storage Command Line Tool │ gsutil │ 3.3 MiB │
└───────────────┴──────────────────────────────────────────────────────┴──────────────────────────┴───────────┘
To install or remove components at your current SDK version [193.0.0], run:
  $ gcloud components install COMPONENT_ID
  $ gcloud components remove COMPONENT_ID
To update your SDK installation to the latest version [193.0.0], run:
  $ gcloud components update
You can update the components by adding them to your shell:
$ gcloud components install alpha beta
Your current Cloud SDK version is: 193.0.0
Installing components from version: 193.0.0
┌──────────────────────────────────────────────┐
│ These components will be installed. │
├───────────────────────┬────────────┬─────────┤
│ Name │ Version │ Size │
├───────────────────────┼────────────┼─────────┤
│ gcloud Alpha Commands │ 2017.09.15 │ < 1 MiB │
│ gcloud Beta Commands │ 2017.09.15 │ < 1 MiB │
└───────────────────────┴────────────┴─────────┘
For the latest full release notes, please visit:
  https://cloud.google.com/sdk/release_notes
Do you want to continue (Y/n)? y
╔════════════════════════════════════════════════════════════╗
╠═ Creating update staging area ═╣
╠════════════════════════════════════════════════════════════╣
╠═ Installing: gcloud Alpha Commands ═╣
╠════════════════════════════════════════════════════════════╣
╠═ Installing: gcloud Beta Commands ═╣
╠════════════════════════════════════════════════════════════╣
╠═ Creating backup and activating new installation ═╣
╚════════════════════════════════════════════════════════════╝
Performing post processing steps...done.
Update done!
After you run the kube-up.sh script, you will see quite a few lines roll past. Let's take a look at them one section at a time:
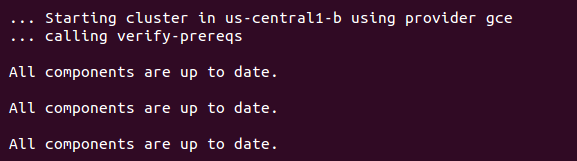
The preceding screenshot shows the checks for prerequisites, as well as making sure that all components are up to date. This is specific to each provider. In the case of GCE, it will verify that the SDK is installed and that all components are up to date. If not, you will see a prompt at this point to install or update:
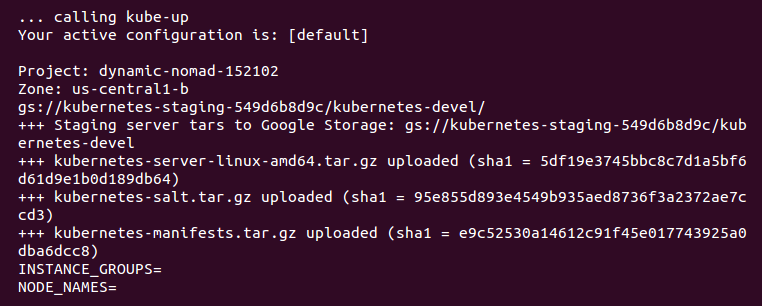
Now, the script is turning up the cluster. Again, this is specific to the provider. For GCE, it first checks to make sure that the SDK is configured for a default project and zone. If they are set, you'll see those in the output:
Note
You may see an output that the bucket for storage hasn't been created. That's normal! The creation script will go ahead and create it.
BucketNotFoundException: 404 gs://kubernetes-staging-22caacf417 bucket does not exist.
Next, it uploads the server binaries to Google Cloud storage, as seen in the Creating gs:... lines:
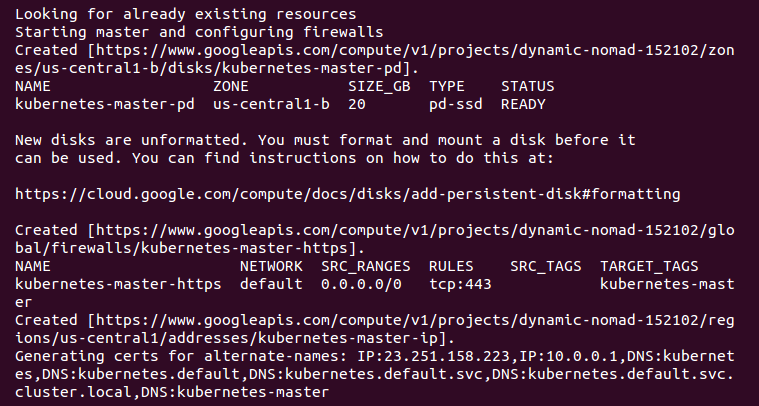
It then checks for any pieces of a cluster already running. Then, we finally start creating the cluster. In the output in the preceding screenshot, we can see it creating the master server, IP address, and appropriate firewall configurations for the cluster:
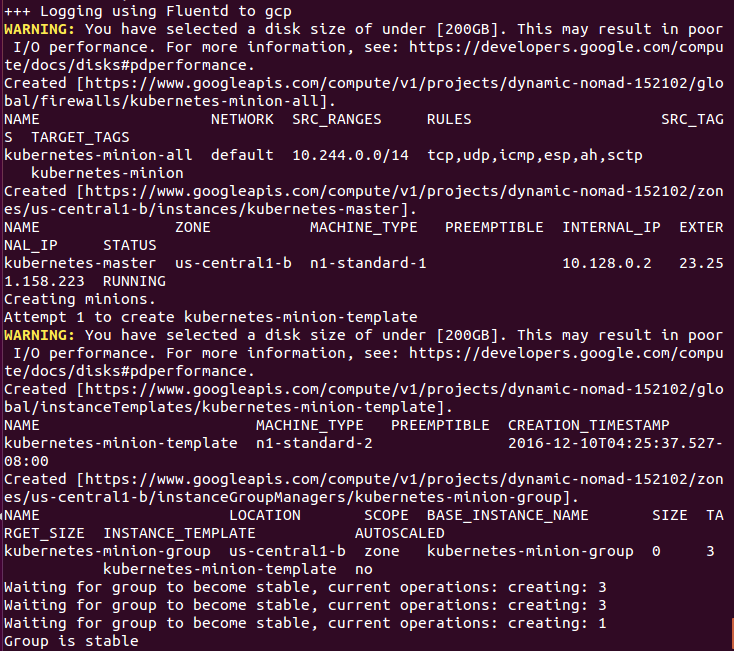
Finally, it creates the minions or nodes for our cluster. This is where our container workloads will actually run. It will continually loop and wait while all the minions start up. By default, the cluster will have four nodes (minions), but K8s supports having more than 1,000 (and soon beyond). We will come back to scaling the nodes later on in this book:
Attempt 1 to create kubernetes-minion-template
WARNING: You have selected a disk size of under [200GB]. This may result in poor I/O performance. For more information, see: https://developers.google.com/compute/docs/disks#performance.
Created [https://www.googleapis.com/compute/v1/projects/gsw-k8s-3/global/instanceTemplates/kubernetes-minion-template].
NAME MACHINE_TYPE PREEMPTIBLE CREATION_TIMESTAMP
kubernetes-minion-template n1-standard-2 2018-03-17T11:14:04.186-07:00
Created [https://www.googleapis.com/compute/v1/projects/gsw-k8s-3/zones/us-central1-b/instanceGroupManagers/kubernetes-minion-group].
NAME LOCATION SCOPE BASE_INSTANCE_NAME SIZE TARGET_SIZE INSTANCE_TEMPLATE AUTOSCALED
kubernetes-minion-group us-central1-b zone kubernetes-minion-group 0 3 kubernetes-minion-template no
Waiting for group to become stable, current operations: creating: 3
Group is stable
INSTANCE_GROUPS=kubernetes-minion-group
NODE_NAMES=kubernetes-minion-group-176g kubernetes-minion-group-s9qw kubernetes-minion-group-tr7r
Trying to find master named 'kubernetes-master'
Looking for address 'kubernetes-master-ip'
Using master: kubernetes-master (external IP: 104.155.172.179)
Waiting up to 300 seconds for cluster initialization.
Now that everything is created, the cluster is initialized and started. Assuming that everything goes well, we will get an IP address for the master:
... calling validate-cluster
Validating gce cluster, MULTIZONE=
Project: gsw-k8s-3
Network Project: gsw-k8s-3
Zone: us-central1-b
No resources found.
Waiting for 4 ready nodes. 0 ready nodes, 0 registered. Retrying.
No resources found.
Waiting for 4 ready nodes. 0 ready nodes, 0 registered. Retrying.
Waiting for 4 ready nodes. 0 ready nodes, 1 registered. Retrying.
Waiting for 4 ready nodes. 0 ready nodes, 4 registered. Retrying.
Found 4 node(s).
NAME STATUS ROLES AGE VERSION
kubernetes-master Ready,SchedulingDisabled <none> 32s v1.9.4
kubernetes-minion-group-176g Ready <none> 25s v1.9.4
kubernetes-minion-group-s9qw Ready <none> 25s v1.9.4
kubernetes-minion-group-tr7r Ready <none> 35s v1.9.4
Validate output:
NAME STATUS MESSAGE ERROR
etcd-1 Healthy {"health": "true"}
scheduler Healthy ok
controller-manager Healthy ok
etcd-0 Healthy {"health": "true"}
Cluster validation succeeded
Also, note that configuration along with the cluster management credentials are stored in home/<Username>/.kube/config.
Then, the script will validate the cluster. At this point, we are no longer running provider-specific code. The validation script will query the cluster via the kubectl.sh script. This is the central script for managing our cluster. In this case, it checks the number of minions found, registered, and in a ready state. It loops through, giving the cluster up to 10 minutes to finish initialization.
After a successful startup, a summary of the minions and the cluster component health is printed on the screen:
Done, listing cluster services:
Kubernetes master is running at https://104.155.172.179
GLBCDefaultBackend is running at https://104.155.172.179/api/v1/namespaces/kube-system/services/default-http-backend:http/proxy
Heapster is running at https://104.155.172.179/api/v1/namespaces/kube-system/services/heapster/proxy
KubeDNS is running at https://104.155.172.179/api/v1/namespaces/kube-system/services/kube-dns:dns/proxy
kubernetes-dashboard is running at https://104.155.172.179/api/v1/namespaces/kube-system/services/https:kubernetes-dashboard:/proxy
Metrics-server is running at https://104.155.172.179/api/v1/namespaces/kube-system/services/https:metrics-server:/proxy
Grafana is running at https://104.155.172.179/api/v1/namespaces/kube-system/services/monitoring-grafana/proxy
InfluxDB is running at https://104.155.172.179/api/v1/namespaces/kube-system/services/monitoring-influxdb:http/proxy
To further debug and diagnose cluster problems, use 'kubectl cluster-info dump'.
Finally, a kubectl cluster-info command is run, which outputs the URL for the master services, including DNS, UI, and monitoring. Let's take a look at some of these components.
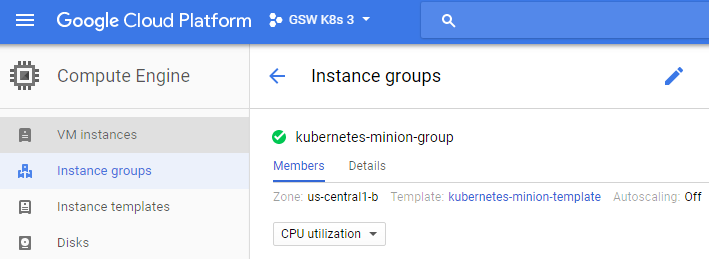
If you'd like to get further debugging and/or diagnose cluster problems, you can use kubectl cluster-info dump to see what's going on with your cluster. Additionally, if you need to pause and take a break and want to conserve your free hours, you can log into the GUI and set the kubernetes-minion-group instance group to zero, which will remove all of the instances. The pencil will edit the group for you; set it to zero. Don't forget to set it back to three if you want to pick up again!
You can simply stop the manager as well. You'll need to click the stop button to shut it down:
If you'd like to start the cluster up again, start the servers again to keep going. They'll need some time to start up and connect to each other.
If you want to work on more than one cluster at a time or you want to use a different name than the default, see the <kubernetes>/cluster/gce/config-default.sh file for more fine-grained configuration of your cluster.
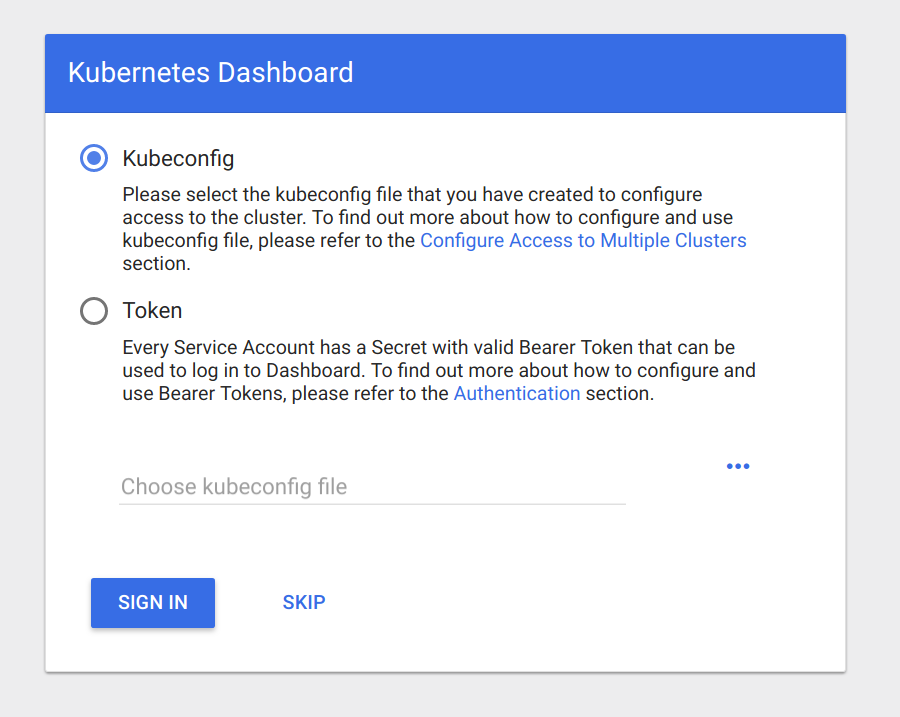
Since Kubernetes v1.3.x, you can no longer authenticate through public IP addresses to the GUI. To get around this, we'll use the kubectl proxy command. First, grab the token from the configuration command, and then we'll use it to launch a local proxy version of the UI:
$ kubectl config view |grep token
 token: RvoYTIn4rExi1bNRzk56g0PU0srZbzOf
$ kubectl proxy --port=8001
Open a browser and enter the following URL: https://localhost/ui/.
Note
You can also type these commands to open a browser window automatically if you're on macOS: $ open https://localhost/ui/ or $ xdg-open https://localhost/ui if you're on Linux.
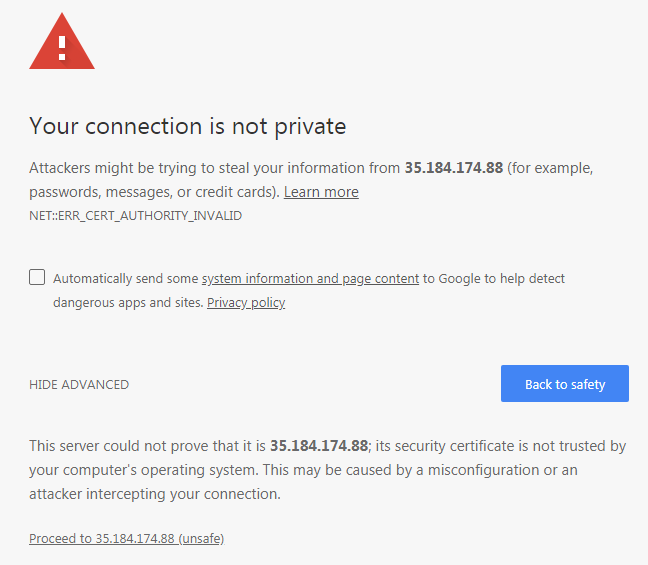
The certificate is self-signed by default, so you'll need to ignore the warnings in your browser before proceeding. After this, we will see a login dialog:
At this login dialog, you'll need to input the token that you grabbed in the aforementioned command.
Note
This is where we use the credentials listed during the K8s installation. We can find them at any time by simply using the config command $ kubectl config view.
Use the Token option and log in to your cluster:
Now that we have entered our token, you should see a dashboard like the one in the following screenshot:
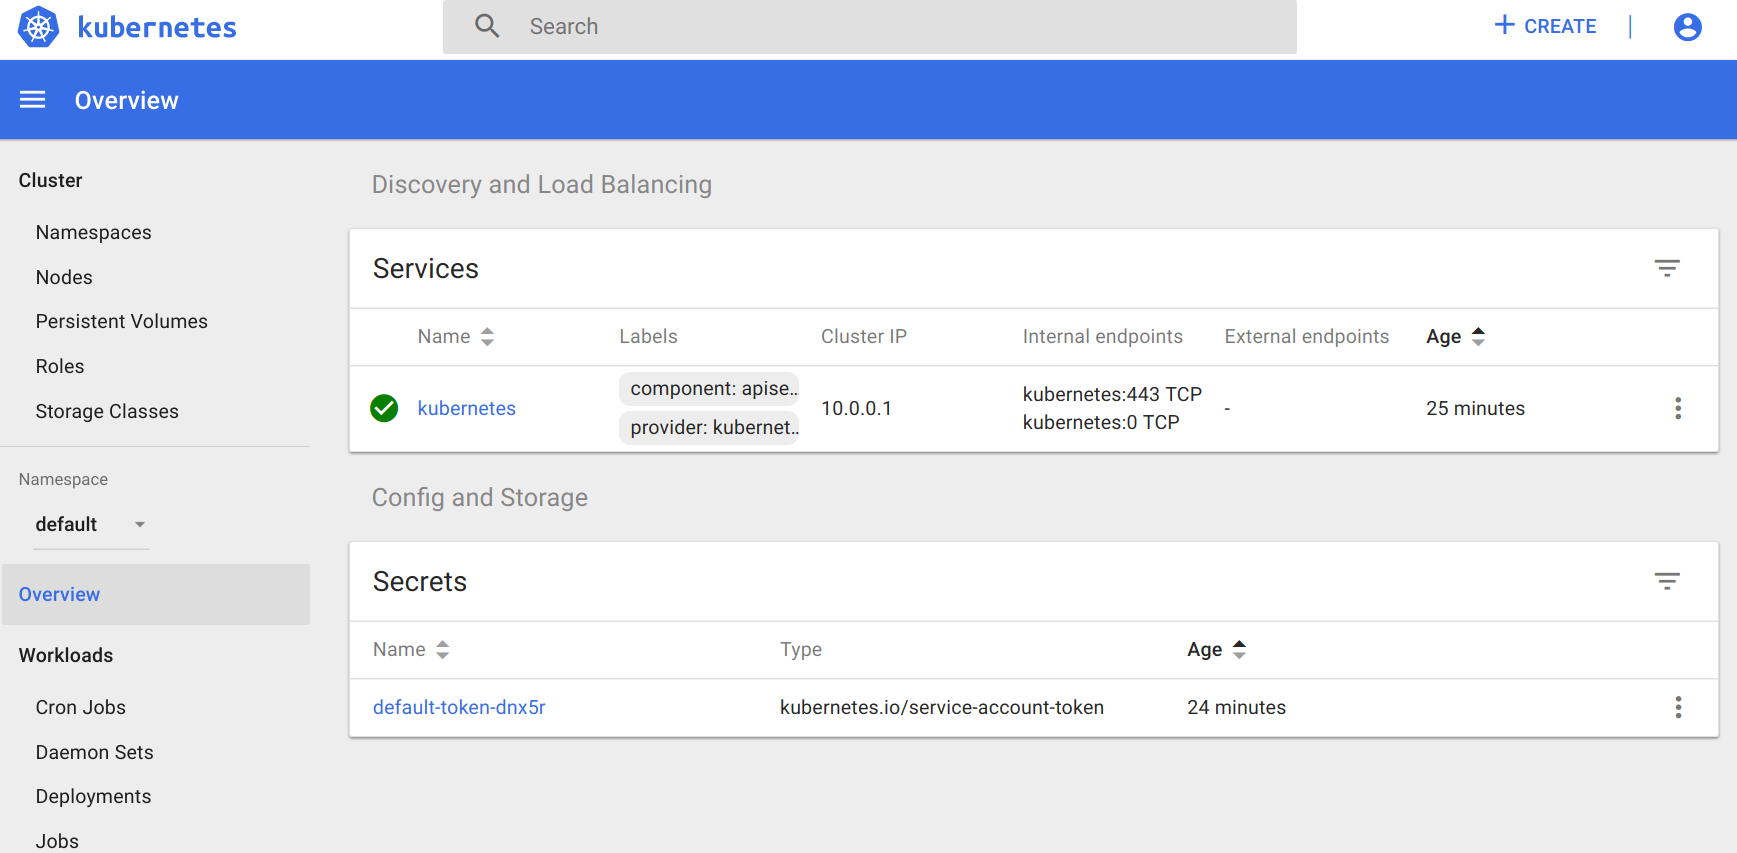
The main dashboard takes us to a page with not much display at first. There is a link to deploy a containerized app that will take you to a GUI for deployment. This GUI can be a very easy way to get started deploying apps without worrying about the YAML syntax for Kubernetes. However, as your use of containers matures, it's a good practice to use the YAML definitions that are checked in to source control.
If you click on the Nodes link on the left-hand side menu, you will see some metrics on the current cluster nodes:

At the top, we can see an aggregate of the CPU and memory use followed by a listing of our cluster nodes. Clicking on one of the nodes will take us to a page with detailed information about that node, its health, and various metrics.
The Kubernetes UI has a lot of other views that will become more useful as we start launching real applications and adding configurations to the cluster.
Another service installed by default is Grafana. This tool will give us a dashboard to view metrics on the cluster nodes. We can access it using the following syntax in a browser:
https://localhost/api/v1/proxy/namespaces/kube-system/services/monitoring-grafana
The Grafana dashboard should look like this:
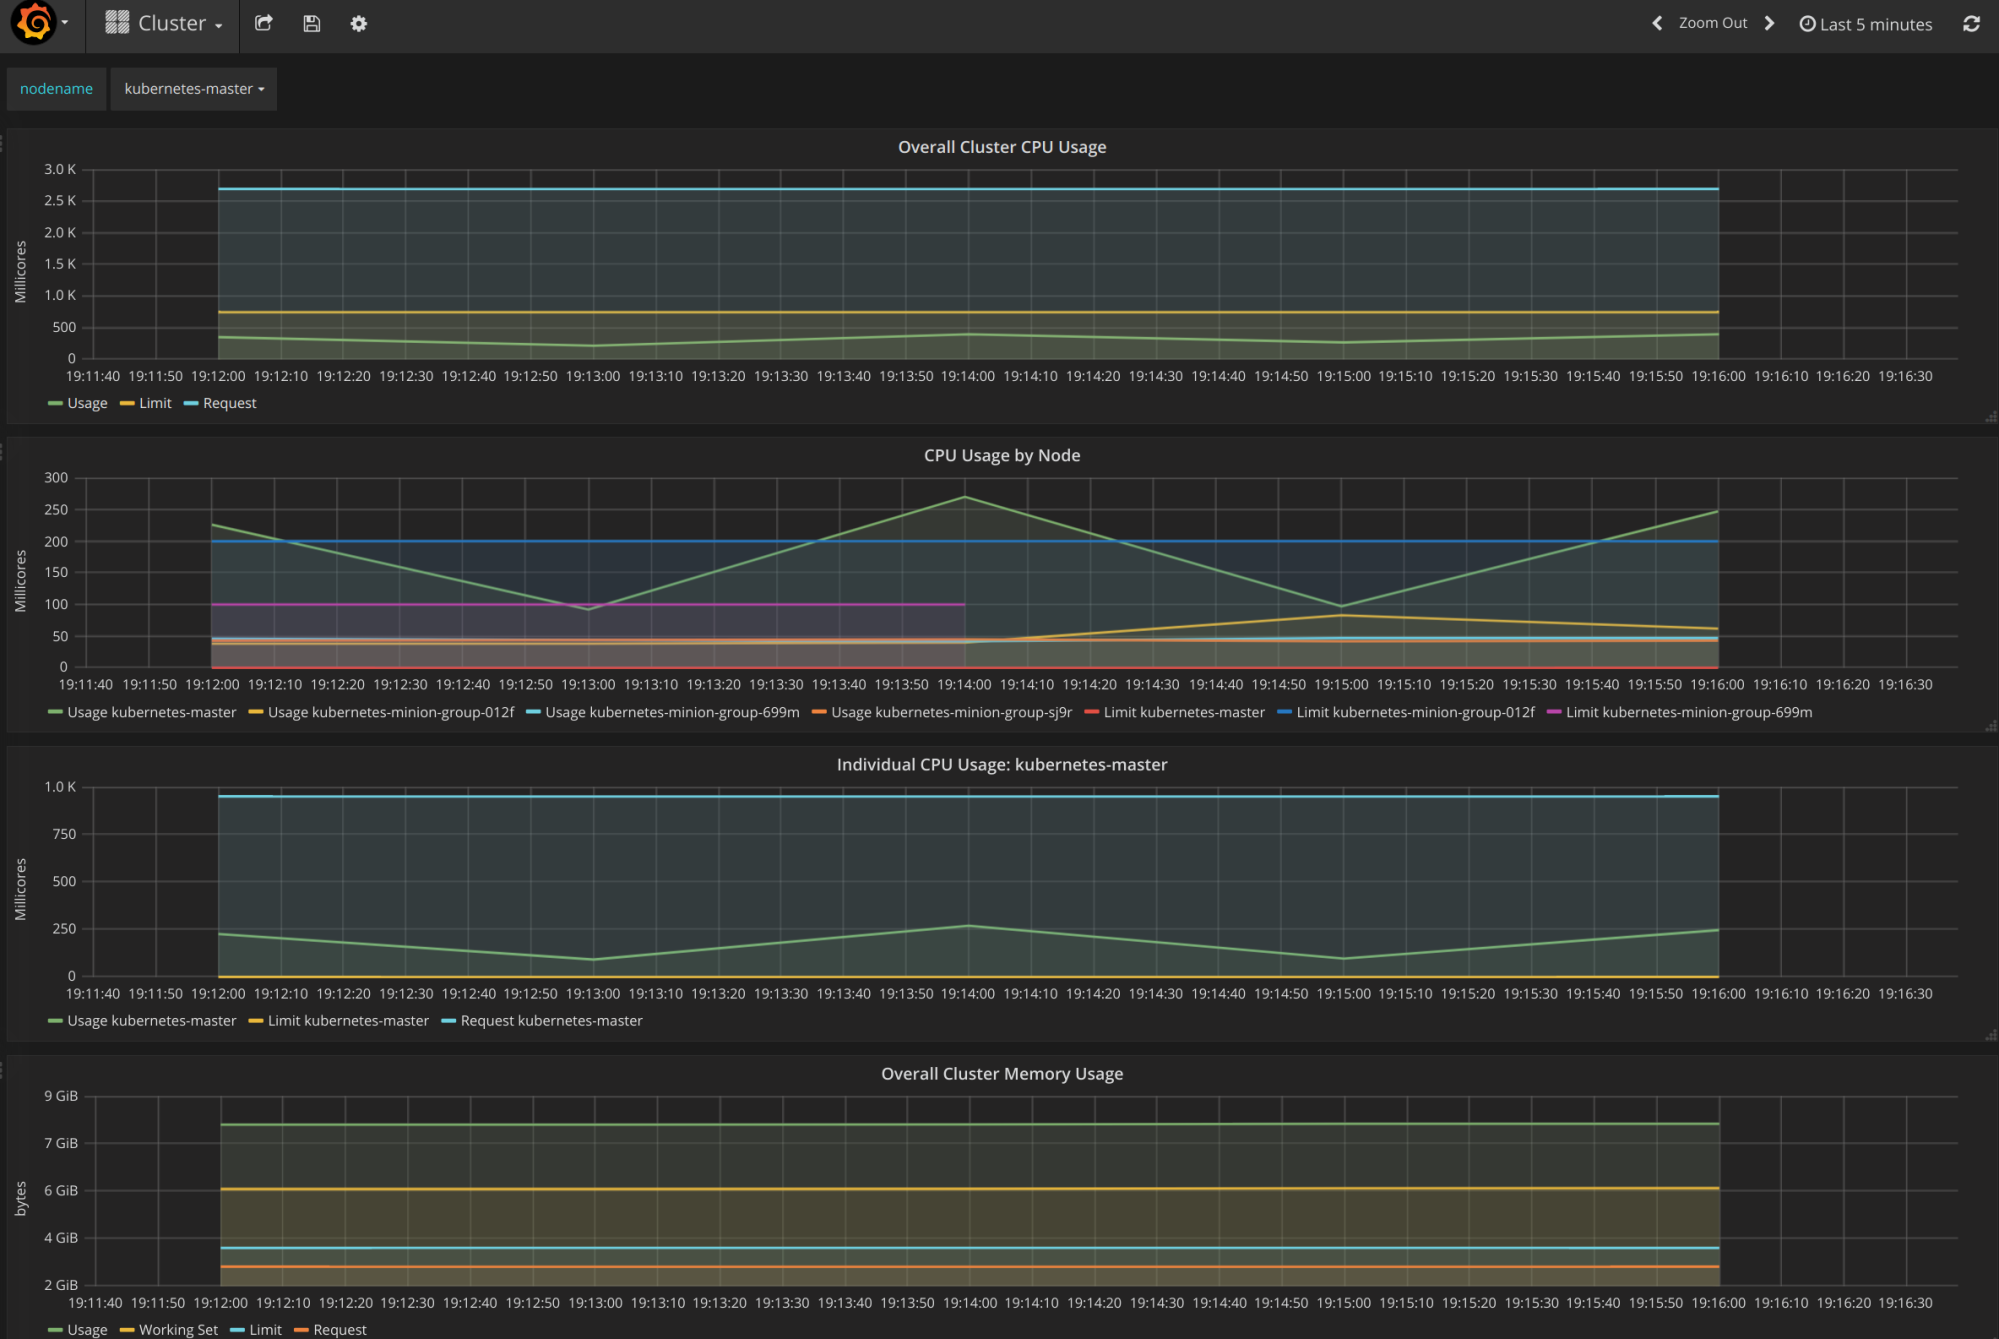
From the main page, click on the Home drop-down and select Cluster. Here, Kubernetes is actually running a number of services. Heapster is used to collect the resource usage on the pods and nodes, and stores the information in InfluxDB. The results, such as CPU and memory usage, are what we see in the Grafana UI. We will explore this in depth in Chapter8, Monitoring and Logging.
The kubectl script has commands for exploring our cluster and the workloads running on it. You can find it in the /kubernetes/client/bin folder. We will be using this command throughout the book, so let's take a second to set up our environment. We can do so by putting the binaries folder on our PATH, in the following manner:
$ export PATH=$PATH:/<Path where you downloaded K8s>/kubernetes/client/bin
$ chmod +x /<Path where you downloaded K8s>/kubernetes/client/bin
Note
You may choose to download the kubernetes folder outside your home folder, so modify the preceding command as appropriate. It is also a good idea to make the changes permanent by adding the export command to the end of your .bashrc file in your home directory.
Now that we have kubectl on our path, we can start working with it. It has quite a few commands. Since we have not spun up any applications yet, most of these commands will not be very interesting. However, we can explore two commands right away.
First, we have already seen the cluster-info command during initialization, but we can run it again at any time with the following command:
$ kubectl cluster-infoAnother useful command is get. It can be used to see currently running services, pods, replication controllers, and a lot more. Here are the three examples that are useful right out of the gate:
- Lists the nodes in our cluster:
$ kubectl get nodes- Lists cluster events:
$ kubectl get events- Finally, we can see any services that are running in the cluster, as follows:
$ kubectl get servicesTo start with, we will only see one service, named kubernetes. This service is the core API server for the cluster.
For any of the preceding commands, you can always add a -h flag on the end to understand the intended usage.
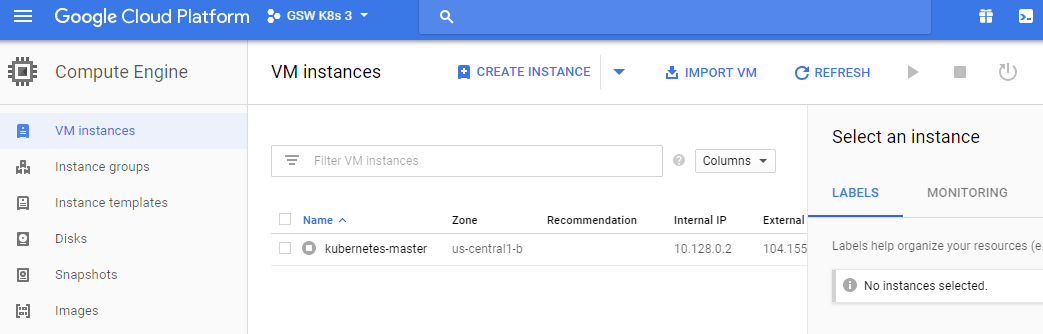
Let's dig a little bit deeper into our new cluster and its core services. By default, machines are named with the kubernetes- prefix. We can modify this using $KUBE_GCE_INSTANCE_PREFIX before a cluster is spun up. For the cluster we just started, the master should be named kubernetes-master. We can use the gcloud command-line utility to SSH into the machine. The following command will start an SSH session with the master node. Be sure to substitute your project ID and zone to match your environment:
$ gcloud compute ssh --zone "<your gce zone>" "kubernetes-master"

$ gcloud compute ssh --zone "us-central1-b" "kubernetes-master"
Warning: Permanently added 'compute.5419404412212490753' (RSA) to the list of known hosts.

Welcome to Kubernetes v1.9.4!

You can find documentation for Kubernetes at:
  http://docs.kubernetes.io/

The source for this release can be found at:
  /home/kubernetes/kubernetes-src.tar.gz
Or you can download it at:
  https://storage.googleapis.com/kubernetes-release/release/v1.9.4/kubernetes-src.tar.gz

It is based on the Kubernetes source at:
  https://github.com/kubernetes/kubernetes/tree/v1.9.4

For Kubernetes copyright and licensing information, see:
  /home/kubernetes/LICENSES

jesse@kubernetes-master ~ $
Note
If you have trouble with SSH via the Google Cloud CLI, you can use the console, which has a built-in SSH client. Simply go to the VM instances details page and you'll see an SSH option as a column in the kubernetes-master listing. Alternatively, the VM instance details page has the SSH option at the top.
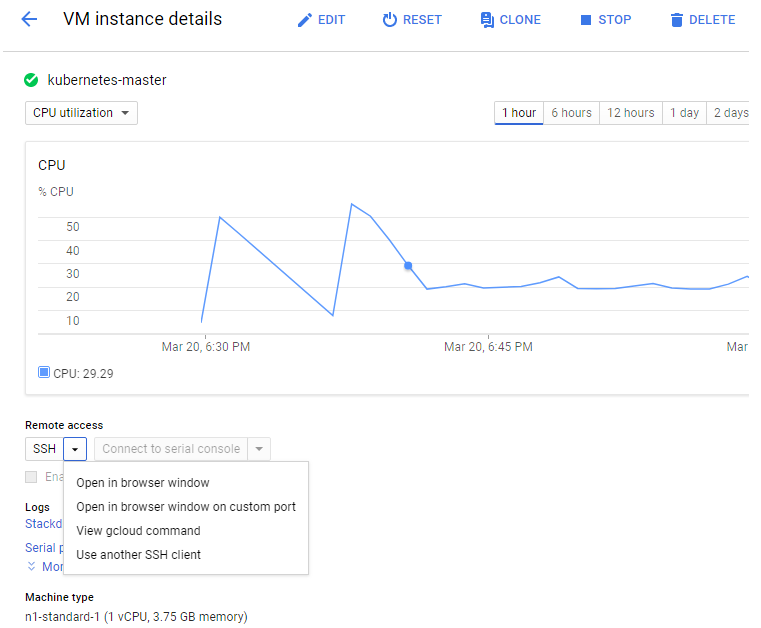
Once we are logged in, we should get a standard shell prompt. Let's run the docker command that filters for Image and Status:
$ docker container ls --format 'table {{.Image}}\t{{.Status}}' 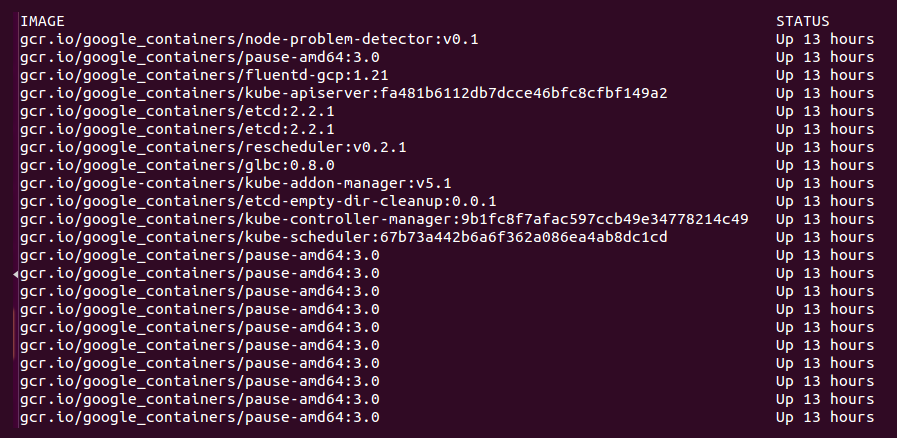
Even though we have not deployed any applications on Kubernetes yet, we can note that there are several containers already running. The following is a brief description of each container:
fluentd-gcp: This container collects and sends the cluster logs file to the Google Cloud Logging service.node-problem-detector: This container is a daemon that runs on every node and currently detects issues at the hardware and kernel layer.rescheduler: This is another add-on container that makes sure critical components are always running. In cases of low resource availability, it may even remove less critical pods to make room.glbc: This is another Kubernetes add-on container that provides Google Cloud Layer 7 load balancing using the new Ingress capability.kube-addon-manager: This component is core to the extension of Kubernetes through various add-ons. It also periodically applies any changes to the/etc/kubernetes/addonsdirectory.etcd-empty-dir-cleanup: A utility to clean up empty keys inetcd.
kube-controller-manager: This is a controller manager that controls a variety of cluster functions, ensuring accurate and up-to-date replication is one of its vital roles. Additionally, it monitors, manages, and discovers new nodes. Finally, it manages and updates service endpoints.kube-apiserver: This container runs the API server. As we explored in the Swagger interface, this RESTful API allows us to create, query, update, and remove various components of our Kubernetes cluster.kube-scheduler: This scheduler takes unscheduled pods and binds them to nodes based on the current scheduling algorithm.etcd: This runs theetcdsoftware built by CoreOS, and it is a distributed and consistent key-value store. This is where the Kubernetes cluster state is stored, updated, and retrieved by various components of K8s.pause: This container is often referred to as the pod infrastructure container and is used to set up and hold the networking namespace and resource limits for each pod.
Note
I omitted the amd64 for many of these names to make this more generic. The purpose of the pods remains the same.
To exit the SSH session, simply type exit at the prompt.
We could SSH to one of the minions, but since Kubernetes schedules workloads across the cluster, we would not see all the containers on a single minion. However, we can look at the pods running on all the minions using the kubectl command:
$ kubectl get pods
No resources found.
Since we have not started any applications on the cluster yet, we don't see any pods. However, there are actually several system pods running pieces of the Kubernetes infrastructure. We can see these pods by specifying the kube-system namespace. We will explore namespaces and their significance later, but for now, the --namespace=kube-system command can be used to look at these K8s system resources, as follows:
$ kubectl get pods --namespace=kube-system
jesse@kubernetes-master ~ $ kubectl get pods --namespace=kube-system
NAME READY STATUS RESTARTS AGE
etcd-server-events-kubernetes-master 1/1 Running 0 50m
etcd-server-kubernetes-master 1/1 Running 0 50m
event-exporter-v0.1.7-64464bff45-rg88v 1/1 Running 0 51m
fluentd-gcp-v2.0.10-c4ptt 1/1 Running 0 50m
fluentd-gcp-v2.0.10-d9c5z 1/1 Running 0 50m
fluentd-gcp-v2.0.10-ztdzs 1/1 Running 0 51m
fluentd-gcp-v2.0.10-zxx6k 1/1 Running 0 50m
heapster-v1.5.0-584689c78d-z9blq 4/4 Running 0 50m
kube-addon-manager-kubernetes-master 1/1 Running 0 50m
kube-apiserver-kubernetes-master 1/1 Running 0 50m
kube-controller-manager-kubernetes-master 1/1 Running 0 50m
kube-dns-774d5484cc-gcgdx 3/3 Running 0 51m
kube-dns-774d5484cc-hgm9r 3/3 Running 0 50m
kube-dns-autoscaler-69c5cbdcdd-8hj5j 1/1 Running 0 51m
kube-proxy-kubernetes-minion-group-012f 1/1 Running 0 50m
kube-proxy-kubernetes-minion-group-699m 1/1 Running 0 50m
kube-proxy-kubernetes-minion-group-sj9r 1/1 Running 0 50m
kube-scheduler-kubernetes-master 1/1 Running 0 50m
kubernetes-dashboard-74f855c8c6-v4f6x 1/1 Running 0 51m
l7-default-backend-57856c5f55-2lz6w 1/1 Running 0 51m
l7-lb-controller-v0.9.7-kubernetes-master 1/1 Running 0 50m
metrics-server-v0.2.1-7f8dd98c8f-v9b4c 2/2 Running 0 50m
monitoring-influxdb-grafana-v4-554f5d97-l7q4k 2/2 Running 0 51m
rescheduler-v0.3.1-kubernetes-master 1/1 Running 0 50m
The first six lines should look familiar. Some of these are the services we saw running on the master, and we will see pieces of these on the nodes. There are a few additional services we have not seen yet. The kube-dns option provides the DNS and service discovery plumbing, kubernetes-dashboard-xxxx is the user interface for Kubernetes, l7-default-backend-xxxx provides the default load balancing backend for the new layer-7 load balancing capability, and heapster-v1.2.0-xxxx and monitoring-influx-grafana provide the Heapster database and user interface to monitor resource usage across the cluster.
Finally, kube-proxy-kubernetes-minion-group-xxxx is the proxy, which directs traffic to the proper backing services and pods running on our cluster. The kube-apiserver validates and configures data for the API objects, which include services, replication controllers, pods, and other Kubernetes objects. The rescheduler guarantees the scheduling of critical system add-ons, given that the cluster has enough available resources.
If we did SSH into a random minion, we would see several containers that run across a few of these pods. A sample might look like the following:
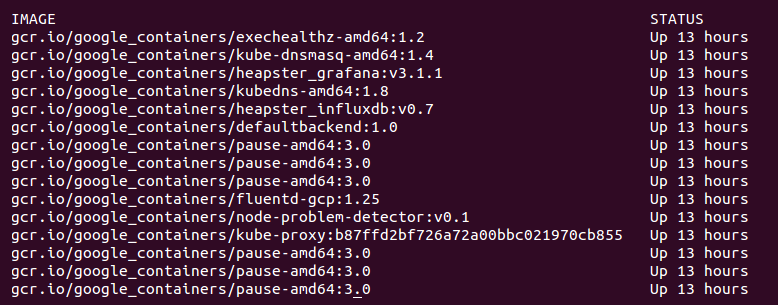
Again, we saw a similar lineup of services on the master. The services we did not see on the master include the following:
kubedns: This container monitors the service and endpoint resources in Kubernetes and synchronizes any changes to DNS lookups.kube-dnsmasq: This is another container that provides DNS caching.dnsmasq-metrics: This provides metric reporting for DNS services in cluster.l7-defaultbackend: This is the default backend for handling the GCE L7 load balancer and Ingress.kube-proxy: This is the network and service proxy for your cluster. This component makes sure that service traffic is directed to wherever your workloads are running on the cluster. We will explore this in more depth later in this book.heapster: This container is for monitoring and analytics.addon-resizer: This cluster utility is for scaling containers.
heapster_grafana: This tracks resource usage and monitoring.heapster_influxdb: This time series database is for Heapster data.cluster-proportional-autoscaler: This cluster utility is for scaling containers in proportion to the cluster size.exechealthz: This performs health checks on the pods.
By default, Kubernetes uses the GCE provider for Google Cloud. In order to use other cloud providers, we can explore a rapidly expanding tool set of different options. Let's use AWS for this example, where we have two main options: kops (https://github.com/kubernetes/kops) and kube-aws (https://github.com/kubernetes-incubator/kube-aws). For reference, the following KUBERNETES_PROVIDER are listed in this table:
Provider | KUBERNETES_PROVIDER value | Type |
Google Compute Engine |
| Public cloud |
Google Container Engine |
| Public cloud |
Amazon Web Services |
| Public cloud |
Microsoft Azure |
| Public cloud |
Hashicorp vagrant |
| Virtual development environment |
VMware vSphere |
| Private cloud/on-premise virtualization |
|
| Virtualization management tool |
Canonical Juju (folks behind Ubuntu) |
| OS service orchestration tool |
Let's try setting up the cluster on AWS. As a prerequisite, we need to have the AWS CLI installed and configured for our account. The AWS CLI installation and configuration documentation can be found at the following links:
- Installation documentation: http://docs.aws.amazon.com/cli/latest/userguide/installing.html#install-bundle-other-os
- Configuration documentation: http://docs.aws.amazon.com/cli/latest/userguide/cli-chap-getting-started.html
You'll also need to configure your credentials as recommended by AWS (refer to https://docs.aws.amazon.com/sdk-for-go/v1/developer-guide/configuring-sdk.html#specifying-credentials) in order to use kops. To get started, you'll need to first install the CLI tool (refer to https://github.com/kubernetes/kops/blob/master/docs/install.md). If you're running on Linux, you can install the tools as follows:
curl -Lo kops https://github.com/kubernetes/kops/releases/download/$(curl -s https://api.github.com/repos/kubernetes/kops/releases/latest | grep tag_name | cut -d '"' -f 4)/kops-darwin-amd64
chmod +x ./kops
sudo mv ./kops /usr/local/bin/
If you're installing this for macOS, you can use brew update && brew install kops from the command-line Terminal. As a reminder, you'll need kubectl installed if you haven't already! Check the instructions in the preceding links to confirm the installation.
In order for us to use kops, we'll need an IAM role created in AWS with the following permissions:
AmazonEC2FullAccess
AmazonRoute53FullAccess
AmazonS3FullAccess
IAMFullAccess
AmazonVPCFullAccess
Once you've created those pieces manually in the AWS GUI, you can run the following commands from your PC to set up permissions with the correct access:
aws iam create-group --group-name kops

aws iam attach-group-policy --policy-arn arn:aws:iam::aws:policy/AmazonEC2FullAccess --group-name kops
aws iam attach-group-policy --policy-arn arn:aws:iam::aws:policy/AmazonRoute53FullAccess --group-name kops
aws iam attach-group-policy --policy-arn arn:aws:iam::aws:policy/AmazonS3FullAccess --group-name kops
aws iam attach-group-policy --policy-arn arn:aws:iam::aws:policy/IAMFullAccess --group-name kops
aws iam attach-group-policy --policy-arn arn:aws:iam::aws:policy/AmazonVPCFullAccess --group-name kops

aws iam create-user --user-name kops

aws iam add-user-to-group --user-name kops --group-name kops

aws iam create-access-key --user-name kops
In order to use this newly created kops user to interact with the kops tool, you need to copy down the SecretAccessKey and AccessKeyID from the output JSON, and then configure the AWS CLI as follows:
# configure the aws client to use your new IAM user
aws configure # Use your new access and secret key here
aws iam list-users # you should see a list of all your IAM users here
# Because "aws configure" doesn't export these vars for kops to use, we export them now
export AWS_ACCESS_KEY_ID=$(aws configure get aws_access_key_id)
export AWS_SECRET_ACCESS_KEY=$(aws configure get aws_secret_access_key)
We're going to use a gossip-based cluster to bypass a kops configuration requirement of public DNS zones. This requires kops 1.6.2 or later, and allows you to create a locally registered cluster that requires a name ending in .k8s.local. More on that in a bit.
Note
If you'd like to explore how to purchase and set up publicly routable DNS through a provider, you can review the available scenarios in the kops documentation here: https://github.com/kubernetes/kops/blob/master/docs/aws.md#configure-dns.
Since we're building resources in the cloud using configuration management, we're going to need to store the representation of our cluster in a dedicated S3 bucket. This source of truth will allow us to maintain a single location for the configuration and state of our Kubernetes cluster. Please prepend your bucket name with a unique value.
Note
You'll need to have kubectl, kops, the aws cli, and IAM credentials set up for yourself at this point!
Be sure to create your bucket in the us-east-1 region for now, as kops is currently opinionated as to where the bucket belongs:
aws s3api create-bucket \
 --bucket gsw-k8s-3-state-store \
 --region us-east-1
Let's go ahead and set up versioning as well, so you can roll your cluster back to previous states in case anything goes wrong. Behold the power of Infrastructure as Code!
aws s3api put-bucket-versioning --bucket gsw-k8s-3-state-store --versioning-configuration Status=EnabledWe'll go ahead and use the .k8s.local settings mentioned previously to simplify the DNS setup of the cluster. If you'd prefer, you can also use the name and state flags available within kops to avoid using environment variables. Let's prepare the local environment first:
$ export NAME=gswk8s3.k8s.local
$ export KOPS_STATE_STORE=s3://gsw-k8s-3-state-store
$ aws s3api create-bucket --bucket gsw-k8s-3-state-store --region us-east-1
{
  "Location": "/gsw-k8s-3-state-store"
}
$
Let's spin up our cluster in Ohio, and verify that we can see that region first:
$ aws ec2 describe-availability-zones --region us-east-2
{
  "AvailabilityZones": [
  {
  "State": "available",
  "ZoneName": "us-east-2a",
  "Messages": [],
  "RegionName": "us-east-2"
  },
  {
  "State": "available",
  "ZoneName": "us-east-2b",
  "Messages": [],
  "RegionName": "us-east-2"
  },
  {
  "State": "available",
  "ZoneName": "us-east-2c",
  "Messages": [],
  "RegionName": "us-east-2"
  }
  ]
}
Great! Let's make some Kubernetes. We're going to use the most basic kops cluster command available, though there are much more complex examples available in the documentation (https://github.com/kubernetes/kops/blob/master/docs/high_availability.md):
kops create cluster --zones us-east-2a ${NAME}With kops and generally with Kubernetes, everything is going to be created within Auto Scaling groups (ASGs).
Note
Read more about AWS autoscaling groups here—they're essential: https://docs.aws.amazon.com/autoscaling/ec2/userguide/AutoScalingGroup.html.
Once you run this command, you'll get a whole lot of configuration output in what we call a dry run format. This is similar to the Terraform idea of a Terraform plan, which lets you see what you're about to build in AWS and lets you edit the output accordingly.
At the end of the output, you'll see the following text, which gives you some basic suggestions on the next steps:
Must specify --yes to apply changes
Cluster configuration has been created.

Suggestions:
* list clusters with: kops get cluster
* edit this cluster with: kops edit cluster gwsk8s3.k8s.local
* edit your node instance group: kops edit ig --name=gwsk8s3.k8s.local nodes
* edit your master instance group: kops edit ig --name=gwsk8s3.k8s.local master-us-east-2a

Finally configure your cluster with: kops update cluster gwsk8s3.k8s.local --yes
Note
If you don't have an SSH keypair in your ~/.ssh directory, you'll need to create one. This article will lead you through the steps: https://help.github.com/articles/generating-a-new-ssh-key-and-adding-it-to-the-ssh-agent/.
Once you've confirmed that you like the look of the output, you can create the cluster:
kops update cluster gwsk8s3.k8s.local --yesThis will give you a lot of output about cluster creation that you can follow along with:
I0320 21:37:34.761784 29197 apply_cluster.go:450] Gossip DNS: skipping DNS validation
I0320 21:37:35.172971 29197 executor.go:91] Tasks: 0 done / 77 total; 30 can run
I0320 21:37:36.045260 29197 vfs_castore.go:435] Issuing new certificate: "apiserver-aggregator-ca"
I0320 21:37:36.070047 29197 vfs_castore.go:435] Issuing new certificate: "ca"
I0320 21:37:36.727579 29197 executor.go:91] Tasks: 30 done / 77 total; 24 can run
I0320 21:37:37.740018 29197 vfs_castore.go:435] Issuing new certificate: "apiserver-proxy-client"
I0320 21:37:37.758789 29197 vfs_castore.go:435] Issuing new certificate: "kubecfg"
I0320 21:37:37.830861 29197 vfs_castore.go:435] Issuing new certificate: "kube-controller-manager"
I0320 21:37:37.928930 29197 vfs_castore.go:435] Issuing new certificate: "kubelet"
I0320 21:37:37.940619 29197 vfs_castore.go:435] Issuing new certificate: "kops"
I0320 21:37:38.095516 29197 vfs_castore.go:435] Issuing new certificate: "kubelet-api"
I0320 21:37:38.124966 29197 vfs_castore.go:435] Issuing new certificate: "kube-proxy"
I0320 21:37:38.274664 29197 vfs_castore.go:435] Issuing new certificate: "kube-scheduler"
I0320 21:37:38.344367 29197 vfs_castore.go:435] Issuing new certificate: "apiserver-aggregator"
I0320 21:37:38.784822 29197 executor.go:91] Tasks: 54 done / 77 total; 19 can run
I0320 21:37:40.663441 29197 launchconfiguration.go:333] waiting for IAM instance profile "nodes.gswk8s3.k8s.local" to be ready
I0320 21:37:40.889286 29197 launchconfiguration.go:333] waiting for IAM instance profile "masters.gswk8s3.k8s.local" to be ready
I0320 21:37:51.302353 29197 executor.go:91] Tasks: 73 done / 77 total; 3 can run
I0320 21:37:52.464204 29197 vfs_castore.go:435] Issuing new certificate: "master"
I0320 21:37:52.644756 29197 executor.go:91] Tasks: 76 done / 77 total; 1 can run
I0320 21:37:52.916042 29197 executor.go:91] Tasks: 77 done / 77 total; 0 can run
I0320 21:37:53.360796 29197 update_cluster.go:248] Exporting kubecfg for cluster
kops has set your kubectl context to gswk8s3.k8s.local
As with GCE, the setup activity will take a few minutes. It will stage files in S3 and create the appropriate instances, Virtual Private Cloud (VPC), security groups, and so on in our AWS account. Then, the Kubernetes cluster will be set up and started. Once everything is finished and started, we should see some options on what comes next:
Cluster is starting. It should be ready in a few minutes.

Suggestions:
 * validate cluster: kops validate cluster
 * list nodes: kubectl get nodes --show-labels
 * ssh to the master: ssh -i ~/.ssh/id_rsa admin@api.gswk8s3.k8s.local
The admin user is specific to Debian. If not using Debian please use the appropriate user based on your OS.
 * read about installing addons: https://github.com/kubernetes/kops/blob/master/docs/addons.md
You'll be able to see instances and security groups, and a VPC will be created for your cluster. The kubectl context will also be pointed at your new AWS cluster so that you can interact with it:

Once again, we will SSH into master. This time, we can use the native SSH client and the admin user as the AMI for Kubernetes in kops is Debian. We'll find the key files in /home/<username>/.ssh:
$ ssh -v -i /home/<username>/.ssh/<your_id_rsa_file> admin@<Your master IP>If you have trouble with your SSH key, you can set it manually on the cluster by creating a secret, adding it to the cluster, and checking if the cluster requires a rolling update:
$ kops create secret --name gswk8s3.k8s.local sshpublickey admin -i ~/.ssh/id_rsa.pub
$ kops update cluster --yes
Using cluster from kubectl context: gswk8s3.k8s.local
I0320 22:03:42.823049 31465 apply_cluster.go:450] Gossip DNS: skipping DNS validation
I0320 22:03:43.220675 31465 executor.go:91] Tasks: 0 done / 77 total; 30 can run
I0320 22:03:43.919989 31465 executor.go:91] Tasks: 30 done / 77 total; 24 can run
I0320 22:03:44.343478 31465 executor.go:91] Tasks: 54 done / 77 total; 19 can run
I0320 22:03:44.905293 31465 executor.go:91] Tasks: 73 done / 77 total; 3 can run
I0320 22:03:45.385288 31465 executor.go:91] Tasks: 76 done / 77 total; 1 can run
I0320 22:03:45.463711 31465 executor.go:91] Tasks: 77 done / 77 total; 0 can run
I0320 22:03:45.675720 31465 update_cluster.go:248] Exporting kubecfg for cluster
kops has set your kubectl context to gswk8s3.k8s.local

Cluster changes have been applied to the cloud.

Changes may require instances to restart: kops rolling-update cluster

$ kops rolling-update cluster --name gswk8s3.k8s.local
NAME STATUS NEEDUPDATE READY MIN MAX NODES
master-us-east-2a Ready 0 1 1 1 1
nodes Ready 0 2 2 2 2

No rolling-update required.
$
Once you've gotten into the cluster master, we can look at the containers. We'll use sudo docker ps --format 'table {{.Image}}t{{.Status}}' to explore the running containers. We should see the following:
admin@ip-172-20-47-159:~$ sudo docker container ls --format 'table {{.Image}}\t{{.Status}}'
IMAGE STATUS
kope/dns-controller@sha256:97f80ad43ff833b254907a0341c7fe34748e007515004cf0da09727c5442f53b Up 29 minutes
gcr.io/google_containers/pause-amd64:3.0 Up 29 minutes
gcr.io/google_containers/kube-apiserver@sha256:71273b57d811654620dc7a0d22fd893d9852b6637616f8e7e3f4507c60ea7357 Up 30 minutes
gcr.io/google_containers/etcd@sha256:19544a655157fb089b62d4dac02bbd095f82ca245dd5e31dd1684d175b109947 Up 30 minutes
gcr.io/google_containers/kube-proxy@sha256:cc94b481f168bf96bd21cb576cfaa06c55807fcba8a6620b51850e1e30febeb4 Up 30 minutes
gcr.io/google_containers/kube-controller-manager@sha256:5ca59252abaf231681f96d07c939e57a05799d1cf876447fe6c2e1469d582bde Up 30 minutes
gcr.io/google_containers/etcd@sha256:19544a655157fb089b62d4dac02bbd095f82ca245dd5e31dd1684d175b109947 Up 30 minutes
gcr.io/google_containers/kube-scheduler@sha256:46d215410a407b9b5a3500bf8b421778790f5123ff2f4364f99b352a2ba62940 Up 30 minutes
gcr.io/google_containers/pause-amd64:3.0 Up 30 minutes
gcr.io/google_containers/pause-amd64:3.0 Up 30 minutes
gcr.io/google_containers/pause-amd64:3.0 Up 30 minutes
gcr.io/google_containers/pause-amd64:3.0 Up 30 minutes
gcr.io/google_containers/pause-amd64:3.0 Up 30 minutes
gcr.io/google_containers/pause-amd64:3.0 Up 30 minutes
protokube:1.8.1
We can see some of the same containers as our GCE cluster had. However, there are several missing. We can see the core Kubernetes components, but the fluentd-gcp service is missing, as well as some of the newer utilities such as node-problem-detector, rescheduler, glbc, kube-addon-manager, and etcd-empty-dir-cleanup. This reflects some of the subtle differences in the kube-up script between various public cloud providers. This is ultimately decided by the efforts of the large Kubernetes open-source community, but GCP often has many of the latest features first.
You also have a command that allows you to check on the state of the cluster in kops validate cluster, which allows you to make sure that the cluster is working as expected. There's also a lot of handy modes that kops provides that allow you to do various things with the output, provisioners, and configuration of the cluster.
There are various other modes to take into consideration, including the following:
- Build a terraform model:
--target=terraform. The terraform model will be built inout/terraform. - Build a cloudformation model:
--target=cloudformation. The Cloudformation JSON file will be built inout/cloudformation. - Specify the K8s build to run:
--kubernetes-version=1.2.2. - Run nodes in multiple zones:
--zones=us-east-1b,us-east-1c,us-east-1d. - Run with a HA master:
--master-zones=us-east-1b,us-east-1c,us-east-1d. - Specify the number of nodes:
--node-count=4. - Specify the node size:
--node-size=m4.large. - Specify the master size:
--master-size=m4.large. - Override the default DNS zone:
--dns-zone=<my.hosted.zone>.
Note
The full list of CLI documentation can be found here: https://github.com/kubernetes/kops/tree/master/docs/cli.
Another tool for diagnosing the cluster status is the componentstatuses command, which will inform you of state of the major Kubernetes moving pieces:
$ kubectl get componentstatuses
NAME STATUS MESSAGE ERROR
scheduler Healthy ok
controller-manager Healthy ok
etcd-0 Healthy {"health": "true"}
You just had a little taste of running the cluster on AWS. For the remainder of this book, I will be basing my examples on a GCE cluster. For the best experience following along, you can get back to a GCE cluster easily.
Simply tear down the AWS cluster, as follows:
$ kops delete cluster --name ${NAME} --yesIf you omit the --yes flag, you'll get a similar dry run output that you can confirm. Then, create a GCE cluster again using the following, and in doing so making sure that you're back in the directory where you installed the Kubernetes code:
$ cd ~/<kubernetes_install_dir>
$ kube-up.sh
If you'd like to learn more about other tools for cluster automation, we recommend that you visit the kube-deploy repository, which has references to community maintained Kubernetes cluster deployment tools.
Note
Visit https://github.com/kubernetes/kube-deploy to learn more.
The kube-up.sh script and kops are pretty handy ways to get started using Kubernetes on your platform of choice. However, they're not without flaws and can sometimes run aground when conditions are not just so.
Luckily, since K8's inception, a number of alternative methods for creating clusters have emerged. We'd recommend checking out Minikube in particular, as it's an extremely simple and local development environment that you can use to test out your Kubernetes configuration.
This project can be found here: https://github.com/kubernetes/minikube.
Note
It's important to mention that you're going to need a hypervisor on your machine to run Minikube. For Linux, you can use kvm/kvm2, or VirtualBox, and on macOS you can run native xhyve or VirtualBox. For Windows, Hyper-V is the default hypervisor.
The main limitation for this project is that it only runs a single node, which limits our exploration of certain advanced topics that require multiple machines. Minikube is a great resource for simple or local development however, and can be installed very simply on your Linux VM with the following:
$ curl -Lo minikube https://storage.googleapis.com/minikube/releases/latest/minikube-linux-amd64 && chmod +x minikube && sudo mv minikube /usr/local/bin/Or install it on macOS with the following:
$ brew cask install minikubeWe'll cover how to get started with Minikube with the following commands:
$ minikube start
Starting local Kubernetes v1.7.5 cluster...
Starting VM...
SSH-ing files into VM...
Setting up certs...
Starting cluster components...
Connecting to cluster...
Setting up kubeconfig...
Kubectl is now configured to use the cluster.
You can create a sample deployment quite simply:
$ kubectl run hello-minikube --image=k8s.gcr.io/echoserver:1.4 --port=8080
deployment "hello-minikube" created
$ kubectl expose deployment hello-minikube --type=NodePort
service "hello-minikube" exposed
Once you have your cluster and service up and running, you can interact with it simply by using the kubectl tool and the context command. You can get to the Minikube dashboard with minikube dashboard.
Note
Minikube is powered by localkube (https://github.com/kubernetes/minikube/tree/master/pkg/localkube) and libmachine (https://github.com/docker/machine/tree/master/libmachine). Check them out!
Additionally, we've already referenced a number of managed services, including GKE, EKS, and Microsoft Azure Container Service (ACS), which provide an automated installation and some managed cluster operations. We will look at a demos of these in Chapter 14, Hardening Kubernetes.
Finally, there is the option to start from scratch. Luckily, starting in 1.4, the Kubernetes team has put a major focus on simplifying the cluster setup process. To that end, they have introduced kubeadm for Ubuntu 16.04, CentOS 7, and HypriotOS v1.0.1+.
Let's take a quick look at spinning up a cluster on AWS from scratch using the kubeadm tool.
We will need to provision our cluster master and nodes beforehand. For the moment, we are limited to the operating systems and version listed earlier. Additionally, it is recommended that you have at least 1 GB of RAM. All the nodes must have network connectivity to one another.
For this walkthrough, we will need one t2.medium (master node) and three t2.mirco (nodes) sized instances on AWS. These instance have burstable CPU and come with the minimum 1 GB of RAM that's required. We will need to create one master and three worker nodes.
We will also need to create some security groups for the cluster. The following ports are needed for the master:
Type | Protocol | Port range | Source |
All traffic | All | All | {This SG ID (Master SG)} |
All traffic | All | All | {Node SG ID} |
SSH | TCP |
| {Your Local Machine's IP} |
HTTPS | TCP |
| {Range allowed to access K8s API and UI} |
The following table shows the port's node security groups:
Type | Protocol | Port range | Source |
All traffic | All | All | {Master SG ID} |
All traffic | All | All | {This SG ID (Node SG)} |
SSH | TCP |
| {Your Local Machine's IP} |
Once you have these SGs, go ahead and spin up four instances (one t2.medium and three t2.mircos) using Ubuntu 16.04. If you are new to AWS, refer to the documentation on spinning up EC2 instances at the following URL: http://docs.aws.amazon.com/AWSEC2/latest/UserGuide/LaunchingAndUsingInstances.html.
Be sure to identify the t2.medium instance as the master and associate the master security group. Name the other three as nodes and associate the node security group with those.
Note
These steps are adapted from the walk-through in the manual. For more information or to work with an alternative to Ubuntu, refer to https://kubernetes.io/docs/getting-started-guides/kubeadm/.
Next, we will need to SSH into all four of the instances and install the Kubernetes components.
As the root user, perform the following steps on all four instances:
- Update the packages and install the
apt-transport-httpspackage so that we can download from sources that use HTTPS:
   $ apt-get update
   $ apt-get install -y apt-transport-https
- Install the Google Cloud public key:
   $ curl -s https://packages.cloud.google.com/apt/doc/apt-key.gpg |
apt-key add -- Next, let's set up the repository:
   cat <<EOF >/etc/apt/sources.list.d/kubernetes.list
   deb http://apt.kubernetes.io/ kubernetes-xenial main
   EOF
   apt-get update
   apt-get install -y kubelet kubeadm kubectl docker.io kubernetes-cni
You'll need to make sure that the cgroup driver used by the kubelet on the master node is configured correctly to work with Docker. Make sure you're on the master node, then run the following:
docker info | grep -i cgroup
cat /etc/systemd/system/kubelet.service.d/10-kubeadm.conf
If these items don't match, you're going to need to change the kubelet configuration to match the Docker driver. Running sed -i "s/cgroup-driver=systemd/cgroup-driver=cgroupfs/g" /etc/systemd/system/kubelet.service.d/10-kubeadm.conf should fix the settings, or you can manually open the systemd file and add the correct flag to the appropriate environment. After that's complete, restart the service:
$ systemctl daemon-reload
$ systemctl restart kubelet
On the instance you have previously chosen as master, we will run master initialization. Again, as the root, run the following command, and you should see the following output:
$ kubeadm init
[init] using Kubernetes version: v1.11.3
[preflight] running pre-flight checks
I1015 02:49:42.378355 5250 kernel_validator.go:81] Validating kernel version
I1015 02:49:42.378609 5250 kernel_validator.go:96] Validating kernel config
[preflight/images] Pulling images required for setting up a Kubernetes cluster
[preflight/images] This might take a minute or two, depending on the speed of your internet connection
[preflight/images] You can also perform this action in beforehand using 'kubeadm config images pull'
[kubelet] Writing kubelet environment file with flags to file "/var/lib/kubelet/kubeadm-flags.env"
[kubelet] Writing kubelet configuration to file "/var/lib/kubelet/config.yaml"
[preflight] Activating the kubelet service
[certificates] Generated ca certificate and key.
[certificates] Generated apiserver certificate and key.
[certificates] apiserver serving cert is signed for DNS names [master kubernetes kubernetes.default kubernetes.default.svc kubernetes.default.svc.cluster.local] and IPs [10.96.0.1 172.17.0.71]
[certificates] Generated apiserver-kubelet-client certificate and key.
[certificates] Generated sa key and public key.
[certificates] Generated front-proxy-ca certificate and key.
[certificates] Generated front-proxy-client certificate and key.
[certificates] Generated etcd/ca certificate and key.
[certificates] Generated etcd/server certificate and key.
[certificates] etcd/server serving cert is signed for DNS names [master localhost] and IPs [127.0.0.1 ::1]
[certificates] Generated etcd/peer certificate and key.
[certificates] etcd/peer serving cert is signed for DNS names [master localhost] and IPs [172.17.0.71 127.0.0.1 ::1]
[certificates] Generated etcd/healthcheck-client certificate and key.
[certificates] Generated apiserver-etcd-client certificate and key.
[certificates] valid certificates and keys now exist in "/etc/kubernetes/pki"
[kubeconfig] Wrote KubeConfig file to disk: "/etc/kubernetes/admin.conf"
[kubeconfig] Wrote KubeConfig file to disk: "/etc/kubernetes/kubelet.conf"
[kubeconfig] Wrote KubeConfig file to disk: "/etc/kubernetes/controller-manager.conf"
[kubeconfig] Wrote KubeConfig file to disk: "/etc/kubernetes/scheduler.conf"
[controlplane] wrote Static Pod manifest for component kube-apiserver to "/etc/kubernetes/manifests/kube-apiserver.yaml"
[controlplane] wrote Static Pod manifest for component kube-controller-manager to "/etc/kubernetes/manifests/kube-controller-manager.yaml"
[controlplane] wrote Static Pod manifest for component kube-scheduler to "/etc/kubernetes/manifests/kube-scheduler.yaml"
[etcd] Wrote Static Pod manifest for a local etcd instance to "/etc/kubernetes/manifests/etcd.yaml"
[init] waiting for the kubelet to boot up the control plane as Static Pods from directory "/etc/kubernetes/manifests"
[init] this might take a minute or longer if the control plane images have to be pulled
[apiclient] All control plane components are healthy after 43.001889 seconds
[uploadconfig] storing the configuration used in ConfigMap "kubeadm-config" in the "kube-system" Namespace
[kubelet] Creating a ConfigMap "kubelet-config-1.11" in namespace kube-system with the configuration for the kubelets in the cluster
[markmaster] Marking the node master as master by adding the label "node-role.kubernetes.io/master=''"
[markmaster] Marking the node master as master by adding the taints [node-role.kubernetes.io/master:NoSchedule]
[patchnode] Uploading the CRI Socket information "/var/run/dockershim.sock" to the Node API object "master" as an annotation
[bootstraptoken] using token: o760dk.q4l5au0jyx4vg6hr
[bootstraptoken] configured RBAC rules to allow Node Bootstrap tokens to post CSRs in order for nodes to get long term certificate credentials
[bootstraptoken] configured RBAC rules to allow the csrapprover controller automatically approve CSRs from a Node Bootstrap Token
[bootstraptoken] configured RBAC rules to allow certificate rotation for all node client certificates in the cluster
[bootstraptoken] creating the "cluster-info" ConfigMap in the "kube-public" namespace
[addons] Applied essential addon: CoreDNS
[addons] Applied essential addon: kube-proxy

Your Kubernetes master has initialized successfully!

To start using your cluster, you need to run the following as a regular user:

  mkdir -p $HOME/.kube
  sudo cp -i /etc/kubernetes/admin.conf $HOME/.kube/config
  sudo chown $(id -u):$(id -g) $HOME/.kube/config

You should now deploy a pod network to the cluster.
Run "kubectl apply -f [podnetwork].yaml" with one of the options listed at:
  https://kubernetes.io/docs/concepts/cluster-administration/addons/

You can now join any number of machines by running the following on each node
as root:

  kubeadm join 172.17.0.71:6443 --token o760dk.q4l5au0jyx4vg6hr --discovery-token-ca-cert-hash sha256:453e2964eb9cc0cecfdb167194f60c6f7bd8894dc3913e0034bf0b33af4f40f5
To start using your cluster, you need to run as a regular user:
mkdir -p $HOME/.kube
 sudo cp -i /etc/kubernetes/admin.conf $HOME/.kube/config
 sudo chown $(id -u):$(id -g) $HOME/.kube/config
You should now deploy a pod network to the cluster. Run kubectl apply -f [podnetwork].yaml with one of the options listed at https://kubernetes.io/docs/concepts/cluster-administration/addons/.
You can now join any number of machines by running the following on each node as root:
kubeadm join --token <token> <master-ip>:<master-port> --discovery-token-ca-cert-hash sha256:<hash>Note that initialization can only be run once, so if you run into problems, you'll need to use kubeadm reset.
After a successful initialization, you will get a join command that can be used by the nodes. Copy this down for the join process later on. It should look similar to this:
$ kubeadm join --token=<some token> <master ip address>The token is used to authenticate cluster nodes, so make sure to store it somewhere securely for future use.
Our cluster will need a networking layer for the pods to communicate on. Note that kubeadm requires a CNI compatible network fabric. The list of plugins currently available can be found here: http://kubernetes.io/docs/admin/addons/.
For our example, we will use calico. We will need to create the calico components on our cluster using the following yaml. For convenience, you can download it here: http://docs.projectcalico.org/v1.6/getting-started/kubernetes/installation/hosted/kubeadm/calico.yaml.
Once you have this file on your master, create the components with the following command:
$ kubectl apply -f calico.yamlGive this a minute to run setup and then list the kube-system nodes in order to check this:
$ kubectl get pods --namespace=kube-systemYou should get a listing similar to the following one with three new calico pods and one completed job that is not shown:

Calico setup
Now, we need to run the join command we copied earlier, on each of our node instances:
$ kubeadm join --token=<some token> <master ip address>Once you've finished that, you should be able to see all nodes from the master by running the following command:
$ kubectl get nodesIf all went well, this will show three nodes and one master, as shown here:

We took a very brief look at how containers work and how they lend themselves to the new architecture patterns in microservices. You should now have a better understanding of how these two forces will require a variety of operations and management tasks, and how Kubernetes offers strong features to address these challenges. We created two different clusters on both GCE and AWS, and explored the startup script as well as some of the built-in features of Kubernetes. Finally, we looked at the alternatives to the kube-up script in kops, and tried our hand at manual cluster configuration with the kubeadm tool on AWS with Ubuntu 16.04.
In the next chapter, we will explore the core concept and abstractions K8s provides to manage containers and full application stacks. We will also look at basic scheduling, service discovery, and health checking.
- Name three places where you can easily deploy a Kubernetes cluster.
- What are other types of pre-existing virtualization technologies that predate containers?
- Name as many cgroup controls as you can!
- What are some of the reasons why enabling CI/CD with containers is so important to organizations?
- What prerequisites are required to get a Kubernetes cluster up and running on AWS or GCE?
- Name four services running on the Kubernetes master nodes. Hint: these are containers.
- What are some alternatives to the
kube-up.shscript? - What's the tool used for building a Kubernetes cluster from scratch?
Want more information on DevOps practices on Kubernetes? Check out DevOps with Kubernetes: https://www.packtpub.com/virtualization-and-cloud/devops-kubernetes.
You can also read about different applications and automation approaches with the Kubernetes Cookbook: https://www.packtpub.com/virtualization-and-cloud/kubernetes-cookbook.