


Office Live Small Business is quite a feature-rich product. Website-building tools make up only a small part of its overall feature set. Not only that, those tools are scattered over several web pages. Therefore, it's a good idea to get oriented so that you can find your bearings quickly once we start building your website in earnest.
In this chapter, you will:
Learn how to sign in and sign out of your Office Live Small Business account
Preview a four-page starter website that Office Live Small Business automatically creates for you
Explore the site-building tools at your disposal and learn to navigate between them
Have you already signed up for Office Live Small Business? If not, now's the time.
You don't need to have a domain name to sign up and start creating your website. In fact, Office Live Small Business's sign-up process doesn't even ask you for one. It assigns a third-level domain alias to your website instead. After you build your site, and if you like it, you can register a domain name of your choice with a registrar of your choice and associate it with your website.
For example, when I opened an Office Live Small Business account for this book's companion website, I hadn't decided on a domain name. I just opened a new Office Live Small Business account and was assigned officeliveguide.web.officelive.com as the third-level domain name for my website. After I built the website, I registered the domain name officeliveguide.com and associated it with my website.
I recommend that you do the same. That way, you won't have to go through the hassle of changing registrars if you don't like your Office Live Small Business website.
Instructions for registering a new domain name for your website as well as instructions for pointing an existing domain name at your website are on the companion website at www.officeliveguide.com/domain.aspx.
1. Browse to www.officelive.com. The Microsoft Office Live web page appears:

2. Click the Sign in button in the top right-hand corner. You'll arrive at Office Live Small Business's Sign In page, as shown in the following screenshot:

3. If you prefer a secured sign-in, as I do, click the Use enhanced security link under the Sign in button and Office Live Small Business will display a secured sign-in page. The secured page looks just like the unsecured page. But if you look carefully, the link under the Sign in button now reads Use standard security.

When you use the secured sign-in, your Windows Live ID and password are encrypted when they're sent over the wire for authenti cati on. This prevents the bad guys from stealing them. That's why online stores, bank websites, or any other websites that require you to provide sensiti ve informati on use secured channels. Unlike your banking session, however, Offi ce Live only uses the secured connection for signing you in. Once you're in, it reverts to the standard connection.
4. Enter your Windows Live ID and password.
5. If you want Office Live Small Business to remember your Windows Live ID, select the Remember me on this computer checkbox.
6. If you want Office Live Small Business to remember your password as well, select the Remember my password checkbox below it.
Note
Remember me on this computer and Remember my password checkboxes make signing in easier in the future. But once you select them both, anybody who has access to your computer account can access your Office Live Small Business account as well. In fact, that person will have access to all of your Microsoft accounts; such as Windows Live, Windows Live Spaces, and Office Live Mail, which are secured by your Windows Live ID. Personally, I prefer to enter my credentials every time I visit a website.
7. Click the Sign in button. You'll arrive at the Microsoft Office Live Home page:

You signed in to your Office Live Small Business account and arrived at the Microsoft Office Live Home page. That's too long a name to repeat throughout the remainder of this book. So, I'll simply call it the Home page. But don't confuse it with the home page of the website you'll soon build. We'll call that page the Default page for reasons that I'll explain in Chapter 5.
The Home page is your dashboard for managing your Office Live Small Business account. It sports one-click access to several common tasks that you're likely to perform after signing-in to your account.
But the page is a bit confusing for three reasons:
It has too many links.
Many of the links are redundant. For example, there are three links on the page that lead to the website section.
Although the page is clearly for the benefit of first-time visitors, you see it every time you sign in to your Office Live Small Business account.
But with time, you’ll learn to use this page to work more efficiently. The links we’ll focus on for now are in the site navigation bar at the top centre of the page: Home, Workspaces, Web Site, E-mail, Support, and More. You'll see these links on almost every page. They represent Office Live Small Business's top-level functions. Each link leads you to a section of the site—a sub-site of sorts, which focuses on that particular function.
Although we'll spend most of our time in the website section, which deals with building and maintaining your website, we'll briefly touch upon other sections, such as the E-mail section and a few sub-sections under More, when necessary.
1. Click the Sign Out link in the top right-hand corner of the Home page. You'll find this link on almost all pages under your account. Office Live Small Business will inform you that you've signed out.
2. Close your browser.
You signed out of your Office Live Small Business account. You could simply have closed the browser window, but that's not really prudent.
Whenever you sign in, the Windows Live ID authentication system stores some information in browser cookies so that you don't have to sign in repeatedly. Closing the browser window doesn't get rid of the cookies. So, anyone who uses your computer after you, has full access to all your accounts attached to your Windows Live ID. When you sign out explicitly, as you just did, the cookies are deleted and others can't access your account accidentally.
Another benefit of logging off, and thereby deleting the cookies, is that your computer doesn't "remember" anything from your previous session.

The Page Manager page you're looking at, is your website's management console. It's your dashboard for building and managing your website. As it's the first page you see when you come to the Web Site section, it's the logical place to initiate actions. You'll spend a great deal of time on it. Therefore, let's explore it in detail.
When the page first loads, the element that really catches your attention is the upside-down tab titled Get started with your own Web site. It's also the least relevant element. You'll find this tab on several Office Live Small Business pages. It mostly sports links to help topics. You can collapse it and maximize your work area by clicking the Hide Getting Started link. Go ahead, try it.
"Well, that's really nice", you're probably thinking, "but where do I make a web page"? That's what the little toolbar in the middle of the page and the links underneath it are for. We'll get to them in just a few minutes, trust me! But first, let's take a quick look at a little surprise that Office Live Small Business has in store for you: a starter website.

Office Live Small Business automatically creates a skeleton site with four sample pages when you sign up for the service. You just previewed that site.
We'll use this site to dig deeper into Office Live Small Business's features and tools. Then we'll use some of the pages to practice the common tasks that you'll perform while building and maintaining your website.
Notice that you don't see any advertisements when you view your website. Office Live Small Business is an ad-supported service but it displays advertisements only on your account management console. Therefore, you only see them when you're building your site. Visitors to your finished website will not see them. This feature alone sets Microsoft Office Live Small Business apart from other site-building tools. A free website is exactly that—no strings attached.
Let's now get back to exploring the Page Manager.

It's made up of the following components, as you can see in the partial screenshot above:
The table of pages at the bottom displays a row for every page on your website, along with a few options to manipulate it. It also displays the size of the page and the date when you changed it last.
The Page Manager toolbar that spans the page, just above the page list, houses links for performing common site-maintenance tasks. In fact, you just clicked on the View Site link to preview the starter website.
The Site actions tile, in the top right-hand corner, which is a pull-down menu with options for performing site-maintenance tasks that you don't need to perform all that often.
1. Click the Properties link for the About Us page; it's the third link in the options column of the page list. The Choose page properties window opens:

2. Take a minute to explore the two tabs and read the information on them.
You just explored the properties of a web page.
One of the most important properties of a page is its title. It appears in the browser's title bar when the page opens in a visitor's browser. When a visitor bookmarks the page or creates a shortcut for it on his desktop, its name is set to the title of the web page. That way, people can find a given page among their bookmarks or shortcuts quite easily.
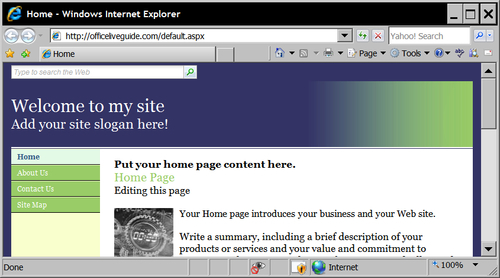
Look at the following web page, for example:

The title of the page above is Home. That's not very helpful. If you change the title to something like The Office Live Guide—Home Page, people can find the page easily among their bookmarks or shortcuts.
Search engines attach a good deal of importance to a page's title. It appears as the primary link for that page in search results. More significantly, the title plays a big role in how search engines determine how to index the page. If the title is simply Home, it could end up in some category related to home ownership, homes for the elderly, or even funeral homes. But The Office Live Guide—Home Page tells the spiders that the page has something to do with Office Live and they can index it accordingly.
Note
What's a spider?
A spider is a little program that a search engine uses to traverse websites and index their content. Each search engine has its own spider. It follows links from page to page as it finds them. This process of following links is called crawling.
Spiders are also called crawlers or bots. The celebrity among bots, of course, is Googlebot—Google's spider.
Of course, the title is not the sole criterion spiders use to index your pages but it plays a significant enough role in their decisions for you to take the trouble of giving meaningful titles to your web pages.
The information on the Search Engine Optimization tab describes meta tags which help search engines index your web site. We’ll explore search engines and meta tags in Chapter 10. In the mean time, can you think of three words or phrases that best describe your small business? Write them down in the space below.
1. __________________________________
2. __________________________________
3. __________________________________
If nothing comes to your mind right away, that’s okay. But put the task on your to-do list. Remember, you’re going to need them in Chapter 10.
At this stage, you don't have to understand what each piece of information or each setting means. I just want you to get accustomed to the lingo of web pages and browse around, so that you get an overview of a web page's properties from 30,000 feet. We'll get back to the details as we progress with building your website.
Try clicking the Edit navigation position button. A new Navigation window opens. Read the instructions in the window and then close it.
When you're done exploring the page properties, click Cancel to return to the Page Manager.
Some design elements of a website apply to the site as a whole; others apply only to a specific web page. For example, the title of your website, usually the name of your business, appears on every web page of your site. The text on the Home page, on the other hand, is specific only to that page; it's not relevant anywhere else. Office Live Small Business has two distinct tools to manipulate each category of settings. The tool for manipulating site-wide settings is called the Site Designer and the tool for manipulating settings on individual pages is called the Page Editor.
1. Pull down the Design Site menu from the Page Manager toolbar and select the first option, Design site, as shown in the following screenshot:

2. A new window opens, displaying the Microsoft Office Live Small Business Web Design Tool web page. It has two tabs: Site Designer and Page Editor. The Site Designer tab is active when the window opens, as shown in the following screenshot:

3. You've seen this page before; it's the homepage of your starter website. But notice that this time around, there's Microsoft Office 2007-style ribbon at the top. The buttons on the ribbon that have small black triangles at the bottom are pull-down selection menus. The buttons that don't have the triangles open property windows like the one you saw while viewing page properties earlier in this chapter. Let's try changing a setting to get an idea of how the Site Designer settings work.
4. Click on the Header button on the ribbon. The Customize Header window, as shown in the next screenshot, opens.

5. Change the text Welcome in the gray box in the Site Title section to Welcome to my site. Click OK. The window closes.
6. Notice that the Site Title on the web page displayed in Site Designer is now Welcome to my site. Click the View link just above the Site Designer tab. A dialog box opens to ask you whether you want to save your changes. Click OK.
7. The dialog box goes away and a new browser window opens with a preview of your starter website. Notice that the title of the website is now Welcome to my site:

8. Click on the navigation links on the left-hand side to view other pages on the website. You'll see that the new title appears on all the pages.
9. Close the preview window and return to Site Designer.
10. Close the Site Designer window and return to Page Manager.
Go back to Site Designer and try clicking on the various buttons on its ribbon. Every time you click a button, a pull-down menu or a small window will appear. The menus and window will give you a sense of the kind of site-wide settings available in Office Live Small Business.
Don't worry if you don't understand what they are for. Right now, your goal is to get an overview of the tools at your disposal from 30,000 feet.
When you're done, return to the Page Manager.
1. Pull down the Design Site menu from the Page Manager toolbar and select the second option, Edit pages.

2. The Microsoft Office Live Small Business Web Design Tool opens, once again, in a new window. But this time, the Page Editor tab is the active tab when the window opens, as shown in the following screenshot:
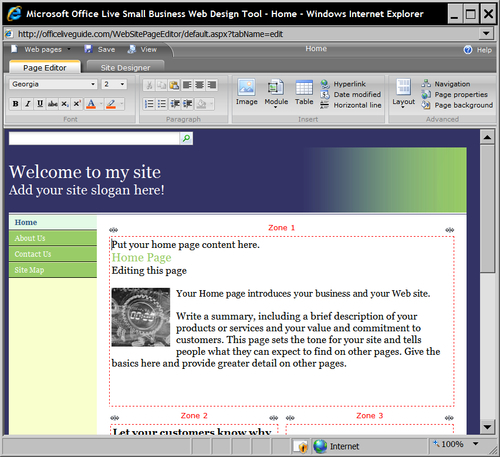
3. The Page Editor, too, has a Microsoft Office 2007-style ribbon. The buttons and links on the ribbon, however, will remind you of a word processor. And for good reason, Page Editor is primarily a tool for editing a web page's content. The content on web pages resides in zones that are marked by red dotted lines around them.
4. Let us try doing something simple in the Page Editor. Select the first line in Zone 1, one that reads Put your home page content here., the same way that you'd select text in a word processor.
5. Click the B button on the ribbon, the first button in the bottom row of the ribbon's Font section, to make the text bold.
6. Click the Save button in the top left-hand corner of the window; it is just above the Page Editor tab.
7. Click the View button next to it to preview the site. Notice that the text now appears in bold typeface.
8. Click on the navigation links on the left-hand side to view other pages on the website. You'll see that the text on other pages hasn't changed. That's because making the text bold is an action specific to the Home page. It has no bearing on the content of the other pages.
9. Close the preview window and return to Page Editor.
10. Close the Site Designer window and return to Page Manager.
The two primary tools for designing your website with Office Live Small Business are Site Designer and Page Editor. You just got a bird's eye view of each. To recap:
1. Site Designer is the tool for setting design options that affect the entire website.
2. Page Editor is the tool for designing and editing content on individual web pages.
Although you're not quite ready to be a professional web designer just yet, you should now have a pretty good idea of what's involved in building a website using Office Live Small Business.
Open up Page Editor and try the options available on its ribbon. That should give you a general idea of the range of page-design options available to you.
Some of them will be Greek to you. Fear not. We'll figure them out as we progress.
When you're done, return to the Page Manager.
1. To open the Home page in Page Editor, you chose the Edit pages option on the Design Site pull-down menu on Page Manager's toolbar. Can you think of another way to do the same thing?
2. Open the Home page in the Page Editor in any way that you want to. Now, how would you bring up the About Us page in the Page Editor without going back to the Page Manager?
In addition to the Page Manager, the Site Designer, and the Page Editor, Office Live Small Business has three additional tools: Image Gallery, Document Gallery, and Template Gallery. You can access them by clicking on the links in the navigation pane on Page Manager's left-hand side, as shown in the following screenshot:
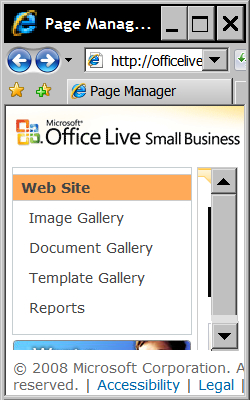
The Image Gallery contains a set of tools for editing and uploading pictures to your website. We'll see the precise mechanics of doing so in Chapter 7. For now, just remember that any picture that appears on your website will reside here.
The Document Gallery contains tools to upload downloadable documents and other special purpose files to your website. Again, we'll see how to do this in Chapter 7. At this point, it's sufficient to remember that downloadable documents such as brochures and price lists belong in the Document Gallery.
The Template Gallery is a tool to manage web page templates. Templates are boilerplate designs for web pages. Office Live Small Business provides a selection of professionally-designed templates right out of the box. But you can also build custom templates of your own design. We'll see how to build them and store them in the Template gallery in Chapter 5.
The fourth link, Reports, leads you to a set of web analytics tools. Web analytics tools analyze the traffic to your website. They help you understand who's visiting your site and why. But they don't play a role in the building of the website, per se.
Go back to the Page Manager and click on each of the links in the left navigation pane, in turn, to briefly visit the sections that they lead to. Notice that the first three sections are empty and have the same links in their left navigation panes as the Page Manager. The Reports section, on the other hand, displays some content and has a different set of links.
To return to the Page Manager from the Image Gallery, for example, you can simply click the Web Site link at the top of the left navigation pane, but to return to Page Manager from Reports, you'll have to click the Web Site link in the site navigation bar.
In this chapter, I gave you a whirlwind tour of Office Live Small Business's site-building tools. Of course, we didn't dig deeply into any of them. But that wasn't the idea anyway. The goal of this chapter was to give you an overall sense of what you're getting into!
Here's a recap of the chapter:
Office Live Small Business has a set of tools for building a website. You can access them by signing in to your Office Live Small Business account.
When you sign up, Office Live Small Business automatically creates a four-page starter website for you.
Page Manager is the dashboard for managing your website.
The primary site-building tools are the Site Designer and the Page Editor.
Site Designer is used for setting site-wide design elements.
Page Editor is used for editing the content of individual web pages.
A set of three ancillary tools: Image Gallery, Document Gallery, and Template Gallery is useful in storing and manipulating pictures, downloadable documents, and page templates, respectively.
That's just about everything you'll need to know to get started. In the next chapter, we'll jump right in and start building your very own website!
