In this chapter, we will cover the following recipes:
Deploying the required service accounts
Creating the distributed key management container in Active Directory
Installing Virtual Machine Manager on a single server
Installing a highly available Virtual Machine Manager server
Microsoft System Center 2012 R2 Virtual Machine Manager (VMM) is a critical component of Hyper-V Network Virtualization. It provides the management infrastructure to control Hyper-V Network Virtualization.
It provides the following features:
Network definitions, both physical and virtual
Control of Hyper-V hosts
Virtual Machine templates
Service templates
VMM is a part of the Microsoft System Center 2012 R2 product. It is primarily composed of seven components, which are listed in the following table:
The following diagram shows the components and where they would be installed:

VMM is capable of managing the alternative hypervisors: XenServer and VMware ESX/vSphere (via a VMware vCenter installation).
For the smallest implementation, it is possible to install all of the components on a single server, including the VirtualManagerDB database. You have the option to make the installation of VMM highly available by using features such as SQL Server Failover Clustering, SQL Server AlwaysOn High Availability Groups, Failover Clustering for VMM Management Servers, Clustered File Servers for the VMM Library, and multiple Windows Deployment Servers.
This recipe will provide you with the steps required to deploy the required service accounts to the correct servers. It will assist you with your evaluation of Virtual Machine Manager before deploying into a production environment. For the purpose of the Service Accounts, please read Appendix, Planning Virtual Machine Manager.
It is assumed you have access to Active Directory to create and populate Security Groups and to create and link Group Policy Objects.
The following diagram shows you the high-level steps involved in this recipe and the tasks required to complete this recipe:

The following screenshot shows how the Active Directory Organization Units (OUs) are structured for this recipe:

The list of accounts that will be used is as follows:
|
Account name |
Use |
Username |
|---|---|---|
|
VMM Service Account |
SVC_VMMSrvc | |
|
VMM Agent Run As Account |
SVC_VMMAgntRA | |
|
VMM SQL Server Account |
SVC_VMMSQLEng | |
|
VMM SQL Server Agent Account |
SVC_VMMSQLAgnt | |
|
VM Domain Join Run As Account |
SVC_VMMJoinDom | |
|
VMM Installation Account |
Install_VMM |
Now perform the following steps:
Create the user accounts for VMM.
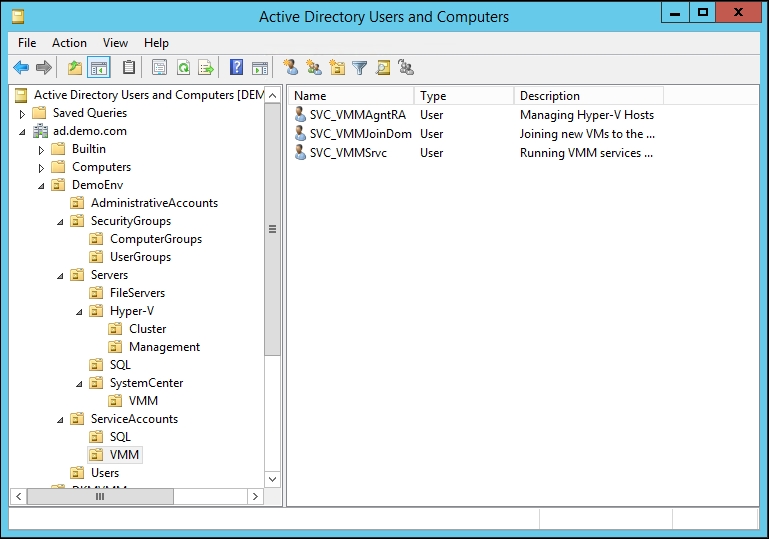
The user accounts for SQL are shown in the following screenshot:

The groups for Hyper-V Servers and VMM Servers are shown in the following screenshot:

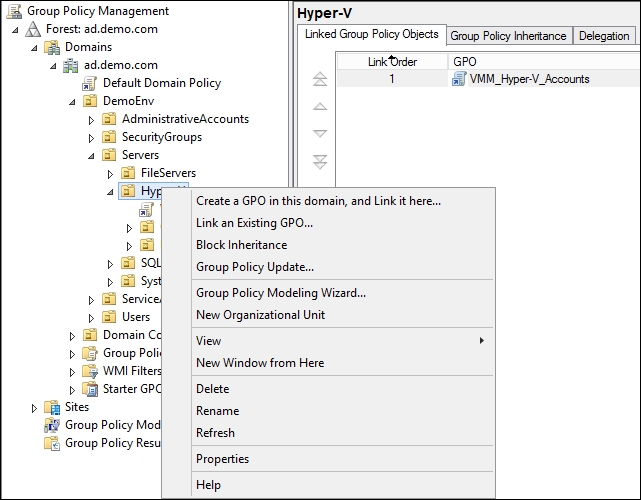
A new Group Policy Object (GPO) needs to be created and linked to the Hyper-V OU.

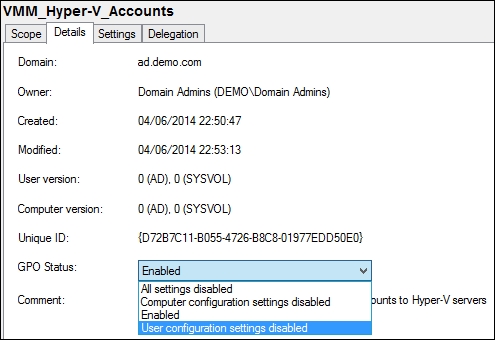
Click on the Details tab and select User configuration settings disabled from the GPO Status dropdown, as shown in the following screenshot:
Right-click on the GPO name under the Hyper-V OU and click on Edit. Navigate to Computer Configuration | Preferences | Control Panel Settings | Local Users and Groups. Right-click and navigate to New | Local Group.
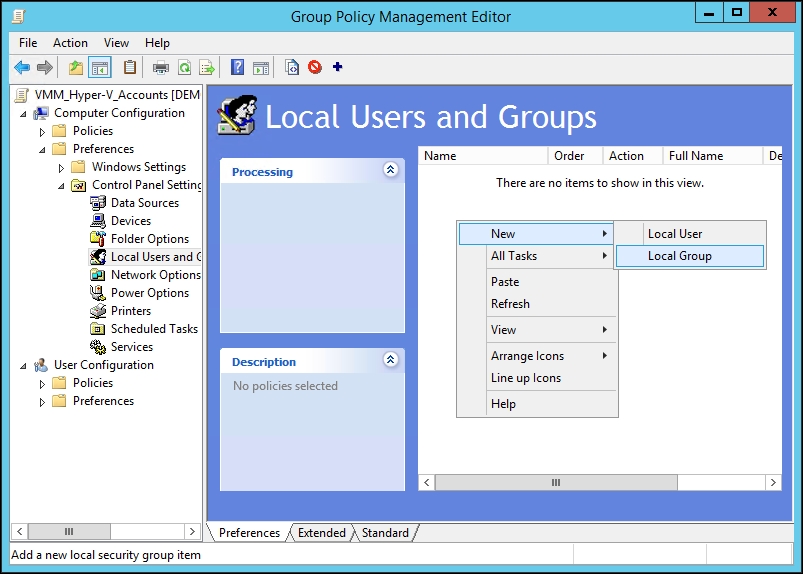
Make sure the Action field is set to Update, Group name is set to Administrators (built-in), and you have added SVC_VMMAgntRA to the Members section.

In the Group Policy Management MMC, right-click on the OU where the GPO has been deployed and click on Group Policy Update. This triggers a remote Group Policy Update on the Hyper-V hosts.
This completes this recipe. The required service accounts with the necessary permissions have been scoped and deployed correctly.
Some of the data stored by VMM needs to be held securely, so it cannot be compromised. For example, when you store user credentials in VMM for Run As accounts, the passwords for these are encrypted. When you install VMM, you are given the choice of where to store the encryption keys, as shown in the following screenshot:

It is required to always store your encryption keys in Active Directory if you are going to deploy a highly available (clustered) installation of VMM.
The account used to install VMM must have full control over the container in Active Directory for the duration of the installation. During the installation, the installer program reconfigures the security of the container to ensure that only the correct security principles have access.
For a small scale installation, a single container in the root of Active Directory could be created to store the encryption keys. For a large-scale implementation where several different installations of VMM may be required due to the number of hosts and/or virtual machines, it is advisable to create a parent container in Active Directory and then have containers within the parent for each installation of VMM.
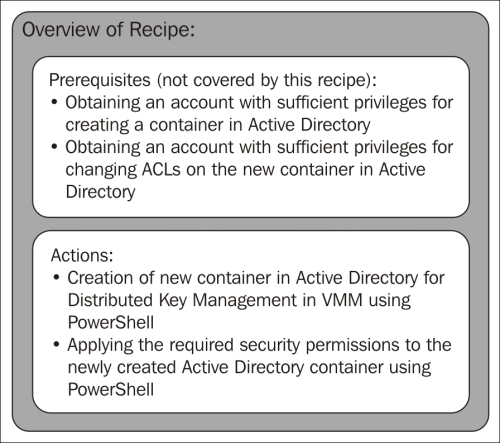
You will need to have sufficient access to Active Directory to create Container objects.
The following diagram shows you the high-level steps involved in this recipe and the tasks required to complete this recipe:
There are two possible methods of creating a container in Active Directory: one is using ADSI Edit and the other is via PowerShell. The method discussed here will be PowerShell-based:
On a Domain Controller, or a machine where the Active Directory PowerShell Module is installed, open an elevated PowerShell console.
The following PowerShell line will create a container called
DKMVMMin the root of Active Directory:New-ADObject –Name DKMVMM –Type container –Path "DC=ad,DC=demo,DC=com"
Once the container has been created, the user who will be installing VMM needs to have full control of the container and that permission must apply to the container and all descendant objects. The following PowerShell will perform this function:
Set-PSDrive AD:

$VMMInstallAccount = Get-ADUser -Identity Install_VMM

$SID = New-Object System.Security.Principal.SecurityIdentifier $VMMInstallAccount.SID

$DKMVMMacl = Get-Acl -Path "CN=DKMVMM,DC=ad,DC=demo,DC=com"

$ObjectGuid = New-Object Guid 00000000-0000-0000-0000-000000000000

$newACL = New-Object System.DirectoryServices.ActiveDirectoryAccessRule $SID,"GenericAll","Allow",$objectguid,"All"

$DKMVMMacl.AddAccessRule($newACL)

Set-Acl -AclObject $DKMVMMacl -Path "CN=DKMVMM,DC=ad,DC=demo,DC=com"
This recipe is complete and the Distributed Key Management container is now ready to be used by DEMO\Install_VMM during installation.
When VMM is installed, it uses the Distributed Key Management container to store its encryption keys and using the privileges granted to it previously, it will lock down the container to ensure that only the account running the VMM Management Service, the VMM Installation Account, and Domain Administrators have access to the container.
This recipe provides the steps required to install all the VMM roles on a single server, including SQL Server. This type of deployment is suitable for the test and development environments. It will enable you to evaluate VMM for Hyper-V Network Virtualization. While supported, it is highly recommended that a multiserver deployment is implemented for production. A multiserver installation can give you a great deal of flexibility and resiliency in a VMM installation.
It is assumed you have reviewed the recipe and have implemented the required elements for installing VMM.
The following diagram shows you the high-level steps involved in this recipe and the tasks required to complete this recipe:

This will result in the following applications and their components being installed on this single server:
SQL Server 2012 SP1 for the VirtualManagerDB database
VMM 2012 R2 Management Server with the VMM Console and VMM Library
To install VMM, you must install SQL Server 2008 R2 SP2 or higher. This recipe will discuss installing SQL Server 2012 SP1 Standard Edition, which is included in the System Center license.
SQL Server 2012 requires the .NET 3.5 Framework. The source files for this are not installed on a Windows Server 2012 (or higher) installation by default. To add the .NET 3.5 Framework, you will need access to the Windows Server 2012 R2 DVD/ISO content.
The following PowerShell must be executed from an elevated PowerShell console:
Install-WindowsFeature –Name Net-Framework-Core –Source D:\sources\sxs

Note
D: denotes where the ISO contents are available from. This could be a network share if more appropriate for you.
VMM requires .NET Framework 4.5 (or 4.5.1) and is installed on Windows Server 2012 R2 by default.
Tip
Downloading the example code
You can download the example code files for all Packt books you have purchased from your account at http://www.packtpub.com. If you purchased this book elsewhere, you can visit http://www.packtpub.com/support and register to have the files e-mailed directly to you.
VMM requires two components of the Assessment and Deployment Kit (ADK) from Microsoft to be installed:
Deployment Tools
Windows Pre-installation Environment
The following screenshot shows these two components selected in the installation screen:

Note
Please ensure these components are installed prior to installing VMM. You can obtain the ADK from http://www.microsoft.com/en-us/download/details.aspx?id=39982.
VMM requires the following SQL Server 2012 components to be installed:
Database Engine Services
Management Tools – Complete
There are no special SQL collation requirements for VMM. When installing SQL Server, it will determine the appropriate collation according to the language of the operating system.
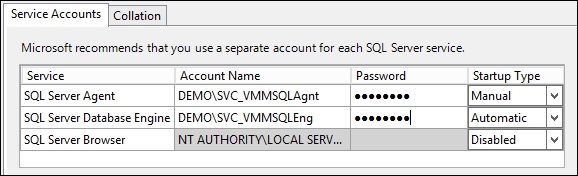
During the installation, the SVC_VMMSQLAgnt account was assigned to run the SQL Agent Service and the SVC_VMMSQLEng account was assigned to run the SQL Server Service, as shown in the following screenshot:
Once SQL Server has been installed, then VMM can be installed.
Ensure the Install_VMM and SVC_VMMSrvc accounts have been granted administrative rights to the server where VMM will be installed. Additionally, the Install_VMM account requires the following permissions in the SQL instance:
The ALTER ANY LOGIN permission on the server or membership in the securityadmin fixed server role
The CREATE DATABASE, CREATE ANY DATABASE, or ALTER ANY DATABASE permissions
Alternatively, the VirtualManagerDB database can be precreated in the SQL instance, in which case the Install_VMM account would only require the ALTER ANY LOGIN permission on the server or membership in the securityadmin fixed server role. The VMM Service Account (SVC_VMMSrvc) and the Install_VMM accounts require SQL logins to be created and have the db_owner rights assigned to VirtualManagerDB.

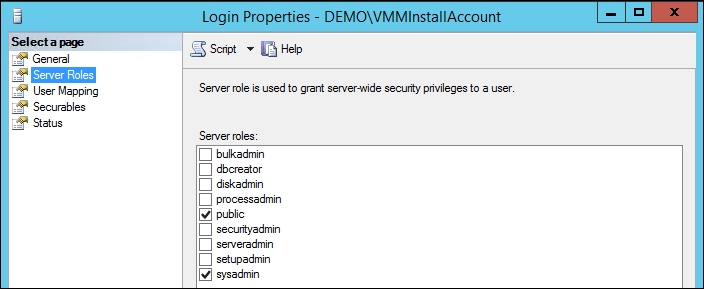
The SVC_VMMSrvc only has the public Server role, as shown in the following screenshot:

Add the securityadmin role to the Install_VMM login.

Once the VirtualManagerDB database has been created, create a new user in the database for the Install_VMM user.
Log in to the server where you wish to install VMM with the Install_VMM account. Insert or mount the VMM installation media and launch the installation for VMM using the
setup.exefile. On the installation screen, click on Install.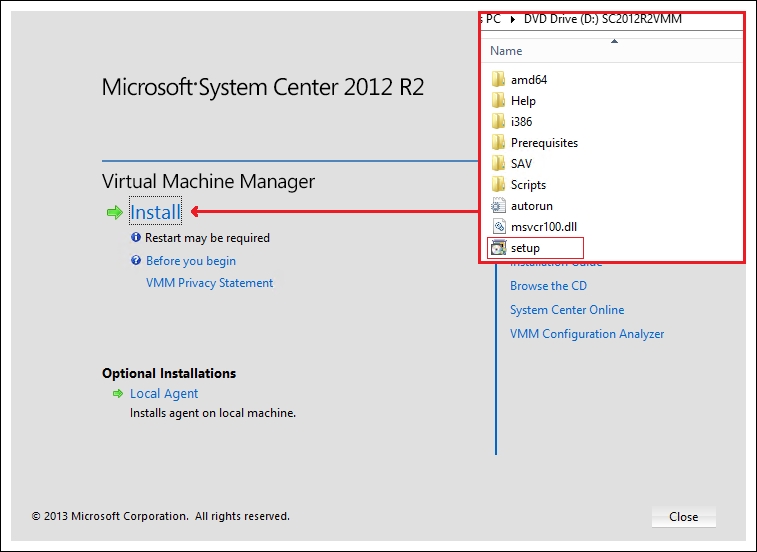
When prompted to select which features to install, select VMM management server (this will automatically select the VMM console option). Click on Next.
On the Product registration information page, enter the appropriate details. If you do not enter a product key, then VMM will be installed in the evaluation mode. It is possible to enter a product key post installation. Click on Next.
Review the Please read this license agreement page and accept to continue with the installation. Click on Next.
Select whether or not to participate in the Customer Experience Improvement Program (CEIP). Click on Next.
When prompted whether or not to turn on Microsoft Update, it is suggested not to use Microsoft Update. System Center should be updated as per Microsoft guidelines and VMM updates have been known to include SQL scripts that must be executed manually to complete the update. Select Off and click on Next.
On the Select the installation location page, accept the default installation location or specify a custom location. Click on Next.
Provided your machine passes the prerequisite check, which it should if all preceding steps have been followed, you will need to change the Select an existing database or create a new database option to the existing VirtualManagerDB. Click on Next.
While not strictly necessary on a single server deployment, it is suggested to run the VMM Service as a Domain Account and store the encryption keys in Active Directory. This will allow you to move from a single server installation to a highly available installation. Enter the DEMO\SVC_VMMSrvc account and password; under the Distributed Key Management section, enter the distinguished name of the DKMVMM container that was created in the previous recipe. Click on Next.

Leave the Port configuration option as default unless you require different ports. Click on Next.
On the Library configuration page, leave the selections as default. Click on Next.
Review the Installation summary information and click on Install.
If prompted, follow the instructions for the registration of Service Principle Names in Active Directory. This completes the installation of VMM. You can review the setup logs at
C:\ProgramData\VMMLogs.
Installing VMM on a single server is very simple, and the most important phase is the prerequisites; these must be completed prior to the installation.
The service account specified for the VMM Management Service to use is granted the required permissions on the database during installation, unless you precreated the database.
Note
While it is possible to install all of the required VMM components on a single server, it is not recommended for a production environment. Hyper-V Network Virtualization with VMM utilizes the VMM management server, and subsequently the database, significantly more than traditional VLAN networking in Hyper-V.
This recipe provides the steps required to install VMM on a multiserver environment. This will involve creating several Windows Server Failover Clusters:
A cluster of two servers for a SQL Server 2012 AlwaysOn Availability Group
A cluster of two servers for VMM Management Server
A cluster of two servers for the VMM Library Server
A multiserver installation for VMM can give you a great deal of flexibility and resiliency in the overall installation.
You will need three Windows Server Failover Clusters created for this recipe. You will need to create a Computer object in Active Directory for each of the following clustered roles:
SQL Server Availability Group Listener: in this example it will be SysCtrDBS-AGL
The name of the VMM Client Access Point; in this example, it will be VMMMS
The name of the File Server Client Access Point; in this example, it will be VMMLibServer
Please ensure that you have created the computer account objects for SysCtrDBS-AGL, VMMMS, and VMMLibraryServer in Active Directory and granted sufficient privileges to the associated Cluster computer accounts for these objects. Additionally, please ensure that these computer account objects are disabled in Active Directory.
The following diagram shows you the high-level steps involved in this recipe and the tasks required to complete this recipe:
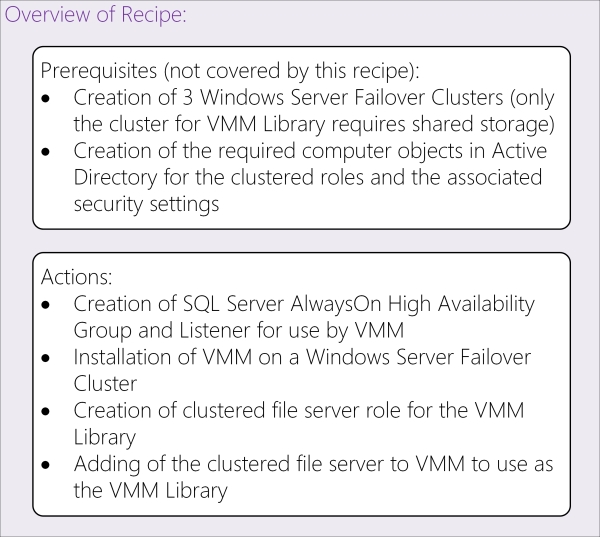
The preceding steps will result in the following VMM components being installed in the following configuration:
The VirtualManagerDB database will be installed on a new SQL Server 2012 AlwaysOn Availability Group
VMM 2012 R2 Management Server will be installed on two servers with the System Center Virtual Machine Manager service being a clustered role
A clustered file server with the VMM Library share deployed
To learn how to install the following components, please visit the following links for Microsoft TechNet:
Installation of SQL Server ready for AlwaysOn: http://technet.microsoft.com/en-us/library/bb500395(v=sql.110).aspx
Configuration of the Windows Firewall to permit the required network traffic: http://technet.microsoft.com/en-gb/library/cc753558.aspx
Creating Computer Accounts in Active Directory: http://technet.microsoft.com/en-us/library/cc781364(v=ws.10).aspx
The first step is to create the SQL Server 2012 AlwaysOn Availability Group (this is a feature of SQL Server Enterprise Edition) for VMM to be installed against. It is assumed that you have installed SQL Server 2012 SP1 on both of your cluster nodes, but have not created the AlwaysOn Availability Group and the associated Listener. Now, you need to perform the following steps:
On the first SQL node, for this example DEMO-SQL01, open the SQL Server Configuration Manager application, right-click on the SQL Server Service instance under SQL Server Services and click on Properties. On the AlwaysOn High Availability tab, check the Enable AlwaysOn Availability Groups checkbox. Then, restart the SQL Server service after enabling this checkbox.

Perform the same task on the second SQL Server node.
On the first SQL node, open SQL Server Management Studio and create a database called
TmpVMMDB. A database is required to create the AlwaysOn Availability Group against. Once VMM has been installed, the database can be removed.
Ensure the Recovery Model dropdown of the database is set to Full. Perform a full backup of the TmpVMMDB database. If you do not do this, you will not be able to create the Availability Group.

On the first SQL node, open SQL Server Management Studio, expand the AlwaysOn High Availability folder, right-click on Availability Groups, and select New Availability Group Wizard, as shown in the following screenshot:

Read the introduction screen and click on Next.
Provide a name of the Availability Group; in this example, it will be
SysCtrDBs. Click on Next.
Select the TmpVMMDB database to be added to the Availability Group. Click on Next.
On the Specify Replicas page, click on Add Replica and enter the name of the other SQL node. Click on Connect.
Once the server has been added, set the options as shown in the following screenshot:

Click on the Listener tab and select the option to Create an availability group listener. In this example, it will be called
SysCtrDBs-AGL. It will listen on port1433and have a static IP address. Once configured, click on Next.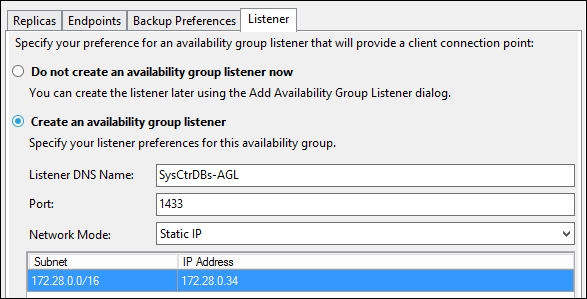
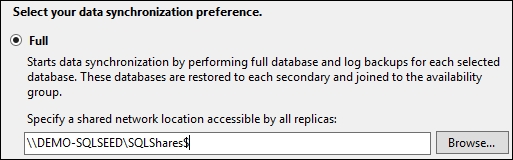
On the Select Initial Data Synchronization page, enter a file share that the account the SQL Server Agent service is running under has Full control over. Click on Next.
The next screen will validate the settings you have entered to ensure the Availability Group can be created. Click on Next.
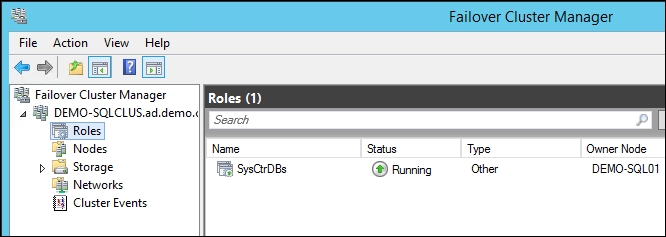
After the Availability Group is created, you will have a DNS entry for SysCtrDBs-AGL and under Failover Cluster Manager, you will see Role.
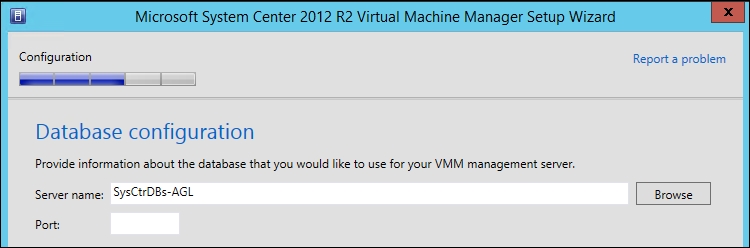
You can then install VMM using the AlwaysOn Availability Group listener name as the name of the SQL Server.
When you install VMM, the installation process can detect if it is running on a Windows Server Failover Cluster and will install itself as a clustered role. There is very little difference in the installation process from installing VMM on a standalone server. However, it must be noted that the System Center Virtual Machine Manager service must run under a domain account and that the Distributed Key Management container must be created in Active Directory and configured for use during installation. The svc_VMMSrvc account must be a member of the Local Administrators group on the server.
As an alternative to precreating the database as we did in the previous recipe, you could make sure the Install_VMM account has sysadmin privileges on the SQL Server instance.
As seen in the following screenshot, the cluster has been created; however, there are no roles on the cluster:

The installation process of VMM is very similar to installing VMM on a single server; however, there are few differences. The steps for installation are as follows:
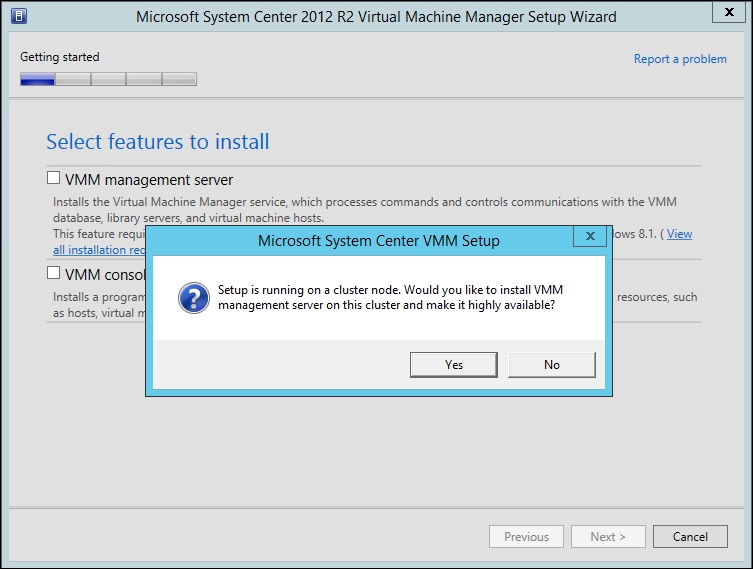
When installing VMM management server role, the VMM installation will ask you if you want to make it highly available. Click on Yes.
When selecting the SQL Server to use for the installation of VirtualManagerDB, you must select SQL Server AlwaysOn High Availability Group Listener.
You will be prompted to enter the name of the Client Access Point for the VMM instance and the IP address you want to assign, which is
VMMMSin this case.
When installing VMM on a failover cluster, you will not be able to create a library share on the server.

After the installation is complete, the VMMMS role can be seen in Failover Cluster Manager, as shown in the following screenshot:

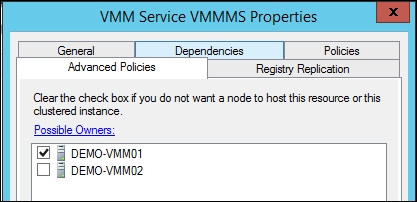
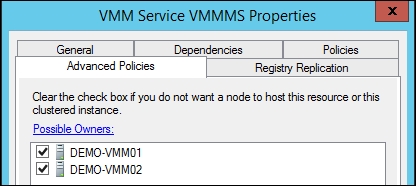
If you examine the VMMMS role, you can see that only one node can possibly own the role at the moment.
Once the first VMM installation is complete, there are a number of SQL Server tasks that need to be performed:
Add the SVC_VMMSrvc SQL Login to the other SQL Server node.
Alter the recovery model of the VirtualManagerDB database to Full.
Create a full backup of VirtualManagerDB.
Add VirtualManagerDB to the AlwaysOn High Availability Group.
Remove TmpVMMDB from the AlwaysOn High Availability Group.
The SQL Server Logins that have been created by the VMM installation process must be created in every other node of the SQL Server AlwaysOn High Availability Group. Failure to complete this will result in VMM inability to access the database should it failover. This is because unlike Failover Clustering, which protects the entire SQL Server instance, SQL Server AlwaysOn High Availability Groups only protect databases.
As shown in the following screenshot, the SVC_VMMSrvc Login is not present on the second SQL Server node in the AlwaysOn High Availability Group, DEMO-SQL02:
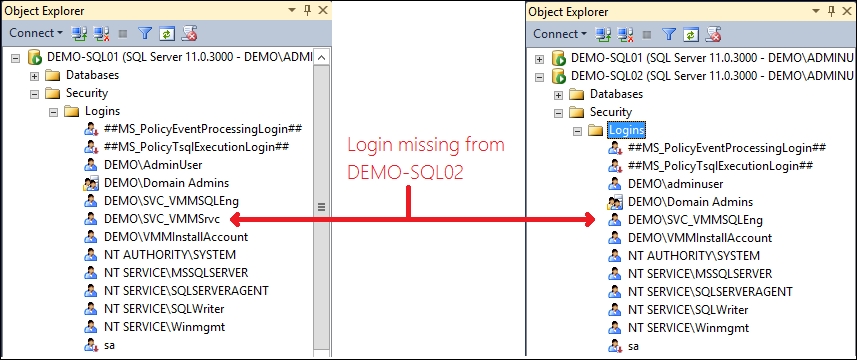
Add the SQL Login for the SVC_VMMSrvc account by executing the following T-SQL in SQL Server Management Studio:
CREATE LOGIN [DEMO\SVC_VMMSrvc] FROM WINDOWS
GO
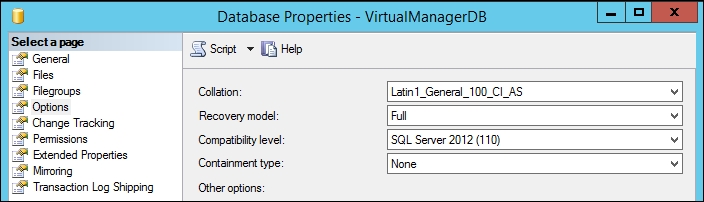
All databases that are to be included in a SQL Server AlwaysOn High Availability Group must use the Full recovery model.
To alter the recovery model, open the first SQL Server node in SQL Server Management Studio, right-click on the database, and click on Properties. In the Select a page section, click on Options and change the Recovery model to Full, as shown in the following screenshot:
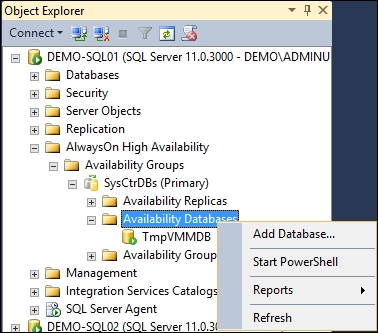
To add VirtualManagerDB to the AlwaysOn High Availability Group, perform the following steps:
Open SQL Server Management Studio, navigate to AlwaysOn High Availability | SysCtrDBs (Primary), right-click on Availability Databases, and click on Add Database. This is shown in the following screenshot:
Select VirtualManagerDB, ensure the database has "Meets requirements". If not, ensure you have changed the Recovery model option to Full and created a full backup. Click on Next.
On the Select Initial Data Synchronization page, the share that was previously used will be shown. Change this share if necessary. Click on Next.
You will then be prompted to connect to the second node of the AlwaysOn High Availability Group. Click on Connect. Then, click on Connect again. Click on Next.
Ensure the validation checks are all passed; if not, rectify the failures. Click on Next.
On the Summary page, click on Finish.
The VirtualManagerDB database will then be added to the AlwaysOn High Availability Group.
Now that the VirtualManagerDB database has been added to the AlwaysOn High Availability Group, the TmpVMMDB database can be removed from the SysCtrDBs AlwaysOn High Availability Group. To do this, perform the following steps:
Open SQL Server Management Studio, navigate to AlwaysOn High Availability | SysCtrDBs (Primary) | Availability Databases, right-click on TmpVMMDB, and click on Remove Database from Availability Group. This is shown in the following screenshot:

In the Remove Database from Availability Group 'SysCtrDBs' screen, click on OK.
The copies of TmpVMMDB can then be deleted from each of the SQL Servers.
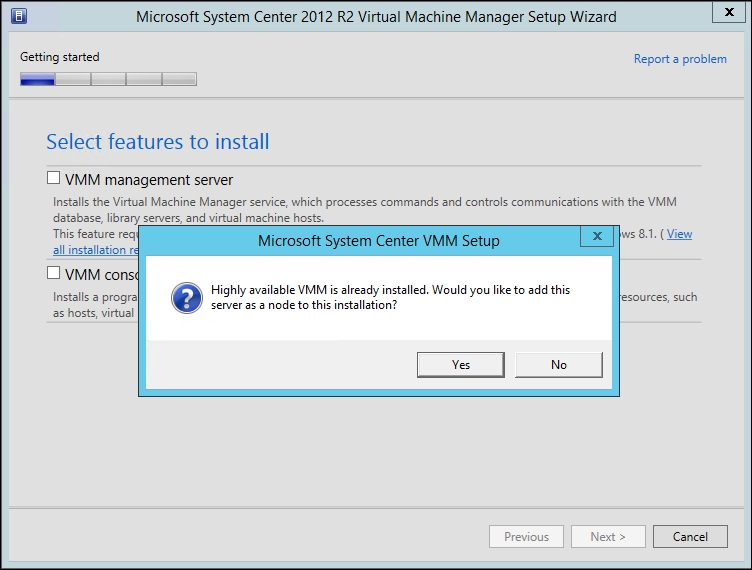
The SVC_VMMSrvc account must be a member of the Local Administrators group on the server. You need to perform the following steps for this:
When selecting to install the VMM Management Server role, the VMM installation will ask you to add this server to the already highly available installation. Click on Yes.
During the installation of VMM, there are few decisions to be made. When prompted to choose the SQL Server, all the options are grayed out as shown in the following screenshot:

On the next screen, the options are grayed out as these are controlled by the cluster and the Distributed Key Management information has already been populated. However, you must enter the password for the service account as shown in the following screenshot:

After the installation completes, if you investigate the VMMMS role, you can see that both nodes are now possible owners of the role.
The VMM Library Server can use a Clustered File Server that has been created as File Server for general use rather than Scale-Out File Server for application data. To do so, perform the following steps:
Open Failover Cluster Manager on one of the cluster nodes that will host the VMM Library Server.
Right-click on the cluster and click on Configure Role.
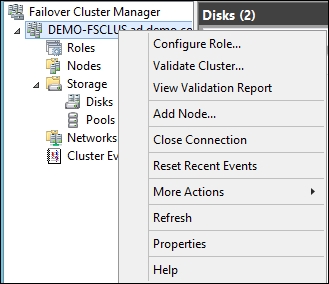
Click on Next.
Click on File Server.
Click on Next.
Select File Server for general use.
Click on Next.
Enter the name of the Client Access Point for the File Server; in this case,
VMMLibServer. Then, enter an IP address and click on Next.Select the available storage to be assigned to the File Server. Click on Next.
Click on Next.
Click on Finish.
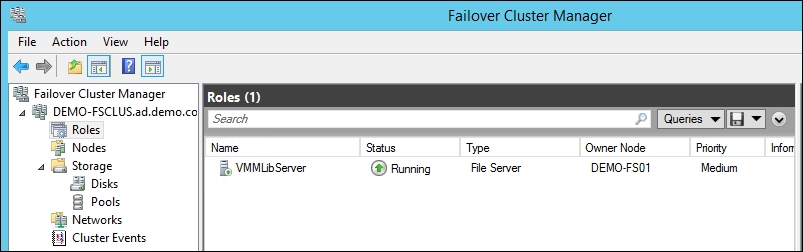
The VMMLibServer role can be seen in Failover Cluster Manager.
To add a share to the File Server, right-click on the VMMLibServer role and click on Add File Share.

In the File share profile, select SMB Share – Quick. Click on Next.
Select the appropriate volume. Click on Next.
Enter a name in the Share name field, in this case
Library. Enter a description for the share, as shown in the following screenshot: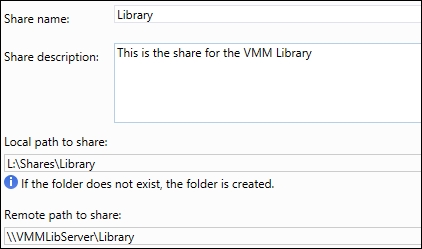
Click on Next.
Uncheck the Allow caching of share checkbox. Click on Next.
The minimum permissions required for a VMM Library share is for the SYSTEM account to have full access in Share Permissions and NTFS Permission. However, as users may need to contribute content to the share, ensure the appropriate users and/or security groups have the appropriate permissions. Click on Next.
Click on Create. This share is ready for use by VMM as a Library Share. You must ensure that the svc_VMMAgntRA account has administrative rights on both nodes of the file server cluster.
Before the Library Server can be added to the VMM, you must create a Run As Account in VMM. This determines the credentials that VMM uses to manage remote systems. Perform the following steps:
Open the VMM Console on one of the VMM servers. Remember to connect to
VMMMS:8100as shown in the following screenshot: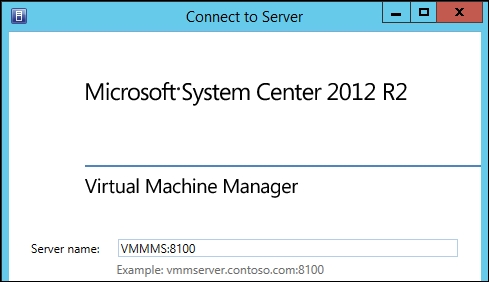
Navigate to the Settings section and click on Security. You can see the default Run As Accounts created by the VMM installation.
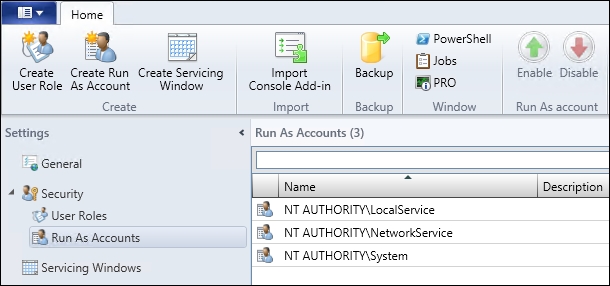
Click on Create Run As Account on the ribbon bar, enter the details as appropriate, and click on OK.

You also need to add Cluster to VMM. For this you need to perform the following steps:
Open the VMM console on one of the VMM servers. Remember to connect to
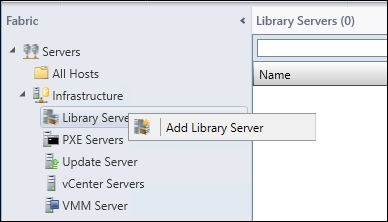
VMMMS:8100as shown in the following screenshot:Navigate to the Fabric workspace, expand the Infrastructure option, right-click on Library Servers, and then click on Add Library Server.
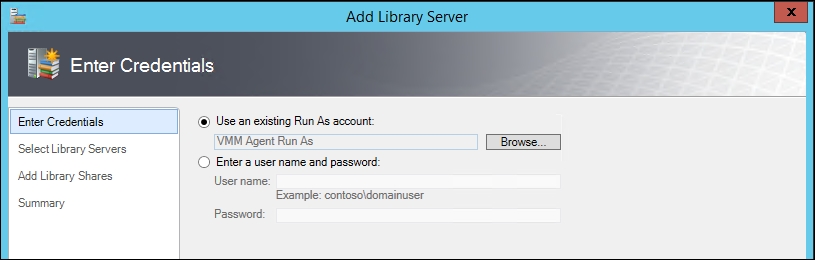
Select the VMM Agent Run As account, as shown in the following screenshot, and click on Next.
Enter
VMMLibServerin the Computer name field and click on Add. VMM can then see the clustered role and all the servers that form that role. Click on Next.
Select the Library share created previously and check the checkbox under Add Default Resources. Click on Next.
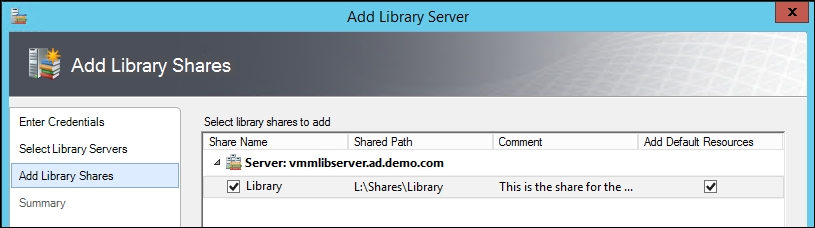
Once the VMM job is complete, you will see the two nodes of the File Server cluster and the Client Access Point listed in the Library Servers section, as shown in the following screenshot:

While installation of VMM in a highly available configuration can be time consuming, it can help reduce, if not eliminate, the number of single points of failure for the installation.
Through the use of failover clusters (including SQL Server AlwaysOn High Availability Groups), each component can be made highly available. Each role can move from one server in the cluster to another. This allows the VMM service and its required components to remain online while underlying aspects are maintained such as the Windows Server installations.