


In this chapter we will explain, how the Unity game authoring system can be integrated into a CAD or BIM-based workflow. It is very important to learn how changes to the design can be propagated into Unity, by fully understanding the asset-based approach inside Unity. The workflow will be illustrated mostly with examples from Graphisoft ArchiCAD, Trimble SketchUp and Maxon CINEMA 4D, but similar workflows can be followed with Autodesk Revit, Maya and 3ds Max or even the Open Source Blender.
While prior experience with Unity is not required to follow this book, it is recommended that you also follow an introductory Unity tutorial to get started with setting up a project, creating, positioning, and selecting game objects, adjusting properties, and running the game. But don't be afraid, as we will explain the required steps along the road. Some good starting points are given in the first three chapters of the book Unity 3.x Game Development Essentials by Will Goldstone (published by Packt Publishing) and the Beginner Editor official video tutorial series available at http://unity3d.com/learn/tutorials/modules/beginner/editor.
This chapter is mostly about workflow, and while filled with important comments, this is for the most part a read only chapter. However, it is important to get a grip on your workflow from modeling to real-time visualization.
In this chapter, we will cover the following topics:
Assets and the Unity workflow overview
CAD or 3D modeling software (such as, AutoCAD, SketchUp, Rhino, and Blender)
BIM software (namely, ArchiCAD and Revit)
Updating the scene when changes occur to the model
Unity was developed in the context of game development and provides an efficient integration into existing pipelines, independent of the used modeling and content creation software. Regardless if the team consists of you alone or you are part of a large group of designers, developers, artists, and technical directors, you need to get your workflow up and running to be efficient. This is equally relevant for architectural offices, which are also organized around long-running projects where different people interact and collaborate, using a variety of software applications for drafting, modeling, and presentations.
Inside Unity, you create a project, which is stored inside a single folder on your hard disc. Within the project folder, there are a wide variety of folders and files, which are mostly regulated in the background by Unity. The Assets folder is where all your files are stored that you need to manage directly, such as models, scripts, textures, and scene files. There is a direct relation between what you see inside the Unity project panel and what occurs as files in your local file system.
Unity also supports additional modules that facilitate the technical aspects of collaboration, for example, by setting the project up with the Asset Server system or by tuning the project metadata (the information about each file) into separate meta-files, that are better suited for version control systems (VCS), such as Subversion or Git. While such systems are common with software development, they are not widely used in architectural projects. They present an opportunity to share projects between different users, computers, and systems. Using a version control system with Unity, team members can check out files in the project and receive changes from other members. This is more efficient than copying the whole large project folder back and forth since only changes need to be synced. Only the Assets and ProjectSettings folders need to be synced; other folders are generated locally. More information on using external version control systems with Unity can be found at http://docs.unity3d.com/Documentation/Manual/ExternalVersionControlSystemSupport.html, the official Unity documentation website.
Nowadays, it can be assumed that almost any architect or architectural office use CAD or modeling software, such as Autodesk AutoCAD or Nemetschek VectorWorks, commonly in combination with Trimble SketchUp . In addition, we currently see a migration towards Building Information Modeling (BIM), which will be discussed in the next section.
It should be noted that 2D Drafting is still omnipresent in architectural offices worldwide. While AutoCAD presents both 2D and 3D functionality, many offices still rely on the creation of 2D documents for documentation purposes. The first hurdle they need to tackle in the context of real-time architectural visualization is switching to 3D, as the use of a Game Authoring Environment, such as Unity makes hardly any sense when you don't create 3D models.
As it stands, Unity is mostly oriented to the so-called Digital Content Creation (DCC) systems, which provide a combination of modeling, rendering, and animation functionality, such as Autodesk 3ds Max
or
Maxon CINEMA 4D. Models from such software can be saved directly inside the Unity project's Assets folder and are subsequently converted in the background automatically. When using any of the directly supported software tools, modelers can further edit the models by simply double-clicking the model name from within Unity. This opens the original software, where they can modify the model and save it again, with Unity taking care of the model conversion in the background. This approach is supported by Autodesk 3ds Max and Maya, Maxon CINEMA 4D, Blender, and some other applications given at http://docs.unity3d.com/Documentation/Manual/3D-formats.html. However, most architects will agree that these are not the primary modeling systems in use for architectural modeling.
As it stands, a typical CAD model in for example, AutoCAD DWG format, is not supported by Unity, so you need to convert your model into an alternative format. The FBX format is currently the best supported format for Unity, probably alongside the open COLLADA format, with extension .DAE. If your CAD or 3D software can export one of these two formats directly, use them as your first choice. Otherwise, you can try if your software has 3DS or OBJ export, which are the other two formats that Unity can also read directly. While DXF is supported as well, this is not recommended, as you need to use an older version of the format and texture information will not survive the conversion.
The following table gives an overview of which formats can be exported from some typical CAD software into Unity 4.x and also discusses expected possible problems.
|
CAD Software |
Export |
Comments |
|---|---|---|
|
AutoCAD ( |
|
Not supported by Unity. |
|
|
Not recommended. | |
|
|
Preferred, especially if textures have been applied already. | |
|
VectorWorks ( |
|
Not recommended. |
|
|
Exchange add-on recommended; requires CINEMA 4D. | |
|
|
RenderWorks add-on required. | |
|
SketchUp ( |
|
Preferred, but only supported by Pro-version or add-ins. |
|
|
Through Google Earth | |
|
|
Can be added with Ruby script. | |
|
Rhino ( |
|
Good 3D format support, with control over polygon count and texture mapping. |
The primary goal is to get a model on the right scale and with correctly applied materials inside Unity. While not set in stone, the units inside Unity are typically interpreted as being meters. For proper material conversion, support for texturing and the preservation of UV-texture coordinates (the way materials are projected onto geometry, which is discussed later on) is essential. While this is common knowledge for visualization artists and game modelers, this is not always the case for CAD users. Most architectural 3D models are created to contain accurate geometry, but present materials as single colors, often tied to the layer on which the object resides.
If you are in a situation where there is no suitable supported format, you have to rely on 3D conversion software. Even if your CAD system is supported, it makes sense to pass it through other software to fine-tune the conversion. You can export an AutoCAD model as a DWG file into 3ds Max and do the Unity conversion from there.
There are several typical problems that can occur when loading CAD models inside Unity. In most cases, paying attention during modeling can optimize the results considerably.
The following screenshot displays a rather typical SketchUp model of the Barcelona Pavillion, by the architect Mies van der Rohe. It was downloaded from the 3D Warehouse and modeled by user Cintilante 3D available at http://sketchup.google.com/3dwarehouse/details?mid=fabea878c454e119e8d39fcb58c495ea. When you open the model inside SketchUp, everything looks normal, but when loading it inside Unity, a large part of it seems to be missing at first sight.
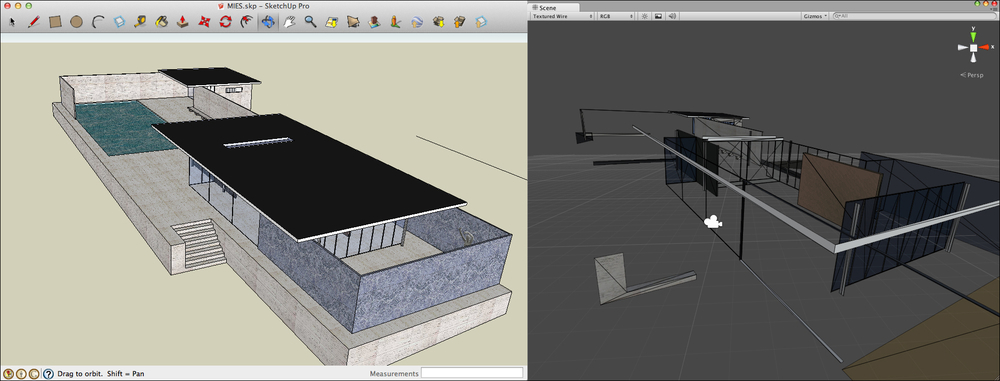
Upon closer inspection, the geometry is actually available in the model, but can only be seen from the other side, for example, from the bottom. CAD software often displays front and back-faces of geometry, whereas Unity hides back-faces for performance reasons (namely, back-face culling). The order in which vertices of faces are connected defines the face orientation. If you don't pay attention to face orientation during modeling, gaps will appear inside Unity. This problem is not unique to Unity. Abvent Artlantis, a rendering companion software often used by architects, also hides back-faces. We have encountered this numerous times when students are trying to import SketchUp models. This is less problematic when you model with volumes or primitive objects, as they are usually well oriented to start with.
The solution is to either display both sides of the geometry, which effectively doubles the geometry to show on screen, or to flip the wrongly oriented faces in the modeling system, which is obviously recommended. In a correct model, only front faces should be visible. In the case of SketchUp, front and back-faces are both visible, but they have different materials applied, which complicates conversion to Unity.
When you model with single faces, this really becomes problematic. The face will only be visible from the front side and is missing completely when looking from the back. If you are modeling fences or other thin elements, such as glass panes, you need to either model them as thin boxes or export the model with faces for both sides separately. If supported, turn off back-face display in the CAD system, to better assess how the model will appear inside Unity. When using SketchUp, switch to the Monochrome Face Style, which will show all face orientation mistakes (back-faces) in a light blue color, as shown in the following screenshot:
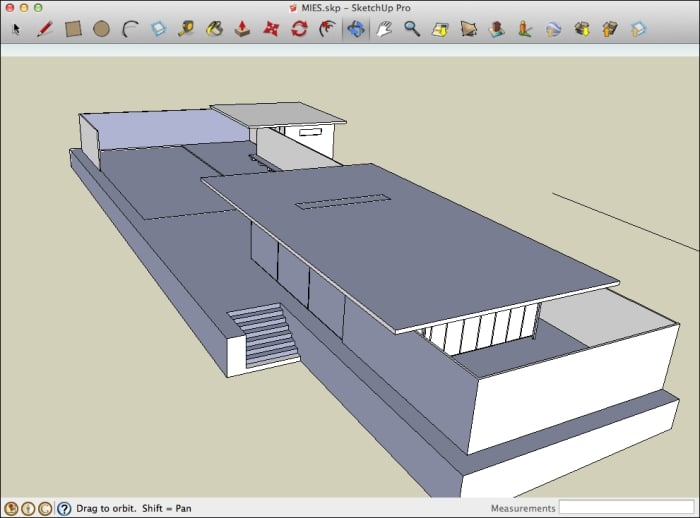
Right click on the problematic faces and choose the Reverse Faces… option. Before you export any SketchUp model to Unity, switch to this face style and flip all blue faces. Beware that you might need to re-assign materials, as the front face material will be moved to the other side as well, which is not visible in the Monochrome face style.
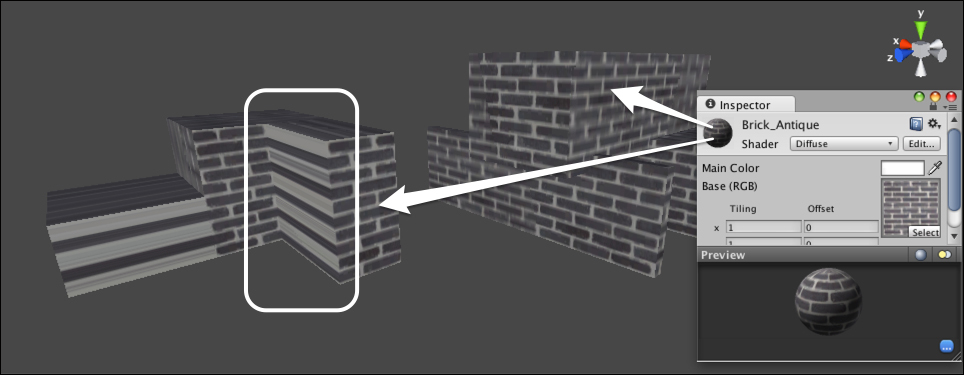
Texture coordinates are the link between a texture image (for example, a picture of a brick wall) and the geometry onto which it is applied. Texture coordinates are stored inside the vertices of geometry, alongside geometric coordinates.
While most game modelers colorize geometry using textures, many architectural models contain plain and solid colors. When exporting to Unity, this becomes a problem, as faces will not have their texture coordinates properly set up. When you assign a material inside Unity or change the Base (RGB) texture, it will not be positioned correctly. Chances are that you'll only see a single color, usually the border pixel(s) of the texture or that the position and scale of the texture map on the geometry is inconsistent. The following image displays a basic brick texture and how it is mapped on the imported geometry. The stretched pixels indicate an incorrect mapping setup.
To alter these coordinates from within Unity, Unity requires separate tools and is really cumbersome, certainly when the original model changes. Always assign textures in the original model, even if the texture itself is only a placeholder.
The way models are created for game environments is fundamentally different from the way architectural models are set up. Professional game modelers are trained to use as little geometry as possible. Even though Unity is capable of displaying fairly large and complex models, performance will suffer, so every possible face that is never seen is omitted.
In a CAD model, this is not the case. A door that is placed inside a wall will cover the side of the wall opening, but the faces of this side are still modeled, even if they are never seen. Likewise, cabinets and closets are commonly placed against a wall. If the cabinet never moves, game modelers would remove those faces, whereas architects need them to be visible, as the model can be displayed with or without the covering objects visible.
This problem is harder to solve, as the architectural model has many different purposes. In any case, the architect would need to set up a specific model display to be used when exporting for real-time usage. Such a view needs to hide as much geometry as possible and hide at least those elements that are never to be seen in the real-time model.
It can be valuable to export the CAD or BIM model in chunks, providing more flexibility inside Unity to selectively show or hide parts of the model. Depending on the use case, you could toggle furniture, technical installations, outside walls or even different design alternatives. The next section will show this with the help of an example.
Most CAD systems support a notion of a Block or a Symbol. These are objects that occur repeatedly, with identical properties. Typical examples include furniture or sanitary equipment. This technique is called instancing , in general. Such objects are used to diminish file sizes and optimize modeling and display performance. Instancing in Unity is organized using Prefabs, which are displayed with a blue name in the editor.
However, when converting CAD models to Unity, instancing information often gets lost, depending on the way the export function was implemented. This is something to be tested early on, since it can make a huge difference in performance.
If the export process does not support instancing, it might be beneficial to export only the unique geometry and assemble the model inside Unity, after turning each unique element into a single prefab. For example, in a restaurant project, export a single table into a separate file and load that into your Unity project as a prefab alongside the building geometry. When copying this, all instances will be identical and the system can optimize its performance automatically. This is more efficient than exporting the full scene with all tables included. Beware that this can be a considerable effort, so do this only if required, for example, when the player is able to move or interact with the tables.
Building Information Modeling or BIM is a methodology of organizing the building process by using digital building models, containing both geometry and information about the entities which comprise a building. The designer creates a three-dimensional model of the building, which embeds information about objects, properties, and relations.
Note
The BIM process is inherently tied to BIM authoring tools, which in the context of this book are typically architectural 3D modeling systems. The best known BIM authoring applications are Graphisoft ArchiCAD and Autodesk Revit and both have been created for this purpose from the beginning. There is also a version of AutoCAD, called AutoCAD Architecture that adheres to this concept. There is a wide variety of other software systems for BIM, ranging from modeling (authoring), to viewing, and analysis, but this is beyond the scope of this book.
In the context of architectural visualization, it is important to understand that the modeling process with BIM software is more indirect, when compared to traditional 3D CAD or DCC modeling methods. The user creates building objects, such as walls, floors, and roofs, inserts windows, doors, and other objects, and sets up a variety of views which display the model in some form, such as a 2D annotated drawing, a section or elevation drawing, or a 3D view. The idea is that the model is the main source of all information about the building and all related views are derived from it, just like you would set up a database and create queries that filter information from the model.
The indirect modeling is apparent in the way objects are managed. You start from predefined or custom created parametric objects, which are positioned using only a small set of location parameters: position, orientation, and size mainly. Instead of manipulating 3D geometry directly, you would select the object and change its properties, which triggers a routine that recreates the 3D geometry or other related geometry and characteristics. This also means that there are multiple possible representations of the model. Take this into account when preparing a BIM model for architectural real-time visualization with Unity. You have to decide on many aspects that steer the geometry generation, for example, scale level and building phase or status, alongside a plethora of model display options.
Let's explain this with an example that could be applied in most BIM authoring software applications.
When the architect creates the design, he or she can set up the model in BIM software as an assembly of building entities positioned on stories. At any time, the model can be shown in a 3D view. However, many possible 3D views can be created. Imagine that it has been decided to visualize a first design proposal to the client. The model can be set up at a moderately detailed scale level (for example, 1:100), with the main fixed furniture visible, albeit without some of the model details, such as door knobs and closet handles.
In addition, all technical installations, which have been created as part of the model and which are important mostly for the engineers and contractors, have been hidden in the model. It was decided to mainly show the atmosphere of the design through materials and lights and the layout of the facility.
The particular 3D view is then exported into a Unity compatible format and placed inside a separate folder underneath the project Assets folder. We skip the many possible interoperability issues in this example and focus on the overall workflow. Within Unity, the model is imported and positioned in a scene, to be explored in the "game" by the building owner, who receives the Unity project as a standalone application.
Although the architect imagined the building owner not to be interested in the technical details, there are some worries about the feasibility of placing the large ventilation shafts and ducts in a non-obtrusive way, so the architect is asked to update the design. In the BIM authoring system, a new 3D view is created, which only displays the technical installations as 3D geometry and this is exported as a second model for Unity. This model is added to the scene and a small GUI is scripted with two simple buttons to toggle the visibility of the architectural and the installation model upon request. In Chapter 7, Full Control with Scripting, we explain how to provide such an option to the user.
After the next client meeting, some design changes are requested. The architect adjusts the model in the BIM authoring software and exports the models again from the two views that have been set up, overwriting the first export files. The model inside Unity is updated automatically and the new version of the interactive application simply has to be built again with identical settings. While the design model changes took some effort, the time it took to update the real-time model inside Unity was negligible.
The scenario pictured here requires some experience to set up a properly, but it is not far-fetched at all and presents an important added value of using BIM authoring software for a real-time architectural visualization. The master model contains the actual, current version of the design, which can be updated at any time, and is completely in sync with the technical drawings, the presentation drawings, or renderings. The real-time model can be updated with minimal effort to integrate changes into Unity. This makes the process accessible in an architectural office, although dedicated visualization teams can create more extensive and graphically refined models, when specializing in the Unity part of the workflow.
It is strongly advised to not try to make a single model encompassing every part of the design. It is much more efficient to set up separate complementary models, such as architectural, structural, and technical subsets. They can be assembled inside Unity and toggled from a simple user interface.
While the scenario depicted above seems easy and straightforward, the interoperability poses particular problems. Most BIM software lacks the direct support of the FBX format and even when available, this export is often not optimized for Unity.
Many of the pitfalls we discussed about CAD software are still applicable: architectural BIM models often use plain colors for materials and often lack texture-mapping information.
The problem of back-face culling is less prevalent, as the BIM software tools generate suitable polyhedral meshes where the face orientation is set up properly apart from maybe the glass panes, which are often modeled as a single face only.
There is a huge risk of adding too much geometry into the model, especially when furniture is included or (even worse) if trees and cars are included. While BIM tools often support a good library of common building objects, such as chairs, tables, but also windows and doors, they are typically not set up to minimize geometry. For example, a closet model also contains geometry for the inner parts, even though they are probably never seen in the real-time model, unless the model is set up to allow doors to be opened.
If supported by the BIM software, it is advised to set up the objects to be scale sensitive, allowing them to hide large parts of the geometry when displayed at a larger scale. This can then be used as a setting inside the particular views that have been set up for export to the real-time model. Some applications, such as ArchiCAD also provide a resolution setting for most curved objects, which controls the tessellation into polyhedral meshes.
To make matters worse, the export process often creates each object as a completely new geometric object, disregarding instancing in most cases. If you place 20 chairs in a restaurant space (which is easy to do in a BIM system), each chair will count as separate geometry in the exported model.
If feasible (it often isn't), create separate singular models for such objects and use Prefabs inside Unity, which places a much smaller burden on a scene, as repeated geometry will be optimized by the game engine. We will learn more on optimization in Chapter 5, Models and Environment.
When trying to add a rotation or sliding animation for doors and windows, it is often impossible to separate the moving parts from the static ones. It may even be necessary to hide them in the model and replace them with custom Unity animated objects, which takes much more effort. As a simple compromise, you can disable collisions on these objects or set them up in their open state in the BIM software, so they don't hinder navigation.
3D modeling systems and recently BIM authoring software can be extended with plug-ins or add-ons. A good example is the BIMx module, developed by Graphisoft, which is integrated into ArchiCAD. It allows a direct export from the ArchiCAD model into a standalone application, including the player and the model. It can be played on a computer (Mac or PC) or loaded into the free BIMx app for Android or iOS devices, allowing real-time navigation through the project, with only minimal effort. The following screenshot displays how an ArchiCAD model looks inside the BIMx software.

Other interesting systems that are worth mentioning are Autodesk Showcase, Act-3D Lumion, LightUp for SketchUp and Viso3D, also for SketchUp. There is also REALIS3D, which is a dedicated architectural visualization system, built with Unity.
When requiring real-time navigation for a project, it is good to consider such solutions. What they provide in ease-of-use (for example, single click export, built-in features), they often lack customization options. User interaction and the method of navigation are commonly predefined, without the possibility to add other forms of interactivity or visualization.
It is precisely this customization and flexibility that can be the motivation to master a real-time authoring system, such as Unity, at the cost of added effort and complexity. You could re-create most of the functionality of BIMx inside Unity and once this level of interactivity is prepared, using custom scripts, there is nothing preventing you to go a step further. Since this book is about Unity, we will not go into further detail about such dedicated systems.
Regardless if you use CAD or BIM software or rely on DCC systems, chances are that the models need to be updated to reflect changes in the design. Traditional visualization systems often fully import models and convert them in a system specific internal model, which is edited and adapted in a project. However, in such systems, you need to redo all these changes when you have to replace a model with a new, updated version. Since you cannot reasonably assume that a model is completely finalized before any game authoring starts, a more efficient workflow is in order. Like many game authoring systems, Unity is not modeling software, but relies on external software, such as Autodesk 3ds Max or Maxon CINEMA 4D. It is, however, possible to add modeling functionality to Unity using third-party plug-ins, such as ProBuilder available at http://www.probuilder3d.com or GameDraw available at http://gamedraw.mixeddimensions.com.
When you load models inside Unity, they are handled by an internal importer module. Like most 3D systems, you can tweak the import with a number of settings. However, in Unity these settings are maintained as part of the imported model's properties and a reference to the original file is kept. Whenever that file is updated, for example by exporting the model again, using the same file name, Unity recognizes this and reloads the file, applying the same import settings again. This is a very important behavior of the Unity pipeline, as you can see that all models that have already been placed inside the different scenes of a project are placed on exactly the same position, at the same scale and using the same geometry conversion. This also allows you to tweak the import, for example, by altering the import settings and re-importing the model even if it has already been placed in scenes of the project.
The following screenshot displays an ArchiCAD model inside Unity:

Unity goes a step further when you use one of the directly supported DCC modeling systems, such as 3ds Max, Maya, or CINEMA 4D. If you save your native model directly inside the project's Assets folder, Unity automatically imports the model, or so it seems. Actually, Unity calls the original application in the background to request an export to the FBX format.
If you have such a supported modeling application and it is installed on the same machine as Unity, making changes can be really straightforward as shown:
Double click the model icon inside Unity. The native model gets loaded inside the DCC software, ready for you to make changes.
When you have finished editing, simply save the file and close the DCC software.
When you switch back to Unity, after a few moments, the converted
FBXmodel is reloaded automatically in the background.
For the user, it just looks like there is only a single model that Unity can import when changes occur. This same process also works fine with for example, Photoshop PSD files, where no conversion is required.
When using SketchUp or ArchiCAD or other 3D modeling software that is not directly recognized by Unity, the process is a little more complicated:
Double click the model icon inside Unity to launch the authoring software.
When you are ready with editing, you need to export the model manually. Export the file to
FBXor another supported format and overwrite the previous version in the Unity project'sAssetsfolder.When you switch back to Unity, the model is replaced with the new version.
Tip
If you need to set up the conversion configuration each time (for example, when the software does not remember export settings), take care of noting which configuration was used last time. For example, how the model is organized, how textures are treated,and if a possible transformation occurs. Once you have a conversion configuration that works, take a note of all the export settings and be wary of applying them again at the next export action.
While we would prefer to claim that any modeling software is equally usable, two combinations are worth mentioning specifically and they are based on using software from the same vendor in both cases.
When using CAD or BIM software from Autodesk, it helps to pass through DCC software that is also provided by Autodesk. AutoCAD or Revit models are best passed through 3ds Max or Maya before converting to FBX into Unity. This is especially important to reflect model changes. AutoCAD models are usually passed as DWG files to Max or Maya. Set up correct material properties and texture mapping and either save the file directly inside the
Assets folder (to have Unity call up the translation in the background) or export to FBX into the Assets folder. The former is slightly more convenient, but the latter gives you full control and is usually the preferred choice for experienced users.
This is equally true when using software from Nemetschek (or one of its daughter companies). ArchiCAD and VectorWorks models are best passed through CINEMA 4D, before converting to Unity, for exactly the same reason. The Exchange plug-ins for ArchiCAD and VectorWorks optimizes the model exchange with CINEMA 4D and automates model updates. You can set up materials and textures and still refine the model in the original creation software. CINEMA 4D models can be placed directly inside the Assets folder.
As always with interoperability through add-ons, success depends on particular software versions and supported platforms and the fact that a software update of one application can break compatibility with the other one. Alas, this is beyond our control.
You can also be confronted with permission problems. When you use the automatic conversion process, Unity copies an FBX exporter module in the supported application's add-on folder, which requires administrative permissions. On Windows, you have to launch Unity as an administrator at least once to have this process completed.
With both the Autodesk and Nemetschek applications workflow, you can reload the architectural model, while preserving applied materials, mapping, or animations, and consequently reload the FBX model inside Unity while preserving the additional settings over there. The following screenshot gives an example of an ArchiCAD model that is exported to CINEMA 4D and loaded inside Unity:

Based on reactions in user forums on Unity (for example, the Unity Community at http://forum.unity3d.com/forum.php) or one of the related DCC software programs, many people actually suggest ignoring the automatic conversion and leaving the native models (for example, MAX or C4D files) outside of the Assets folder. They would rather perform the conversion manually. This allows more control, for example by splitting the model up in smaller chunks, so they are easier to manipulate inside Unity. This is also required when you collaborate with others and not everyone has the Unity or modeling software available on their machine. In that case, the artist responsible for the 3D model can work on a provided FBX, while the designer responsible for the building model can continue working, and export the model when updates need to be integrated.
The following figure summarizes several workflows that are known to work well for architectural visualization. Bold arrows are the recommended pathways for optimal integration.

In this chapter we have talked about the Unity Asset-based workflow. Getting this workflow organized properly is required for working efficiently.
Many architectural projects start from a 2D CAD drawing, in which case there is little you can do inside Unity. If you have a 3D model, made in 3D CAD or BIM software, it is still advised to use a DCC application to pass the model through, to allow fine-tuning of the conversion. At best, this supports a workflow where changes to the design model can still be incorporated in the real-time model, without losing applied interaction inside Unity.
We explained common problems and pitfalls, and collected several tips: apply supported software workflows and formats, use meters as units, set up normals correctly, always apply textures, export models in chunks, and avoid excessive geometry.
Further chapters will explain the actual process in more detail, from simply getting started, to full control over graphic quality and interaction.
So without further delay, fire up your modeling software of choice and ensure you have a copy of Unity installed and activated, either the free or the pro-version. In the next chapter, we will load our project in Unity and add the necessary interactivity to walk around in real-time with very little effort, using functions that are installed with Unity.
