Download code from GitHub
IoT with ESP32 using Arduino IDE
The Internet of Things (IoT) has revolutionized the way we interact with everyday objects, making them smarter, more efficient, and more connected. One of the key components of IoT is the microcontroller, which is required for the collection and processing of data from sensors and other devices. The ESP32 microcontroller, a product of Espressif, is one of the most popular choices for IoT projects due to its low cost, high performance, and built-in Wi-Fi and Bluetooth connectivity.
Through this chapter, we will take a deep dive into ESP32 and compare it with other microcontroller units (MCUs) available on the market. We will also explore the power of ESP32 and discuss why it is the ideal choice for IoT projects.
Furthermore, we will introduce you to the world of IoT and its application in various domains, including healthcare, agriculture, and smart homes. This section will help you understand how IoT is revolutionizing the world and how you can contribute to it.
Lastly, we will introduce you to the Arduino Integrated Development Environment (IDE) 2.0, one of the most popular programming platforms for IoT projects and a beginner-friendly environment. We will discuss various other available options for programming ESP32.
In this chapter, we’ll cover the following topics:
- A brief introduction to IoT
- Understanding the capabilities of ESP32 for IoT
- Deep dive into the Arduino IDE 2.0 to program ESP32
By the end of this chapter, you will have achieved the following:
- Gained knowledge about IoT and its applications in various domains
- Understood the features and advantages of ESP32 over other microcontrollers
- Become familiar with the Arduino IDE 2.0
- Learned how to program ESP32 using the Arduino IDE
- Written a Hello World program using ESP32 and the Arduino IDE
We hope this chapter will be informative and will inspire you to explore the endless possibilities of IoT with ESP32. Let’s get started!
A brief introduction to IoT
Before diving into the main subject of this book, which is using ESP32 with the Arduino IDE 2.0 for IoT projects, it’s important to first learn about IoT. Understanding the basics of IoT will help us see why it is important to pick the right microcontroller and the best communication method for our project. By knowing the basics of IoT, we can better use its potential in our ESP32 projects with the Arduino IDE 2.0. Additionally, knowledge of IoT and its applications will provide a sense of motivation and direction for getting started.
To keep this introduction brief, in this section, we are going to describe what IoT is, its main characteristics, and the basic architecture of IoT technology, which includes all the core parts and key components of IoT. Then, we will discuss the applications of IoT in different sectors and domains.
IoT and its main characteristics
IoT refers to a network of physical objects, devices, and systems that are connected to the internet and are equipped with sensors, software, and network connectivity, enabling them to collect and exchange data. To simplify it, a thing can be a smartwatch you wear that tracks your activity and health data and sends that information to your phone or your doctor using the internet or a network. Overall, IoT is about making things more connected, efficient, and convenient for people in their everyday lives.
After explaining what IoT is, it’s important to understand the main characteristics of IoT to explain the idea of IoT in more detail; this will help you distinguish it from other technologies and develop effective IoT solutions that can deliver real value and impact. The main characteristics of IoT are connectivity, sensing and perception, data collection and perception, interoperability, security and privacy, scalability, and user experience. These characteristics enable IoT to be used in a wide range of applications, and it has use cases in various domains, from healthcare to agriculture and smart homes.
To give you a better understanding of these characteristics, each of these is described as follows, with a real-world example in the field of smart farming or agriculture:
- Connectivity: As we discussed, IoT is a network of physical objects; connectivity is a fundamental trait of IoT. IoT devices are connected to each other, to the internet, and to other networks, which allows them to exchange data and communicate in real time through automation. In the context of smart agriculture, wireless sensor networks for real-time monitoring, remote access, and control of irrigation systems using mobile or web-based interfaces are examples of connectivity.
- Sensing and perception: Another important trait of IoT is that it enables devices to collect data and analyze it to gain insights, make decisions, and automate processes. Sensing involves the collection of data from the physical environment using sensors, while perception involves processing and analyzing data to derive insights and take action. One example of sensing and perception in IoT can be seen in smart agriculture, where sensors are used to monitor soil moisture, temperature, and humidity, and a perception algorithm analyzes this data to determine the optimal time for watering and adjusting the temperature of a greenhouse.
- Data collection and analysis: Data collection and analysis is a characteristic that enables devices and systems to collect large amounts of data from various sources and analyze it to generate insights and support decision-making. Data collection and analysis in smart agriculture can involve processing the data collected by sensors and using it to make decisions about crop management. For example, by analyzing data on soil moisture and weather patterns, farmers can determine when to plant, irrigate, or fertilize crops. This is where machine learning (ML) algorithms can be applied for enhanced decision-making.
- Interoperability: Interoperability is the ability of different devices and systems to communicate with each other seamlessly, enabling them to work together to achieve common goals and improve overall efficiency. For example, in smart farming, farmers can collect and analyze data from multiple sources that are interconnected and work together to make informed decisions about crop management, such as soil moisture, temperature, and weather conditions.
- Security and privacy: Security and privacy are important characteristics of IoT as they ensure that the data collected and transmitted by IoT devices is secure and private. In smart agriculture, security and privacy can include encryption and authentication protocols to prevent unauthorized access to data, as this data could be exploited by malicious attacks for financial gains or to cause harm to farmers.
- Scalability: Scalability in IoT refers to the ability to handle a growing number of devices and data traffic in a network without a significant decrease in performance. Scalability in the case of smart agriculture can include the addition of more sensors to cover larger areas of the farm and the integration of new technologies as they become available.
- User experience: User experience in IoT refers to the ease of use and convenience of the technology for the end user. In the context of smart agriculture, it includes providing a simple and intuitive interface for farmers to access and interpret the data collected by sensors; for example, designing a user-friendly mobile application, providing real-time alerts and notifications in case of issues, or creating a customizable dashboard to view and analyze data. This characteristic plays a vital role in the adoption or success of IoT applications.
All these characteristics are crucial for the successful implementation and operations of IoT applications. Without all the aforementioned characteristics, IoT systems cannot function effectively. Their characteristics ensure that IoT devices and systems are reliable, efficient, and secure, ultimately leading to better user experiences and outcomes.
The basic architecture of IoT
The architecture of IoT can be defined as the components of IoT interconnected with each other and how they interact to provide a complete solution. The components that make up the IoT architecture include devices, sensors, connectivity, applications, storage, and so on. The IoT architecture can be divided into four layers at a high level:
- Sensing or perception layer: The perception layer is responsible for sensing the environment. Sensors and actuators are the core components of this layer, and this stage of the layers is responsible for data gathering.
- Network layer: The network layer is responsible for data transmission by providing connectivity between devices. It includes internet gateways, network gateways, and network technologies such as Bluetooth, Wi-Fi, Zigbee, and cellular networks, which we are going to discuss in upcoming chapters in detail.
- Data processing layer: The data processing layer is responsible for processing data, managing storage, and making decisions. The task of this layer is to process information and make required decisions.
- Application layer: The application layer is the bottommost layer, and it makes a bridge between the end user and the IoT system. The application layer also includes various software applications that run on devices and servers, such as mobile applications, web applications, dashboards, and analytics tools.
Figure 1.1 shows the basic architecture of IoT. The arrow on the left of the diagram shows the data flow or control flow:

Figure 1.1 – Basic architecture of IoT
The data flows from top to bottom, where the sensor collects data, the network layer transmits the data, the data processing layer analyzes and stores the data, and the application layer is responsible for showing that data to the end user, whereas the control flow is from bottom to top; take an example of a thermostat.
In the case of controlling a thermostat using a mobile application, the process involves several layers of interaction. At the application layer, the user interacts with the mobile application to adjust the thermostat’s temperature setting. The user’s command is then analyzed and translated into a specific action at the data processing layer. This action includes determining which thermostat device to control based on the user’s input. Subsequently, at the network layer, the command is sent over a network connection to the designated thermostat device. The thermostat device receives the command and adjusts its temperature settings accordingly, effectively regulating the temperature in response to the user’s input. This layered approach ensures seamless control of the thermostat through the mobile application.
Applications of IoT
IoT has changed the way we live, work, and interact with the world around us. From smart homes and wearables to smart cities and industrial automation, IoT is making its way into every aspect of our lives. The applications of IoT are continuously evolving and diverse, with new use cases emerging every day. IoT has the potential to gather significant amounts of data, and data being the new gold can help transform everything around us.
In this section, we will explore some of the most exciting and innovative applications of IoT and how they are transforming the way we live and work. Since the number of IoT applications is enormous, we are going to discuss selective applications categorized in the form of the following industries:
- Smart homes: Smart homes are a popular application of IoT, which involves the use of interconnected devices to manage, optimize, and automate various things in your daily life. In smart homes, home automation is one example of IoT that allows users to control various devices and systems such as lights, heating, and entertainment systems through mobile or other interfaces. Security, surveillance, and energy management are other examples that make our home smarter, more secure, and energy-efficient, which results in reduced energy bills and a smaller carbon footprint.
- Healthcare: IoT has revolutionized the healthcare industry by introducing remote health monitoring and patient tracking. IoT-enabled devices or, more specifically, wearable IoT devices these days can monitor patients’ vital signs and send the data to healthcare providers in real time, enabling them to be proactive. Additionally, IoT can help improve asset management so that all the required equipment is available when needed.
- Industrial automation: IoT technology has played a vital role in bringing significant advancements in predictive maintenance, which has ensured the continuity of production. Also, IoT helps in supply chain management and quality control. All these applications of IoT in industries have reduced downtime and increased productivity and cost savings.
- Transportation and logistics: IoT has helped the transportation and logistics sector as well by offering efficient ways of managing fleets, tracking assets, and improving parking management systems. With the help of IoT devices and sensors such as GPS trackers, fleet managers can track the location, speed, and condition of their vehicles in real time, which makes it easier for them to plan routes and manage fuel. Asset tracking enables logistics managers to track and monitor shipments and ensure they are in good condition.
- Agriculture: IoT has a lot of potential to increase productivity in the agriculture sector, with applications such as precision farming, livestock monitoring, and crop management. Farmers can use IoT sensors and data analytics to monitor the growth and health of crops, irrigation and fertilization processes can be optimized, and it also aids in the detection of diseases and pests.
The aforementioned applications are the most popular ones, but IoT has helped other businesses and industries as well. In the last part of this book, we will make our own projects that will use the potential of IoT to help us with different daily tasks.
In this section, we learned what IoT is and what its main characteristics are, and we discussed the basic architecture of IoT, from the sensing layer to the application layer. Toward the end of the section, we familiarized ourselves with IoT applications and discussed how these applications can contribute to our daily lives and make them easier. In the next section, we will discuss the capabilities of ESP32 and will learn why it is one of the best candidates for IoT-enabled applications.
Understanding the capabilities of ESP32 for IoT
In the previous section, we discussed a lot about IoT. ESP32 is equipped with built-in Bluetooth (supporting Low Energy, or LE), and Wi-Fi makes it the perfect candidate for IoT use cases. It can help in various layers of the IoT architecture. For example, it can serve as a sensor node in the sensing layer, which can help us collect and transmit data from various sensors; it can also work as a gateway or a hub in the network layer, collecting data from multiple nodes and forwarding it to the cloud or other devices; it can be used for data analysis and processing, and can also be used in the application layer in the form of wearable devices or robotics.
The versatility of ESP32 makes it an ideal candidate for IoT applications, and in this section, we will be discussing more details about ESP32, its different variants, and a brief comparison of ESP32 with other development boards available for IoT development.
A brief overview of the ESP32 board and its variants
As discussed in the introduction, ESP32 helps a lot in IoT development, but there are several variants of ESP32 microcontrollers on the market. Some popular ones include ESP32-WROOM, ESP32-WROVER, ESP32-DevKitC, and ESP32-SOLO. The difference between all these variants is in their features, such as the amount of memory and number of pins, but the features that make it perfect for IoT development are common in almost all these variants. All variants of ESP32 are based on the same chip (that is, the ESP32 System on chip (SoC), which has a dual-core processor), and all variants have built-in Wi-Fi and Bluetooth LE (BLE) support and various input/output interfaces such as Universal Asynchronous Receiver-Transmitter (UART), Serial Peripheral Interface (SPI), Inter-Integrated Circuit (I2C), analog-to-digital converters (ADCs), digital-to-analog converters (DACs), and pulse-width modulation (PWM). You can read more about this at https://www.espressif.com/sites/default/files/documentation/esp32_datasheet_en.pdf.
ESP32 versus other development boards
When we say ESP32 is a perfect candidate for IoT development, it is not the only one. There are other options for IoT use cases. The following table will conclude why ESP32 is the best beginner-friendly option for getting started with IoT:
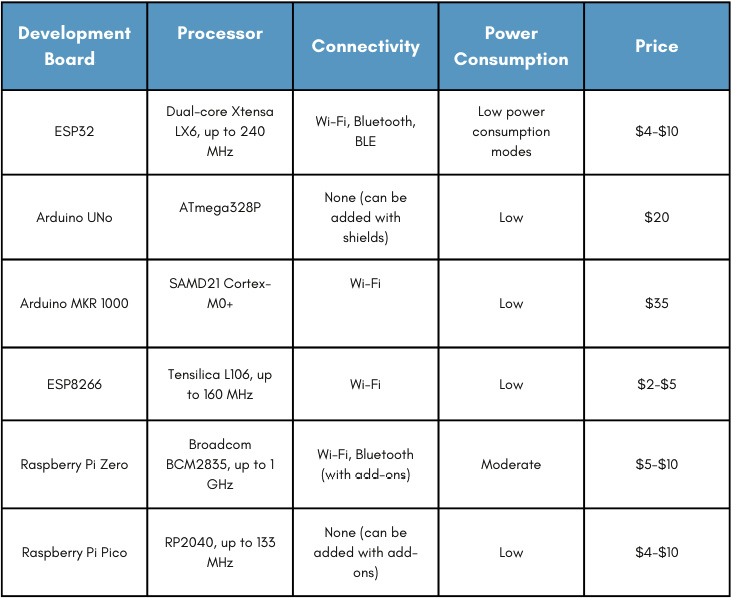
Figure 1.2 – Comparison of ESP32 with other IoT-enabled development boards
From the comparison table shown in Figure 1.2, we can see that ESP32 outperforms the other available development boards for IoT development in terms of price, power consumption, and connectivity options. However, other boards have other features that make them suitable for other applications; for example, Raspberry Pi Zero has a microprocessor and can run on the Linux OS, making it suitable for applications that require more computation power, and can be used to perform more complicated tasks.
To conclude, ESP32 provides Wi-Fi, Bluetooth, and BLE connectivity and provides interfaces for connectivity such as I2C, SPI, and UART, which can be used to connect other connectivity options such as a 5G shield, NarrowBand-IoT (NB-IoT) shield, or Long Range (LoRa) transmitter and receiver. Another advantage of using ESP32 is it provides low power consumption modes, such as deep sleep, and so on, which is one of the required features for IoT development.
In this section, we learned that built-in Wi-Fi and BLE capabilities enable ESP32 to be used in IoT-based applications, and the low power consumption and low prices make it one of the best development boards for IoT-based projects. Furthermore, we compared ESP32 with other development boards on the market. In the next section, we will learn about the capabilities of the Arduino IDE and program ESP32 using it.
Deep dive into the Arduino IDE 2.0 to program ESP32
In this section, we will discuss the ESP32 board and its programming using the Arduino IDE 2.0. As discussed in the previous section, ESP32 is a powerful microcontroller and can be programmed in several ways. We will discuss some common ways in which we can program ESP32 and discuss why the Arduino IDE is a beginner-friendly IDE to get started with ESP32. We will have a brief introduction to the Arduino IDE, install the Arduino IDE, and will get ourselves familiarized with the Arduino IDE user interface. Then, we will move on to setting up the IDE for programming ESP32, and finally, we will walk through a simple “Hello World” example using an LED to demonstrate the basics of ESP32 programming with the Arduino IDE.
How can ESP32 be programmed?
ESP32 can be programmed in several ways, including the Arduino IDE, the Python programming language, the Expressif-IoT Development Framework (ESP-IDF, the official development framework by Espressif), and many more. Some of the most common and widely used methods are described as follows:
- Arduino IDE: A beginner-friendly IDE that can help you write, compile, and upload code to ESP32 using the Arduino programming language.
- MicroPython: A Python-based interpreter that runs on ESP32, allowing developers to write Python code and execute it directly on the device.
- ESP-IDF: The official development framework for ESP32 offers several APIs for low-level hardware access and allows for more flexibility in programming and debugging.
- Other programming options: Other ways can be used to program ESP32, such as Visual Studio Code with PlatformIO, JavaScript and Node.js, and Rust.
The following table differentiates the three most common options for programming:
|
Parameter |
Arduino IDE |
MicroPython |
ESP-IDF |
|
Language |
C++ |
Python |
C |
|
IDE support |
Yes |
No |
No |
|
Community support |
High |
Moderate |
High |
|
Low-level access |
Limited |
Limited |
Full |
|
Learning curve |
Easy |
Easy |
Moderate |
Table 1.1 – Comparison of programming options for ESP32
Table 1.1 compares the three most common options for programming ESP32. The Arduino IDE and MicroPython are beginner-friendly options, while ESP-IDF provides you complete access to the functionalities of ESP32. However, the absence of IDE support in ESP-IDF and MicroPython makes it difficult for beginners to get started.
The Arduino IDE 2.0
The Arduino IDE 2.0 is the latest version of the popular open source software (OSS) for programming Arduino boards. The IDE is an easy-to-use platform for programming microcontrollers and creating interactive electronic projects. It has many new features as compared to the previous versions, it is more user-friendly and powerful, and you can use and manage libraries (libraries are pre-written code modules that simplify the development of Arduino projects by providing functions for various tasks), boards, and projects in a single place, making it easier to find and organize your work.
It is an official software for programming Arduino boards, but you can add support for other boards such as ESP32, ESP8266, Network Repository Function (NRF) boards, and Synchronous Transport Module (STM) boards, and its user-friendly interface helps beginner-level developers get started easily.
Installing the Arduino IDE 2.0
Installing the Arduino IDE 2.0 is a very straightforward process that is like installing any other software. Following are summarized steps you can follow to install the Arduino IDE 2.0 on your system:
- Go to the Arduino software page on the Arduino website (https://www.arduino.cc/en/software).
- Scroll down to the download options and select an option based on your operating system:

Figure 1.3 – Arduino IDE download options
- For Windows, run the installer and follow the prompt. For Linux, extract the downloaded file and run the
arduino -idescript. For macOS, open the downloaded.dmgfile and drag the application’s Arduino IDE 2.0 icon into the application folder.
Important note
Depending on your system configuration, you may need to install additional dependencies or drivers. Refer to the Arduino installation documentation (https://docs.arduino.cc/software/ide-v2/tutorials/getting-started/ide-v2-downloading-and-installing) or Arduino Forum for more details.
Hopefully, you have successfully installed the Arduino IDE, and in the next section, we will have an overview of the Arduino IDE user interface.
An overview of the Arduino IDE 2.0 user interface
The IDE 2.0 is divided into four main sections: the menu bar, the left sidebar, the editor area, and the bottom panel. The menu bar provides access to all functions and tools available in the IDE, including opening and saving files, compiling code, and uploading it to the board:
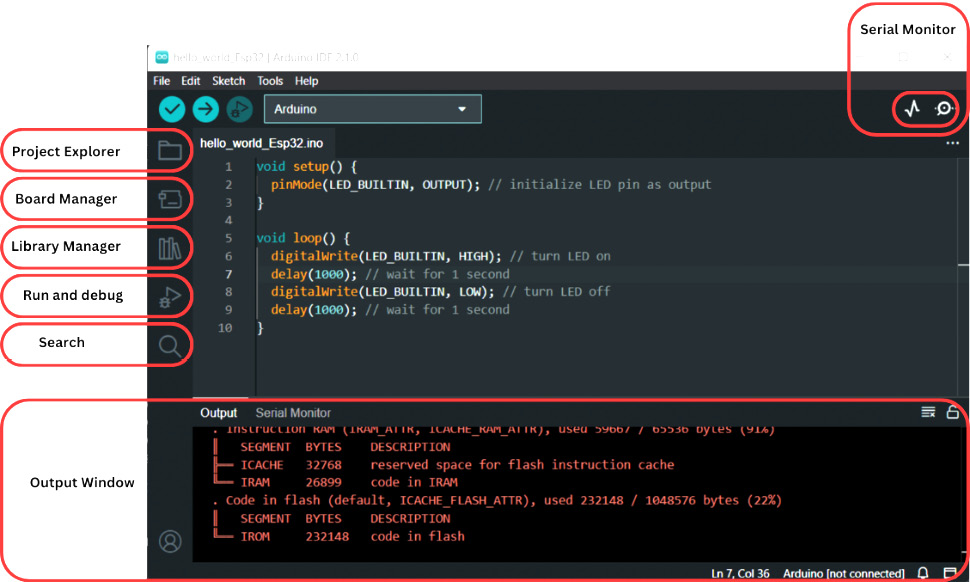
Figure 1.4 – Overview of the Arduino IDE 2.0 user interface
The left sidebar contains the project explorer, which shows the structure of the project, the board manager, which can help you install new boards’ support, the library manager, which will help you to include, search for, and install new libraries, and debugger and search options, which help while writing code and debugging errors.
The editor area is where code is written and edited, and features such as syntax highlighting and autocompletion make it easy to write code.
The bottom panel displays the console output, debugging information, and serial monitor, which we will be using a lot in upcoming chapters for debugging our code.
Setting up the Arduino IDE 2.0 for ESP32
To use ESP32 in the Arduino IDE, we will first have to install the ESP32 board support, which helps us to compile, build, and upload the ESP32 program. The board support can be installed using the following steps:
- Once the Arduino IDE is installed, launch Arduino IDE.
- Go to File | Preferences…:
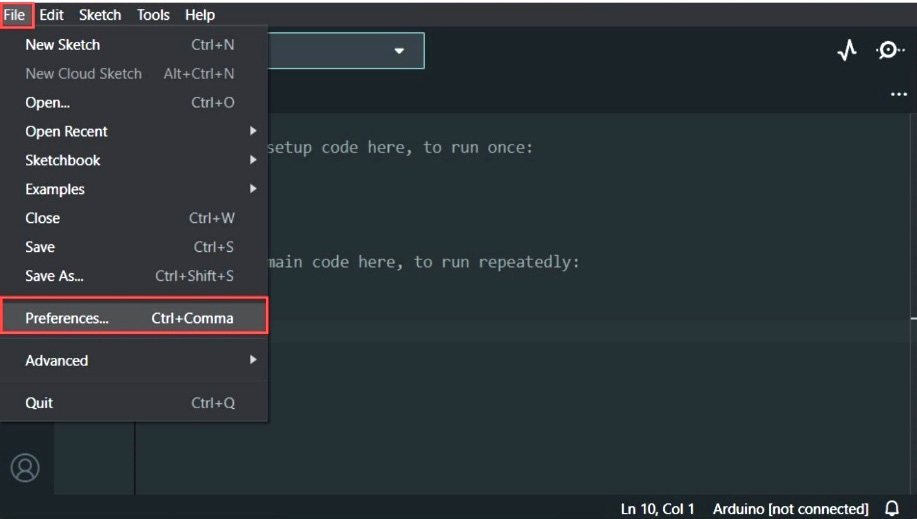
Figure 1.5 – Preferences in the Arduino IDE
- Paste the following link into the Additional boards manager URLs section: https://raw.githubusercontent.com/espressif/arduino-esp32/gh-pages/package_esp32_index.json
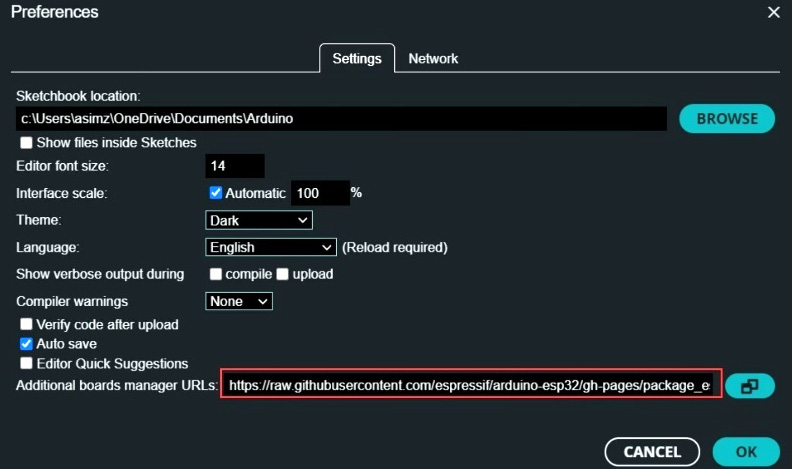
Figure 1.6 – Pasting URL into the Additional boards manager URLs section
- After adding the URL to the Additional boards manager URLs section, go to BOARDS MANAGER, which can be accessed from the left-hand side menu, type
esp32, and install the board support:
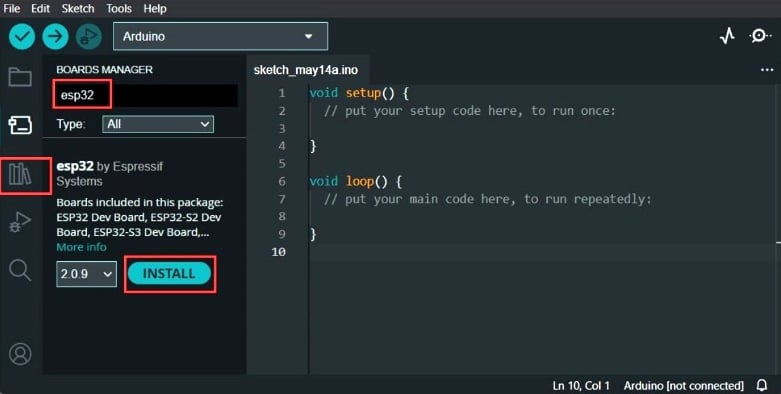
Figure 1.7 – Installing ESP32 board support in the Arduino IDE

Figure 1.8 – ESP32 board support installed in the Arduino IDE
Important note
If you have multiple URLs in the Additional boards manager URLs section (for example, if you have ESP8266, NRF boards, or other boards support installed), you can separate the URLs using a comma between them.
You have now installed the board support for ESP32 and are ready to write and upload exciting IoT programs to ESP32 using the Arduino IDE. In the next part, we will write a “Hello World” example for ESP32.
ESP32 “Hello World” example using the Arduino IDE 2.0
In other programming languages, the Hello World program is the simplest program that serves as an introduction to the programming language and mostly prints “Hello World." In the case of ESP32 and the Arduino IDE, the equivalent to the Hello World program is a blinking LED as it is the simplest and most basic program to test the functionality of the board and its ability to communicate with the IDE. If the LED blink is successful, the developer can verify that the board and IDE are working as expected and can proceed to more complex projects.
You can follow the next steps to run the “Hello World” example:
- Open a new sketch by clicking File | New in the Arduino IDE.
- Type the following code in the new sketch:
void setup() {pinMode(LED_BUILTIN, OUTPUT);
}
void loop() {digitalWrite(LED_BUILTIN, HIGH);
delay(1000);
digitalWrite(LED_BUILTIN, LOW);
delay(1000);
}
The Hello World code is made up of two parts or functions: the
setup()function and theloop()function.The
setup()function runs only once when the ESP32 board is powered up or reset. In our previous code, we used thesetup()function to initialize the LED pin as an output.The
loop()function runs continuously after thesetup()function has been executed. In our last example, we first turn on the LED using thedigitalWrite()function and set the digital pin toHIGH. Then, using thedelay()function, we wait for1000milliseconds or 1 second before setting the state of the LED toOFFby setting the digital pin toLOWand wait for another short amount of time to use thedelay()function. The process is repeated, resulting in the LED blinking. - Make sure you have selected the right version of the ESP32 board and the correct COM port.
- Upload the sketch to the ESP32 board by clicking on the Upload button in the Arduino IDE and wait for the upload process to complete.
- Once the upload is complete, you will see the built-in LED in ESP32 should start blinking:
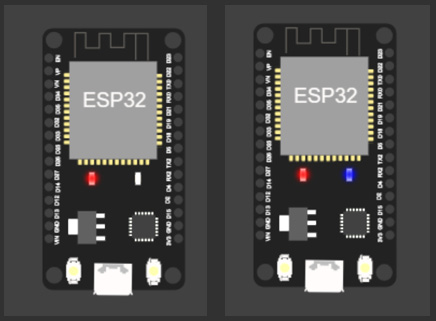
Figure 1.9 – Built-in LED state OFF (left ESP32) and built-in LED state ON (right ESP32)
Congratulations! You have run your first project using ESP32 and the Arduino IDE. You are on the right track to build exciting IoT projects. In the next section, you will learn a bonus skill; that is, simulating your project in a browser.
Bonus – Simulating ESP32 projects
This book is written to give you practical knowledge of ESP32 and encourages you to build projects using real hardware, but simulating ESP32 projects can be advantageous in several ways as compared to using actual hardware. Simulation can save costs and allows you to do rapid testing and debugging without hardware damage, and it provides an interactive way for beginners to learn and experiment with ESP32 and the Arduino IDE.
Let’s simulate the Hello World program in the ESP32 simulator. You could follow the next steps to simulate your ESP32 projects:
- Visit https://www.wokwi.com, which is an Arduino and ESP32 simulator and is designed to simulate IoT projects in a browser:
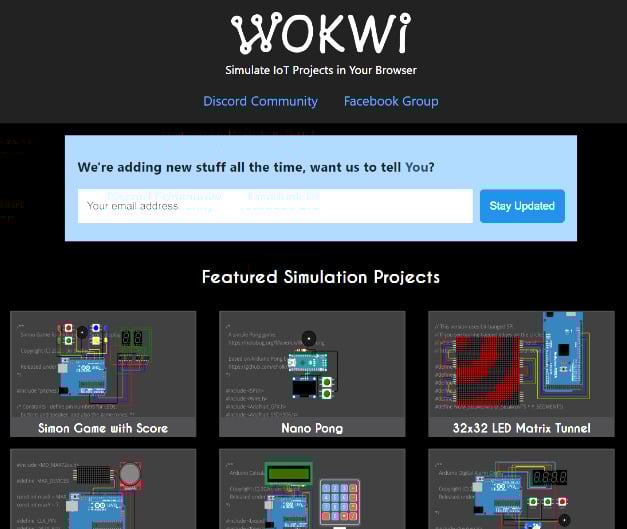
Figure 1.10 – Wokwi IoT simulator
- Sign up for a new account and then log in:
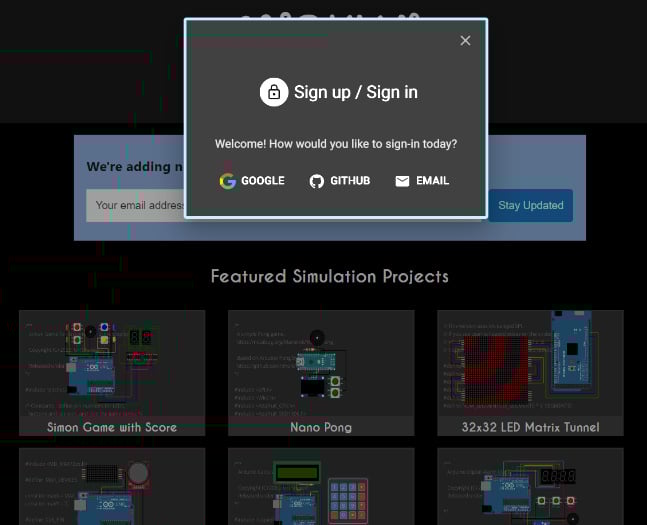
Figure 1.11 – Signing up for or signing in to Wokwi
- After logging in, navigate to https://wokwi.com/dashboard/projects and click on + NEW PROJECT:

Figure 1.12 – Creating a new project in Wokwi
- When it asks for boards, select ESP32 if you want to simulate using the Arduino programming language:
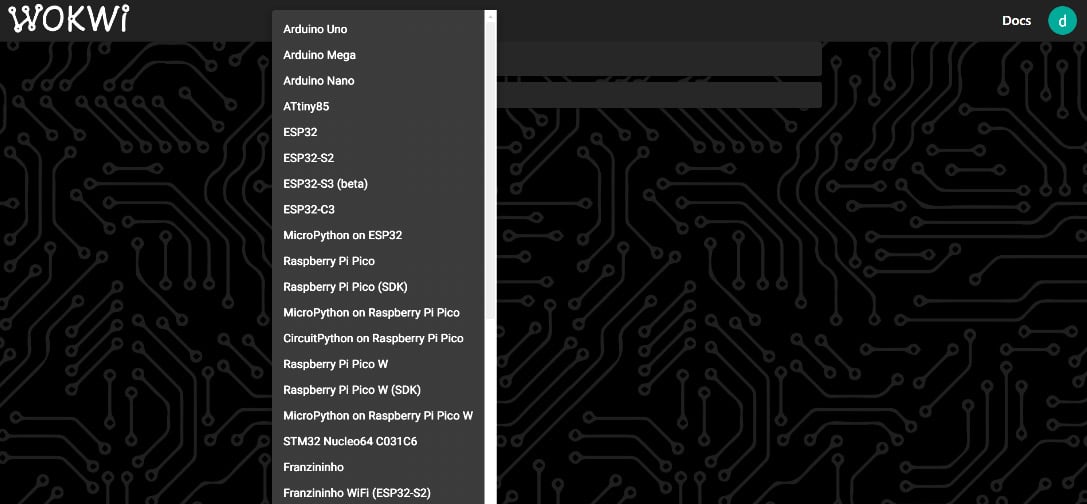
Figure 1.13 – Selecting the ESP32 board in Wokwi
- In the
sketch.inofile, paste the Hello World code:
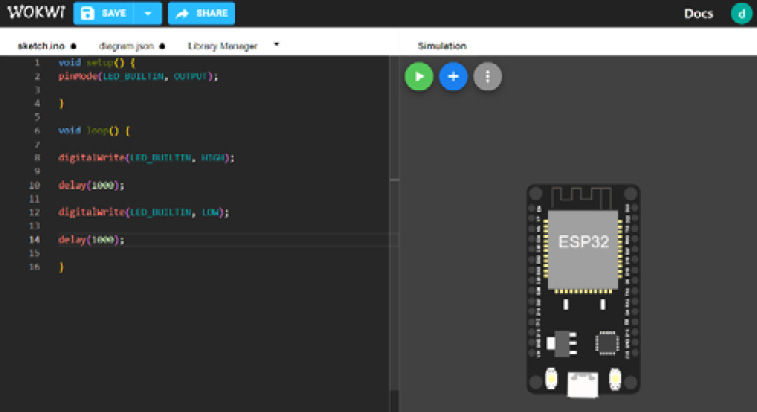
Figure 1.14 – Writing code in Wokwi
- Click on the green button that says Start the simulation, and you will see that the built-in LED will start blinking:
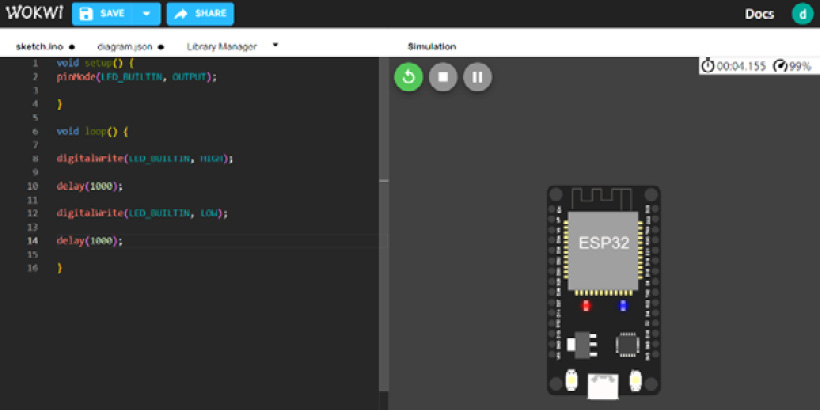
Figure 1.15 – Running a simulation in Wokwi
If you would like to add more parts, you can click on the blue + button, and you will see many peripheral options such as buttons, switches, LEDs, LCDs, different sensors, and so on:
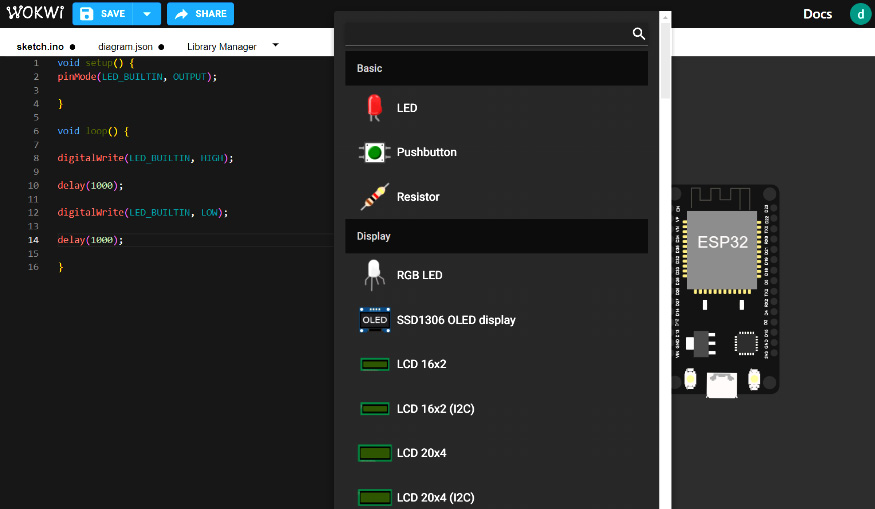
Figure 1.16 – Adding a new part in Wokwi
This simulation tool will help you debug code without actually making circuits. All the examples that we will perform in this book can be simulated using Wokwi.
Summary
In this chapter, we discussed the basics of IoT, including its main characteristics that distinguish it from other technologies, and we discussed the architecture of IoT and learned the directions of data flow and control flow in the IoT architecture. Then, we explored some common and popular applications of IoT such as smart homes, healthcare, industrial automation, transportation, logistics, and agriculture.
After discussing IoT, we discussed the ESP32 board, compared it with other microcontrollers, and discussed the different variants of ESP32 boards and how ESP32 can be programmed. We then discussed the Arduino IDE 2.0, which is the latest version of the Arduino official board programmer, installed the ESP32 board support to set it up for using ESP32, and finally, we ran a “Hello World” example on ESP32 and simulated it using an ESP32 simulator, which can help us in cost savings, testing, and debugging.
In the next chapter, we will be discussing how to interface sensors with ESP32.