


 Download code from GitHub
Python’s Integration with Blender
Blender accepts code instructions in the same way as it interacts: via a graphical user interface.. That allows artists and studios to implement their own features and automation.
Python, a highly extensible programming language with low barriers to entry, is widely used in computer graphics.
Though Blender’s core is written in C and C++, menus and graphic elements use Python. That allows custom and factory functionalities to share the same look and feel.
In this chapter, we’ll learn how to run Python commands in Blender and where to look for their outcome. We will also see where a history of past instructions is found and how to use that to our advantage. Lastly, we will introduce a code editor and a version control system and see how they help make our work easier.
By the end of this chapter, you will understand how a programmer works and why it is not so different from using software in the first place.
In this chapter, we will cover the following main topics:
- The scripting workspace
- Python execution
- Version control
Technical requirements
Besides Blender 3.3+ or in this case, Blender 3.3 (https://www.blender.org/download/lts/3-3), you will require the following free tools:
- Visual Studio Code, available at https://code.visualstudio.com/Download. Version 1.66 is used in this book, and is available at https://code.visualstudio.com/updates/v1_66
- Git (optional), found at https://git-scm.com/downloads
You are encouraged to write your own code; the examples for this chapter can be found at the following URL: https://github.com/PacktPublishing/Python-Scripting-in-Blender/tree/main/ch1.
Since it is a free, open source software, there are plenty of ways to install Blender. We are going to look at the most common install solutions.
Installing Blender
The procedure for installing Blender varies with the operating system. Like most applications, installers for Microsoft Windows and Apple macOS are provided. Also, portable versions, such as archives that can be uncompressed and executed everywhere in the system, are available for Linux and Windows.
The version of Blender used in this book, 3.3, might differ from other versions already installed on the system. In that case, we can install different versions of Blender on the same machine.
Installing Blender on Windows
There are more ways to install a program on Microsoft Windows: Windows Installer, Microsoft Store, and using a portable archive. While most application publishers choose one of those options, all of them are available for Blender.
Installing multiple versions via Windows Installer
The most common way to install Blender on Windows is to download Windows Installer from Blender’s download page. Executing the downloaded .msi file installs Blender. Before Blender 3.4, only one of the multiple installed versions was available in the Start menu.
If that is the case for you, the other versions can be accessed by navigating to the Program Files folder, usually C:\Program Files\Blender Foundation, using Windows Explorer.
We can execute blender.exe directly from the Blender 3.3 folder or use right-click > New > Shortcut in Windows Explorer and create a shortcut to it:
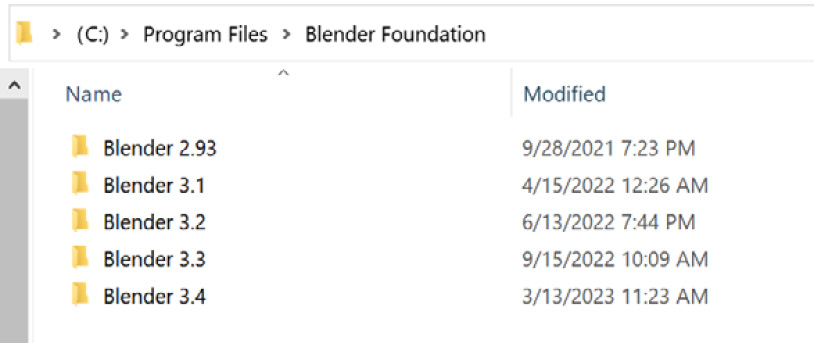
Figure 1.1: Multiple versions of Blender in Program Files
Alternatively, since version 3.3 is a Long-term Support version, it is also available in the Microsoft Store.
Installing Blender from the Microsoft Store
The download page of Blender 3.3 provides a link to the Microsoft Store installer. Alternatively, we can start Microsoft Store from the Start menu and look up blender in the top bar. Once we get to the Blender page, we make sure that it’s published by Blender Foundation and click the Get button:
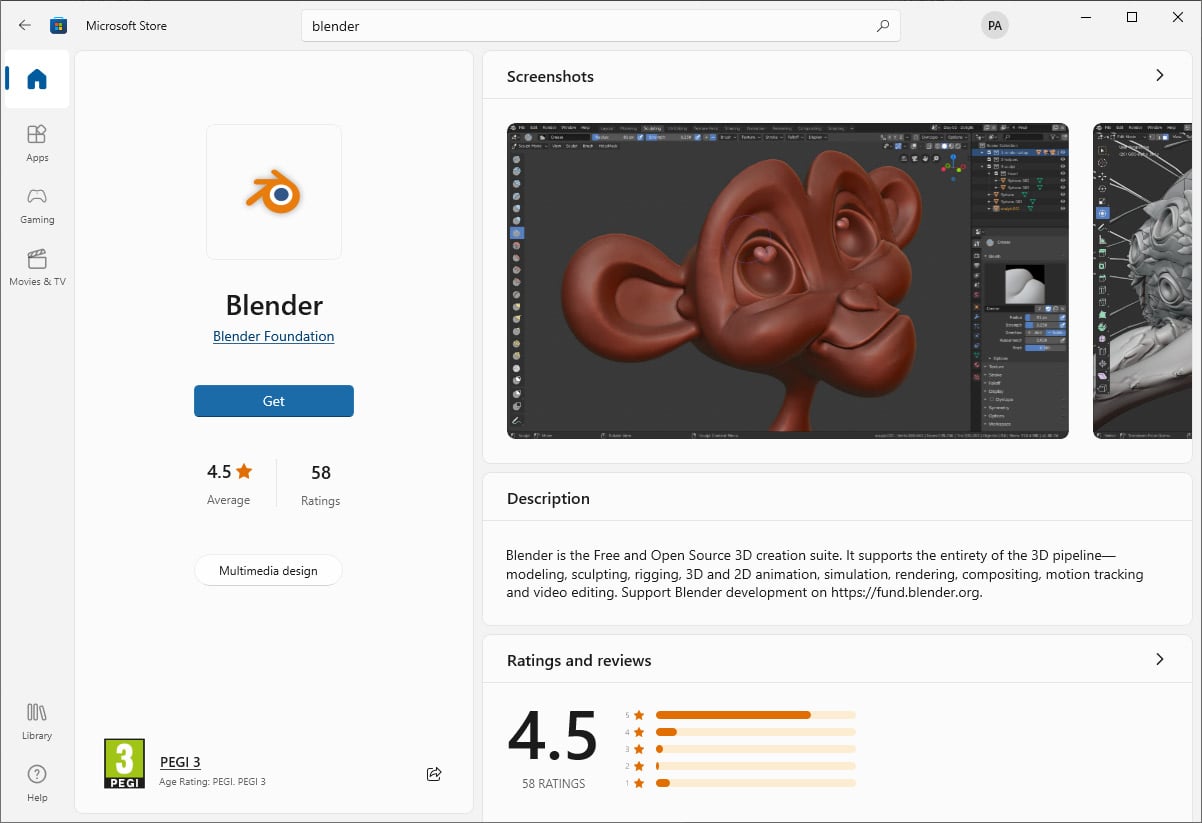
Figure 1.2: Installing Blender from the Microsoft Store
That will add a Blender 3.3 entry in the Start menu:
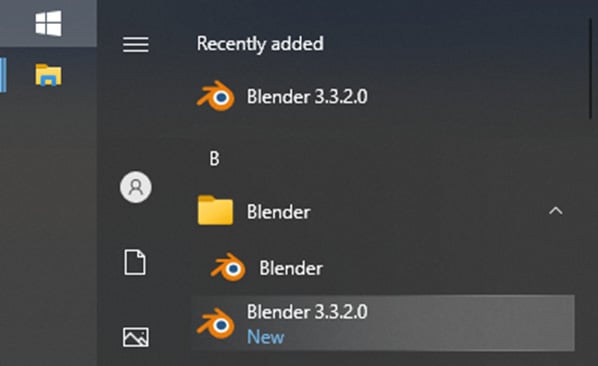
Figure 1.3: Multiple versions in the Start menu
Microsoft Store gives the advantage of always adding a shortcut for the installed version. If, for some reason, Microsoft Store is not an option, we can download a portable archive.
Downloading a portable archive
To avoid any application packaging, we can download a Windows portable .zip file, or a Linux .tar.xz archive.
Portable versions can be used from any location of the system, even removable drives. We only need to extract the archive in a directory of choice via right-clicking -> Extract in the file manager and then executing the blender.exe or blender executable in the unpacked folder.
Installing multiple versions on macOS
We can download the .dmg packages for Apple Intel or Apple Silicon computers. Once downloaded, double-clicking the file will open the installer window. If another version of Blender is already present in the system, a prompt dialog will ask whether we want to keep both or replace the installed version with the new one.
Selecting Keep Both will install the new version as Blender 2. The digit depends on the installation order and doesn’t reflect the actual version of Blender. We can rename it Blender 3.3 using right-click -> Rename on the Application entry in the file manager:
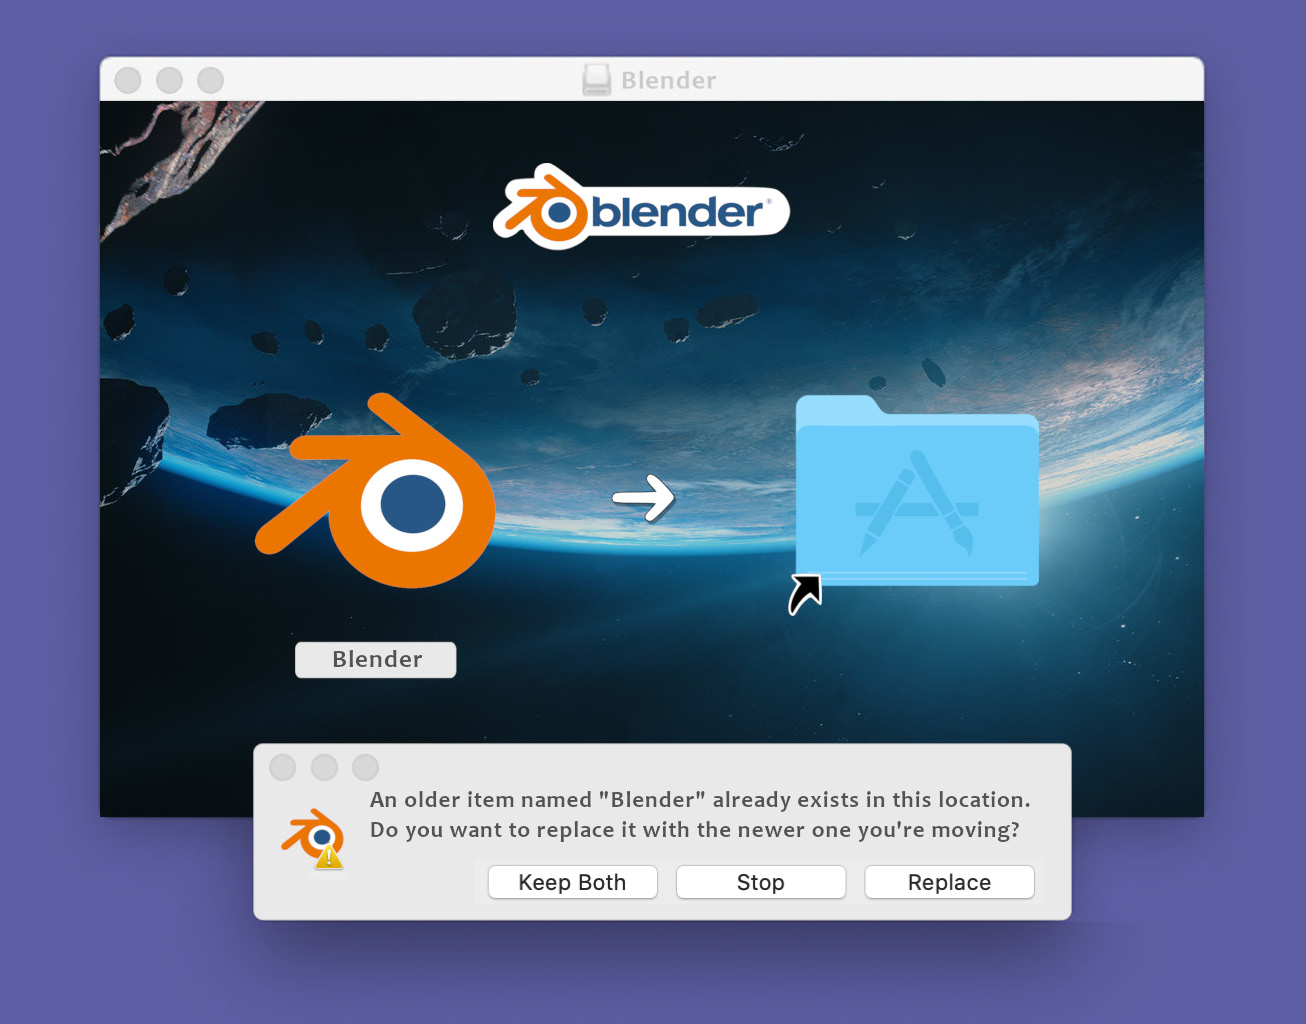
Figure 1.4: Installing an additional version of Blender on macOS
There are many other ways to install Blender: a link to stores such as Steam (Windows, macOS, or Linux) or Snapcraft (Linux only) is provided on the download page, not to mention the package manager of Linux distribution (apt on Ubuntu, yum on CentOS, and so on). It is worth mentioning that it is possible to build Blender from the source code, but that’s an advanced topic beyond the scope of this book.
While this book sticks to version 3.3, the examples should work on future releases of the 3.x series with minor corrections at worst.
A future major release, such as Blender 4 or 5, is almost guaranteed to break compatibility with past scripts. Still, the knowledge from this book about best practices and thought patterns will stand the test of time.
Now that we have installed Blender on our system, we can dive into its scripting capabilities.
The Scripting workspace – first steps with Python
A sequence of Python instructions is often referred to as a script. Likewise, the activity of producing Python code is usually called Scripting.
Blender’s interface consists of different workspaces. Each of them is a tab meant for a different activity. At the time of writing, the Scripting tab is the last on the right side of the screen. Clicking on it switches to the interface designed for Python users.
The most significant elements are the Python console, the Info Log, and the Text Editor:

Figure 1.5: Blender scripting interface
We will start our journey in Python by typing commands in the Python console.
The Python console
The console is an interactive terminal with a header that displays the current version of Python (3.10.2, at the time of writing) and a >>> prompt sign to advertise that it’s waiting for interactive text. All we need to do is hover the cursor on it and type an instruction:

Figure 1.6: The Python console
“Hello World!” from the console
The practice called Hello World! is a way to familiarize yourself with a new programming language. It’s about displaying the titular phrase using a command.
We will use the print function for that. Example code for the interactive console starts with the >>> prompt symbol. We don’t need to type that as well in the console: it is already there. We click on the console area and type print("Hello World"):
>>> print("Hello World")
Then press Enter. The console output is displayed in a different color and doesn’t start with the prompt:

Figure 1.7: Displaying our output on the console
We can use the Python console to query information about the Python version.
Checking the Python release
The current version of Python can be displayed anytime using the sys module. We need to import this module and look for its version attribute. That takes the following two lines:
>>> import sys
>>> sys.version
The console prints out verbose information about the version in use:
'3.10.2 (main, Jan 27 2022, 08:34:43) ...'
The three digits of the version number stand for major, minor, and micro versions. A different major release number implies heavy changes in the language syntax: Python 3.0 is very different from any Python 2.x releases. A minor release introduces new features but doesn’t break compatibility with older code. A micro release doesn’t bring changes to the language; it consists of bug fixes and other forms of maintenance.
The changes brought with each new Python version are available as Release Notes on the download page of the Python Software Foundation:
https://www.python.org/downloads/
If our script relies on a feature introduced with a minor release, we can check the version numbers individually using version_info, as seen here:
import sys
if sys.version_info.minor < 6:
    print("Warning: This script requires Python 3.6.x")
Compared with other software, Blender follows the Python release cycle very tightly. This is done mostly to take advantage of the latest improvements in terms of performance and bug fixes.
Checking the Blender release
The current Blender release can be checked in the graphical user interface or in Python scripts.
Checking the Blender release in the interface
Starting from version 3.0, the most immediate place to check for the version number of Blender is in the lower-right corner of the window. In version 3.3, the version number is followed by the current time and frame set for the scene:
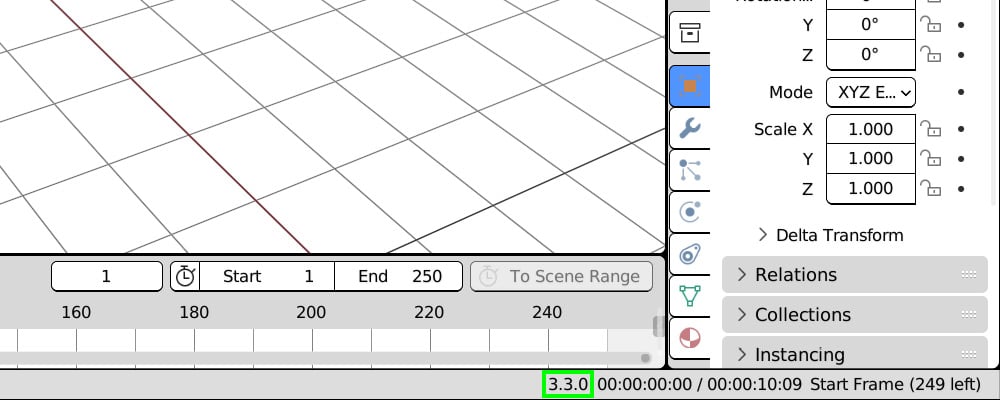
Figure 1.8: Blender version number in the status bar
Another way to display the version number is by clicking the Blender icon in the top-right corner of the menu bar and then selecting About Blender from the menu.
We can also get Blender’s version number via Python scripts.
Checking the Blender release in Python scripts
If our scripts rely on features from a specific version, they must be able to determine on which release of Blender it is running. That information is contained in the bpy.app module. We can display the current version by typing these lines in the console:
>>> import bpy
>>> bpy.app.version
In Blender 3.3.2, the console returns the following:
(3, 3, 2)
Unlike sys.version_info, bpy.app.version doesn’t contain names, just numbers. Nevertheless, we can store them in variables using the Python syntax:
>>> major, minor, micro = bpy.app.version
Then, we can use print to display the single version numbers:
>>> print("Major version:", major)
Major version: 3
>>> print("Minor version:", minor)
Minor version: 3
>>> print("Micro version:", micro)
Micro version: 2
A new major release of Blender brings drastic changes to the interface and workflow, while a minor release introduces new tools for animation or for generating images.
To display the information, we have used the print function. Since functions are the first step toward structured programming, we will have a better look at how they work and how we can change the "Hello World!" message to something else.
Invoking functions
When we use a function, we say that we call or invoke that function. To do that, we type its name, followed by parentheses. Between parentheses, there is the function’s argument, such as the input on which it operates:

Figure 1.9: Function and argument in a Python script
When invoked, the print function reads the argument and displays it on a new line.
The "Hello World!" argument is a string literal: it can be any sequence of characters enclosed between quotation marks ("").
We can feed any other message to print; the output will vary accordingly:

Figure 1.10: Printing text in the Blender Python console
Now that we have gained confidence, we will look at some Blender commands.
The Info Log
The user activity is displayed as Python commands in the log area, at the bottom left of the Scripting workspace. We can open Blender and perform the following operations:
- Delete the default cube in the Viewport via right-click -> Delete.
- From the Viewport top bar, click Add -> Mesh -> Cylinder.
- From the Viewport top bar, click Add -> Mesh -> UV Sphere. We will find these three lines in the Info Log area:

Figure 1.11: History of actions in the Info Log area
The entries of the Info Log are the Python commands triggered by our recent activity. We can copy those lines and use them in our scripts.
Using the lines from the log
Clicking or dragging with the left mouse button selects the log lines. We can copy them to the clipboard via right-click -> Copy:

Figure 1.12: Copying Python commands from the Info Log
We can go back to the startup scene and paste them into the console:
- Restart Blender or click File -> New -> General.
- Go to the Scripting workspace.
- In the Python console, right-click -> Paste, and press Enter.
Executing those lines will delete the initial cube, then add two objects: the same steps run manually earlier. We will see how we can change their content and affect the outcome.
Changing parameters
Let’s not focus too much on the code for now: it will be clearer in the next chapter. Anyway, we might recognize a pattern from the "Hello World!" example:
function(arguments between parentheses)
And at least one argument is self-explanatory in its purpose:
bpy.[…]_uv_sphere_add(…, …, location=(0, 0, 0), …)
location=(x, y, z) represents the 3D coordinates where a new object is added. We can change the last line and create our sphere just above the cylinder.
Let’s revert to the startup scene once more and paste our lines again, but before we press Enter, this time, we change the last zero to 2:
bpy.ops.mesh.primitive_uv_sphere_add(radius=1, enter_editmode=False, align='WORLD', location=(0, 0, 2), scale=(1, 1, 1))
We have just run our first script. It deletes the selected objects and stacks two new shapes on top of each other:

Figure 1.13: Cylinder and Sphere primitives, created via Python
The Python console can execute code with immediacy but is not very practical for more than a few lines. We will now see how to run Python scripts as documents.
The Text Editor
This is the largest element in the Scripting workspace. It can be used for writing text and scripts.
To add a new script, we click the + New button in the top bar and create a new text:

Figure 1.14: Creating a new text object in the Text Editor
Let’s type some words, for instance, a more verbose version of “Hello World!”. Like many programmer editors, Blender displays the line numbers on the left:

Figure 1.15: Writing scripts in the Text Editor
Also, the words have different colors according to their Python meaning: white for the function, yellow for the string, and red for the parenthesis. This feature is called syntax highlighting and gives useful visual feedback: the color of the words depends on their role in the programming language.
Running text documents
If the current text is a Python script, we can execute it from the Text Editor:
- Click on Run Script from the Text menu in the Text Editor menu bar.
- Look for the execution outcome info in the Info Log:

Figure 1.16: Executing scripts in the Text Editor
The Info Log confirms that something has happened:

Figure 1.17: The script execution mentioned in the Info Log
But we might be disappointed, as the printout text is apparently nowhere to be found!
The reason is that the output of the Text Editor goes straight to the System Console, the operating system’s command line.
On Windows, we can display it using Window ->Toggle System Console from Blender’s top bar. To read system messages on a Unix-based system (Linux or macOS), we must start Blender from a command line in the first place.
Once brought up, System Console displays the output printed by the Text Editor:
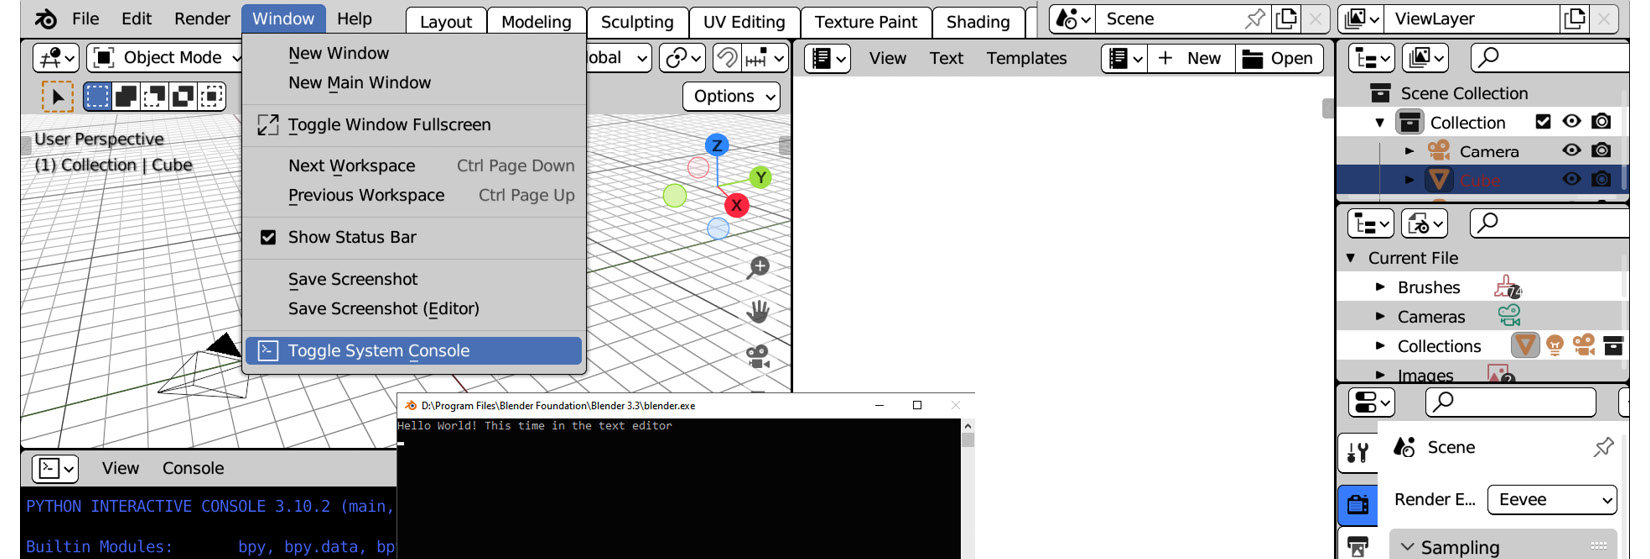
Figure 1.18: Displaying the System Console on Windows
The default name for our text block is Text. It can be renamed by clicking on it. We’ll better add the .py suffix as an extension to make it clear that it’s a Python script:

Figure 1.19: Renaming text blocks in Blender
Copying the Python console as script
Remember the lines we entered in the Python console earlier? If we haven’t closed Blender or loaded a new scene, we can copy them to the clipboard at once.
- From the Console menu in the Python console top bar, select Copy as Script.
- Create another text block using Text > New from the Text Editor menu.
- Give the text a new name, such as
OurFirstScript.py. - Paste the lines from the clipboard via right-click -> Paste in the text area.
Looking at the Text Editor, it turns out that the full version of the script is a little bit longer than our three lines:
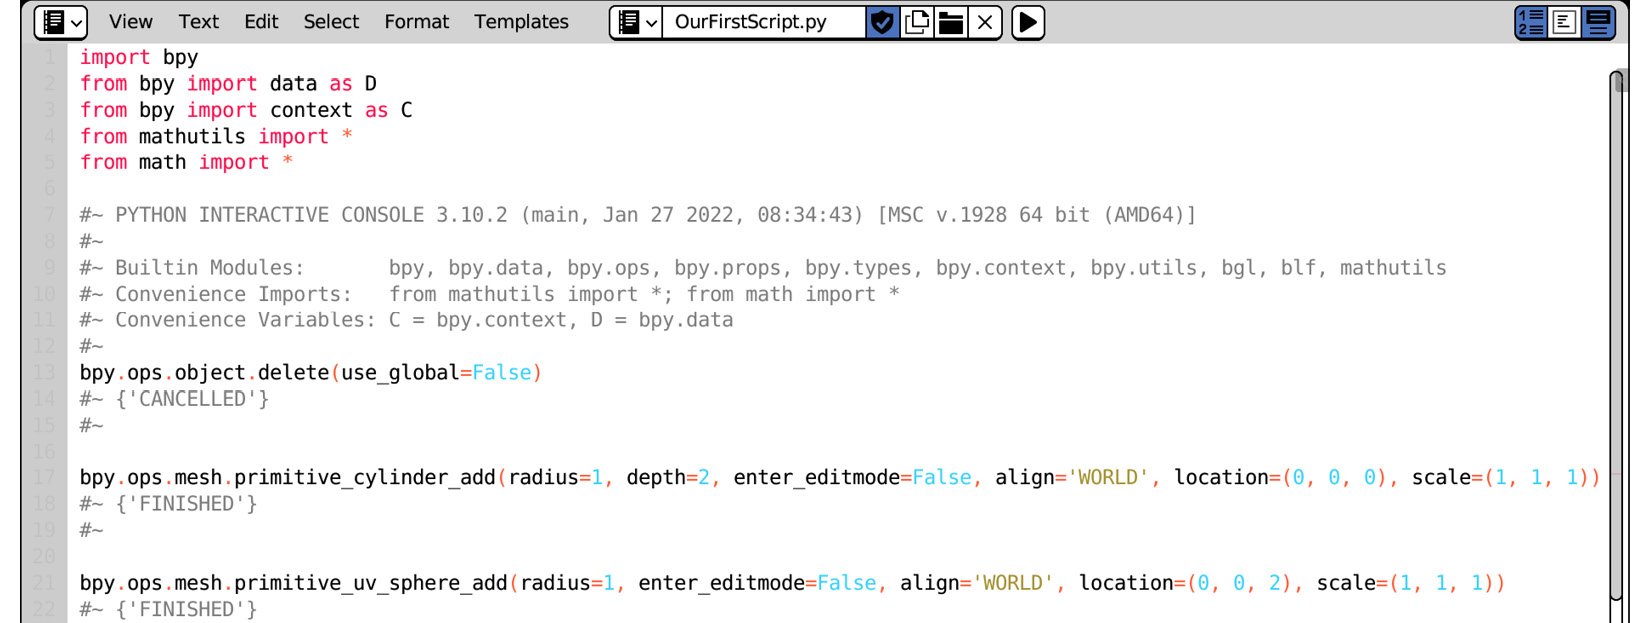
Figure 1.20: The Python console input copied to the Text Editor
The first five rows set up the console environment. They are executed behind the scenes when Blender starts.
Lines starting with a hash (#) are comments: they are ignored by Python and contain reminders or explanations meant for human readers.
Our own instructions are respectively at lines 13, 17, and 21. This script can be executed via Text -> Run Script as we did before or via the Alt + P keys combination.
Exporting text files
The notepad icon lets us switch between different text blocks via a drop-down list:

Figure 1.21: Switching between text blocks in Blender
Selecting Text | Save As… from the editor menu bar saves the current text to disk. A new window lets us select a folder and confirm the filename:
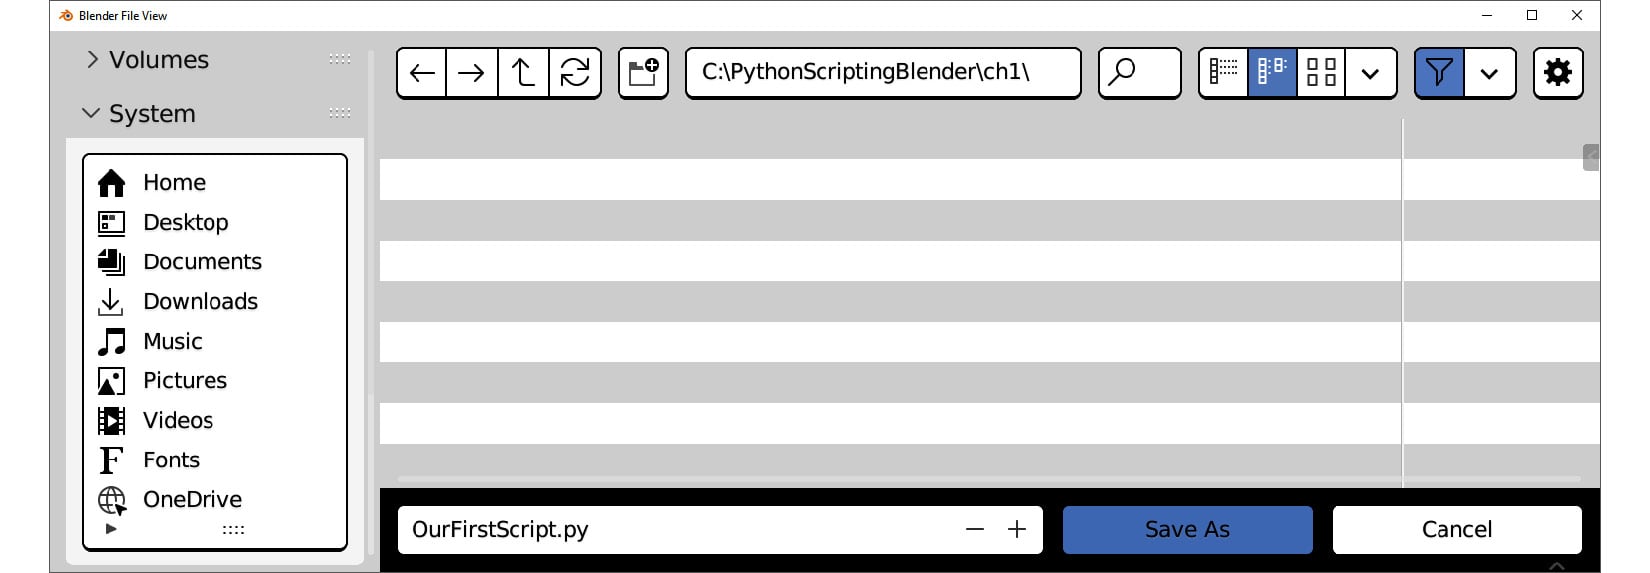
Figure 1.22: Saving the content of the Text Editor to file
Blender’s Text Editor is great for quick tests, but a programmer text editor is usually preferred for more serious tasks. We are going to use Visual Studio Code in the next section.
External editor – Visual Studio Code
Visual Studio Code (VS Code), is a fast, multiplatform, free editor from Microsoft, available for Windows, macOS, and Linux. Using an external editor makes our code independent from a session of Blender. Also, a programmer text editor offers many utilities besides syntax highlighting.
VS Code 1.66 is used in this book. It is a fast, lightweight editor available for most platforms, but there are plenty of alternatives – most notably, the following:
- Notepad++: This is a fast but powerful editor for Windows, available at https://notepad-plus-plus.org.
- PyCharm: This is a Python integrated development environment (IDE) by JetBrains. A free community version can be found at https://www.jetbrains.com/pycharm.
- LightTable: This is an interesting open source editor, available at http://lighttable.com.
- Sublime: This is a commercial text editor, found at https://www.sublimetext.com.
Most Linux distributions come with at least one decent, ready-to-use, text editor. We encourage you to experiment and find the text editor of your choice.
In this section, we will set up VS Code for Python scripting.
Pick the right studio!
VS Code and Visual Studio have a similar name but are two different products from Microsoft. While VS Code is a programmer text editor, Visual Studio is a full development environment for advanced languages such as C++. While C++ projects may require a specific version of the building environment, it is safe to use any version of VS Code as long as Python is a supported language.
Loading our scripts folder
We can load the folder that contains our script files using the Open Folder… entry from the File menu. The editor will display the folder content on the first tab of the left column: the Explorer tab. Clicking on a .py file opens the script for editing.
Additional Python support can be installed by clicking Install on the bottom-right notification:
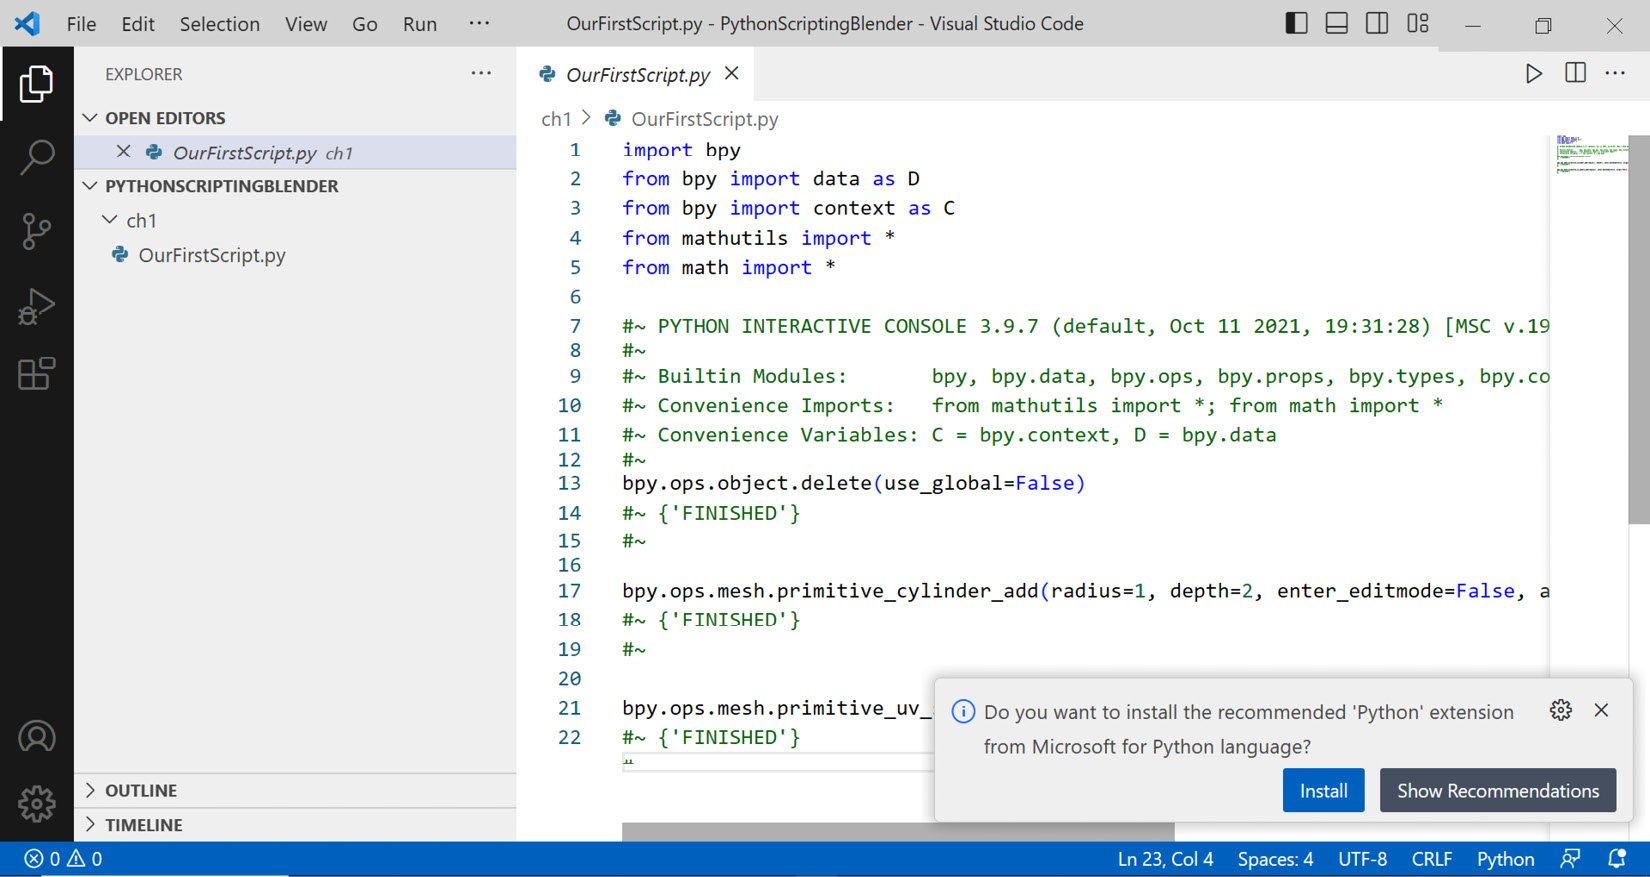
Figure 1.23: Our Python script in VS Code
Keeping Blender’s text blocks in sync
When a text file open in Blender is changed by another application, a red question mark appears to the left of the filename:

Figure 1.24: Blender detects changes in a saved script
Clicking the question mark displays the viable actions:
- Reload from disk: This loads and displays the up-to-date file
- Make text internal (separate copy): The displayed text is now part of the Blender session, no longer tied to any text file on disk
- Ignore: Changes are ignored; Blender will still display the old text and keep reporting that it’s out of sync with the text saved on disk
To have additional help, we can add versioning to our files. That allows us to make changes without worrying about breaking things or losing our work.
Version control and backup
Version control helps to keep track of file changes, save snapshots of the code, and roll back to older versions if necessary. Git is the most used versioning system at present; it is free and integrated into most editors. In this section, we will use version control in combination with VS Code.
Initializing the repository
Once Git is installed, it can be used from VS Code, by activating the Source Control tab using the branch icon on the left column bar. The Initialize Repository button adds versioning to our folder:
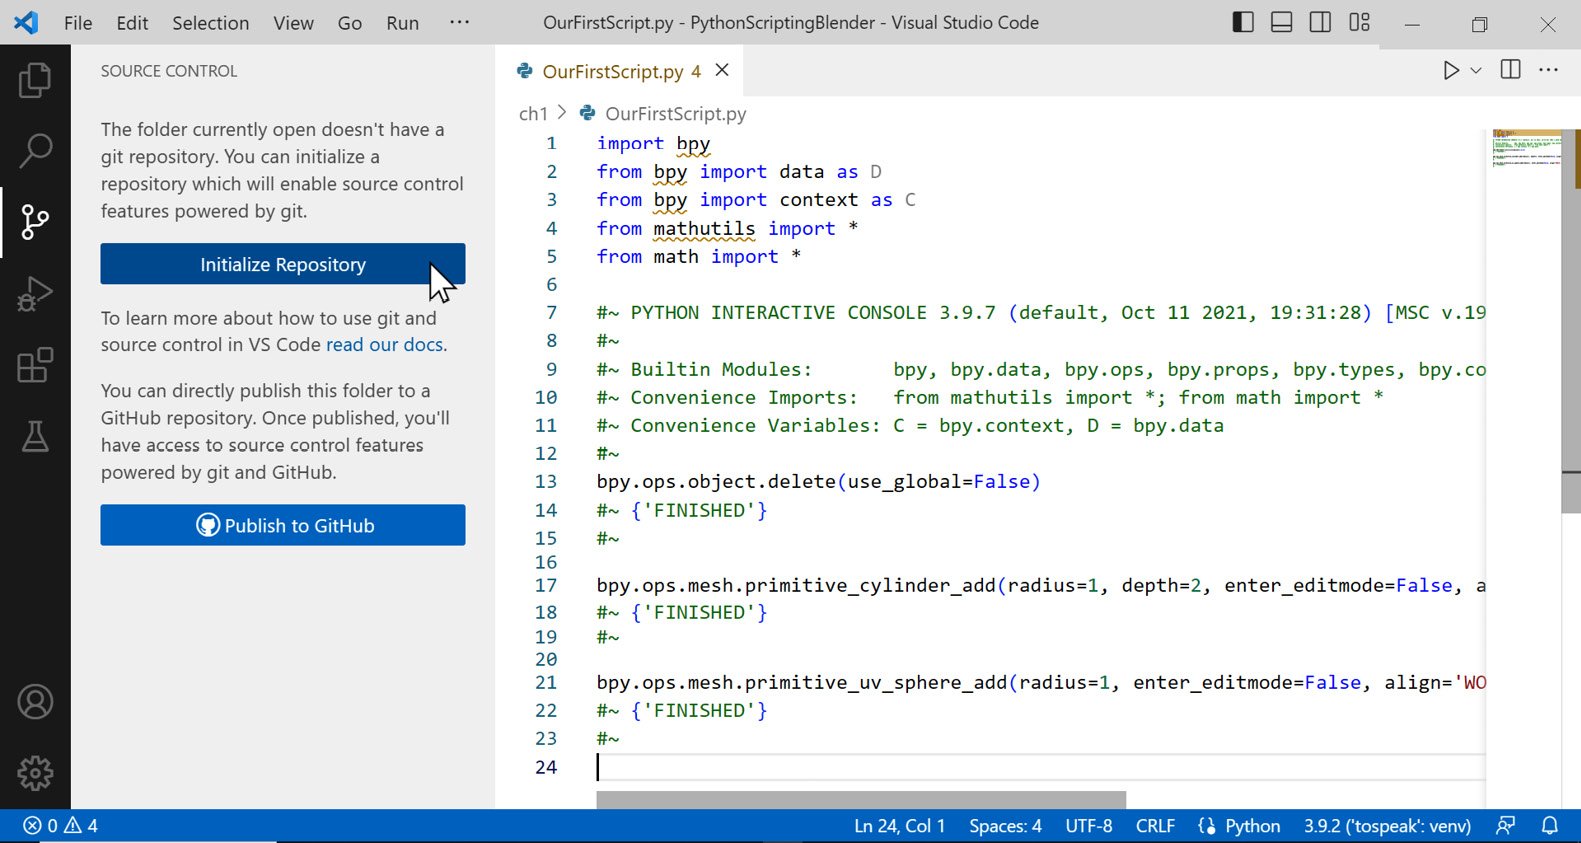
Figure 1.25: Adding version control in VS Code
The icon will change and warn us about the presence of files. We click the + icon next to the filename to add them to versioning. In Git terminology, we are going to Stage the current changes:
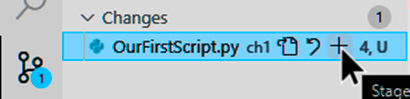
Figure 1.26: Staging changes in VS Code
The editor shows the before/after conditions of our files. We can add a message in the text field on the top left and click the tick icon. This will Commit our changes to the project history:

Figure 1.27: Commit changes in VS Code
Making changes
Let’s say we don’t want our script to delete the current objects. To do that, we delete line number 13:
bpy.ops.object.delete(use_global=False)
When the file is saved, version control detects this change. We can stage that by clicking the + icon, as before. If we select OurFirstScript.py in the left column, VS Code highlights the current changes. We add a message for this new commit and click the tick button again:
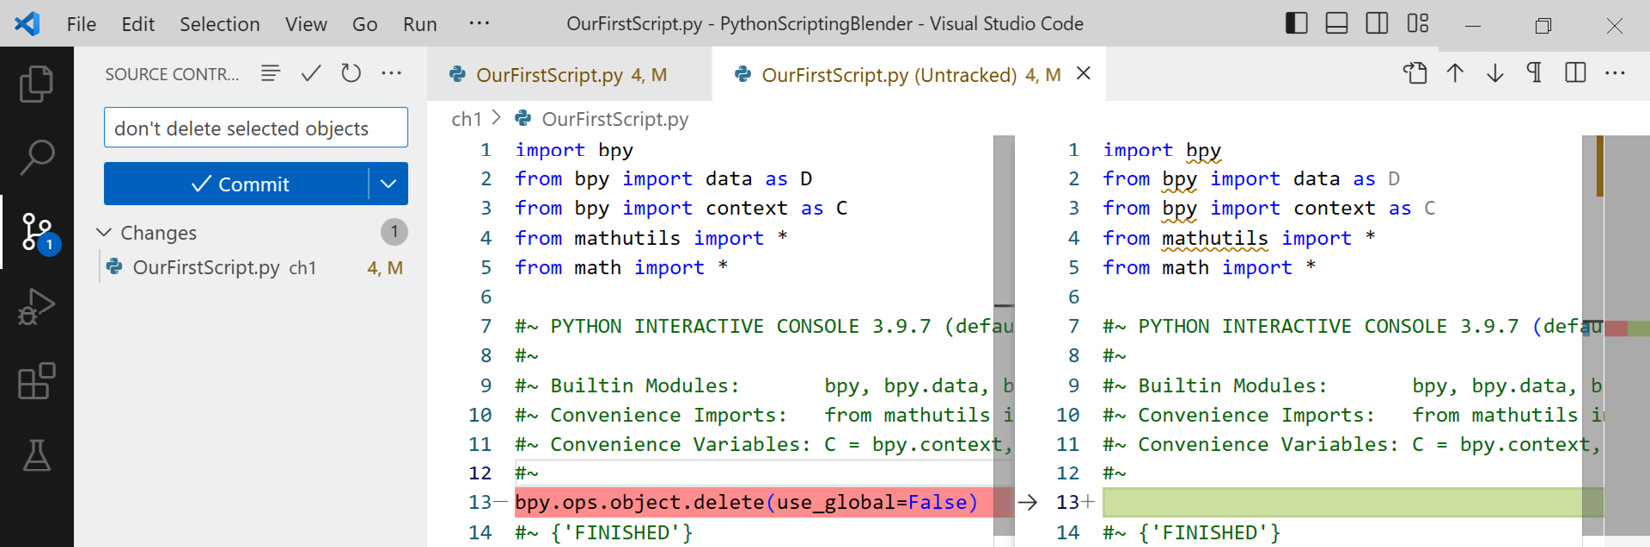
Figure 1.28: Displaying changes in VS Code
If we go back to the Explorer tab and select our script, we will see that a section called Timeline can be expanded: it contains a list of our commit messages. Selecting a commit displays the related changes, allowing us to restore old lines of code. Every change that is not committed can be easily undone using the Revert function.
Reverting uncommitted changes
Let’s add some incorrect text at line 7 and save. If, for any reason, we cannot undo that, we can right-click our file in the Version Control tab and select Discard Changes:
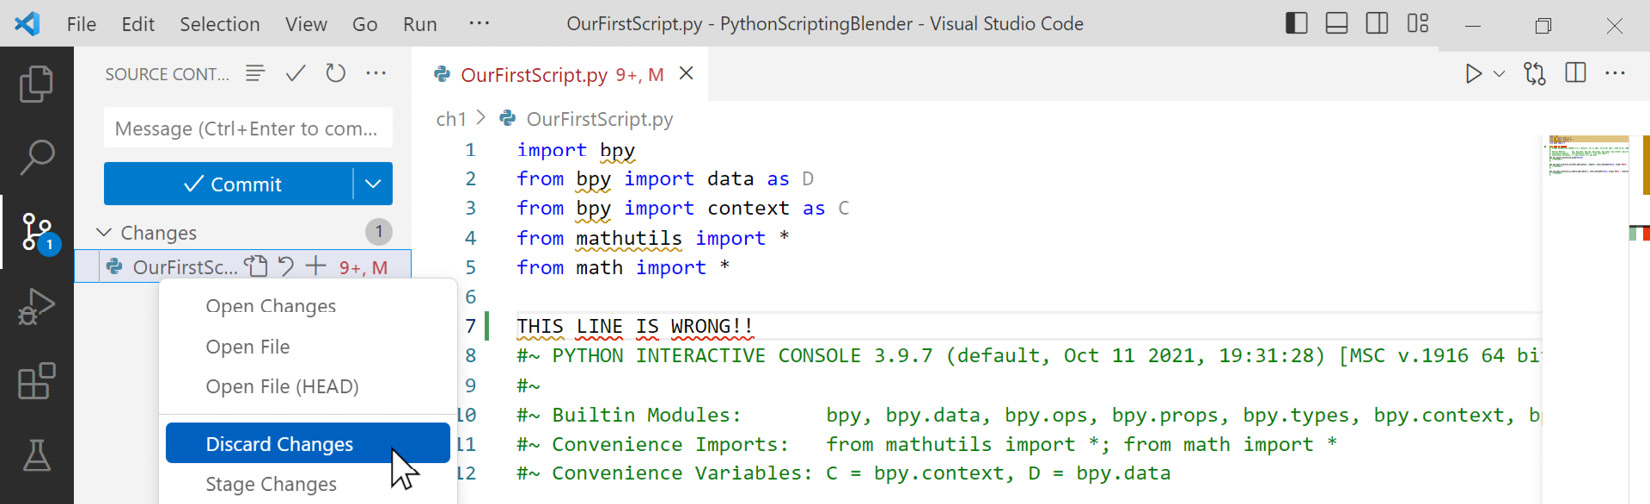
Figure 1.29: Discarding uncommitted changes in VS Code
The importance of version control can be underestimated at first but becomes vital in more complex projects. It’s a wide topic that goes beyond the scope of this book, but it’s important to grasp at least the basics of it.
Summary
In this chapter, we gained confidence with scripting and introduced the fundamental tools for Python programming. You learned how to look for Python commands in the Blender log and execute them in different contexts, and how to set up a coding environment. We also learned how to keep track of our code and edits.
In Chapter 2, we will refine our knowledge of Python. We will meet the most common entities and learn how to use the programming logic to write more useful scripts.
Questions
- How do we display the sections of Blender that accept Python input?
- How can we read the output and printout from Python execution?
- Does Blender use Python to carry on the user actions?
- How can we look at Blender’s Python activity log?
- How do we write scripts in Blender? Can we edit them in other applications?
- How and in which tab can we initialize version control in VS Code?
- How can we access a script’s timeline in VS Code?

