


Welcome to Instant Pentaho Data Integration Kitchen. The aim of this book is to guide you in using the Pentaho Data Integration (PDI) command-line tools more effectively. It will help you in using Kitchen and Pan for your daily operations with PDI without any pain.
This recipe guides you through creating a simple PDI transformation using the graphical development environment Spoon. Using this simple example, we will see how to play with PDI command-line tools. The goal of this recipe is to extract a list of customers located in a selected country. The country to be exported is identified through an input parameter and the export is made to an Excel file located in the same directory where the transformation is run.
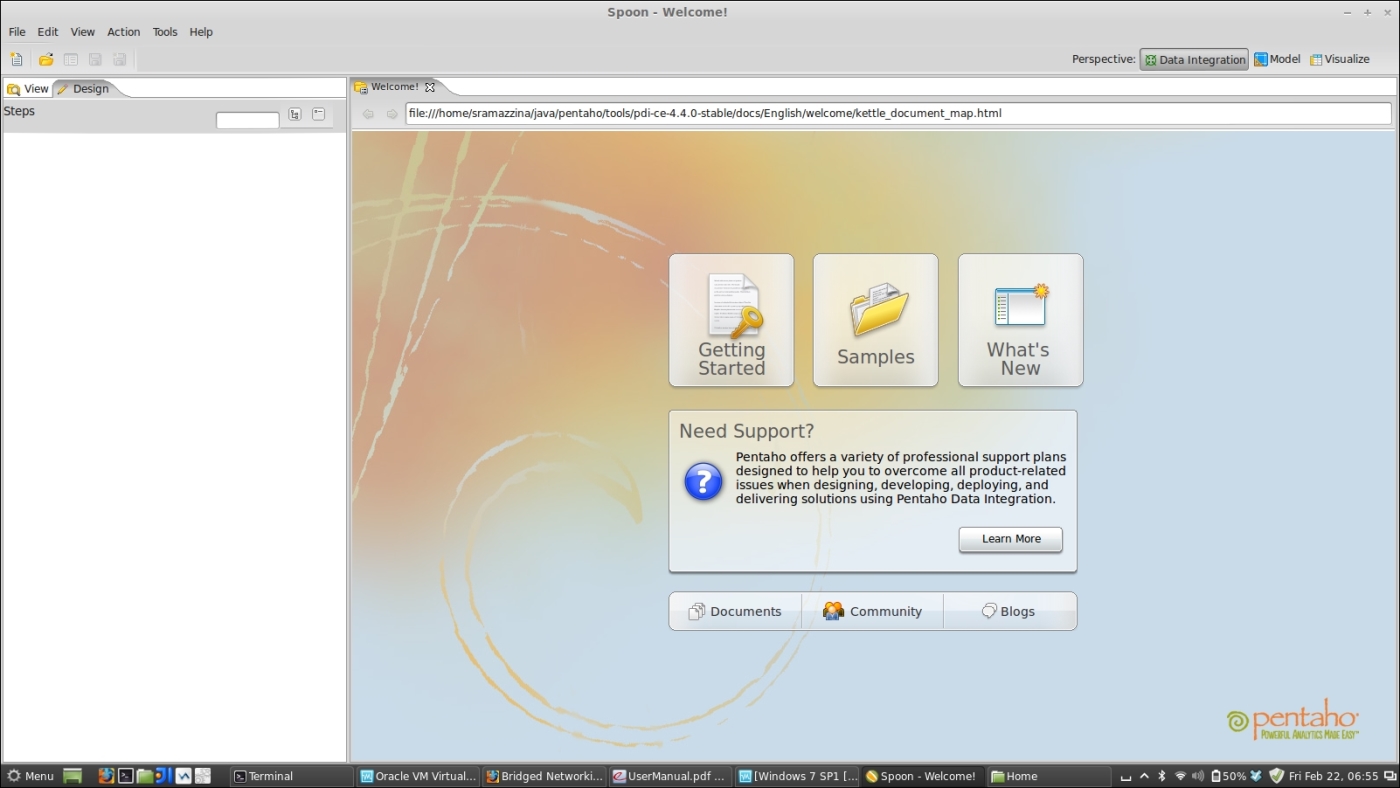
To get ready for this recipe, you first need to check that your Java environment is configured properly; to do this, check that the JAVA_HOME environment variable is set. Even if PDI while starting up tries to guess the value of the JAVA_HOME environment variable from the system, it is always good practice to set the JAVA_HOME environment variable. As soon as this is done, you need to start Spoon, the PDI's graphical development environment. You can start Spoon from the command line using the appropriate script located in the PDI's home directory. As soon as you get into the PDI home directory, you can run the proper script depending on the specific operating system environment.
Have a look at the following options:
If you are on Windows, use the script
spoon.batto start the applicationIf you are on Linux or Mac, use the script
spoon.shto start the application
Create a new empty transformation. To do this, you can perform either of the following steps:
Click on the New button from the toolbar menu and select the Transformation item entry.
Select the Transformation item entry by navigating to File | New or by pressing Ctrl + N.
Go to the Transformation properties dialog and define a new transformation parameter called
p_country. To do this, perform the following steps:Open the Transformation settings dialog by either pressing Ctrl + T or by right-clicking anywhere on the working area to the right and selecting Transformation settings from the newly displayed contextual menu.
Once the dialog opens, select the Parameters tab and add a new parameter called
p_country.

Select the Design tab from the left view. The list of category folders will appear in the Steps panel. Perform the following steps on them:
From the Input category folder, get a Text File Input step and drag-and-drop it into the working area on the right.
From the Job category folder, get a Get Variables step and drag-and-drop it into the working area on the right.
From the Flow category folder, get a Filter and a Dummy step and drag-and-drop them into the working area on the right.
Rename the Dummy step
Discarded customers.From the Output category folder, get a Microsoft Excel Output step and drag-and-drop it into the working area on the right.
Connect the steps together in the following specified order:
Connect the Text File Input step to the Get Variable step.
Connect the Get Variable step to the Filter step.
Connect the Filter step to the Microsoft Excel Output step and then connect the Filter step to the Dummy step as well.
Configure the Text File Input step as follows:
Open the Text File Input step properties dialog by either double-clicking on the step icon in the working area or right-clicking on the step icon and selecting Edit step.
Configure the name of the step.
Under the File tab, configure the file to be read by typing the complete name of the file in the File or Directory input field. Because the sample file is located in the same sample directory where the transformation resides, a good approach to naming the file in a way that is location independent is to use a system variable to parameterize the directory name where the file is located. In our case, the complete filename is
${Internal.Transformation.Filename.Directory}/customers.txt.
After the name of the file has been typed in, click on the Add button; the file will be added to the selected files located beneath as follows:
Select the Fields tab. You must fill in the table describing the fields format.
Click on the Get Fields button. The Text File Input step automatically analyzes a first set of 100 rows in the input file and tries to guess the field names to be imported. By the end of this inspection, all the fields will automatically get defined. Remember to verify the guessed data types so that only the
CUSTOMER_KEYfield has an Integer data type while the remaining fields have a String data type.Click on OK and close the Text File Input step properties dialog.
Configure the Get Variable step as follows:
Open the Get Variable step properties by either double-clicking on the step icon in the working area or right-clicking on the step icon and selecting Edit step.
Configure the name of the step.
Click on the first row under the Field column, add a new column; named
filter_countryand press the Tab key.The cursor goes to the next column. Add the name of the parameter whose value is used to populate the new field:
${p_country}. Press the Tab key.In the next column, where the cursor goes, select String as the data type of the new field.
Click on OK and close the Get Variable step properties dialog.
Configure the Filter step as follows:
Open the Filter step properties dialog by either double-clicking on the step icon in the working area or right-clicking on the step icon and selecting Edit step.
From the Send "true" data to step combobox, select the Write selected country customers item entry to set the path that is to be navigated to any time the result of the condition is
true.From the Send "false" data to step combobox, select the Discarded customers item entry to set the path that is to be navigated to anytime the result of the condition is
false.Add a new condition called
COUNTRY = filter_country.To also manage the cases where the
p_countryparameter has not been set by the user, when starting the procedure, add another condition calledfilter_country IS NULL. Set this new condition as an alternate to the previous condition by using theORlogical operator.Click on OK and close the Filter step properties dialog.

Configure the Microsoft Excel Output step as follows:
Open the Microsoft Excel Output step properties dialog by either double-clicking on the step icon in the working area or right-clicking on the step icon and selecting Edit step.
Configure the name of the step.
Under the File tab, configure the name of the export file by typing the complete name of the file in the Filename input field. Remember to write the name of the file without any extension because the file extension is located in the Extension input field. The exported file will be put in the same samples directory where the transformation resides. In any case, a good approach is to type the filename in a way that is location independent, using a system variable to parameterize the directory name where the file is located. In our case, the complete filename is
${Internal.Transformation.Filename.Directory}/selected_country_customers.Select the Fields tab. You must fill in the table describing the field's format.
Click on the Get Fields button. The Text File Input step automatically analyzes a first set of 100 rows in the input file and tries to guess the field names to be imported. At the end of this inspection, all the fields will automatically get defined.
Click on OK and close the Microsoft Excel Output step properties dialog.
Save the transformation with the suggested name
read-customers.ktr.The transformation design is now complete. You can now go to the Design a simple job (Simple) recipe and create the job that will use this transformation.

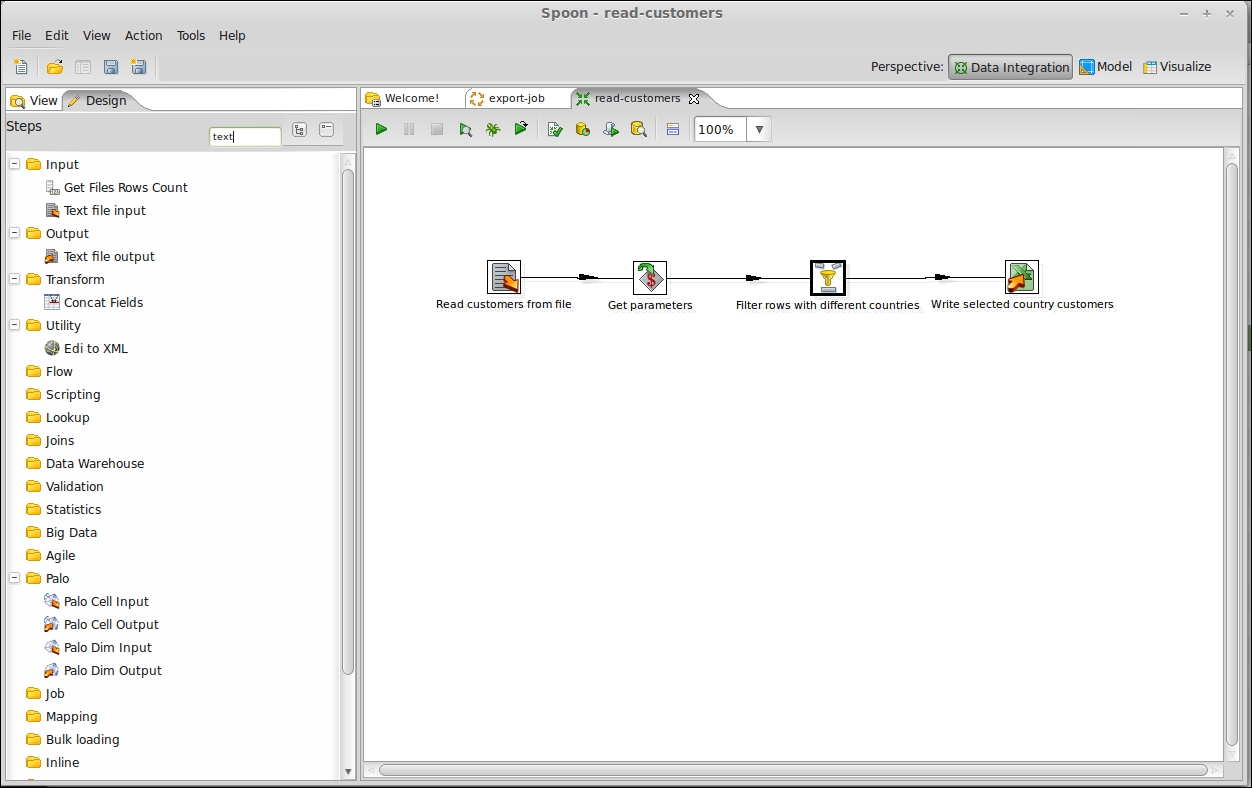
Now that we have designed a sample transformation, let's analyze a quick way to easily find and get directly to the needed steps.
A set of category folders organizes transformations to facilitate the user's search process. If you are unsure about the right location of the step you are looking for, you can easily find it using the search functionality. To do this, go to the Search input text field located in the upper-left corner of the design view and write the name of the step you are looking for. While you are typing, you will see the items in the Steps panel whose name starts with the letters you are typing appear as shown in the following screenshot:
This recipe guides you through creating a simple PDI job using the graphical development environment Spoon. In a PDI process, jobs orchestrate other jobs and transformations in a coordinated way to realize our business process. This simple job uses the transformation created in the previous recipe, and we will use it as a simple example in this book's recipes, wherever necessary, to play with PDI command-line tools.
To get ready for this recipe, you need to check that the JAVA_HOME environment variable is set properly and then start the Spoon script. For more information on this, check what we detailed in the first recipe, Designing a sample PDI transformation (Simple).
Create a new empty job. To do this, you can perform either of the following steps:
Click on the New button from the toolbar menu and select the Job item entry
Select the Job item entry by navigating to File | New or by pressing Ctrl + ALT + N.
Go to the Job settings dialog and define a new parameter called
p_country. Do this as follows:Open the Job settings dialog by either pressing Ctrl + J or right-clicking on any place of the right working area and selecting Job settings from the newly displayed contextual menu.
Once the dialog opens, select the Parameters tab and add a new parameter called
p_country.Select the Design tab from the left-hand side view to display the list of tasks from their corresponding category folders. Look for the following tasks and drag-and-drop them into the working area on the right:
From the General category folder, get a Start task and a Transformation task and drag-and-drop them into the working area.
From the File management category folder, get a Delete File task and drag-and-drop it into the working area.
From the Utility category folder, get an Abort task and drag-and-drop it into the working area on the right.
Connect the tasks together in the following specified order:
Connect the Start task to the Delete File task.
Connect the Delete File task to the Transformation task and then connect the Delete File task to the Dummy task as well.
Connect the Transformation task to the Success task and then connect the Transformation task to the Dummy task as well.
Connect the Dummy task to the Abort task.
Configure the Delete File task as follows:
Open the Delete File task properties dialog by either double-clicking on the step icon in the working area or right-clicking on the step icon and selecting Edit job entry.
Configure the name of the task.
Configure the name of the file to be deleted by typing the complete name of the file in the Filename input field. The file to be deleted is located in the same samples directory where the transformation and the job reside. In any case, a good approach is to type the filename in a way that is location independent, using a system variable to parameterize the directory name where the file is located. In our case, the complete filename is
${Internal.Transformation.Filename.Directory}/selected_country_customers.xls.As you can see in the Properties dialog, you can tick a checkbox so that the task will fail in case the file to be deleted does not exist.

Click on OK and close the Delete File task properties dialog.
Configure the Transformation task as follows:
Open the Transformation task properties dialog by either double-clicking on the step icon in the working area or right-clicking on the step icon and selecting Edit job entry.
Configure the name of the task.
Under the Transformation specification tab, configure the name of the file for the transformation we're going to call. The transformation's file is located in the same samples directory where the job resides. In any case, a good approach is to type the filename in a way that is location independent, using a system variable to parameterize the directory name where the file is located. In our case, the complete filename is
${Internal.Job.Filename.Directory}/read-customers.ktr.Save the job with the suggested name,
export-job.kjb, in the same directory where you previously saved the transformation.
Try to execute the processes from the Spoon GUI. This is normally done by the developer to test or debug his/her jobs and transformations. To do this, click on the Run button, which can be identified by the green triangle icon located in the toolbar.
After the execution, if anything gets terminated successfully, the task icons will be decorated by a green mark that indicates that the specific tasks were executed successfully. Moreover, down in the working area, the Job Entry log details view indicates the results for every single task called by the job.

A Pentaho ETL process is created generally by a set of jobs and transformations.
Transformations are workflows whose role is to perform actions on a flow of data by typically applying a set of basic action steps to the data. A transformation can be made by:
A set of input steps
A set of transformation steps
A set of output steps
Input steps take data from external sources and bring them into the transformation. Examples of input steps are as follows:
File input steps (text, Excel, properties, other)
Table input steps
OLAP source input steps or other similar steps
Transformation steps apply elementary business rules to the flow of data; the composition of this set of elementary transformation steps into an organized flow of operations represents a process. Examples of transformation steps are those that perform the following actions:
Make operations on strings
Make calculations
Join different flow paths
Apply scripts to the data with the goal of getting the results into other fields
Output steps send the data from the flow to external targets, such as databases, files, web services, or others. Therefore, we can say that transformations act as a sort of unit of work in the context of an entire ETL process. The more a transformation is atomic and concrete in its work, the more we can reuse it throughout other ETL processes.
Jobs are workflows whose role is to orchestrate the execution of a set of tasks: they generally synchronize and prioritize the execution of tasks and give an order of execution based on the success or failure of the execution of the current task. These tasks are basic tasks that either prepare the execution environment for other tasks that are next in the execution workflow or that manage the artifacts produced by tasks that are preceding them in the execution workflow. For example, we have tasks that let us manipulate the files and directories in the local filesystem, tasks that move files between remote servers through FTP or SSH, and tasks that check the availability of a table or the content of a table. Any job can call other jobs or transformations to design more complex processes. Therefore, generally speaking, jobs orchestrate the execution of jobs and transformations into large ETL processes.
In our case, we have a very simple example with a job and a transformation to support our recipes' experiments. The transformation gets data from a text file that contains a set of customers by country. After the data from the text file is loaded, it filters the dataflow by country and prints the result on an Excel file. The filter is made using a parameter that you set at the time you start the job and the filter step. The job checks if the previous file exists, and if so, deletes it and then calls the transformation for a new extraction. The job also has some failure paths to manage any sort of error condition that could occur during the processing of the tasks. The failure paths terminate with a step that aborts the job, marking it as failed.
Every time we design a job or a transformation, there are some basic rules to follow to help you make things more easily portable between different systems, and, eventually, self-describing. The use of internal variables and a proper naming system for your job tasks and transformation steps are good rules of thumb. Then at the end, a brief recap of the various color and icon indicators that are implicitly present in the design of your process is also a good exercise. They help you to understand how the flow of information moves (inside your transformations) or how the set of operations execute in your flow (inside a job) quickly.
Each task in a job and each step in a transformation has a set of properties to let the user configure the expected behavior; one of these properties is used to give it a name. Giving tasks and steps an appropriate name is a very important thing because it helps us to make our transformations or jobs more readable. This suggestion becomes more valuable as the process becomes bigger. Documentation is always considered an unpleasant thing to do, but documenting processes is the only way to remember what we made, and why, in the long term. In this case, the correct naming of our components is something that, if done well, can be considered as a documentation in itself, at least for the insiders. And that is good enough!
When writing our sample jobs and transformations, we used internal variables to set the path of the files we are reading or writing and set the path of the transformation file we have linked. This is very important to make our transformation and job location unaware so that we can easily move them here and there in our servers without any pain.
Kettle has two internal variables for this that you can access whenever required. By pressing Ctrl + Space directly from inside the field, you can activate the variables inspector to help you with finding out the right variable name without having to struggle with it. Going back to our problem of building a location-independent path, Kettle has two important system variables for this:
Internal.Job.Filename.Directory – This is the directory name where the running job resides
Internal.Transformation.Filename.Directory – This is the directory name where the running transformation resides
The important thing about these two variables is that PDI resolves them dynamically at runtime. So whenever you refer to a file, if you properly refer the path of the referred file to one of these two variables (depending on the case), you will be able to build location-unaware processes that will give you the ability to move them around without any pain.
Kettle jobs and transformations are full of visual indicators to help us easily and quickly understand why and when the flows follow this path, if the task or step is running, whether it's terminating successfully or not, or other such similar things. Taking care of these indications helps us a lot in understanding if everything has gone, or will go, according to what we intended.
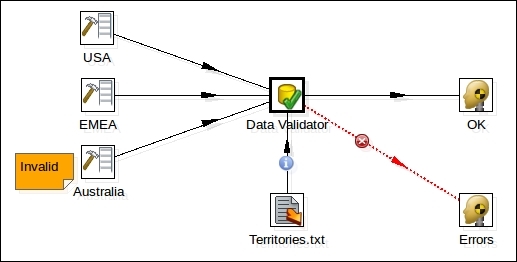
Let's see some examples. While designing a transformation in Spoon, you can see that the connections between the steps (called hops) assume different colors or representation in different situations. The following screenshot shows a Data Validator step with a set of inputs and two outputs:
We can note two interesting things here:
One of the two output hops has been designed with a bold red dotted line, and this line has a red icon with an "x" sign on it. The red dotted line represents a path that carries the lines that caused an error. In this case, the error is related to the failure of the validation rule in the Data Validator step. The red "x" icon represents a graphical sign that enforces the information that this is an error path.
One of the input hops has a circular blue icon with a lowercase "i" character in it. This icon indicates that the hop connects a source step whose rows are an input to configure a parameter of the target step. In this case, the row that comes from the Text File Input step named Territories.txt configures a set of "allowed territories" that must be used to validate the rows that are coming in.
We can summarize the meaning behind the various hop colors as shown in the following table:
|
Color |
Meaning |
|---|---|
|
Green |
The hop distributes rows; if multiple hops are leaving a step, rows of data will be distributed evenly to all the target steps |
|
Red |
The hop copies rows; if multiple hops are leaving a step, all rows of data will be copied to all the target steps |
|
Yellow |
The hop provides information for the step and distributes rows |
|
Gray |
The hop is disabled |
|
Black |
The hop has a named target step |
|
Blue |
Candidate hop using middle button and drag |
|
Red (bold dotted line) |
The hop is used for carrying rows that caused errors in the source step(s) |
Other kinds of icons can be found while designing transformations in other situations. Let's see another example where a Filter step is going to be used:
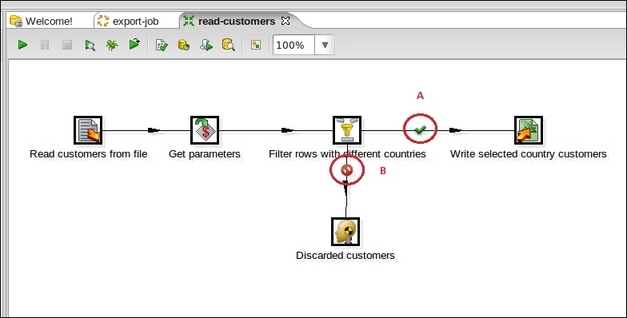
As you can see, the Filter step named Filter rows with different countries has two different output hops with two different icons indicated by the two red bold letters A and B:
The icon indicated by the bold red letter A means that the hop is followed only when the condition specified in the Filter step has been satisfied (the result of the evaluation is true)
The icon indicated by the bold red letter B means that the hop is followed only when the condition specified in the Filter step has not been satisfied (the result of the evaluation is false)
Similar concepts apply to a job's hops. Let's have a look at the following example:
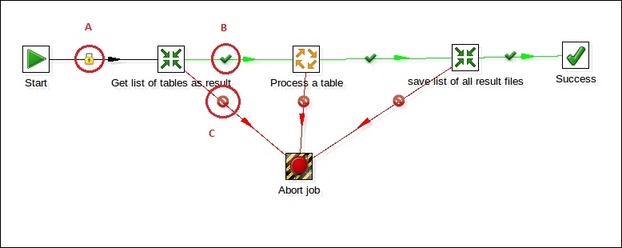
Because the jobs are process orchestrators in this case, a job hop is just an element of flow control. Hops link to job entries, and based on the results of the previous job entry, they determine what happens next. Icons help us to indicate the conditions under which that particular hop is followed:
Unconditional – The icon identified by the red bold letter A in the screenshot represents this condition. It specifies that the next job entry will be executed regardless of the result of the originating job entry.
Follow when result is true – The icon identified by the red bold letter B in the screenshot represents this condition. It specifies that the next job entry will be executed only when the result of the originating job entry is true.
Follow when result is false – The icon identified by the red bold letter C in the screenshot represents this condition. It specifies that the next job entry will be executed only when the result of the originating job entry is false.
Again, hops in jobs assume different colors depending on the properties and the state of the job at that particular point:
The hop connecting two tasks is black anytime the target entry is executed regardless of the result of the source entry (unconditional)
The hop connecting two tasks is green anytime the target entry is executed if the result of the source entry is successful (result is true)
The hop connecting two tasks is black anytime the target entry is executed if the result of the source entry is unsuccessful (result is false)
This recipe guides you through configuring the script for command-line tools so that you can properly manage your execution performance in case of increased memory requirements. Many steps work in memory, so the more memory we reserve to PDI, coherently with the available memory and the overall system requirements, the better it is. A wrong memory configuration leads you to bad performance and/or unexpected OutOfMemory exception errors.
You will learn how to modify the script files Kitchen or Pan to set new memory requirements. This recipe will work the same for both Kitchen and Pan; the only difference to consider is in the names of the script files.
Remember that in PDI, we have two different sets of scripts to start PDI processes from the command line:
The Kitchen scripts for starting PDI jobs
The Pan scripts for starting PDI transformations
As soon as you get into the PDI home directory, you can edit them depending on the specific operating system environment.
So, let's move on and go to the PDI home directory and start working on this recipe.
To change the memory settings by modifying the script in Windows, perform the following steps:
From the PDI home directory, open the
kitchen.bat(orpan.bat) script.Scan through the script's code until you find the following lines of code:
if "%PENTAHO_DI_JAVA_OPTIONS%"=="" set PENTAHO_DI_JAVA_OPTIONS=-Xmx512m
Change the value of the variable
PENTAHO_DI_JAVA_OPTIONSto the required memory value for example, to1024:set PENTAHO_DI_JAVA_OPTIONS=-Xmx1024m
Save the file and exit.
To change the memory settings by modifying the script in Linux or Mac, perform the following steps:
From the PDI home directory, open the
kitchen.shscript (orpan.sh).Scan through the script's code until you find the following lines of code:
if [ -z "$JAVAMAXMEM" ]; then
  JAVAMAXMEM="512"
fi

if [ -z "$PENTAHO_DI_JAVA_OPTIONS" ]; then
  PENTAHO_DI_JAVA_OPTIONS="-Xmx${JAVAMAXMEM}m"
fi
Change the value of the variable
JAVAXMEMto the required memory value for example, to1024:JAVAMAXMEM="1024"
Save the file and exit.
Tip
Downloading the example code
You can download the example code files for all Packt books you have purchased from your account at http://www.packtpub.com. If you purchased this book elsewhere, you can visit http://www.packtpub.com/support and register to have the files e-mailed directly to you.
Setting the environment variables in Windows is another, cleaner way to change the memory settings. To do this, you need to execute the steps summarized as follows:
Go to Control Panel and open the Environment variables dialog window.
Create a new system variable by clicking on the New button in the System Environment Variable section of the Environment variables dialog window.
Add a new variable called
PENTAHO_DI_JAVA_OPTIONS.Set the value of the variable. If we want to assign 1024 MB to PDI, for example, we set the variable's value to
–Xmx1024m.
Click on OK to confirm and close the New System Variable dialog window.
Click on OK to close the System Environment Variables dialog window. This change will affect both scripts for jobs and transformations without any additional requirement.
To change the memory settings by setting the environment variables in Linux/Mac, perform the following steps:
Go to the User home directory and open the
.bash_profilescript file. If it does not exist, create a new one.Add the following line to the script file:
export PENTAHO_DI_JAVA_OPTIONS="-Xmx1024m"
Save and close the file. Remember that this new environment variable will either be visible in the user context starting from the next login or after closing and re-opening your terminal window.
Setting the environment variable is a good way to configure our scripts seamlessly without modifying anything in the standard script. However, we can simplify our life by writing scripts that encapsulate all the internals related to the preparation of the script's execution environment. This lets us run our process without any hassle.
Kettle and Pan are two scripts that start our PDI processes from the command line. This means that they are full of switches that let us configure our PDI job to run properly. However, sometimes starting a job or a transformation is also a matter of preparing an execution environment that could require a bit of effort in terms of technical knowledge as well as a considerable amount of time. We do not usually want our user to be in such a situation. Therefore, to work around this, encapsulate the call to either the Kitchen or the Pan script, and the rest of the things will be taken care of by the custom script that does all of this without any pain.
Let's say we have a PDI job to start in Linux/Mac. We can write a bash script called startMyJob.sh that starts our job easily by configuring all the settings required to perform the job execution properly as shown in the following code:
#!/bin/bash

export PENTAHO_DI_JAVA_OPTIONS="-Xmx3072m -Djava.io.tmpdir=/mnt/tmp"
export KETTLE_HOME=/home/ubuntu/pdi_settings

/home/ubuntu/pentaho/data-integration/kitchen.sh -file=/home/ubuntu/pentaho/etl/run_load.kjb -level=Basic -param:SKIP_FTP=false -param:SKIP_DIMENSIONS=true "run_model"
As you can see, the code prepares the execution environment by setting the following:
The memory options
The location of a directory to store temporary files
The
KETTLE_HOMEvariable
Finally, it starts the PDI job. You can see how simple it is to start our job using this script instead of spending a lot of time on manual settings every time!
This recipe guides you through simply starting a PDI job using the script Kitchen. In this case, the PDI job we are going to start is stored locally in the computer filesystem, but it could be anywhere in the network in any place that is directly accessible. You will learn how to start simple jobs both with and without a set of input parameters previously defined in the job.
Using command-line scripts is a fast way to start batches, but it is also the easiest way to schedule our jobs using our operating system's scheduler. The script accepts a set of inline arguments to pass the proper options required by the program to run our job in any specific situation.
To get ready for this recipe, we first need to check that our Java environment is configured properly; to do this, check that the JAVA_HOME environment variable is set. Even if all the PDI scripts, when started, call other scripts that try to find out about our Java execution environment to get the values of the JAVA_HOME variable, it is always a good rule of thumb to have that variable set properly anytime we work with a Java application.
The Kitchen script is in the PDI home directory, so the best thing to do to launch the script in the easiest way is to add the path to the PDI home directory to the PATH variable. This gives you the ability to start the Kitchen script from any place without specifying the absolute path to the Kitchen file location. If you do not do this, you will always have to specify the complete path to the Kitchen script file.
To play with this recipe, we will use the samples in the directory <book_samples>/sample1; here, <book_samples> is the directory where you unpacked all the samples of the book.
For starting a PDI job in Linux or Mac, use the following steps:
Open the command-line terminal and go to the
<book_samples>/sample1directory.Let's start the sample job. To identify which job file needs to be started by Kitchen, we need to use the
–fileargument with the following syntax:–file: <complete_filename_to_job_file>Remember to specify either an absolute path or a relative path by properly setting the correct path to the file. The simplest way to start the job is with the following syntax:
$ kitchen.sh –file:./export-job.kjbIf you're not positioned locally in the directory where the job files are located, you must specify the complete path to the job file as follows:
$ kitchen.sh –file:/home/sramazzina/tmp/samples/export-job.kjbAnother option to start our job is to separately specify the name of the directory where the job file is located and then give the name of the job file. To do this, we need to use the
–dirargument together with the–fileargument. The–dirargument lets you specify the location of the job file directory using the following syntax:–dir: <complete_path_to_ job_file_directory>So, if we're located in the same directory where the job resides, to start the job, we can use the following new syntax:
$ kitchen.sh – dir:. –file:export-job.kjbIf we're starting the job from a different directory than the directory where the job resides, we can use the absolute path and the
–dirargument to set the job's directory as follows:$ kitchen.sh –dir:/home/sramazzina/tmp/samples –file:export-job.kjb
For starting a PDI job with parameters in Linux or Mac, perform the following steps:
Normally, PDI manages input parameters for the executing job. To set parameters using the command-line script, we need to use a proper argument. We use the
–paramargument to specify the parameters for the job we are going to launch. The syntax is as follows:-param: <parameter_name>= <parameter_value>Our sample job and transformation does accept a sample parameter called
p_countrythat specifies the name of the country we want to export the customers to a file. Let's suppose we are positioned in the same directory where the job file resides and we want to call our job to extract all the customers for the country U.S.A. In this case, we can call the Kitchen script using the following syntax:$ kitchen.sh –param:p_country=USA -file=./export-job.kjbOf course, you can apply the
–paramswitch to all the other three cases we detailed previously.
For starting a PDI job in Windows, use the following steps:
In Windows, a PDI job from the filesystem can be started by following the same rules that we saw previously, using the same arguments in the same way. The only difference is in the way we specify the command-line arguments.
Any time we start the PDI jobs from Windows, we need to specify the arguments using the
/character instead of the–character we used for Linux or Mac. Therefore, this means that:-file: <complete_filename_to_job_file>Will become:
/file: <complete_filename_to_job_file>And:
–dir: <complete_path_to_ job_file_directory>Will become:
/dir: <complete_path_to_ job_file_directory>From the directory
<book_samples>/sample1, if you want to start the job, you can run the Kitchen script using the following syntax:C:\temp\samples>Kitchen.bat /file:./export-job.kjbRegarding the use of PDI parameters in command-line arguments, the second important difference on Windows is that we need to substitute the
=character in the parameter assignment syntax with the:character. Therefore, this means that:–param: <parameter_name>= <parameter_value>Will become:
/param: <parameter_name>: <parameter_value>From the directory
<book_samples>/sample1, if you want to extract all the customers for the country U. S. A, you can start the job using the following syntax:C:\temp\samples>Kitchen.bat /param:p_country:USA /file:./export-job.kjb
For starting the PDI transformations, perform the following steps:
The Pan script starts PDI transformations. On Linux or Mac, you can find the
pan.shscript in the PDI home directory. Assuming that you are in the same directory,<book_samples>/sample1, where the transformation is located, you can start a simple transformation with a command in the following way:$ pan.sh –file:./read-customers.ktrIf you want to start a transformation by specifying some parameters, you can use the following command:
$ pan.sh –param:p_country=USA –file:./read-customers.ktrIn Windows, you can use the
Pan.batscript, and the sample commands will be as follows:C:\temp\samples>Pan.bat /file:./read-customers.ktrAgain, if you want to start a transformation by specifying some parameters, you can use the following command:
C:\temp\samples>Pan.bat /param:p_country=USA /file:./read-customers.ktr
This recipe guides you through starting a PDI job packed in an archived file (.zip or .tar.gz) using Kitchen. We will assume that the PDI job to be launched (we will call it the main job) and all the related jobs and transformations called during the execution are stored inside a .zip or .tar.gz archive file locally in the computer's filesystem; the execution will happen directly by accessing the files inside the archive without needing to unpack them to a local directory. This practice is a good idea in certain situations where we need to find a quick way to move our ETL processes around on different systems rapidly and without any pain; by packing everything in an archive file, we can move just one file instead of moving a bunch of files and directories—this really is easier!
To get ready for this recipe, you need to check that the JAVA_HOME environment variable is properly set and then configure your environment variables so that the Kitchen script can start from anywhere without specifying the complete path to your PDI home directory. For details about these checks, refer to the recipe Executing PDI jobs from a filesystem (Simple).
To play with this recipe, you can use the samples in the directory <book_samples>/sample2; here, <book_samples> is the directory where you unpacked all the samples of the book.
For starting a PDI job from within a .zip or .tar.gz archive file in Linux or Mac, you can perform the following steps:
Open a command-line window and go to the
<book_samples>/sample2directory.Kettle uses Apache VFS to let you access a set of files from inside an archive and use them directly in your processes; this is because it considers the archived content as a sort of virtual filesystem (VFS). To access a file in the archive, you need to give the complete path using a specific URI. In case you're going to access files contained in a
.ziparchive, the syntax to be used for the URI is as follows:zip://arch-file-uri[!absolute-path]On the other hand, if we wanted to access files contained in a
.tar.gzfile, we need to use the following syntax:tgz://arch-file-uri[!absolute-path]To identify which job file needs to be started, we need to use the
–fileargument with the following syntax; but now, the syntax has changed because we need to use, as a value, the URI with the syntax we saw in the preceding step:–file: <complete_URI_to_job_file>Remember that because we are talking about a URI to the file, we always need to consider the absolute path to the archive file followed by the path to the file we are going to start as a job.
To start the sample job named
export-job1.kjbfrom within a.ziparchive, use the following syntax:$ kitchen.sh –file:'zip:///home/sramazzina/tmp/samples/samples.zip!export-job1.kjb'The usage of parameters from within the command-line tool is the same as we saw in the Executing PDI jobs from a filesystem (Simple) recipe. So, if we want to extract all the customers from the country U. S. A, the command to use is as follows:
kitchen.sh -param:p_country=USA –file:'zip:///home/sramazzina/tmp/samples/samples.zip!export-job1.kjb'Use the same command to start a job from within a
.tar.gzarchive, but with a different filesystem type in the URI. Here is a sample of a simple job that has been started without parameters:$ kitchen.sh –file:'tgz:///home/sramazzina/tmp/samples/samples.tar.gz!export-job1.kjb'The following syntax is for a simple job that has been started with parameters:
kitchen.sh -param:p_country=USA –file:'tgz:///home/sramazzina/tmp/samples/samples.tar.gz!export-job1.kjb'Different from what we saw in the Executing PDI jobs from a filesystem (Simple) recipe, this time the
–dirargument does not make any sense because we always need to access the archive through its complete URI and the–fileargument.
For starting a PDI job from within a .zip archive file in Windows, perform the following steps:
Starting a PDI job from within an archive file on Windows requires for the same rules we saw previously to be followed using the same arguments in the same way.
Any time we start the PDI jobs from Windows, we need to specify the arguments using the
/character instead of the–character we used in Linux or Mac. Therefore, this means that the–fileargument will change from:–file: <complete_URI_to_job_file>To:
/file: <complete_URI_to_job_file>Go to the directory
<books_samples>/sample2; to start your sample job from within the ZIP archive, you can start the Kitchen script using the following syntax:C:\temp\samples>Kitchen.bat /file:'zip:///home/sramazzina/tmp/samples/samples.zip!export-job1.kjb'Let's create another example using parameters in the command. Go to the directory
<books_samples>/sample2; to start the job by extracting all the customers for the country U. S. A, you can use the following syntax:C:\temp\samples>Kitchen.bat /param:p_country:USA /file:'zip:///home/sramazzina/tmp/samples/samples.zip!export-job1.kjb'
For starting PDI transformations from within archive files, perform the following steps:
PDI transformations are always started using Pan scripts. On Linux or Mac, you can find the
pan.shscript in the PDI home directory. To start a simple transformation from within an archive file, go to the<book_samples>/sample2directory and type the following command:$ pan.sh –file: 'tgz:///home/sramazzina/tmp/samples/samples.tar.gz!export-job1.kjb'Or, if you need to specify some parameters, type the following command:
$ pan.sh –param:p_country=USA –file:./read-customers.ktrOn Windows, you can use the
Pan.batscript and the sample commands to start our transformation as follows:C:\temp\samples>Pan.bat /file='zip:///home/sramazzina/tmp/samples/samples.zip!read-customers1.ktr'Or, if you need to specify some parameters through the command line, type the following command:
C:\temp\samples>Pan.bat /param:p_country:USA /file='zip:///home/sramazzina/tmp/samples/samples.zip!read-customers1.ktr'
This way of starting jobs and transformations is possible because PDI uses the Apache VFS library to accomplish this task. The Apache VFS library is a piece of software that lets you directly access files from within any type of archive by exposing them through a virtual filesystem using an appropriate set of APIs. You can find more details about the library and how it works on the Apache website at http://commons.apache.org/proper/commons-vfs.
Using jobs and transformations from within archive files slightly changes the way we design jobs and transformations. Another interesting consideration is that you can directly reference resource files packed together with your ETL process file. This lets you distribute configuration files or other kinds of resources in a uniform way. This approach could be an easy way to have a single file containing anything needed by our ETL process, making everything more portable and easier to manage. The following paragraph details the main changes applied to this new version of our sample.
When jobs or transformations are used from inside an archive, the files relate to the root of the archive, and the internal variable ${Internal.Job.Filename.Directory} does not make any sense. Because of this, we need to change the way our example process links any kind of file.
Look at the samples located in the directory <book_samples>/sample2; this directory contains the same transformations and jobs, but they need to undergo major changes for them to work in this case. They are as follows:
The job links the transformation without using the system variable
${Internal.Job.Filename.Directory}to dynamically obtain the path to the job file. This is because, internally to the archive file, the transformation is in the root of this virtual filesystem, so the filename is enough for this purpose.Instead of using the
${Internal.Job.Filename.Directory}variable to specify the input and output path for the files, we added two new parameters,p_input_directoryandp_target_directory, to let the user specify the input directory and output directory. If we have not specified a value for these parameters, we'll set a default value that is local to the directory where the job starts.
This recipe guides you through starting PDI jobs using Kitchen by assuming that PDI jobs are stored in the PDI repository. We will learn how to start simple jobs both with and without a set of input parameters previously defined in the job.
There are different versions of repositories that you can use depending on your needs: filesystem, database, and Pentaho repository.
The filesystem repository is a very easy form of repository; it lets you store your files at a specified location in the filesystem.
The database repository is another simple form repository that uses database tables as a way to have a unique central objects store. It is usually an authenticated repository and does not have any kind of versioning or locking mechanism on the object, so it is not recommended for team development.
The last type of repository, the Pentaho repository, is a sophisticated repository environment for safely storing our BI object (and so our ETL processes) available only for the Enterprise Edition (EE) of PDI.
To play with this recipe, I prepared a filesystem repository in the <book_samples>/sample3 directory with all the related transformations and the job in it. The repository is located in the samples/sample3 directory. To have our example working fully, we need to add the filesystem repository (see the How to define a filesystem repository section under the There's more… section of this recipe for details about it) to PDI by specifying the complete path to the <book_samples>/sample3 directory in the base directory field.
Check if the JAVA_HOME environment variable is set properly and configure your environment variables so that the Kitchen script can start from anywhere without specifying the complete path to your PDI home directory. For details about these checks, refer to the Executing PDI jobs from a filesystem (Simple) recipe.
For starting a PDI job from a filesystem repository in Linux or Mac, perform the following steps:
Let's start our sample job from the repository; to do this, we need to use two new arguments:
The
–repargument identifies the repository we are going to connect to; the syntax is as follows:–rep: <id_of_the_repository>The
–jobargument specifies the name of the job that needs to be started; the syntax is as follows:–job: <name_of_the_job>
So, because the ID of our repository is
sample3, we'll start the sample job with the following syntax:$ kitchen.sh –rep:sample3 –job: export-jobSuppose that the job is not located in the root directory of our repository, but is stored in the
pdi_bookdirectory; to start it, we must specify the correct path to the job in the repository with the following syntax using the–dirargument:$ kitchen.sh –rep:sample3 –dir:/pdi_book -job:export-jobParameter usage from within the command-line tool is exactly the same as we saw in the previous recipes. So, if we want to extract all the customers from the country U.S.A, a sample of the command to use is as follows:
kitchen.sh -param:p_country=USA ––rep:sample3 –job: export-job
For starting a PDI job from a filesystem repository on Windows, perform the following steps:
Starting a PDI job from within a filesystem repository on Windows requires for the same rules we saw previously to be followed with the exception that, as usual, we need to specify the arguments using the
/character instead of the–character that we used for Linux or Mac. So, the–repargument will change to/rep:/rep: < id_of_the_repository >And the
–jobargument will change to/job:/job: < name_of_the_job >Let's suppose that the job is located in the root directory of our repository; we can call the Kitchen script using the following syntax:
C:\temp\samples>Kitchen.bat /rep:sample3 /job:export-jobAbout the use of PDI parameters through the command-line arguments: let's suppose we run our job by extracting all the customers for the country U.S.A; we can call our job using the following syntax:
C:\temp\samples>Kitchen.bat /rep:sample3 /job:export-job /param:p_country:USA
For starting a PDI job from a database repository, perform the following steps:
The process of starting a PDI job in a database repository is the same as in a filesystem repository. The only difference in this case is that a database repository is an authenticated source, so it requires a username and password.
The
–userparameter lets you specify a valid username to connect to the repository. If you are on Linux/Mac, the syntax will be as follows:–user: <repository_username>For Windows, you need to change the
–character to the/character; the syntax is as follows:/user: <repository_username>The
–passargument lets you specify a valid password for the user you are using to connect to the database repository; the syntax in this case for Linux/Mac is as follows:–pass: <repository_user_password>And for Windows, the syntax is as follows:
/pass: <repository_username>Suppose that our job, called
export-job.kjb, is located in a database repository instead of in a filesystem repository, and that we are connecting to the userpdiuserwith the passwordpassword. The example command to start the job in Linux/Mac is as follows:$ kitchen.sh –user:pdiuser –pass:password –rep:sample3 –dir:/pdi_book -job:export-jobWhereas in Windows, the syntax is as follows:
C:\temp\samples>Kitchen.bat /user:pdiuser /pass:password /rep:sample3 /job:export-job
Up until now, we worked with jobs and transformations saved as XML files in the plain filesystem. Let's discuss some important things in the following sections that will help them work properly if we were to store them in a repository. Then, we'll talk about how to define a filesystem and a database repository.
When using jobs and transformations from within repositories (either database or files), things change slightly. In this case, the ETL process files relate to the root of the repository, and the internal variable Internal.Job.Filename.Directory does not make any sense. Because of this, we need to change the way our example job links jobs or transformations or any kind of file. The major changes are as follows:
The job links the transformation using the system variable
Internal.Job.Repository.Directoryto dynamically get the path to the job file in the repository. This system variable gives you the path to the job file being executed in the repository at runtime.To specify the input and output path for all the files read or written from or to the outside world, we added two new parameters,
p_input_directoryandp_target_directory, to specify the absolute or relative path (it depends on your needs) to the input and output directories. In our examples, these parameters default to the local directory where the job or transformation starts.
Creating a filesystem repository is a fairly easy task. Let's follow the ensuing summarized steps and try to define a new one:
Start Spoon and navigate to Tools | Repository | Connect. The repository connection dialog opens.
Click on the new repository button (the green circular button with the + icon in it). The Select repository type dialog box opens.
Spoon lets you decide between the two repository types. Choose the filesystem repository type and click on OK. The File repository settings dialog box opens in front of you.

Select the base directory that will contain the repository objects (in our case, it is the
<book_samples>/sample3directory).Fill in the ID field with the ID of the repository; in our case, the ID of the repository is
sample3.Set a name for the repository. You can even use spaces in your repository name because it is just a sort of label.
Click on OK and you are done. The newly created repository will appear in the list of available repositories.
The process to define a database repository is almost identical to what we saw in the previous paragraph regarding the filesystem repository. The difference here is that PDI requires a connection definition where it can create the related repository's database tables. Let's follow the ensuing summarized steps to create a new one:
Start Spoon and navigate to Tools | Repository | Connect. The repository connection dialog opens.
Click on the new repository button (the green circular button with the + icon in it). The Select repository type dialog box opens.
Spoon lets you decide between the two repository types. Choose the database repository type and click on OK. The Repository information dialog box opens in front of you.

Choose the connection name from a list of connections. In case there is no valid connection to use, you can define it by clicking on the New button (we assume you already know how to define a connection and that you already have a connection available). Fill in the repository ID and repository name.
If you don't have an existing repository or if you are accessing an old repository version, you can respectively create the necessary tables or upgrade the existing ones by clicking on the Create or Upgrade button.
Click on OK and you are done. The newly created repository will appear in the list of available repositories.
This recipe guides you through managing the PDI execution log in terms of the following aspects:
Setting up the verbosity level
Redirecting it to an output file for future reference
This recipe will work the same for both Kitchen and Pan; the only difference is in the name of the script's file used to start the process.
To get ready for this recipe, you need to check that the JAVA_HOME environment variable is properly set and then configure your environment variables so that the Kitchen script can start from anywhere without specifying the complete path to your PDI home directory. For details about these checks, refer to the recipe Executing PDI jobs from a filesystem (Simple).
For changing the log's verbosity level, perform the following steps:
Open a command-line window and go to the
<book_samples>/sample1directory.Any time that we are going to start a job or a transformation, we can manually set the verbosity of our log output. The more verbosity you choose to have, the more logs will be produced. To do this, we can use the
–levelargument specified for Linux/Mac as follows:–level: <logging_level>And for Windows, the argument specified is as follows:
/level: <logging_level>The
–levelargument lets you specify the desired logging level by choosing its value from a set of seven possible values specified as follows:Error: This level is intended only to show errorsNothing: This means the argument isn't showing any outputMinimal: This level uses minimal logging and provides a low verbosity on your log outputBasic: This is the default basic logging levelDetailed: This is intended to be used as soon as you require a detailed logging outputDebug: This is used for debugging purposes for a very detailed outputRowlevel: The maximum amount of verbosity; logging at a row level can generate a lot of data
To start the job in Linux/Mac with a log level set to the Error level, we can give the following command:
$ kitchen.sh –file:/home/sramazzina/tmp/samples/export-job.kjb –level:ErrorTo start the job in Windows with a log level set to the Error level, we can give the following command:
C:\temp\samples>Kitchen.bat /file C:\temp\samples\export-job.kjb /level:Error
For saving an ETL process log to output files for future reference, use the following steps:
The log produced by our Kettle processes is an invaluable resource to properly diagnose problems and solve them quickly. So, it is a good rule of thumb to save the logs and eventually archive them for future reference.
In case you are launching your jobs from the command line, there are different ways to save the log.
The first thing we can do is save the log to a file using the
logfileargument. This argument lets you specify the complete path to the logfile name.To set the logfile name on Linux/Mac, use the following syntax:
–logfile: <complete_logfilename>To set the logfile name on Windows, use the following syntax:
/logfile: <complete_logfilename>Let 's suppose that we are going to start the
export-job.kjbKettle job, and we want a Debug log level and to save the output to a specified logfile calledpdilog_debug_output.log. To do this on Linux/Mac, type the following command:$ kitchen.sh –file:/home/sramazzina/tmp/samples/export-job.kjb –level:Debug –logfile:./pdilog_debug_output.logTo set the logfile on Windows, type the following command:
C:\temp\samples>Kitchen.bat /file:C:\temp\samples\export-job.kjb /level:Debug /logfile:.\pdiloc_debug_output.logAs soon as your PDI starts, it will start filling a buffer that contains all the rows produced by your log. This is interesting because it lets you keep the memory usage under control. By default, PDI maintains the first 5000 logs' rows produced by your job in this buffer. This means that if your ETL process produces more than 5000 rows, the output log is truncated.
To change the length of the log buffer, you need to use the
maxloglinesargument; this argument lets you specify the maximum number of log lines.To set the maximum number of log lines that are kept by Kettle on Linux/Mac, use the following argument:
–maxloglines: <number_of_log_lines_to_keep>To set the maximum number of log lines that are kept by Kettle on Windows, use the following argument:
/maxloglines: <number_of_log_lines_to_keep>If you specify
0as the value for this argument, PDI will maintain all of the log lines produced.Another method to limit the number of log lines kept internally by the PDI logging system is to filter log lines by age. The
maxlogtimeoutargument lets you specify the maximum age of a log line in minutes before it is removed by the log buffer.To set the maximum age of a log line on Linux/Mac in minutes, use the following argument:
–maxlogtimeout: <age_of_a_logline_in_minutes>To set the maximum age of a log line on Windows in minutes, use the following argument:
/maxlogtimeout: <age_of_a_logline_in_minutes>If you specify
0as the value for this argument, PDI will maintain all the log lines indefinitely.Let's suppose, for example, that we're going to start the
export-job.kjbKettle job and that we want to keep 10000 rows in our log buffer. In this case, the command we need to use in Linux/Mac is as follows:$ kitchen.sh –file:/home/sramazzina/tmp/samples/export-job.kjb –level:Debug –logfile:./pdilog_debug_output.log –maxloglines:10000
The log is an invaluable source of information that is useful to understand what and where something does not work. This will be the topic covered by the first paragraph of this section. Then, we will see a brief example that helps us produce logfiles with a parametric name.
The log that our ETL process produces contains a valuable set of information that helps us understand where our process fails. The first case of failure is given by a system exception. In this case, it is very easy to identify why our process fails because the exception message is clearly identifiable in the logfile. As an example, let's suppose that we're starting our job from a wrong directory or that our job file is not found in the path we're giving; we will find a detailed exception message in the log as follows:
INFO  17-03 22:15:40,312 - Kitchen - Start of run.
ERROR: Kitchen can't continue because the job couldn't be loaded.
However, a very different thing is when our process does not explicitly fail because of an exception, but the results are different from what is expected. It could be that we expected 1000 rows to be written to our file, but only 900 were written. Therefore, what can we do to understand what is going wrong? A simple but effective way to try to understand what goes wrong is to analyze an important part of our log that summarizes what happened for each of our tasks. Let's consider the following section taken from the log of one of our sample processes:
INFO  17-03 22:31:54,712 - Read customers from file - Finished processing (I=123, O=0, R=0, W=122, U=1, E=0)
INFO  17-03 22:31:54,720 - Get parameters - Finished processing (I=0, O=0, R=122, W=122, U=0, E=0)
INFO  17-03 22:31:54,730 - Filter rows with different countries – Finished processing (I=0, O=0, R=122, W=122, U=0, E=0)
INFO  17-03 22:31:54,914 - Write selected country customers – Finished processing (I=0, O=122, R=122, W=122, U=0, E=0)
As you can clearly see, the section that can always be found almost at the end of any transformation called by the job summarizes what happens at the boundaries (input and output) of every step of our transformation. Keeping an eye on this log fragment is a key point in understanding where our business rules are failing and where we are getting lesser records than expected. On the other hand, remember that because jobs are mainly orchestrators, they do not contain any data, so there is no need for such a log section for them.
It could be interesting to separate our execution logs by appending the execution date and time to the logfile name. To do this, the simplest thing we can do is to wrap our Kitchen script in another script used to set the proper logfile name using some shell functions.
As an example, I wrote a sample script for Linux/Mac that starts PDI jobs by filename and writes a logfile whose name is made up of a base name, a text string containing the date and time when the job was submitted, and the extension (conventionally .log). Have a look at the following code:
now=$(date +"%Y%m%d_%H%M%s")
kitchen.sh -file:$1.kjb -logfile:$2_$now.log
As you can see, it's a fairly trivial script; the first line builds a string composed by year, month, name, hour, minutes, and seconds, and the second concatenates that string with a logfile's base name and extension. To start the script, use the following syntax:
startKitchen.sh <job_to_start_base_name> <logfile_base_name>
So, for example, the following command starts Kitchen by calling the job export-job.kjb and produces a logfile called logfile_20130319_13261363696006.log:
$./startKitchen.sh ./export-job ./logfile
You can do a similar batch for the Windows platform.
This recipe guides you through discovering the structure and content of your PDI repository using the PDI command-line tools. We can know anything about the repository from the command line: we can view the list of available repositories, or view the list of directories in the repository, view the list of jobs or transformations in the specified directory. This recipe will work the same for both Kitchen and Pan, with the exception of the listing of jobs and transformations in a repository's directory; the first works with Kitchen and the second with Pan.
To get ready for this recipe, you need to check that the JAVA_HOME environment variable is set properly and then configure your environment variables so that the Kitchen script can start from anywhere without specifying the complete path to your PDI home directory. For details about these checks, refer to the recipe Executing PDI jobs from a filesystem (Simple).
To get the list of the available repositories, perform the following steps:
Sometimes we need to start a job or a transformation but we do not have the details of the repository we are going to interact with. The first thing we need to know is the name of the repository we are going to connect to to start our process. To get the name of the available repositories, we can use the
listrepcommand-line argument.The usage is very simple because it does not need any value, just the name of the argument specified in the command line.
Imagine that we need to find the list of the available repositories on Linux/Mac; the command to give is as follows:
$ kitchen.sh –listrepTo do the same thing on Windows, the command is written as follows:
C:\temp\samples>Kitchen.bat /listrepThe result we get is the repositories listed in a clear and concise form with the repository ID in the first column and the repository name in the second column:
INFO  19-03 23:18:51,675 - Kitchen - Start of run.
INFO  19-03 23:18:51,695 - RepositoriesMeta - Reading repositories XML file: /home/sramazzina/.kettle/repositories.xml
List of repositories:
#1 : sample3 [PDI Book Samples]  id=KettleFileRepository
To get the list of directories in a selected repository, perform the following steps:
The next step after we have found the repository we were looking for could be to look for a job or transformation located somewhere in the repository.
To do this, we need to get the list of available directories in the repository using the
listdirargument used together with the following arguments:The
repargument, to specify the name of the repository where we want to display the internal directory structure.The
dirargument, to give the directory name's starting point. The command will show you the directories contained in a specific directory. If this argument has not been specified, PDI assumes that you want to show all the directories contained in the root directory. Navigating through the structure of a complex repository is quite a tedious and iterative process, but something is better than nothing!The
userand–passarguments, in case your repository is an authenticated repository, to specify the username and password that needs to be connected to.
To find the list of the available directories in the root of the repository
rep3, the command to fire on Linux/Mac is as follows:$ kitchen.sh –rep:sample3 –listdirTo find the list of the available directories in the root of the repository
rep3, the command to fire on Windows is as follows:C:\temp\samples>Kitchen.bat /rep:sample3 /listdirThe command returns the list of available directories in the following form:
INFO  20-03 07:07:17,236 - Kitchen - Start of run.
INFO  20-03 07:07:17,252 - RepositoriesMeta - Reading repositories XML file: /home/sramazzina/.kettle/repositories.xml
dir2
dir1
The directory
dir1has a subdirectory,subdir11; to show this directory, we need to specify another command that for Linux/Mac is as follows:$ kitchen.sh –rep:sample3 –dir:dir1 –listdirAnd for Windows, the command is as follows:
C:\temp\samples>Kitchen.bat /rep:sample3 /dir:dir1 /listdirPDI will show us the children of the directory
dir1as follows:INFO 20-03 07:07:34,324 - Kitchen - Start of run. INFO 20-03 07:07:34,339 - RepositoriesMeta - Reading repositories XML file: /home/sramazzina/.kettle/repositories.xml subdir11
If you're checking the directories of an authenticated repository, the command will change as follows for Linux/Mac:
$ kitchen.sh –user:pdiuser –pass:password –rep:sample3 –listdirAnd the command will change as follows for Windows:
C:\temp\samples>Kitchen.bat /user:pdiuser /pass:password /rep:sample3 /listdirThe output of the command will remain the same.
To get the list of jobs in a specified directory, perform the following steps:
Now that we know about the internals of our repository, we're ready to look for our jobs.
The argument used to show the list of the available jobs in a specified directory is
listjob. This argument must be used together with the following:The
repargument, to specify the name of the repository where we want to display the internal directory structure.The
dirargument, to give the name of the directory. The command will show you the jobs contained in a specific directory. If this argument is not specified, PDI assumes that you want to show all the jobs contained in the root directory.The
userandpassarguments, in case your repository is an authenticated repository, to specify the username and password that needs to be connected to.
To find the list of the available jobs in the root directory of the repository
rep3, the command to fire on Linux/Mac is as follows:$ kitchen.sh –rep:sample3 –listjobsTo find the list of the available jobs in the root directory of the repository
rep3, the command to fire on Windows is as follows:C:\temp\samples>Kitchen.bat /rep:sample3 /listjobsThe command returns the list of available jobs in the following form:
INFO  20-03 07:30:46,642 - Kitchen - Start of run.
INFO  20-03 07:30:46,657 - RepositoriesMeta - Reading repositories XML file: /home/sramazzina/.kettle/repositories.xml
export-job
If you're checking the jobs in an authenticated repository, the command on Linux/Mac will change in the following way:
$ kitchen.sh –user:pdiuser –pass:password –rep:sample3 –listjobsIf you're checking the jobs in an authenticated repository, the command on a Windows platform will change in the following way:
C:\temp\samples>Kitchen.bat /user:pdiuser /pass:password /rep:sample3 /listjobs
To get the list of transformations in a specified directory, perform the following steps:
The Pan script lets us see the list of transformations contained in a directory of our repository.
To do this, we need to specify the
–listtransargument together with the same arguments specified for the–listjobsargument; for details about this, please refer to the previous paragraph to get a detailed explanation of the meaning and syntax of those arguments.To find the list of the available transformations in the root directory of the repository
rep3, the command to fire on Linux/Mac is as follows:$ pan.sh –rep:sample3 –listtransTo find the list of the available transformations in the root directory of the repository
rep3, the command to fire on Windows is as follows:C:\temp\samples>Pan.bat /rep:sample3 /listtransThe command returns the list of available transformations in the following form:
INFO  20-03 07:35:10,073 - Pan - Start of run.
INFO  20-03 07:35:10,103 - RepositoriesMeta - Reading repositories XML file: /home/sramazzina/.kettle/repositories.xml
read-customers
Anything applied to the display of jobs contained in a specific directory and the ability to apply the same command to an authenticated repository applies here to transformations as well; the only recommendation is to remember to use the Pan script instead of the Kitchen script.
This recipe guides you through exporting the structure and content of your PDI repository using the PDI command-line tools. The first trivial use of this option is for something such as the backup of our job. The job and all of its dependencies will be exported to a ZIP file that we can, for example, move to another location for archiving. But at the end, what's the funny part of all of this? The job that you exported in your .zip archive starts directly from the exported archive file. For details about how to start a job from an archive file, follow what we explained in the recipe Executing PDI jobs packaged in archive files (Intermediate). This recipe will work the same for both Kitchen and Pan.
To get ready for this recipe, you need to check that the JAVA_HOME environment variable is set properly and then configure your environment variables so that the Kitchen script can start from anywhere without specifying the complete path to your PDI home directory. For details about these checks, refer to the recipe Executing PDI jobs from a filesystem (Simple).
To dump the jobs stored in a PDI repository to an archive file, use the following steps:
Dumping a job stored in a repository, either authenticated or not, is an easy thing. To try the following examples, use the filesystem repository we defined during the recipe Executing PDI jobs from the repository (Simple).
To export a job and all of its dependencies, we need to use the
exportargument followed by the base name of the.ziparchive file that we want to create. Remember that you don't need to specify any extension for the exported file because it will get attached automatically.This kind of repository is unauthenticated, but you can do exactly the same things using an authenticated repository by specifying the username and password to connect to the repository.
To export the job
export-jobfrom thesamples3repository on Linux/Mac, type the following command:$ kitchen.sh -rep:sample3 -job:export-job -export:sample-exportTo export the job
export-jobfrom thesamples3repository on Windows, type the following command:C:\temp\samples>Kitchen.bat /rep:sample3 /job:export-job /export:sample-export
To dump the jobs stored in the filesystem to an archive file, use the following steps:
You can do the same things to export jobs stored in the plain filesystem; in this case, the job must specify the files related to the job that is to be exported:
Using the
fileargument and giving the complete path to the job file in the filesystemUsing the
fileanddirarguments together
For details about the usage of these arguments, see the recipe Executing PDI jobs from a filesystem (Simple). Let's go to the directory
<books_samples>/sample1.To try to export all of the files related to the
export-job.kjbjob in Windows, type the following command:kitchen.sh -file:./export-job.kjb -export:sample-exportTo try to export all of the files related to the
export-job.kjbjob in Linux/Mac, type the following command:C:\temp\samples>Kitchen.bat /file:./export-job.kjb /export:sample-export
There is no magic behind the creation of the archive containing our job and all of its referenced files of jobs and transformations. Everything is always made using the Apache VFS library to let PDI create the exported .zip archive file very easily. You can find more details about the Apache VFS library and how it works on the Apache website at http://commons.apache.org/proper/commons-vfs.
Just a few words on some simple hints that can help you prevent unexpected behavior from the application.
Be careful when you are working with input steps that take an input as a set of files through a list. In our sample transformation, this is the case with the TextInput step. This step reads the file containing the customer dataset and sends the dataset into the transformation flow. All of these steps take as input a set of files to process. It could happen very easily that you forget an empty line at the very end of that file list as shown in the following screenshot:
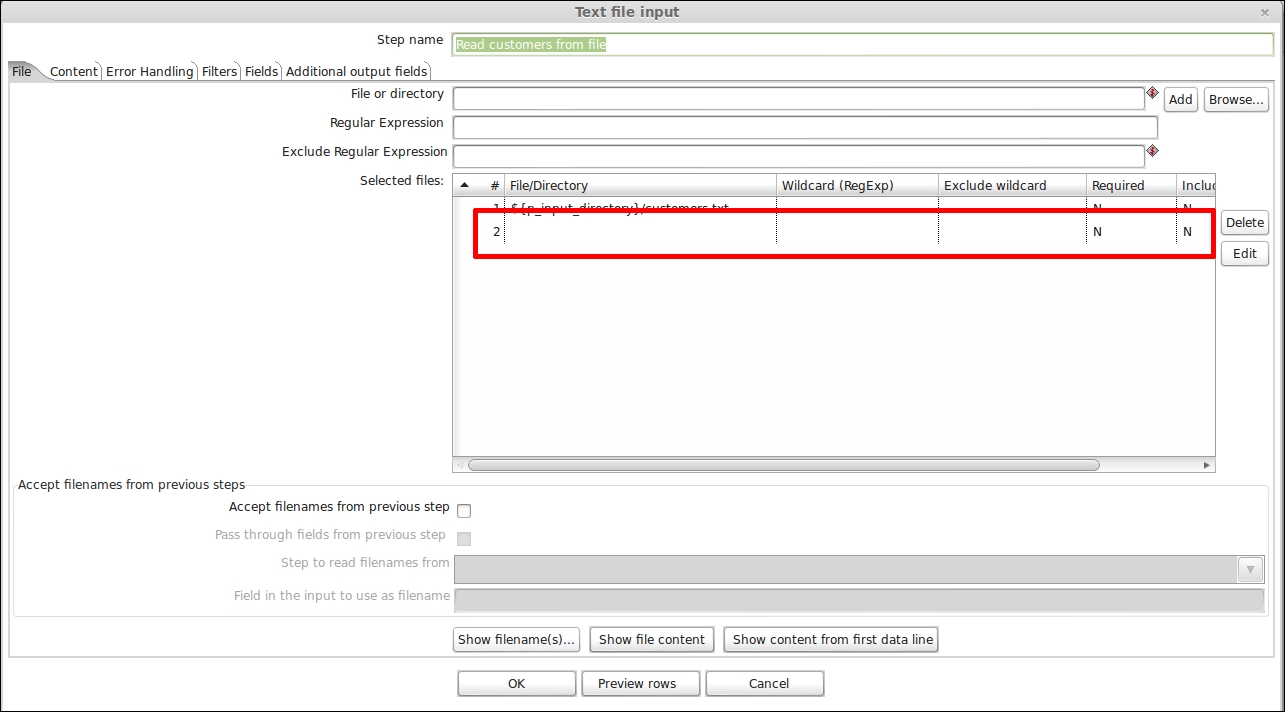
PDI does not give you an error while designing your transformation in Spoon if you leave the unused line highlighted in the preceding screenshot blank. But you could get into trouble if you try to export the job that uses that transformation by preventing the successful export of the job. So remember to check for this; and if these situations do exist, remember to clean it up.
This recipe covers an important aspect related to getting the return code that was obtained from the execution of our jobs. It gives you some advice on how to get it so that it could be used to determine if everything is going as expected. This recipe will work the same for both Kitchen and Pan; the only difference is in the name of the script's file used to start the process.
To get ready for this recipe, you need to check that the JAVA_HOME environment variable is set properly and then configure your environment variables so that the Kitchen script can start from anywhere without specifying the complete path to your PDI home directory. For details about these checks, refer to the recipe Executing PDI jobs from a filesystem (Simple).
Every time you start a PDI process, either jobs or transformations, the script that started the job or the transformation gets back from PDI with a return code that gives an indication about whether the process terminated successfully or not.
In case the process terminated unsuccessfully, the code gives you an overall indication of what happened.
Looking on the Internet at the Pentaho wiki and at some blogs (an interesting article was published recently on this topic in Diethard Steiner's blog at http://diethardsteiner.blogspot.it/2013/03/pentaho-kettle-pdi-get-pan-and-kitchen.html), you can easily find a summary table that describes these error codes and their meaning, which we have described for reference purposes in the There's more… section.
To display this code on Linux/Mac, edit the
kitchen.shscript and add the following command at the end of the PDI script. This command returns the exit code of the last called process:exit?1
To display this code on a Windows platform, edit the
Kitchen.batscript and add the following command at the end of the PDI script. This command returns the exit code of the last called process:echo %ERRORLEVEL%
You can do the same with the Pan scripts. As soon as the script terminates, it displays the error code. You can try it out by adding it to your scripts and then calling one of your sample jobs or transformations. Getting this code is a very interesting thing because as soon as you call Kitchen or Pan scripts from inside another script, the caller is able to take action in case something goes wrong. This means that we can design an error handling strategy.
It will be interesting to have a look at the summary of all the exit codes.
The following table summarizes all the exit codes with a brief explanation of their meanings:
|
Code |
Description |
|---|---|
|
|
The job/transformation ran without a problem. |
|
|
An error occurred during processing. |
|
|
An unexpected error occurred during loading/running of the job/transformation. Basically, it can be an error in the XML format, an error in reading the file, or it can denote that there are problems with the repository connection. |
|
|
Unable to connect to a database, open a file, or other initialization errors. |
|
|
The job/transformation couldn't be loaded from XML or the repository; basically, it could be that one of the plugins in the |
|
|
An error occurred while loading steps or plugins (an error in loading one of the plugins mostly). |
|
|
Command line usage printing. |
ETL processes are always batch processes; you will launch them, and then at the very end you expect to get back the results. There is no kind of user interaction during the process's execution. Often, ETL processes can take quite some time to execute because they either work with a lot of data or they implement complex process rules that take a long time to execute. It is always a good idea to schedule them so that they can run whenever the system load is low. This last recipe guides you through how to schedule PDI jobs and transformations on Unix/Linux. As usual, anything is applicable for both jobs and transformations; the only difference is in the name of the script's file that is to be scheduled.
To get ready for this recipe, you need to check that the JAVA_HOME environment variable is set properly and then configure your environment variables so that the Kitchen script can start from anywhere without specifying the complete path to your PDI home directory. For details about these checks, refer to the recipe Executing PDI jobs from a filesystem (Simple).
To schedule ETL processes on Linux, use the steps that follow:
To schedule ETL processes on Linux, we always use the
cronscheduler. The task to do this is very easy, while understanding the syntax of thecronschedules is a bit more complicated.To add a new schedule, you need to edit the
crontabfile; to do this, type the following command from the Linux command line:crontab –eDepending on the distribution, you can also use some graphical tools to do the same, but as I always suggest, it is better to learn the command-line commands to give you complete freedom and portability.
To schedule a process, you need to specify the time at which the command will run. To do this, there is a particular syntax that lets you specify minutes, hours, the month date, and the month year. The format of any of these items is as follows:
Minute: The minute of the hour (0-59)
Hour: The hour of the day (0-23)
Month day: The day of the month (1-31)
Month: The month of the year (1-12)
Weekday: The day of the week (0-6, 0 = Sunday)
You can follow some simple rules to specify ranges or multiple values for any of the preceding items, summarized as follows:
Define ranges by giving the start and end values of the interval and separating them with a hyphen
-Define multiple values by separating the single values with a comma
So, let's suppose that we want to schedule a job in the
<book_samples>/sample1directory calledexport-job.kjbto execute at every half an hour, at 20 and 50 minutes past the hour every day, except on weekends. To do this, you need to add a new schedule by typing the following command:20,50 * * * 1-5 <pdi_home>/kitchen.sh –file <books_samples>/export-job.kjb
After you have typed the command, save and quit the
crontabeditor by pressing the Esc key; then type:wq, and then press the Enter key. The schedule will immediately be available. As you can see, in this case, you need to specify the complete path to the PDI scripts and to theexport-job.kjbjob. Of course, scheduling a Pan script is just a matter of changing the script name.Further references about how to schedule tasks with the
cronscheduler can be found on Wikipedia at http://en.wikipedia.org/wiki/Cron.
To schedule ETL processes in Windows from Task Scheduler, use the steps that follow:
Go to Control Panel | Administrative Tools | Task Scheduler.
Select Create a Basic Task from the menu on the right.
The Create Basic Task Wizard dialog will be displayed. Enter the task name (for example,
Example PDI job). Click on Next.
Select the schedule you want to apply. You can either select the schedule based on the calendar or on an event. Let us suppose our schedule is based on the calendar and we want our program to be scheduled daily. Select the Daily radio button and click on Next.

Insert the time you want the event to fire and its recurrence multiplicity (Recur every). We want, for example, the event to fire everyday at 4.00 A.M. Click on Next.

Select the action you want to accomplish; in our case, we select Start a program. Click on Next.
In the Program/script field, insert the full path and the name of the script you want to start (
Kitchen.batorPan.bat). In the Add arguments field, insert the usual information you pass along to the Kitchen or Pan script to start your job or transformation properly. Click on Next.
At the end, a summary dialog will open showing you all the parameters you inserted to completely define your schedule.

Click on Finish.
Your job will now appear in the list of waiting jobs.
To schedule ETL processes in Windows using the command line, use the following steps:
The
atcommand works the same ascron, so it becomes very easy to schedule our job with Kitchen or our transformation with Pan.Let's suppose that we want to schedule a job in the
<book_samples>/sample1directory calledexport-job.kjbto be executed everyday at 8:00 AM with the exception of the weekends. To do this, you need to add a new schedule by typing the following command:at 8:00 /every:M,T,W,Th,F <pdi_home>\Kitchen.bat /file:<books_samples>\export-job.kjbAfter you type the command, the schedule immediately becomes available. As you can see, in this case, you need to specify the complete path to the PDI scripts and to the
export-job.kjbjob.
For Linux/Mac users, an interesting point is that whenever we execute a problem through a cron schedule, we get into trouble with our environment variables settings. Let's see how we can apply a little trick to solve all of this easily and without any pain.
For Linux/Mac users, we can get into trouble because a crontab schedule for our application does not work properly. The reason for this is that crontab passes a minimal set of environment variables to our application. To look at this, you can add a dummy job and have the output of the environment variables written on a file as suggested by the following example:
* * * * * env > /tmp/env.log
To work around this, a first simple practice would be to remember to specify all of the environment variables used by your script in the script. If you are going to launch an application, wrap it in a little script where you will set all of your needed environment variables.
In case you don't want to redefine all of your environment variables, another option would be to add the following in the crontab scheduler before your command:
. $HOME/.profile.
An example of this is as follows:
0 5 * * * . $HOME/.profile; /path/to/command/to/run
This could be a simple way to access any environment variable defined for our user without having to respecify them in our script one by one.


