


Nowadays, starting a web development poses a considerable challenge, since clients have got used to having powerful desktop-based interfaces at their disposal, which can also be delivered in record time. If we focus on Line of Business (LOB) applications, we find the additional challenge which is the fact that our apps have to be ready for massive changes, taking into account tight deadlines without sacrificing stability. All of us have suffered that "little last-minute change". Everybody has heard things like, "We got to change the way in which discounts for purchases are managed. This could be ready in just five minutes, couldn't it?"
To overcome such situations, web developers can make use of a combination of ASP.NET (webforms or MVC), HTML, JavaScript, AJAX, and the more advanced HTML 5 and jQuery.
Nevertheless, when we implement LOB applications we often find that:
We have to struggle in order to make our pages consistent in different browsers; even in different versions of the same browser.
Our developers have to learn a language to develop client side, and another one to develop the server side.
JavaScript is a polemic language—love it or hate it. For some developers it is not object-oriented (although it has OO capabilities) and is an interpreted language. One only has to forget to add a semicolon, or introduce a syntax error when typing a command, and our application may produce an execution time error.
HTML 5 only works in updated browsers. Could you imagine yourself telling your client something like, "Well, what you have to do is install the latest version of Chrome or IE on your 1,000 PCs. This is also applicable to your associate companies."
We have to mix business and presentation logic. We try to avoid going to the server, for instance, to make validations which do not require reading a database. That is to say, we mix the reading of an input or an HTML ComboBox with the realization of validations. For example, if the user chooses more than four high-end products and is a premium client, we can enable a special 10 percent discount. This causes serious trouble when changes are required in the page layout, even if they are insignificant.
Microsoft has published a plugin called Silverlight (the word plugin reminds us of Flash, one of the most accepted plugin-based technologies) which allows us to encode with sturdy, compiled languages (such as C# and VB.NET). This plugin incorporates a lite version, that is the .NET Framework, which offers us the possibility to take advantage of everything offered at the client side while implementing a new markup language called XAML. The advantages of using Silverlight are as follows:
Our applications are sturdier; for example, allowing us to implement automatic unit testing at the client side.
We can decouple business presentation and implement an architecture at the client side.
We can decouple roles. While a designer can deal with presentation, we as developers are able to focus on the business of building the application.
Our application is more scalable (we free up resources on the server) and we do not depend on tricks to maintain application status.
We can have a standard XAML implemented the same way in every single browser. No more headaches such as, "it looks good in IE6 but not in IE7, or Firefox, and so on".
In addition, Silverlight is multi-platform (for example, Windows or Mac) and multi-device (computers, mobile devices with Symbian or WP7 support, for instance, among others).
In this book, we are going to deal with Silverlight 5. The tool that Microsoft recommends for development is Visual Studio 2010. Therefore, we will have to install the following software:
Visual Studio 2010 (if you do not have a commercial license, you can download the express version available at http://www.microsoft.com/express/downloads/#2010-Visual-CS)
Visual Studio 2010 SP1 at http://www.microsoft.com/download/en/details.aspx?id=23691
Microsoft Silverlight 5 Tools for Visual Studio 2010 at http://www.microsoft.com/download/en/details.aspx?id=23887
All of these individual links are available at http://www.silverlight.NET/getstarted/.
Silverlight is a plugin installed in web browsers in a quick and clean way similar to Flash. That is, Flash is in a controlled environment, and applications run under a sandbox environment.
As for the architecture, if we compare it to a standard web application, we can substitute XAML for HTML, C# or VB.NET for JavaScript, and so on. We can also make use of a reduced version of the.NET Framework as shown in the following figure:

The plugin is about 4 MB in size and does not depend on the desktop version of Microsoft .NET Framework.
All this is fine but there a few questions to be answered such as how is the Silverlight application installed on a server? How is it executed on a client machine? Let's see how it works:
When we build a Silverlight project, an XAP file is generated (Silverlight can also be configured to generate several files).
This file is just a ZIP file with all the necessary assemblies and resources to execute the application.
This XAP file is stored on our web server.
In an HTML page, we reference it using an
OBJECTtag.When the user navigates to that page, the XAP file of the application is downloaded and unzipped. Then, the application starting point is sought and the application is executed.
Application execution takes place in a controlled sandbox environment, so a malicious developer cannot format the client's HDD (in some cases, user confirmation is required to interact with the hardware, otherwise interaction is simply denied to the application).

To get a better idea of how it works, let's compare an HTML web application with a Silverlight one:

Now that we have our development environment ready, we will create our first Silverlight project. Of course, it will be the classic Hello World. On this occasion, we will use the example to learn:
How to create a new project
How to encode directly into the markup language
How to drag elements from the Toolbox palette and configure them using Properties
How to respond to an event and call a Code-Behind method
Let's open Visual Studio and start creating the app:
To create a new project, we must launch Visual Studio. Select File | New Project and choose the Silverlight Application option:

Once the route and type of project has been chosen, a dialog will appear, asking us if we want to create a web project to host our Silverlight application.
Click on OK (a Silverlight application needs a web page which instantiates it with an
OBJECTtag).
We now have the solution created. It consists of two projects:
Silverlight project: The wizard creates an entry point (
.appfile) and a default page (MainPage). In the default MainPage, we can see the layout definition (MainPage.xaml) and its associated Code-Behind (mainpage.cs). It is advisable to remember that this Code-Behind is executed at the client side and not at the server side.Web project: This simply consists of an ASP.NET page and an HTML page to try our Silverlight application.
We can clearly see every element of the solution in the following figure:

In this section, we will add our first Silverlight controls, encoding them directly into the markup language. We will see next how to carry out the same operation via drag-and-drop:
Open the file
MainPage.xaml.Add a text block containing the expression Hello World. To do this, we will enter the following code:
<Grid x:Name="LayoutRoot" Background="White">
  <TextBlock Text="Hello World!" FontSize="20"/>
</Grid>
Tip
Downloading the example code
You can download the example code files for all Packt books you have purchased from your account at http://www.packtpub.com. If you purchased this book elsewhere, you can visit http://www.packtpub.com/support and register to have the files e-mailed directly to you.
We must build the project and execute the example by clicking on the play icon.

We can now see our first Silverlight application in action!

It is highly recommended that you have a good knowledge of the XAML markup language and some experience practicing it. Nevertheless, if you intend to make a rapid prototype or just need to begin developing immediately, you can use the drag-and-drop controls from the toolbar directly in to the form (as in a WinForms application).

You can also edit the features of a control by accessing the Properties window as shown in the following screenshot:

In order to achieve a higher control over the windows layout (with the aim to, for example, achieve an optimal disposition of the controls in different resolutions), we suggest learning the XAML markup language or using Expression Blend, which is a tool for designers (and developers).
In the following example, we will allow the user to change the message Hello World! to one of their choice. Starting from the previous example, we will follow the given steps:
Open the
mainpage.xamlfile.Replace the XAML code inserted in the previous example by the one highlighted as follows (we have added an additional textbox, a button, and identifiers for the controls).
<Grid x:Name="LayoutRoot" Background="White">
  <StackPanel Orientation="Vertical">
  <TextBlock x:Name="tbLabel"
  Text="Hello World!"
  FontSize="20"/>
            <StackPanel Orientation="Horizontal">
                <TextBlock
                    Text="New Text:"
                    FontSize="16"/>
                <TextBox
                    x:Name="txInput"
                    Width="120"/>
                <Button Content="Change"/>
            </StackPanel>
        </StackPanel>
    </Grid>
When we build and execute the project, we realize that our window now has the aspect as shown in the following screenshot:

Next, we must implement the response to the
Clickevent of the Change button.Hook to the
Clickevent directly in the XAML file. As soon as we start typing, IntelliSense (Microsoft's implementation of autocompletion) will ask us if we want to create the method (hitting Enter or Tab would create the method with the default name or with the name of the control after selecting aClickevent).
Execute the same operation from the Properties panel (or by directly double-clicking on the button control):

As a result, XAML will look as follows:
<Button Content="Change" Click="Button_Click"/>
In Code-Behind, in the method invoked by the
Clickevent, we must add a line of code, which transfers the text content entered by the user to the tag where we showed 'Hello World'.private void Button_Click(object sender, RoutedEventArgs e) { tbLabel.Text = txInput.Text; }When we execute, we will be able to enter a new text that substitutes 'Hello World'.

Now that we have taken our first steps with Silverlight, let's have a quick introduction to some basic concepts in XAML.
Extensible Application Markup Language (XAML) is a declarative language. Specifically, XAML can initialize objects and set properties of objects, using a language structure that shows hierarchical relationships between multiple objects, and uses a backing type convention that supports extension of types. You can create visible user interface (UI) elements in the declarative XAML markup. You can then use a separate Code-Behind file to respond to events and manipulate the objects you declare in XAML (For more information on XAML, you can take a look at http://msdn.microsoft.com/en-us/library/cc189036(v=vs.95).aspx).
The advantages of XAML when compared to HTML are as follows:
XAML is a modern language, adapted to the current needs of users and implemented from scratch (whereas HTML suffers from organic growth)
We have only one way to implement it, which avoids us headaches derived from the problems of adaptation with different browsers and their versions
There is a clear differentiation between declarative (XAML) and business logic/code parts (
.csCode-Behind)
The best you can do is try it and see for yourself.
When you work with HTML, you build the basic visual structure of a page by using tables or divs (in more modern browsers, you can use a canvas as well). In Silverlight 5 we have three basic elements: Canvas, StackPanel, and Grid.
This layout control permits us to place Child controls in coordinates relative to the canvas parent (taking into account that the upper-left corner of the canvas is the (0,0) coordinate) X, Y, Z (Z for the ZIndex). It is perfect for the implementation of drawing applications or those devoted to diagram management.
In the following code you can see an example where a rectangle and an ellipse are drawn:
<Canvas>
  <Rectangle
    Canvas.Top="25" Canvas.Left="50"
    Fill="Blue" Width="70"
    Height="80" StrokeThickness="3" Stroke="Black" />
  <Ellipse
    Canvas.Top="50" Canvas.Left="80"
    Fill="Yellow" Width="120"
    Height="80" StrokeThickness="3" Stroke="Black"
  />
</Canvas>
Canvas.Top and Canvas.Left are attached properties. Such properties allow a child element to store a value associated with a property defined on an ancestor element.
The result is as shown in the following screenshot:

The StackPanel control allows us to pile up child controls in horizontal or vertical rows. We can nest several StackPanel controls. This combination makes it possible to implement complex layouts, as shown in the following code and the resulting screenshot:
<StackPanel Orientation="Vertical" HorizontalAlignment="Center">
  <Image Source="./images/Hydrangeas.jpg" Height="200" Margin="5"/>
  <StackPanel Orientation="Horizontal">
    <Image Source="./images/Chrysanthemum.jpg" Height="100"  Margin="5"/>
    <Image Source="./images/Hydrangeas.jpg" Height="100" Margin="5"/>
    <Image Source="./images/Jellyfish.jpg" Height="100" Margin="5"/>
  </StackPanel>
</StackPanel>
A grid permits us to place content in rows and columns. The concept is similar to an HTML table, but much more evolved. Before you start adding controls to the grid, you need to specify its layout. This is done with the Grid.RowDefinitions
and Grid.ColumnDefinitions
collection.
To set the position of the element inside the grid, we use the attached properties Grid.Row
and Grid.Column
. The first position starts at 0. To establish the width or height of a given row or column, we can use a fixed pixel width/height. Let the layout manager autoadjust the size to the space available (auto), or provide a given width/height based on percentages instead of pixels.
<Grid x:Name="LayoutRoot" Background="White">
  <Grid.RowDefinitions>
    <RowDefinition Height="100"/>
    <RowDefinition Height="100"/>
  </Grid.RowDefinitions>
  <Grid.ColumnDefinitions>
    <ColumnDefinition Width="150"/>
    <ColumnDefinition Width="90"/>
    <ColumnDefinition Width="*"/>
  </Grid.ColumnDefinitions>

  <Image Source="./images/Desert.jpg"
    Height="100" Margin="5"
  Grid.Row="0" Grid.Column="0"/>
  <TextBlock Text="Desert"
    Grid.Row="0" Grid.Column="1"/>
  <TextBlock Text="Geographical area whose average annual precipitation is less than 250 millimeters (10 in) per year."
    Grid.Row="0"
    Grid.Column="2"
    TextWrapping="Wrap"
  />

  <Image Source="./images/Tulips.jpg"
    Height="100" Margin="5"
    Grid.Row="1" Grid.Column="0"/>
  <TextBlock Text="Tulip"
    Grid.Row="1"
  Grid.Column="1"/>
  <TextBlock Text="Perennial, bulbous plant which belongs to the family Liliaceae."
    Grid.Row="1"
    Grid.Column="2"
    TextWrapping="Wrap"
  />
</Grid>
Silverlight offers us a series of user controls, which are available in the Toolbox palette. The most common ones are shown in the following screenshot:

You can find additional controls (for free) in the Silverlight Toolkit (http://silverlight.codeplex.com/). There are plenty of commercial libraries available.
Now we will lay out the main window of our application:
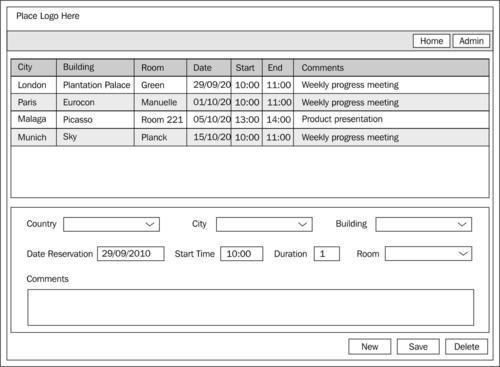
This window lets the user see the meeting room reservations which are already made, as well as edit them, or create new ones.
First, we must create a new project, and then edit the XAML code of the MainPage file.
We must now define three rows to the grid layout container:
The resulting user control includes the grid and rows created:
<UserControl x:Class="ReservationLayout.MainPage"
  xmlns="http://schemas.microsoft.com/winfx/2006/xaml/presentation"
  xmlns:x="http://schemas.microsoft.com/winfx/2006/xaml"
  xmlns:d="http://schemas.microsoft.com/expression/blend/2008"
  xmlns:mc="http://schemas.openxmlformats.org/markup-compatibility/2006"
  mc:Ignorable="d"
  d:DesignHeight="300" d:DesignWidth="400">

  <Grid x:Name="LayoutRoot" Background="White">
    <Grid.RowDefinitions>
      <RowDefinition Height="300"/>
      <RowDefinition Height="300"/>
      <RowDefinition Height="90"/>
    </Grid.RowDefinitions>
  </Grid>

</UserControl>
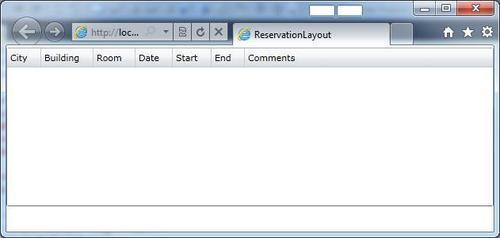
Next, we must add a DataGrid control to the layout and indicate the row in which its parent container will be assigned:
<UserControl
  x:Class="ReservationLayout.MainPage"
  xmlns="http://schemas.microsoft.com/winfx/2006/xaml/presentation"
  xmlns:x="http://schemas.microsoft.com/winfx/2006/xaml"
  xmlns:d="http://schemas.microsoft.com/expression/blend/2008"
  xmlns:mc="http://schemas.openxmlformats.org/markup-compatibility/2006"
  xmlns:sdk="http://schemas.microsoft.com/winfx/2006/xaml/presentation/sdk"
  mc:Ignorable="d"
  d:DesignHeight="300" d:DesignWidth="400">

  <Grid x:Name="LayoutRoot" Background="White">
    <Grid.RowDefinitions>
      <RowDefinition Height="200"/>
      <RowDefinition Height="150"/>
      <RowDefinition Height="90"/>
    </Grid.RowDefinitions>

    <sdk:DataGrid Grid.Row="0"/>
  </Grid>
</UserControl>
Note
The easiest way to insert DataGrid control is by dragging it directly from the Toolbox window in Visual Studio and then dropping it in our layout (it adds all the necessary references for us). After that, we only have to jump to the XAML of the application and define the row and/or column where we want it to appear.
If we execute the application, the result is not very appealing. We will only see a white rectangle that represents the DataGrid control. We will learn how to manage this control in subsequent chapters. For now, we will add some column definitions to make it look more similar to the following example screen.
To make it easier, we have to select the DataGrid object and use the Properties tab.
On the one hand, we disable auto-generation of columns.

On the other hand, we will define the columns manually, clicking on the property Columns.

The following is the XAML that we get:
<sdk:DataGrid Grid.Row="0" AutoGenerateColumns="False">
  <sdk:DataGrid.Columns>
    <sdk:DataGridTextColumn
      CanUserReorder="True"
      CanUserResize="True"
      CanUserSort="True"
      Header="City"
      Width="Auto"
    />
    <sdk:DataGridTextColumn
      CanUserReorder="True"
      CanUserResize="True"
      CanUserSort="True"
      Header="Building"
      Width="Auto"
    />
    <sdk:DataGridTextColumn
      CanUserReorder="True"
      CanUserResize="True"
      CanUserSort="True"
      Header="Room"
      Width="Auto"
    />
    <sdk:DataGridTextColumn
      CanUserReorder="True"
      CanUserResize="True"
      CanUserSort="True"
      Header="Date"
      Width="Auto"
    />
    <sdk:DataGridTextColumn
      CanUserReorder="True"
      CanUserResize="True"
      CanUserSort="True"
      Header="Start"
      Width="Auto"
    />
    <sdk:DataGridTextColumn
      CanUserReorder="True"
      CanUserResize="True"
      CanUserSort="True"
      Header="End"
      Width="Auto"
    />
    <sdk:DataGridTextColumn
      CanUserReorder="True"
      CanUserResize="True"
      CanUserSort="True"
      Header="Comments"
      Width="*"
    />
  </sdk:DataGrid.Columns>
</sdk:DataGrid>
Let's take a look at the final result:
We now move to the detailed area. The easiest thing to do here will be to design the page using Expression Blend or Visual Studio. We will use the knowledge acquired in this chapter to design the window manually using grid control. To do this, we must define the following area of rows and columns:
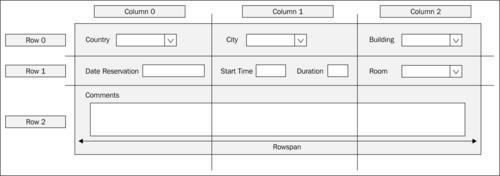
The generated XAML can be seen in the code that follows. A few things should be taken care of. They are:
The grid container which we insert is inside the parent layout grid
We use
Marginproperties to assign space between grid rows, as well as between labels and controlsTo lay out labels and controls, we will use a
StackPanelcontrol and adjust theorientationproperty, setting it to vertical or horizontal, as applicable (another valid approach to position them is to play with eachMarginproperty of each control, this margin being related to its container cell)For the Comments textbox to occupy all of the grid width, we add a property called
ColSpan
<Grid Grid.Row="1" HorizontalAlignment="Center" MinWidth="670" Margin="5">
<Grid.RowDefinitions>
<RowDefinition Height="25"/>
<RowDefinition Height="30"/>
<RowDefinition Height="80"/>
</Grid.RowDefinitions>
<Grid.ColumnDefinitions>
<ColumnDefinition Width="200"/>
<ColumnDefinition Width="250"/>
<ColumnDefinition Width="220"/>
</Grid.ColumnDefinitions>
<StackPanel
Orientation="Horizontal"
Grid.Row="0"
Grid.Column="0">
<TextBlock
Text="Country"
Margin="0,5,5,0"/>
<ComboBox Width="143"/>
</StackPanel>
<StackPanel
Orientation="Horizontal"
Grid.Row="0"
Grid.Column="1">
<TextBlock
Text="City"
Margin="0,5,5,0"
/>
<ComboBox Width="221"/>
</StackPanel>
<StackPanel
Orientation="Horizontal"
Grid.Row="0"
Grid.Column="2">
<TextBlock
Text="Building"
Margin="0,5,5,0"/>
<ComboBox Width="100"/>
</StackPanel>
<StackPanel
Orientation="Horizontal"
Grid.Row="1"
Grid.Column="0"
Margin="0,5,0,0"
>
<TextBlock
Text="Date Reservation" Margin="0,5,5,0"
/>
<TextBox Width="90"/>
</StackPanel>
<StackPanel
Orientation="Horizontal"
Grid.Row="1"
Grid.Column="1"
Margin="0,5,0,0"
>
<TextBlock
Text="Start Time"
Margin="0,5,5,0"
/>
<TextBox Width="70"/>
<TextBlock
Text="Duration"
Margin="0,5,5,0"
/>
<TextBox Width="61"/>
</StackPanel>
<StackPanel
Orientation="Horizontal"
Grid.Row="1"
Grid.Column="2"
Margin="0,5,0,0"
>
<TextBlock
Text="Room"
Margin="0,5,5,0"/>
<ComboBox Width="113"/>
</StackPanel>
<StackPanel
Orientation="Vertical"
HorizontalAlignment="Left"
Grid.Row="3"
Grid.Column="0" Grid.ColumnSpan="3"
Margin="0,5,0,0"
>
<TextBlock
Text="Comments"
Margin="0,5,5,0"/>
<TextBox
Width="599"
Height="50"/>
</StackPanel>
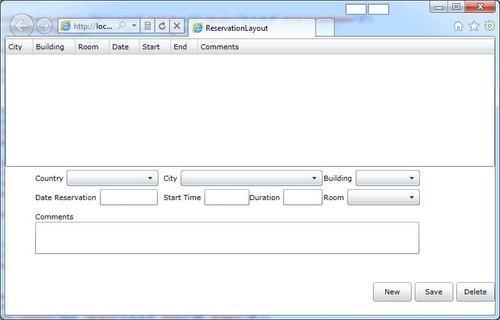
</Grid>The result of the page layout is as follows:
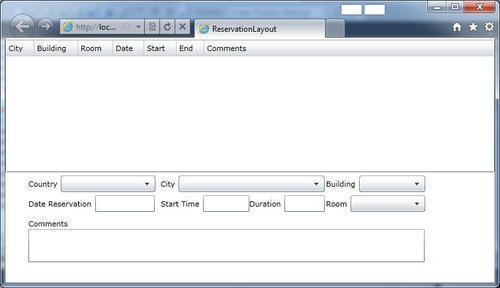
We will add the control panel in the lower part of the window to complete the layout. We will use a StackPanel container with horizontal orientation to do so.
<StackPanel
  Grid.Row="2"
  Orientation="Horizontal" HorizontalAlignment="Right">
  <Button Content="New"
    Width="60" Height="30"/>
  <Button Content="Save"
    Margin="5,0,0,0"
    Width="60" Height="30"/>
  <Button Content="Delete"
    Margin="5,0,0,0"
    Width="60" Height="30"/>
</StackPanel>
We have now laid out our window as shown in the following screenshot:
In this chapter, we have assimilated the fundamentals of Silverlight architecture, installed the necessary tools, implemented the classic 'Hello World' project, and learned some basic concepts related to XAML.
The main points to be remembered are as follows:
Silverlight provides us with a very powerful development framework
Silverlight allows us to develop with .NET client-side coding
Even though we can lay out windows via drag-and-drop, it is crucial to know the basics of XAML
In the next chapter, we will begin with some concepts concerning management applications. Similarly, we will learn how to add windows and dialogs, as well as how to implement navigation between those windows.
If you haven't worked with Silverlight before, you probably couldn't get enough of this chapter. If you want to further increase your knowledge, we recommend Microsoft Silverlight 4 Business Application Development: Beginner's Guide, Albert Cameron and Frank LaVigne, Packt Publishing. Likewise, you can find more information at the following sites:
XAML Silverlight Quick Start:
Build your First Silverlight app:
http://www.silverlight.net/learn/overview/getting-started/getting-started-with-silverlight
Getting Started with Silverlight Development (8 part tutorial):
http://timheuer.com/blog/articles/getting-started-with-silverlight-development.aspx
