


 Download code from GitHub
Fundamental Concepts of Network Automation
This chapter details some of the key concepts that need to be applied practically before we deep-dive into network-automation-specific examples. As detailed in the first edition, understanding the concepts and how to write a program for network automation is as important as giving out accurate results of a script.
The following topics will be covered in this chapter:
- A readable script
- Basic programs
- Making a decision on which scripting language to use (Python or PowerShell)
- Introduction to code check-in and its importance
- Sample use cases
Technical requirements
The technical requirements are as follows:
- Python (3.5 or above)
- PowerShell (5.0 or above)
- Windows 8 or above (for PowerShell)
The codes for this chapter can be found at https://github.com/PacktPublishing/Practical-Network-Automation-Second-Edition.
A readable script
As network automation/DevOps engineers, we often tend to overlook the way we write a script. The focus is always on providing accurate results, which is great, but as we scale our script or application, a focus on the readability of the script is essential.
This becomes a key requirement when we start to work as a team where we have multiple contributors for a script or set of scripts.
Let's look at an example of a bad Python script that returns the result as expected (output is correct):
 x=input("What is your name:")
 print ("how are you"+x)
 y="how are you"+x
 if ("test1" in y) and ("test2" in y):
  print ("cool")
 x=y.split(" ")
 x=x[2]+"awesome"
 if ("are" in x):
  print ("not cool")
After the second or third line of code as we read through, we lose the understanding of program flow, and what the expected result was. Eventually, it becomes very difficult to interpret even a simple script such as this.
Imagine how difficult it would be for someone who has not written this code to interpret a bigger script (say, 50 lines).
Now, let's modify this code to make it readable:
#ask for input of user's name and prints it with a message
x=input("What is your name:")
print ("how are you"+x)
y="how are you"+x

#validates and prints message if 'test1' AND 'test2' exists in input
if ("test1" in y) and ("test2" in y):
    print ("cool")

#splits the sentence stored in variable x with blank spaces
x=y.split(" ")
print (x)
#adds the string "awesome" to the third word in the sentence and stores it in x
x=x[2]+"awesome"

#validates if word "are" is in x and prints the message accordingly
if ("are" in x):
    print ("not cool")
As we can see, each section (or line) that achieves a specific result is tagged by a remark line (denoted by #). This line is a human-readable line that is ignored by the program (or compiler) and is used to ensure any reader of the program understands what is going on in each section. This ensures that each and every aspect of the script is easily understood by the reader; as the script is enhanced, troubleshooting and modifications in the program become very easy.
Another key aspect in the readability of a program is to ensure we add some key information at the very start of the code.
A generic suggestion would be to include the following:
- The author's name
- Version of the script (starts with 1.0)
- One-liner description of basic usage of the script
- Any specific installation requirements
As an example, let 's add this to the very top of the preceding script:
#Name: Abhishek Ratan
#Version: 1.0
#Usage: Asks for user input and validates it for some specific keywords
#Additional installation required: None
Basic programs
Taking this forward, let's write some basic scripts or programs using Python that can help us understand how to leverage Python in our daily automation tasks.
Validating an IPv4 address
This example will show us how to validate an IP address format, given as an input:
ip_address=input("Enter IP address: ")
#remove any extra characters
ip_address=ip_address.strip()

#initialize a flag to point to true for an ip address
ip_address_flag=True

#validate if there are only 3 dots (.) in ip address
if (not(ip_address.count('.') == 3)):
    ip_address_flag=False
else:
    #Validate if each of the octet is in range 0 - 255
    ip_address=ip_address.split(".")
    for val in ip_address:
        val=int(val)
        if (not(0 <= val <=255)):
            ip_address_flag=False

#based upon the flag value display the relevant message
if (ip_address_flag):
    print ("Given IP is correct")
else:
    print ("Given IP is not correct")
The sample output is as follows:
>>
 Enter IP address: 100.100.100.100
 Given IP is correct
 >>>
 Enter IP address: 2.2.2.258
 Given IP is not correct
 >>>
 Enter IP address: 4.7.2.1.3
 Given IP is not correct
 >>>
As we can see, based upon our validations in the script, the output of our program, returns a validation status of True or False for the IP address that was given as input.
As we move forward, it's important to know that Python, or any programming language, has multiple predefined functions/libraries that can be utilized to perform particular functions. As an example, let's see the earlier example of validating the IPv4 address, using a prebuild library (socket) in Python:
import socket
addr=input("Enter IP address: ")
try:
    socket.inet_aton(addr)
    print ("IP address is valid")
except socket.error:
    print ("IP address is NOT valid")
The sample output is as follows:
>>
 Enter IP address: 100.100.100.100
 IP address is valid
 >>>
 Enter IP address: 2.2.2.258
 IP address is NOT valid
 >>>
 Enter IP address: 4.7.2.1.3
 IP address is NOT valid
 >>>
In the preceding approach, using a prebuilt library helps us to ensure that we do not have to reinvent the wheel (or create our own logic for something that has already been developed by other developers), and also ensures our script remains lean and thin while achieving the same expected results.
Making the right choice
In this example, we will use a switch case to identify the right set of configurations based upon certain input given by the user.
As a prerequisite understanding, the syntax of the exec-timeout command based upon OS is as follows:
- Cisco IOS command: exec-timeout 15 0
- Cisco NXOS command: exec-timeout 15
#create a dictionary:
config={
    "IOS":"exec-timeout 15 0",
    "NXOS":"exec-timeout 15"
    }
getchoice=input("Enter IOS type (IOS/NXOS) : ")
if (getchoice == "IOS"):
 print (config.get("IOS"))
if (getchoice == "NXOS"):
 print (config.get("NXOS"))
The sample output is as follows:
>
 Enter IOS type (IOS/NXOS) : IOS
 exec-timeout 15 0
 >>>
 Enter IOS type (IOS/NXOS) : NXOS
 exec-timeout 15
 >>>
In the preceding example, we have tackled a common challenge of using a switch case in Python. Unlike some other languages, Python does not provide a switch case statement, hence we need to use a dictionary to overcome this. Using this approach, we can remove the usage of multiple if statements and directly call the dictionary values based upon the mappings done in the dictionary.
Hiding credentials
This is another common problem engineers face. There are times when we need to ask for password as input from the user. As the user types in the password, it is clearly visible on the screen, and view able by anyone watching the screen. Additionally, there are times when we need to save the credentials, but need to ensure they are not visible in the script as clear-text passwords (which is a cause of concern as we share the scripts among fellow engineers). In this example, we will see how to overcome this challenge.
The code to perform encryption and decryption on the given credentials is as follows:
import getpass
import base64
#ask for username .. will be displayed when typed
uname=input("Enter your username :")

#ask for password ... will not be displayed when typed
#(try in cmd or invoke using python command)
p = getpass.getpass(prompt="Enter your password: ")

#construct credential with *.* as separator between username and password
creds=uname+"*.*"+p

###Encrypt a given set of credentials
def encryptcredential(pwd):
  rvalue=base64.b64encode(pwd.encode())
  return rvalue

###Decrypt a given set of credentials
def decryptcredential(pwd):
    rvalue=base64.b64decode(pwd)
    rvalue=rvalue.decode()
    return rvalue

encryptedcreds=encryptcredential(creds)
print ("Simple creds: "+creds)
print ("Encrypted creds: "+str(encryptedcreds))
print ("Decrypted creds: "+decryptcredential(encryptedcreds))
The sample output is as follows:
C:\gdrive\book2\github\edition2\chapter1>python credential_hidings.py
 Enter your username :Myusername
 Enter your password:
 Simple creds: Myusername*.*mypassword
 Encrypted creds: b'TXl1c2VybmFtZSouKm15cGFzc3dvcmQ='
 Decrypted creds: Myusername*.*mypassword
As we can see in the preceding example, we have used two libraries: getpass and base64. The getpass library gives us the advantage of not echoing (or displaying) what we type on the screen, and the value gets stored in the variable that we provide.
Once we have the username and password, we can use it to pass it to the relevant places. Another aspect that we see here is that we can hard code our username and password in the script without showing it in clear text, using the base64 library to encode our credentials.
In the preceding example, a combination of the Myusername username and the mypassword password have been separated by a *.* tag and it is converted to base64 as b'TXl1c2VybmFtZSouKm15cGFzc3dvcmQ='. The b in front denotes the byte format as base64, which works on byte instead of strings. In this way, the same encoded value of bytes can be hardcoded in a script, and the decrypt function can take that as input and provide back the username and password to be used for authentication.
Accessing APIs
Here, we see a generic example of how to access an API and parse some basic values from the return values:
import requests
city="london"
#this would give a sample data of the city that was used in the variable
 urlx="https://samples.openweathermap.org/data/2.5/weather?q="+city+"&appid=b6907d289e10d714a6e88b30761fae22"
#send the request to URL using GET Method
 r = requests.get(url = urlx)
 output=r.json()
#parse the valuable information from the return JSON
 print ("Raw JSON \n")
 print (output)
 print ("\n")
#fetch and print latitude and longitude
 citylongitude=output['coord']['lon']
 citylatitude=output['coord']['lat']
 print ("Longitude: "+str(citylongitude)+" , "+"Latitude: "+str(citylatitude))
The sample output is as follows:
>>>
 Raw JSON
{'coord': {'lon': -0.13, 'lat': 51.51}, 'weather': [{'id': 300, 'main': 'Drizzle', 'description': 'light intensity drizzle', 'icon': '09d'}], 'base': 'stations', 'main': {'temp': 280.32, 'pressure': 1012, 'humidity': 81, 'temp_min': 279.15, 'temp_max': 281.15}, 'visibility': 10000, 'wind': {'speed': 4.1, 'deg': 80}, 'clouds': {'all': 90}, 'dt': 1485789600, 'sys': {'type': 1, 'id': 5091, 'message': 0.0103, 'country': 'GB', 'sunrise': 1485762037, 'sunset': 1485794875}, 'id': 2643743, 'name': 'London', 'cod': 200}

Longitude: -0.13, Latitude: 51.51
 >>>
Using the requests library, we fetch the sample weather information from an open API (public API) for London, England. The output returned is JSON, which we print first as raw (that is, print the output exactly as we got it back), and then parse out the meaningful info (the city's latitude and longitude) from the JSON payload.
Using regular expressions (regex)
There are times when an engineer wants to parse specific data from a sentence or a big chunk of data. Regex is the best tool of the trade for this purpose. Regex is a common concept in every programming language, with the only difference being the syntax in each programming language.
The following example shows how to use regex in Python:
import re
sample="From Jan 2018 till Nov 2018 I was learning python daily at 10:00 PM"

# '\W+' represents Non-Alphanumeric characters or group of characters
print(re.split('\W+', sample))

#Extract only the month and Year from the string and print it
regex=re.compile('(?P<month>\w{3})\s+(?P<year>[0-9]{4})')

for m in regex.finditer(sample):
    value=m.groupdict()
    print ("Month: "+value['month']+" , "+"Year: "+value['year'])

# to extract the time with AM or PM addition
regex=re.compile('\d+:\d+\s[AP]M')
m=re.findall(regex,sample)
print (m)
The sample output is as follows:
>
 ['From', 'Jan', '2018', 'till', 'Nov', '2018', 'I', 'was', 'learning', 'python', 'daily', 'at', '10', '00', 'PM']
 Month: Jan , Year: 2018
 Month: Nov , Year: 2018
 ['10:00 PM']
As we can see in the preceding output, the first line of code, is a simple sentence split into separate words. The other output is a regex in a loop, which extracts all the months and years depicted by three characters (mmm) and four digits (yyyy). Finally, in the last line of code, a time extraction (extracting a time value using regex) is performed, based upon AM/PM in the hh:mm format.
Handling files
Once in a while, we need to work on stored data or store some data from a script. For this purpose, we use file-handling techniques.
Consider the example for handling data storage (as a record) :
getinput=input("Do you want to store a new record (Y/N) ")
#this is to remove any extra spaces
 getinput=getinput.strip()
#this is to convert all input to lower case
 getinput=getinput.lower()
#read values and create a record
 if ("y" in getinput):
   readvaluename=input("Enter the Name: ")
   readvalueage=input("Enter the Age: ")
   readvaluelocation=input("Current location: ")
   tmpvariable=readvaluename+","+readvalueage+","+readvaluelocation+"\n"
### open a file myrecord.csv in write mode, write the record and close it
   fopen=open("myrecord.csv","w")
   fopen.write(tmpvariable)
   fopen.close()
The output is as follows:
>>
 ===== RESTART: C:/gdrive/book2/github/edition2/chapter1/file_handling.py =====
 Do you want to store a new record (Y/N) n
 >>>
 ===== RESTART: C:/gdrive/book2/github/edition2/chapter1/file_handling.py =====
 Do you want to store a new record (Y/N) y
 Enter the Name: abhishek
 Enter the Age: 10
 Current location: US
 >>>
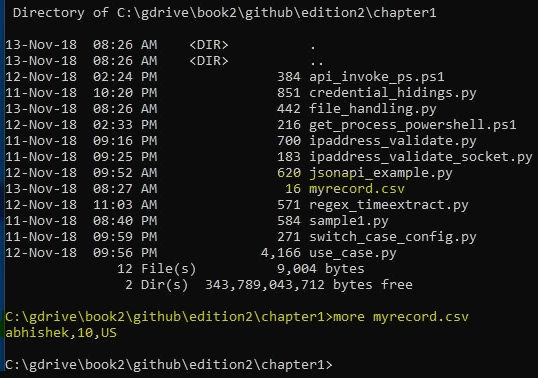
Once this is executed, a myrecord.csv file is created in the same location as the script (as we did not specify a file path):
Making a decision (Python or PowerShell)
There are times when, as an automation engineer, we might have to choose between PowerShell and Python for certain tasks. Python is extensively used for interaction with infrastructure devices, Network Gear, and multiple vendors, but to have deep integration into and accessibility on any Windows platform, PowerShell will be the best choice. Python is extensively used in Linux environments, where PowerShell has a very limited support. PowerShell comes pre-installed in every flavor of Windows, but a major updated version (PowerShell 5.0) is available from Windows 10 onward.
PowerShell also has its own built-in libraries to support various tasks, like Python, has an extensive support community and backing from Microsoft, which adds new enhancements regularly.
Let's look at a couple of examples of PowerShell to help us understand how to write a PowerShell code.
API access
Here, we call the weather API to get coordinates for a particular location (say London, England):
#use the city of london as a reference
 $city="london"
 $urlx="https://samples.openweathermap.org/data/2.5/weather?q="+$city+"&appid=b6907d289e10d714a6e88b30761fae22"
# used to Invoke API using GET method
 $stuff = Invoke-RestMethod -Uri $urlx -Method Get
#write raw json
 $stuff
#write the output of latitude and longitude
 write-host ("Longitude: "+$stuff.coord.lon+" , "+"Latitude: "+$stuff.coord.lat)
The output is as follows:
PS C:\Users\abhishek.ratan> C:\gdrive\book2\github\edition2\chapter1\api_invoke_ps.ps1
coord : @{lon=-0.13; lat=51.51}
 weather : {@{id=300; main=Drizzle; description=light intensity drizzle; icon=09d}}
 base : stations
 main : @{temp=280.32; pressure=1012; humidity=81; temp_min=279.15; temp_max=281.15}
 visibility : 10000
 wind : @{speed=4.1; deg=80}
 clouds : @{all=90}
 dt : 1485789600
 sys : @{type=1; id=5091; message=0.0103; country=GB; sunrise=1485762037; sunset=1485794875}
 id : 2643743
 name : London
 cod : 200
Longitude: -0.13 , Latitude: 51.51
As we can see in the code, a major difference between writing code in Python and PowerShell is that in PowerShell we do not need to focus on indentation. PowerShell does not care about indentation, whereas a Python compilation would fail if strict indentation was not adhered to.
Also, we do not need to import any specific library in PowerShell, as it has very extensive built-in functions that are directly callable from the script.
Interacting with local machines
As mentioned earlier, PowerShell is deeply integrated with Windows at all levels. Let's look at an example of certain processes (system or PowerShell processes from Microsoft), running locally on the Windows machine:
Get-Process `
 | Where-Object {$_.company -like ‘*Microsoft*’}`
 | Where-Object {($_.ProcessName -like ‘*System*’) -or ($_.ProcessName -like ‘*powershell*’)}`
 | Format-Table ProcessName, Company -auto
The output is as follows (when executed from PowerShell console):
PS C:\Users\abhishek.ratan> Get-Process `
 | Where-Object {$_.company -like ‘*Microsoft*’}`
 | Where-Object {($_.ProcessName -like ‘*System*’) -or ($_.ProcessName -like ‘*powershell*’)}`
 | Format-Table ProcessName, Company -auto
ProcessName          Company
 -----------         -------
 powershell          Microsoft Corporation
 powershell_ise      Microsoft Corporation
 SystemSettings       Microsoft Corporation
 SystemSettingsBroker Microsoft Corporation
As we can see in this example, another feature of PowerShell is the piped command format support (|). Similar to Unix, a piped command in PowerShell is used to take objects, output from one cmdlet, easily send it to another cmdlet, and so on, until we granularize to a final output.
In this example, we took the output of Get-Process (which is a full process dump of our local machine), and filtered out the processes running from Microsoft Corporation. Then we further refine it to show only those processes that have the System or powershell in the name. The final output is piped to a tabular format with ProcessName and Company as the table header.
Introduction to code check-in and its importance
As we move forward in writing code and scripts, we also need to ensure they are stored somewhere for quick access. In today's world, where we can work from virtually anywhere, it's nearly impossible to work on only one machine everywhere you go.
Additionally, when we write a set of scripts and multiple team members are involved, we need to find a way to share our code and current updates on the code in real-time. This helps each of the contributors to be updated on each other's code to avoid redundant code. There are multiple techniques to ensure we can store our code/collaborate on code-writing and distribute the code to other engineers, but most code-sharing is done through Git.
Apart from collaboration and code-sharing, a very important use case for a code check-in is to keep your code stored in an environment where an abrupt crash or any local hardware issue (even a stolen computer) would not make your hours or weeks of efforts come to a standstill.
Let's start by creating a sample account at GitHub code hosting platform where user(s) can check-in the code, perform an initialization in a local machine, and perform a code check-in.
Git installation and initialization
Git is a version control system which tracks the changes when working with computer codes while GitHub is a web-based Git version control repository hosting service. Git is installed on a local computer whereas GitHub is hosted on web platform. In our test scenario, we will utilize the free Git service by signing up and creating our repository online at https://github.com/.
The following steps guide us through creating a repository in Git:
- Click on New repository:

- Give a name to the repository (in this case, mytest), and click on Create repository:

- Note the instructions to clone (that is, make a copy of this repository) on your local machine:

- Download and install the Git client from https://git-scm.com/downloads, choosing the release for the OS of the machine. In our test, we have a Windows 10 machine, hence we are using the Git client for Windows.
- Follow the instructions to clone the Git repository in your specific folder. From Command Prompt, run the following command:
 C:\test>git clone https://github.com/pnaedition2/mytest.git
 Cloning into 'mytest'...
 warning: You appear to have cloned an empty repository.
 C:\test>cd mytest
 C:\test\mytest>git pull
 Your configuration specifies to merge with the ref 'refs/heads/master'
 from the remote, but no such ref was fetched.
- To confirm (validate) if configuration is working, get a Git status:
C:\test\mytest>git status
On branch master
No commits yet
Untracked files:
(use "git add <file>..." to include in what will be committed)
git
nothing added to commit but untracked files present (use "git add" to track)
Code check-in
As we have the Git environment initialized in our local computer, we will proceed with a code check-in of a simple Python script:
- Confirm that the file that needs to be checked in exists in the folder:
 Directory of C:\test\mytest
 12-Nov-18 03:16 PM <DIR> .
 12-Nov-18 03:16 PM <DIR> ..
 12-Nov-18 03:12 PM 0 git
 12-Nov-18 03:16 PM 34 myfirstcodecheckin.py
 2 File(s) 34 bytes
 2 Dir(s) 345,064,542,208 bytes free
- If the file has not been added to git, it would show up in the git status command under untracked files:
C:\test\mytest>git status
On branch master
No commits yet
Untracked files:
(use "git add <file>..." to include in what will be committed)
git
myfirstcodecheckin.py
nothing added to commit but untracked files present (use "git add" to track)
- Add this file for the code check-in and validate it again using git status (the added file will now show under the Changes to be committed section):
C:\test\mytest>git add myfirstcodecheckin.py
C:\test\mytest>git status
On branch master
No commits yet
Changes to be committed:
(use "git rm --cached <file>..." to unstage)
new file: myfirstcodecheckin.py
Untracked files:
(use "git add <file>..." to include in what will be committed)
git
- Commit this particular change to the master (in other words, ensure the local copy is now saved on the server, ready to be shared with others):
C:\test\mytest>git commit -m "this is a test checkin"
[master (root-commit) abe263d] this is a test checkin
Committer: Abhishek Ratan <abhishek.ratan@servicenow.com>

1 file changed, 1 insertion(+)
create mode 100644 myfirstcodecheckin.py
The -m in this section specified a comment for this particular code check-in. This generally depicts what code is being checked in and is treated like a remark section for this particular check-in.
- We need to push our changes back to the server hosted on the web:
C:\test\mytest>git push
Counting objects: 3, done.
Writing objects: 100% (3/3), 273 bytes | 273.00 KiB/s, done.
Total 3 (delta 0), reused 0 (delta 0)
remote:
remote: Create a pull request for 'master' on GitHub by visiting:
remote: https://github.com/pnaedition2/mytest/pull/new/master
remote:
To https://github.com/pnaedition2/mytest.git
* [new branch] master -> master
This completes the check-in process for a specific file (or code script). To confirm that the process was successful, we can go to the GitHub URL of your repository to see the file:

As a final note, the next time someone clones the Git repository on a different machine, they just need to do a simple git pull for the same files to be visible and as a local copy on that particular machine. A similar approach can be followed for subsequent check-ins, as well as modifications to current files.
Sample use cases
Let's summarize our learning in the chapter using a couple of sample use cases.
First use case
Consider the first scenario as follows:
A travel agency has three customers. For our use case, the requirement is to suggest a package for a specific city using the predefined preferences for any two customers. As an additional output or suggestion, there needs to be a suggestion on weather status for the next five days. Also, to provide an enhanced end user experience, ask a single question to determine check-in time and type of transport for the journey.
The code is as follows:
...
import getpass
import base64
import requests
from collections import Counter
import re

#ask for username .. will be displayed when typed
uname=input("Enter your username :")

#ask for password ... will not be displayed when typed
#(try in cmd or invoke using python command)
p = getpass.getpass(prompt="Enter your password: ")

#construct credential with *.* as separator between username and password
creds=uname+"*.*"+p

#encrypted creds of the registered customers
#for testing username:password is customer1:password1 , customer2:password2, and so on

#create a dictionary:
customers={
    "customer1":b'Y3VzdG9tZXIxKi4qcGFzc3dvcmQx',
    "customer2":b'Y3VzdG9tZXIyKi4qcGFzc3dvcmQy',
    "customer3":b'Y3VzdG9tZXIzKi4qcGFzc3dvcmQz'
    }

###Decrypt a given set of credentials
def decryptcredential(pwd):
    rvalue=base64.b64decode(pwd)
    rvalue=rvalue.decode()
    return rvalue
###Encrypt a given set of credentials
def encryptcredential(pwd):
  rvalue=base64.b64encode(pwd.encode())
  return rvalue

#to validate if a customer is legitimate
flag=True

### procedure for validated customer
def validatedcustomer(customer):
    print ("Hello "+customer)
    inputcity=input("Which city do you want to travel (ex London/Paris/Chicago): ")
    inputaddinfo=input("Any specific checkin time [AM/PM] and preferred mode of travel [car/bus]: ")

    #### extract the regex values from additional info
    regex=re.compile('\d+:\d+\s[AP]M')
    time=re.findall(regex,inputaddinfo)
    if "car" in inputaddinfo:
        transport="car"
    else:
        if "bus" in inputaddinfo:
            transport="bus"

    ### create sentence based upon the additional info provided
    print ("\n\nYou have selected to checkin at "+time[0]+", and your preferred transport will be "+transport+" .")

    getcityinfo=validatecity(inputcity)

    ### this is to sort the dictionary from highest to lowest based upon weather types
    sorted_d = [(k, getcityinfo[k]) for k in sorted(getcityinfo, key=getcityinfo.get, reverse=True)]

    ###iterate through the weathers to construct a sentence
    sentence="Weather prediction for next 5 days is (chance of) "
    for item in sorted_d:
        sentence=sentence+" "+item[0]+": "+str(item[1])+"%,"
    print (sentence)

### to validate the average weather for that city for next 5 days
def validatecity(inputcity):
    #create empty list
    weathers=[]
    weatherpercentage={}
    #remove any additional spaces accidentally entered
    inputcity=inputcity.strip()
    urlx="https://samples.openweathermap.org/data/2.5/forecast?q="+inputcity+"&appid=b6907d289e10d714a6e88b30761fae22"
    #send the request to URL using GET Method
    r = requests.get(url = urlx)
    output=r.json()
    ### this is to parse the type of weather and count them in a list
    for item in output['list']:
        weathers.append(item['weather'][0]['description'])
    countweather=Counter(weathers)
    #### this is to find the percentage of each weather type from the given output (36 variations are returned from API)
    for item in countweather:
        weatherpercentage[item]=int((countweather[item]/36) * 100)
    return weatherpercentage

### validate if the username is part of any customers
if (uname in customers):
    encryptedcreds=encryptcredential(creds)
    getcustomercreds=customers[uname]
    ### validate if the credentials provided is the same as stored credentials for that customer
    if not(str(encryptedcreds.decode()) == str(getcustomercreds.decode())):
        flag=False
else:
    flag=False

if not(flag):
    print ("Unauthorized customer.")
else:
    validatedcustomer(uname)
Scenario 1: Incorrect username and password:
C:\gdrive\book2\github\edition2\chapter1>python use_case1.py
Enter your username :abhishek
Enter your password:
Unauthorized customer.
Scenario 2: Correct username but incorrect password:
C:\gdrive\book2\github\edition2\chapter1>python use_case1.py
Enter your username :customer1
Enter your password:
Unauthorized customer.

C:\gdrive\book2\github\edition2\chapter1>
Scenario 3: Correct username and password:
C:\gdrive\book2\github\edition2\chapter1>python use_case1.py
Enter your username :customer1
Enter your password:

Hello customer1
Which city do you want to travel (ex London/Paris/Chicago): paris
Any specific checkin time [AM/PM] and preferred mode of travel [car/bus]: travel checkin at 12:30 PM by bus

You have selected to checkin at 12:30 PM, and your preferred transport will be bus .
Weather prediction for next 5 days is (chance of) clear sky: 61%, light rain: 27%, few clouds: 5%, broken clouds: 2%, moderate rain: 2%,

C:\gdrive\book2\github\edition2\chapter1>
As we can see in the preceding output, the customer selected paris, with a check in time of 12:30 PM and bus as their mode of transport.
Based upon the location selected, the API call was made to the weather site, and a prediction of the weather for the next 5 days was returned in JSON. This has been evaluated in terms of a percentage, and a result value was given, which predicts a 61% chance of clear sky, followed by a 27% chance of light rain.
Let's run this output for another customer:
C:\gdrive\book2\github\edition2\chapter1>python use_case1.py
Enter your username :customer2
Enter your password:
Hello customer2
Which city do you want to travel (ex London/Paris/Chicago): Chicago
Any specific checkin time [AM/PM] and preferred mode of travel [car/bus]: checkin preferred at 10:00 AM and travel by car


You have selected to checkin at 10:00 AM, and your preferred transport will be car .
Weather prediction for next 5 days is (chance of) clear sky: 51%, light rain: 37%, few clouds: 5%, broken clouds: 2%, moderate rain: 2%,

C:\gdrive\book2\github\edition2\chapter1>
In this particular situation, we see that customer2 has a check-in preference of 10:00 AM and prefers to travel by car.
Also, as per their selection of Chicago, the prediction of the weather is clear sky: 51%, light rain: 37%, few clouds: 5%, broken clouds: 2%, moderate rain: 2%.
Second use case
Consider the second scenario as follows:
As an admin, you need to provide a script to users to add/delete themselves based upon authentication status and if authenticated successfully, provide an option to change their passwords:
...
import getpass
import base64
import os.path

###Check with credential storage file exists. If not, then create one, otherwise read data from the current file
storedcreds=[]
if (os.path.isfile("usecase_creds.txt")):
    fopen=open("usecase_creds.txt")
    storedcreds=fopen.readlines()
else:
    fopen=open("usecase_creds.txt","w")

###Decrypt a given set of credentials
def decryptcredential(pwd):
    rvalue=base64.b64decode(pwd)
    rvalue=rvalue.decode()
    return rvalue

###Encrypt a given set of credentials
def encryptcredential(pwd):
  rvalue=base64.b64encode(pwd.encode())
  return rvalue

#### this is used to deregister a authenticated user
def deregister(getencryptedcreds):
    with open("usecase_creds.txt") as f:
        newText=f.read().replace(getencryptedcreds+"\n","")

    with open("usecase_creds.txt", "w") as f:
        f.write(newText)
    print ("you are deregistered")

#this is to store the read encrypted creds from file into expanded username and password combo
storedcredsexpanded=[]
for item in storedcreds:
    item=item.strip()
    #to ensure we do not parse the blank values or blank lines
    if (len(item) > 2):
        tmpval=decryptcredential(item)
        storedcredsexpanded.append(tmpval)

#ask for username .. will be displayed when typed
uname=input("Enter your username :")

#ask for password ... will not be displayed when typed
#(try in cmd or invoke using python command)
p = getpass.getpass(prompt="Enter your password: ")

#construct credential with *.* as separator between username and password
creds=uname+"*.*"+p

#encrypted creds of the registered customers
#for testing username:password is customer1:password1 , customer2:password2, and so on...
getencryptedcreds=encryptcredential(creds)

#validate authentication of user
flag=False
usrauthenticated=False
for item in storedcreds:
    if (getencryptedcreds.decode() in item):
        flag=True

if (flag):
    print ("Authenticated successfully")
    usrauthenticated=True
else:
    print ("Authentication failed")
    #validate if user exists
    tmpvalue=decryptcredential(getencryptedcreds)
    #split username and password
    tmpvalue=tmpvalue.split("*.*")
    usrflag=False
    ###validate if this username exists otherwise give an option for new registration
    for item in storedcredsexpanded:
        item=item.split("*.*")
        if (tmpvalue[0] == item[0]):
            print ("User already exists but password incorrect. Please contact Admin for password reset")
            usrflag=True
            break
    #if user does not exist
    if (usrflag==False):
            readinput=input("User does not exist, Do you want to register yourself (Y/N) ")
            readinput=readinput.strip()
            readinput=readinput.lower()
            if (readinput == "y"):
                uname=input("Enter your username :")
                p = getpass.getpass(prompt="Enter your password: ")
                creds=uname+"*.*"+p
                getencryptedcreds=encryptcredential(creds)
                ## to convert bytes to string
                getencryptedcreds=getencryptedcreds.decode()

                ##open file in append mode
                fopen=open("usecase_creds.txt","a")
                fopen.write(getencryptedcreds+"\n")
                fopen.close()
                print ("User added successfully")

if (usrauthenticated):
    readinput=input("Do you want to deregister yourself (Y/N) ")
    readinput=readinput.strip()
    readinput=readinput.lower()
    if (readinput == "y"):
        deregister(getencryptedcreds.decode())
    else:
        readinput=input("Do you want to change your password (Y/N) ")
        readinput=readinput.strip()
        readinput=readinput.lower()
        if (readinput == "y"):
            p = getpass.getpass(prompt="Enter your password: ")
            creds=uname+"*.*"+p
            newencryptedcreds=encryptcredential(creds)
            newencryptedcreds=newencryptedcreds.decode()
            getencryptedcreds=getencryptedcreds.decode()

            ###updated the credential of the user
            with open("usecase_creds.txt") as f:
                newText=f.read().replace(getencryptedcreds, newencryptedcreds)

            with open("usecase_creds.txt", "w") as f:
                f.write(newText)
            print ("Your password is updated successfully")
The outputs based upon different scenario are as follows:
Scenario 1: A user who is not registered receives the following output:
C:\gdrive\book2\github\edition2\chapter1>python use_case2.py
Enter your username :newcustomer
Enter your password:
Authentication failed
User does not exist, Do you want to register yourself (Y/N) y
Enter your username :newcustomer
Enter your password:
User added successfully

C:\gdrive\book2\github\edition2\chapter1>
Scenario 2: A user who is registered but forgot their password receives this output:
C:\gdrive\book2\github\edition2\chapter1>python use_case2.py
Enter your username :newcustomer
Enter your password:
Authentication failed
User already exists but password incorrect. Please contact Admin for password reset

C:\gdrive\book2\github\edition2\chapter1>
Scenario 3: A user who is a registered customer, and wants to change their password if authenticated successfully, receives the following output:
C:\gdrive\book2\github\edition2\chapter1>python use_case2.py
Enter your username :customer2
Enter your password:
Authenticated successfully
Do you want to deregister yourself (Y/N) n
Do you want to change your password (Y/N) y
Enter your password:
Your password is updated successfully
Scenario 4: A user who is a registered customer, and want to deregister themselves if authenticated successfully, receives the following output:
C:\gdrive\book2\github\edition2\chapter1>python use_case2.py
Enter your username :newcustomer
Enter your password:
Authenticated successfully
Do you want to deregister yourself (Y/N) y
you are deregistered

C:\gdrive\book2\github\edition2\chapter1>
All of these preceding operations are saved in the background, using the file operations, under the file named usecase_creds.txt:
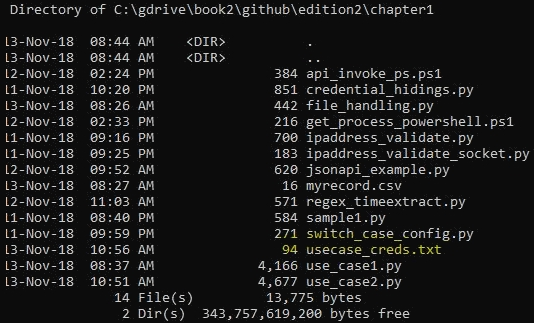
Additionally, as an example, here is the current output of usecase_creds.txt, which shows that none of the credentials storage in the file occurs in clear-text (or human-readable format):
C:\gdrive\book2\github\edition2\chapter1>more usecase_creds.txt
Y3VzdG9tZXIxKi4qcGFzc3dvcmQx
Y3VzdG9tZXIyKi4qbmV3cGFzc3dvcmQ=
YWJoaXNoZWsqLipoZWxsb3dvcmxk

C:\gdrive\book2\github\edition2\chapter1>
Summary
In this chapter, we covered the working examples of various terminology/techniques that we will use while performing network automation. This chapter also introduced readers to writing a good program, which is a key requirement in a collaborative environment. This chapter also explained the use of Git and GitHub as a code check-in, and why it is important and advantageous to publish the code on a server as compared to a local copy. Readers were also introduced to making a choice between two popular scripting languages, Python and PowerShell, while working on mixed environments or platforms. The short examples given will help the reader to understand the practical usage of Python; they also expose multiple concepts that will be used regularly when writing a program.
Finally, the use cases are a summation of all the previous learning and show how to use that knowledge in a bigger project. Some of the concepts given in the use cases are key to network-automation programs that will be developed further in the next chapter.
The next chapter will go deeper into how to write scripts using Python, with a specific focus on usability for network engineers. There will be samples, tips, and best practices as well.
Questions
-
As a best practice and to keep the script simple and readable, we should not add any comments to the script [True/False].
-
In the phrase I have been learning Python for the last 1 month and 2 days, what is the smallest possible regular expression that would return the value 2 days?
-
While performing an encoding using base64, the value returned is in bytes. Which specific method do we use to ensure it is converted to the String value?
-
To ensure the password we type is not visible to anyone, what is the method we can invoke to ask for the password from the user?
-
What are the w and a modes in a file operation?
-
What is a library in Python?


