


This chapter explains all you need to know to get started when working with Scratch. We'll be focusing on using the latest version of Scratch, Scratch 2.0. Scratch gives young programmers the flexibility to develop programs of all types, many of which will be explored throughout this book. This chapter is meant to get you used to working with the Scratch interface before we dive into the more challenging topics involved. Note that if you have worked with Scratch some time before, you may wish to move on to Chapter 2, Storytelling. If you are new to Scratch, or have been away for quite some time, this chapter is just the right place to get started! For more information on getting started, it might be helpful to visit the Scratch resources at http://scratch.mit.edu/help.
This first recipe to follow, which will help you download and install Scratch to your computer. Follow along and you'll be using Scratch in no time.
Our first recipe is all about getting Scratch up and running. Scratch can easily be used on any computer. Simply visit http://scratch.mit.edu/help/faq/ to see the requirements for Scratch. If you've used Scratch 1.4 before, you'll recall that you had to install Scratch on your computer. The Scratch creators have made it even easier to use Scratch 2.0. Now you can run Scratch directly within your browser. All you need is a recent browser and Adobe Flash Player!
To use Scratch 2.0, simply click on the Create link on the Scratch home page. If you want to use Scratch 1.4, follow these steps. The installer will create a link on your desktop for you as well as a Start menu shortcut. Follow these steps to download and install Scratch:
Open your browser, and then visit http://scratch.mit.edu/scratch_1.4/ to download the version of Scratch you need.
Click on the link to the appropriate version based on your operating system, as shown in the following screenshot:

Depending on your Internet connection speed, it may take a couple of minutes for Scratch to download.
Click on Yes on any prompts that come up confirming you want to open the file.
The Scratch installer will open. Click on Next > to begin the install process.

Next you'll be prompted to choose an install location. The default location will serve most people just fine.

Click on Next >.
Scratch will give you the option to choose a Start menu folder location. It will default to creating a new folder called Scratch. You may change this if you wish.

Click on Install.
Scratch will install, and then give you the following screenshot when finished:

Click on Next >.
The final screen will give you the Start Scratch and Make a shortcut to Scratch on the desktop options.

Click on Finish and then you'll be ready to go!
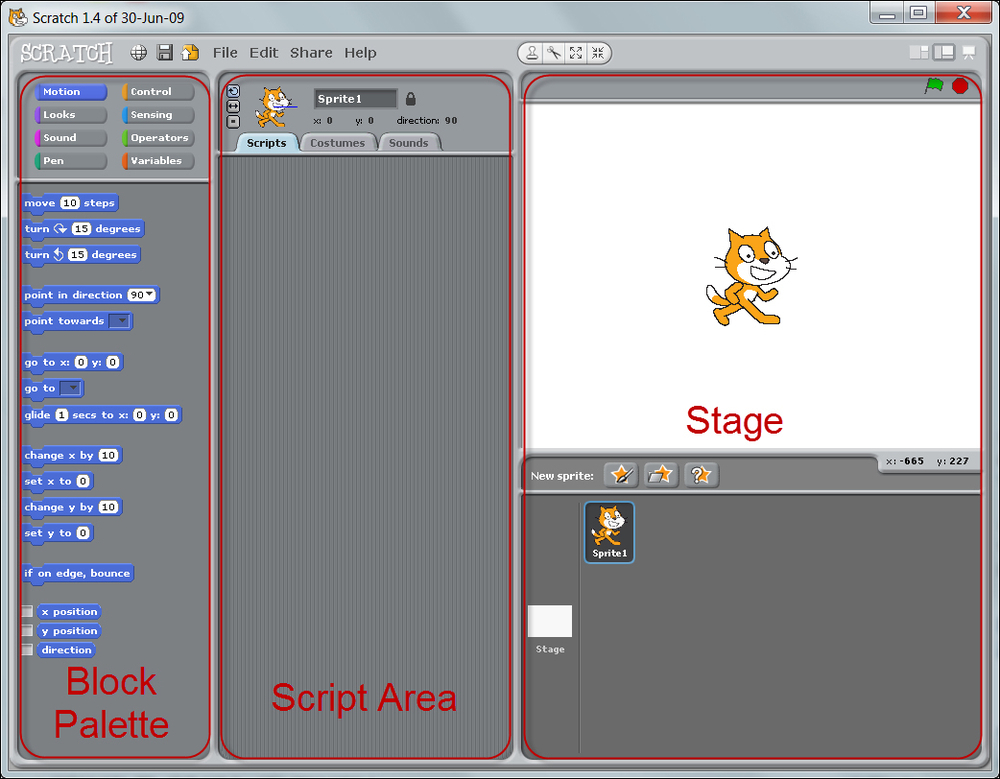
Once you're inside Scratch, play around with the interface. Scratch is broken up into three main areas that you'll be working in. These are called the Block Palette, Script Area, and Stage. These three areas are labeled in the following screenshot:
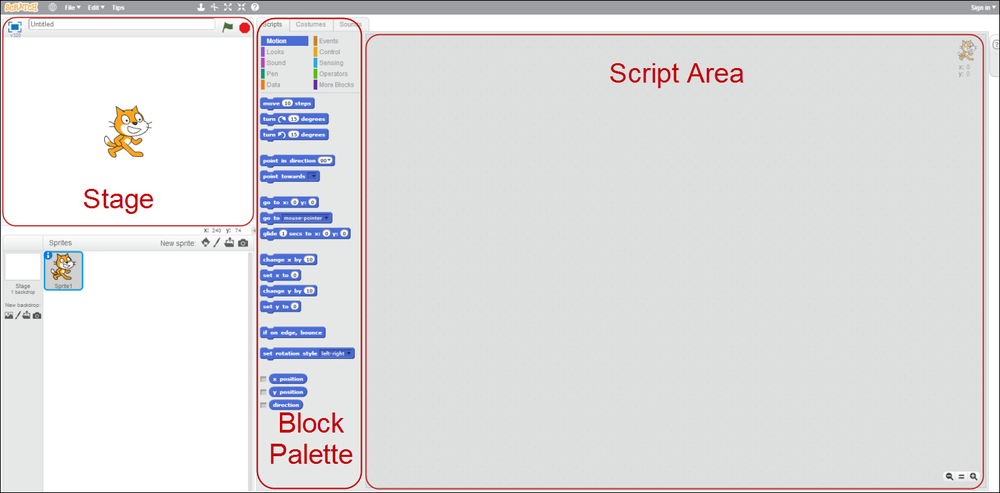
In Scratch 2.0, you'll see these areas in the following manner:
So, what are these three areas all about? How do I use them to build programs?
Each of these areas helps in a different way to build your program. The Block Palette is your library of commands, which you can add to your program. To build programs, all you need to do is drag and-drop these to your Script Area. Notice that there are eight categories of blocks. Each of these is color coded and does something different. We will explore more and more of these with each program we create!
The script area is vital to each individual program. A sprite is an object in Scratch we will program (usually characters). The default is the cat seen in the preceding screenshot. Each sprite as well as the background have their own Script Area, where you can drag blocks from the Block Palette. With more complicated programs, you need to drag more and more of these blocks to the Script Area.
A few examples of sprites you might use in your program are:
Characters for a story or game
Buttons to control things in your program
Things you want to display on the stage, maybe digits for numbers that need to have background programming
The last area of the Scratch interface is probably your favorite: the Stage. Here is where everything you've programmed comes together, and then you can see it in action. Just below the Stage is the collection of all the sprites you've added to your program, this is how you select those individual script areas we mentioned before. Once we get past our first program, most of the magic will happen after you click on the green flag up in the right-hand corner of the stage. You can also stop everything by clicking on the little red button next to the green flag.
Now that you have a basic understanding of the interface of Scratch, we can move on to customizing some of the fun things we'll be programming. Our next recipe, Deleting the default sprite features importing, adding, and changing sprites. See the rest of the recipes in this chapter as well for further basic information you'll need to program with Scratch.
As we mentioned before, sprites are the objects you program. They are the characters to your stories, players of your games, and everything in between. When you first open up Scratch, the default sprite is the cat (the one seen in the screenshot of the interface). You may want to use that sprite, or import a different one or more of them. We'll start by deleting the default sprite.
Later in this chapter, we are going to create our first program with Scratch: Hello World. All of our recipes in this chapter will lead up to this. Let's get this setup by customizing our environment. All you have to do to get this recipe ready is open up Scratch. This recipe is all about getting rid of the default sprite so that you can import others.
Follow through this series of steps to get rid of the default sprite that Scratch opens with:

You will notice with this set of tools above the stage, you have a few other fun options to work with. The first of these is the clone tool. Use this to copy sprites on your stage, so you don't have to reimport them (once we get to that, don't worry, it's coming!).
The third and fourth tools here are great in adjusting the size of your sprites. The first of these two increases the size (or grows) of your sprite. Similarly, the last tool decreases (or shrinks) your sprite. Each click increases or decreases the size by one level.
Now to the really fun part: adding in a new sprite! Directly below the stage area is a set of three buttons, as you can see in the following screenshot:

Each of these buttons helps us to import the sprites we want in our program. These are the buttons we'll work with for the next couple of recipes.
The second of these buttons gives you the best opportunity to bring out your creative side. This opens up the paint editor. From here, you can create your own sprite or import one of the sprites from the Scratch library, and then customize it. We won't get into a lot of depth to using it now, but if you're feeling to make your own sprite, take some time to play around.
In the preceding screenshot, you'll see the paint editor that gives you many of the functions that you have in the commonly known basic paint software that comes with your computer. In the beginning, it might be easier to use the Import button to bring in a sprite from the library. Then you can use the various paint cropping and drawing tools to make the sprite your own.
These are the steps we'll need to create a custom sprite (or customize one of the pre-made ones):
Click on the second of the buttons described previously.
The paint editor (shown in the previous screenshot) will open up.
Use the tools of the paint editor to create the sprite of your choice.
Click on OK once you've finished editing the sprite. Your sprite will now be in the stage.
This is one of the easiest ways to get programming quickly! The second of our buttons is called the Choose new Sprite from File button. This will open up a dialog box showing you all of the available sprites in the Scratch library.
You have many different sprites to choose from, including the categories of animals, fantasy, letters, people, things, and transportation.
Note
Remember, sprites are any objects you will be programming to do something in your overall program. In many cases, they will be characters in a story or in a game. In some cases, they may be buttons your user will interact with or some other general object. This is where the categories of letters or things come into play!
For the purposes of our first program, we'll choose one of the animals. You can choose whichever sprite you want, what matters is the programming we'll put into it later on.
Follow these steps and you'll have a new sprite to program within no time:
Click on the first button from the set of four shown in the following screenshot:
A dialogue box will pop up to select the sprite. Choose the folder for the type of sprite you want. Either double-click on the folder or click on OK.

Find the sprite you like and then click on OK.
The sprite will now be on the stage and ready to program with.
Once you've been programming in Scratch for a while, there is a good chance that you may need to change the background to something other than the default white color. Fortunately, Scratch makes this easy to do!
The area directly underneath the stage is where we select the sprite we are currently going to work on the programming for. You'll also notice that on the left side is an icon with a picture of the stage background (currently white if you haven't been straying from this chapter). This icon is labeled stage. Click on this.
If you've done anything in the script area with the sprite you had selected, you'll notice it is no longer visible in the script area. Whatever you do, don't worry. You have a different script area for each sprite as well as the stage.
Note
You might be wondering what we are going to do with the script area for the stage. We won't use this for a while until we get into more advanced programs, but the stage script area is great for programming actions that will occur in the background of your program. Sometimes you may not have a block of programming that isn't specific to a particular sprite. This is where you will put that block.
So let's get rid of that boring background! Follow along with these steps!
In the stage script area, click on the second tab towards the top labelled Backdrops. You can import several backgrounds that you may later on want to access through programming blocks in your block palette. For now, let's just import a new one and delete the white background.
Similar to how we imported new sprites in three different ways; you have towards the top of the Backdrops tab three different options for backgrounds. The second of these brings up the paint editor. If you didn't take the time to get used to the paint editor when making your own sprite this may be a great time to create a background. You can add any colors you want, shapes, or imported images.
If you didn't go down the route of creating your own background, then you can choose the very common import button. Just like the sprite library, you have categories. The categories for your pre-made backgrounds are indoors, nature, outdoors, and sports. You also have an x-y grid you can use if you are getting into some fun with math.
Tip
Not happy with the backgrounds available? Don't want to make your own? The dialog box that comes up just points to the folder on your computer where Scratch has put these pre-made designs when it was installed. You can access your pictures on other parts of your computer just as you would in any other software package on your computer.
The third option is to upload an image directly from your computer.
The fourth option you have is to access your computer's webcam and take a picture. Clicking on the camera option will pop up the webcam of your computer. Click on the picture of the camera and you should see your webcam's image pop into the background!
Once you've selected your new background, you'll see it added to the list of backgrounds available to program with. It should look something similar to the following screenshot:

To delete the white background we won't need, click the small circle containing an x.
Note
Notice that you can edit or copy backgrounds. This gives you the functionality to customize backgrounds and make them your own. Also, notice that you can change the given name of a background (the default seen in the preceding screenshot is background1). As you build more complicated programs, it may be beneficial to give these names you'll recognize throughout the program. You might find it useful to do the same thing with your sprites; we'll bring this up again later though.
Now that you have a new sprite and a new background, we are ready to create our first program. We may not have a fancy game yet, but it's enough to get us acquainted with Scratch and ready for our next steps.
If you've done much programming before, you may have already seen a program similar to this. If this is your first time programming and you go on to learn more, it is likely you'll get used to doing many of these types of programs. It is customary in many programming packages for your first experience to be a Hello World program.
This is a rather simple program that we'll work with for the rest of the chapter to get us settled in Scratch. Our first task is to get our sprite to tell the world "hello". From there, we'll do a few other fun things.
Follow these steps:
Use the background and sprite you imported from earlier in the chapter or import new ones; it's up to you!
Activate the script area you need by clicking on the sprite you have in the program in the area below the stage (not the stage itself). If you were working with backgrounds above, you may need to go to the script area, and then change the tab from Costumes to Scripts.
Next, we need to work with the block palette to build our program. First we'll give the sprite the functionality to output hello world to the screen. Remember the Block palette we talked about in the beginning of the chapter? Now it's the time to put it in use. Click on the second category of blocks labeled Looks. These purple blocks handle anything to do with the appearance of your sprite.
Now from the Looks category, click and hold the block to the script area.

Click on the area that has the word Hello!, and then change this to say Hello World!. If you want, you can also change the 2 to any other number you'd like. This number 2 represents the amount of time our message will be displayed.
Try double-clicking on your newly added block. Watch the stage. Your sprite will display the message, and you have created your very first program. Don't worry; they get much more fun as we go along!
Let's continue by adding a control block to our script.
Choose the Events category. Drag over the first block in this category and drop it right on top of the Looks block we already placed on the stage.
They look together as puzzle pieces, and you'll see a white line as you hover over the spot (which Scratch is anticipating you will drop the block onto). This can be tremendously useful once you get into having several blocks within others.

Note
The preceding screenshot is known as a top-hat block. It gets its name from being like a top-hat and going on top of a script. These top-hat blocks are ones that start of a sequence of programming and can't be built on from above. Almost all of the blocks from the Events category are top-hat blocks.
Now that we have the "When green flagged clicked" block in our program, we no longer have to double-click on the script to run the script. If you click on the green flag on the stage, everything underneath the When green flag clicked block will run for us. We'll start most of our programs this way, so that we'll get accustomed to just dragging it in quite often.
So, what is happening behind the scenes right now in our program? Basically, when we click on the green flag on our stage, this sends a signal throughout the program that is received by the When green flag clicked block (known as a listener). Once this listener is activated, the program sequentially works through the list of commands connected to the When green flag clicked block until they are all completed. Once finished, the program is done. As you'll see in some of our programs later, you can have as many of these listener blocks in your program as you want. You can then run multiple parts of your program simultaneously.
Now that we have this basic program, why not make it a little more interesting? Scratch gives us so many ways we can do just that! Let's take the chance now to add a bit more to our Hello World program.
Note
Saving your work in any type of programming you do is important! Stop now and change the name shown above the stage to something you'll remember. By default, Scratch saves to your own project folder on the Scratch website. Give the file a name. If you view the project page, you can add notes and instructions to your project.
The next thing we'll do is make our sprite move across the stage. Under the Motion category of blocks in the block palette, grab the first block and drag it underneath the current set of blocks you have. It looks similar to the following screenshot:

You now have three blocks in your script for this program. The following are the steps to be performed to move our sprite across the stage:
Click on the green flag on the stage. You should see your sprite greeting you with the Hello World! phrase from before, and then move the sprite a small amount to the right.
Note
Movement to the right is denoted by positive numbers, and movement to the left is denoted by negative numbers (unless of course you change the sprite's direction using other motion blocks). An easy way to think of it is the comparison to an x-y coordinate plane; it works the same way.
We can continue to press the green flag and our sprite will move. Experiment a bit with the value in the motion block you just added. Change it to a larger number, then maybe even a negative number.
What if we want our sprite to keep moving though once we press the green flag? This part is easy! We're going to introduce a new block that you're going to learn to use quite a bit when you program. Under the control set of blocks, you'll see the one that is labeled forever. It looks as though it wraps around something, and it does! We're going to call this a forever loop.
Note
A forever loop is also called sometimes an infinite loop in programming. Once you get into higher-level languages, you might find an infinite loop to be trouble. Can you guess why? It's because if you make a complicated enough program, you may not know when the infinite loop is continuing forever, so it has the potential to wreak havoc on your program. It's hard for that to be an issue in Scratch, though, so we won't worry too much about that for now.
Drag this forever loop into your program. As you drag, essentially try and place it between the looks block you added and the motion block. The forever loop will expand as you hover, so it looks like it will wrap around the motion block.
Your code should now look similar to the following screenshot:

Try pressing the green flag and see what happens. Your sprite should move to the end of the stage and then stop. Our goal is to get our sprite to bounce off the screen and then go back and forth.
In the Motion blocks, we'll see another block we can use to make this happen. It's called the if on edge, bounce block, which is towards the bottom of the list. Drag this block directly underneath the move 10 steps block we've added already, and still in the forever loop. You should immediately see your sprite begin to bounce back and forth on the stage. If not, try clicking on the green flag button again.
You've probably noticed by now that your sprite isn't staying upright as it bounces across the screen. Scratch has some easy settings to fix this. On your sprite, if you want to access settings (shown beneath the stage), click on the small blue icon in the corner. You'll see the following screenshot:

Here we have several bits of information that can be helpful in building our programs. Notice the three buttons to the left of the picture of your sprite. The following are the ways in which these buttons affect the orientation of your sprite:
If you click on the first button, your sprite will be able to rotate when it bounces off of objects such as the edge of the screen. This is the default for every sprite in Scratch.
If you click on the second button, this fixes the orientation of your sprite such that it will only face back and forth. Click on this one for our Hello World program; your sprite should straighten out and then move across the screen as you would expect an animal or person to do.
The last one fixes the orientation of your sprite completely. It won't change the direction the sprite will be looking, and your sprite won't go upside down at all. This may be useful in future games we make where we want fixed objects moving.
Now we'll examine a few of the other things that are in the sprite settings area. The first of these is the label for the sprite, ours is currently labeled Sprite1. You can change this name to anything you want that might make it easier to identify throughout your program. This is particularly helpful when you make a more complicated program that has many more sprites to keep track of.
Also, take a look at the three numbers below the sprite label. Two of these, the x and y values, tell you the location of your sprite on the stage. Remember how we said the stage is essentially a coordinate plane? Think of the center as the origin where x: 0 and y: 0. Negative values move to the left (or down for y) and positive values move to the right (or up for y). You also see a direction label. This tells you the direction your sprite is currently facing in degrees.
Note
Before proceeding with the next part, try changing the number of steps your sprite moves within the loop. Change the number first from 10 to something higher, and then try a lower number between 1 and 10. You'll see this adjusts the speed of your sprite when it's in the loop. This is because the sprite moves the number of steps you set and then continues to repeat. By increasing the number you are increasing the number of steps that occur only one time through the loop, but not increasing the time it takes. As a result, your sprite speeds up. This works the same way in decreasing your speed with a lower number of steps.
Now let's say instead of our sprite just bouncing back and forth on the screen, we want to have it follow our mouse. This can be a nice addition to our program, and may come in handy in future programs we make.
The following are the steps we have to do in order to accomplish this:
Drag in a new block from our Block palette. Notice the Motion block that says point towards has an empty space. Click on the down arrow in this empty space, and then select mouse pointer.

Now drag this block into the program directly underneath the if on edge, bounce block.
Now run your program by clicking on the green flag. Move your mouse around the stage; and your sprite will follow the pointer.
It's not going to take too long for us to add more and more sprites to our programs. Let's learn how to do this now while we're still getting started. There are two ways to accomplish this:
Our first task is to copy code to a new sprite. The following are the steps to perform this task:
Begin by importing a new sprite into your program. Recall from above how to do this.
Once you have a new sprite, keep the script area from the original sprite selected and then click and hold the top-hat block containing all of our code so far.
Drag this over the area underneath the stage showing all of the sprites.
Drop the code on top of the new sprite.

It won't look similar to what had happened before, but you'll be able to click on the new sprite now and see that the exact code you just dragged in is duplicated there. This can be a great method to duplicate code you need for many sprites.
Run your program and test what we've done. You should see both sprites greeting the world, and then follow your mouse pointer around the stage.
Now we can also consider a situation where we might want to duplicate the code within a sprite. This part isn't really necessary for our Hello World program, but it is nice to know how to perform this using the following steps:
Remember those four buttons we talked about above the stage? The first one is a clone tool. Click on this tool, and then click on the part of the code you wish to duplicate. This can either be the top-hat block containing all of the code, or just some of the blocks below it.
As you move your mouse, you'll see that you are dragging a copy of the code you just clicked. Click anywhere in the script area to drop the code. If you were duplicating just a piece of code (note that because we used a forever loop, we can't do this part now), you can add it to the bottom of the code you are copying. If you have repetitive actions that need to occur in sequence, this can be an easy way of copying code quickly.
Try adjusting your program a bit to get used to Scratch.
Select the script area of your second sprite and change the number of steps per loop that run. If your first sprite is still set to 10, change the other sprite to something (for example, 2 or 3). Experimenting with various blocks and programs we develop here in this book will be a great way to become a Scratch expert pretty quickly.
We've done a lot of introductory tasks to get our Hello World program working in this chapter. You should now have a good understanding of the basics that you need to complete everything in this book. Each chapter will lead you into a different aspect of programming with Scratch, many of which will get you into more and more advanced programs as you go. As it was mentioned before, be sure to follow along near your computer and work with Scratch as you go. Practicing as you go helps you build your skills much better than just reading along.
Most importantly, have fun!
This chapter is focused on the basics you'll need to get going in Scratch. In our next chapter we're going to focus on getting you ready to use Scratch to tell stories. If you're not looking to tell stories, it still may be useful to look over some of the recipes in Chapter 2, Storytelling to prepare you for using some of those techniques in other things we'll do later on in the book.