The world is being automated, with huge chunks of data being produced and processed for the analytics, controlling, and connecting purposes. The Raspberry Pi board can provide a vast range of automation and data processing if used vigorously. This tiny board provides ample functionalities and opportunities to change the world around us. This chapter is the first step towards doing that.
If you are first-time Linux user or are new to programming, it may seem difficult to understand many commands and codes, but the motivation to change the world is likely to be enough to start building the projects. This chapter provides an easy guide to start using the Raspberry Pi board and the total build-up for the users to interface the sensors. It will make the Raspberry Pi your best buddy. It is important to know the steps included in this chapter to rapidly build the projects. This chapter covers:
A basic understanding of the Raspberry Pi board and its useful connectors
Steps to install the operating system for the first time
Unique methods to share the Internet connection with the Raspberry Pi
Linux basics and useful shell commands
Installing important libraries
Introduction to compiling and executing C and Python programs
Practice problem statements for Shell, C, and Python
Before we get started, it's time to reintroduce our good friend, the Raspberry Pi. Kudos to the designers of the board, who have packed everything we need to accomplish our projects in a credit-card-sized printed circuit, also called a credit-card-sized single-board computer. There are two versions of Raspberry Pi: Raspberry Pi 1 and Raspberry Pi 2. Due to earlier developments, the Raspberry Pi 1 family consists of model A, model A+, model B, and model B+. The recently launched model is Raspberry Pi 2, the new addition to the model B category. Nowadays, the most widely used Raspberry Pi is model B+, which is also called the original Raspberry Pi board in the Raspberry Pi 1 family. The predecessor of the Raspberry Pi models B and B+ was model A, which is not widely used in the hobbyist space compared to other models such as A+ and B+. If you are not aware of the specifications of these boards, take a look at the complete comparison in the following table, which contains the comparable parameters of the current models of Raspberry Pi 1 and 2. Then you can choose a board that you want.
|
Features |
Raspberry Pi 1 |
Raspberry Pi 2 | ||
|---|---|---|---|---|
|
Models |
B |
A+ |
B+ |
B |
|
Processor |
BCM2835 |
BCM2836 | ||
|
Processor cores |
Single |
Quad | ||
|
Speed |
700 MHz |
900 MHz | ||
|
RAM |
512 MB |
256 MB |
512 MB |
1024 MB |
|
GPU |
VideoCore IV | |||
|
Pin header |
26 pin |
40 pin |
40 pin |
40 pin |
|
Audio and video ports |
RCA, HDMI port |
3.5 mm jack, merged audio-composite video and HDMI port | ||
|
Ethernet port |
Yes |
No |
Yes |
Yes |
|
USB ports |
2 |
1 |
4 |
4 |
|
Power |
Micro USB port | |||
|
Digital interfaces |
CSI (camera), DSI (display) ribbon cable connectors | |||
|
Memory card |
SD |
MicroSD | ||
Raspberry Pi 1 has a Broadcom BCM2835 processor with a 256 MB or 512 MB RAM on top of it. The processors and RAM are integrated as Package on Package (POP). On the other hand, Raspberry Pi 2 has a Broadcom BCM2836 processor, which comes with a 1024 MB RAM interfaced beneath the board. Raspberry Pi 1 model A+ is still loved by minimal RasPi users who need low-powered performance when they are running on batteries. There's lots of good stuff here: RAM states the temporary memory available to run the current processes and applications. Multimedia processing ensures smooth graphical processing to run high-resolution videos through HDMI and video-extensive applications on Raspberry Pi.
Note
We have already decided to make the Raspberry Pi our friend, and like all our friends, it requires a unique and cool name so that we can call it easily when we need it. I would like to call it a RasPi, so throughout the book, whenever you are referring to the name RasPi, it's your buddy, Raspberry Pi.
Your new friend has all the capabilities that your computer has. The RasPi can be used to understand how a computer works, to learn programming, for word processing, and for gaming. Here are the small and shiny hacks that we can do with RasPi:
Do you want to watch your favorite high-definition movie just by connecting a display to it? You can do this.
Do you want to use RasPi as a web server, where you can run your websites? Not a problem with RasPi.
Do you have a vacation and want to play video games, such as Minecraft? You can try using RasPi.
Do you want to use it as your point-and-shoot digital camera while you are going to visit a zoo this weekend? Easy!
You can even make your own robot or quadcopter using the RasPi. Wow!
All of these features come in such a small piece of board.
Note
Does this make you excited? Obviously, yes! There are such numerous applications that we can build with the RasPi, but they are out of the scope of this book.
Because of its ability to interact with the outside world, the major applications developed using RasPi include recognizing the surrounding parameters using sensors and converting them into useful data to analyze and control the appliances that we are going to experiment in the upcoming chapters.
I assume that you have the RasPi (model B or B+) in your hand, and you might be wondering what are the different connectors and electronic elements on the board. Rather than introducing the jargon of specifications, I will introduce what we need to make our projects. Take a look at the different connectors in the following diagrams. The nomenclature presented here will be used throughout the book.
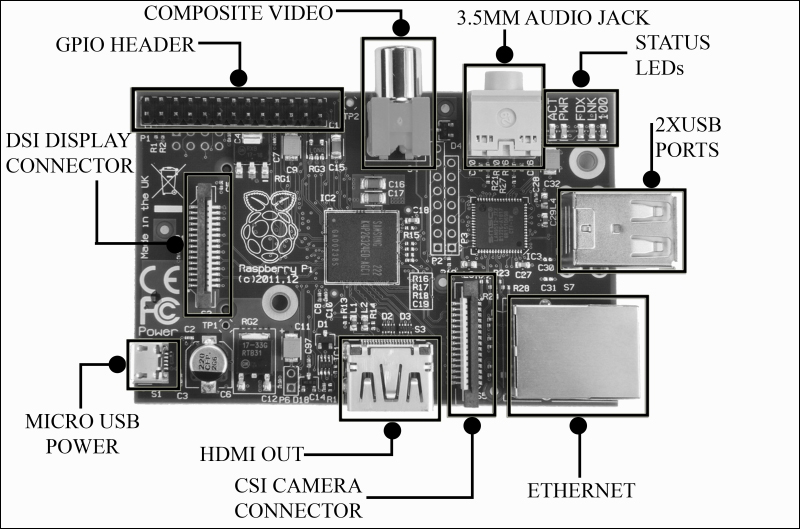
The Raspberry Pi 1 model B connectors
The Raspberry Pi 1 model B+ and Raspberry Pi 2 model B look identical to each other, and the difference is only in performance.
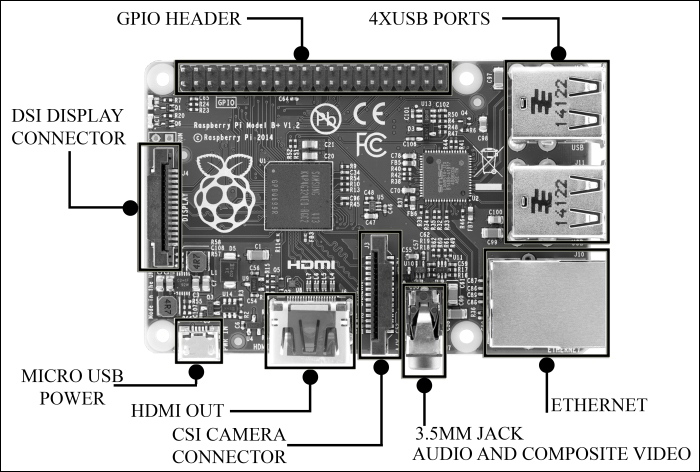
The Raspberry Pi 1 model B+ and Raspberry Pi 2 model B connectors
Due to a more powerful processor and an upgraded RAM, Raspberry Pi 2 Model B improves on performance by six times. In a clockwise direction in the diagram of the RasPi 1 model B, the short description of the important connectors is as follows:
GPIO header: GPIO stands for General Purpose Input Output, which has been brought out to pin connectors present on the board. The processor on board (BCM283x, which is the brain of a RasPi) has a facility to provide a specific functionality during the runtime of your own program. We are going to use them a lot in the upcoming chapters. The great thing with this is that you can assign a specific task to the specific GPIO in your program, and while your program executes, it goes to logic low or high (triggers to off state and on state) accordingly. We can read values from any other peripherals, such as sensors, and compute the received values in your own programs. Apart from reading the values, we can show the result of the program by connecting LEDs or embedded LCD displays to the board. Depending on the decision taken in the code, we can drive a motor connected on GPIO through a motor driver circuit. This feature on RasPi makes a huge difference compared to the normal computing board by giving developers the freedom of crafting the creation.
Tip
For example, in one of your applications, if the temperature falls below 20 degree Celsius then the thermostat connected to your RasPi gets the signal through the specific GPIO assigned and it starts heating. GPIOs typically work in logic high (1, ON) and logic low (0, OFF), and this will work the way you program it!
RCA video out: This is the most widely used and one of the oldest connectors that both old and new televisions or displays use. It carries the video signal, which is the type output on the RasPi. The RCA connector or composite video signal is merged with a 3.5 mm audio jack on RasPi 1 model A+ and model B+ and RasPi 2 model B.
3.5 mm audio out jack: If you are not using the HDMI connection (which will be described soon), the audio can be played through speakers or headphones using a standard 3.5 mm jack. In RasPi 1 model B+ or RasPi 2 model B, audio jack being the combination of composite and audio has all the functionalities of composite video and audio out.
USB: This is the most common connector, widely used in the modern computers, and hence called the Universal Serial Bus. You can connect your flash drives, keyboard, Wi-Fi dongles, and mouse to play around with the RasPi. You can also connect the externally powered USB hub with RasPi to connect more USB-based peripherals on it.
Ethernet: This is one of the most important connections to have a remote login on RasPi and to provide wired internet connection. In the next sections of this chapter, we will be using it widely. We cannot always connect RasPi to the dedicated display, so we use the remote login, and we see the entire desktop or Command-line Interface (CLI) of RasPi on our computer screen.
CSI camera connector: The RasPi board does not come with camera module integrated, but a separately bought camera module can be interfaced using the CSI connector via a 15 cm flex cable. A longer flex cable will lead to bad quality of images. The 5-megapixel Raspberry Pi camera module can be used to record high-definition videos as well as still photographs. It's easy to use for beginners, but has plenty to offer advanced users if you're looking to expand your knowledge. This camera module provides improved performance over a USB-connected camera.
HDMI connector: The High-definition Multimedia Interface (HDMI) is a compact audio/video interface used to transfer uncompressed media data. You can connect your modern HDTV to watch full high definition (FHD/HD) videos through the RasPi. If you plug in the HDMI connector, there is no need to connect the speakers to the audio jack, and if you want to get sounds on both HDMI and the 3.5 mm jack, then you'll have to play with and edit the internal files of Linux.
Micro USB power: You survive on food, don't you? Well, so does the RasPi (kind of). It needs power supply to operate. The device can be powered by a 5V input voltage, and the current ratings solely depend upon what you have hooked up with RasPi. Have you seen any power button on RasPi? In fact, the RasPi module does not have the power on button. Therefore, just plugging the micro USB power adapter will boot the RasPi.
Note
The maximum current the Raspberry Pi models A and B can use is 1 ampere, so if you need to connect a USB device that will take the power requirements of the Raspberry Pi above 1 ampere, then you must connect it to an externally powered USB hub. For example, a USB hard disk will need an ample amount of current to operate, which RasPi cannot deliver through the USB port. Alternatively, the maximum power model B+ can use is 2 amperes before needing to connect devices to an externally powered USB hub. There are power banks and batteries available for connecting to the RasPi if you are designing a remotely operated car or a quadcopter. If you are not sure how much power the USB device is going to take, buy an externally powered USB hub. Do not go above 2.4 amperes in any case, because this will destroy your RasPi if peripheral current demand is high—it'll be dead!
SD card slot: The SD card is important because it is where the RasPi keeps its operating system. It is also where you will store your documents, programs, and pictures. It is the secondary and a necessary memory part for the RasPi, the on-board RAM being the primary. Model B requires the standard-sized SD card (the big one!), whereas model B+ requires the microSD card.
Tip
It is suggested to purchase the microSD card with the SD card adaptor so that if you switch over from RasPi 1 model B to B+ or RasPi 2 model B, you can retain the same operating systems and your programs. Additionally, after installing the libraries and setups, the OS crash can be painful. To avoid this, the periodical backup of the entire OS should be taken, and this can be used to install the OS on a new SD card again. The microSD card can easily be contained in an SD adaptor to convert it into a normal SD card, with no performance losses.
Display connector: Last but not least, the display connector is used to connect a 7-inch finger-touch LCD display to the board for your embedded product development. But usually, the RCA and HDMI are enough. If your application requires this, then you will need to use it.
Following your recent purchase of the RasPi, you now have to make it ready to work for you. In this section, we are going to install an operating system on which our RasPi will run. The most popular, stable, and widely used operating system for RasPi is the Wheezy-Raspbian.
The Raspbian runs on an open platform, Debian Linux. Why are we going to use Raspbian instead of directly using Linux and other flavors of Linux? Simply because Raspbian has all device drivers written for the RasPi. In brief, the device driver is a program that gives the details of the hardware to the running operating system and supports the user interface to take/give commands from/to the hardware. As our RasPi has different hardware than a personal computer or general-purpose computer, the modified operating system is needed to completely use all resources on the hardware. It is best for those who want to follow the default standards.
You can download the Wheezy-Raspbian install file (known as an image file) from the Raspberry Pi foundation's website at http://downloads.raspberrypi.org/raspbian_latest. If you want to install the GUI-free flavor of Linux (Direct CLI), you can try Arch Linux. It can be downloaded from the ArchLinuxArm web page at http://archlinuxarm.org/os/ArchLinuxARM-rpi-latest.tar.gz.
We need some essential components to successfully start up the RasPi. Note that this subsection is for those users who are using the RasPi for the first time and have not purchased the preloaded SD card. If you have installed the operating system on your SD card, then you can skip this section, or just look at the procedure to help your friend who has just brought a new RasPi.
When you buy a RasPi module, it may or may not be sold with an SD card. If your RasPi did not come with an SD card, then the minimum size you should get is 4 GB. RasPi doesn't have any on-board memory, so purchasing an SD card is the only way to get data storage as well as an operating system. I have an 8 GB SD card for my RasPi, and it works well and is sufficient for doing almost all projects.
Once you have an SD card, you are ready for this step. These steps are broadly explained in my personal blog too, which you can visit at http://rushigajjar.blogspot.in/2014/03/setting-up-raspberry-pi-for-first-time.html.
Let's see the procedure for different operating systems.
These things need to be kept in mind while working on Windows:
Format the SD card: Use the SD Card Association's tool (www.sdcard.org/downloads) to format/wipe your old data from the SD card. Use of the SD formatter provides optimal performance for your memory cards compared to the generic formatting facilities provided by your computer's operating system.
Write the image of the OS on an SD card: The downloaded Raspbian OS will be written from a raw disk image to a removable device using the popular and free tool, Win 32 Disk Imager (sourceforge.net/projects/win32diskimager/). Follow the steps on the screen, and you can easily write an image of Raspbian on your SD card. Once you are done with this process, jump to the next section.
The following things need to be kept in mind while working on Mac OS X:
Download software to write the image of the OS on an SD card: There are multiple tools available for Mac OS X users such as ApplePi-Baker, PiWriter, and Pi Filler. PiWriter is a CLI-based tool, whereas ApplePi-Baker and Pi Filler are GUI-based tools. Pi Filler is recommended to be used because it is simpler and faster than other tools. It can be downloaded from http://ivanx.com/raspberrypi/files/PiFiller.zip.
Write the image on the SD card: Insert an SD card, locate or choose the downloaded image in the tool, and erase the SD card in the automatically popped-up menu. Select the continue button to write the image on the SD card.
These things need to be kept in mind while working on Linux:
Unzip the downloaded image: If you are using a GUI-based Linux OS on your desktop computer, open the
downloadfolder and unzip the OS by right-clicking on Extract Here.Download the software to write the image of the OS on an SD card: You can install image writer from the Ubuntu Software Center. Open Software Center and search for ImageWriter. Insert the SD card in your desktop and follow the GUI (click on the Write to Device button) to locate and write the image on your SD card.
Now, it's time to start the RasPi for the first time. After the process of writing an OS on the SD card, insert the SD card into the slot available on the RasPi. Connect the display (or TV) through an RCA or HDMI connection, and power up the RasPi by connecting a power supply to the micro USB connector. You will be able to see the configuration screen. Directly select the expand_rootfs option (from the keyboard connected through the USB of the RasPi) and wait for some time to complete the background process. When you write the image on the SD card, everything is in a compact bundle, where it needs to be expanded for the RasPi's complete operation. Expanding the root filesystem (expand_rootfs) resizes the partitions in the SD card and allows us to utilize the memory space in it. By this point, you should restart your RasPi.
Tip
Before powering up the RasPi using the micro USB cable, the SD card must be inserted and the HDMI cable must be attached. RasPi reads the signals coming through HDMI to check the display connection. If the display is not available at the first point of startup, it disables the HDMI interface and streaming to optimize performance.
When the RasPi restarts, you will be able to see many pieces of code running on the screen. Don't panic! It's a normal process that goes on in the RasPi. When it becomes stable, it will prompt you to enter the username and password. By default, the username and password are pi and raspberry respectively.
Tip
Note that while you are writing your password, you will not be able to see anything coming on the screen; don't worry. Welcome to the Linux world!
Once you've entered the correct password, you will be able to see the CLI with pi@raspberrypi~$on your screen, monitor, or TV, which is now ready to take commands from you. Aye, aye, captain!
Enter the startx command as pi@raspberrypi~$startx and press Enter. Now you have a white screen with the Raspberry Pi logo and a GUI that looks similar to our personal desktop computers. Take a bite!
So, we saw an easy and compact guide for setting up the RasPi for the first time. We'll now add more functionality to our RasPi by providing an Internet connection for it. A computer is incomplete without an Internet connection, and so is our RasPi. This is something we need to solve, especially as we can directly download useful libraries and applications on the RasPi through the internet.
Once you have finished setting up the RasPi, it's time to connect it to the Internet. Basically, there are two very common ways of connecting the RasPi to Internet: the first (and easiest way) is via Wi-Fi connection using a Wi-Fi dongle, or transceiver; the second is somewhat tricky but it's the most economical and practical way to utilize everything you have and without an additional Wi-Fi dongle. This will require a laptop/desktop computer (a PC) and an Ethernet cable. We will see how to follow each of the ways.
You can purchase the dongle for the RasPi from any leading online store or an electronics store near you. It ranges from 10 to 20 USD at the time of writing this book. While in the process of purchasing, read about the power requirements of the dongle. You can purchase the miniature Wi-Fi dongle available on Adafruit, or a dongle from brand names: PiFi or Edimax. If you are thinking of giving a try to Ethernet Internet connection sharing, then this section can be skipped. The basic steps for enabling the Wi-Fi network connection are introduced here.
Tip
It is advisable to use either of the methods at once. If you choose to use the Wi-Fi dongle, then you can skip the section of Ethernet sharing and vice versa.
In the CLI of the RasPi, enter the following command to note down the gateway and netmask of the Ethernet connection so that you can add a static IP defined in the interface file in the upcoming steps:
netstat -nr
We have to perform the following steps to enable the Wi-Fi network connection:
Go to the network interfaces file of the RasPi by entering the
sudo nano /etc/network/interfacescommand in the CLI. Note that you will get acquainted with these commands in the upcoming sections. Once you enter the command, the text you need to change is this:auto lo iface lo inet loopback iface eth0 inet static address 169.254.0.2 netmask 255.255.0.0 broadcast 169.254.0.255 gateway 0.0.0.0 allow-hotplug wlan0 iface default inet dhcp wpa-ssid "ssid_name" wpa-psk "password"After editing the file, press Ctrl + X and press Y to confirm the edit made by you.
Shut down the RasPi by entering the sudo poweroff command. You then need to connect the Wi-Fi dongle and turn it on again. While it is booting up, it finds the Wi-Fi adaptor connected to it. Pretty simple, isn't it!
All of the preceding steps require a dedicated display, mouse, keyboard, and all other cables to get the view of the working RasPi. For regular uses, this is somewhat bulky to carry all of these along with your RasPi. At this stage, I assume that you have already installed Raspbian OS.
Note
For this method, you just need your laptop/desktop (it already has an inbuilt Wi-Fi module, which is why we don't purchase an additional Wi-Fi dongle for RasPi until we have a special requirement), the Windows operating system, and an Internet connection. You do not need any add-on displays, keyboard, mouse, or Wi-Fi dongles connected with the RasPi.
So all we need is an Ethernet cable, a power supply to RasPi, the SD card with Raspbian, a Windows-based PC with an Ethernet port, an SD card reader for the PC (just required for the first time, either inbuilt or as an add-on SD card reader), and the RasPi (obviously!).
Assemble all of these on a neat table and just start your laptop without starting up the RasPi. I will run you through the step-by-step process. If you follow it, you'll have a working Internet connection provided from your PC to your RasPi with no added costs of Wi-Fi dongles.
The first step is to edit the file that RasPi checks when it starts booting. Try inserting the SD card of the RasPi into your PC's SD card reader. Open Explorer (where all the drives are listed); there, you can find the removable media. You will be amazed to see that the partition is about 15 MB to 20 MB, but your card is actually 8 GB or 16 GB! Don't panic; it's just the boot space of RasPi. You will be able to see the multiple files on this media. We are interested in editing the cmdline.txt file. Just double-click on the file (or open it in standard Notepad), and you will be able to see the following startup commands:
dwc_otg.lpm_enable=0 console=ttyAMA0,115200 kgdboc=ttyAMA0,115200 console=tty1 root=/dev/mmcblk0p2 rootfstype=ext4 elevator=deadline rootwait
You can change some settings by adding the static IP address of your RasPi at the end of the line (take a look at the following code). There is no need to understand the meaning of all of these parameters at this stage; I will introduce them when they will be useful.
dwc_otg.lpm_enable=0 console=ttyAMA0,115200 kgdboc=ttyAMA0,115200 console=tty1 root=/dev/mmcblk0p2 rootfstype=ext4 elevator=deadline rootwait ip=169.254.0.2
In bold, you will see the static IP we have provided for the RasPi.
Note
From now onwards, you'll always have to access your Pi using this IP address, when you access it from your PC.
Tip
If you are a Linux or Mac OS X user, insert the SD card into the SD card reader. There will be two partitions visible. Open the boot partition and follow the same process explained to add the IP address to the cmdline.txt file.
Save the file, safely remove the SD card from the PC, and move on to the next step.
Now it's time to start and boot the RasPi by inserting the SD back into the RasPi. Establish an Ethernet connection between the RasPi and your PC before powering up the RasPi. You will see now multiple LEDs blinking on RasPi, stating that the Ethernet connection is being established and there is a transfer of data occurring between the PC and the RasPi. Check the working connection of PC and RasPi by entering ping 169.254.0.2 in Command Prompt (Start Menu | Run | cmd.exe). Note that we are using the same IP address as entered in the cmdline.txt file. It should give a response like this:
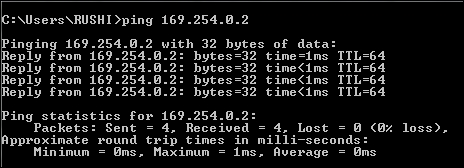
The ping command allows us to send the predefined size of packets to the host systems and expects them to be reflected back. The Lost = 0 section in the response shows that all the packets sent from the PC to the RasPi are reflected back and the connection is working.
For Linux and Mac OS X users, the connection can be verified by entering the ping 169.254.0.2 command in the terminal. Enter the ping command in the same Command Prompt to get the Ethernet port IP address of your PC. Following this, enter ipconfig (ifconfig in the case of Mac OS X and Linux users) and note down the IP address of the LAN connection (Ethernet), which is 169.254.121.232 in the following screenshot:

Shut down the RasPi (sudo poweroff), remove the SD card, insert it back into your PC, and follow the Editing the command-line file of RasPi section. Add the noted IP address (in this case, it's 169.254.121.232) at the end of the cmdline.txt file, as shown in the following code:
dwc_otg.lpm_enable=0 console=ttyAMA0,115200 kgdboc=ttyAMA0,115200 console=tty1 root=/dev/mmcblk0p2 rootfstype=ext4 elevator=deadline rootwait ip=169.254.0.2 ::169.254.121.232
Here, the double colon (::) is the most important part to be put between the RasPi's IP address and your PC's IP address. Then, save the cmdline.txt file.
Turn on the RasPi after safely inserting the SD card back into RasPi and plugging in the micro USB adapter. On a Windows PC, you need to open Network and Sharing Center by navigating to Control Panel | Change adapter settings, right-clicking on the adapter where you are getting Internet connection, and going to its properties.
Click on the Sharing tab. Keep the Allow other network users to connect through this computer's Internet connection option checked and click on OK. This setting changes the IP address of the Ethernet port of the PC; we need to reset it.
In the same window of the adapter settings, go to the properties of the Local Area Network connection (Ethernet), double-click on the IPv4 settings, and click on Obtain an IP Address Automatically as well as Obtain DNS server address automatically.
Tip
The IP address we provide for the RasPi may have a subnet class different from the network in your home. The interesting point is that this subnet class remains between the RasPi and PC. Don't panic if the Wi-Fi adapter of your PC is getting IPs in range of 192.x.x.x. This method still works, as Windows allows the Internet sharing between cross subnets. This is because we have enabled the Internet sharing and Ethernet settings as automatic. Therefore, it is clear that the Wi-Fi-to-PC (192.x.x.x) and PC-to-RasPi (169.254.x.x) scenarios work successfully.
Mac OS X user can follow the same steps by navigating to Preferences | Sharing and it would be very easy to follow the GUI.
Linux users can click on network menu in the top panel and navigate to Edit Connections... and then double click your wired connection and keep the wireless connection untouched. Navigate to the IPv4 Settings tab and select method: Shared to other computers.
Secure Shell (SSH) is a cryptographic network protocol for secure data communication. It means remote command-line login and remote command execution between two networked computers. Here, we use it for the command-line login and remote command execution between the PC and the RasPi. A one-of-a-kind and free SSH client is PuTTY (www.putty.org) for Windows, and since it is an open source, you can download it for free. Run PuTTY on your Windows PC and change the settings as follows:
Tip
For Linux and Mac OS X users, there is no need to install the PuTTY client, as they can directly perform this task from their terminal window by the ssh pi@169.254.0.2 command.
In the Host Name textbox of PuTTY, provide the same IP address that you entered in
cmdline.txt(which is169.254.0.2, as per the example given in the previous section).Following this, navigate to Category | Connection | SSH | X11 and check the Enable X11 forwarding option.
In the left-side Category menu, click on Session, enter the session name in the Saved Sessions field, and save it so that you don't have to save the settings every time you connect the RasPi with the PC.
Double-click on the saved connection and enter the ID and password; you will get the CLI on the screen of your laptop. Now how do we check the working Internet connection on the RasPi?
The answer to the preceding question is simple; enter the following command to check the Internet connection:
ping -c 4 www.google.com
You should get the same response with 0 percent packet loss, and now you have a working Internet connection on your RasPi. All of this is one-time hard work; later on, if you just have to keep your settings unchanged, log in to PuTTY, and enjoy the Internet on the RasPi. For the first time, setting up is somewhat a long process, but you know you've saved almost 10 USD for a Wi-Fi dongle. Isn't that a great thing?
Note
Here is a beautiful tip: you can install Xming from http://www.straightrunning.com/XmingNotes/, which is an X Windows System Server. Once it is installed, run it and you should see that there is no window. Worry not because as soon as you magically input the command lxsession in PuTTY, you will see the entire desktop of the RasPi on your PC's screen. A program similar to Xming is VNC Viewer, which directly opens the desktop of the RasPi by entering the IP address of the RasPi without logging in from PuTTY. Amazing, right?
Many authors and books will teach you the concepts of the Linux operating system, so I will just quickly introduce Linux here. You can refer to Beginning Linux Programming 4th Edition, Wrox Publishing, written by Neil Matthew and Richard Stones. For shell scripting, you can refer to Linux Shell Scripting Cookbook Second Edition, Packt Publishing, written by Shantanu Tushar and Sarath Lakshman. This operating system is mostly known for its non-user-friendliness to beginners! When users start using Linux, they often wonder, "Why is this operating system widely used and famous?" Linux is the biggest open source platform for hobbyists like us, and it allows us to modify the kernel of the operating system the way we want. Some advantages of using Linux include (and are certainly not restricted to) being free, stable, quick, and dependable under the General Public License (GPL).
You can build your own personalized operating system using Linux kernel distributions, for example, a Raspbian developed on the Debian flavor of Linux. We need our customized operating systems because if we develop our personalized hardware, we know how it should be programmed and we develop the drivers according to our needs on top of the Linux kernel. We will now go through the most powerful tool in any Linux operating system—the terminal.
The most important tool of the Linux operating system is the terminal—the CLI of Linux. Windows users may have already come across Command Prompt (as we used in the previous section) and Mac OS X users may be familiar with the terminal. Once you learn the commands of the terminal, the Linux world opens up to you. Using the terminal, you can easily interact with the operating system and its kernel, which indirectly connects you and enables you to access the hardware resources. Shell is a command language translator (or interpreter) that executes command input from user. Shell uses the Linux kernel to execute commands.
In the terminal, you can use many shells. One of the most common shells is called Bourne-Again Shell (Bash). Unless you get into the complicated programming of shell, which is also known as shell scripting, you may not feel the strengths and weaknesses of a particular shell. Most of the simple commands remain the same for different shells. Shell scripting is useful when you want to do postprocessing on your files in the same or different directories, modify the usual commands of Linux by your own way, or just print or execute a program. Shell scripts allow several commands that would otherwise be entered manually in a command-line interface to be executed automatically, without waiting for a user to trigger each stage of the sequence. This allows us to create the preconfigured file to execute the C programs for our sensors in the upcoming projects, which can really save our time while creating the projects.
Well, this can be a very long list if we introduce and explain all the commands of Linux. Even a separate book twice this size is not enough to completely illustrate all the functionalities of the commands. We will see the commands that are essential and will be used throughout this book. This list can be used as a reference, and it's necessary to understand these commands:
pi@raspberrypi~$: It's now time to introduce the most commonly seen command. It welcomes you on the first login and every subsequent login to your RasPi. This shows your username and the hostname of the RasPi. Here, the username ispiand the hostname israspberrypi.sudo: This is an abbreviation of Superuser DO. This command gives you all privileges of the superuser (root, the most powerful user) of Linux. It is used in concatenation with other commands such asnano,su,chmod, and so on. By writing thesudo sucommand, you can enter superuser mode, in which you can execute, delete, and create any kind of files in any folders. This really gives you superpowers in Linux!man: This is the command that shows the manual of the Linux commands and different other function definitions. Typeman sudoand you will get all the details related to thesudocommand.pwd: This is an abbreviation of the present working directory. This shows you the current directory you are working in. Typepwdand press the Enter key. This should display something like/home/pi.ls: This is a command used to list the files or search for some files contained in a particular directory. Just typinglsand pressing the Enter key will give you a list of all files contained in the system. The options withlsare-a,-l, and so on. Just typeman lsfollowed by the Enter key to see the different options available with it.cd: This command stands for change directory. Just give a path followed by thecdcommand and you will be taken to that directory. For example,cd /home/pi/python_gamesmoves you directly to thepython_gamesfolder, whilecd ..takes one step out of a particular directory.apt-get: This is the package manager for any Debian-based Linux distribution. It allows you to install and manage new software packages on your RasPi. Once you have an Internet connection on the RasPi, typesudo apt-get install <package-name>. It will first download the package and then install the same package. To remove a package, just usesudo apt-get remove <package-name>. To update and upgrade the operating system, you can usesudo apt-get updateandsudo apt-get upgraderespectively.cp: This is used to copy the file from one directory to another, for example,cp /home/pi/python_games/gem1.png /home/pi/gem1.pngwill copy thegem1.pngfile to the/home/pifolder from/home/pi/python_games. You can use themvcommand instead ofcpto move the file from one folder to another.rm: This removes the specified file (or directory whenrmdiris used). For example,rm gem1.png.cat: This lists the content of the file; for example,cat example.shwill display the content of theexample.shfile.mkdir: This creates the new directory in the present working directory; for example,mkdir packtwill create a directory namedpacktin the present working directory. Just use thelscommand to check whether it has been created or not by checking the list.startx: This command provides RasPi users with the user interface for running a window session.sudo shutdown -h: This leads to terminate all the processes on the RasPi, whereassudo haltstops the CPU from running mode and halts the OS. Thesudo poweroffcommand safely turns off the RasPi module.
These are the most frequently used commands for the RasPi. If more are needed in your projects, you will be introduced to them where relevant.
Let's create our first shell file:
Type
sudo nano example.shin the CLI of your RasPi (you can use PuTTY or the terminal on your PC and connect the RasPi through Ethernet connection with your PC). Just type the following code in the nano text editor:echo hello world echo this is my first shell program
Press Ctrl + X to exit and press Y to confirm the exit while also saving the file. The
echocommand simply displays the text on the screen of the terminal when executed; this is similar to theprintfcommand in C, but is really simple compared to it, right?Now enter the
sudo chmod +x example.shcommand in the terminal to provide execution permissions on theexample.shfile.Execute the shell program by just typing
./example.sh(./means a dot followed by a forward slash, which makes the shell execute the filename that is after the forward slash).
Notice that this is very short introduction to shell, and now you will learn the useful commands that will be used throughout the book to create the projects.
I compare this section to an ice cream with chocolate sauce (yummy! ssrupp!). If you have a vanilla ice cream in your hand, you can enjoy the ice cream, but once you pour chocolate sauce on that, it becomes more delicious, doesn't it? Adding and installing libraries in the RasPi is the same scenario. The RasPi is amazing with the added libraries, which can give you the functionalities you want, whether it is on the GPIO or on the camera port. A library is a particular set of functions that gives you easiness while writing the programs.
Step by step, we will install the useful libraries. To install the libraries, all you need is an Internet connection on the RasPi via PuTTY, as explained in previous sections.
Tip
Before installing any libraries, verify that your operating system has the latest update. Always check for upgrades and updates by entering these commands:
sudo apt-get update
sudo apt-get upgrade
Here, we update the RasPi to provide information on the latest package versions and dependencies. All the repositories will get information about their latest packages and to resynchronize. In the next step, upgrade will fetch new versions of packages according to the list provided in the update list. This process will take time, depending on the size of the update and the quality of the Internet connection.
git is a code management system used for collaborative work among programmers across the world, and it makes tracing change in the code easy. You will find many libraries and projects on git. If you know the source repository, you can directly get the library using git-core. Install git-core using this command:
sudo apt-get install git-core
The wiringPi library is created by Gordon, written in C, and provides you with support to extend your C programs to control the GPIOs. You can easily download (which will need the Internet connection shared on the RasPi) this library from Gordon's git core profile by typing the following command:
git clone git://git.drogon.net/wiringPi
The RasPi then downloads the library and creates a folder in the root directory. Use the cd wiringPi command to change the directory and go to the wiringPi directory. The next command to be entered is git pull origin, which fetches the latest version, and then we are ready to build the script using the ./build command.
Now, once the build process is done, we are ready to use the wiringPi library in any C program we write in the future. To check whether this particular library is working perfectly, enter these commands: gpio -v and gpio readall. This will convince you that you have installed it correctly. In Chapter 2, Meeting the World of Electronics, you will learn how to use wiringPi in shell script and the C language.
The latest distribution of the RasPi comes with python-gpio installed, but this library will be necessary for those who have an old distribution installed. The python-gpio library allows you to easily access and control the GPIO pins while running the Python script. This library can be downloaded from the Python organization's website, but we will install it using the LXTerminal or PuTTY. Let's proceed by downloading the .tar file:
wget https://pypi.python.org/packages/source/R/RPi.GPIO/RPi.GPIO-0.5.7.tar.gz
If you aren't aware, let me tell you that a TAR file is a kind of bundled file used to make the download compact and easy. We need to extract the downloaded file in a directory:
tar -xf RPi.GPIO-0.5.7.tar.gz
Let's rename this folder for ease of use; use this command:
mv RPi.GPIO-0.5.7 python_gpio
Move to the python-gpio directory to install the library using this command:
cd python_gpio
Tip
While writing a command, you can use the Tab key, which provides an autocompletion feature. For example, while writing the cd pyth command, press Tab. This will autocomplete the command, which will save the time spent on long filenames. Pressing the Tab key twice will give you a list of the available commands or filenames.
Now, we will install this library:
sudo python setup.py install
There is a possibility that it gives you a response that the library is already installed with the latest version. After this process, if you want to remove the downloaded file, you can use the rm command and remove it. Finally, one more library that provides support for the Python
Serial Peripheral Interface (SPI) protocol on GPIO is spidev. You can install it using the following command. You can refer to the Serial Peripheral Interface section of Chapter 2, Meeting the World of Electronics, to learn more on SPI protocol. We will be using the SPI protocol in Chapter 6, Uploading Data Online – Spreadsheets, Mobile, and E-mails, when we build the sensor station project to send sensor data on web pages.
sudo pip install spidev
We'll use Python because it is a very simple, yet powerful, language and is easy to write and read because of its indentation and standard English keywords.
Note
There are two major versions available and there is a current debate on Python 2 versus Python 3. You can read it at https://wiki.python.org/moin/Python2orPython3.
This book will mostly use Python 2.7.x. If you are beginner and want to learn Python, I advise you to go with Python 3; there is not much difference between the two, but there are noticeable differences and you will observe them.
The C programming language offers ample benefits when developing the projects using already available libraries, such as wiringPi, which can give you full control of GPIO pins. If you have previously developed a project on C, you can integrate the wiringPi functions and get the same functionalities as your previous project. Also, you can simultaneously use GPIO.
Let's play around with both the languages; this will not give you the whole idea of the programming, but it will give you a good start and will create interest. We will see both the languages one by one.
When you use the RasPi, the Python is already an installed component. In the Linux CLI, you can just type python and the Python CLI will wait for you to enter the commands. Just type print "this is my first program in Python" and press Enter. Voilà! You have executed a command of Python. This will not allow you to write full-length code directly now, so what to do if you want to write a long code? There is a better way than this, and we will use that throughout the book.
Type sudo nano example1.py and you will observe the nano text editor on the screen. Then type the following code:
name = "World"
name = "Hello " + name
print name
for i in range(3):
    print "Whoa"
import this
Now press Ctrl + X and then press Y to save the changes. You will be back to the Linux CLI. Now type python example1.py. The Python program will be compiled and the output will be displayed in the same window. One thing you should notice is that indentation is very necessary in Python. Remove the indentation before the print "whoa" script and then execute the program; you will find an error of indentation. In the loops, special care for inserting indentation should be taken while writing the code. This makes the programs easy to read for people other than programmers.
You should know that the most powerful language existing today is C, and it allows us to fulfil all our coding needs. The C language is very common and is an essential language. Let's go through the procedure of executing a C program, which is almost similar to executing Python programs.
Type sudo nano example2.c in the LXTerminal or PuTTY. Then you can type any C code you know, or on a beginner basis, you can try this code:
#include<stdio.h>
int i;
int main()
{
for(i=0;i<3;i++)
printf("Harder you work, Luckier you get");
return 0;
}
Press Ctrl + X and press Y to save the changes. Now it's our turn to compile and execute the program. The compiler for C programs is always included in the Linux distribution, which can be cc or gcc. Type this command to compile the C program:
gcc -o example2 example2.c
In -o example2, the example2 part will be the name of the output file and the example2.c part is the file we saved after writing the C program. Press Enter and check the errors. Correct it by typing sudo nano example2.c and solve it (if any error occurs). Once it is successfully compiled, type the ls command to check whether the output file has been created. The output filename will be example2. You can now type ./example2 to execute the compiled code.
These processes are really helpful in creating sensor projects, and once you practice more codes, it will be easy for you to understand the process.
This section includes some practice problems, which should be exercised with shell, C, and Python. The reason behind this practice is that it will make you stronger in understanding the problems and logic of programs, which can really help you to easily make the sensor project. This practice will not cover or give you the idea of entire language or script, but will make you comfortable enough to understand the codes used in the next chapters.
I advise you to connect the Raspberry Pi through an Ethernet cable with your PC, and use the methods stated in the preceding sections to execute the programs. You can take help of the Internet (www.cprogramming.com/quiz/) to understand the logic and the syntax. The problem statements shown here should be attempted in all three languages/scripts, which will give you enough idea to work with scripts and languages:
Write a program to get all Armstrong numbers below 1000. Note that among three digit numbers, an Armstrong number is equal to the sum of the cubes of its digits. For example, 153 is an Armstrong number because 153 = 13+ 53+33.
Convert the temperature value from degrees Celsius to degrees Fahrenheit and vice versa. Ask user to get the value and decide whether they are entering it in Celsius or Fahrenheit. Show a warning message if the temperature is above 38 degrees Celsius or 100 degrees Fahrenheit.
Create a calculator that has all the basic functionalities, such as addition, subtraction, division, and multiplication. Ask the user to select the function they want. Show an error if they divide anything by zero.
Get a time value from the clock, attach to a
Time isstring, and display the current time, for example,Time is 17-Oct-14 10:18:22AM.
The skills acquired by performing these exercises will allow you to better understand the projects in the upcoming chapters. You can expect an easy programming level in upcoming chapters. These chapters will focus more on Python and C programs. Hence, more practice on programs will help you gain a better understanding of the language and increase logical thinking.
In this chapter, you learned about the different connectors and functionalities available on the Raspberry Pi board. We successfully installed the operating system on the RasPi and shared an Internet connection with it. After these processes, you learned the basic Linux commands and a glance of the Linux terminal and shell scripting, which will be used frequently while developing applications and projects. Then we installed the useful libraries (in the same way as we add a chocolate topping on top of a vanilla ice cream). A brief introduction to compiling and executing C and Python programs was given to kick-start work on the Raspberry Pi.
Tip
I am sure that you will solve the problems stated at the end of this chapter to get an idea of how code works. This will help a lot in the upcoming chapters.
In the next chapter, you will be learning the basics of electronics so that you can easily develop the projects. These basics are essential for interfacing the sensors. You will also learn how sensors communicate with the Raspberry Pi. We will run simple codes to drive LEDs on GPIO pins.