Pixelmator has many tools that will give you very advanced ways to edit your photos, no matter what your level of photography. It's one of those applications that has a beautiful and sleek look to it. At first glance it can seem like a very simple application. Just like many things in life, looks can be deceiving, and Pixelmator is a great example of a well-designed application that has a lot of power underneath the interface and helps to give digital artists and photographers the tools they need to unleash their creative process. Pixelmator gives us many of the strong tools that other applications have at a fraction of the cost, making it a must-have app for photographers at any level out there.
With Pixelmator, you can unleash the creative artist inside and enhance your photos.
Pixelmator is a Mac-only app and can be purchased through the Mac App store.
Purchasing and installing Pixelmator is very easy through the Mac App store. Just launch the app store on your mac and search for Pixelmator, click on purchase and sign in with your iTunes credentials to compete the purchase and installation of the app. You can also download a 30-day free trial from their website at http://www.pixelmator.com/try/.
To get started, we will use a blank document and walk through the important settings to get your document started on the right foot. When you open Pixelmator, go to the File | New menu option (or click Command + N). Here you will be greeted with a simple dialog box to set your image dimensions. The size and resolution you set for the final image is very important, so make sure to select the largest size you think you might possibly use. Say you are creating a collage of images for a poster that you think you are going to print with a 11 x 14 size. After working on it for hours you create a final masterpiece and love it so much you want to print it with a size of 30 x 40. Well, sorry to say, but once you scale something up after editing you will lose a ton of quality in the image and have a pretty poor quality 30 x 40 poster. So always remember to set the size of the image from the very start to as large as you might possibly want to print; you can always size down later but cannot size up.
When choosing the size and resolution you will be able to enter in anything freeform or click on the Preset dropdown at the top to choose from many popular sizes such as 1280 x 800 or an 8 x 10 inch option for printing. The resolution is just as important as the physical size and really depends on what type of medium you are going to have as your final outcome. If you are only creating something to view on a computer, 72 pixels/inch (PPI) is all you need, that's the max that a screen can display. However, if you are going to print an image, then you should set the resolution higher; 300 PPI should be perfect.
Note
When you go to print a digital image, the pixels are converted to dots. This is where you hear the term dots per inch (DPI). Because these dots have spaces between them, 300 PPI isn't equal to 300 DPI. If your image is 300 PPI, pixels become roughly 150 DPI. In the printing world, 150 DPI is the standard for printing photographic quality images.
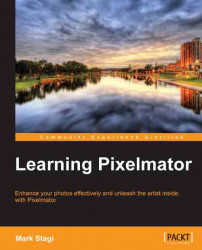
One very useful feature is the ability to create your own presets. If you use a specific custom size over and over again, it will save time to create a custom preset with this size. To do this, first set the width, height, and resolution, and then click on the gear icon on the bottom-left corner of the dialog box. Here you will see a Save Preset As… option as shown in the following screenshot:
Click on this and name your preset to save this for future use. Presets are also grouped by a few predefined types, namely, Screen, Web, Photo, Print, and Other, which help in organizing your list.
Note
Using presets and keyboard shortcuts will always save a lot of time in the long run. As you work, remember to save the most common tasks you do as presets if possible.
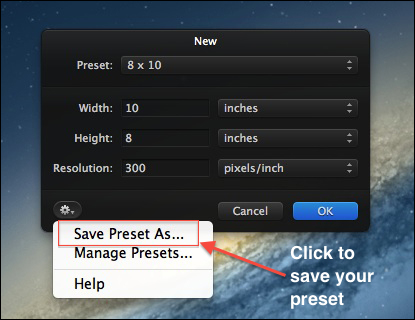
Once you have the size and resolution set up, you will see a blank canvas waiting for you to start getting creative with. There are a few ways you can add images to this blank canvas. The easiest way is just a simple drag-and-drop. Simply open up a new Finder window on your computer and navigate to the image you would like to add to the canvas. Then drag-and-drop the photo to place it. It might not be sized exactly how you want it to be, but we will be able to adjust this at any time; we will cover how to resize images later on in this chapter.
Here you can see just how easy it is to drag-and-drop a new image into an existing Pixelmator project:
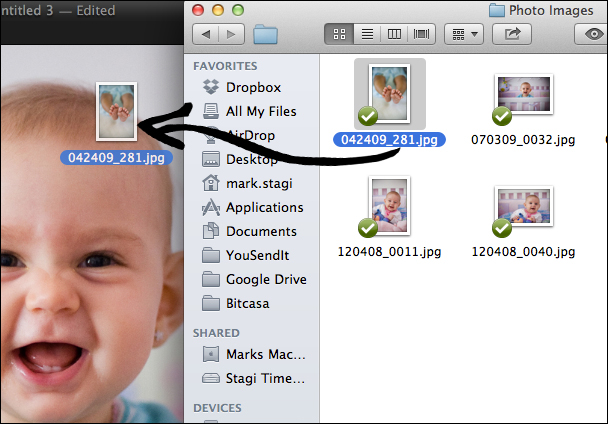
You can also use the Import menu button in the File menu to add images, if you have your camera or a card reader connected to the computer. This will bring up an Import dialog box which will give you the ability to selectively import certain images by Command + clicking on specific images or clicking on the Import All button.
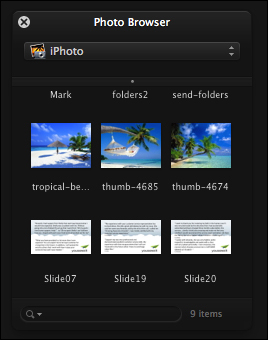
Another way to add images to your canvas is to use the Command + 6 key combination and open up the Photo Browser. Here you will have the ability to browse through your iPhoto library or the Pictures folder. If you have a huge folder of files, just use the search at the bottom of the Photo Browser to perform a search.
Once you have dragged a photo into the canvas, just use the move tool to move it to the area you would like.
As we talked about at the start of this chapter, your image size and resolution is very important. Let's take a few minutes before moving on to talk a little more about what image resolution really is. All digital images are made up of pixels , which are tiny squares filled with a solid color. When you have many of these tiny squares filled with shades of different colors, you get the appearance of a smooth image. Photos are taken at different resolutions depending on the camera and settings. In today's market, many digital single-lens reflex (DSLR) cameras can have a resolution up to 5616 × 3744 pixels.
Within Pixelmator, you can adjust the resolution and image size by going to the Image | Image Size. Here, you will be able to change the height and width of the image and have it set as either pixels, percent, inches, cm, mm, or points. There are a few things that you want to make sure to keep in mind when changing the image size. First, unless you want to distort the image you will want to keep the checkbox for scale proportionally checked. This will ensure that any change you make to the height of the image will proportionally change the width as well and vice versa, so there is no distortion in the image.

Another thing to keep in mind is that you normally don't want to size things up too much. Say you have an image that is 3000 x 2000 pixels and you want to increase the width to 4000 pixels. You will have to make sure that the Resample Image option is checked at the bottom of the Image Size menu. But how does Pixelmator add 1000 pixels to the width of the image? The key is resampling , which basically means that the program is going to add new pixels to the image by guessing, based on the surrounding colors. Since the program is basically guessing (although it is a very smart guess) on what types of pixels to add, you get a loss of sharpness, so as a general guideline it's not recommended to go up in size too much.
Since all photographers will use Pixelmator for different uses, you will want to get the workspace configured to match the way you like to work and the tools that you really need the most. Aside from the main image window, there are a few other windows that you will usually want to make visible, such as the Tools, Layers, Effects Browser, Brushes, Gradients, Photo Browser, Fonts, and Colors. You will always want some of these windows (such as the Tools window) open, while others (such as Fonts) you might only need from time to time. You can always turn on/off menu items from the View menu. The windows can be positioned anywhere on your screen as per your needs by clicking-and-dragging the top section of the window.
You can also use the arrows icon on the top-right corner of your image window to enter a full-screen mode, or go to View | Enter Full Screen (keyboard shortcut is Control + Command + F). This will expand the image and make it full screen to clear out any distractions that you might have running on in your desktop.
The overall layout of Pixelmator is composed of your main image window and many other toolbars that can be shown/hidden depending on your workflow. Let's first start with the main window where your image is located. You can always use the Command + 0 keyboard shortcut to fit the photo on the screen or use Command + –/+ to zoom in/out of the image. You can also zoom to the actual size of the image by using the shortcut Alt + Command + 0. If you want to see what zoom level you are currently at, just click on the Magnify icon on the tool bar and you will see the percent zoom indicated at the top-middle of the window.
The main image window has many options you can customize. The most common thing that you might want to turn on is to show the rulers on the x and y axis. This will show you rulers spanning the top and left-hand side of the window. The measurement that the ruler is shown in will be set in pixels by default, but can be edited by going to Pixelmator | Preferences | Rulers. Here set the default ruler units to Pixels, Inches, Centimeters, Millimeters, Points, Picas, or Percent. You can use the Command + R shortcut to toggle on and off with the ruler view.
Turning on or off the Rulers option (as well as any other options for the main image window) can all be accessed in the View menu or with keyboard shortcuts.

Another option that can be helpful is the grid view. You can show a grid overlay on the image, which can be very helpful when alighting items. The keyboard shortcut to show the grid view is Alt + Command + '. The following screenshot is an example of what the default grid lines look like over an image:

The gridlines can also be customized in the main preferences screen by navigating to Pixelmator | Preferences | Rulers. You are able to set the color of the gridlines and the number of pixels between the gridlines and subdivisions.
Guides are another very helpful viewing option, especially when you are trying to create a page layout or a collage with many images and need to alight them in a certain way. Guides are easy to create, but first make sure you have them turned on by going to View | Guides | Show Guides or using the keyboard shortcut Alt + Command + ;. Once you have the view turned on, you can add as many guides as you need by simply clicking and holding down the mouse then dragging from the left-hand side or top edge where the ruler is. As you drag your mouse along, you will see a counter showing exactly where you are on the ruler and the blue guide line. In the following screenshot, you can see how the guidelines show up on your canvas:

Release the mouse to place the guide. If you ever need to move a guide, you can always move it later. Moving a guideline is easy, move your mouse over the guideline and then click-and-drag to reposition it anywhere on the canvas.
There are also a few other settings for guides that can be very helpful. These are all located at View | Guides. The first option in this menu is called Show Guides at Object Center. This is very helpful when trying to position an image in the very center of the document. Once it's turned on and you are going to move any layer, you will see a blue guideline appear when the center of that layer is in the center of the overall canvas or the center of any other layers on the canvas.

You can also turn on the option to Show Guides at Object Edges.
The Guides menu has two additional items you can turn on. The first option is Show relative spacing. This option only works when you have three or more objects that are lined up on the canvas. Say you are trying to line up three images to be printed in one large horizontal photo and you want equal spacing between the three photos. When you move one image so that it's equal in distance compared to the two other images, a purple object spacing guide will show you the distance between the images in the current ruler unit that you are using.
In this image, you can see that the images have an equal spacing in between them by using the relative spacing option:

The last option in the guide's menu is to show relative sizing. When this option is checked and you are transforming the size of an image, you will see a purple sizing guide appear when the height and width are the same for both images.
In the following screenshot, you can see that the two images on the left-hand side of the canvas are of the same exact size:

Using rulers, grids, and guides will help you save a lot of time getting different layers positioned just right and also help you edit layouts with precision. You can also change the default color of the guides and object spacing by navigating to Pixelmator | Preferences and accessing the Ruler Preferences menu to choose your own color from the color picker instead of the default blue and purple that Pixelmator sets.
One very important menu is at the very top of the image window on the left-hand side. Here you will see a gear icon that is clickable and shows additional options for the tool that you have selected. I'll refer to this menu throughout the book as the tool settings menu. With this tool settings menu, you will see context-sensitive settings based on the tool that you are currently using. Whenever you first use a tool, it's a good practice to view what options are available for that tool under this settings menu.

Also, on the top of the image window you will have a list of other options spanning across the top. These options will be different depending on the tool you are currently in. For example, if you are using the crop tool, you will see options to constrain the proportions of the crop; and if you are using the Paint Bucket tool, you will see options to pick your color and also the blend options for the tool.
You can turn this on and off by navigating to the Show/Hide Tool options in the View menu.
There is also an info bar that is shown right below the tools options at the top of the main image window. This can also be turned on/off in the Show/Hide Info Bar options in the View menu. Once you turn this bar on, you can also customize what shows up on this by Control + clicking in this area to bring up a list of options you can turn on or off.

The Tools pane is one of the most important menu bars that you constantly use. Here you will see 28 different tools that Pixelmator has. We will cover the details on many of these tools later on in this book. To add or remove tools from this menu, navigate to Pixelmator | Preferences | Tools. From here you can drag additional tools into the toolbar or drag any of them you don't need outside of the toolbar.
Before we get into using some of the tools and making adjustments, one of the most commonly used keyboard shortcuts that you will use is the Command + Z shortcut to undo your last action. You can continue using the Command + Z shortcut to go back as many steps as you need. There is also a redo shortcut at Shift + Command + Z.
This section will cover common tools used for editing and enhancing images.
One of the most common adjustments that need to be made with digital photos is fixing the color balance. You might have taken a photo outside and forgot to change the white balance from Tungsten earlier in the day to Daylight. Or you left the white balance on auto and the skin tones are just a little off. Pixelmator has some easy color effects to fix any color balance issues or to make artistic adjustments such as changing a photo to black and white. All of the color adjustments will be done in the Effects browser. If you don't have this window visible, it can be found on the menu under View | Show Effects. Once this window is up, select the Color Adjustments option from the drop-down menu at the top.
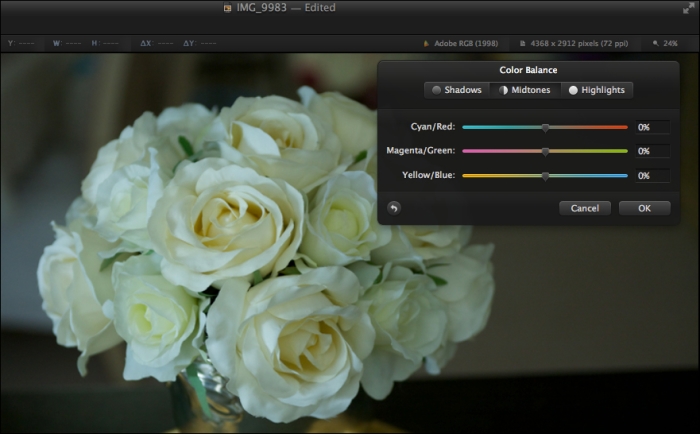
Before we start making adjustments to the image's color, it's always a good idea to duplicate the layer you are working on. This way, if you ever need to easily go back to the original, you can delete the new layer you are working on and always have the main layer still intact. To do this, navigate to Edit | Duplicate. To make adjustments to the overall color of the image, double-click on the Color Balance button. This will open up sliders to change the Cyan/Red, Magenta/Green, or Yellow/Blue color balance within the Shadows, Midtones, and Highlight areas.
Let's start with this image that came straight out of the camera. This image was taken inside and the white balance of the camera was set to Tungsten. Although it was inside, there was hardly any indoor light and the main light on the scene was from a window that has some great sunlight coming in. The white balance should have been set to Daylight or Cloudy on the camera to get the color balance closer to reality. Since the color of the image is very cold, we need to warm it up a bit.
Let's walk through the steps to correct this:
First, start with the Midtones and start to adjust the colors one by one. You can see that this original image has too much green and blue colors in it. So I'll start by moving the Magenta/Green slider over to the magenta side to add more magenta to the midtones of the image.
Next, move over to the Yellow/Blue slider and start to add some yellow shade to the image.
You can also see that there is a slight cyan tint so move the Cyan/Red slider over to the red side slightly to add just a little bit of red shade to the image.
Next, proceed to make the needed color changes to the Shadows and Highlights until you get the perfect image.
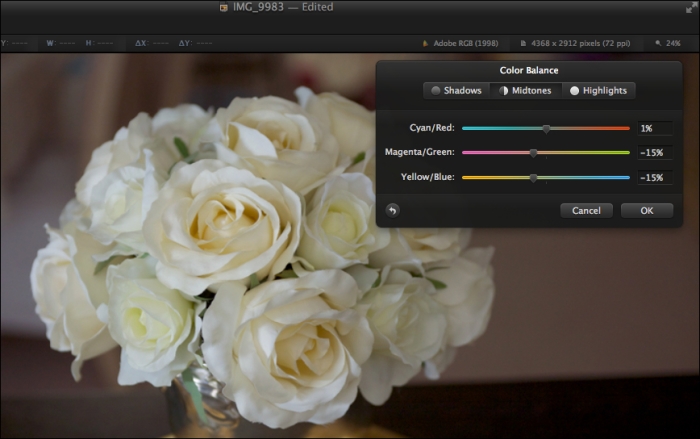
Also remember that while there is technically a correct color, you should always color-balance things to fit your exact style of photography. I love to have many of my portraits contain an extra warmth to the image and while I might add more yellow to a portrait than other people would, it fits my creative vision and style for the shot. Here is what the final color of the flowers look like, much more natural!
Cropping can be the key that separates a great image from a decent image. Although as artists we should always try to capture the perfect image in camera while taking the photo, many times it just doesn't work out perfectly. The crop tool can quickly be accessed by using the keyboard shortcut of C.
Once you have the crop tool selected, click-and-drag on the image to make your crop selection. You can set the proportions of the crop to be constrained to a specific ratio or even be a freeform crop by selecting an option from the Constrain menu in the toolbar.
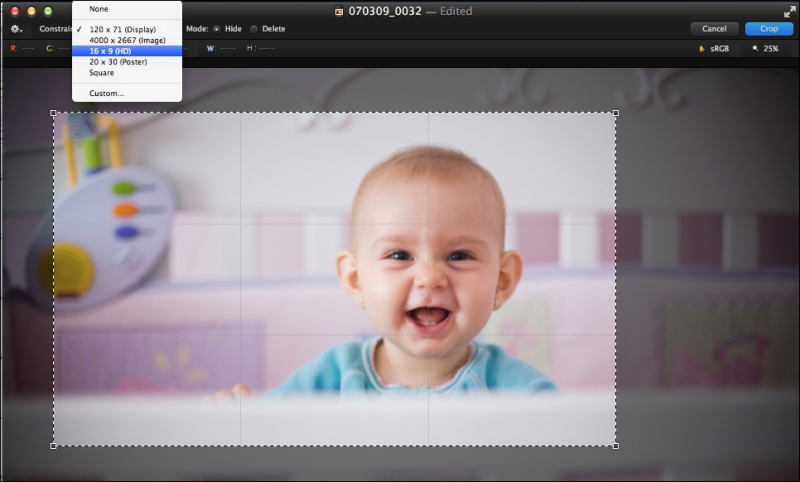
After you have drawn the initial selection on the image, you can refine the selection by moving your cursor to one of the four corners of the selection and using a click-and-drag action to move your selection. You can also rotate the image if you need to straighten a part of the photo. To straighten the image while cropping, move the cursor to just outside of the corners of the selection box; it will turn the cursor to show a 90-degree arrow. Now click-and-drag the image to rotate.
After you have the crop selection perfect and are ready to crop, you first have to select the crop mode. There are just two crop modes to choose from: Hide or Delete. The difference between the two is what happens to the part of the image you are cropping out. With Delete it's pretty straightforward, the image you are cropping out gets deleted. When choosing Hide however, it will crop the image but keep the part cropped out invisible so you can always move the image after it's cropped to bring back those cropped parts. This comes in handy if you need to alter the crop afterwards, since the data is still there, just select the move tool (keyboard shortcut M) and move the image around, anything outside of the frame will appear. After you select the crop mode either double-click within the cropped part or press the Enter key to finish cropping the image.
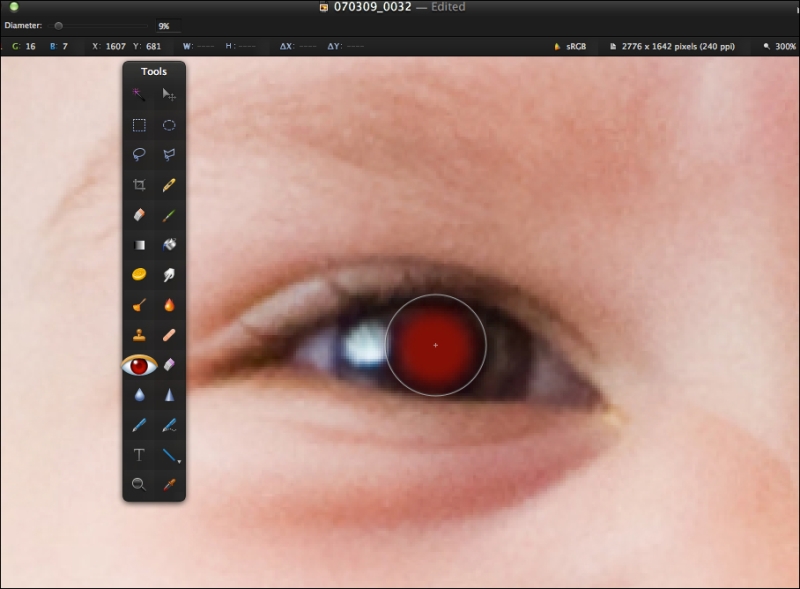
Another common issue with some flash photos is the infamous red eye. Red eye is caused when you have a flash very close to the axis of the camera lens. Because of the position of the flash the light reflects off the back of the persons eyeball and comes back out through the pupil, and since there is ample blood in the back of the eye, it shows through as red to the camera. In Pixelmator, you can fix red eye either automatically or manually. To have it automatically fix red eye, all you have to do is click on the red eye tool in your tool menu and then in the tool settings menu select Auto Fix Red Eye. Just like magic the red eye will be removed. As with many things, an automated process isn't perfect and will not always get the red eye out, so you might want to manually remove the red eye from the photo.
To manually remove the red eye, just perform the following steps:
Adjust the Diameter slider at the top to be approximately the size of the person's pupil.
Then click on the pupil and the red eye will be removed.
Dodging and burning is a term from the old days of printing in a darkroom. Back then, photographers had to use an enlarger to place a focused beam of light through a film negative to expose a light-sensitive piece of photo paper. When you wanted part of the image to be lighter, you would "dodge" that area by covering the light from hitting the sensitive photo paper. Alternatively, if you wanted part of the photo to be darker, you would "burn" parts of the photo by allowing light to only hit a certain part of the photo.
Dodging and burning in the digital realm is pretty much the same concept, you are going to be either adding or removing light from a scene. This can be done as follows:
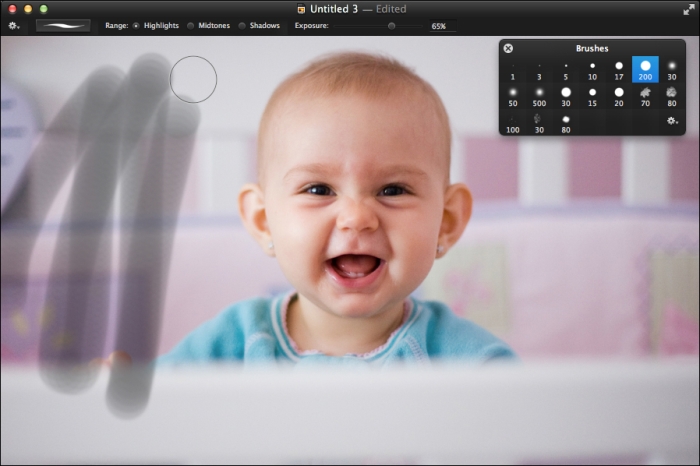
We will start with the burn tool, which looks like a small orange flame in the tools menu.
Once you select the burn tool, you will want to click on the brush image that is on the top of the image window next to the tool settings menu.
When you click on this, it will open up a new pop-up window showing a list of brushes to pick. Having the right brush is essential to making a smooth burn on the image.
Before we get into how to choose the right brush, let's talk a little more about why you want to dodge or burn a photo. Normally, you will want to burn an area of a photo where you don't want people to focus their eye on. If you have a portrait and want people to focus directly on the person, you might want to burn in the edges of the photo so the readers eye is driven right to the main subject. It is natural reaction for someone who is looking at a photo to automatically have their eye first go to the lightest part of the image. The highlights really draw the user's attention, but many times we don't want them to focus on these highlights. You might have some bright areas around the edges of a portrait; however, you don't want the viewer to focus on the edge of the picture but instead to focus on your subject.
Now let's walk through an example on dodging and burning.
Start with a hard brush that has a 200-pixel diameter.
Next, set the exposure to be 65 percent. The exposure will control how much "light" will hit the photo so how dark it will be as you brush it on.
Do a couple of quick swipes back and forth over the top-left area of the photo. You will see when you go over the same area with the burn brush; it will get darker and darker with every pass. When you burn something in too much, it's pretty harsh and really is distracting.
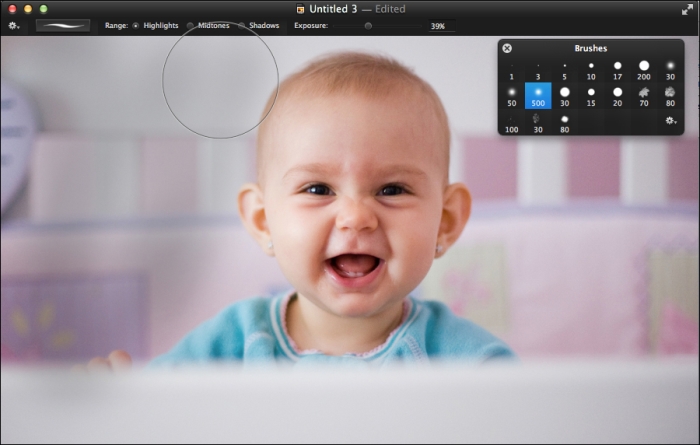
Instead of having these hard lines, let's change the brush up to a 500-pixel diameter brush and also one that has 0 hardness. The hardness controls the edge of the brush, so instead of having a hard line edge this will have a soft edge. The Brushes window menu can be accessed by using the keyboard shortcut Command + 4. This will give you a few preset brushes, but you can also customize these to create your own brushes. To open up the additional brush settings, first click on the gear icon on the bottom-right corner of the Brushes window and select Show Brush Settings.
Here you will see a wide range of options to customize your brush. You can set the size of the brush, hardness of the brush, as well as many other fine-tune adjustments such as the spacing and scatter. As you adjust the brush settings, you will see a preview brush stroke show up at the bottom of the Brush window.
When using the larger and softer brush, you will see that you get a much more natural and smooth transition from the dark areas you are painting into the other areas that you aren't changing.
The blur and sharpen tools are similar, in a way, to the dodge and burn tools. These are tools that help you brush on certain effects of the photo and instead of making the image darker or lighter, you can make it more or less sharp. This also helps to guide the user's eye around the photo and is very important in having your photo tell a story. Just like the viewer's eye in a photo goes to the lightest part of the print, their eye also goes to the sharpest part of the print. So having certain parts be super sharp and others be soft will let you be a visual storyteller and guide the reader's eye throughout the photo.
To use the blur tool, click on the icon that looks like a water droplet in the tools menu. At the top of the image menu, you can adjust the strength of the blur and also click on the brush icon in order to customize the brush size, hardness, and other details. There are many different ways you can use the blur tool, but a common use is to smooth out skin. If you are using the tool to soften skin, you should select a brush that has a very low hardness so the blur effect fades into the rest of the skin in a very natural way. Brush the effect on to the areas you would like to blur. It's also a good idea to start with a lower strength in the blur options and paint the effect over and over to get the most natural look to the effect.
Tip
When adjusting the size of any brush you can use the [ and ] keys to make your brush smaller/larger.
The sharpen tool works exactly in the same manner as the blur tool just giving you the opposite effect. You can click on the cone icon in the tools menu or use the keyboard shortcut of the O key. Sharpening can be important to guide the viewer's eye around your photo. You can give the eyes of a portrait a little sharpening to focus the viewers right into the eyes or sharpen parts of a landscape to give a certain part of the landscape more focus in the image.
Blurring and sharpening the image should be used to fine-tune your photography and help to tell the full artistic story of the shot.
We covered a lot of ground in this first chapter to give you a good foundation on Pixelmator. We learned how to get started with a blank canvas and how setting the right size is important at the beginning. We also walked through importing images on to a canvas and went over the layout of the canvas and tools. In the latter half of the chapter, we went over using some of the common tools for image editing.
Now that we have a good understanding on how to import your images into Pixelmator and perform some simple adjustments, we will move onto using the various selections tools in the next chapter.