In this chapter, you will learn how to install Debian onto your BeagleBone. There are two ways to boot the BeagleBone and run the OS: the first way is to run off the microSD card, and the second is to run off the internal eMMC (flash). BeagleBone has 4 GB of onboard flash, which is not expandable. It is recommended that the microSD be used so that there is ample room left for you to install other programs that will be needed later in the book, and this is what will be shown in this chapter. In order to install the OS, you require a microSD card (an 8 GB card will be fine), an SD card reader (which most laptops have built-in), and the Windows program Win32 DiskImager. This program will write the actual OS image to the SD card, which the BeagleBone will boot from. An archival program, such as WinRAR or 7-Zip, is also needed to extract the OS image from the downloaded archive.
At this point, you should install Win32 DiskImager and the archival program. This will be used to write the Debian image on the SD card. The archive for the disk image is located at http://beagleboard.org/latest-images and http://debian.beagleboard.org/images/bone-debian-7.8-lxde-4gb-armhf-2015-03-01-4gb.img.xz.
In order to start the installation, perform the following steps:
Extract the files from this archive and run Win32 Disk Imager. If you are using Windows 7 or higher, you will have to run the program as an administrator in order to write the Debian image to the SD card.
Select the extracted image file using the blue-colored folder icon, and make sure that the device selected to be written to (
F:\in the following picture) is your SD card.Click on write and the image will be written to the SD card, as shown in the following screenshot:

Once the image is written to the SD card, remove the card from the PC and insert it into the SD card slot on the BeagleBone.
The following image shows the BeagleBone board with HDMI, Ethernet, and USB installed and an SD card inserted:

At this point, the board is ready to be powered up and to run Debian. The USB cable may not have enough capacity to power the BeagleBone board, so it is strongly suggested that the board be powered by a 5-volt DC power cube with a current output of 2 amps. This will provide sufficient power to the board. Turn on the power to the board. If the board does not power up, press S3 to enable the power. S3 is located directly above the Ethernet connection. After about a minute, your screen should display a login prompt. If this does not happen, power off the board and hold down the boot button (located near the top-right corner of the board, close to the SD card); then apply power to the board and don't release the boot button until the user LEDs begin to flicker.
The following screenshot shows the display that you will get after you log in for the first time:

In order to login, the username is debian and the password is temppwd. The next thing that needs to be done is to get all the updates that are available, and then the image should be resized in order to use the entire 8 GB of the SD card. In order to update, the following commands should be run:
sudo apt-get update
sudo apt-get upgrade
sudo apt-get dist-upgrade
All of these three commands can be run at the same time by inserting && between each command. After the update is completed, reboot the board (sudo reboot) and relogin. At this point, the image will be resized to use the entire size of the SD card.
Before the resizing operation, run the following command to show how much of the SD is being used:
df –h
The following screenshot shows the output of the df –h command:

First, list the volumes that are available on the SD card by running the following command:
ls –l /dev/mmcblk*
The output will show all the volumes, as shown in the following screenshot. The volume that will be modified is the first volume in the list, /dev/mmcblk0. This is because mmcblk0 refers to the SD card.
A list of all the available volumes is shown in this screenshot.

At this point, the superuser should be logged in to complete the disk resizing, by executing the following command:
sudo su
Again, the password is temppwd. Once the superuser is active, run fdisk on the first volume with the following command (also shown in the preceding screenshot):
fdisk /dev/mmcblk0
Once fdisk is running, enter p as the first command. This will display the partition information of the SD. The resizing operation will delete the empty partitions and expand the primary partition to use the entire SD.
First, press d for delete and then press 2 for partition 2. Next, press n for new, p for primary, and 2 for partition 2. Specify the start and end sectors for the new partition—just select the default values by pressing Enter. In fact, outside the first n, they are all default choices and pressing Enter alone to confirm the choice is all that is needed. Select w to commit the changes to the SD card. Notice that the partition table in this example was "busy," so a reboot is needed for the changes to be reflected. Reboot by entering sudo reboot from the terminal command line, and re-login to update the changes for the next step of resizing the filesystem.
As we can see in the following image, the resized partition is ready to have the file system resized onto it.

Now the file system is ready to be resized. This will take only one command, as follows:
resize2fs /dev/mmcblk0p2
After this command, the SD card will have all its space available to the OS. Running another df –h command will confirm that the new disk size is now much more than 2 GB.
The following screenshot shows the new file system on the SD card, which resulted from running the resize2fs command:

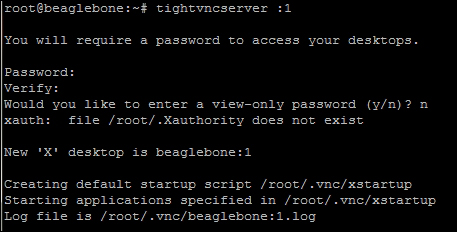
In order to remotely access the BeagleBone, the Tightvnc server needs to be installed with the following command:
sudo apt-get install tightvncserver
Once the server is installed, it needs to be set up as follows:
tightvncserver :1
This will then ask for a password to access the desktop. Enter a password and verify it. This will be the password used to login to the BeagleBone with the VNC remote viewing client. If a remote connection is needed, to view what is happening on the BeagleBone, a separate password can be entered.
After the server is set up, reboot and re-login. Open a terminal and enter the following command to get the IP address of the BeagleBone:
ifconfig
This will be needed on the remote PC to access the system.

Run the VNC server in order to allow the BeagleBone to start accepting remote connections with the tightvncserver :1 command.
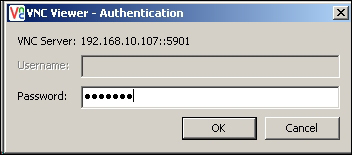
On the remote computer, a VNC viewer should be installed. There are many options to choose from, which will work. In the remote address, enter the BeagleBone's IP address and add the :1 at the end and connect to the BeagleBone.
When you run the VNC viewer, you will see a ''connection'' screen similar to the one shown in the following screenshot:
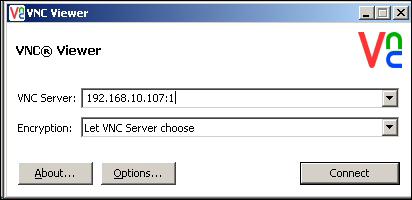
The default encryption method is to let VNC choose, so just go with the default. The next window that pops up will be the login window, where you have to enter the password that you were prompted for when you installed the VNC Server, as shown in the following screenshot:
Tip
Downloading the example code
You can download the example code files from your account at http://www.packtpub.com for all the Packt Publishing books you have purchased. If you purchased this book elsewhere, you can visit http://www.packtpub.com/support and register to have the files e-mailed directly to you.
Fortunately for us, the good folks who maintain the Debian image files have included the Cloud9 IDE in the standard image. For those of you who don't know what an IDE is, the letters stand for Integrated Development Environment. Cloud9 allows you to write and debug various types of source code. In order to access Cloud9, you have to simply enter the IP address of the BeagleBone in your favorite web browser followed by :3000, because Cloud9 uses port 3000.

In this chapter, the BeagleBone was set up to run Debian on a resized SD card. The image was also updated to get the latest upgrades available. Then, the LXDE desktop environment was installed. Finally, the Cloud9 IDE was set up and run. Now, the BeagleBone is ready to build the applications needed to control the devices discussed in the later chapters. In the next chapter, we will talk about the software that will be used to store streamed video, and serve up both audio and video files to any device on the network.