The Banana Pi is a single-board computer, which enables you to build your own individual and versatile system. In fact, it is a complete computer, including all the required elements such as a processor, memory, network, and other interfaces, which we are going to explore. It provides enough power to run even relatively complex applications suitably.
In this chapter, we are going to get to know the Banana Pi device. The available distributions are mentioned, as well as how to download and install these distributions. We will also examine Android in contrast to our upcoming Linux adventure.
Thus, you are going to transform your little piece of hardware into a functional, running computer with a working operating system. You will master the whole process of doing the required task from connecting the cables, choosing an operating system, writing the image to an SD card, and successfully booting up and shutting down your device for the first time.
In the following picture, you see a Banana Pi on the left-hand side and a Banana Pro on the right-hand side:

As you can see, there are some small differences that we need to notice. The Banana Pi provides a dedicated composite video output besides the HDMI output. However, with the Banana Pro, you can connect your display via composite video output using a four-pole composite audio/video cable on the jack.
In contrast to the Banana Pi, which has 26 pin headers, the Banana Pro provides 40 pins. Also the pins for the UART port interface are located below the GPIO headers on the Pi, while they are located besides the network interface on the Pro.
The other two important differences are not clearly visible on the previous picture. The operating system for your device comes in the form of image files that need to be written (burned) to an SD card. The Banana Pi uses normal SD cards while the Banana Pro will only accept Micro SD cards. Moreover, the Banana Pro provides a Wi-Fi interface already on board. Therefore, you are also able to connect the Banana Pro to your wireless network, while the Pi would require an external wireless USB device.
Besides the mentioned differences, the devices are very similar. You will find the following hardware components and interfaces on your device.
On the back side, you will find:
A20 ARM Cortex-A7 dual core central processing unit (CPU)
ARM Mali400 MP2 graphics processing unit (GPU)
1 gigabyte of DDR3 memory (that is shared with the GPU)
On the front side, you will find:
Ethernet network interface adapter
Two USB 2.0 ports
A 5V micro USB power with DC in and a micro USB OTG port
A SATA 2.0 port and SATA power output
Various display outputs [HDMI, LVDS, and composite (integrated into jack on the Pro)]
A CSI camera input connector
An infrared (IR) receiver
A microphone
Various hardware buttons on board (power key, reset key, and UBoot key)
Various LEDs (red for power status, blue for Ethernet status, and green for user defined)
As you can see, you have a lot of opportunities for letting your device interact with various external components. In the upcoming chapters, we are going to explore most of the possibilities in detail.
The Banana Pi is capable of running any operating system that supports the ARM Cortex-A7 architecture. There are several operating systems precompiled, so you are able to write the operating system to an SD card and boot your system flawlessly. Currently, there are the following operating systems provided officially by LeMaker, the manufacturer of the Banana Pi.
Android is a well-known operating system for mobile phones, but it is also runnable on various other devices such as smart watches, cars, and, of course, single-board computers such as the Banana Pi.
The main advantage of running Android on a single-board computer is its convenience. Anybody who uses an Android-based smartphone will recognize the graphical user interface (GUI) and may have less initial hurdles. Also, setting up a media center might be easier to do on Android than on a Linux-based system.
However, there are also a few disadvantages, as you are limited to software that is provided by an Android store such as Google Play. As most apps are optimized for mobile use at the moment, you will not find a lot of usable software for your Banana Pi running Android, except some Games and Multimedia applications. Moreover, you are required to use special Windows software called PhoenixCard to be able to prepare an Android SD card.
Because of the mentioned disadvantages, this book will show you how to get Android up and running, but focus on Linux-based distributions in the next chapters.
Most of the Linux users never realize that they are actually using Linux when operating their phones, appliances, routers, and many more products, as most of its magic happens in the background. We are going to dig into this adventure to discover its possibilities when running on our Banana Pi device.
The following Linux-based operating systems—so-called distributions—are used by the majority of the Banana Pi user base and are supported officially by the manufacturer:
Lubuntu: This is a lightweight distribution based on the well-known Ubuntu using the LXDE desktop, which is principally a good choice, if you are a Windows user.
Raspbian: This is a distribution based on Debian, which was initially produced for the Raspberry Pi (hence the name). As a lot of Raspberry Pi owners are running Raspbian on their devices while also experimenting with the Banana Pi, LeMaker ported the original Raspbian distribution to the Banana Pi. Raspbian also comes with an LXDE desktop by default.
Bananian: This too is a Debian-based Linux distribution optimized exclusively for the Banana Pi and its siblings.
All of the aforementioned distributions are based on the well-known distribution, Debian. Besides the huge user base, all Debian-based distributions use the same package manager Apt (Advanced Packaging Tool) to search for and install new software, and all are similar to use. In the upcoming recipes, we are going to use Raspbian. However, most recipes will be valid for the other Debian-based distributions.
There are still more distributions that are officially supported by LeMaker, such as Berryboot, LeMedia, OpenSUSE, Fedora, Gentoo, Scratch, ArchLinux, Open MediaVault, and OpenWrt. All of them have their pros and cons or their specific use cases. If you are an experienced Linux user, you may choose your preferred distribution from the mentioned list, as most of the recipes in this book are similar to, or even equally usable on, most of the Linux-based operating systems.
Moreover, the Banana Pi community publishes various customized Linux distributions for the Banana Pi regularly. The possible advantages of a customized distribution may include enabled and optimized hardware acceleration capabilities, supportive helper scripts, fully equipped desktop environments, and much more. However, when deciding to use a customized distribution, there is no official support by LeMaker and you have to contact the publisher in case you encounter bugs, or need help.
The following two recipes will explain how to set up the SD card with the desired operating system and how to get the Banana Pi up and running for the first time. This recipe is a predecessor, as the required hardware components and the downloaded image is valid for both Windows and Linux systems.
Usually, the Banana Pi is shipped without any other components. Besides the device itself, you will need at least a source for energy, which is usually a USB power supply and an SD card to boot your Banana Pi. Also, a network cable and connection is highly recommended to be able to interact with your Banana Pi from another computer via a remote shell using the application SSH (that is covered in the next chapter).
You might also want to actually see something on a display. Then, you will need to connect your Banana Pi via HDMI, composite, or LVDS to an external screen. It is recommended that you use an HDMI Version 1.4 cable since lower versions can possibly cause issues.
Besides inputting data using a remote shell, you can directly connect an USB keyboard and mouse to your Banana Pi via the USB ports.
After completing the required tasks in the upcoming recipes, you will be able to boot your Banana Pi.
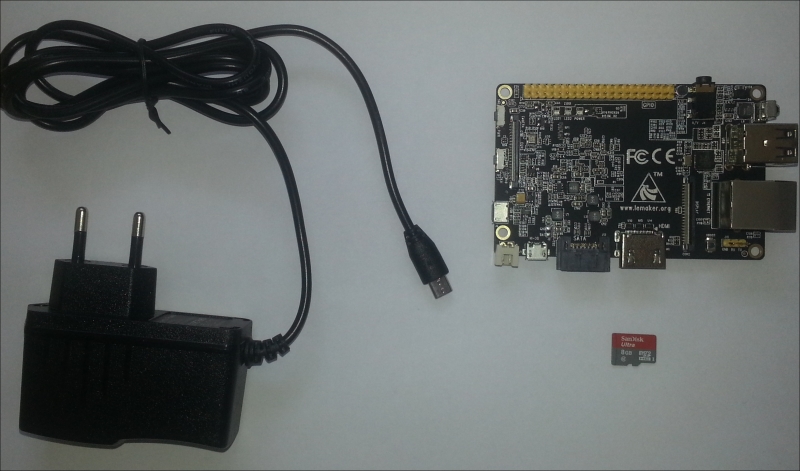
The following picture shows a USB power supply, a Banana Pro, and a Micro SD card.
The following components are required for this recipe:
Furthermore, you are going to need an Internet connection to download a Linux distribution or Android.
A few optional but highly recommended components are:
Connection to a display (via HDMI or composite)
Network connection via Ethernet
USB keyboard and mouse
You can acquire these items from various retailers. All items shown in the previous two pictures were bought from an online retailer that is known for originally selling books. However, the Banana Pi and the other products can be acquired from a large number of retailers. It is recommended to get a USB power supply with 2000mA (2A) output.
To download an operating system for Banana Pi, follow these steps:
Download an image of your desired operating system. We are going to download Android and Raspbian from the official LeMaker image files website: http://www.lemaker.org/portal.php?mod=list&catid=4.
The following screenshot shows the LeMaker website where you can download the official images:

If you are clicking on one of the mirrors (such as Google Drive, Dropbox, and so on), you will be redirected to the equivalent file-hosting service. From there, you are actually able to download the archive file.
Once your archive containing the image is downloaded, you are ready to unpack the downloaded archive, which we will do in the upcoming recipes.
LeMaker image files. This is the official location for operating systems by the manufacturer of the Banana Pi—http://www.lemaker.org/portal.php?mod=list&catid=4
The Banana Pi / Arch Linux / Customized Distribution article on Ryad's blog. This is a customized Arch Linux distribution provided by the author, including a lot of features such as the LXDE desktop environment and enabled hardware acceleration—http://blog.eldajani.net/banana-pi-arch-linux-customized-distribution/
This recipe will explain how to set up the SD card using a Windows operating system.
To prepare your image and the SD card on Windows, you will usually need the following software ingredients:
A downloaded image from the previous recipe
7-Zip
SD Formatter
Win32 Disk Imager to write Linux-based operating systems
PhoenixCard to write the Android operating system
In the upcoming steps, we will unpack the archive containing the operating system image for the Banana Pi and write the image to the SD card:
Open the downloaded archive with 7-Zip. The following screenshot shows the 7-Zip application opening a compressed
.tgzarchive:
Unpack the archive to a directory until you get a file with the file extension
.img. If it is.tgzor.tar.gzfile, you will need to unpack the archive twice. The following screenshot shows the final image file with the file extension.imgand the unpacked and compressed.tgzarchive:
Create a backup of the contents of the SD card as everything on the SD card is going to be erased unrecoverablely.
Open SD Formatter and check the disk letter (E:\ in the following screenshot).

Choose Option to open the Option Setting window and choose:
FORMAT TYPE: FULL (Erase)
FORMAT SIZE ADJUSTMENT: ON
When everything is configured correctly, check again to see whether you are using the correct disk and click Format to start the formatting process.
In the following steps, we are writing an Android image to the SD card using Windows:
Execute
PhoenixCard.exe.Choose the Android image file by clicking on Img File.
Choose the write mode Startup and click on Format to Normal.
You will see a message, that the formatting was successful.
After the formatting, click on Burn while leaving the write mode as Startup. After a few minutes, your SD card should be ready to boot up Android on the Banana Pi.
The following screenshot shows the PhoenixCard application where the image has been successfully written:

Now you can insert the SD card into your Banana Pi and power it up. After the booting process, you will see the Android operating system.
The following steps explain how to write a Linux-based distribution to the SD card on Windows:
Format the SD card using SD Formatter, which we covered in the previous section.
Open the Win32 Disk Imager.
Choose the image file by clicking on the directory button.
Check, whether you are going to write to the correct disk and then click on Write. The next screenshot shows the writing operation of Win32 Disk Imager:

Once the burning process is done, you are ready to insert the freshly prepared SD card containing your Linux operating system into the Banana Pi and boot it up for the first time.
Some images are archived using Linux archive formats, which Windows may be unable to unpack natively. Therefore, it might be necessary to install a tool which is capable of unpacking the archive. In this recipe, we use 7-Zip to unpack the archives, which is open source software and is easy to use. Some images are also available as ZIP files, which can also be unpacked using 7-Zip or Windows Explorer. To extract the image from a ZIP file using the Windows Explorer, right-click on the ZIP file and select Extract all.
Linux archives usually have to be unpacked twice. Firstly, to uncompress the archive (.tar.gz or .tgz) and secondly, to unpack the actual tar archive (which is used to collect files into one uncompressed file). On Linux, you will be able to unpack the packed archives, and uncompress the compressed archives with one command.
After unpacking the image file and formatting your SD card, you need software to burn the image to the SD card. For Android, you will need the software PhoenixCard, for any other image based on Linux, the software Win32 Disk Imager is required.
SD Formatter is free downloadable software by the SD Association to reformat SD cards efficiently and safely. You can get it for the Windows platform at https://www.sdcard.org/downloads/formatter_4/
PhoenixCard is a specialized tool used to write Android images to the SD card. You can get it for the Windows platform at https://drive.google.com/file/d/0B_VynIqhAcB7NTg2UkRDdHRWX2s/edit?usp=sharing or alternatively at http://download.eldajani.net/bananapi/phoenixcard.zip
Win32 Disk Imager is an open source tool we use to write the operating system images to SD cards. You can get it for the Windows platform at http://sourceforge.net/projects/win32diskimager/
This recipe will explain how to set up the SD card using a Linux-based operating system. On Linux computers, you usually will not need any special software to uncompress archives or write the image to an SD card. To do these tasks, you usually need the command-line tools tar and dd that are preinstalled on almost any Linux distribution by default.
To prepare your image and the SD card on Linux, you will only need the following software ingredients:
A downloaded image from the Downloading an operating system for the Banana Pi recipe
The dd program
The tar program including gzip support
Optionally, the fdisk program
The following steps are required to unpack the image archive and write the image to the SD card:
Note
Use the following dd command very carefully. The dd command will overwrite anything on the output (the of parameter). In fact, you can damage your computer, if you choose the wrong output. So, make sure that the value of the parameter of is definitely the SD card.
Unpack the downloaded
.tar.gzor.tgzarchive using the following command:$ tar -xzvf Raspbian_For_BananaPi_v1412.tgzIf you have downloaded a
.zipfile, you use the following command:$ unzip Raspbian_For_BananaPi_v1412.zipDetermine how your SD card is recognized by the system. You can check the correct path of your SD card by using the following command:
$ sudo fdisk -lMake a backup of the contents on your SD card.
Unmount all partitions of the SD card, if any partition is mounted:
$ sudo umount /dev/mmcblk0*Write the image to the SD card:
$ sudo dd if=Raspbian_For_BananaPi_v1412.img of=/dev/mmcblk0 bs=1MThe writing process takes a few minutes.
On some systems, the SD card is automatically mounted after the writing process. Unmount the partitions of the SD card again:
$ sudo umount /dev/mmcblk0*
When the writing process is finished, you can eject your SD card and put it into the SD slot of your Banana Pi.
On Linux, you also need to unpack an image file and write the image to the SD card. Luckily, these tasks are much quicker and more easily done on the command line and you usually do not need to install additional software.
In fact, to unpack the image, you need the tar command and to write an image to the SD card you need the dd (disk dump) command. The tool tar is a program to pack or unpack archive files. The tool dd is a utility to convert and copy files from a source (the input file—the if parameter) to a destination (the output file—the of parameter). In contrast to a normal file copy, the actual order of the bytes is preserved.
The dd command is executed with root privileges (by using the prefix command sudo) to use the image file as input, the SD card as output, and to read/write with a block size (the bs parameter) of one megabyte. That block size value is a safe choice when writing images to or reading from SD cards. You can also try a block size value of 4M, which results in a faster but possibly unsuccessful writing process.
You do not need to format the SD card before issuing the dd command as dd also writes the whole partition information directly to the SD card.
Note
The output parameter has to be the whole SD card (/dev/mmcblk0 in our previous example). Make sure not to accidentally write to a partition of the SD card. This means do not use /dev/mmcblk0p1 or the like).
Moreover, depending on your computer, the SD card may be recognized as /dev/sdX and not /dev/mmcblk0. Use the fdisk -l command to determine the correct device file as mentioned in this recipe.
The dd command will take some time. If you want to check the progress, you can issue the following command in another shell:
$ sudo pkill -USR1 -n -x dd
This will output the current status on the running dd job.
This recipe will explain how to boot up and shut down the Banana Pi. As the Banana Pi is a real computer, these tasks are as equally important as tasks on your desktop computer. The booting process starts the Linux kernel and several important services. The shutting down stops them accordingly and does not power off the Banana Pi until all data is synchronized with the SD card or external components correctly.
To boot your device, you need the following ingredients:
A wired up Banana Pi
A prepared SD card with an operating system
We are going to boot up and shut down the Banana Pi.
Do the following steps to boot up your Banana Pi:
Attach the Ethernet cable to your local network.
Connect your Banana Pi to a display.
Plug in an USB keyboard and mouse.
Insert the SD card to your device.
Power your Banana Pi by plugging in the USB power cable.
The following screenshot shows a new Android installation on the Banana Pi after a successful boot:

The next screenshot shows the desktop of Raspbian after a successful boot:

To shut down your Linux-based distribution, you either use the shutdown command or do it via the desktop environment (in case of Raspbian, it is called LXDE). For the latter method, these are the steps:
Click on the LXDE icon in the lower-left corner.
Click on Logout.
Click on Shutdown in the upcoming window.
To shut down your operating system via the shell, type in the following command:
$ sudo shutdown -h now
When you have prepared the SD card successfully, you can finally boot up your Banana Pi with your desired operating system.
The boot sequence should initiate immediately. You will see blinking LEDs. If only the red LED is lit, you probably made a mistake when writing the image to the SD card or the SD card is defective.
If you powered off the device previously, you may need to press and hold the Power key to restart the booting of your device. You will see the boot messages, if you connected your Banana Pi to a display. When the boot has finished, you are welcomed by your operating system for the first time.
Note
If you are using the wired Ethernet network interface on Android, make sure to enable Use Ethernet in the Android settings under Wireless & Networks | More.
On Linux, you can shut down the device via the shell. If you are on the desktop, you can access the shell via an application called Terminal (or LXTerminal in case of Raspbian).
The shutdown command expects a mode parameter (-h, that is, halt in this case) and a time (now). If you want to reboot your device, you can use the mode -r (reboot). As the shutdown command requires root privileges, we are executing the shutdown command with the prefix command sudo. This will issue the next command—shutdown—to be executed with root privileges. You will have to enter the password of the user. On most of the Banana Pi distributions, the default passwords for the default user is bananapi.
Alternatively, you can also power off or reboot your Banana Pi via the LXDE menu or the appropriate commands. The following are the commands for power off and reboot respectively:
$ sudo poweroff
$ sudo reboot
For the manual page of the
shutdowncommand, use:$ man shutdownRefer to Wikipedia for the article on the
sudocommand at https://en.wikipedia.org/wiki/Sudo