


In this first chapter of the book, we will only focus on the basics and get started with the Arduino Ethernet shield. In order to build more complex projects in the next chapters of the book, we first need to be absolutely sure that our shield is functioning correctly, and it can connect to our local network and the Web.
To ensure this, we'll first assemble the hardware, and then build a simple Arduino sketch that will connect to the Web, grab a test web page, and display it back inside the Arduino Serial Monitor.
These will be the major takeaways of this chapter:
First, we'll make sure that you have all the required hardware and software components. We are also going to assemble the shield and the Arduino Uno board, and connect everything to our local network via a router.
Then, we will write the sketch that will connect your shield to your local network as well as the Web, and this sketch will grab a test page to make sure your connection is working correctly.
Finally, we are going to test this sketch and monitor the status of the Ethernet shield on the Arduino Serial Monitor. From this first test of the shield, we'll be able to tell whether the shield is correctly connected to the Internet or not.
You don't need a lot of hardware for this first project. You only need an Arduino Uno board, and of course, the Arduino Ethernet shield. Other boards such as the Arduino Mega will work as well for the projects in the first chapter of the book, but you might face difficulties for the projects in the following chapters in the book. Therefore, I recommend that you use an Arduino Uno board for all the projects of this book.
Before actually assembling the shield with the board, make sure to write down the MAC address of the shield, which is written on the back of the shield. We will need it later in the project when we write the first sketch.
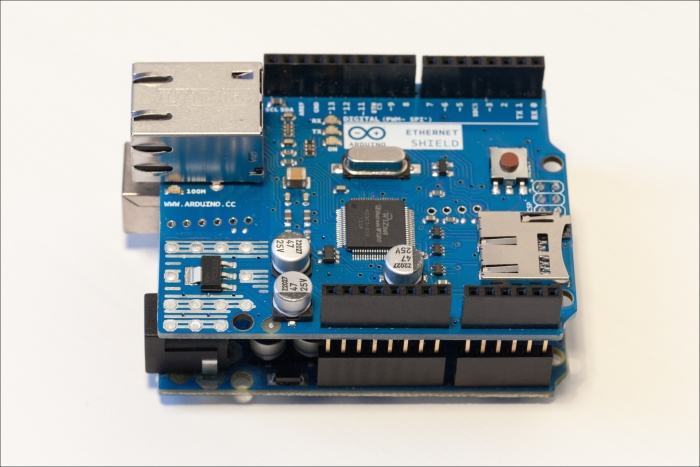
This is an image of the assembled board and the Ethernet shield:
You will also need a USB B to USB A cable to connect the Arduino board to your computer, and an Ethernet cable to connect the shield to a router.
On the software side, all you need is the Arduino IDE, which can be found at the following address:
http://arduino.cc/en/main/software
The Ethernet library is included by default in the Arduino software, so you don't need to install any additional components.
The hardware configuration in this chapter is really simple. At this point, you should already have the Arduino Ethernet shield connected to your Arduino Uno board. If that's not the case, please do so now.
You then have only two cables to plugin: a USB cable between your computer and the Arduino Uno board and the Ethernet cable. Simply connect the USB cable to one port of your computer.
For the Ethernet cable, you have several options. The easiest thing you can do, which is what I recommend, is to connect the Ethernet cable directly from the shield to the main router of your home. Usually, you will have a Wi-Fi router in your home, which you use to enable Wi-Fi connectivity for your computer and other devices. This router should also have some Ethernet ports, where you can connect your Ethernet shield. The advantage of this solution is that your shield will automatically get an IP address and will have access to the Internet automatically. This assumes that your router is configured for DHCP; go to your router settings to enable DHCP. As this procedure varies depending on the brand of your router, refer to your router documentation to find out how to do this on your specific router.
If you don't have a router, you can directly connect the Ethernet cable to your computer. I don't recommend this alternative, as configuring your computer to connect to the shield and sharing the Internet connection with the shield is really complex, and it also depends on your operating system.
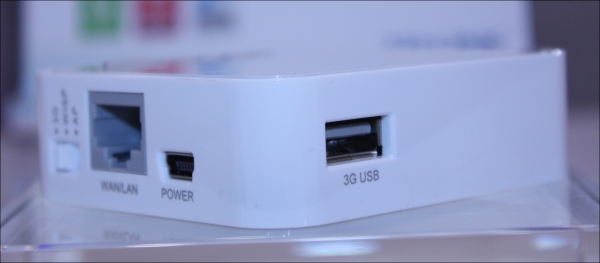
If you really don't have access to a router but you have access to a Wi-Fi network, I recommend buying one of these small Wi-Fi routers that have an Ethernet port. It can connect to any Wi-Fi network in range and share the connection automatically with other devices via Ethernet.
For example, as shown in the following image, I recommend the TP-Link MR3020 router:
This is an image of the assembled hardware for the tasks in this chapter, with the USB cable and the Ethernet cable plugged in the project:
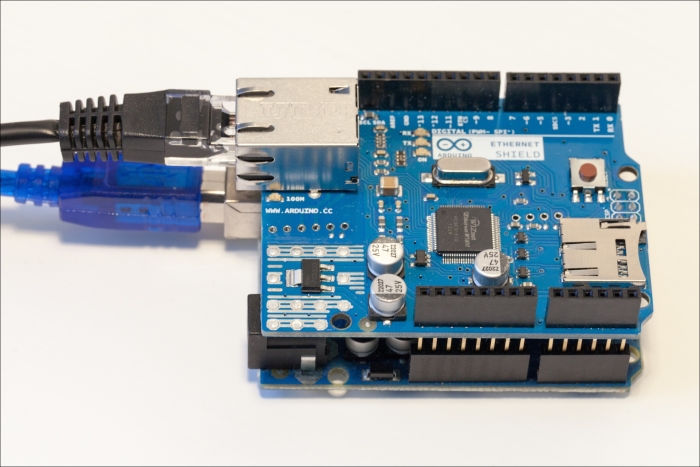
If everything is wired correctly, you should see the ON LED on the Ethernet shield is switched on, as well as the LINK LED near the Ethernet port.
Now that the hardware is ready, we can write our first sketch to test the Ethernet shield and the connection to the Web. Note that the pieces of code shown in this section are only the most important parts of the code, and you can find the complete code inside the GitHub repository of the book.
Start the Arduino sketch by including the following required libraries to use the shield:
#include <SPI.h>
#include <Ethernet.h>
Tip
Downloading the example code
You can download the example code files for all Packt books you have purchased from your account at http://www.packtpub.com. If you purchased this book elsewhere, you can visit http://www.packtpub.com/support and register to have the files e-mailed directly to you.
Then, we have to define the MAC address of the Ethernet shield. This address is located just behind the shield, and you should have noted it down already. You have to enter it in the following format:
byte mac[] = { 0x90, 0xA2, 0xDA, 0x0E, 0xFE, 0x40 };We also need to define where we are going to connect to test the connection. You can use any web page you want, or even perform a search on Google, but for this first test, I want to use a simple page.
I found this website with a simple test page that we'll try to grab while making a request later in the sketch. You can also set up your own page if you have a web server online, for example, if you have a blog hosted somewhere.
The website address is stored in a char variable:
char server[] = "www.brainjar.com";
Note that you can also use other pages here, for example http://www.example.com/hello.
The Ethernet shield will then automatically get the IP address of this website.
To get an IP address for the Ethernet shield itself, we'll use DHCP to automatically get one from the router we are connected to. However, if DHCP fails, we need to assign a default address to the shield.
This is stored in an IPAddress variable. Note that you can put anything you want inside this variable. As for this first project, we really need DHCP to work to get connected to the Web. However, it is a good practice to specify an IP address in the same subnet as your router, so the shield can at least connect to your local network. For example, the IP address of my computer was 192.168.1.100, so I specified a similar IP address for the shield:
IPAddress ip(192,168,1,50);
We can now create the instance for the Ethernet client with the following code:
EthernetClient client;
Now, in the setup() function of the sketch, we will try to get an IP address using DHCP. If you're connected to a router, there is no reason it would fail. However, if it does indeed fail, we will automatically set the default IP address for the shield:
if (Ethernet.begin(mac) == 0) {
    Serial.println("Failed to configure Ethernet using DHCP");
    Ethernet.begin(mac, ip);
}
Then, we will print out the IP address on the Serial port for debugging reasons:
Serial.begin(115200);
Serial.print("IP address: ");
Serial.println(Ethernet.localIP());
Now, in the loop() function of the sketch, we will actually connect to the server. It starts by calling the connect function and checks whether we are indeed connected. If that's the case, we print it out on the Serial monitor for debugging purposes:
if (client.connect(server, 80)) {
    if (client.connected()) {
      Serial.println("connected");
Now that we are connected, we can set the GET request for the test page we want to access:
client.println("GET /java/host/test.html HTTP/1.1");
client.println("Host: www.brainjar.com");
client.println("Connection: close");
client.println();
After the request is sent, we will read the data that is coming back from the server, to check whether everything went fine. We will also print out this data on the Serial monitor:
while (client.connected()) {
  while (client.available()) {
    char c = client.read();
    Serial.print(c);
  }
}
Finally, when we are sure that the client is not connected anymore, we will print the information on the Serial monitor and call the close() function on the Ethernet client:
if (!client.connected()) {
  Serial.println();
  Serial.println("disconnecting.");
  client.stop();
}
Finally, we don't want to continuously do this action, but only repeat it every five seconds. This is done with a delay() function:
delay(5000);
It's now time to test the sketch.
Note
The complete code for this first chapter can be found the GitHub repository of the book:
https://github.com/openhomeautomation/arduino-networking/tree/master/chapter1
Make sure that the Ethernet cable is plugged in your shield and your router, and upload the sketch to the Arduino board. You can now also open the Serial Monitor, and select the correct Serial speed (115200 for the Arduino sketch of this chapter); that's the first thing you should see, which is the IP address of your board:
IP address: 192.168.1.103
Then, the Arduino board should connect to the server:
Connecting...
If this is successful, the output will show that it is indeed connected:
connected
Now, the Arduino board will send the GET request to the server in order to grab the content of the test page. The server will answer with an HTTP 200 OK status if the request was successful, along with the contents of the page:
HTTP/1.1 200 OK
Content-Length: 308
Content-Type: text/html
Last-Modified: Tue, 27 May 2003 15:17:04 GMT
Accept-Ranges: bytes
ETag: "6291ea76324c31:5897"
Server: Microsoft-IIS/6.0
X-Powered-By: ASP.NET
Date: Thu, 15 May 2014 17:35:40 GMT
Connection: close
Inside this long answer, you should see many HTML tags, such as <html> and <head> tags. Inside the answer, you should also get the content of the page inside a <p> tag as follows:
<p>This is a very simple HTML file.</p>
If you can see this, congratulations! Your Ethernet shield is working correctly! Finally, the Arduino board will also display that the Ethernet shield has been disconnected from the remote server:
disconnecting
If everything worked correctly, it means that your Ethernet shield is working correctly, and it can connect without any problems to your local network and to the Web.
If something didn't work as expected, there are several things you can check. First, make sure that all connections are correctly made, and that the Ethernet cable is correctly plugged between the shield and your router.
If the DHCP fails at the beginning of the sketch and your shield can't get an IP address, please check whether DHCP is activated without limitations on the MAC addresses in the configuration panel of your router.
Finally, if the Arduino board can't connect to the remote server, first check whether the server itself is working by entering the URL of the test page manually in your browser.
In this first chapter of the book, we built our first project with the Arduino Ethernet shield, only to check whether the shield was working correctly and whether it could connect to your local network and to the Internet. We only made sure that the Ethernet shield could indeed be connected to the Internet, but this already gave you an overview of everything that you can do with the Ethernet shield. You saw how easy it is to send requests with the Ethernet shield, which is something we will use later in the book to send data from the Ethernet shield to a remote server.
These were the major takeaways from this first chapter:
First, we made sure that all the hardware was correctly set and that the shield was connected to your router via an Ethernet cable.
Then, we built the first sketch of this book simply to test that the Ethernet shield could indeed connect to the local network and the Web. To test this, we built a sketch that connects to the Web and grabs a test page from a remote server.
Finally, we uploaded this code to the board and checked that everything was working correctly by monitoring the status of the connection in the Arduino Serial Monitor. We also defined some strategies on what to do if the sketch didn't work and the shield could not connect to the Web.
In the next chapter of the book, we are going to build our first application using the Ethernet shield. We are also going to use an Ethernet client, but this time to connect to a server running on our own computer and to send measurements that come from a temperature and humidity sensor.