Download code from GitHub
In this chapter, we will cover the following recipes:
Creating a user account
Creating user accounts in batch mode
Creating a group
Adding group members
Deleting a user account
Managing file permissions
Getting root privileges with sudo
Setting resource limits with limits.conf
Setting up public key authentication
Securing user accounts
In this chapter, you will see how to add new users to the Ubuntu server, update existing users, and set permissions for users. You will get to know the default setting for new users and how to change them. Also, you will take a look at secure shell (SSH) access and securing user profiles.
While installing Ubuntu, we add a primary user account on the server; if you are using the cloud image, it comes preinstalled with the default user. This single user is enough to get all tasks done in Ubuntu. There are times when you need to create more restrictive user accounts. This recipe shows how to add a new user to the Ubuntu server.
Follow these steps to create the new user account:
To add a new user in Ubuntu, enter following command in your shell:
$ sudo adduser bobEnter your password to complete the command with
sudoprivileges:
Now enter a password for the new user:

Confirm the password for the new user:

Enter the full name and other information about the new user; you can skip this part by pressing the Enter key.
Enter
Yto confirm that information is correct:
This should have added new user to the system. You can confirm this by viewing the file
/etc/passwd:
In Linux systems, the adduser command is higher level command to quickly add a new user to the system. Since adduser requires root privileges, we need to use sudo along with the command, adduser completes following operations:
If you want to skip the password prompt and finger information while adding the new user, use the following command:
$ sudo adduser --disabled-password --gecos "" username
Alternatively, you can use the useradd command as follows:
$ sudo useradd -s <SHELL> -m -d <HomeDir> -g <Group> UserName
Where:
-sspecifies default login shell for the user-dsets thehomedirectory for the user-mcreates ahomedirectory if one does not already exist-gspecifies the default group name for the user
Creating a user with the command useradd does not set password for the user account. You can set or change the user password with the following command:
$sudo passwd bob
This will change the password for the user account bob.
With adduser, you can do five different tasks:
Add a normal user
Add a system user with system option
Add user group with the
--groupoption and without the--systemoptionAdd a system group when called with the
--systemoptionAdd an existing user to existing group when called with two non-option arguments
Check out the manual page man adduser to get more details.
You can also configure various default settings for the adduser command. A configuration file /etc/adduser.conf can be used to set the default values to be used by the adduser, addgroup, and deluser commands. A key value pair of configuration can set various default values, including the home directory location, directory structure skel to be used, default groups for new users, and so on. Check the manual page for more details on adduser.conf with following command:
$ man adduser.conf
Check out the command
useradd, a low level command to add new user to systemCheck out the command
usermod, a command to modify a user accountSee why every user has his own group at http://unix.stackexchange.com/questions/153390/why-does-every-user-have-his-own-group
In this recipe, you will see how to create multiple user accounts in batch mode without using any external tool.
Follow these steps to create a user account in batch mode:
Create a new text file
users.txtwith the following command:$ touch users.txtChange file permissions with the following command:
$ chmod 600 users.txtOpen
users.txtwith GNU nano and add user account details:$ nano users.txt
Press Ctrl + O to save the changes.
Press Ctrl + X to exit GNU nano.
Enter
$ sudo newusers users.txtto import all users listed inusers.txtfile.Check
/etc/passwdto confirm that users are created:
We created a database of user details listed in same format as the passwd file. The default format for each row is as follows:
username:passwd:uid:gid:full name:home_dir:shell
Where:
username: This is the login name of the user. If a user exists, information for user will be changed; otherwise, a new user will be created.uid: This is theuidof the user. If empty, a newuidwill be assigned to this user.gid: This is thegidfor the default group of user. If empty, a new group will be created with the same name as the username.full name: This information will be copied to thegecosfield.home_dir: This defines thehomedirectory of the user. If empty, a newhomedirectory will be created with ownership set to new or existing user.shell: This is the default loginshellfor the user.
The new user command reads each row and updates the user information if the user already exists, or it creates a new user.
We made the users.txt file accessible to owner only. This is to protect this file, as it contains the user's login name and password in unencrypted format.
Group is a way to organize and administer user accounts in Linux. Groups are used to collectively assign rights and permissions to multiple user accounts.
Follow these steps to create a group:
Enter the following command to add a new group:
$ sudo addgroup guestEnter your password to complete
addgroupwith root privileges.
Here, we are simply adding a new group guest to the server. As addgroup needs root privileges, we need to use sudo along with the command. After creating a new group, addgroup displays the GID of the new group.
Similar to adduser, you can use addgroup in different modes:
Add a normal group when used without any options
Add a system group with the
--systemoptionAdd an existing user to an existing group when called with two non-option arguments
Check out the manual page for the addgroup(man addgroup) to get more details.
Once you have groups in place, you can add existing users as well as new users to that group. All access rights and permissions assigned to the group will be automatically available to all the members of the group.
You will need super user or root privileges to add a group member to the Ubuntu server.
Follow these steps to add group members:
Here, you can use
addusercommand with two non-option arguments:$ sudo adduser john guestEnter your password to complete
addgroupwith root privileges.
As mentioned previously, you can use the adduser command to add an existing user to an existing group. Here, we have passed two non-option arguments:
Alternatively, you can use the command usermod to modify the group assigned to the user:
$ sudo usermod -g <group> <username>
To add a user to multiple groups, use the following command:
$ sudo usermod -a -G <group1>,<group2>,<group3> <username>
This will add <username> to <group1>, <group2>, and <group3>. Without flag –a, any previously assigned groups will be replaced with new groups.
If you no longer need a user account, it is good idea to delete that account.
Follow these steps to delete the user account:
Enter the following command to delete a user account:
$ sudo deluser --remove-home johnEnter your password to complete
addgroupwith root privileges:
Here, we used the deluser command with the option --remove-home. This will delete the user account named john and also remove the home and mail spool directories associated with john. By default, the deluser command will delete the user without deleting the home directory.
It is a good idea to keep a backup of user files before removing the home directory and any other files. This can be done with an additional flag along with the deluser command:
$ deluser --backup --remove-home john
This will create a backup file with the name john.tar.gz in the current working directory, and then the user account and the home directory will removed.
When called with the --group option, the deluser command will remove the group. Similarly, when called with two non-option arguments, the deluser command will try to remove a user from a specific group:
$ deluser john guest # this will remove user john from group guest
$ deluser --group guest # this will remove a group
If you want to disable the user account rather than delete it, you can do it with the following commands:
$ sudo usermod --expiredate 1 john # disable the user account john
$ sudo usermod --expiredate "" john # re-enable user account john
$ sudo usermod -e YYYY-MM-DD john # specify expiry date
We have created users and groups. In this recipe, you will work with default file permissions for users and groups, as well as see how to modify those permissions.
Create two users, user1 and user2. Create new group editor and add user1 and user2 as members.
Follow these steps to manage file permissions, follow these steps:
To change groups for files and directories:
Log in with
user1.Create a new directory
documentsunderhome:user1@ubuntu:~$ mkdir documentsCreate a text file under
documents:user1@ubuntu:~$ echo "hello world"> documents/file.txtNow log in with
user2:user1@ubuntu:~$ su user2Try to edit the same text file. It should say
Permission denied:user2@ubuntu:/home/user1$ echo "hello again">documents/file.txt
log in as
user1and change the group ofdocumentstoeditor:user1@ubuntu:~$ chgrp -R editor documents
Switch to
user2and try editing the same file. Now it should work:
To set permissions with
chmod, follow these steps:Create simple shell script with the following command:
$ echo 'echo "Hello World!!"'> hello.shExecute a shell script with the following command:
$ ./hello.sh
Set executable permission to
hello.shwith the following command:$ chmod u+x hello.shCheck new permission with the following command:
$ ls -l
Execute
hello.shagain:

To protect shared files with sticky bit, follow these steps:
Log in as
user1and set sticky bit for directorydocuments:user1@ubuntu:~$ chmod +t documentsLog in as
user2and create a new file.Try to delete any file under
documents. It should fail:

When you create a new file or directory in Ubuntu, the default permissions for files are read and write access to owner and owner's private group, along with read, write, and execute access for directories. You can check the default setting with umask -S.
In our example, we have user1 and user2. Both of them are members of the editor group. When user1 creates a file, the default permissions are limited to user1 and its private group (user1) named after the user account. This is the reason user2 sees Permission denied on editing file. By changing the group of documents to editor we allow all members of editor to read and write to files in documents.
With the chmod command, we can set permissions at a more granular level. In our example of hello.sh, we have set the executable permission for hello.sh. Similarly, we can set read permission as follows:
$chmod +r filename
To set write permission, use the following command:
$chmod +w filename
You can set more selective permissions with additional parameters before mode expression as follows:
$chmod ugo+x filename
Here, u sets the permission for user, g for group, and o for all others.
To remove permissions, replace + with -. For example, $chmod o-w filename. Alternatively, you can use the Octal format to specify permissions:
$chmod 777 filename
This gives read, write, and execute permission to user group and others, whereas the command $chmod 600 filename gives set, read, and write permissions for owner and no permission to groups and others. In Octal format [777], the first bit is used for the user or owner of the file, the second bit is for group, and the third bit is for everyone else. Check out the following table for more information:
|
Notation |
Octal value |
Permissions |
|---|---|---|
|
-|---|---|--- |
0|000|000|000 |
Regular files, no permissions |
|
d|r--|r--|r-- |
d|400|400|400 |
Directory, read permission to owner, group, and others |
|
-|rw-|r--|r-- |
-|644|644|644 |
Regular file, read and write permission to owner and read permission to group or others |
|
-|rwx|rwx|rwx |
-|777|777|777 |
Regular file, all permissions to everyone |
Finally, when you share files within a group of users, there are chances that someone deletes the file that is required by other users. Sticky bit can protect these file from deletion. When sticky bit is set, only the owner or a user with root privileges can delete a file.
You can set sticky bit with the command chmod as $chmod +t directoryName. Sticky bit is shown in long listing (ls -l) with symbol t or T. Additionally, sticky bit works only with directories and is ignored on ordinary files.
Many times when working as a root user, all files and directories created are owned by root. A non-root user can't write to these directories or files. You can use the command chown to change the ownership of such files and assign them to respective users.
To change ownership of a file, use the following command:
$chown newuser filename
To change the owner as well as the group of file, use the following command:
$chown newuser:newgroup filename
You can skip changing owner and change only the group with the following command:
$chown :newgroup filename
Note that the chown command can only be used by users with root privileges.
When you create a new Ubuntu server in the cloud, by default you get the root account. This account has full system access with no restrictions at all and should only be used for administrative tasks. You can always create a new user account with fewer privileges. But there are times when you need extra root privileges to add a new user or change some system setting. You can use the sudo command to temporarily get extra privileges for a single command. In this recipe, you will see how to grant sudo privileges to a newly created user.
Follow these steps to get the root privileges with sudo:
Add new user if required:
$sudo adduser johnMake
johna member ofsudogroup with the following command:$sudo adduser username sudo
All sudo access rules are configured in a file located at /etc/sudoers. This file contains a list of users and groups that are allowed to use the sudo command:
alan ALL=(ALL:ALL)ALL // allow sudo access to user alan
%sudo  ALL=(ALL)  ALL // allow sudo access to members of sudo
The line alan ALL=(ALL:ALL) ALL specifies that the user alan can run any command as any user and optionally set any group (taken from man pages for sudoers: man sudoers).
The entry %sudo ALL=(ALL) ALL specifies that any member of system group sudo can run any command as any user.
All we have to do is add a new user to the group sudo and that user will automatically get sudo privileges. After getting the membership of the sudo group, user needs to log out and log back in for the changes to take effect. Basically, the user shell needs to be restarted with new privileges. Optionally, you can always go and change the sudoers file for a specific condition.
Here, we will discuss how to set a password-less sudo and some additional benefits of sudo.
sudo is a useful and handy tool for temporary root privileges, but you need to enter your password every time. This creates problems especially for users with no password set. This problem can be solved by setting the NOPASSWD flag in the sudoers file. Make sure you use the visudo tool to edit the sudoers file:
Open the
sudoersfile with thevisudocommand:$sudo visudoSelect the line for user or group you want to allow password-less
sudoaccess.Add
NOPASSWDafter closing the bracket:%sudo ALL=(ALL:ALL) NOPASSWD: ALLPress Ctrl + O and then confirm with the Enter key to save the changes.
Press Ctrl + X to exit
visudo.
Now, the users of the group sudo should be able to use the sudo command without providing a password. Alternatively, you can add a separate entry to limit password-less access to a specific user.
Note that the sudoers program performs cache authentication for a small time (default is 15 minutes). When repeated within timeout, you may notice password-less sudo without setting the NOPASSWD flag.
In addition to running a single command with sudo, you might want to execute a list of commands with the sudo privileges. Then, you can open a shell with root access (# prompt) with the command $sudo -s. The shell environment remains same as original user, but now you can execute commands as a root user.
Alternatively, you can switch user to root with the command $sudo su -. This command will open a new shell as a root user.
Ubuntu is a multiuser and multi-process operating system. If a single user or process is consuming too many resources, other processes might not be able to use the system. In this recipe, you will see how to set resource limits to avoid such problems.
Following are the steps to set the resource limits:
Check the CPU use limit with
$ulimit –t.To set new limit, open
limits.confwith the following command:$sudo nano /etc/security/limits.confScroll to the end of the file and add following lines:
username  soft  cpu  0  # max cpu time in minutes
username  hard  cpu  1000 # max cpu time in minutes
Enter Ctrl + O to save the changes.
Enter Ctrl + X to exit GNU nano editor.
PAM stands for pluggable authentication module. The PAM module pam_limits.so provides functionality to set a cap on resource utilization. The command ulimit can be used to view current limits as well as set new limits for a session. The default values used by pam_limits.so can be set in /etc/security/limits.conf.
In this recipe, we are updating limits.conf to set a limit on CPU uses by user username. Limits set by the ulimit command are limited to that session. To set the limits permanently, we need to set them in the limits.conf file.
The syntax of the limits.conf file is as follows:
<domain> <type> <item> <value>
Here, <domain> can be a username, a group name, or a wildcard entry.
<type> denotes the type of the limit and it can have the following values:
soft: This is a soft limit which can be changed by userhard: This is a cap on soft limit set by super user and enforced by kernel
<item> is the resource to set the limit for. You can get a list of all items with $ulimit –a:
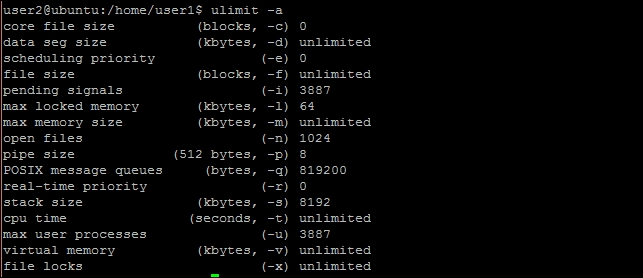
In our example, we have set soft limit on CPU uses to 0 minutes and hard limit to 1000 minutes. You can changes soft limit values with the ulimit command. To view existing limits on open files, use the command $ulimit -n. To change limits on open files, pass the new limit as follows:
$ulimit -n 4096
An unprivileged process can only set its soft limit value between 0 and hard limit, and it can irreversibly lower hard limit. A privileged process can change either limit values.
In this recipe, you will see how to set up secure public key authentication.
Follow these steps to set up public key authentication:
Add a new user. You can skip this step if you have already created a user:
$sudo adduser johnLog in as
johnand change to thehomedirectory withcd ~/:Create a
.sshdirectory if it doesn't already exist:$ mkdir .sshCreate a file named
authorized_keysunder the.sshdirectory:$ touch .ssh/authorized_keysSet permissions on the
.sshdirectory to700:$chmod 700 .sshSet permissions for
authorized_keysto600:$ chmod 600 .ssh/authorized_keysGenerate public key pair on your local system with the following command:
$ ssh-keygenCopy the generated public key from the
.ssh/id_rsa.pubfile to theauthorized_keysfile on the server.Now, open an
sshconnection from local to server with the following command:$ ssh john@serverIf asked for confirmation, type
yesand press the Enter key to continue:
Logging in with SSH supports different authentication methods. Public key authentication and password-based authentication are two common methods. To log in with public key authentication, we need a public private key pair. We generate this key pair with the ssh-keygen command. This command creates two files under the .ssh directory in the user's home:
id_rsa: This is the private key fileid_rsa.pub: This is the public key file
You can view the contents of the files with $cat id_rsa.pub. It should start with something like ssh-rsa AAAA...(except for the trailing dots).

We then copy the contents of public key to the server's authorized_keys file. Ensure that all contents are listed on single line in the authorized_keys file.
Also, ensure the permissions are properly set for the .ssh directory, and ensure that the authorized_keys file and directory are owned by the user. The permissions for the .ssh directory limits read, write, and execute permissions to the owner of the file. Similarly, for authorized_keys file, permissions are limited to read and write for owner only. This ensures that no other user can modify the data in the .ssh directory. If these permissions are not properly set, the SSH daemon will raise the warning Permission denied?.
When the SSH client initiates a connection with the server, the server sends public key identification of server to client. If a client is connecting to the server for the first time, it shows a warning and asks for user confirmation to store the server key in the known_hosts file under the .shh directory. After receiving the identity, the client authenticates server to ensure that it is really the intended server.
After server authentication, the server sends a list of possible authentication methods. The client selects the authentication method and selection to the server. After receiving the authentication method, the server sends a challenge string encrypted with client's private key. The client has to decrypt this string and send it back to server along with previously shared session key. If the response from the client matches the response generated by the server, then client authentication succeeds.
You might be searching for a secure option to install key on server. Here's one way!
If your local system has the ssh-copy-id tool installed, you can directly add your public key to the server's authorized_keys file with a single command:
$ ssh-copy-id john@serverdomain
After providing the password, your local public key will be added to the authorized_keys file under the .ssh directory of the user john.
Most of the connection issues are related with configuration problems. If you happen to face any such issue, read the error message in detail. It is descriptive enough to understand the mistake. You can also go through following checklist:
Check if the SSH daemon is running. Check the port in use and port conflicts, if any
Check whether the firewall configuration allows SSH ports
Check the list of configuration methods that are enabled
Check permissions for your private keys on your local system
Check
authorized_keysfile for your public key on the serverCheck for any entry with the old address of the server in
known_hostson the local system
Additionally, you can use the verbose flag (-v or -vvv) with the ssh command to get details of every step taken by the SSH client. Also, check SSH daemon logs on server.
If your local system runs Windows, then you can use tools provided by puTTYto generate new keys and connect to the server:
putty.exe: This is the SSH client on Windowsputtygen.exe: This tool generates public or private keyspscp.exe: This is the SCP client for secure file transfer
When using public key generated by the puttygen.exe tool, make sure that you convert the key to OpenSSH key format. Remove all comments and prepend ssh-rsa. Additionally, the entire key should be listed on a single line.
Another easy option is to use puttygen.exe. Load your private key in PuTTYgen and then copy the public key from the Key section of the PuTTYgen window.
For more information on the full working of SSH authentication, visit http://www.slashroot.in/secure-shell-how-does-ssh-work
In this recipe, we will look at ways to make user profiles more secure.
Follow these steps to secure the user account:
Set a strong password policy with the following steps:
Open the
/etc/pam.d/common-passwordfile with GNU nano:$ sudo nano /etc/pam.d/common-passwordFind the line similar to this:
password [success=1 default=ignore] pam_unix.so obscure sha512Add
minlento the end of this line:password [success=1 default=ignore] pam_unix.so obscure sha512 minlen=8
Add this line to enforce alphanumeric passwords:
password requisite pam_cracklib.so ucredit=-1 lcredit=-1 dcredit=-1 ocredit=-1Save changes and exit GNU nano editor.
Press Ctrl + O to save changes.
Press Ctrl + X to exit GNU nano editor.
Secure the
homedirectory with the following steps:Check
homedirectory permissions with the following command:$ ls -ld /home/usernameRestrict permissions to user and group with the following command:
$ chmod 750 /home/usernameChange
adduserdefault permissions by editing/etc/adduser.conf. FindDIR_MODE=0755and change it toDIR_MODE=0750.
Disable SSH access to root user with the following step:
Open
/etc/ssh/sshd_configand add or editPermitRootLogintoPermitRootLogin no
Disable password authentication with the following step:
Open
/etc/ssh/sshd_configand add or editPasswordAuthentication no
Install
fail2banwithsudo apt-get install fail2ban.
This recipe discussed a few important steps to make user accounts more secure.
A password is the most important aspect in securing user accounts. A weak password can be easily broken with brute force attacks and dictionary attacks. It is always a good idea to avoid password-based authentication, but if you are still using it, then make sure you enforce a strong password policy.
Password authentication is controlled by the PAM module pam_unix, and all settings associated with login are listed at /etc/pam.d/login. An additional configuration file /etc/pam.d/common-password includes values that control password checks.
The following line in the primary block of common-password file defines the rules for password complexity:
password [success=1 default=ignore] pam_unix.so obscure sha512
The default setting already defines some basic rules on passwords. The parameter obscure defines some extra checks on password strength. It includes the following:
Palindrome check
Case change only
Similar check
Rotated check
The other parameter, sha512, states that the new password will be encrypted with the sha512 algorithm. We have set another option, minlen=8, on the same line, adding minimum length complexity to passwords.
Tip
For all settings of the pam_unix module, refer to the manual pages with the command man pam_unix.
Additionally, we have set alphanumeric checks for new passwords with the PAM module pam_cracklib:
password requisite pam_cracklib.so ucredit=-1 lcredit=-1 dcredit=-1 ocredit=-1
The preceding line adds requirement of one uppercase letter, one lowercase letter, one digit (dcredit), and one special character (ocredit)
There are other PAM modules available, and you can search them with the following command:
$ apt-cache search limpam-
You might also want to secure the home directory of users. The default permissions on Ubuntu allow read and execute access to everyone. You can limit the access on the home directory by changing permission on the home directory as required. In the preceding example, we changed permissions to 750. This allows full access to the user, and allows read and execute access to the user's primary group.
You can also change the default permissions on the user's home directory by changing settings for the adduser command. These values are located at /etc/adduser.conf. We have changed default permissions to 750, which limits access to the user and the group only.
Additionally, you can disable remote login for the root account as well as disable password-based authentication. Public key authentication is always more secure than passwords, unless you can secure your private keys. Before disabling password authentication, ensure that you have properly enabled public key authentication and you are able to log in with your keys. Otherwise, you will lock yourself out of the server.
You might want to install a tool like fail2ban to watch and block repeated failed actions. It scans through access logs and automatically blocks repeated failed login attempts. This can be a handy tool to provide a security against brute force attacks.