


This chapter contains the following recipes:
Installing CentOS using Anaconda in graphics mode
Installing CentOS using Anaconda in text mode
Coordinating multiple installations using Kickstart
Running a cloud image with Amazon Web Services' EC2
Installing a container image from the Docker Registry
Installing the GNOME desktop
Installing the KDE Plasma desktop
This chapter's recipes focus on getting up and running with CentOS using a variety of installation methods. You'll learn how to perform interactive graphical and text-based installations using Anaconda and perform an unattended installation using Kickstart. You'll also see how to run CentOS in the cloud with Amazon Web Services and in a Docker container image. Most of the recipes in this book take place at the command prompt, but some require a graphical desktop, so we'll finish up with a look at installing the GNOME and KDE Plasma desktops.
In this recipe, you'll learn how to install CentOS using the graphical installer Anaconda. This is the most common way that CentOS is installed, although there are other ways too (some of which are discussed in later recipes). This approach is also the easiest installation method, especially for setting up single-server deployments.
This recipe assumes that you have a copy of the CentOS 7 installation medium. If you don't, visit https://www.centos.org and download a minimal ISO image. You'll also need to make a physical disc from the image. Instructions for burning the ISO image to disc can be found at https://www.centos.org/docs/5/html/CD_burning_howto.html.
Follow these steps to install CentOS using the graphical installer Anaconda:
Insert the installation disc into your system's optical drive (or USB stick into a USB port) and reboot. The system should boot to the CentOS 7 installation menu:

The installer is launched from the installation menu
Note
If your system doesn't boot to the installation menu then the drive may not be configured as a boot device. The exact steps to verify and adjust the configuration vary between BIOS vendors, but in general you'll press Esc, F1, F2, or Delete while the system is booting to gain access to the BIOS settings. Then you'll find the list of boot devices and change the order in which each is searched for a boot record.
Using the arrow keys, make sure that the Install CentOS 7 option is highlighted and press Enter.
The WELCOME TO CENTOS 7 screen confirms which language to use during the installation process. Select your desired language and click on Continue:

You can change the language used during the installation process
The next screen is a menu that organizes the installation options by category. We'll configure networking first—click on NETWORK & HOST NAME under the SYSTEM category:
Note
If your system doesn't have a mouse, you can navigate using Tab to cycle through the input fields, use the arrow keys to select the entry, and press Enter to select or activate an input.

The installation summary screen organizes the installation options into categories
Enter the system's hostname in the Host name field. Then, select the system's primary network interface and toggle the switch at the right to ON to enable it. Click on the Done button when you're finished to return to the INSTALLATION SUMMARY menu:

The NETWORK & HOST NAME screen lets us configure the system's network interfaces
Click on DATE & TIME under the LOCALIZATION category.
Set your time zone by either selecting your region and city or by clicking on your location on the map. Then, click on Done to return to the INSTALLATION SUMMARY menu:

The DATE & TIME screen lets us configure the system's time zone
If you know what purpose the system will serve on your network and require something more than a minimal installation, click on SOFTWARE SELECTION under the SOFTWARE category. Select the environment and any additional add-ons to install the desired packages. When you're finished, click on Done:

The SOFTWARE SELECTION screen lets us install purpose-based software
Click on INSTALLATION DESTINATION under the SYSTEM category.
Click on the appropriate drive in the Local Standard Disks area to set the installation target. If the drive is not bootable, or if multiple drives are selected, click on the Full disk summary and boot loader... link at the bottom of the screen to open the Selected Disks window. Then, select the drive you want to be the boot device, click on the Set as Boot Device button, and click on Close. When you're finished, click on Done:

The INSTALLATION DESTINATION screen lets us set the disk where CentOS will be installed
Click on the Begin Installation button to start the installation process.
Click on Root Password. In the input fields, enter and confirm the password you want to use for the system's root account. Click on Done when you've finished entering these details:
Note
You'll need to press the Done button twice to return to the configuration screen if you specify a password that's too weak. If you need help to create a strong password, visit http://www.howtogeek.com/195430/how-to-create-a-strong-password-and-remember-it/.

The ROOT PASSWORD screen lets us set the root account's password
Click on User Creation. In the input fields, provide your name, username, and desired password. Again, press Done when you've finished entering these details:

The CREATE USER screen lets us create an unprivileged user account
When the installation is complete, click on the Finish Configuration button. Anaconda will finalize the system's configuration and the button's label will change to Reboot.
Remove the CentOS installation media from the drive and reboot your system.
After installing CentOS using Anaconda in graphical mode, you should now have a basic CentOS 7 system up and running. The process began when we booted the system from the installation disc and selected Install CentOS 7 from the installation menu. The installer's kernel loaded into memory and Anaconda launched in graphical mode.
The NETWORK & HOST NAME screen shows a list of the available network interfaces and basic information about them, for instance, the card's MAC address and transfer rate. By default, the interfaces are configured to use DHCP to obtain their IP address when they are enabled. (Configuring a static IP address is discussed in a later recipe.)
The system's time zone is set on the LOCALIZATION screen. The date and time fields are disabled when NTP is enabled because the values will be set by the NTP service. The system clock's time can drift for many reasons, especially if the system is running on a virtual machine, so allowing NTP to manage the system's time is a good idea to ensure it stays correct. If the date and time fields aren't set by NTP, make sure the Network Time toggle is set ON. You can specify an NTP server by clicking on the button with the gears icon.
The INSTALLATION DESTINATION screen lets us set the installation target for CentOS and specify how the system's drives are partitioned. You can choose to configure the partitions if you have special requirements, but in this recipe I let Anaconda partition the drives automatically.
While Anaconda is busy installing CentOS and any additional software packages you may have requested, it shows us the Configuration screen. This screen gives us the opportunity to set a password for the system's administrative account (root) and create an unprivileged user account. You should only sign in with root when necessary; for your normal day-to-day work you should use your unprivileged account. Anaconda finalizes the installation by configuring the system's boot record and creating the user account.
After the system reboots, the Grub boot loader prompt appears and the arrow keys can be used to select a boot configuration. There's also a timer, so pressing nothing will eventually boot the system using the default configuration.
For more information on installing CentOS 7, refer to the RHEL 7 Installation Guide (https://access.redhat.com/documentation/en-US/Red_Hat_Enterprise_Linux/7/html/Installation_Guide).
Next, you'll learn how to install CentOS using Anaconda in text mode. It's recommended that you install CentOS graphically because graphics mode is easier to use and offers more functionality. However, it may not be available when the system lacks sufficient resources to run the installer in graphical mode, for example, if the display adaptor's capabilities are limited or if there is reduced RAM.
This recipe assumes that you have a copy of the CentOS 7 installation medium. If you don't, visit https://www.centos.org to download an ISO image and then burn the image to a disc.
Follow these steps to perform a text-based installation of CentOS:
Insert the installation disc into your system's optical drive (or USB stick into a USB port) and reboot. The system should boot to the CentOS 7 installation menu.
Using the arrow keys, make sure the Install CentOS 7 option is highlighted and press Tab. The command to boot the installer kernel appears at the bottom of the screen.
Add the word
textto the end of the list of arguments and press Enter. Anaconda will launch in text mode:vmzlinuz initrd=initrd.img inst.stage2=hd:LABEL=CentOS \x207\x20x86_64 rd.live.check quiet textThe Installation menu presents the installation options by category. Type 2 and press Enter to select Timezone settings:

The text-based installation menu categorizes the installation options
The Timezone settings menu presents a list of regions. Enter the number for the desired value.
You will be given a list of available time zones in the selected region (paginate through the list by pressing Enter if the list is long). Enter the number for the desired time zone.
If you know what purpose the system will serve and require something more than a minimal installation, enter 3 to select Software selection. Here you can select groups of software packages for that purpose. When finished, enter c to continue back to the Installation menu.
Enter 5 to select Network settings.
Enter 1 to set the system's hostname. Type the desired name and press Enter.
Enter the number to configure the system's primary network interface. Then, enter 7 to mark Connect automatically after reboot and 8 to mark Apply configuration in installer. Enter c to go back to the Network settings menu and c again to return to the Installation menu:

The Network settings menu lets us configure the system's network interfaces
Enter 6 to select Install Destination.
If the desired drive is not already marked, enter the number for the drive. Then, enter c to continue. The Autopartioning Options menu is shown in the following screenshot:

The Install Destination menu let us set the installation target and the Autopartioning Options menu lets us specify how the disk will be used
Enter the number for the desired partitioning (Use All Space is the default) and then c to continue.
Select the desired partition scheme (LVM is the default) and then enter c to return to the Installation menu.
Enter 8 to select Create user.
Enter 1 to mark the Create user option. Provide your name and set a username for the account by entering 2 and 3 respectively. Enter 4 to mark the Use password option and then 5 to set your password. Then, enter c to return to the Installation menu:
Note
You must confirm you really want to use your password if you provide a password that is too weak.

The Create User menu let us create an unprivileged user account
Enter 9 to select Set root password. Enter and confirm the password you want to use for the system's root account.
After all of the sections that required attention have been resolved, enter b to begin the installation process.
When the installation is complete, remove the media from the drive and reboot the system.
This recipe showed you how to install CentOS using Anaconda running in text mode. The process began when we booted the system from the installation disc, selected Install CentOS 7 from the installation menu, and added the text option to the boot parameters. The installer's kernel loaded into memory and Anaconda launched in text mode.
The text-based installation is similar to installing CentOS in graphical mode, answering prompts for time zone, software, and networking information. However, Anaconda presents the prompts in a different order when running in text mode and some functionality is missing. For example, we can't perform custom disk partitioning. Nevertheless, text mode enables us to quickly install a basic CentOS system.
For more information on installing CentOS 7, refer to the RHEL 7 Installation Guide (https://access.redhat.com/documentation/en-US/Red_Hat_Enterprise_Linux/7/html/Installation_Guide).
If you're planning on installing CentOS on multiple servers, it's more convenient to automate as much of the process as possible. In this recipe, you'll learn how to use Anaconda's kickstart.cfg file to perform an unattended network-based installation.
This recipe requires at least two systems on your network: an existing system running an HTTP server to host the installation files and Kickstart configuration (the recipe Installing Apache HTTP Server and PHP in Chapter 10, Managing Web Servers, shows you how to install Apache) and the target system on which we'll install CentOS. You'll also need the installation media and administrative privileges.
Follow these steps to perform unattended network installations using the Kickstart method:
Log in to the system running the HTTP server using the root account.
Place the installation disc in the system's optical drive.
Mount the disc using the
mountcommand so that its contents are accessible:mount /dev/cdrom /mediaCreate a new directory under Apache's web root to host the installation files:
mkdir -p /var/www/html/centos/7/x86_64Copy the contents of the installation disc to the new directory:
cp -r /media/* /var/www/html/centos/7/x86_64Copy the
kickstart.cfgfile created by Anaconda when the system was installed to Apache's web root:cp /root/kickstart.cfg /var/www/html/kickstart.cfgUnmount and remove the installation disc:
umount /media
eject /dev/cdrom
Insert the disc into the target system's drive and reboot it. The system should boot to the CentOS 7 installation menu.
Highlight the Install CentOS 7 option and press Tab.
Update the arguments used to boot the installer kernel to read as follows. Change the IP address as necessary to point to the system hosting the Kickstart file:
vmlinuz initrd=initrd.img ks=http://192.168.56.100/kickstart.cfg
Press Enter to begin the installation process.
Once the installation process begins, you can eject the disc and begin the next system's installation. Repeat steps 8-11 for each additional system.
Anaconda writes the configuration values we provide when performing a graphical or text-based installation to kickstart.cfg. If you plan on installing CentOS on multiple servers, it's more convenient to use the file to provide the interface's answers. The remaining installations can be performed mostly unattended and the systems' configurations will be more consistent.
This recipe showed you how to make the kickstart.cfg file and the CentOS installation files available to other systems over the network, and update the boot command to tell Anaconda where to look for the installation files and prompt responses. Since the software packages are retrieved from the installation server instead of the disc, you can eject the disc as soon as the installation process is underway and use it to begin the next process on your next system.
Of course, kickstart.cfg can be used as a starting point, and you can edit the responses using a text editor to further customize the installations. If you like, you can create multiple kickstart files in the web root, each with a different configuration. Just specify the desired file when you set the installer's boot arguments.
Note
Although you can edit your kickstart files with a basic text editor, dedicated programs exist for editing them as well. Check out Kickstart Configurator (http://landoflinux.com/linux_kickstart_configurator.html).
For more information on coordinating multiple installations of CentOS 7, refer to the following resources:
RHEL 7 Installation Guide (https://access.redhat.com/documentation/en-US/Red_Hat_Enterprise_Linux/7/html/Installation_Guide)
Anaconda documentation (http://rhinstaller.github.io/anaconda/index.html)
Install PXE Server on CentOS 7 (http://www.unixmen.com/install-pxe-server-centos-7)
Amazon Web Services (AWS) is a suite of services hosted within Amazon's network infrastructure which allows companies and individuals take advantage of their computing/storage capacity and world wide data centers. Elastic Cloud Compute (EC2) is a virtualization platform that lets us set up virtual systems on demand, usually to host websites and web apps. This recipe will walk you through the process of setting up a new virtual server running CentOS on the AWS platform.
This recipe assumes that you have an AWS account. You can sign up for one at http://aws.amazon.com. You will need to provide a valid credit card, although you will have access to Amazon's free tier for 12 months.
To set up a new Amazon Machine Instance (AMI) on AWS's EC2 platform, follow these steps:
Log in at https://aws.amazon.com and go to the AWS Management console. Under the Compute category, click on the EC2 link to access the EC2 management page. Then, click on the Launch Instance button:
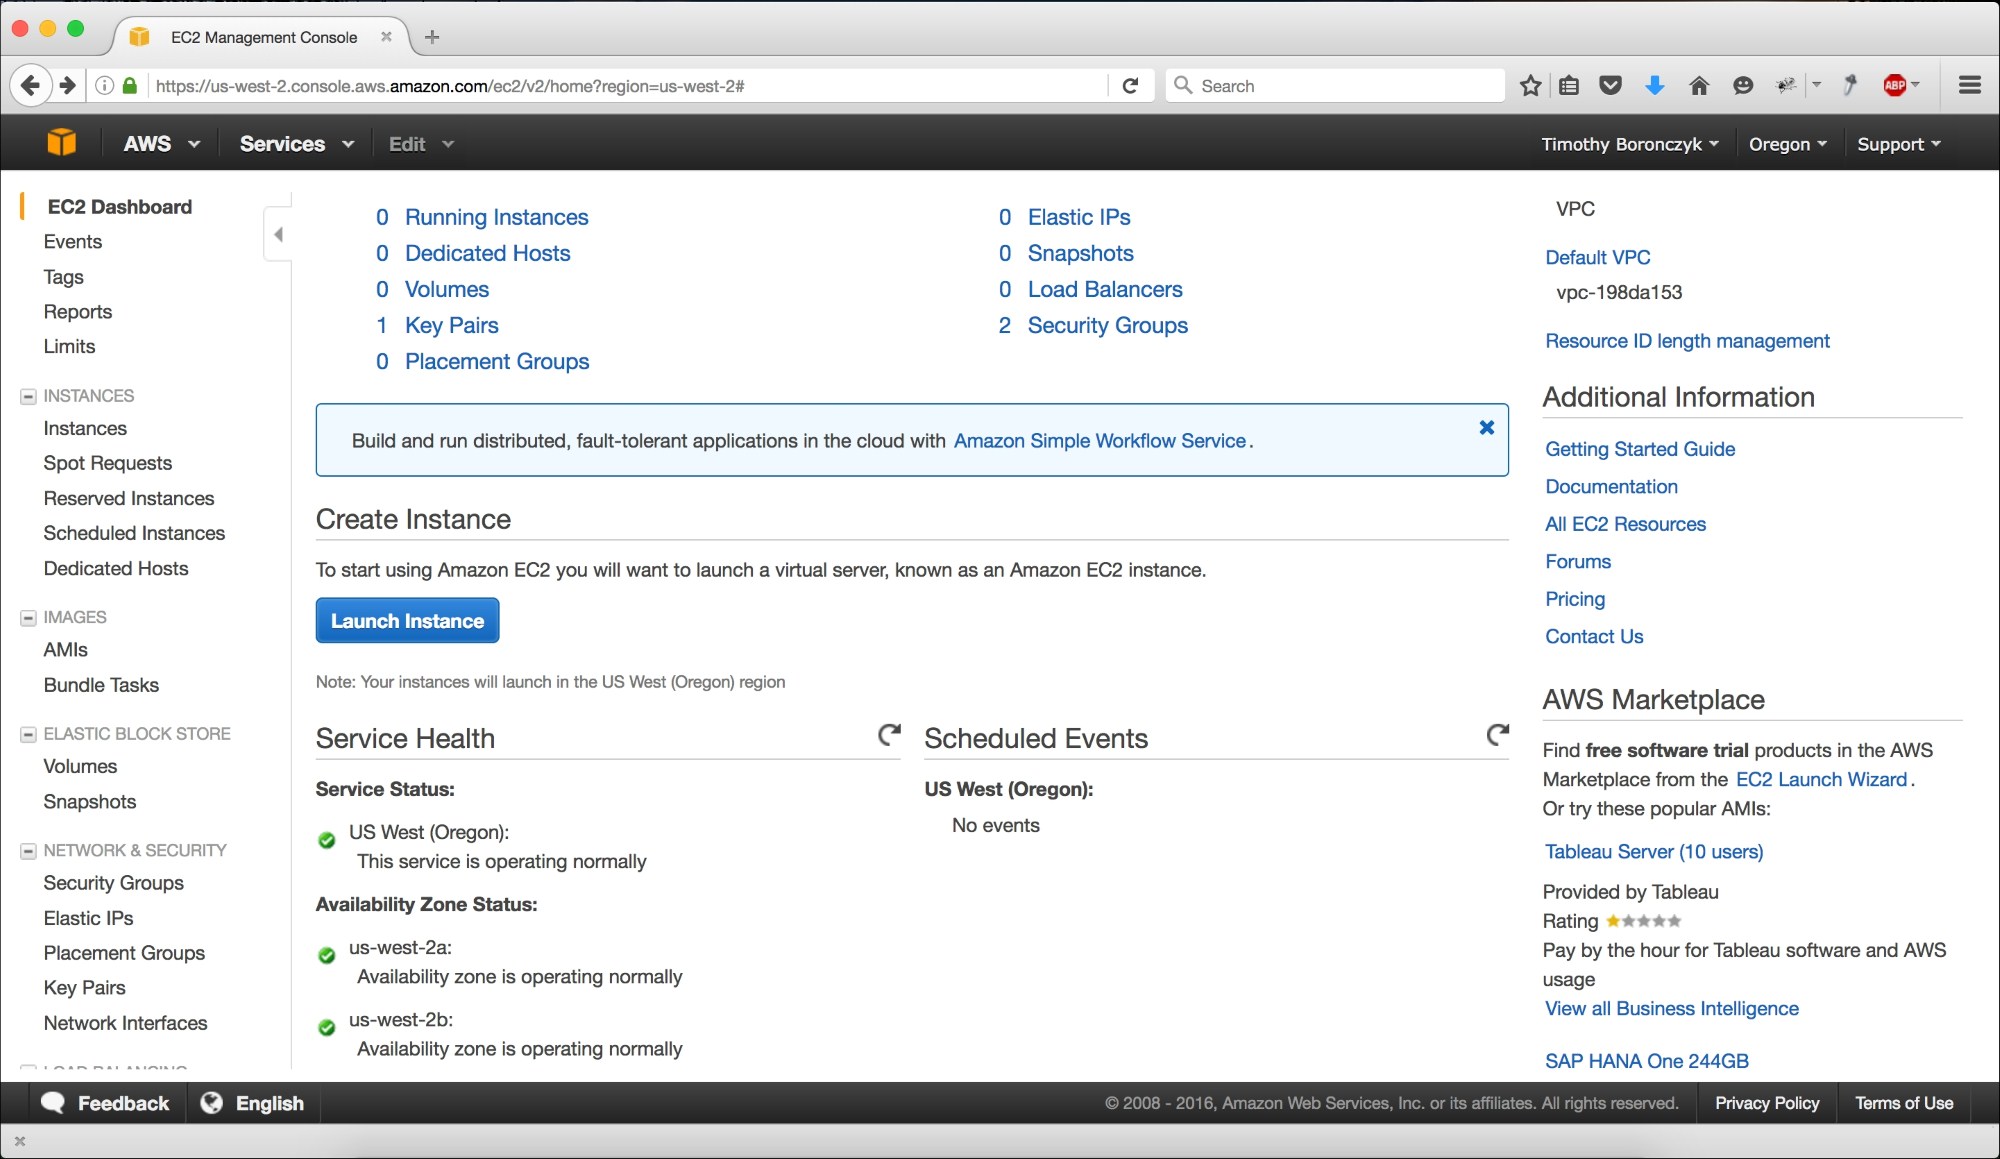
The EC2 Management Console presents an overview and quick access to resources
On the Choose an Amazon Machine Image (AMI) page, select Community AMIs in the side menu and then check the CentOS filter. A list of instances created by the community will be shown. Select the one you desire:
Note
Review the list of available images carefully. Many are available, created using different versions of CentOS and with various configurations.

The image selection page presents a filterable list of machine images created by community users
On the Review Instance Launch page, review your instance's resources (the number of virtual CPUs, available memory, and so on) and click on the Launch button:
Note
Amazon guides you through selecting an AMI and configuring it in a wizard-like fashion, listing the steps at the top of the page. The Review and Launch buttons jump directly to the last step. You can use the links at the top of the page to go back to an earlier step and adjust the instance's configuration.

Review your instance's resources on the Review Instance Launch page
Using the drop-down list, select Create a new key pair, enter a suitable filename for the key, and click on the Download Key Pair button. After you save the downloaded private encryption key, click on the Launch Instances button:

You're prompted to create a pair of encryption keys the first time you launch the image
On the launch status page, click on the View Instances button at the bottom of the page. Then, right-click on the running instance and select Connect from the context menu. Select the preferred connection method and follow the instructions that appear on the screen.
This recipe walked you through the steps necessary to spin up a new CentOS AMI on AWS's EC2 platform. To log in to the system, a password or set of encryption keys is needed, and since the primary user account's password is likely to be unknown, we opted to generate a new pair of keys. The private key is downloaded and then used with your SSH client to authenticate your login.
Once you have logged in to your running system, it's worth viewing the contents of the /etc/system-release file to verify the running version of CentOS. Also, you should use the passwd command to change the root account's password if the account isn't already locked down. This is an important security precaution because you don't know who knows the default password. You'll find recipes for managing user permissions in Chapter 3, User and Permission Management, and recipes for managing remote access in Chapter 6, Allowing Remote Access:

After you log in, verify the system's version number and update the root password
Refer to the following resources for more information on working with AMIs on Amazon's EC2 platform:
What Is Amazon EC2? (http://docs.aws.amazon.com/AWSEC2/latest/UserGuide/concepts.html)
Connect to Your Linux Instance (http://docs.aws.amazon.com/AWSEC2/latest/UserGuide/AccessingInstances.html)
Remove SSH Host Key Pairs (http://docs.aws.amazon.com/AWSEC2/latest/UserGuide/building-shared-amis.html#remove-ssh-host-key-pairs)
This recipe shows you how to procure a CentOS base for your development needs using Docker, a virtualization strategy based on the concept of containers. Each container wraps the target software in its own filesystem so that it can run regardless of the operating system on which it's installed. Developers like Docker especially because it helps provide consistency between development and deployment environments.
The recipe assumes that you have a system with Docker installed. If you don't, you can obtain the Docker installer from http://www.docker.com.
Follow these steps to install a CentOS container image from the Docker Registry:
Open the Docker Toolbox terminal program.
At the terminal's prompt, invoke the
docker pullcommand to retrieve a CentOS 7 container:docker pull centos:7After the container has been downloaded, you can launch an interactive shell with
docker run:docker run -i -t centos:7 /bin/bash
This recipe retrieves the official CentOS container from the Docker Registry using the docker pull command. By providing the version tag (:7), we can make sure we retrieved CentOS 7 as opposed to an earlier (or perhaps newer) version.
Alternatively, Kitematic is the graphical program which lets us search for and retrieve containers from the registry. Simply launch Kitematic and enter CentOS as the search term in the search box. Then, look for the official CentOS repository in the results list.
The default version retrieved by Kitematic is the latest. To specifically select CentOS 7 or a maintenance release, click on the entry's ellipsis button. Set the desired tag and then click on the Create button:

Kitematic displays the results of searching for CentOS
Refer to the following resources for more information about working with Docker:
Docker home page (http://www.docker.com)
Understanding the Docker architecture (https://docs.docker.com/engine/understanding-docker)
The official CentOS Docker hub (https://hub.docker.com/_/centos)
This recipe shows you how to install the GNOME desktop environment, which provides a graphical user interface (GUI) for working with your CentOS system. Usually, such environments aren't installed on server systems, but it can be convenient sometimes to have one available. For example, an administrator might feel more comfortable updating a system's configuration using graphical programs.
Note
GNOME isn't the only GUI environment available —other popular environments include KDE, XFCE, and Fluxbox. If GNOME isn't your cup of tea, the next recipe shows you how to install KDE.
This recipe requires a CentOS system with a working network connection. Administrative privileges are also required by logging in with the root account.
Follow these steps to install the GNOME desktop environment:
Install the
GNOME Desktoppackage group withyum groupinstall:yum groupinstall "GNOME Desktop"Manually start the desktop environment using
startx:startxIf more than one environment is installed, you'll need to specify the path to
gnome-session:startx /usr/bin/gnome-sessionWhen you're done using GNOME and log out of the desktop, you'll be returned to the console.
To configure the system to automatically start the graphical environment when it boots, set the default start up target to
graphical.target:systemctl set-default graphical.target
This recipe uses yum to install the GNOME desktop environment. All of the necessary components and dependencies are installed by the GNOME Desktop package group. Package groups saves us time and hassle because they let us install a collection of packages for a common task at the same time instead of individual packages one at a time.
yum groupinstall "GNOME Desktop"
Unlike Windows, where the graphical desktop is part of its operating system, Linux systems delegate basic graphics and input handling to a graphics server. This approach is one reason why there are several desktop environments to choose from —it abstracts many of the specifics and provides a common platform on top of which any number of environments can run, both locally and across a network. CentOS's default graphics server is X Window System.
If GNOME is the only desktop environment installed, it'll be run by default when we launch X with startx. However, if more than one desktop is installed, we need to tell X which one we want to run. For GNOME, we provide the path to gnome-session:
startx /usr/bin/gnome-session

The GNOME desktop provides a graphical interface for working with the system
The systemd service manager is responsible for starting various servers and processes when the system boots. The systemctl command is our interface to the service manager and can be used to set the default boot target. The default target dictates whether the system boots to a terminal or GUI-based login screen:
systemctl set-default graphical.target
When set to graphical, systemd starts X and the GNOME Display Manager when the system boots, which presents us with a graphical login to provide our account details. Once we're authenticated, the desktop session is initiated and we find ourselves at the GNOME desktop.
If you no longer want to boot to the graphical environment, you can set the default target back to multiuser and the system will boot to the terminal-based login screen again:
systemctl set-default multi-user.target

The following resources will provide you with more information about installing graphical desktop environments and using the GNOME desktop:
GNOME Library (https://help.gnome.org)
RHEL 7 Desktop Migration and Administration Guide (https://access.redhat.com/documentation/en-US/Red_Hat_Enterprise_Linux/7/html/Desktop_Migration_and_Administration_Guide)
Guild to X11/Starting Sessions (https://en.wikibooks.org/wiki/Guide_to_X11/Starting_Sessions)
How to install desktop environments on CentOS 7 (http://unix.stackexchange.com/questions/181503/how-to-install-desktop-environments-on-centos-7/181504#181504)
Separating the graphical interface from the operating system gives users the power to choose the graphical environment they like best. Don't worry if you're not a GNOME fan because there are still many other desktops you can explore! This recipe shows you how to install another popular desktop environment, KDE Plasma Workspaces.
This recipe requires a CentOS system with a working network connection. Administrative privileges are also required by logging in with the root account.
Follow these steps to install the KDE Plasma Workspaces desktop environment:
Install the
KDE Plasma Workspacespackage group:yum groupinstall "KDE Plasma Workspaces"Manually start the desktop environment using
startkde. When you're done using KDE and log out of the desktop, you'll be returned to the console:startkdeTo configure the system to automatically start the graphical environment when it boots, use
systemctlto set the default start up target tographical.target:systemctl set-default graphical.target
This recipe installs the KDE Plasma Workspaces desktop environment via Yum's package groups. All of the necessary software components and dependencies to run KDE are installed by the KDE Plasma Workspaces package group:
yum groupinstall "KDE Plasma Workspaces"
The startkde script starts the X server and launches the KDE environment together. Unlike with GNOME, we're not invoking startx directly, so we don't need to provide additional paths when more than one environment is installed:
startkde

KDE Plasma Workspaces is a popular graphical desktop environment for Linux-based systems
The following resources will provide you with more information about installing and using KDE Plasma Workspaces:
How to install desktop environments on CentOS 7 (http://unix.stackexchange.com/questions/181503/how-to-install-desktop-environments-on-centos-7/181504#181504)
KDE documentation (https://docs.kde.org)