


 Download code from GitHub
Introducing Android Things
Welcome to Android Things Quick Start Guide. In this introductory chapter, we will look at the big picture of Android Thing, how it compares to other—in principle—similar platforms, such as Arduino, and explore the vision behind the platform. We will check the different developer kits available exploring the pros and cons of each one. We will also look at the other components we will use throughout the book. We will also learn how to install Android Things on a developer kit and how to connect to it from our development computer in order to deploy our code. Finally, we will follow the creation of a basic project for Android Things using Android Studio, see how it is structured, and discuss the differences with a default Android project. The topics covered are as follows:
- What is Android Things?
- Design concepts behind Android Things
- Hardware you will need
- Setting up a developer kit
- Creating an Android Things project
So, let's get started.
Technical requirements
You will be required to have Android Studio and Android Things installed on a developer kit. You also will require many hardware components to effectively perform the tasks given in this chapter. The components are very interesting to have, just to see them working, but the Rainbow HAT is particularly important. We go into details about the developer kits and how to pick the right one, as a part of Chapter 1, Introducing Android Things. Finally, to use the Git repository of this book, you need to install Git.
The code files of this chapter can be found on GitHub:
https://github.com/PacktPublishing/Android-Things-Quick-Start-Guide.
Check out the following video to see the code in action:
What is Android Things?
Android Things is the IoT platform made by Google and based on Android. You could have guessed that by its name. It is similar to Android Wear, Android Auto, and Android TV in the way that it is an adaptation of Android to another domain, where most of the concepts of the platform are still valid, but there are significant differences as well.
The platform is intended to design and build IoT devices and bring them to the mass market. The key idea behind it is that you can easily prototype your project and, once it is ready, you can move from your developer kit to a simpler and smaller carrier board with just the SoM (System-on-Module).
SoMs are very handy. They are a step up from SoCs (System-on-Chips). They integrate RAM, flash storage, Wi-Fi, and Bluetooth on a single module. The official boards come with the FCC certifications, so all the process of getting the software onto them is streamlined.
Throughout the process of going to mass market, Google will provide security updates to the platform, so keeping your IoT devices up to date and secure is no longer something you have to worry about.
All the areas of this process are centralized on the Android Things Console, which has a similar function to the Google Play Console, but is more focused on building images that you can then distribute and deploy.
One of the key advantages of Android Things is that it can make use of almost all of the already existing Android libraries and frameworks, which gives it a head start in terms of tooling. From the developer point of view, it also lowers the entry barrier to make IoT devices, since all the knowledge you have of the Android framework, libraries, and tools is fully transferable.
Internet of Things (IoT) vs. smart devices
Before we go any further, let's try to establish what most people understand by IoT and what smart objects are.
An IoT device is meant to use the internet as something integral for its behavior. Examples include remote controlled lights, any appliance that you can interact with over an API (such as lights, ovens, thermostats, coffee makers, and so on) even if it is only for reading data, such as an umbrella that glows when there is a rain forecast, or writing it, such as a simple weather station. For all those systems, the internet is an integral part of the concept.
On the other hand, a smart object is something that is designed to work in isolation. This can still include many complex components, such as machine learning and computer vision. A self-driving robot that navigates a maze or smart curtains that open when there is sunlight are both quite autonomous. A device that you show a photo of a dog to and tells you the breed also falls into this category (and yes, that is one of the official demos of Android Things). All these examples are smart, but they do not need the internet, so I like to call them just smart devices and, yes, we can build those with Android Things too.
Android Things vs. other platforms
Probably the most commonly asked question is: how does Android Things position itself with Arduino?
They are completely different platforms. Android Things is a full operating system running on an SoM, while Arduino runs on microcontrollers. From a capabilities point of view, they are in different orders of magnitude.
Everything you can do on Arduino, you can do with Android Things, but the opposite is not true; there are many things you can do on Android Things that you can't even get close to with Arduino, and we will cover some of them in the final chapter.
Lastly, there is the comparison of SDK and tools. Android Studio is one of the best IDEs overall. The Arduino IDE is very simple and limited. Not to mention how much easier it is to manage project dependencies on Android Studio compared to Arduino libraries.
However, not everything is better on Android Things. There are a few areas where Arduino has the upper hand, namely, power consumption and analog input/output.
The power consumption of Arduino is very low; you can run it on batteries or even solar power for extended periods of time. That is definitely not possible with the current developer kits for Android Things; even a large battery pack will get depleted in just a matter of days.
There is room for everything on IoT. I think Arduino is best at having sensor data collection on the field, but then a central hub running Android Things can do aggregation, cloud upload, and even use machine learning to interpret the readings.
The other platform I usually get asked to compare Android Things with is a Raspberry Pi running Linux and programming it on Python. In this case the hardware is exactly the same, but there are two main advantages of Android Things.
Firstly, if you plan to eventually release and sell your IoT project, Android Things offers a developer console and even a means to mass produce devices, as well as automatic security updates.
Secondly, even with all the libraries that are available on Python, there are more and better examples of using Android. Building an IoT app is a lot closer to a mobile app than it is to a desktop app, so all your prior Android knowledge is easily transferable to Android Things.
Android Things shines when using all the tools that it has available; be it services such as Firebase for cloud storage or cloud messaging and TensorFlow for image classifiers, or libraries such as Retrofit to create API clients and NanoHTTPD to create a server, or just SDK classes, such as Thread, Alarm, Timer, and so on.
Emulators and testing
Since Android Things is meant to be used with custom hardware, it is useless to have an emulator of just the dev kit. Also, given the wide variety of hardware that we can connect, it is almost impossible to emulate it; we would need a whole electronics set to be able to draw our project and then run it. Those are the reasons why Android Things does not have an emulator.
In my experience, the lack of an emulator is not a problem. On the one hand, it is very satisfying to see the hardware working, and, on the other, many problems that you'll face will not be solved with an emulator, problems such as deciding how to arrange the components inside the chassis of a robot car or figuring out how many turns of a stepper motor are needed to activate a candy dispenser.
In my experience, the most common source of bugs when working with electronics is the actual wiring of the circuits. A loose cable or a misplaced connection are often the reason why something is not working and an emulator won't solve that. Besides, setting the connections on a program is usually more time-consuming than actually wiring them.
Finally, if you really want to use something like an emulator to test your project as you go along, my suggestion is to rely on testing using a mocking framework, such as Mockito or EasyMock, and either run instrumentation tests on the device or use Robolectric to run them on your computer.
While testing on Android Things is beyond the scope of this guide, and I don't recommend investing in it for just prototyping and tinkering; if you are planning on going to the mass market with any IoT project, testing should definitely be on your agenda.
Android Studio
One of the big advantages of Android Things is that it relies on the excellent set of tools that Google has been building for Android over the years. Among those tools, Android Studio is probably the most impressive.
It is not only that you do not need to get used to a new IDE. Android Studio is already an excellent tool.
You have dependency management with gradle, multi-module and library projects, support for flavors, and so on. And that is just basic gradle. The IDE itself has excellent wizards, refactoring tools, search and autocompilation, profiling, and much more. Plus, do not forget Kotlin support.
Android Studio has come a long way since the early days of Android with Eclipse, and Android Things has all those tools at its disposal from day one.
Design concepts behind Android Things
We have talked about the vision that drives Android Things. Let's now look at the design considerations as a platform that are reflected in how it works and the options it gives to us, namely being designed without the requirement to have a display, the meaning of Activity and Home, and a different way of working with permissions and notifications.
Displays are optional
The most significant characteristic of Android Things is that it has been designed to work without a graphical user interface. This is a very logical decision if you consider that most IoT devices do not have a screen. It is important because it dictates that all the APIs that have a strong requirement for a screen need to be redesigned or disabled/removed.
Quite often, this design decision is misunderstood as that Android Things does not support graphical user interfaces. That is not correct. You can use the same classes as you would do when building a UI on Android, the same way to create layouts and assign them to an activity. Those layouts will work fine and you can rely on them if you are building a device that has that sort of interface, but it is not a requirement for an Android Things project.
One small difference is that Android Things does not have a status bar or navigation buttons and, therefore, the application window takes all the real state of the display. This also implies that there is no way of displaying notifications on Android Things, so the Notification API is not present
Finally, even though you may not have a UI, the key component we will use to build our applications is the Activity, but, in many cases, it will not have a visual component.
Home activity support
Similar to Android home screen launchers, Android Things supports the concept of home, and it is defined the same way. This is the application that will run when the device boots. We will see how this is declared later in the chapter when we explore the default project of Android Things.
An IoT device will usually have a single purpose, in contrast with mobile phones that have multiple apps that can be launched. That single purpose is what the Home application does.
While developing, you can launch apps in the same way you can on Android phones, also having them declared on the Manifest. This is useful for quickly testing some ideas, especially if you are just playing around with simple apps and do not want them to become the home app, but keep in mind that you won't have the ability to launch them in any other way.
Permissions
Granting permissions to apps is a good example of a feature that has been redesigned because having a display is not mandatory. In Android, permission requests are pop ups that ask the user. So how do we do this without a user interface?
Firstly, the permissions are declared in the same way as you would do for an Android app; you just add them to your Manifest.
Then, permissions are granted at install time, either with Android Studio when you are developing, or via the Android Things Console if you include the app for distribution.
You can also use adb to grant and revoke permissions
Android Things Console
Android Things provides a console that has a similar role to the Google Play Console for mobile apps, although its functionalities are quite different.
The key functionalities that the console provides to developers are:
- Downloading and installing the latest Android Things system image
- Building factory images that contain OEM applications along with the system image
- Pushing over-the-air (OTA) updates
- Managing OEM applications
- Analytics
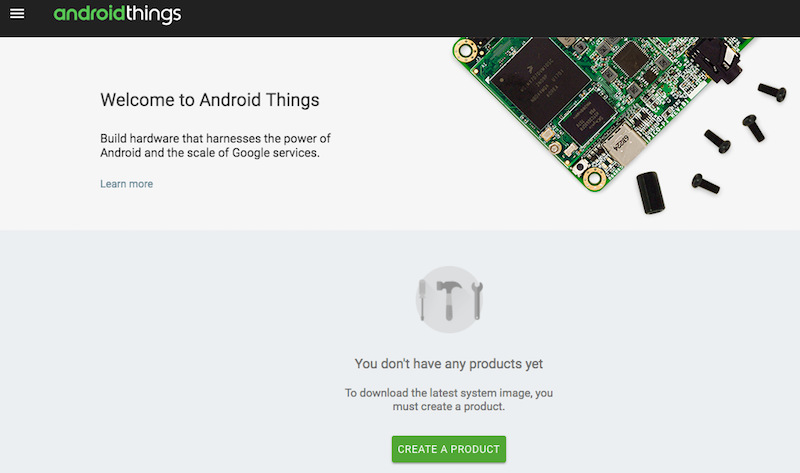
The Android Things Console will help us with distribution.
It is intended to be used when you move to mass production and you want to build the image to be flashed on your boards.
Given the nature of this book, the console is not something we will be exploring. We will just use it to download the script that flashes the default image on the developer kits.
Supported APIs
Android Things relies heavily on Android libraries to offer flexibility and functionality. Given that Android Things is optimized for embedded devices that may not contain the same feature set as an Android phone or tablet, not all the APIs are present. In most cases this is coming from the restriction of not requiring a UI. There is a reference list of system APIs and Google APIs that are supported and unsupported in the Appendix.
As a rule of thumb, if it requires a system service -such as a calendar or telephone- or a strong UI component -such as AdMob or Sign-in- it is likely to not be supported, but the number of available services is remarkably large.
Hardware you will need
As already mentioned, the Android Things SDK does not include an emulator . If you want to test your code, you need to get a developer kit. There are only two supported developer kits, which are Raspberry Pi 3 and NXP Pico iMX7D. There are more boards available for production (such as Qualcomm SDA212 and MediaTek MT8516), and there were other developer boards during the developer preview phase (Intel Curie and Edison early on, and two other NXP boards more recently), but they are all deprecated.
We will look at the differences of both boards so that you can pick the one that suits you best.
You will also need a Rainbow HAT for all the examples on the next chapter and, in part, for the rest of the book. It will allow you to get hands-on quickly by letting you focus on writing software that interacts with hardware without the need for any wiring. The Rainbow HAT was designed for Android Things in particular and all developer kits have an option to include it.
As we advance through the book and we start interacting with other hardware; you will need some breakout circuits to be able to test the code. I have picked components that are relatively cheap and are supported on Android Things. We'll have a quick overview in this section. You do not need to get them all, but they are fun to play with.
Most likely, you will not need any breadboards, resistors, and suchlike, although they are sometimes necessary. In any case, you will still need some wires. Dupont connectors are very handy, especially female-female ones in order to connect the dev kit to the other components.
Android Things developer kits
As we mentioned, there are two developer kits available; one with a Raspberry Pi and one with an NXP iMX7D.
You can always just get a supported board or, if you already have a Raspberry Pi, repurpose it; but the kits come with some added niceties.
Raspberry Pi
The key advantage of a Raspberry Pi is that most people already have one, so getting started on Android Things is very easy.
The developer kit includes a special case that makes it visually appealing, but that's not just it, it includes the name and function of each pin, which turns out to be very handy.
Other advantages of this developer kit are as follows:
- HDMI connector
- Four USB ports
- Price
However, this board has one big disadvantage: the micro-USB port is for power only, so it can only be accessed with adb via a network connection.

If you prefer having Wi-Fi and HDMI out of the box (or if you already have one), pick the Raspberry Pi.
NXP Pico iMX7D
The second developer kit is way more complete. It includes the following:
- 5'' touch screen (and connector)
- Camera (and connector)
The main advantage of this kit, however, is not the extra hardware; it is that you can use adb (the command-line tool) over the USB type C cable in the same way you would do for Android on a phone.
While that is a big advantage that makes development much easier, this developer kit has some drawbacks:
- Wi-Fi does not work unless you connect the external antenna
- The screen provided is the only way to access the system UI (there is no HDMI)

If you prefer USB deployment and debugging and don't mind the price tag, NXP should be your choice.
Rainbow HAT
The Rainbow HAT (Hardware On Top) is a component you place on top of your developer kit—as with any other HAT—and is specifically designed to give a quick start into Android Things. It contains (in the maker's own words) a buffet of sensors, inputs, and displays to explore Android Things.
Using the Rainbow HAT has many benefits. It allows us to focus on the software side of Android Things, not having to worry about connecting anything, wiring, pinouts, and protocols. The selection of hardware is very good and it covers a wide range of components that work in different ways.
You can purchase it as a standalone component, but most Android Things developer kit bundles include it.

Although it was originally designed for the Raspberry Pi, the pinout is compatible with the iMX7D, so it can be used on both.
The Rainbow HAT includes:
- Three single color LEDs, in red, green, and blue, above each button
- Three capacitive buttons (labeled A, B, and C)
- A piezo buzzer
- A four-digit 15-segment LCD alphanumeric display
- BMP280 temperature and pressure sensor
- Seven APA102 multi colour LEDs
- Some extra pins, labeled
In the following chapter, we will explore each and every one of the components with simple programs to get familiar with the usage of Android Things drivers.
In later chapters, we will still use the Rainbow HAT at the beginning as a means to get familiar with the underlying protocols that are used for each component, in order to then move onto other components.
Components, circuits, and so on
In most examples, we will use components that have drivers supported by Google as contrib-drivers. The remaining ones will be collected from other developers, including my own repository, PlattyThings.
The following is a list of the different components that we will be using across our examples. For the ones that have a particular controller chip, I have added the code of the controller so that you can make sure you have a compatible component:
- 3v3 relay
- Pyroelectric Infrared PIR Motion Sensor
- MQ135: smoke sensor
- L298N: dual DC Motor controller (and two DC motors)
- ULN2003: stepper motor controller (28YBJ-48 – Stepper motor)
- HC-SR04: ultrasound proximity sensor
- M1637: a seven-segment, four digit LCD
- Tower Pro MG90S: servo motors
- LEDs (single color and RGB)
- PCF8591: Analog-to-Digital Converter (ADC)
- PCA9685: PWM extension board
- PCF8575: GPIO extension board
- LCD display with LCM1602 controller
- MPU6050: Gyroscope
- MAX7219: LED matrix
- SSD1306: OLED display (wired to I2C and SPI)
Each of the chips usually requires some basic setup wiring that involves a few resistors. To avoid having to wire all that into a breadboard, we will be using breakout circuits, which are basically a small printed board with the chip and everything that is required, so it can be connected directly to our board.
However, in a few cases we will still need to use breadboards. Essentially, this is the case when using buttons and LEDs, which are not worth putting on a breakout circuit just themselves.
Wires and breadboards
The last components we will need are cables and breadboards. The most convenient cables have Dupont connectors. Dupont female connectors can be inserted on the pins on the boards, or in the breakout circuits, while male connectors can be inserted on breadboards.

We will be using female-to-female Dupont connectors most of the time, but some male-to-female ones will be useful to connect to a common power source or ground.
When we are making prototype circuits, we usually do them on breadboards. Each column of a breadboard is connected, and so are the top and bottom rows (which are generally used for Vcc and ground)
If you have some LEDs, buttons, and resistors, you can make use of them, but, in any case, we will keep wiring on breadboards to a minimum. Some interesting components that you can use are variable resistors, such as potentiometers, light resistors, and thermistors.
There are several starter packs typically designed for Arduino that combine most of these components and they are always handy to have around.
Finally, you can get your hands on a multimeter. We won't need one for the examples in this book, but it will be very useful if you plan to get more hands-on with electronics.
Setting up a developer kit
To configure our Android Things developer kit, we will use the setup utility script that can be downloaded from the Android Things Console. It is a simple wrapper of a few tools and simplifies the process of getting our board ready.
The setup utility will help us to install Android Things on the developer kit and also to configure Wi-Fi.

The download contains executables for Linux, macOS, and Windows. If you are going to flash a Raspberry Pi, make sure to run it with administrator permissions (sudo on macOS/Linux) because writing the SD card requires root permissions.
Installing Android Things
To proceed with the installation of Android Things, we just have to execute the script for our operating system:
$ sudo ./android-things-setup-utility-macos
The script is quite self-explanatory. We just have to follow the steps and select what we want to do. The trickiest part is to configure Wi-Fi, but we can do that later any time in several ways. It looks like this:
Android Things Setup Utility (version 1.0.19)
============================
This tool will help you install Android Things on your board and set up Wi-Fi.
What do you want to do?

1 - Install Android Things and optionally set up Wi-Fi
2 - Set up Wi-Fi on an existing Android Things device
We select Install Android Things. We will be asked about the hardware since there are differences in the process. For this example we will be using a Raspberry Pi because it is a bit more complex. The setup for the iMX7D is simpler, since you do not need to extract the SD card or connect to the network via a cable.
What hardware are you using?
1 - Raspberry Pi 3
2 - NXP Pico i.MX7D
The script will download the required tools and will ask us if we want to use a default image or a custom one.
For our purposes, and for development in general, a default image is the best option. The custom image is used when you are later in the process of building your device and want to test that everything works as expected:
Raspberry Pi 3
Do you want to use the default image or a custom image?
1 - Default image: Used for development purposes. No access to the Android
Things Console features such as metrics, crash reports, and OTA updates.
2 - Custom image: Upload your custom image for full device development and
management with all Android Things Console features.
The script will then download the required image and flash it into the device.
If you are using an NXP board, this is done via the USB type C cable. Please note that the script is a bit confusing in terms of whether you have to connect to your laptop directly or via a USB hub. In any case, make sure the port can properly power the device. This is likely to fail if you use a non-powered USB hub.
Connect your device to this computer:
The USB cable should plug into your board's USB-C port. If your computer also has USB-C ports like the more recent MacBooks, you will need to use a USB hub.
Otherwise the board won't power on correctly.
In the case of a Raspberry Pi, you need to extract the SD card and insert it in your computer so that it can be flashed. This is the step that requires root permissions.
Downloading Etcher-cli, a tool to flash your SD card...
20.5 MB/20.5 MB
Unzipping Etcher-cli...

Plug the SD card into your computer. Press [Enter] when ready
[...]
iot_rpi3.img was successfully written to Apple SDXC Reader Media (/dev/disk3)
Checksum: 4d176685
And with that, our board has Android Things installed. Now, we have the option to configure Wi-Fi, which we are going to do in the next section.
If you have successfully installed Android Things on your SD card, you can now put the SD card into the Raspberry Pi and power it up. Otherwise you can abort and run the tool again.
This last message is a bit confusing. It asks us whether we have successfully installed Android Things. It refers to the need for root permissions to write on the SD card. If you forgot to run the script with sudo, it will fail and you'll need to start over again.
Configuring Wi-Fi using the script
We already mentioned that you can only deploy your code to a Raspberry Pi using adb over a network connection, so configuring Wi-Fi is quite important. I do use an Ethernet cable most of the time when testing on a Pi, but configuring Wi-Fi comes in handy quite often.
In the case of the iMX7D, this step is even less important, since we can use the board for debugging via the USB type C cable.
In any case, there are several ways to configure Wi-Fi: you can use the script any time to perform just this step, you can do it with the adb command (for which the script is a wrapper) or you can use the system UI for that.
Let's take a quick look at the message from the script:
Would you like to set up Wi-Fi on this device? (y/n)
Please plug your Raspberry Pi to your router with an Ethernet cable, then press [Enter].
So, to be able to configure Wi-Fi on a Raspberry Pi, you need to connect it via Ethernet first; then, the script will connect to it using adb and configure Wi-Fi.
In the case of the iMX7D, the message is slightly different:
Please ensure antenna is already attached. If it is not, disconnect your board, attach the antenna and reconnect your board to your computer.

When ready, press [Enter]...
This board will not be able to connect to Wi-Fi unless the antenna is connected, but the configuration is done via the USB type C cable:
Attempting to connect to your Raspberry Pi at Android.local...
Connected to device through Ethernet.
Enter the Wi-Fi network name: PlattySoftHQ
Enter the Wi-Fi network password (leave empty if no password):
Connecting to Wi-Fi network PlattySoftHQ...
Looking for device... This can take up to 3 minutes.
Device found.
Waiting...
What the script does is to connect adb to the device using the name Android.local and then send an adb command to set up the Wi-Fi. If you want to do that by hand, you just have to type the following:
$ adb connect Android.local
connected to Android.local:5555
$ adb shell am startservice \
    -n com.google.wifisetup/.WifiSetupService \
    -a WifiSetupService.Connect \
    -e ssid <Network_SSID> \
    -e passphrase <Network_Passcode>
You can see the complete list of parameters in the official documentation at https://developer.android.com/things/hardware/wifi-adb.
Since the script relies on the device identifying itself as Android.local on the local network, this only works if it is the only device doing that. If you already have another device on the network that uses that name (such as another Android Things or an Android TV) this may fail, so let's look at a back-up plan.
Configuring Wi-Fi using the system UI
Early versions of Android Things did not have any UI besides a screen that displayed the Android Things logo and the current IP. Part of the feedback received was that using Android.local as the means to connect to the board was way too unreliable and, since you need to connect a display to the dev kit to see the IP if that fails, you could also configure it straight away, so that feedback was incorporated to the default app.
On the current version of Android Things, you can configure Wi-Fi the same way you would on an Android device. On a Raspberry Pi, you want to connect an HDMI display, mouse, and keyboard (or a touchscreen, if you have one). The iMX7D should work without any issues with the script, but you can also use the touchscreen that is provided with the dev kit.
The main screen of Android Things is similar to an Android settings screen, but with a far fewer options. Let's pick networks and then enable wireless.

By clicking on a Wi-Fi, you can just enter a password directly on the device.

You should take this chance, now that you have a screen connected, and write down the IP for later use.
Connecting to your Android Things
On an iMX7D, you just need to use adb as you would do with an Android-powered smartphone; no extra setup is required.
For Raspberry Pi, you need to connect to adb over the network, so, regardless of whether it is connected via a cable or via Wi-Fi, you can just type the following:
$ adb connect Android.local
If you are lucky that should be enough, but if, as we mentioned before, you have several devices identifying as Android.local, this will fail. In that case, you will need to connect using the IP of the dev kit. The simplest way to know the IP address of a device is to attach a display to it, so hopefully you already have that IP written down.

$ adb connect 192.168.42.38
connected to 192.168.42.38:5555
And you are ready to deploy your apps to the dev kit. It will appear with a name, such as Google Iot_rpi3, on the Select Deployment Target dialog of Android Studio.
Now that we have our development kit ready to be used, let's create a sample empty project for Android Things.
Creating an Android Things project
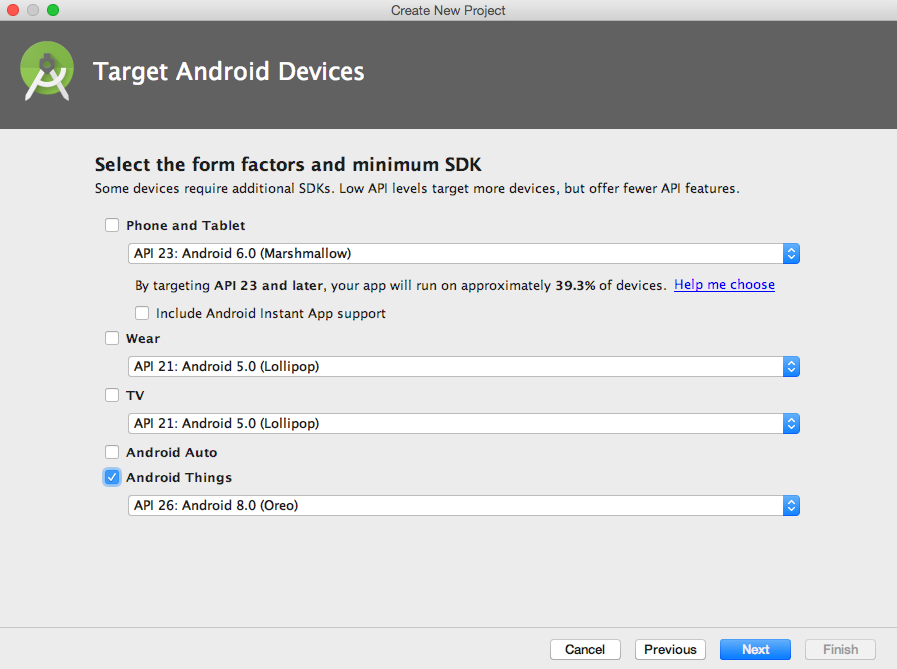
Creating an Android Things project is very easy. Android Studio has included it as a form factor inside the default wizard for New Project.
So, let's go ahead and create a project. When we are asked about the target devices, we unselect Phone and Tablet and select Android Things instead:
The next step is to choose whether we want to have an Activity added to our project and, if so, of which kind. Here we have the first important difference because we have the option of an Empty Activity as well as a Peripheral Activity:
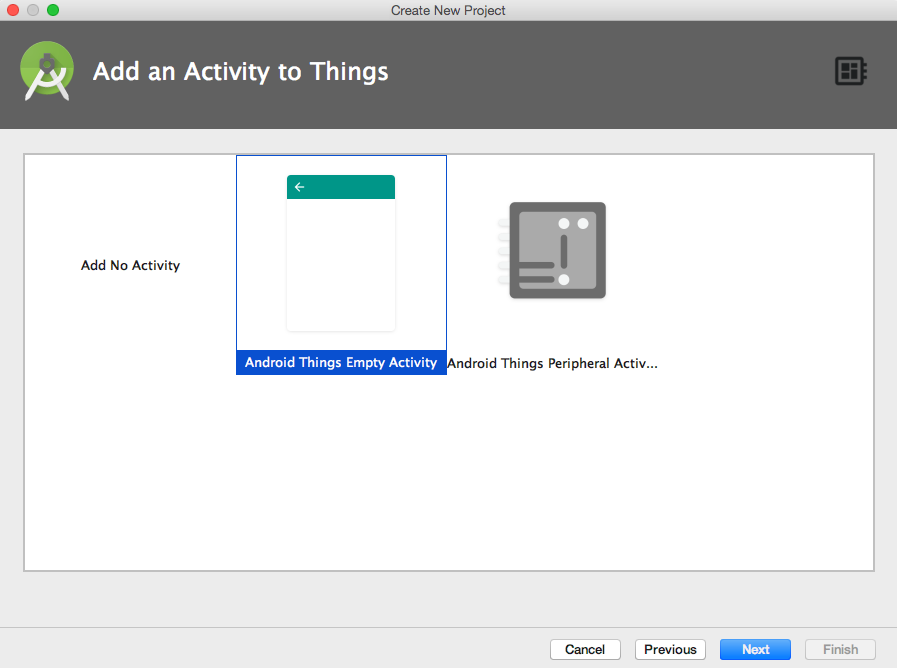
The main difference between the two types of activities is that in the case of Peripheral Activity, the last step allows us to configure several peripherals that are included in the contrib-drivers package and will insert initialization code for such devices in the Activity as well as the dependencies in gradle.
Another small difference is that an Empty Activity will add an onCreate method, while a Peripheral Activity (even if we do not add any drivers) will add both onCreate and onDestroy.
For now, we will create a Peripheral Activity with no peripherals.
Don't forget to select Kotlin as programming language. We will be using Kotlin because it is more modern than Java and allows us to write code that is more expressive and easier to follow. Kotlin is also meant to be the future of Android development and it makes a lot of sense to use it in the newest Android-based platform.
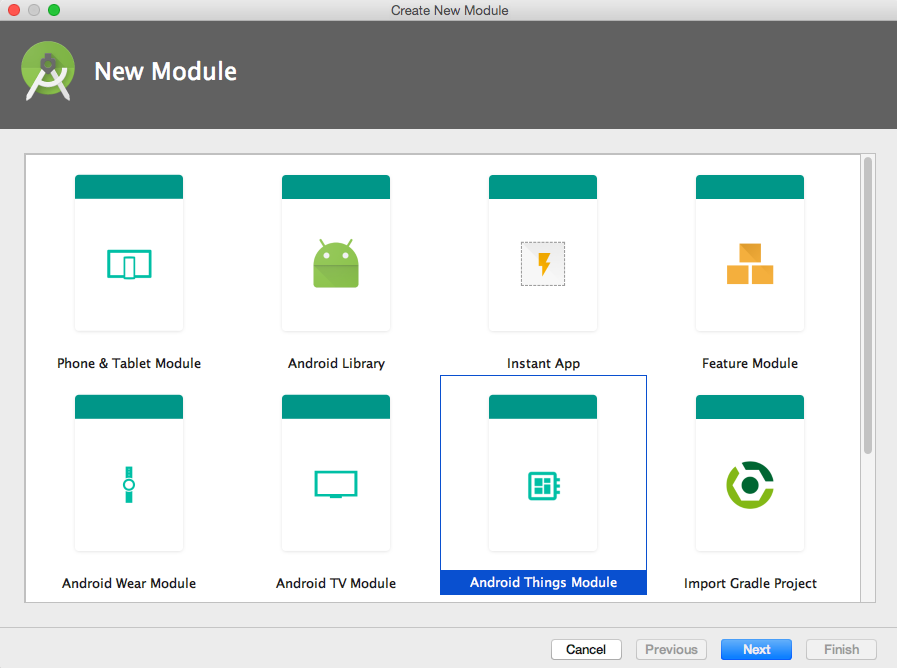
Android Studio also offers the possibility of creating an Android Things module to be added to an existing project. This is interesting when you are building an IoT device with a companion app. You can have a mobile module and an Android Things module, both inside the same project.
Android Things projects have a few particularities that distinguish them from the standard Android ones. Let’s take a look at the code that has been generated and explore the differences.
Manifest
The place with most differences is the Manifest.
<?xml version="1.0" encoding="utf-8"?>
<manifest xmlns:android="http://schemas.android.com/apk/res/android"
 package="com.plattysoft.myapplication">

   <uses-permission android:name="com.google.android.things.permission.USE_PERIPHERAL_IO" />

   <application>
      <uses-library android:name="com.google.android.things" />

      <activity android:name=".MainActivity">
         <intent-filter>
            <action android:name="android.intent.action.MAIN" />
            <category android:name="android.intent.category.LAUNCHER" />
         </intent-filter>
         <intent-filter>
            <action android:name="android.intent.action.MAIN" />
            <category android:name="android.intent.category.HOME"/>
            <category android:name="android.intent.category.DEFAULT"/>
         </intent-filter>
      </activity>

   </application>
</manifest>
First, we have a new permission request: USE_PERIPHERAL_IO. This permission does not exist in the standard Android SDK; it is specific to Android Things and is required to open peripherals, which are essentially everything we will be working with.
This permission was added on the release candidate, so many hobbyist projects that were created for earlier versions of Android Things do not have it. Pay attention if you are importing samples or drivers from the community, as this permission may be missing.
Inside the application tag, we see a uses-library declaration. This indicates a dependency on a library to allow installation. If the device does not have the Android Things library, it will not let us install the app on it. This is similar to what happens with the leanback library of Android TV. The library is part of the Android Things operating system, so we do not have to do anything; that code is there to prevent installation of IoT apps on phones by mistake.
A third difference is that the activity we have created has two intent filters, one for LAUNCHER and one for HOME. A normal Android app will not have the HOME category. As we mentioned earlier, Android Things is designed in a way that it launches a single application, and that application is marked with the category HOME. Earlier versions used the category IOT_LAUNCHER, but it was replaced with HOME on the release candidate.
The reason behind having a second intent filter is simply to allow us to launch the application from Android Studio. By marking an Activity with the category LAUNCHER, we can run it from the IDE. This simplifies development significantly, especially if you reuse the same board for several projects.
Gradle configuration
The second area that has some differences is the gradle configuration. Let's look at build.gradle.
Besides the dependencies and configuration to allow the use of Kotlin, we can see that a new library has been added to the dependencies:
compileOnly 'com.google.android.things:androidthings:+'
This is the counterpart of the library we have declared on the Manifest. The gradle dependency is marked as compileOnly, which means that the library is expected to be installed on the target device and will not be included in the code of the application.
Activity code
We can see that the Activity has just two methods, onCreate and onDestroy.
class MainActivity : Activity() {

    override fun onCreate(savedInstanceState: Bundle?) {
        super.onCreate(savedInstanceState)
    }

    override fun onDestroy() {
        super.onDestroy()
    }
}
It is noticeable that both methods are empty; while we are used to setting the layout using setContentView on standard Android applications, that code is not there. The explanation is, one again, that displays are optional on Android Things and, therefore, the creation of a layout is optional.
The second interesting point is that there are two methods. This is meant to enforce the lifecycle of peripherals.
The recommended way to work with peripherals is to open them inside onCreate, keep a reference to use them along the app, and close and release them inside onDestroy. Remember, peripherals are hardware that is still on once your application finishes, so if one app leaves them in a particular state, you’ll find them in the same state. If an app does not release them, you may not be able to open them and get an IOException.
You can, however, open a peripheral, perform some operations with it, and close it straight away. It is less efficient but, in certain cases, can be handy.
Most peripheral drivers implement AutoCloseable, so they will close themselves even if you forget to do so once the application is destroyed, but it is best to stick to the recommended practices.
Throughout this book, we will be using drivers from the Google-maintained contrib-drivers repository and also from other community-maintained ones, although most will be from PlattyThings. On Android Things Developer Preview 7 and 8, breaking changes were introduced to the SDK, and many community drivers have not been updated to the latest version. I have made that repository to ensure that all the drivers work on Android Things 1.0.
Summary
In this first chapter we have learned about the big picture of Android Things, the vision behind the platform, and how it compares to other IoT platforms. We explored the different developer kits available so you can pick the one that suits you best and learned how to install Android Things on them and how to connect them to our development computer. Finally, we followed the creation of a basic project for Android Things with Android Studio, saw how it is structured, and looked at the differences with a default Android project.
Now that we have everything ready, it is time to start tinkering with the Rainbow HAT, which will be the focus of our next chapter.