Performance evaluation for most software products is a very scientific process: determine the maximum supported performance metrics (number of concurrent users, maximum allowed memory usage, CPU usage, and so on); perform load testing against the application in scenarios that try to simulate real-world behavior; gather instrumentation data from test cases; analyze the data for performance bottlenecks; complete a root-cause analysis; make changes in the configuration or application code to fix the issue; and repeat.
Just because game development is a very artistic process does not mean it should not be treated in equally objective and scientific ways. Our game should have a target audience in mind, who can tell us the hardware limitations our game might be under. We can perform runtime testing of our application, gather data from multiple components (CPU, GPU, memory, physics, rendering, and so on), and compare them against the desired metrics. We can use this data to identify bottlenecks in our application, perform additional instrumentation to determine the root cause of the issue, and approach the problem from a variety of angles.
To give us the tools and knowledge to complete this process, this chapter will introduce a variety of methods that we will use throughout the book to determine whether we have a performance problem, and where the root cause of the performance issue can be found. These skills will give us the techniques we need to detect, analyze, and prove that performance issues are plaguing our Unity application, and where we should begin to make changes. In doing so, you will prepare yourselves for the remaining chapters where you will learn what can be done about the problems you're facing.
We will begin with an exploration of the Unity Profiler and its myriad of features. We will then explore a handful of scripting techniques to narrow-down our search for the elusive bottleneck and conclude with some tips on making the most of both techniques.
The Unity Profiler is built into the Unity Editor itself, and provides an expedient way of narrowing our search for performance bottlenecks by generating usage and statistics reports on a multitude of Unity3D components during runtime:
CPU usage per component of the Unity3D Engine
Rendering statistics
GPU usage on several programmable pipeline steps and stages
Memory usage and statistics
Audio usage and statistics
Physics engine usage and statistics
Note
With the release of Unity 5.0, Unity Technologies has made the Profiler available to all developers running the Personal Edition (the new name for the Free Edition).
Users running the Free Edition of Unity 4 must either upgrade to Unity 5, or purchase a license for Unity 4 Pro Edition.
This additional reporting comes with a price, however. Additional instrumentation flags will be enabled within the compiler, generating runtime logging events and a different level of automated code optimization while the Profiler is in use, which causes some additional CPU and memory overhead at runtime. This profiling cost is not completely negligible, and is likely to cause inconsistent behavior when the Profiler is toggled on and off.
In addition, we should always avoid using Editor Mode for any kind of profiling and benchmarking purposes due to the overhead costs of the Editor; its interface, and additional memory consumption of various objects and components. It is always better to test our application in a standalone format, on the target device, in order to get a more accurate and realistic data sample.
Tip
Users who are already familiar with connecting the Unity Profiler to their applications should skip to the section titled The Profiler window
We will begin with a brief tutorial on how to connect our game to the Unity Profiler within a variety of contexts:
Local instances of the application, either through the Editor or standalone
Profiling the Editor itself
Remote instances of the application on an iOS device (the iPad tablet or the iPhone device)
Remote instances of the application on an Android device (a tablet or phone device running Android OS)
We will briefly cover the requirements for setting up the Profiler in each of these contexts.
The only way to access the Profiler is to launch it through the Unity Editor and connect it to a running instance of our application. This is the case whether we're running our game within the Editor, running a standalone application on the local or remote device, or when we wish to profile the Editor itself.
To open the Profiler, navigate to Window | Profiler within the Editor. If the Editor is already running in Play Mode, then we may see reporting data gathering in the Profiler Window:

Tip
To profile standalone projects, ensure that the Use Development Mode and Autoconnect Profiler flags are enabled when the application is built.
Selecting whether to profile an Editor-based instance (through the Editor's Play Mode) or a standalone instance (separately built and running in the background) can be achieved through the Active Profiler option in the Profiler window.

The Unity Profiler
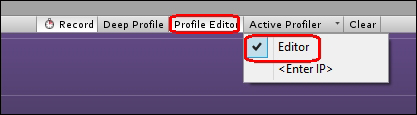
Profiling the Editor itself, such as profiling custom Editor Scripts, can be enabled with the Profile Editor option in the Profiler window as shown in the following screenshot. Note that this requires the Active Profiler option to be configured to Editor.
The Profiler can also connect to an instance of the Unity Webplayer that is currently running in a browser. This enables us to profile our web-based application in a more real-world scenario through the target browser, and test multiple browser types for inconsistencies in behavior.
Ensure that the Use Development Mode flag is enabled when the Webplayer application is built.
Launch the compiled Webplayer application in a browser and, while it is active in the browser window, hold the Alt key (Option key on a Mac) and right-click on the Webplayer object within the browser to open the Release Channel Selection menu. Then select the Development channel, as shown in the following screenshot:

As shown in the following screenshot, open the Profiler in the Unity Editor within the Profiler window, and then navigate to Active Profiler | WindowsWebPlayer(COMPUTERNAME) or Active Profiler | OSXWebPlayer(COMPUTERNAME), depending on the Operating System:

You should now see reporting data collecting in the Profiler window.
The Profiler can also be connected to an active instance of the application running remotely on an iOS device, such as an iPad or iPhone. This can be achieved through a shared WiFi connection. Follow the given steps to connect the Profiler to an Apple device:
Note
Note that remote connection to an Apple device is only possible when the Profiler is running on an Apple Mac device.
Ensure that the Use Development Mode and Autoconnect Profiler flags are enabled when the application is built.
Connect both the iOS device and Mac to a local or ADHOC WiFi network.
Attach the iOS device to the Mac via the USB or the Lightning cable.
Begin building the application with the Build & Run option as normal.
Open the Profiler window in the Unity Editor and select the device under Active Profiler.
You should now see the iOS device's profiling data gathering in the Profiler window.
There are two different methods for connecting an Android device to the Unity Profiler: either through a WiFi connection or using the Android Debug Bridge (ADB) tool. ADB is a suite of debugging tools that comes bundled with the Android SDK.
Follow the given steps for profiling over a WiFi connection:
Ensure that the Use Development Mode and Autoconnect Profiler flags are enabled when the application is built.
Connect both the Android and desktop devices to a local WiFi network.
Attach the Android device to the desktop device via the USB cable.
Begin building the application with the Build & Run option as normal.
Open the Profiler window in the Unity Editor and select the device under Active Profiler.
You should now see the Android device's profiling data gathering in the Profiler Window.
For ADB profiling, follow the given steps:
From the Windows command prompt, run the
adbdevicescommand, which checks if the device is recognized by ADB (if not, then the specific device drivers for the device may need to be installed and/or USB debugging needs to be enabled on the target device).Ensure that the Use Development Mode and Autoconnect Profiler flags are enabled when the application is built.
Attach the Android device to the desktop device via the cable (for example, USB).
Begin building the application with the Build & Run option as normal.
Open the Profiler Window in the Unity Editor and select the device under Active Profiler.
You should now see the Android device's profiling data gathering in the Profiler window.
We will now cover the essential features of the Profiler as they can be found within the interface.
Note
Note that this section covers features as they appear in the Unity Profiler within Unity 5. Additional features were added to the Profiler with the release of Unity 5; these may be different, or not exist, in Unity 4's Profiler.
The Profiler window is split into three main areas:
Controls
Timeline View
Breakdown View
These areas are as shown in the following screenshot:
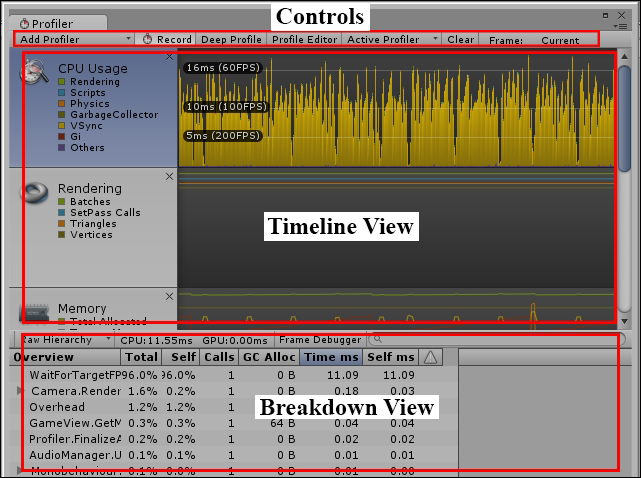
The top bar contains multiple controls we can use to affect what is being profiled and how deeply in the system data is gathered from. They are:
Add Profiler: By default, the Profiler shows several of Unity's engine components in the Timeline View, but the Add Profiler option can be used to add additional items. See the Timeline View section for a complete list of components we can profile.
Record: Enabling this option will make the Profiler continuously record profiling data. Note that data can only be recorded if Play Mode is enabled (and not paused) or if Profile Editor is enabled.
Deep Profile: Ordinary profiling will only record the time and memory allocations made by any Unity callback methods, such as
Awake(),Start(),Update(),FixedUpdate(), and so on. Enabling Deep Profile recompiles our scripts to measure each and every invoked method. This causes an even greater instrumentation cost during runtime and uses significantly more memory since data is being collected for the entire call stack at runtime. As a consequence, Deep Profiling may not even be possible in large projects running on weak hardware, as Unity may run out of memory before testing can even begin!Tip
Note that Deep Profiling requires the project to be recompiled before profiling can begin, so it is best to avoid toggling the option during runtime.
Because this option measures all methods across our codebase in a blind fashion, it should not be enabled during most of our profiling tests. This option is best reserved for when default profiling is not providing enough detail, or in small test Scenes, which are used to profile a small subset of game features.
If Deep Profiling is required for larger projects and Scenes, but the Deep Profile option is too much of a hindrance during runtime, then there are alternatives that can be found in the upcoming section titled Targeted Profiling of code segments.
Profile Editor: This option enables Editor profiling—that is, gathering profiling data for the Unity Editor itself. This is useful in order to profile any custom Editor Scripts we have developed.
Active Profiler: This drop-down globally offers choices to select the target instance of Unity we wish to profile; this, as we've learned, can be the current Editor application, a local standalone instance of our application, or an instance of our application running on a remote device.
Clear: This clears all profiling data from the Timeline View.
Frame Selection: The Frame counter shows how many frames have been profiled, and which frame is currently selected in the Timeline View. There are two buttons to move the currently selected frame forward or backward by one frame, and a third button (the Current button) that resets the selected frame to the most recent frame and keeps that position. This will cause the Breakdown View to always show the profiling data for the current frame during runtime profiling.
Timeline View: The Timeline View reveals profiling data that has been collected during runtime, organized by areas depending on which component of the engine was involved.
Each Area has multiple colored boxes for various subsections of those components. These colored boxes can be toggled to reveal/hide the corresponding data types within the Timeline View.
Each Area focuses on profiling data for a different component of the Unity engine. When an Area is selected in the Timeline View, essential information for that component will be revealed in the Breakdown View for the currently selected frame.
The Breakdown View shows very different information, depending on which Area is currently selected.
This Area shows CPU Usage for multiple Unity subsystems during runtime, such as MonoBehaviour components, cameras, some rendering and physics processes, user interfaces (including the Editor's interface, if we're running through the Editor), audio processing, the Profiler itself, and more.
There are three ways of displaying CPU Usage data in the Breakdown View:
Hierarchy
Raw Hierarchy
Timeline
The Hierarchy Mode groups similar data elements and global Unity function calls together for convenience—for instance, rendering delimiters, such as BeginGUI() and EndGUI() calls are combined together in this Mode.
The Raw Hierarchy Mode will separate global Unity function calls into individual lines. This will tend to make the Breakdown View more difficult to read, but may be helpful if we're trying to count how many times a particular global method has been invoked, or determining if one of these calls is costing more CPU/memory than expected. For example, each BeginGUI() and EndGUI() call will be separated into different entries, possibly cluttering the Breakdown View, making it difficult to read.
Perhaps, the most useful mode for the CPU Area is the Timeline Mode option (not to be confused with the main Timeline View). This Mode organizes CPU usage during the current frame by how the call stack expanded and contracted during processing. Blocks at the top of this view were directly called by the Unity Engine (such as the Start(), Awake(), or Update() methods), while blocks underneath them are methods that those methods had called, which can include methods on other Components or objects.
Meanwhile, the width of a given CPU Timeline Block gives us the relative time it took to process that method compared to other blocks around it. In addition, method calls that consume relatively little processing time, relative to the more greedy methods, are shown as gray boxes to keep them out of sight.
The design of the CPU Timeline Mode offers a very clean and organized way of determining which particular method in the call stack is consuming the most time, and how that processing time measures up against other methods being called during the same frame. This allows us to gauge which method is the biggest culprit with minimal effort.
For example, let's assume that we are looking at a performance problem in the following screenshot. We can tell, with a quick glance, that there are three methods that are causing a problem, and they each consume similar amounts of processing time, due to having similar widths.
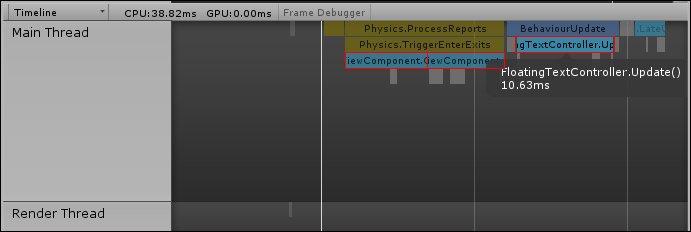
In this example, the good news is that we have three possible methods through which to find performance improvements, which means lots of opportunities to find code that can be improved. The bad news is that increasing the performance of one method will only improve about one-third of the total processing for that frame. Hence, all three methods will need to be examined and improved in order to minimize the amount of processing time during this frame.
The CPU Area will be most useful during Chapter 2, Scripting Strategies.
The GPU Area is similar to the CPU Area, except that it shows method calls and processing time as it occurs on the GPU. Relevant Unity method calls in this Area will relate to cameras, drawing, opaque and transparent geometry, lighting and shadows, and so on.
The GPU Area will be beneficial during Chapter 6, Dynamic Graphics.
The Rendering Area provides rendering statistics, such as the number of SetPass calls, the total number of Batches used to render the scene, the number of Batches saved from Dynamic and Static Batching, memory consumed for Textures, and so on.
The Rendering Area will be useful in Chapter 3, The Benefits of Batching.
The Memory Area allows us to inspect memory usage of the application in the Breakdown View in two different ways:
Simple Mode
Detailed Mode
The Simple Mode provides only a high-level overview of memory consumption of components such as Unity's low-level Engine, the Mono framework (total heap size that will be garbage-collected), Graphics, Audio (FMOD), and even memory used to store data collected by the Profiler.
The Detailed Mode shows memory consumption of individual game objects and components, for both their native and managed representations. It also has a column explaining the reason for that object consuming memory and when it might be de-allocated.
The Memory Area will be the main focal point of Chapter 7, Masterful Memory Management.
The Audio Area grants an overview of audio statistics and can be used both to measure CPU usage from the audio system, as well as total memory consumed by Audio Sources (for both playing and paused sources) and Audio Clips.
The Audio Area will come in handy as we explore art assets in Chapter 4, Kickstart Your Art.
There are two different Physics Areas, one for 3D physics (Nvidia's PhysX) and another for the 2D physics system (Box2D) that was integrated into the Unity Engine in version 4.5. This Area provides various physics statistics such as Rigidbody, Collider, and Contact counts.
We will be making use of this Area in Chapter 5, Faster Physics.
Good coding practices and project asset management often make finding the root cause of a performance issue relatively simple, at which point the only real problem is figuring out how to improve the code. For instance, if the method only processes a single gigantic for loop, then it will be a pretty safe assumption that the problem is either with the iteration of the loop or how much work is processed each iteration.
Of course, a lot of our code, whether we're working individually or in a group setting, is not always written in the cleanest way possible, and we should expect to have to profile some poor coding work from time to time. Sometimes, hack-y solutions are inevitable, and we don't always have the time to go back and refactor everything to keep up with our best coding practices.
It's easy to overlook the obvious when problem solving and performance optimization is just another form of problem solving. The goal is to use Profilers and data analysis to search our codebase for clues about where a problem originates, and how significant it is. It's often very easy to get distracted by invalid data or jump to conclusions because we're being too impatient or missed a subtle clue. Many of us have run into occasions, during software debugging, where we could have found the root cause of the problem much faster if we had simply challenged and verified our earlier assumptions. Always approaching debugging under the belief that the problem is highly complex and technical is a good way to waste valuable time and effort. Performance analysis is no different.
A checklist of tasks would be helpful to keep us focused on the issue, and not waste time chasing "ghosts". Every project is different and has a different set of concerns and design paradigms, but the following checklist is general enough that it should be able to apply to any Unity project:
Verifying the target Script is present in the Scene
Verifying the Script appears in the Scene the correct number of times
Minimizing ongoing code changes
Minimizing internal distractions
Minimizing external distractions
Sometimes there are things we expect to see, but don't. These are usually easy to note, because the human brain is very good at pattern recognition. If something doesn't match the expected pattern, then it tends to be very obvious. Meanwhile, there are times where we assume something has been happening, but it didn't. These are generally more difficult to notice, because we're often scanning for the first kind of problem. Verification of the intended order of events is critical, or we risk jumping to conclusions, wasting valuable time.
In the context of Unity, this means it is essential to verify that the script we expect to see the event coming from is actually present in the Scene, and that the method calls happen in the order we intended.
Script presence can be quickly verified by typing the following into the Hierarchy window textbox:
t:<monobehaviour name>
For example, typing t:mytestmonobehaviour (note: it is not case-sensitive) into the Hierarchy textbox will show a shortlist of all GameObjects that currently have a MyTestMonobehaviour script attached as a Component.
Tip
Note that this shortlist feature also includes any GameObjects with Components that derive from the given script name.

We should also double-check that the GameObjects they are attached to are still enabled, since we may have disabled them during earlier testing, or someone/something has accidentally deactivated the object.
If we assume that a MonoBehaviour, which is causing performance problems, only appears once in our Scene, then we may ignore the possibility that conflicting method invocations are causing a bottleneck. This is dangerous; what if someone created the object twice or more in the Scene file, or we accidentally instantiated the object more than once from code? What we see in the Profiler can be a consequence of the same expensive method being invoked more than once at the same time. This is something we will want to double-check using the same shortlist method as before.
If we expected only one of the Components to appear in the Scene, but the shortlist revealed more than one, then we may wish to rethink our earlier assumptions about what's causing the bottlenecks. We may wish to write some initialization code that prevents this from ever happening again, and/or write some custom Editor helpers to display warnings to any level designers who might be making this mistake.
Preventing casual mistakes like this is essential for good productivity, since experience tells us that, if we don't explicitly disallow something, then someone, somewhere, at some point, for whatever reason, will do it anyway, and cost us a good deal of analysis work.
Making code changes to the application in order to hunt down performance issues is not recommended, as the changes are easy to forget as time wears on. Adding debug logging statements to our code can be tempting, but remember that it costs us time to introduce these calls, recompile our code, and remove these calls once our analysis is complete. In addition, if we forget to remove them, then they can cost unnecessary runtime overhead in the final build since Unity's Debug logging can be prohibitively expensive in both CPU and memory.
One way to combat this problem is to use a source-control tool to differentiate the contents of any modified files, and/or revert them back to their original state. This is an excellent way to ensure that unnecessary changes don't make it into the final version.
Making use of breakpoints during runtime debugging is the preferred approach, as we can trace the full call stack, variable data, and conditional code paths (for example, if-else blocks), without risking any code changes or wasting time on recompilation.
The Unity Editor has its own little quirks and nuances that can leave us confused by certain issues.
Firstly, if a single frame takes a long time to process, such that our game noticeably freezes, then the Profiler may not be capable of picking up the results and recording them in the Profiler window. This can be especially annoying if we wish to catch data during application/Scene initialization. The upcoming section, Custom CPU Profiling, will offer some alternatives to explore to solve this problem.
One common mistake (that I have admittedly fallen victim to multiple times during the writing of this book) is: if we are trying to initiate a test with a keystroke and we have the Profiler open, we should not forget to click back into the Editor's Game window before triggering the keystroke! If the Profiler is the most recently clicked window, then the Editor will send keystroke events to that, instead of the runtime application, and hence no GameObject will catch the event for that keystroke.
Vertical Sync (otherwise known as VSync) is used to match the application's frame rate to the frame rate of the device it is being displayed on (for example, the monitor). Executing the Profiler with this feature enabled will generate a lot of spikes in the CPU usage area under the heading WaitForTargetFPS, as the application intentionally slows itself down to match the frame rate of the display. This will generate unnecessary clutter, making it harder to spot the real issue(s). We should make sure to disable the VSync colored box under the CPU Area when we're on the lookout for CPU spikes during performance tests. We can disable the VSync feature entirely by navigating to Edit | Project Settings | Quality and then the subpage for the currently selected build platform.
We should also ensure that a drop in performance isn't a direct result of a massive number of exceptions and error messages appearing in the Editor console. Unity's Debug.Log(), and similar methods such as Debug.LogError(), Debug.LogWarning(), and so on, are notoriously expensive in terms of CPU usage and heap memory consumption, which can then cause garbage collection to occur and even more lost CPU cycles.
This overhead is usually unnoticeable to a human being looking at the project in Editor Mode, where most errors come from the compiler or misconfigured objects. But they can be problematic when used during any kind of runtime process; especially during profiling, where we wish to observe how the game runs in the absence of external disruptions. For example, if we are missing an object reference that we were supposed to assign through the Editor and it is being used in an Update() method, then a single MonoBehaviour could be throwing new exceptions every single update. This adds lots of unnecessary noise to our profiling data.
Note that we can disable the Info or Warning checkboxes (shown in the following screenshot) for the project during Play Mode runtime, but it still costs CPU and memory to execute debug statements, even though they are not being rendered. It is often a good practice to keep all of these options enabled, to verify that we're not missing anything important.

This one is simple but absolutely necessary. We should double-check that there are no background processes eating away CPU cycles or consuming vast swathes of memory. Being low on available memory will generally interfere with our testing, as it can cause more cache misses, hard-drive access for virtual memory page-file swapping, and generally slow responsiveness of the application.
If our performance problem isn't solved by the above checklist, then we probably have a real issue on our hands that demands further analysis. The task of figuring out exactly where the problem is located still remains. The Profiler window is effective at showing us a broad overview of performance; it can help us find specific frames to investigate and can quickly inform us which MonoBehaviour and/or method may be causing issues. However, we must still determine exactly where the problem exists. We need to figure out if the problem is reproducible, under what circumstances a performance bottleneck arises, and where exactly within the problematic code block the issue is originating from.
To accomplish these, we will need to perform some profiling of targeted sections of our code, and there are a handful of useful techniques we can employ for this task. For Unity projects, they essentially fit into two categories:
Controlling the Profiler from script code
Custom timing and logging methods
Note
Note that the following section mostly focusses on how to investigate Scripting bottlenecks through C# code. Detecting the source of bottlenecks in other engine components will be discussed in their related chapters.
The Profiler can be controlled in script code through the static Profiler class. There are several useful methods in the Profiler class that we can explore within the Unity documentation, but the most important methods are the delimiter methods that activate and deactivate profiling at runtime: Profiler.BeginSample() and Profiler.EndSample().
Tip
Note that the delimiter methods, BeginSample() and EndSample(), are only compiled in development builds, and as such they cause no overhead in the final build. Therefore, it is safe to leave them in our codebase if we wish to use them for profiling tests at a later date.
The BeginSample() method has an overload that allows a custom name for the sample to appear in the CPU Usage Area's Hierarchy Mode view. For example, the following code will profile invocations of this method and make the data appear in the Breakdown View under a custom heading:
void DoSomethingCompletelyStupid() {
  Profiler.BeginSample("My Profiler Sample");

  List<int> listOfInts = new List<int>();
  for(int i = 0; i < 1000000; ++i) {
    listOfInts.Add(i);
  }

  Profiler.EndSample();
}
Tip
Downloading the example code
You can download the example code files from your account at http://www.packtpub.com for all the Packt Publishing books you have purchased. If you purchased this book elsewhere, you can visit http://www.packtpub.com/support and register to have the files e-mailed directly to you.
We should expect that invoking this poorly designed method (it generates a list containing a million integers, and then does absolutely nothing with it) will cause a huge spike in CPU usage, chew up several Megabytes of memory, and appear in the Profiler Breakdown View under the heading My Profiler Sample as the following screenshot shows:

Note that these custom sample names do not appear at the root of the hierarchy when we perform Deep Profiling. The following screenshot shows the Breakdown View for the same code under Deep Profiling:

Note how the custom name for the sample does not appear at the top of the sample, where we may expect it to. It's unclear what causes this phenomenon, but this can cause some confusion when examining the Deep Profiling data within Hierarchy Mode, so it is good to be aware of it.
The Profiler is just one tool at our disposal. Sometimes, we may want to perform customized profiling and logging of our code. Maybe we're not confident the Unity Profiler is giving us the right answer, maybe we consider its overhead cost too great, or maybe we just like having complete control of every single aspect of our application. Whatever our motivations, knowing some techniques to perform an independent analysis of our code is a useful skill to have. It's unlikely we'll only be working with Unity for the entirety of our game development careers, after all.
Profiling tools are very complex, so it's unlikely we would be able to generate a comparable solution on our own within a reasonable time frame. When it comes to testing CPU usage, all we need is an accurate timing system, a fast, low-cost way of logging that information, and some piece of code to test against. It just so happens that the .NET library (or, technically, the Mono framework) comes with a Stopwatch class under the System.Diagnostics namespace. We can stop and start a Stopwatch object at any time, and we can easily acquire a measure of how much time has passed since the Stopwatch was started.
Unfortunately, this class is not very accurate—it is accurate only to milliseconds, or tenths of a millisecond at best. Counting high-precision real time with a CPU clock can be a surprisingly difficult task when we start to get into it; so, in order to avoid a detailed discussion of the topic, we should try to find a way for the Stopwatch class to satisfy our needs.
Before we get obsessed with the topic of high precision, we should first ask ourselves if we even need it. Most games expect to run at 30 FPS (frames-per-second) or 60 FPS, which means they only have around 33 ms or 16 ms, respectively, to compute everything for the entire frame. So, hypothetically, if we only need to bring the performance of a particular code block under 10ms, then repeating the test thousands of times to get microsecond precision wouldn't really tell us anything useful.
However, if precision is important, then one effective way to increase it is by running the same test multiple times. Assuming that the test code block is both easily repeatable and not exceptionally long, then we should be able to run thousands, or even millions, of tests within a reasonable timeframe and then divide the total elapsed time by the number of tests we just performed to get a more accurate time for a single test.
The following is a class definition for a custom timer that uses a Stopwatch to count time for a given number of tests:
using UnityEngine;
using System;
using System.Diagnostics;
using System.Collections;

public class CustomTimer : IDisposable {
  private string m_timerName;
  private int m_numTests;
  private Stopwatch m_watch;

  // give the timer a name, and a count of the number of tests we're running
  public CustomTimer(string timerName, int numTests) {
    m_timerName = timerName;
    m_numTests = numTests;
    if (m_numTests <= 0)
      m_numTests = 1;
    m_watch = Stopwatch.StartNew();
  }

  // called when the 'using' block ends
  public void Dispose() {
    m_watch.Stop();
    float ms = m_watch.ElapsedMilliseconds;
    UnityEngine.Debug.Log(string.Format("{0} finished: {1:0.00}ms total, {2:0.000000}ms per test for {3} tests", m_timerName, ms, ms / m_numTests, m_numTests));
  }
}
The following is an example of the CustomTimer class usage:
int numTests = 1000;

using (new CustomTimer("My Test", numTests)) {
  for(int i = 0; i < numTests; ++i) {
    TestFunction();
  }
} // the timer's Dispose() method is automatically called here
There are three things to note when using this approach. Firstly, we are only making an average of multiple method invocations. If processing time varies enormously between invocations, then that will not be well-represented in the final average. Secondly, if memory access is common, then repeatedly requesting the same blocks of memory will result in an artificially higher cache hit rate, which will bring the average time down when compared to a typical invocation. Thirdly, the effects of JIT compilation will be effectively hidden for similarly artificial reasons as it only affects the first invocation of the method. JIT compilation is something that will be covered in more detail in Chapter 7, Masterful Memory Management.
The using block is typically used to safely ensure that unmanaged resources are properly destroyed when they go out of scope. When the using block ends, it will automatically invoke the object's Dispose() method to handle any cleanup operations. In order to achieve this, the object must implement the IDisposable interface, which forces it to define the Dispose() method.
However, the same language feature can be used to create a distinct code block, which creates a short-term object, which then automatically processes something useful when the code block ends.
Note
Note that the using block should not be confused with the using statement, which is used at the start of a script file to pull in additional namespaces. It's extremely ironic that the keyword for managing namespaces in C# has a naming conflict with another keyword.
As a result, the using block and the CustomTimer class give us a clean way of wrapping our target test code in a way which makes it obvious when and where it is being used.
Another concern to worry about is application warm up. Unity has a significant startup cost when a Scene begins, given the number of calls to various GameObjects' Awake() and Start() methods, as well as initialization of other components such as the Physics and Rendering systems. This early overhead might only last a second, but that can have a significant effect on the results of our testing. This makes it crucial that any runtime testing begins after the application has reached a steady state.
If possible, it would be wise to wrap the target code block in an Input.GetKeyDown() method check in order to have control over when it is invoked. For example, the following code will only execute our test method when the Space Bar is pressed:
if (Input.GetKeyDown(KeyCode.Space)) {
  int numTests = 1000;

  using (new CustomTimer("Controlled Test", numTests)) {
    for(int i = 0; i < numTests; ++i) {
      TestFunction();
    }
  }
}
There are three important design features of the CustomTimer class: it only prints a single log message for the entire test, only reads the value from the Stopwatch after it has been stopped, and uses string.Format() for generating a custom string.
As explained earlier, Unity's console logging mechanism is prohibitively expensive. As a result, we should never use these logging methods in the middle of a profiling test (or even gameplay, for that matter). If we find ourselves absolutely needing detailed profiling data that prints out lots of individual messages (such as performing a timing test on each iteration of a loop, to find which iteration is costing more time than the rest), then it would be wiser to cache the logging data and print it all at the end, as the CustomTimer class does. This will reduce runtime overhead, at the cost of some memory consumption. The alternative is that many milliseconds are lost to printing each Debug.Log() message in the middle of the test, which pollutes the results.
The second feature is that the Stopwatch is stopped before the value is read. This is fairly obvious; reading the value while it is still counting might give us a slightly different value than stopping it first. Unless we dive deep into the Mono project source code (and the specific version Unity uses), we might not know the exact implementation of how Stopwatch counts time, at what points CPU ticks are counted, and at what moments any application context switching is triggered by the OS. So, it is often better to err on the side of caution and prevent any more counting before we attempt to access the value.
Finally, there's the usage of string.Format(). This will be covered in more detail in Chapter 7, Masterful Memory Management, but the short explanation is that this method is used because generating custom strings using the +operator results in a surprisingly large amount of memory consumption, which attracts the attention of the garbage collector. This would conflict with our goal of achieving accurate timing and analysis.
The Unity Profiler currently has a few fairly significant pitfalls when it comes to saving and loading Profiler data:
Only 300 frames are visible in the Profiler window at once
There is no way to save Profiler data through the user interface
Profiler binary data can be saved into a file the Script code, but there is no built-in way to view this data
These issues make it very tricky to perform large-scale or long-term testing with the Unity Profiler. They have been raised in Unity's Issue Tracker tool for several years, and there doesn't appear to be any salvation in sight. So, we must rely on our own ingenuity to solve this problem.
Fortunately, the Profiler class exposes a few methods that we can use to control how the Profiler logs information:
The
Profiler.enabledmethod can be used to enable/disable the Profiler, which is the equivalent of clicking on the Record button in the Control View of the Profiler.The
Profiler.logFilemethod sets the current path of the log file that the Profiler prints data out to. Be aware that this file only contains a printout of the application's frame rate over time, and none of the useful data we normally find in the Profiler's Timeline View. To save that kind of data as a binary file, we must use the options that follow.The
Profiler.enableBinaryLogmethod will enable/disable logging of an additional file filled with binary data, which includes all of the important values we want to save from the Timeline and Breakdown Views. The file location and name will be the same as the value ofProfiler.logFile, but with.dataappended to the end.
With these methods, we can generate a simple data-saving tool that will generate large amounts of Profiler data separated into multiple files. With these files, we will be able to peruse them at a later date.
In order to create a tool that can save our Profiler data, we can make use of a
Coroutine. A typical method will be executed from beginning to end in one sitting. However, Coroutines are useful constructs that allow us write methods that can pause execution until a later time, or an event takes place. This is known as yielding, and is accomplished with the yield statement. The type of yield determines when execution will resume, which could be one of the following types (the object that must be passed into the yield statement is also given):
After a specific amount of time (
WaitForSeconds)After the next Update (
WaitForEndOfFrame)After the next Fixed Update (
WaitForFixedUpdate)Just prior to the next Late Update (
null)After a
WWWobject completes its current task, such as downloading a file (WWW)After another Coroutine has finished (a reference to another Coroutine)
The Unity Documentation on Coroutines and Execution Order provides more information on how these useful tools function within the Unity Engine:
Tip
Coroutines should not be confused with threads, which execute independently of the main Unity thread. Coroutines always run on the main thread with the rest of our code, and simply pause and resume at certain moments, depending on the object passed into the yield statement.
Getting back to the task at hand, the following is the class definition for our ProfilerDataSaverComponent, which makes use of a Coroutine to repeat an action every 300 frames:
using UnityEngine;
using System.Text;
using System.Collections;

public class ProfilerDataSaverComponent : MonoBehaviour {

  int _count = 0;

  void Start() {
    Profiler.logFile = "";
  }

  void Update () {
    if (Input.GetKey (KeyCode.LeftControl) && Input.GetKeyDown (KeyCode.H)) {
      StopAllCoroutines();
      _count = 0;
      StartCoroutine(SaveProfilerData());
    }
  }

  IEnumerator SaveProfilerData() {
    // keep calling this method until Play Mode stops
    while (true) {

      // generate the file path
      string filepath = Application.persistentDataPath + "/profilerLog" + _count;

      // set the log file and enable the profiler
      Profiler.logFile = filepath;
      Profiler.enableBinaryLog = true;
      Profiler.enabled = true;

      // count 300 frames
      for(int i = 0; i < 300; ++i) {

        yield return new WaitForEndOfFrame();

        // workaround to keep the Profiler working
        if (!Profiler.enabled)
          Profiler.enabled = true;
      }

      // start again using the next file name
      _count++;
    }
  }
}
Try attaching this Component to any GameObject in the Scene, and press Ctrl + H (OSX users will want to replace the KeyCode.LeftControl code with something such as KeyCode.LeftCommand). The Profiler will start gathering information (whether or not the Profiler Window is open!) and, using a simple Coroutine, will pump the data out into a series of files under wherever Application.persistantDataPath is pointing to.
Tip
Note that the location of Application.persistantDataPath varies depending on the Operating System. Check the Unity Documentation for more details at http://docs.unity3d.com/ScriptReference/Application-persistentDataPath.html.
It would be unwise to send the files to Application.dataPath, as it would put them within the Project Workspace. The Profiler does not release the most recent log file handle if we stop the Profiler or even when Play Mode is stopped. Consequently, as files are generated and placed into the Project workspace, there would be a conflict in file accessibility between the Unity Editor trying to read and generate complementary metadata files, and the Profiler keeping a file handle to the most recent log file. This would result in some nasty file access errors, which tend to crash the Unity Editor and lose any Scene changes we've made.
When this Component is recording data, there will be a small overhead in hard disk usage and the overhead cost of IEnumerator context switching every 300 frames, which will tend to appear at the start of every file and consume a few milliseconds of CPU (depending on hardware).
Each file pair should contain 300 frames worth of Profiler data, which skirts around the 300 frame limit in the Profiler window. All we need now is a way of presenting the data in the Profiler window.
Here is a screenshot of data files that have been generated by ProfilerDataSaverComponent:

The Profiler.AddFramesFromFile() method will load a given profiler log file pair (the text and binary files) and append it into the Profiler timeline, pushing existing data further back in time. Since each file will contain 300 frames, this is perfect for our needs, and we just need to create a simple EditorWindow class that can provide a list of buttons to load the files into the Profiler.
Tip
Note that AddFramesFromFile() only requires the name of the original log file. It will automatically find the complimentary binary .data file on its own.
The following is the class definition for our ProfilerDataLoaderWindow:
using UnityEngine;
using UnityEditor;
using System.IO;
using System.Collections;
using System.Collections.Generic;
using System.Text.RegularExpressions;

public class ProfilerDataLoaderWindow : EditorWindow {

  static List<string> s_cachedFilePaths;
  static int s_chosenIndex = -1;

  [MenuItem ("Window/ProfilerDataLoader")]
  static void Init() {
    ProfilerDataLoaderWindow window = (ProfilerDataLoaderWindow)EditorWindow.GetWindow (typeof(ProfilerDataLoaderWindow));
    window.Show ();

    ReadProfilerDataFiles ();
  }

  static void ReadProfilerDataFiles() {
    // make sure the profiler releases the file handle
    // to any of the files we're about to load in
    Profiler.logFile = "";

    string[] filePaths = Directory.GetFiles (Application.persistentDataPath, "profilerLog*");

    s_cachedFilePaths = new List<string> ();

    // we want to ignore all of the binary
    // files that end in .data. The Profiler
    // will figure that part out
    Regex test = new Regex (".data$");

    for (int i = 0; i < filePaths.Length; i++) {
      string thisPath = filePaths [i];

      Match match = test.Match (thisPath);

      if (!match.Success) {
        // not a binary file, add it to the list
        Debug.Log ("Found file: " + thisPath);
        s_cachedFilePaths.Add (thisPath);
      }
    }

    s_chosenIndex = -1;
  }

  void OnGUI () {
    if (GUILayout.Button ("Find Files")) {
      ReadProfilerDataFiles();
    }

    if (s_cachedFilePaths == null)
      return;

    EditorGUILayout.Space ();

    EditorGUILayout.LabelField ("Files");

    EditorGUILayout.BeginHorizontal ();

    // create some styles to organize the buttons, and show
    // the most recently-selected button with red text
    GUIStyle defaultStyle = new GUIStyle(GUI.skin.button);
    defaultStyle.fixedWidth = 40f;

    GUIStyle highlightedStyle = new GUIStyle (defaultStyle);
    highlightedStyle.normal.textColor = Color.red;

    for (int i = 0; i < s_cachedFilePaths.Count; ++i) {

      // list 5 items per row
      if (i % 5 == 0) {
        EditorGUILayout.EndHorizontal ();
        EditorGUILayout.BeginHorizontal ();
      }

      GUIStyle thisStyle = null;

      if (s_chosenIndex == i) {
        thisStyle = highlightedStyle;
      } else {
        thisStyle = defaultStyle;
      }

      if (GUILayout.Button("" + i, thisStyle)) {
        Profiler.AddFramesFromFile(s_cachedFilePaths[i]);

        s_chosenIndex = i;
      }
    }

    EditorGUILayout.EndHorizontal ();
  }
}
The first step in creating any custom EditorWindow is creating a menu entry point with a [MenuItem] attribute and then creating an instance of a Window object to control. Both of these occur within the Init() method.
We're also calling the ReadProfilerDataFiles() method during initialization. This method reads all files found within the Application.persistantDataPath folder (the same location our ProfilerDataSaverComponent saves data files to) and adds them to a cache of filenames to use later.
Finally, there is the OnGUI() method. This method does the bulk of the work. It provides a button to reload the files if needed, verifies that the cached filenames have been read, and provides a series of buttons to load each file into the Profiler. It also highlights the most recently clicked button with red text using a custom GUIStyle, making it easy to see which file's contents are visible in the Profiler at the current moment.
The ProfilerDataLoaderWindow can be accessed by navigating to Window | ProfilerDataLoader in the Editor interface, as show in the following screenshot:

Here is a screenshot of the display with multiple files available to be loaded. Clicking on any of the numbered buttons will push the Profiler data contents of that file into the Profiler.

The ProfilerDataSaverComponent and ProfilerDataLoaderWindow do not pretend to be exhaustive or feature-rich. They simply serve as a springboard to get us started if we wish to take the subject further. For most teams and projects, 300 frames worth of short-term data is enough for developers to acquire what they need to begin making code changes to fix the problem.
One way of describing performance optimization is "the act of stripping away unnecessary tasks that spend valuable resources". We can do the same and maximize our own productivity through minimizing wasted effort. Effective use of the tools we have at our disposal is of paramount importance. It would serve us well to optimize our own workflow by keeping aware of some best practices and techniques.
Most, if not all, advice for using any kind of data-gathering tool properly can be summarized into three different strategies:
Understanding the tool
Reducing noise
Focusing on the issue
The Profiler is an arguably well-designed and intuitive tool, so understanding the majority of its feature set can be gained by simply spending an hour or two exploring its options with a test project and reading its documentation. The more we know about our tool in terms of its benefits, pitfalls, features, and limitations, the more sense we can make of the information it is giving us, so it is worth spending the time to use it in a playground setting. We don't want to be two weeks away from release, with a hundred performance defects to fix, with no idea how to do performance analysis efficiently!
For example, always remain aware of the relative nature of the Timeline View's graphical display. Just because a spike or resting state in the Timeline seems large and threatening, does not necessarily mean there is a performance issue. Because the Timeline View does not provide values on its vertical axis, and automatically readjusts this axis based on the content of the last 300 frames, it can make small spikes appear to be a bigger problem than they really are. Several areas in the Timeline provide helpful benchmark bars, giving a glimpse of how the application was performing at that moment. These should be used to determine the magnitude of the problem. Don't let the Profiler trick us into thinking that big spikes are always bad. As always, it's only important if the user will notice it!
As an example, if a large CPU usage spike does not exceed the 60 FPS or 30 FPS benchmark bars (depending on the application's target frame rate), then it would be wise to ignore it and search elsewhere for CPU performance issues, as no matter how much we improve the offending piece of code it will probably never be noticed by the end user, and isn't a critical issue that affects product quality.
The classical definition of noise in computer science is meaningless data, and a batch of profiling data that was blindly captured with no specific target in mind is always full of data which won't interest us. More data takes more time to mentally process and filter, which can be very distracting. One of the best methods to avoid this it to simply reduce the amount of data we need to process, by stripping away any data deemed nonvital to the current situation.
Reducing clutter in the Profiler's graphical interface will make it easier to determine which component is causing a spike in resource usage. Remember to use the colored boxes in each Timeline area to narrow the search. However, these settings are autosaved in the Editor, so be sure to re-enable them for the next profiling session as this might cause us to miss something important next time!
Also, GameObjects can be deactivated to prevent them from generating profiling data, which will also help reduce clutter in our profiling data. This will naturally cause a slight performance boost for each object we deactivate. But, if we're gradually deactivating objects and performance suddenly becomes significantly more acceptable when a specific object is deactivated, then clearly that object is related to the root cause of the problem.
This category may seem redundant, given that we've already covered reducing noise. All we should have left is the issue at hand, right? Not exactly. Focus is the skill of not letting ourselves become distracted by inconsequential tasks and wild goose chases.
Recall that profiling with the Unity Profiler comes with a minor performance cost. This cost is even more severe when using the Deep Profiling option. We might even introduce more minor performance costs into our application with additional logging and so on. It's easy to forget when and where we introduced profiling code if the hunt continues for several hours.
We are effectively changing the result by measuring it. Any changes we implement during data sampling can sometimes lead us to chase after nonexistent bugs in the application, when we could have saved ourselves a lot of time by attempting to replicate the scenario under non-profiling conditions. If the bottleneck is reproducible and noticeable without profiling, then it's a candidate to begin an investigation. But if new bottlenecks keep appearing in the middle of an existing investigation, then keep in mind that they could simply be bottlenecks we recently introduced with test code, and not something that's been newly exposed.
Finally, when we have finished profiling, have completed our fixes, and are now ready to move on to the next investigation, we should make sure to profile the application one last time to verify that the changes have had the intended effect.
You learned a great deal throughout this chapter on how to detect performance issues within your application. You learned about many of the Profiler's features and secrets, you explored a variety of tactics to investigate performance issues with a more hands-on-approach, and you've been introduced to a variety of different tips and strategies to follow. You can use these to improve your productivity immensely, so long as you appreciate the wisdom behind them and remember to exploit them when the situation makes it possible.
This chapter has introduced us to the tips, tactics, and strategies we need find a performance problem that needs improvement. During the remaining chapters, we will explore methods on how to fix issues, and improve performance whenever possible. So, give yourself a pat on the back for getting through the boring part first, and let's move on to learning some strategies to improve our C# scripting practices.