Download code from GitHub
Welcome to the world of modern OpenGL. Open Graphics Library (OpenGL) is an API that provides developers with various sets of functions that enable them to manipulate graphics and images. It is the core framework of most games today, whether it's mobile games for iOS or Android, or for other platforms, such as desktops and consoles as well. OpenGL just speaks for itself. Take a look at any sort of game you can think of, and it is doable in OpenGL. It's not just restricted to 3D; you can create 2D games as well. The 2D and 3D game engines are created using OpenGL, so it is more than capable of anything that you can think of. In this book, we will learn all the concepts necessary for 3D game development.
In this chapter, we'll take a look at how to set up OpenGL on Windows and Mac, using various libraries, such as GLFW, GLEW, SDL, and SFML. Our main focus for this chapter will be to understand how to download the libraries and set up OpenGL using those. While we are learning about how to set up our projects, we will also take a look at how to link these libraries to our project using absolute and relative linking.
The following topics will be covered in this chapter:
- Downloading the essential libraries
- Setting up a project on different platforms to use the libraries
- Creating an OpenGL rendering window using the libraries
Note
You can refer to all the code files for this chapter in the Chapter01 folder on GitHub. The GitHub link can be found in the preface of the book.
In this section, we'll learn how to set up OpenGL using GLFW and GLEW on your Windows system, by using Visual Studio. But, first let's understand what GLFW and GLEW are. GLFW is an OpenGL framework. It's a very lightweight framework that allows us to detect events such as keyboard input, mouse input, and other sort of inputs, but more importantly, it allows you to create a render window in which you can render your code, as OpenGL doesn't have a way of creating a rendering window, and it needs something like GLFW to create it.
GLEW is the OpenGL Extension Wrangler, which basically allows you to use OpenGL functions that are new, or more precisely, non-core. It provides systematic mechanisms during runtime to determine which OpenGL extensions are supported on the target platform. For any new functions, you essentially require something like OpenGL Extension Wrangler to initialize extensions and to write portable applications.
Note
First things first: For this book, it's really important that you have a good foundation in C++, as, in this book, you will be using OpenGL with C++. It's not the easiest thing, OpenGL. If this is your first time coding or you haven't been coding for long, it is recommended you get a good grasp of C++ and then continue with the book.
Let's begin our setup process by downloading the GLFW and GLEW libraries.
Let's get started with the setup, by performing below mentioned steps:
- First of all, we will need Visual Studio. You might have already installed it. If you did, it's fantastic. If not, go to https://visualstudio.microsoft.com/, go to
Downloads, and then click to download theVisual Studio Community 2017 version. Then, follow the instructions and install Visual Studio onto your system. Once you've got that installed, you just want to make sure it's set up for the C++ environment.
Note
If you have the Pro version, that's fantastic, but the Community version will more than suffice.
- Next, we will download the OpenGL Extension Wrangler library. Visit http://glew.sourceforge.net/, and then click on the
Binariesoption to download the 32-bit or 64-bit version files, as per your system requirements:

Downloading binaries for GLEW
After downloading, just unzip the file and put it somewhere you find feasible to access, because for this project, and any other projects that you create, it will reference that directory. So, you don't want to be moving it around because then you will have to redo the settings for your project. For this project, it's recommended that you create a folder called OpenGL in your C: drive and place all the downloaded libraries in it. This will help you with easy access to the libraries while you are linking those to your project.
Note
When you extract the files, they won't be named nicely and you might find it confusing to view with all the version numbers and stuff. Therefore, to take off any versioning text, it's better that you rename the folders to something as simple as GLEW and GLFW. It's neat this way, you can easily know what you're doing, and it makes it a lot easier to see things.
- Once you have done that, we will move on to downloading OpenGL framework library files. Go to http://www.glfw.org/ and click on the
Downloadmenu. We will want to download the precompiled binaries for Windows. As seen in the following screenshot, select and click to download either the 32-bit or 64-bit version as per your system requirements:

Downloading binaries for GLFW
Note
Note: Even if you know you need to download the 64-bit version for developing on a 64-bit machine, try to stick with the 32-bit version, because unless you think your game or your application is going to be using more than 4 GB of memory, the 32- bit version will more than suffice and it will help you in maximizing compatibility.
Once you've downloaded the file, unzip it and, as mentioned before, place it in the GLFW folder inside the OpenGL folder.
After we have downloaded all the necessary files, we will set up the environment in Visual Studio for OpenGL using the GLFW and GLEW libraries. Follow these steps:
- Open Visual Studio, and then click on
Create new Project...:

Visual Studio start page
- Then, go to
Visual C++ | Windows Desktop | Windows Console Applicationand name your projectGLFWOpenGL, as seen in the following screenshot, and then clickOK:

Creating a new project
Note
If you don't see the Visual C++ option in the New Project window, you might need to download Visual C++. For more information, you can visit the following link:https://docs.microsoft.com/en-us/cpp/build/vscpp-step-0-installation
- Now, right-click on the project in the
Solution Explorerwindow. Go toAdd | New Item, and you will get anAdd New Itemwindow. SelectC++ File, as this will be our main file, and let's name itmain.cppand then click on theAddbutton.
- Next, right-click on the project in the
Solution Explorerwindow. Click onProperties. - A
Property Pageswindow will pop up; click onC/C++|Generaland then go toAdditional Include Directories. Click on the dropdown, then click on<Edit>, and you will get a pop up window as follows:

Adding include directories
- As highlighted in the preceding screenshot, click on the new button and then click on the three dots. And now, browse to the
GLEWfolder inside theOpenGLfolder. Select theincludefolder and then click on theSelect Folderbutton. Next, we repeat the same process to add the GLFW library to our project. Once we have included both the libraries, click on theOKbutton.
- Now, again in the
Property Pageswindow, we'll go toLinker | General, and then go toAdditional Library Directories. Click on the dropdown, then click on<Edit>, and you will get a pop-up window, as follows:

Adding libraries
- As highlighted in the preceding screenshot, click on the new button and then click on the three dots. Now, browse to the
OpenGLfolder where you have downloaded the GLEW files. Open thelibfolder inside theGLEWfolder, then double-click on theReleasefolder, selectWin32, and then click on theSelect Folderbutton. - Repeat the same process to include GLFW libraries. But for GLFW, you've got a bunch of different libraries that you could choose from. For our project, it's best that we select the
lib-vc2015folder. Once you have added both the libraries, click on theOKbutton.
Note
There are a bunch of other versions of libraries that you can choose for GLFW. So, if you have an older version of Visual Studio, you can select the library for that particular version.
- Next, we'll go to
Linker|Input, and then go toAdditional Dependencies. Click on the dropdown, and then click onEdit.What we'll do here is typeopengl32.libin the textbox, as seen highlighted in the following screenshot.opengl32.libis the library built into the operating system. Next, we'll typeglew32s.lib. This is the static library and it will be statically linked to your project. If you don't want to statically link it, you can just remove thesfrom the suffix; it is up to you. Next, we'll typeglfw3.lib, and then click on theOKbutton:

Adding additional dependencies
- Then, click on the
Applybutton.
In the preceding section, we discussed how to download the essential libraries and how to link them up to our project with absolute linking.
In the following section, we'll study how to link these libraries to our project with relative linking, and we'll also learn about how relative linking is beneficial for us. You can use either one of them to link the libraries to your project; it's your choice.
In this section, we'll take a look at how to set up OpenGL using GLFW as the provider to create a render window with relative linking. In the previous section, we discussed absolute linking, So, let's just have a quick overview of what absolute and relative linking actually are.
Absolute linking is a process where you specifically link your libraries to the project. For example, if you create a project and you are linking up libraries like GLFW and GLEW, while linking them up, you specifically put in the paths of the directory they are in. If they're in the C: drive, you would actually put the explicit directory. But, if you move the library files to any other location, then you would have to update your Visual Studio project with the changed path.
With relative linking, the libraries are actually linked, but relative to the project. So, you don't say libraries are in the C: drive; rather, you say those relatively link to your project from a particular folder. So even if you move your libraries, it won't affect your project. It is a great method for transporting the project from one machine to an other. This method of development is preferable when you're working on a platform that doesn't really have a good visual editor; for example, platforms, such as Unity or Unreal.
So, let's get started with relatively linking our libraries and creating an OpenGL render window. Let's open up Visual Studio and follow these steps:
- Click on
Create new project...and go toVisual C++|Windows Desktop|Windows Console Application. Name the projectGLApp(since we are learning how to relatively link the libraries, we've created a different project). - Then, in the
New Projectwindow, click on theBrowse...button. Go to theOpenGLfolder that we've created on the desktop (we are using this folder structure format to understand relative linking). Just select the folder and then clickOK.
- One more thing you need to do before starting the project is to create a folder called
External Librarieswithin theOpenGLfolder on desktop where you have saved your project. Extract the library files for GLEW and GLFW in theExternal Librariesfolder.
- Now, we'll right-click on the project in the
Solution Explorerwindow. Go toAdd | New Item. SelectC++ Fileand name itmain.cpp, and then click on theAddbutton. - Next, right-click on the project in the
Solution Explorerwindow and go toProperties. - A
Property Pageswindow will pop up; click onC/C++|Generaland then go toAdditional Include Directories. In it, click on the dropdown and then click on<Edit>:

Adding include directories
- Then, click on the new button. As we are doing relative linking in this section, we won't click on the three dots. Clicking on them is for absolute linking only, as we have to browse to the directory where we have stored the libraries.
- In the textbox highlighted in the preceding screenshot, type
$(SolutionDir); this command refers to the folder that contains our.slnfile. So if we were to specify a folder in the path, whenever we do something new in the project it'd be relatively linked to wherever that file is located. - To include the files in our project, add the paths as shown in the following screenshot and then click on the
OKbutton:

- Next, we'll link up the libraries. So, in the
Property Pageswindow, we'll go toLinker | General, and then go toAdditional Library Directories. Click on the dropdown, click onEdit, and then click onNew. Add the paths as shown in the following screenshot, and then clickOKand thenApply:

- Now, we've got one more thing to do, and that is to link up the
.libfiles. So, go toLinker|Input, and then go toAdditional Dependencies. Click on the dropdown and then click on<Edit>. Now, in the textbox, just typeopengl32.lib. This library file isn't downloaded withGLFWorGLEW; it's built into Windows. Next, on a new line, just typeglew32s.liband now forGLFW lib-vc2015, typeglfw3.lib. Then, clickOKand click on theApplybutton.
Whichever linking process you are comfortable with, you can follow that. With either of the methods that you use to link the libraries, there's one last step that we need complete before we can begin with coding, and that is to copy and paste the dynamic link library into our project.
Let's take a look at these steps and understand how to add a dynamic link library (dll) to our project:
- Go to the
OpenGLfolder on theC:drive; in it, go to theGLEWfolder, open it and go tobin, double-click on it, and then go toWin32and open it. Then, copy theglew32.dlldynamic link library, as highlighted in the following screenshot:

glew32.dll dynamic link library
- Do as mentioned in the previous step to add the GLFW
.dllfiles to your project - Now, go to the location in your system where the
main.cppfile of your project is, and paste the copied dynamic link library file there.
With this last step, we have completed the setup for OpenGL and have also absolutely or relatively linked the libraries to our project. We are now ready to write code for the OpenGL rendering window.
In the preceding section, we discussed how to set up OpenGL on a Windows platform. But, what if any of you are working on a Mac system? Therefore, let's check out how we can download the libraries and set up OpenGL on the Mac platform.
Here's what we've discussed so far, we discussed about how to set up our project to use GLFW library on Windows. In this section, we'll discuss how to set up OpenGL on a Mac system. So, let's get started.
To download and install the essential libraries onto your Mac system, we'll have to install a package manager for Mac known as Homebrew. Homebrew will help us in installing all the necessary packages and libraries to run our OpenGL code.
To install Homebrew, go to https://brew.sh/, copy the path highlighted in the following screenshot, paste it into your Terminal, and then hit Enter. The prompt will download and install Homebrew on your system:
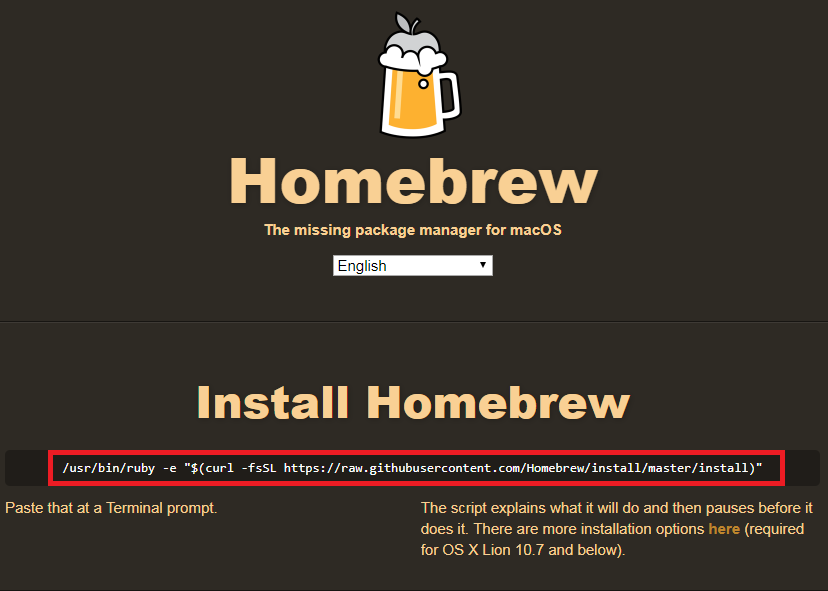
Path on Homebrew homepage
Once we've installed Homebrew, we'll download the GLFW and GLEW libraries onto our system. Let's install GLFW first. To do that, we need to type the following command in the Terminal window:
brew install glfw3In the preceding command, you must have observed we've included the number 3; the reason for that is that if you just type glfw, it installs an older version, which we don't want, so inserting glfw3 will install the latest version. Hit Enter and the libraries will be downloaded onto your system.
Now, we're going to do the same process for GLEW; type the following command in the Terminal:
brew install glew We don't need to put any version for this; just press Enter and the necessary files will be downloaded. That's it for the libraries to download onto our system.
Note
Make a note that, since we're installing the libraries on the system itself and not in our project, whenever you move your project to a different system, you will have to install these libraries onto that particular system.
Once we've downloaded and installed all the essential libraries with the help of Homebrew, we'll now move on to setting up Xcode for OpenGL.
In this section, we'll discuss how to set up Xcode to run our OpenGL code. Follow these steps and carry out the setup process:
- Open up Xcode and click on the
Create a new Xcode projectoption. - Go to
OS X|Application, selectCommand Line Tool, and then clickNext. - You will get the following window; fill in the necessary details, as highlighted in the following screenshot:
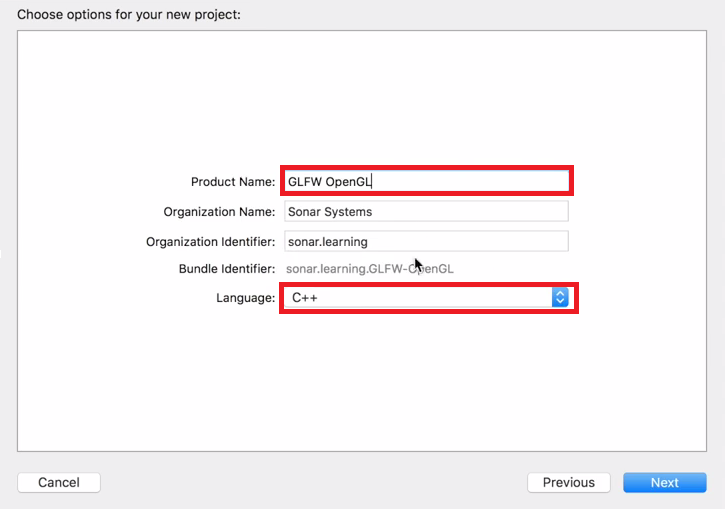
Basic details for a project
- In the preceding screenshot, make sure that the
Languageoption is always set to C++, and then clickNext. TheOrganization NameandOrganization identifierproperties, you can set to whatever you want. - Next, set the location you would like to store and save the project to. Then, click on the
Createbutton. Next, we have just a plain C++ project ready. Before we begin with our code, we need to follow a few more steps necessary to set up our project. - First of all, in Xcode, click on your project and go to
Build Settings. InBuild Settings, go to theSearch Pathssection and click onHeader Search Paths.Then, click on+and type/usr/local/include. This will allow us to#includeGLEW and GLFW in ourmain.cppfile. - Now go to
Build Phases, then click onLink Binary With Libraries, and click the+button. Typeopenglin the search bar, selectOpenGL.framework, and then click on theAddbutton.
- Again click on the
+button, then click onAdd Other.... Now, press Cmd + Shift + G, and it will open up ago-tofolder search bar. In it, type/usr/local. Then click onCellar, go to theglew|libfolder, selectlibGLEW.1.12.0.dylibwithout the little arrow, and then clickOpen.
Note
The arrow is just a shortcut, an alias, and we don't want that. We also don't want the MX version, just the regular .dy non-alias lib.
- Click
+again, then clickAdd Other..., press Cmd + Shift + G, and type/usr/local. Now go toCellar, and go toglfw|lib. Select the non-aliaslibglfw3.3.1.dyliband clickOpen.
With all the steps executed, our project is now set up to use GLEW and GLFW with OpenGL on Mac. We can now go to the main.cpp file on Xcode and start writing our code for creating the OpenGL rendering window.
Let's go to our main.cpp file in Visual Studio or Xcode, and let's get started. Start typing the following code in your editor:
- Begin by adding some header files to our code:
#include <iostream>

// GLEW
#define GLEW_STATIC
#include <GL/glew.h>

// GLFW
#include <GLFW/glfw3.h>
iostream is just the input/output stream built into C++. Then, with GLEW_STATIC, we statically linked GLEW. If you don't want to statically link it, just omit the #define line.
// Window dimensions
const GLint WIDTH = 800, HEIGHT = 600;
You might be thinking, why are we using GLint instead of a regular int? The reason for that is the issues with a regular int on different operating systems; for example, in a different compiler, it might have a different length. With GLint, it is consistent on any compiler, so this is a great way of ensuring maximum compatibility.
- Now, we'll set up our main entry point with
int mainand then we'll initialize GLFW:
// The MAIN function, from here we start the application and run the game loop
int main()
{
   // Init GLFW
glfwInit(); - Next, we'll set up some window hints, which are essentially some properties that we'll set for our window:
// Set all the required options for GLFW
glfwWindowHint(GLFW_CONTEXT_VERSION_MAJOR, 3);
glfwWindowHint(GLFW_CONTEXT_VERSION_MINOR, 3);
The reason we choose 3.3 is because after version 3.1, the code was deprecated in the old version of OpenGL. This was done to prohibit developers from using the older version of OpenGL. Since 3.3, the OpenGL version matches the shader version. So for 3.3, the OpenGL shader language version is also 3.3; it helps in keeping things consistent, neat, and tidy. But if you need a new feature, feel free to use something like 4.3.
- Next, we'll type in some more window hints:
glfwWindowHint(GLFW_OPENGL_PROFILE, GLFW_OPENGL_CORE_PROFILE);
In this project, we'll be using CORE_PROFILE. Actually, there are two main profiles that are available: the core profile and the compatibility profile, COMPAT_PROFILE. The reason we are using CORE_PROFILE in our project is that CORE_PROFILE uses the new OpenGL stuff, whereas the compatibility profile uses the old way of doing things, thus ensuring maximum compatibility. You probably might be thinking even if it ensures maximum compatibility, why is it recommended not to use COMPAT_PROFILE? The reason for that is in this book you're learning OpenGL in general, so we don't want to learn the old, outdated way of doing things. Rather, we want to learn the new, modern OpenGL using vertex objects and vertex arrays to actually store stuff on a graphics card. So if you use the compatibility mode, you're just getting into bad practices when using stuff like glBegin. So, that is the reason why we are setting it to the core profile.
- Once we've set the profile, we set the window hint to get forward compatibility:
glfwWindowHint(GLFW_OPENGL_FORWARD_COMPAT, GL_TRUE);
This window hint is actually required in macOS because otherwise it will crash, but there's no harm in having it on Windows as well.
- In
WindowHint, we'll setGLFW_RESIZABLE, and we'll set this toFALSEso that it prevents the window from being resized. If you want it to be resized, just set it asTRUE:
glfwWindowHint(GLFW_RESIZABLE, GL_FALSE);
- Next, we're going to create our window. For that, we'll add the following code:
// Create a GLFWwindow object that we can use for GLFW's functions
GLFWwindow *window = glfwCreateWindow(WIDTH, HEIGHT, "LearnOpenGL", nullptr, nullptr);
In the preceding code, we call the values of the variables WIDTH and HEIGHT. These terms define the window's size and "LearnOpenGL" sets the title of our window. The window and the monitor variables are defined as null pointers and we'll deal with those in later chapters.
- Next, we'll define variables for our screen's width and height because this will be the actual resolution that we want the window set to:
int screenWidth, screenHeight;
Then, in the following line of code with glfwGetFramebufferSize, we pass the references to the screen width and the screen height:
glfwGetFramebufferSize( window, &screenWidth, &screenHeight );
What this line of code actually does is it gets the actual width of the screen window itself, relative to the density of the screen. You could effectively omit these lines when you create an OpenGL viewport and just use screenWidth and screenHeight values only. But if you have something like a Mac or a Retina Mac, which is not natively 1920 x 1080, or, for example, a higher-density screen with a resolution like 3840 x 2160, the window would just get messed up. The content would be displayed in either the bottom-left of the screen or in the top-left. The previous line of code helps us in getting the actual width and height of our window, relative to any pixel density changes. So it's recommended to have it, as it will ensure maximum compatibility in the future, as more and more high resolution screens are coming out.
if (nullptr == window)
{
       std::cout << "Failed to create GLFW window" << std::endl;
       glfwTerminate();

       return EXIT_FAILURE;
}
In the preceding code, we check the nullptr == window condition and we let the user know that something has gone wrong. Then, we just terminate anything that has been initialized withglfwTerminate();, and finally exit:
glfwMakeContextCurrent(window);
- Next, we need to enable GLEW and we'll do that as follows:
// Set this to true so GLEW knows to use a modern approach to retrieving function pointers and extensions
   glewExperimental = GL_TRUE;
Looking at glewExperimental in the code, you might wonder are we using experimental features? And, why have we to set it to TRUE? The reason for that is GLEW knows to use a modern approach to retrieve functions, pointers, and extensions. Basically, it's just a way of saying we're using GLEW the new and the modern way, but it's not necessarily an experimental function.
- Then, we're going to initialize GLEW and make sure it's successfully initialized in one go:
// Initialize GLEW to setup the OpenGL Function pointers
if (GLEW_OK != glewInit())
{
      std::cout << "Failed to initialize GLEW" << std::endl;
      return EXIT_FAILURE;
} - Next, we'll set up the OpenGL viewport:
   // Define the viewport dimensions
   glViewport(0, 0, screenWidth, screenHeight);
What we did in the preceding line of code is that we set the initial coordinates from 0, 0 to screenWidth and screenHeight. The values that you'll retrieve here will be an accurate representation of what our window is relative to the screen, as you might have a higher or a lower pixel density screen.
- So now that we have set up the view port, we'll create our game loop:
// Game loop
while (!glfwWindowShouldClose(window))
{
       // Check if any events have been activiated (key pressed,
       //mouse moved etc.) and call corresponding response functions
       glfwPollEvents();

       // Render
       // Clear the colorbuffer
       glClearColor(0.2f, 0.3f, 0.3f, 1.0f);
       glClear(GL_COLOR_BUFFER_BIT);

      // Draw OpenGL


      glfwSwapBuffers(window);
}
In the preceding code, we created a While loop and initialized it to check whether the window is open; if it is, then run the loop. In the loop, we are clearing colorbuffer with the help of the glClearColor function.ClearColoris actually an optional line of code, but the reason we are adding it is if we don't add this, we might just get a blank, black background because we haven't drawn anything yet. So instead of a black background, we tried to spruce it up with some color. We defined colors in a range between 0 and 1, which is quite similar to a range between 0 and 255, where 0 is of no value and 1 is the full intensity of red, green, blue, and alpha.
- Then, we added
glClearto clear our window so that we're ready to draw the next frame and put inGL_COLOR_BUFFER_BIT;. Here is where you would draw your OpenGL stuff. As we are not going to draw anything in this chapter, we'll addglfwSwapBuffersand provide it to the window. Then, we'll addglfwTerminateto close the window after thewhileloop is executed:
// Terminate GLFW, clearing any resources allocated by GLFW.
glfwTerminate();

return EXIT_SUCCESS;
}
Now, let's run this code and check the output. You will get a similar OpenGL window on your screen:

OpenGL rendering window for Windows
In this section, we'll discuss how to set up OpenGL on a Windows machine using SDL and GLEW. SDL stands for Simple DirectMedia Layer, and it allows us to create a render window and provides access to input devices through OpenGL. SDL is prominently used to code games and other media applications that run on various operating systems. It's a cross-platform multimedia library written in the C language. GLEW (OpenGL Extension Wrangler), as seen in the previous sections, allows us to easily use extensions and non-core OpenGL functionality.
We'll begin the setup by downloading the essential libraries. Let's first download the SDL library by following these steps:
- Visit http://libsdl.org/index.php, go to
Download, and click on the latest version; at the time of writing this book, SDL 2.0 was the latest version. - Once you have clicked on the latest version, you may either want to download the development libraries or the runtime libraries. For this project, it is recommended that you download
Development Libraries. - We'll go for the Visual C++ one, which is
SDL2-devel-2.0.8-VC.zip. Click on the filename and download it. - Once you've downloaded the file, unzip it and put it in the
SDLfolder inside theOpenGLfolder that we created in previous sections. - After downloading the SDL library, we move on to downloading the GLEW libraries, but as we've already downloaded them in the previous sections, you can just refer to that.
Follow these steps to set up the environment in Visual Studio for OpenGL using SDL and GLEW with absolute linking:
- Open up Visual Studio and click on
Create new Project...in the home page window. - Go to
Visual C++|Windows Desktop|Windows Console Application, name your projectSDLOpenGL, and then clickOK. - Next, right-click on the project in the
Solution Explorerwindow. Click onProperties. - A
Property Pageswindow will pop up, click onC/C++|General, and then go toAdditional Include Directories. Click on the dropdown, then click onEdit, and you will get a pop up window. - Click on the
Newbutton, and then click on the three dots. And now, you want to go to SDL in theOpenGLfolder. Selectincludeand then click on theSelect Folderbutton. Repeat the same process for including GLEW files. Once both the files have been included, click on theOKbutton. - Now, again in the
Property Pageswindow, we'll go toLinker | General, and then go toAdditional Library Directories. Click on the dropdown, then click onEdit, and you will get a pop-up window. - In the window, click on the
Newbutton, then click on the three dots, and go to the SDL folder. Open thelibfolder, go tox86(which is a 32-bit file, actually), and then click on theSelect Folderbutton. - Repeat the same process for including GLEW libraries. Open the
libfolder, then double-click on theReleasefolder, selectWin32, and then click on theSelect Folderbutton. Once you have added both the libraries, click on theOKbutton. - Next, we'll go to
Linker|Input,and then go toAdditional Dependencies. Click on the dropdown, then click onEdit,opengl32.lib. Then, we'll typeglew32s.lib. If you don't want to statically link the library, you can just remove thes. Next, we'll typeSDL2.libandSDL2main.lib, and then click onOK. - Then, click on the
Applybutton.
In this section, we'll take a look at how to set up OpenGL using SDL and GLEW as the provider for creating a render window with relative linking. Follow these steps:
- Click on
Create new project...and go toVisual C++.SelectWindows Console Applicationand name it something likeSDLApp. - Then, in the
New Projectwindow, click on theBrowse...button. Go to theOpenGLfolder that you created on the desktop and placed the downloaded libraries intoExternal Libraries. Just select the folder and then clickOK. - Now, we'll right-click on the project in the
Solution Explorerwindow. Go toAdd | New Item, and you will get anAdd New Itemwindow. SelectC++ File, as this will be our main entry point; let's name itmain.cppand then click on theAddbutton. - Next, again right-click on the project in the
Solution Explorerwindow. Click onProperties. - A
Property Pageswindow will pop up. Click onC/C++|Generaland then go toAdditional Include Directories. Click on the dropdown, and then click onEdit. - Then, click on the
Newbutton and type$(SolutionDir)in the textbox. This command refers to the folder that contains our.slnfile. So if we were to specify a folder in the path, and whenever we do something new in the project, it'd be relatively linked to wherever that file is located.
- To link up the include files, add the paths, as shown in the following screenshot:

- Next, we'll link up the libraries. So, go to
Linker | General, and then go toAdditional Library Directories. Click on the dropdown and then click onEdit. Click onNewand add the paths, as shown in the following screenshot, then clickOK, and clickApply:

- Next, we'll link up the
.libfiles. So, go to the dropdown and clickEdit. Now, just type inopengl32.lib. Then, we'll typeglew32s.lib. Next, we'll typeSDL2.libandSDL2main.lib, and then click onOK. - Then, click on the
Applybutton.
As we saw in the previous sections, before completing the setup, we'll have to copy the dynamic link library into our project. Follow these steps to do that:
- Go to
C:\OpenGL\SDL\lib\x86and copy theSDL2.dlldynamic link library, as seen in the following screenshot:

SDL2.dll dynamic link library
- Now, go to the location in your system where the
main.cppfile of your project is located and paste the dynamic link library there. We'll also have to copy and paste theglew32.dllfile here from thebinfolder of theGLEWfolder.
Here, we'll take a look at how to set up OpenGL using SDL on a Mac system. We'll begin by downloading the essential libraries on your system. As seen in the previous sections, we'll be using Homebrew to download the packages and libraries.
In the Terminal, type the following command to download and install the SDL libraries:
brew install sdl2Now, just press Enter and the SDL library will be downloaded onto your system. Next, we'll download the GLEW library, but since we've already downloaded it in the previous section, you can refer to that. If you want a quick review on downloading GLEW, you can refer to the Downloading the GLFW and GLEW libraries for a Mac section.
Follow these steps:

Details of the project
- Then, set the location where you would like to store and save the project, and then click on the
Createbutton.
- Next, click on your project and go to
Build Settings. InBuild Settings, go to theSearch Pathssection and click onHeader Search Paths. Then, click on+and type/usr/local/include. This will allow us to #include GLEW and SDL header files in ourmain.cpp. - Now go to
Build Phases, then click onLink Binary With Libraries, and click the+button. Typeopenglin the search bar, selectOpenGL.framework, and then click on theAddbutton. - Again click on the
+button, and then click onAdd Other.... Now, press Cmd + Shift + G, and it will open up ago-tofolder search bar. In it, type/usr/local. Then click onCellar, go to theglew|libfolder, selectlibGLEW.1.12.0.dylibwithout the little arrow, and click onOpen. - Click
+again, then clickAdd Other....Press Cmd + Shift + G and type/usr/local. Now go toCellar, and go tosdl | lib. Select the non-aliaslibSDL2-2.0.0.dyliband click on theOpenbutton.
With all the steps executed, our project is now set up to use SDL and GLEW with OpenGL on a Mac. We can now go to the main.cpp file and start writing our code for creating the OpenGL rendering window.
Perform the following steps to understand how to create a rendering window using SDL:
- Let's go to our
main.cppfile in Visual Studio or Xcode and let's get started. The first thing to do is includeiostream; this'll be used to log out any errors that we have:
#include <iostream>
- Then, we'll include other necessary header files, such as the following:
#include <SDL.h>

#include <GL/glew.h>

#include <SDL_opengl.h>
- Next, we'll create a constant variable using
GLint:
const GLint WIDTH = 800, HEIGHT = 600;
The reason for using Glint is quite simple: a regular int on different compilers might have different sizes, whereas GLint is always consistent. The WIDTH and the HEIGHT variables will store the size of our window.
- Then, we'll set up our main entry point:
int main(int argc, char *argv[])
{
You might have noticed we have passed the argc integer and the *argv []aschar. These are the argument count and the argument value and SDL requires them to run the code, or else you will get errors while running it.
- Next, we'll initialize SDL with the help of
SDL_Init()and to it we'll passSDL_INIT_EVERYTHINGto make sure we are initializing every part of the SDL library:
SDL_Init(SDL_INIT_EVERYTHING);
- Then, we'll set up some attributes, which are essentially properties that we'll set for our window:
SDL_GL_SetAttribute(SDL_GL_CONTEXT_PROFILE_MASK, SDL_GL_CONTEXT_PROFILE_CORE);
So, there are three main profiles that we can use for OpenGL with SDL:
- ES, which is embedded systems, for stuff like mobile devices
- There's the core profile, which is for modern OpenGL
- Then there's the compatibility profile, which allows you to use an older version of OpenGL and ensures maximum compatibility.
For our project, we'll use the core profile.
- Next, we'll set up some more attributes, as follows:
SDL_GL_SetAttribute(SDL_GL_CONTEXT_MAJOR_VERSION, 3); SDL_GL_SetAttribute(SDL_GL_CONTEXT_MINOR_VERSION, 3); SDL_GL_SetAttribute(SDL_GL_STENCIL_SIZE, 8);
- Once all the attributes have been declared, we'll declare the SDL window, as follows:
SDL_Window *window = SDL_CreateWindow("OpenGL", 0, 0, WIDTH, HEIGHT, SDL_WINDOW_OPENGL); The preceding code contains the name of our window, OpenGL. Then, we set the position of our window to (0, 0). To set the width and the height of our window, we'll use the WIDTH and HEIGHT values that we declared earlier. The beauty of using these values is if we refer to these anywhere, they'll get updated if we were to change them later.
- Next, for the context, we just need to provide the window variable that we created before:
SDL_GLContext context = SDL_GL_CreateContext(window);

// Set this to true so GLEW knows to use a modern approach to
retrieving function pointers and extensions
glewExperimental = GL_TRUE;
// Initialize GLEW to setup the OpenGL Function pointers
if (GLEW_OK != glewInit())
{
      std::cout << "Failed to initialize GLEW" << std::endl;
      return EXIT_FAILURE;
} - Now, we'll set up the OpenGL viewport, as follows:
// Define the viewport dimensions
glViewport(0, 0, WIDTH, HEIGHT);
What we did in the preceding line of code is that we set the initial coordinates from 0, 0 to Width and Height. The values that you'll retrieve here will be the accurate representation of what our window is relative to the screen, as you might have a higher or a lower pixel density screen. Next, we're going to create a window event, as follows:
SDL_Event windowEvent;
- Now, we'll create our game loop:
while (true)
{
      if (SDL_PollEvent(&windowEvent))
      {
             if (windowEvent.type == SDL_QUIT) break;
      }

      // Clear the colorbuffer
      glClearColor(0.2f, 0.3f, 0.3f, 1.0f);
      glClear(GL_COLOR_BUFFER_BIT);

      // draw OpenGL

      SDL_GL_SwapWindow(window);
}

   SDL_GL_DeleteContext(context);
   SDL_DestroyWindow(window);
   SDL_Quit();

   return EXIT_SUCCESS;
}
In the preceding code, we set while to true to keep the loop constantly running while our application is open. If something happens, like the user closes the application, we'll exit the while loop and do some cleanup. While the loop is running, we'll check for a window event and pass a reference to the window. We'll also check if the window is getting shut down and if it is, then we'll break out of the loop. Now, outside of both the if statements, we'll try to clear the screen with the help of the glClearColor statement. A ClearColor statement isn't necessary. We're adding it because we might just end up getting a black background, as we're not drawing any shapes or any textures at the moment. We'll add color to the window with the help of the following parameters: 0.2f, 0.3f, 0.3f, and 1.0f. These values range between 0 and 1; these are very similar to 0 to 255. And these are red, green, blue, and alpha values. Next, we'll clear the screen with the help of glClear. And, the last thing we're going to do is SDL_GL_SwapWindow. It swaps the window if double buffering is present; if not, then it won't. Then, we'll do some cleanup and exit out of the code with EXIT_SUCCESS.
Now, let's run this code and check the output. You will get the same OpenGL window as we got in the preceding sections.
In this section, we'll study how to set up OpenGL using SFML and GLEW on a Windows machine. But, first, let's understand what SFML is. SFML is a simple and fast multimedia library. It's a software development library designed for cross-platform use to provide a programming interface for various multimedia components on the system. It allows you to do stuff like handle or render windows, so we can draw our OpenGL and handle events, such as various inputs, and it also allows us to handle textures.
Let's download the SFML library onto your system by visiting https://www.sfml-dev.org/index.php. Then, go to Download, click on SFML 2.5.0, and then select whichever Visual C++ version matches your Visual Studio version and system compatibility, and accordingly click on the link. The file will be downloaded as a ZIP file onto your system. Next, go to the OpenGL folder (which we created in the previous sections) and inside it, create a folder called SFML to extract and place our SFML files.
The steps to link the SFML and GLEW libraries to our project with absolute or relative linking are similar to what we discussed in the previous sections. The only difference will be in the step where we link up the .lib files. For that, go to Additional Dependenciesand in the textbox, just type in opengl32.lib. Then, we'll type glew32s.lib. And to link SFML libraries, we'll type sfml-graphics.lib, sfml-system.lib, and sfml-window.lib, and then click on OK.
As seen in the previous sections, before we begin with coding, we need to place the dynamic link library into our project. To do that, go to C:\OpenGL\SFML\bin\ and copy sfml-graphics-2.dll, sfml-system-2.dll, and sfml-window-2.dll, and paste them into the location in your system where the main.cpp file of your project is located. We'll also have to copy and paste the glew32.dll file here from the bin folder of the GLEW folder.
With this, we are all set to code our OpenGL rendering window using SFML.
Check out the below mentioned steps:
#include <iostream>
- Here, we'll include the GLEW and SFML libraries in our project:
#include <GL/glew.h>

#include <SFML/Window.hpp>

const GLint WIDTH = 800, HEIGHT = 600;
In the preceding lines of code, we've defined the GLint constant. The reason we're creating constant global variables is so that we can easily use these wherever we need them in the code, whether that's for initially creating the window or for manipulating some sort of shape.
- Next, let's define our entry point:
int main( )
{
   sf::ContextSettings settings;
   settings.depthBits = 24; settings.stencilBits = 8;
In the preceding lines of code, we've defined some settings for our application and rendering window:
settings.majorVersion = 3;
settings.minorVersion = 3;
settings.attributeFlags = sf::ContextSettings::Core;
Here, the majorVersion and minorVersion that we defined in the preceding lines of code are for setting the version of OpenGL. Here, we set the version as 3.3 by setting the minorVersion and the majorVersion to 3. If you wish to set up for any other version, you'll have to make changes accordingly. ThemajorVersionis to the left of the decimal point and theminorVersionis to the right of the decimal point. Then, we defined that we're using core modern OpenGL by settingContextSettingstoCore.
- Next, you want to define
sf::Window. Here, we're going to putsf::VideoMode, and we're going to putWIDTH,HEIGHT, and32for the pixel depth. Then, we'll addOpenGL SFMLas the title of our window. And then, we addsf::Style::Titlebarandsf::Style::Closeto have a title bar and a close button for our window:
sf::Window window( sf::VideoMode( WIDTH, HEIGHT, 32 ), "OpenGL SFML", sf::Style::Titlebar | sf::Style::Close, settings );
- Now, we'll try to initialize GLEW by setting it to
TRUEand if it's unsuccessful, then we'll display aFailed to initialize GLEWmessage to the developer. And then, we're going to doreturn EXIT_FAILUREbecause it has failed:
   glewExperimental = GL_TRUE;

   if ( GLEW_OK != glewInit( ) )
   {
      std::cout << "Failed to initialize GLEW" << std::endl;

      return EXIT_FAILURE;
   }

bool running = true; - Next, we are going to create a
whileloop and define certain conditions in it:
while ( running )
{
   sf::Event windowEvent;

   while ( window.pollEvent( windowEvent ) )
   {
      switch ( windowEvent.type )
      {
      case sf::Event::Closed:
         running = false;

         break;
      }
  }
In the preceding while loop, we are stating that if the window is closed, we are going to stop running our application and break out of our loop.
      glClearColor( 0.2f, 0.3f, 0.3f, 1.0f );
      glClear( GL_COLOR_BUFFER_BIT );

      // draw OpenGL

      window.display( );
   }

   window.close( );

   return EXIT_SUCCESS;
  }
}
Let's run our code and check whether there are any errors. If no errors pop up, we'll get a rendering window as output, similar to what we have witnessed in the previous sections.
In this chapter, we discussed how to set up OpenGL using various libraries: GLFW, GLEW, SDL, and SFML. We learned how to set up our OpenGL projects on Windows and Mac. And, we also discussed how to link the libraries to our projects using absolute or relative linking. We then created rendering windows to display OpenGL graphics.
In the next chapter, we'll learn how to draw shapes like triangle and rectangle using OpenGL. Also, we'll discuss about how to apply colors and textures to the shapes.