


 Download code from GitHub
Chapter 1: Key Concepts of Automation
Atlassian Jira is a popular workflow management system that allows teams to track their work in various scenarios, the most common of these being software projects, followed closely by service desks. Over time, most teams come to realize that there are many repetitive and time-consuming tasks that need to be performed to ensure project tasks and requests are tracked accurately and in a timely manner.
Since Atlassian recently acquired Automation for Jira and incorporated it as a native feature in Jira Cloud, it is now even easier to create complex and powerful automation rules using an intuitive if-this-then-that approach without having to write any code. Automation for Jira is still available as an add-on app for Jira Server and Jira Data Center and we'll cover both use cases where they diverge in this book.
If, like me, you find yourself saying I'm sure there is a way we can automate this somehow when confronted with yet another monotonous and time-consuming task in Jira, then you've picked up the right book.
In this chapter, we are going to cover the following main topics:
- Getting started with rules
- Working with triggers
- Working with conditions
- Working with actions
- Creating your first rule
By the end of this chapter, you will have a good understanding of the key concepts of automation rules in Jira and how the various components of rules work together to enable you to write rules that will help you to automate any repetitive and other time-consuming tasks in Jira so that you can focus on what really matters: getting things done!
Technical requirements
The requirements for this chapter are as follows:
- Jira Cloud environment: If you don't already have access to Jira, you can create a free Jira Cloud account at https://www.atlassian.com/software/jira/free and ensure that you have both Jira Software and Jira Service Management selected; or
- Jira Server environment: If you are using Jira Server (available from https://www.atlassian.com/software/jira/download), ensure that you have licenses for both Jira Software and Jira Service Management. In addition, you will also need to ensure that you install the Automation for Jira app available from the Atlassian Marketplace.
In both instances, you will need to have at least Project Administrator access to a Jira project.
You can download the latest code samples for this chapter from this book's official GitHub repository at https://github.com/PacktPublishing/Automate-Everyday-Tasks-in-Jira.
The Code in Action videos for this chapter are available at https://bit.ly/38POLVA
Getting started with rules
To understand automations, we need to first take a look at some of the basic concepts associated with them, the foremost of which is the rule.
In this section, we will examine the following concepts:
- The definition of a rule
- Rule scopes
- Owners and actors
- Audit log
These will give us a foundation on which to build in the following chapters, so without further ado, let's get started.
What is a rule?
A rule, in its basic form, is a list of steps required to be executed in a specific order to achieve a desired outcome that is both repeatable and auditable.
By this, we mean that a rule should have the exact same outcome each and every time it is executed, and we should be able to examine the actions applied by the rule chronologically.
Specifically, a rule in Jira allows you to perform actions against issues based on criteria that you set.
Every rule is comprised of three basic components:
- Triggers: The entry point for a rule.
- Conditions: These refine the criteria of the rule.
- Actions: These perform the actual tasks.
In addition to these, a rule also contains some other basic information:
- The rule name
- The rule description
- The rule scope
- The rule owner and actor
- Options to notify the rule owner in the case of rule failures
- Options to allow other rules to trigger this rule
- The rule audit log
Together, these form the building blocks of automation rules. By combining these basic components, you are able to create rules that can be used to automate many time-consuming and repetitive tasks.
The following screenshot shows an outline of the basic components of a rule in Jira:

Figure 1.1 – Visualizing the basic components of a rule
We will cover each of these components in more detail in this and the following chapter.
Understanding scopes
Rules in Jira have can be applied in one of four scopes:
- Global rules
- Multi-project rules
- Project type-specific rules
- Project-specific rules
The following table shows how these rule scopes are defined and which Jira permission is required in order to create and manage a rule that is applied in that scope:

Figure 1.2 – Rule scope permissions
As we can see, most of the rule scopes require you to have Jira Global admin permissions in order to manage them, and this is expected, as these rules span multiple projects and cannot therefore rely on project-specific permissions.
Project rules, on the other hand, can be created and managed by project administrators in addition to Jira global administrators.
Having this distinction allows Jira administrators to delegate the project-specific automations and gives project administrators more flexibility in managing their own project rules, whilst Jira Global admins can focus on automation rules that can be applied across a much wider audience.
Rules can also be moved between the global and project scopes by Jira administrators. If, for example, it is determined that a project-specific rule could be reused across multiple projects, a Jira administrator can adjust the scope of the rule. The reverse is also true. If a particular global rule is only ever utilized by a single project, a Jira administrator can adjust the scope to that specific project and by doing so, transfer administration of the rule to the project administrators.
Owners and actors
Every rule requires both an owner and an actor.
The owner of the rule is generally the user who created the rule and is responsible for maintaining the rule. The rule owner will also receive email notifications from Jira if the rule fails while executing.
The rule actor is the user the rule will execute as. This user must have the correct permissions in the project for both the trigger and any actions the rule will perform. For example, if you create a rule that needs to add a comment to an issue, the rule actor will need to have the Add Comments permission in the project.
Important note
In Jira Cloud, the default rule actor is always the Automation app user and will belong to the atlassian-addons-project-access project role. This project role is assigned every permission in a project and can be changed in the Project settings | Permissions section. Removing permissions from this role could potentially cause add-ons not to work correctly, so it is generally advised not to change these permissions.
Audit log
Every rule has its own audit log, which tracks the execution of a rule chronologically and allows you to examine the outcome as well as the actions applied to the affected items for each execution.
This functionality is not only necessary to be able to track the outcomes of a rule execution; it also gives us the ability to be able to debug rules when things don't go as planned.
We will examine the role of the audit log in debugging rules in more detail in Chapter 10, Troubleshooting Tips and Techniques, when we will explore techniques for debugging rules and solving common issues.
Working with triggers
The starting point for every rule is a trigger. A trigger defines how the rule will activate and will generally listen for events in Jira, such as when an issue is created or when values in fields within an issue change.
In this section, we will begin by looking at Jira events as this will help you to understand when and why rules are triggered, after which we'll explore the available rule triggers, what each of them are, and how they can be used.
Understanding Jira events
To better understand how triggers work, it is worth taking a brief look at how events in Jira work as these are the driving force behind most of the triggers available in the automation rules.
Jira, like many applications, incorporates an event-driven architecture. In essence, this means that every time an action is performed within Jira, an event is fired that allows interested components to listen to and perform additional actions based on those events.
There are two main types of events that affect issues in Jira. The first of these are workflow events. These events are fired when an issue is created and any time an issue is transitioned to a new status in its underlying workflow, and are responsible for causing the Issue created and Issue transitioned triggers in an automation rule to fire.
The second type of event is issue events and these are responsible for the majority of the remainder of the issue triggers and are fired whenever a user (or app) makes a non-workflow-related change to an issue, such as updating a field or linking two issues together.
Rule triggers
Jira automation provides us with a number of triggers that we can use to kick off the execution of our rules.
These triggers are grouped into categories to make it easier to identify which type of trigger you will need when creating your rule, and these categories are as follows:
- Issue triggers
- DevOps triggers
- Scheduled triggers
- Integration triggers
We will take a look at each category in turn and the available triggers in each.
Issue triggers
As we mentioned in the Understanding Jira events section, the majority of triggers relate to events occurring on issues, such as when an issue is created or edited.
Most of the triggers are self-explanatory and single purpose. However, there are some that can be further configured to make the trigger more specific without needing to use additional conditions.
Let's take a look at the issue triggers available at the time of writing and what each one does:
- Field value changed: This rule will run when the value of a field changes. You configure this trigger by selecting the fields you want to monitor or by using a regular expression that matches the field names you want to monitor. You can also optionally narrow which issue operations will trigger the rule.
- Issue assigned: This rule will run when the assignee of the issue changes.
- Issue commented: This rule will run every time a new comment is added to an issue. Note though that this does not include when comments are edited or deleted.
- Issue created: This rule will execute every time an issue is created. This trigger listens for the issue-created event that is always fired as the first step in a workflow.
- Issue deleted: This rule will run when an issue is deleted.
- Issue link deleted: This rule will run when an issue is unlinked from another issue. You can optionally configure this trigger to only execute for specific link types.
- Issue linked: This rule will execute when an issue is linked to another issue. Like the issue link deleted trigger, you can optionally configure which issue link type the trigger will execute for.
- Issue moved: This rule will execute when an issue is moved from one project to another. You can optionally specify that the trigger only executes if an issue is moved from a specific project.
- Issue transitioned: This rule will execute every time an issue transitions through the workflow from one status to another. You can optionally configure this trigger to listen for a specific transition or multiple transitions to or from a specific status.
- Issue updated: This will trigger the rule when details on an issue are updated, except when changes are made by linking, assigning, or logging work on an issue.
- SLA threshold breached: This rule will get triggered for issues in a Service Management project when the SLA threshold has breached or is about to breach. You can configure which SLA to monitor as well as the time before or after it has breached.
- Work logged: This rule will run when a worklog is created, updated, or deleted.
There are a few specialized issue triggers worth taking note of and these are the following:
- Manual trigger: This trigger is not dependent on any underlying events. Instead, triggers of this type are presented to the user in the Issue view and require the user to manually activate them.
- Multiple issue events: This trigger allows you to listen to more than one event for an issue. For example, this is useful when you need to perform the same automation when a ticket is both created and updated, rather than having to create a separate rule for each event.
- Sprint and Version triggers: These triggers are not directly associated with underlying issues, and instead they allow you to perform actions against the related issues when something happens to the containing Sprint or when the versions pertaining to a project are created or changed.
- Service limit breached: This is a specialized trigger that allows you to monitor and manage your automation rules themselves.
DevOps triggers
DevOps triggers are specific to Jira Cloud and allow you to create rules that are linked to events in your connected development tools, such as Bitbucket and GitHub.
Let's take a quick look at these triggers and what they do:
- Branch created: This rule will run when a branch in a connected source repository is created.
- Build failed: This rule will be executed when a build in a connected build tool fails. You can optionally configure this to trigger on specific build names, branches, or tags.
- Build status changed: This rule will be run when the build status in a connected build tool changes, for example, from failed to success, or vice versa. This can optionally also be configured to trigger on specific build names, branches, or tags.
- Build successful: Similar to the previous triggers, this will cause the rule to execute when a build in a connected build tool is successful. This can also optionally be configured to listen for specific build names, branches, or tags.
- Commit created: This rule will run when a commit is created in a connected source repository.
- Deployment failed: This rule will execute when a deployment against a specified environment fails.
- Deployment status changed: This rule will run when the deployment against a specified environment changes status from failed to success, or vice versa.
- Deployment successful: This rule will run when the deployment against a specified environment is successful.
- Pull request created: This rule will execute when a pull request in a connected source repository is created.
- Pull request declined: This rule will execute when a pull request in a connected source repository is declined.
- Pull request merged: This rule will execute when a pull request in a connected source repository is merged.
Important note
DevOps triggers are not available in Jira Server, although these triggers can be emulated using the Incoming webhook integration trigger.
We will explore these triggers in more detail in Chapter 8, Integrating with DevOps tools.
Scheduled triggers
Scheduled triggers allow you to configure rules that run at defined intervals. These can be simple fixed-rate intervals or more complex schedules.
Scheduled triggers are perfect for automating clean-up processes or to create recurring tasks that need to be actioned and we'll look at these in more detail in Chapter 2, Automating Jira Issues.
Integration triggers
The final type of trigger is the incoming webhook. This trigger provides a way for third-party applications to trigger automation rules.
An incoming webhook trigger can specify the exact issues to act on or even provide real-time data that you can use to update issues.
Chapter 5, Working with External Systems, is dedicated to exploring the ways in which we can integrate our automation rules with external systems.
Working with conditions
Once a rule has been triggered and in order for it to continue to run, it will need to meet the criteria that you have specified.
Conditions, therefore, narrow the scope of a rule and if a condition fails, the rule will stop running and no actions following that condition will be performed.
Automation provides a number of conditions that can be applied to a rule, most of which can be applied either in isolation or chained together to form more complex conditions.
The set of conditions available to automation rules is as follows:
- Advanced compare condition: This condition allows us to compare two values using smart values, functions, and regular expressions. This condition gives more flexibility for when the
Issuefields condition is not sufficient. - If/else block: This condition allows us to perform alternate actions depending on whether the conditions in each block match and you can have as many conditions as you need.
- Issue attachments: This condition checks whether attachments exist for an issue.
- Issue fields condition: This condition checks an issue field against a particular criterion that you can specify.
- JQL condition: This condition allows you to check an issue against any valid JQL query.
- Related issues condition: This condition allows you to check whether related issues exist for the triggered issue and whether they match a specific JQL query.
- User condition: This condition allows you to compare a user to a set of criteria.
We will cover conditions in more detail in Chapter 2, Automating Jira Issues.
Working with actions
The final building block in the rule chain is actions. Actions are the components that allow you to make changes within your projects and can perform many tasks, including editing issues, sending notifications, creating tasks, and much more.
Like conditions, a rule chain can include multiple actions in the chain, allowing you to perform more than one task in a single rule; for example, editing an issue field followed immediately by sending a notification via email.
Rule actions are grouped in categories in order to make it easier to identify the type of action you want your rule to perform.
Let's take a look at the categories and then we'll examine the actions in each category:
- Issue actions
- Notifications
- Jira Service Management
- Software
- Advanced
Issue actions
Actions in the Issue actions category allow you to make changes to existing issues as well as create new issues. Let's look at the available actions in this category, and what each of them do:
- Assign issue: This action assigns the issue to a user. This can be to a specific user or by using a method such as balanced workload, round-robin, or randomly when using a list of users.
- Clone issue: This action creates a new issue, in the same project or in a different project, copying across all possible fields. It is not a true clone and will therefore not copy across links, attachments, or comments.
- Comment on issue: This action allows you to add a comment to the issue, optionally specifying the visibility in Service Management projects.
- Create issue: This action creates a new issue in the project, or selected project for global rules, and allows you to select which fields to configure and their corresponding values.
- Create sub-tasks: This action creates sub-tasks on the issue and sets the summary to the specified value. If you select to add additional fields, this action will be converted to a Create issue action with the issue type set to sub-task.
- Delete comment: This action can only be used with triggers that involve adding a comment and can only be used to delete the comment that triggered the rule. It cannot be used to delete any other comment.
- Delete issue: This action causes the current issue that is in context to be deleted.
- Delete issue links: This action allows you to delete any issue links on an issue. You can specify certain types of links to delete or specific issues.
- Edit issue: This action lets you edit the fields on the issue by choosing the fields and setting their corresponding values.
- Link issues: Using this action will allow you to link an issue to another issue by selecting the link type and the issue to link.
- Log work: This action allows you to log time worked against an issue using either actual dates and times, or by using smart value functions.
- Manage watchers: Use this action to specify users to add or remove as watchers on the issue.
- Transition issue: This action allows you to transition an issue from one status to another through the assigned workflow. You can additionally select fields and their associated values to be updated during the transition, providing these fields are present on the issue transition screen.
Notifications
Actions in this category allow you to send notifications via various channels as well as give you the ability to send data to other external systems. The actions in this category are as follows:
- Send email: This action sends an email when the rule executes.
- Send Microsoft Teams message: This action allows you to send a message to notify a team in Microsoft Teams when the rule is run.
- Send Slack message: This action allows you to send a message to a Slack channel or specific Slack user when the rule is run.
- Send Twilio notification: Use this action to send an SMS message using Twilio when the rule is executed.
- Send web request: This action allows you to send a request to any third-party system that can accept web requests. You can also configure this action to accept response data from the external system that can be used in subsequent actions.
Jira Service Management
These actions allow you perform tasks specific to Service Management projects and are as follows:
- Add Service project customer: This action allows you to add customers to your Service Management project.
- Approve/Decline request: You can use this action to approve or decline a request in a Service Management project.
- Create service request: This action allows you to create a service request in a Service Management project. It is similar in function to the Create issue action, but adds the ability to select the request type and customer.
Software
Software actions allow you to manipulate the software versions within a Software project and are limited to the following actions:
- Create version: This action allows you to create new versions within the project. It will not create a version if one with the same name already exists.
- Release version: This action releases the next unreleased version in the project using the version's release date. Alternatively, you can configure which unreleased version to release and optionally override the release date.
- Unrelease version: This action allows you to unrelease a version.
Advanced
The final category is the advanced actions. These actions allow you to do things such as creating variables for use in later rule components, log information to the audit log, and more. Let's take a look at these now:
- Create variable: This action allows you to create a smart variable for use in other actions and conditions within this rule, and is only available in Jira Cloud.
- Delete attachments: This action allows you to delete attachments from an issue using regular expressions against the attachment filenames.
- Log action: Use this action to log a message to the rule's audit log. This action is particularly useful in debugging rules.
- Lookup issues: This action allows you to use JQL to search up to 100 other issues and include the results list in other actions in this rule.
- Re-fetch issue data: This action refreshes the smart values with the latest issue data. This is especially useful in multi-action rules where subsequent actions rely on previously updated data.
- Set entity property: You can use this action to set entity properties on issues, projects, and users. These are hidden key/value stores that are used by certain apps.
Creating your first rule
Now that we've covered the key concepts, let's take a look at creating your first automation rule.
Before we dive into the actual rule, we'll take a brief look at the rule editor user interface and its layout.
The rule editor
The following screenshot represents the automation rule editor. As you can see, it is presented in a structured format that makes working with rules straightforward and intuitive:
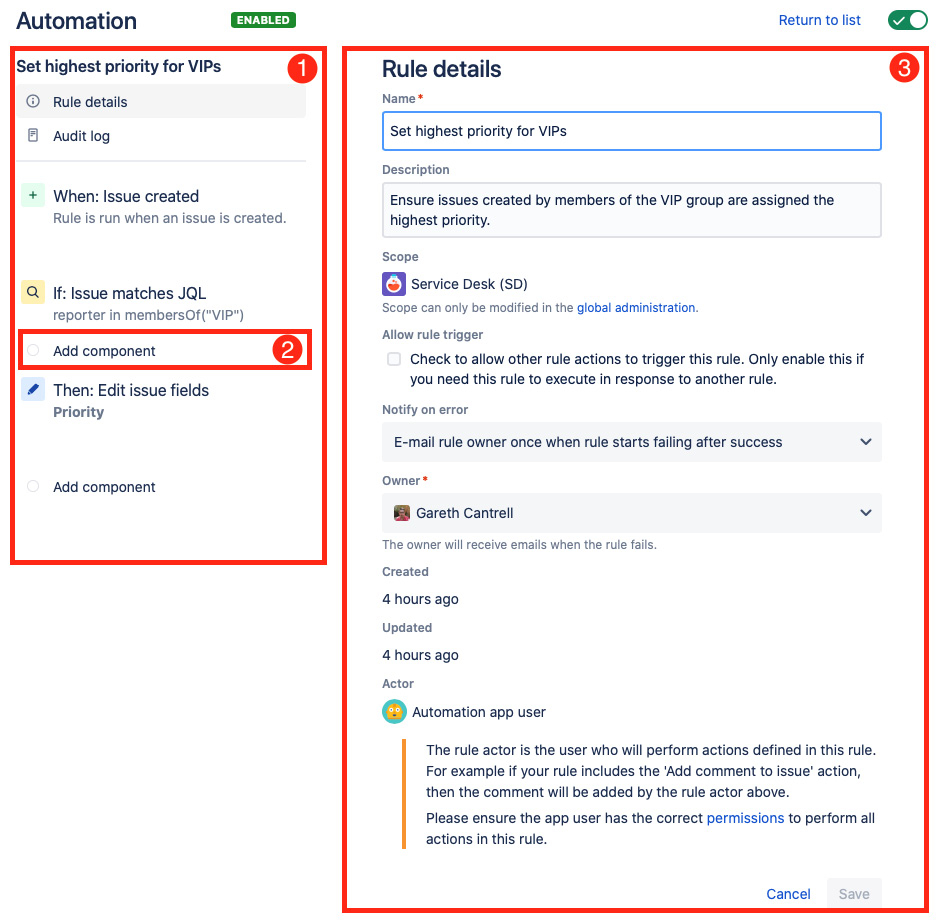
Figure 1.3 – The automation rule editor
Let's take a look at the main components that we have numbered in the preceding screenshot:
- Rule-chain view: In this panel, you can see the name of the rule, along with the components that make up the rule, in the order in which they will be processed during execution. This is also where you can access the rule's main details and its bespoke audit log. You can also drag and drop components in this panel to reorder them.
- Components: You can add new components anywhere in the rule chain by clicking on the Add components link that appears when you move your mouse pointer between any existing components.
- Rule details view: The rule details view allows you to edit the main rule details, view the rule's audit log, and edit the component configurations as applicable.
Creating a rule to assign the highest priority to VIP users' issues
This brings us to our first automation rule. In many organizations, issues raised by VIP users such as managers or executives need to be assigned the highest priority so that they get the attention of the team members immediately.
As this is our first rule, we'll show you step by step, with associated screenshots, how to author an automation rule in Jira so you can see how the rule editor enables us to quickly create a rule intuitively.
Tip
The location of the automation rules configurations differs slightly between Jira Cloud and Jira Server.
In Jira Cloud projects, automation rules can be found under the Automation tab in Project Settings, whilst in Jira Server, they can be found under the Project automation tab.
For this rule, we are going to use a Service Management project. To follow along with this rule, you will need to have a user group defined, called VIP, to which the appropriate users are assigned.
Firstly, in your Service Management project, navigate to Project settings, click on the Automation tab, and then click the Create Rule button in the upper-right corner:
- After you've decided to create a new rule, the first thing you're presented with is the option to choose your trigger.
For this rule, click on the Issue created trigger and then click Save, as shown in the following screenshot:

Figure 1.4 – Selecting the Issue created trigger
- Next we are going to add in a condition that checks whether the user who reported the issue is a member of the VIP user group.
In the following screen, select New condition, followed by the JQL condition component:

Figure 1.5 – Adding the JQL condition component
- The JQL condition component requires further configuration in the form of a JQL query. In the component's configuration screen, enter the following JQL query, then click the Validate query link to ensure the query is valid, and finally, click the Save button:
reporter in membersOf("VIP")Your rule should look similar to the following screenshot:

Figure 1.6 – Configuring the JQL condition component
- Next, we need to insert the action to perform. In this case, we need to use the Edit issue action in order to set the Priority field to highest.
Go ahead and click on New action, followed by Edit issue:

Figure 1.7 – Selecting the Edit issue action
- Like the JQL condition component, the Edit issue component also requires further configuration and we now need to choose the fields we wish to update.
You can set multiple fields in this action. However, for this rule, we are only going to set the Priority field. Start by typing the field name, and then click on the checkbox once you've narrowed your selection:

Figure 1.8 – Selecting the Priority field
- Now that you've selected the Priority field, click out of the Choose fields to set option so that you can access the field values list where you will be presented with a dropdown of available options. Select the value Highest, and then click on Save:

Figure 1.9 – Setting the value of the Priority field
- We have now configured our first rule. All that remains is to give our new rule a name, turn it on, and give it a description.
In the following screen, set the rule name as follows and then click Turn it on to publish the rule:
Set highest priority for VIPsThe completed rule components should look similar to the following screenshot:

Figure 1.10 – Giving the rule a name and turning it on
- Finally, let's give our rule a description and ensure we're happy with the general rule details. Click on Rule details in the Rule-chain view on the left, enter the following description, and then click Save:
Ensure issues created by members of the VIP group are assigned the highest priority.
Figure 1.11 – Adding a description to your rule
- You may have noticed that when you entered the description, the lozenge at the top of the Rule-chain view changed from Enabled to Draft.
This alerts you to the fact that changes have been made to the rule, but not yet published. If you do not wish these changes to be published, either click on the Cancel button at the bottom of the Rule details panel or click the Return to list link in the top-right corner of the Details panel.
For now, click on Publish changes:
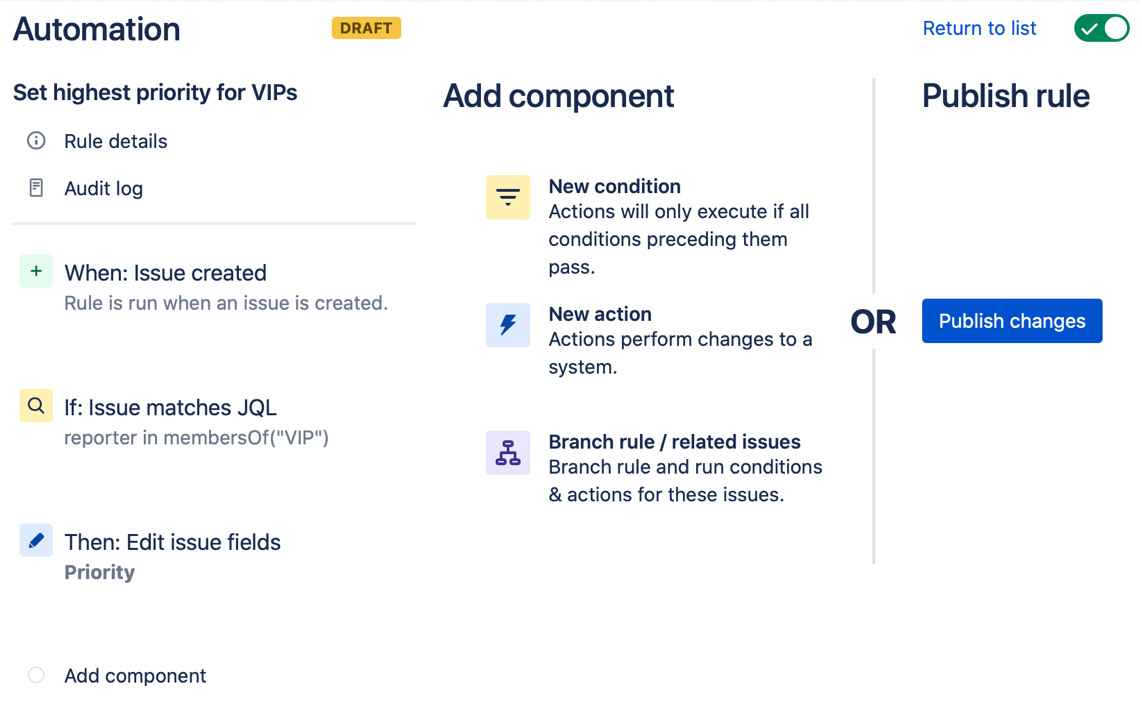
Figure 1.12 – Publishing your rule changes
Your rule will now appear in the rule list against your Service Management project and every time an issue is created by a user in the VIP user group, the priority will automatically update to Highest.
To test this rule, add yourself to the VIP group and create a new service request in your Service Management project. Make sure the priority is set to something other than Highest. Once you have created the issue, navigate to it and examine the activity in the History tab. You should see the priority change from what you selected to Highest, and the activity should be logged against the rule actor.
You have now learned how to create and publish an automation rule in Jira without writing any code.
Summary
In this chapter, you have learned about the key concepts of automation rules in Jira and the basic building blocks of rules, including triggers, conditions, and actions. We also covered rule types and the differences between rule owners and actors and finally, we saw how to combine all of these concepts into our first automation rule.
As you have learned in this chapter, we have a lot of powerful and flexible components at our disposal that will, in turn, help us to create powerful automation rules to automate everyday tasks in Jira without the need to write any code. In the following chapters, we will be exploring these components in more detail and with the help of practical examples that you can use to kick-start your own rules.
In the following chapter, we will learn how to use these components to work with issues in Jira. We'll explore all the conditions we introduced in this chapter, how to work with related issues, and how we can use some of the action components available to edit and transition issues before looking at how we can run rules on a scheduled basis.