


 Download code from GitHub
Teradata installation is easy and straightforward. This chapter will help you in the installation of Teradata 15.10.0.07 SLES 11 for VMware (40 GB), including the monitor tool Viewpoint on 64-bit Windows 7 with 8 GB RAM.
The following recipes will be covered in this chapter:
- Setting up Teradata 15.10
- Setting up Teradata Studio Express
- Teradata on Azure
- Defining a connection
- Connecting to the Teradata system
- Using studio tool options
- Setting up Teradata SQLA
- Configuring SQLA
- Building a query builder
- Importing data
- Exporting data
Before we begin the installation process of our Teradata Database on a local machine, you need to install VMware workstation 12.x for Windows.
- Fire up the installed VMware software:

- Click on
Opena Virtual Machineand select theTDExpress15.10.0.7_Sles11_40GB_vp.vmxfile from the open window prompt:

- You are now ready to play the installed Teradata Database.
- Click on the
Play Virtual machinelink. The setup will run its course and take you to the login screen:

- Login with
rootas the username and password. Wait for the Teradata Lab log wallpaper to show up on the desktop in the bottom-right corner:

- Voila! You have successfully installed the Teradata Database on your machine. The world's best analytical and data warehouse database is now up and running on your machine as the VM image:

In the current version of VMware, we are already blessed with Teradata Studio Express. You will see an icon, Teradata Studio Express; all you need to do is click on this and it will fire up the client tool.
What if you want to install on your local machine/desktop without VMware? It's easy, all you need to do is create a login account at http://developer.teradata.com/ and then go to the download link. Under tools, search for Teradata Studio Express.
For a Windows machine:
- Unzip the client tool package to your local directory.
- Run
setup.exeto launch the Teradata Studio Express installation. - Teradata Studio Express is installed in the Program Files directory. For example,
C:\Program Files (x86)\Teradata\Client\16.00\Teradata Studio Express. - Now, as the VMware machine is Linux OS-based, the installation file will be located in the
/opt/teradatadirectory:

- Teradata Studio Express requires a JDBC connection type; it does not support ODBC like the Teradata SQL assistant. You can connect to the following databases other than Teradata using studio. To add other databases to your preferred list of databases to connect to, go to the Preference tab and select from the list:
- Aster database
- Hadoop database
- DB2
- SQL
- Oracle
Note
Teradata Express also has a big brother, Teradata Studio; the main difference between Express and Studio is that the latter has an administrative window to it. The native Teradata administrator tool is integrated into Studio. So, if you are a DBA or power user, you will be needing Studio.
Here are some highlights of Studio and Express:
With growing demand to increase its footprint, Teradata is now available on the cloud. This means that customers now don't have to worry about data centers and setting up the hardware.
Teradata has availability on the cloud as follows:
- Private cloud
- Public cloud
- Mixed cloud
With a proper subscription account, you can create your own Teradata Database on the cloud with all the capability and features you require.
With the current setup of Azure you can only deploy a 32 node system; if you require more nodes get in touch with Teradata sales personnel.
The thing you need to note is, many things in this recipe might change over time and some of them might not be valid. As the cloud platform is under continuous change, please check your subscription type before deploying a Teradata solution. Deploying Teradata on Azure is similar; you buy Teradata hardware on premises, you need to purchase the software with various available purchase methods.
Note
Deploying Teradata on cloud can cost you money, so be very vigilant when deploying database, as charges/fees can come as a surprise to you.
You can also deploy Teradata with all the additional products such as Viewpoint, datamover, and many others. Or you can buy these products individually; this gives you added advantages when you require flexibility.
There are many factors and parameters when you deploy the solution to the cloud, but in this recipe we will only cover how to create a Teradata Database and Viewpoint instance in Azure and make it available publicly.
You need to have an Azure subscription. Log in to the Azure marketplace and create a free account. It is recommended to have a subscription-based account to have enough cores available to you. Following are some prerequisites:
- Pay-as-you-go subscription on your Azure account
- Sufficiently high quota limits (recommended: 128 cores) in your Azure account
- Once you are logged in to the Azure marketplace, search for Teradata, and as shown in the screenshot, select Teradata Database from the list:

- On next window, read the terms and conditions. And after that, click on Create, as shown in the screenshot:

- Next will be the window with the list of steps. In the first step, you need to provide a User name, a Password, and select a Location based on your requirements. Not all the Locations have products that you require. Click OK to move to step 2. Check the screenshot for details:

- In step 2, select the name of your
database, and provide the DBC password (keep it safe in a notepad). Also, select the flavor orDatabase Tierand Version of the database you want. Azure hosts the latest version Td 16.10. Click OK to move to the next step. Check the following screenshot:

- The next step will be configuring your Viewpoint. To keep it simple, select only a single monitoring Viewpoint system. All the fields are self-explanatory. Password here will be used to log in to Viewpoint via an admin account. Check the following screenshot:

- Options 4 to 8 are optional. You can either enable or disabled them as per your requirements.
- In step 8, once all the configuration is done, a final validation is executed, which checks for all the parameters and cores available at your location. If all went fine, your deployment will start after you make the required purchase. Once finished with the configuration, a template will be prepared for future use. You can download the template from your database, which can be used afterwards if you want to create a same configuration system or want to use template based deployment. Check the following screenshot:

- Your deployment will start, as shown in the following screenshot. It will take approximately 30 mins or so to get the system up and running. You can check the progress from the
Resource groupoption from the left-hand side of the toolbar, and under the resource group you created while deploying the database. Check the following screenshot:

- Now to connect our system on cloud with our local machine, we need to make system available publicly. To do this, once your system is up and running, go to
Resource groupsand selectsearch for database. From the list, we will select network interface. In this option, we will enable the option to access this database publicly. Check the following screenshot:

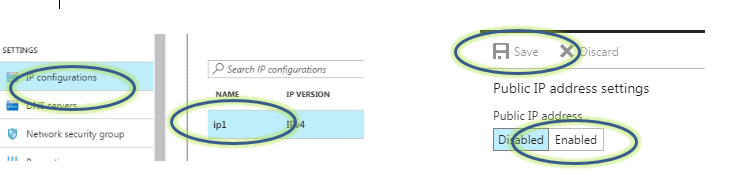
- In the settings, click on IP configurations; next, click on the IP address in the bar. For the next option displayed, select
Enabledunder Public IP address and clickSave, as shown in the screenshot:
- Once you have enabled the public IP, you can now give a DNS name to the IP for easy access. To enable this, search for public IP under the
typecolumn in your resource group. Under the Configuration tab, enter the DNS name as seems fit and save the settings. This can be seen in the following screenshot:

- Repeat the same step for enabling a public IP and assigning a DNS name for accessing Viewpoint from your local machine.
- Open your SQLA and enter the DNS name you grabbed from the settings, and enter the server name to create a DSN connection:

- You can do the same for Viewpoint; grab the DNS as shown in the screenshot and enter it locally in your web browser. Log in using an admin account and enable the system to monitor your existing Teradata Database:

- Welcome to Teradata on Azure.
Teradata on Azure gives you the same performance as on premises. You can get same power of analytic database as you get from an on-premises database. Once on the cloud you can configure your system and can take advantage of the additional Azure applications, as well, to monitor and create system alerts.
If you are stuck with any of the issues when performing deployment, it is advisable to contact the Azure help desk via your dashboard. A ticket will be created and the issue will be resolved based on your subscription type:

Once you deploy your Teradata Database, from time to time you need to upgrade or apply patches to the database. You need to download these from the Teradata access portal and, based on your license tiers, Teradata engineering will help you.
There are four license tiers available as of now:
- Developer: With low performance
- Base: With simple and middle-level performance
- Advance: With high-performance workloads and better performance
- Enterprise: With full capability and enterprise-level performance
Connect better! In this case, we will connect to the Teradata Express VMware machine, which is on the desktop PC, using Teradata Studio Express. However, in the real world, Teradata System(s) are located in safe data centers and you would need the IP address(es) of the system.
We will be establishing a JDBC data connection to a local database:
- Click on
Database Connection, New...:

- Select
Teradata Databasefrom the connection profile screen and provide a name for the connection:

- Enter
localhostin the Database Server Name. When doing a connection to a real-world database, provide an IP or a hostname here. The User Name and Password will bedbc:

If your site/client is using an LDAP to log on, you need to choose an LDAP mechanism and enter your LDAP credentials.
- Click on Test Connection to ensure connectivity.
You are now connected to the Teradata Database; start firing up your queries using SLQ Editor.
Now, before starting up with our very first query, you need to know that express works in the ANSI TMODE. You need to change to TERA mode manually.
Additionally, you can have a multiple connections to the same database connection or a different one.
Note
TERADATA MODE is not Case sensitive, where as ANSI MODE is CASE sensitive. Also, in TERADATA MODE each transaction is committed implicitly and in ANSI MODE transaction has to be committed explicitly.
- Let's execute our very first query:
/*Sample query*/
sel * from dbc.dbcinfo;- The output of the preceding query will give us the current version of the Teradata Database system. Yes, we are on
15.10.03.07:

This is a heavy tool, so it will consume more resources from your PC compared to the handy and breezy SQL Assistant. We'll be exploring SQL Assistant in the later part of this chapter.
Humans and software—we judge them on the basis of their characteristics. Let's explore some of the important options available with Teradata Studio Express.
Here are some of the tool options that we will cover:
- SQL compare: Comparing two text documents is the basic necessity of the coding community. There are many tools for this job. However, when you have a built-in feature for it, you don't need to go anywhere else. You ask how to use it? Click on the Project Explorer tab (next to the Data Explorer tab). Right-click on the SQL tab and create SQL text files that you need to compare. Select both files and select the Compare With | Each Other option. The text that is different will be highlighted and shown:
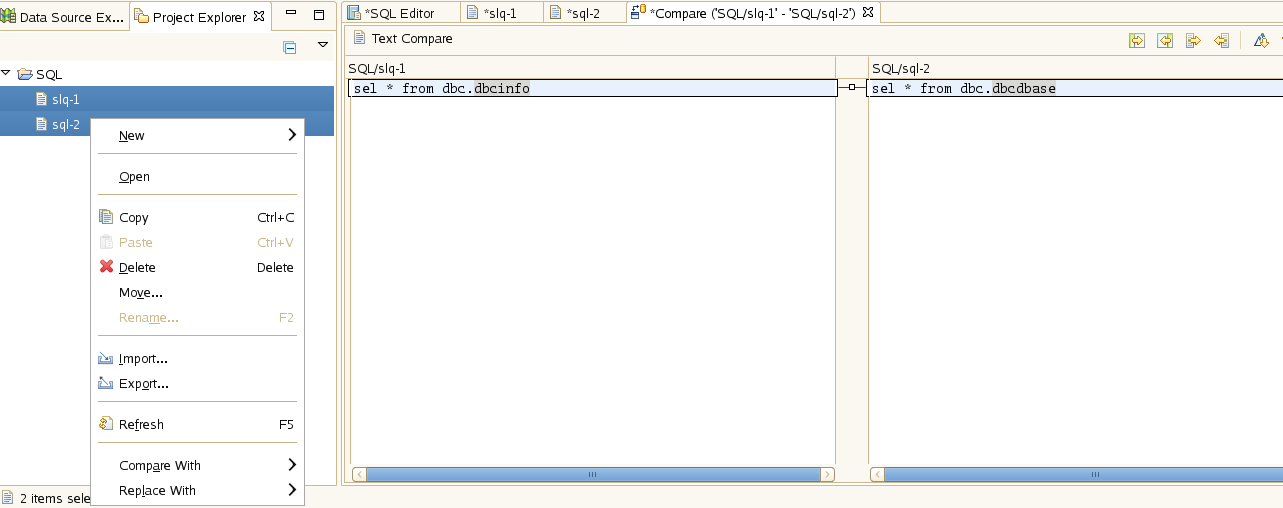
Different text highlighted in the Text Compare
- Code assist and syntax checking: Forgot the names of the tables in the database, a column name, or the syntax of your statement? Express will prompt as you type. Type
EXECfor macro execution with the code assistONand you will get a series of options that will go with the main command. Now, when you write a database name followed by a dot, it will give you a list of tables to choose from that database:

- Object Viewer: This works in a similar to the traditional tool SQL Assistant; however, it can help to get more details for your object of interest. If you have Studio, it will have even more options for admin use. Right-click on any object from the Explorer. You will see all the options affiliated with the object you need:

Options affiliated with the selected option
There are many other options at your disposal that you can explore.
We will now turn our focus to the traditional but easy to use tool, SQL Assistant (SQLA). We now have a SQLA Java version just like Teradata Studio or Teradata Studio Express.
For SQLA to work, you need to download it from the developer.teradata.com website and download Teradata Tools and Utilities, also known as TTU. Once downloaded and installed, start making the connection using ODBC, .NET, or JDBC.
Note
SQLA can informally be referred to as a lightweight version of Studio or Express; you will find it easier to navigate and use.
Here, we will use SQLA 16.0. It is highly recommended that you use the TTU version that matches or is higher than the major release version number of the Teradata Database that you intend to connect with. So, if you are on Teradata Database 15.10, use TTU 15.10 or 16. TTU 13.10 is not recommended. Now that we have this covered, let's move on to the connection.
Use the following steps to establish a connection:
- Click on the plug icon in the top-left corner; now you can either select file data source or machine data source.
- Click on New... if you don't have a connection file. Select user or system data source:

- Then select the option of Teradata Database ODBC driver 16.00; after this, you will see the screen for providing the name of your data connection and source IP.
- Enter your credentials; you have the option to save the password if you don't want to enter it every time you connect to the database:

Wouldn't it be great to have an option to run SQL using the command-line interface with SQLA?
Teradata SQLA allows you to connect to a data source using the ODBC and .NET framework. When you install SQLA from TTU toolkit, make sure to check all the options. You will have two executables:
TTU_BASEhas the following:- ODBC driver
- BTEQ
- All the loading tools, such as fastexport, fastload, and many others
- Named pipe modules
- Websphere access modules
- .NET data provider
- C preprocessor 2
- Tearadata adminstrator
- SQLA
- Teradata Wallet and many more
TTU_DBMhas the following:- Index wizard
- BTEQ
- ODBC driver
- Query scheduler admin, client, server
- TSET
- Workload analyzer
- Visual explain
- Teradata Wallet
Here are some shortcuts to make your daily job easier:
- F2: It will open query builder, with syntax for all SQL queries
- F5: Execute SQL query
- F6: Explain plan for SQL query
- F9: Execute SQL queries in parallel
- F10: Abort SQL query
- F11: Display last error encountered
- Ctrl + N: New SQL query window
- Ctrl + Q: Format SQL query
- Ctrl + U: Convert to UPPERCASE
- Ctrl + H: Find and replace
Once you have the SQLA all fired up, the next thing we want is to configure the settings. SQLA comes with some default settings that you might want to change. For example, every time you execute the query, you may want to preserve the previous ruleset. The default setting has a habit of closing the old ruleset.
In this recipe we will change the SQLA settings to better ones.
- Open SQLA.
- To change the behavior of the
resultset, click on Tools | Options ..., highlighted in the following screenshot:

- From the pop-up window, click on the Query tab, as highlighted in the following screenshot:

- Next, uncheck the following boxes as shown in step 1; option 1will make sure that your old answer set is not closed when you are submitting your query. Tick the 7; option will help you execute highlighted queries when you have multiple queries in your window:

- There are many other options that, if you want, you can check and uncheck.
SQLA is a simple and efficient tool that helps users with their daily work. With better configuration, this tool can be used effectively.
SQLA also provides a way for you to automate your queries from a Windows machine. This recipe won't be covering the full process, but here are some commands that you can use to automate the scripts/jobs.
To execute SQLA from the command prompt, use the following:
Enter the following command on Run:
Sqla -c cookbook -f "c:\workbook\dbc.sql” -e "c:\workbook\resultset\dbc.log"- The
-ccookbook is used to establish a connection to the cookbook server -f "c:\workbook\dbc.sql"opens a file in the given path directly to SQL Assistant-e "c:\workbook\resultset\dbc.log"is used to export theresultsetto the given file
This will open SQLA, execute the queries, and close it afterwards. This is useful to schedule your jobs/queries on Windows machines.
Query builder is your quick reference guide to SQL syntax. It not only lets you use its own SQLs, but also provides you with the option to add your own along with editing the existing ones.
Query builder is available both in SQLA and Teradata Studio Express. Express query builder is more interactive and has drag-and-drop features. Let's first cover SQLA, followed by Studio Express.
Here is how you can proceed with query builder in SQLA:
- Query builder in SQLA is under the Help tab, or you can press F2. Here, you can click on any existing command or browse for the one you need.
- You can also add frequently used queries in query builder. Click on
+as shown in the following screenshot and add the queries that you need most, so that you don't have to search for them:

Here is how to proceed with query builder in Express:
- In express, you can edit an existing query using the query builder. Selecting the query in the SQL Editor, right-click and select the
Edit in Query Builderoption:.

- Once you click on the Edit option, your query will be opened in a new window with many other options. Here, you can add new tables to the existing query, creating a relationship between them. There is also a tab that gives you options to put conditions (
where,or,and) in queries. You can also add the group by clause; refer to the screenshot for details:

There is an option to change the statement type when you click on the statement box.
Let's get the ball rolling now.
We have had Teradata Studio Express and SQLA up and running for a while now. It is time to load data into the Teradata Database.
Now, there are many ways to do this, but, for simplicity, I will be importing data via Excel using the GUI option in Teradata Studio Express. You can copy the table data from Teradata to a data lab just by dragging the source table from the data lab view. The datalab copy wizard helps you through step by step.
You can get the dataset from various websites; there are tons of websites giving free datasets for analysis.
The following are the prerequisites to import the data:
- Create a new user, for example,
Mike. - Create a new database, for example,
TestDb. - Allocate space to the new database.
- Grant appropriate access rights to the new database for the new user.
- Create a table DDL under this database with the same column layout as the import file:

Let's begin with importing data using Studio first and then we will move on to SQLA. The following DDL was used to create the table in the new database. Now load the data from the external file. The following steps allow you to do so:
- Go to data explorer.
- Search for the database under which the required table is located:

- Explore the database.
- Right-click on the table,
Name|Data|Load Data:

- The Wizard will come up; select the source as External File:

This one is also as easy as Studio Express. The prerequisites are the same as Studio:
- Select the Import data option from the File tab.
- You need to write SQL to start importing the data.
ins into AP.countries (?,?)
?here defines the number of columns in your file.- Turn off the import function and execute
Sel *from the table name to verify the data:

To use the CSV file, select Options, as shown in the following screenshot:

Data transfer is a two-way street. We sometimes also have requirements to export the data to a file.
Teradata Studio Express and SQL Assistant both can be used to export data as well.
The data that we imported can be exported back to a file.
With Teradata Studio Express
Here is how wedo it for Studio Express:
- Go to data explorer.
- Search for the database under which the required table is located.
- Explore the database.
- Right-click on the table,
Name|Data|Export Data. - The Wizard will come up; select the destination file where the data needs to be written in.
- Select the option of Export Data Format from File options.
- Once the data is written to the file, you will get a success message.
- Open the file to verify the data.
With Teradata SQLA
- Select the Export Data option from the File tab.
- Execute the select query from which you need to export the data.
- As you hit F5 for execution, a window prompt will appear. Save the file with the required name and format.
- Your data will be written to the file.
Note
If you have a date column in the table, use the data format from the Options tab to get the date format in the file.
To save the file in the Excel format, use "filename.xlsx" in double quotes:
"filename.xlsx"
The export function of the tool let's you copy data from variety of files. This is useful when you want to copy a table data onto your local machine. This is fast and effective way to move data from table to any local file type that you want. It is however recommended not to copy large amount of data set as it might crash the local machine or the application.

