


Welcome to Instant XenMobile. This book will provide you with all the information that you need to get set up with XenMobile. You will learn the basics of XenMobile and how to deploy, secure, and manage mobile devices in your organization, and discover some tips and tricks for using XenMobile.
This book contains the following sections:
So, what is XenMobile? helps you to find out what XenMobile actually is, what you can do with it, and how it can help an organization to implement advanced mobile solutions.
Installation helps you to learn how to download and install XenMobile with minimum fuss and then set it up, so that you can quickly setup and use it in your organization.
Quick start – setting up XenMobile for the first time will show you how to perform one of the core tasks of XenMobile, that is creating courses. Follow the steps to create your own course, which will be the basis of most of your work in Moodle.
Top 6 features you need to know about helps you learn the most important features of XenMobile, which are as follows:
Reporting
Application stores
Secure Mail Gateway
The XenMobile service manager
Dashboard management
Common management tasks
By the end of this section, you will be able to manage the mobile devices in your organization using XenMobile.
People and places you should get to know provides you with many useful links to the project page and forums, as well as a number of helpful articles, tutorials, blogs, and the Twitter feeds of Moodle supercontributors (since, every mobility project is centered on a community)
Reports from the Internet estimate that there will be an explosion of mobile devices in corporate businesses. Mobile devices are quickly becoming the computing device of choice. Unlike traditional computing devices, mobile devices are designed for consumers before businesses, and therefore organizations are having a difficult time securing and managing these devices. They have turned to mobile device management solutions to help them manage both corporate and BYOD devices in a secure manner within their organization.
XenMobile is the next generation of mobile device management (MDM) from Citrix. XenMobile provides organizations the ability to automate most of the administrative tasks on mobile devices for both corporate and highly secured environments. In addition, it can also help organizations in managing bring your own device (BYOD) environments.
XenMobile MDM allows administrators to configure role-based management for device provisioning and security for both corporate and employee-owned BYOD devices.
When a user enrolls with their mobile device, an organization can provision policies and apps to devices automatically, blacklist or whitelist apps, detect and protect against jail broken devices, and wipe or selectively wipe a device that is lost, stolen, or out of compliance. A selective wipe means that only corporate or sensitive data is deleted, but personal data stays intact on a user's device. XenMobile supports every major mobile OS that is being used today, giving users the freedom to choose and use a device of their choice.
Citrix has done an excellent job recognizing that organizations need MDM as a key component for a secure mobile ecosystem. Citrix XenMobile adds other features such as secure @WorkMail, @WorkWeb, and ShareFile integration, so that organizations can securely and safely access e-mail, the Internet, and exchange documents in a secure manner. There are other popular solutions on the market that have similar claims. Unlike other solutions, they rely on container-based solutions which limit native applications. Container-based solutions are applications that embed corporate data, e-mail, contact, and calendar data. Unfortunately, in many cases these solutions break the user experience by limiting how they can use native applications. XenMobile does this without compromising the user experience, allowing the secure applications to exist and share the same calendar, contact, and other key integration points on the mobile device. They were the only vendors at the time of writing this book, that had a single management platform which provided MDM features with secure storage, integrated VDI, multitenant, and application load balancing features, which we believe are some of the differentiators between XenMobile and its competitors.

Citrix XenMobile MDM Architecture
Mobile application stores (MAS) and mobile application management (MAN) are the concepts which you manage and secure access to individual applications on a mobile device, but leave the rest of the mobile device unmanaged. In some scenarios, people consider this as a great way of managing BYOD environments because organizations only need to worry about the applications and the data they manage. XenMobile has support for mobile application management and supports individual application policies, in addition to the holistic device policies found on other competing products.
In this book, you will gain a deep understanding of XenMobile and its key features. You will learn how to install, configure, and use XenMobile in your environment to manage corporate and BYOD environments. We will then explore how to get started with XenMobile, configure policies and security, and how to deploy XenMobile in our organization. Next, we will look at some of the advanced features in XenMobile, how and when to use them, how to manage compliance breaches, and other top features. Finally, we will explore what do next when you have XenMobile configured.
Welcome to the world of XenMobile MDM. Let's get started.
Mobile device management (MDM) is a software solution that helps the organizations to manage, provision, and secure the lifecycle of a mobile device. MDM systems allow enterprises to mass deploy policies, settings, and applications to mobile devices. These features can include provisioning the mobile devices for Wi-Fi access, corporate e-mail, develop in-house applications, tracking locations, and remote wipe. Mobile device management solutions for enterprise corporations provide these capabilities over the air and for multiple mobile operating systems.
Blackberry can be considered as the world's first real mobile enterprise solution with their product Blackberry Enterprise Server (BES). BES is still considered as a very capable and well-respected MDM solution. Blackberry devices were one of the first devices that provided organizations an accurate control of their users' mobile devices. The Blackberry device was essentially a dumb device until it was connected to a BES server. Once connected to a BES server, the Blackberry device would download policies, which would govern what features the device could use. This included everything from voice roaming, Internet usage, and even camera and storage policies. Because of its detailed configurability, Blackberry devices became the standard for most corporations wanting to use mobile devices and securing them.
Apple and Google have made the smartphone a mainstream device and the tablet the computing platform of choice. People ended up waiting days in line to buy the latest gadget, and once they had it, you better believe they wanted to use it all the time. All of a sudden, organizations were getting hundreds of people wanting to connect their personal devices to the corporate network in order to work more efficiently with a device they enjoyed. The revolution of consumerization of IT had begun. In addition to Apple and Google devices, XenMobile supports Blackberry, Windows Phone, and other well-known mobile operating systems.
Many vendors rushed to bring solutions to organizations to help them manage their Apple and mobile devices in enterprise architectures. Vendors tried to give organizations the same management and security that Blackberry had provided them with previous BES features. Over the years, Apple and Google both recognized the need for mobile management and started building mobile device management features in their operating system, so that MDM solutions could provide better granular management and security control for enterprise organizations.
Today organizations are replacing older mobile devices in favor of Apple and Google devices. They feel comfortable in having these devices connected to corporate networks because they believe that they can manage them and secure them with MDM solutions. MDM solutions are the platform for organizations to ensure that mobile devices meet the technical, legal, and business compliance needed for their users to use devices of their choice, that are modern, and in many cases more productive than their legacy counterparts. MDM vendors have chosen to be container-based solutions, or device-based management. Container-based solutions provide segmentation of device data and allow organizations to completely ignore the rest of the device since all corporate data is self-contained. A good analogy for container-based solutions is Outlook Web Access. Outlook Web Access allows any computer to access Exchange email through a web browser. Computer software and applications are completely agnostic to corporate e-mail. Container-based solutions are similar, since they are indifferent to the mobile device data and other configuration components when being used to access an organization's resources, for example, e-mail on a mobile phone.
Device-based management solutions allow organizations to manage device and application settings, but can only enforce security policies based on the features made available to them by device manufacturers. XenMobile is a device-based management solution, however, it has many of the features found in container-based solutions giving organizations the best of both worlds.
In five easy steps, you can install and set up XenMobile on your system
Before you install XenMobile, you need to check whether you have all of the required elements, which are as follows:
Note
These values are updated as of August 2013. Please note that users should use the recommended values. The minimum values should only be used for lab environments with less than 10 mobile devices used for testing.
Disk space: 500 MB free (min). However, most installations will require at least 10 GB free.
Memory: 1 GB (min), 4 GB (recommended). The server must use an Intel Xeon class running at 3Ghz or AMD Opteron 1.8 Ghz class or faster processor.
Moodle requires a web server environment and it runs in Apache and IIS easily. Moodle should run in any server environment that supports PHP.
Server must be physical or virtual. We have tested this extensively on both the VMware ESXi and VMWarevCloud environments, along with Microsoft Hyper-V environments and it did not have any issue with virtual platforms.
You must ensure that you do not have any other software installed and running, including web servers, database servers, or other server type software running on XenMobile. The system should be purposefully built only for Citrix.
XenMobile will install PostgreSQL, however other SQL servers can be used. For large installations an external SQL server is recommended.
If you want to download the XenMobile MDM you need to contact Citrix to get a demo of the software. Citrix offers cloud-based demos, you can even request to download their software at: http://deliver.citrix.com/XenMobileMDM.html/.
We would suggest that anyone who is interested in XenMobile requests the cloud-based demo. These requests usually come from IT teams or the office of the CIO in an organization. It has all the features of the on-premise demo, but does not require you to set up or install the system. All the features can be tested and experienced with the cloud-based demo.
In addition to the hardware requirements described in the first step, most of the installations will need their Java software updated on their systems. XenMobile requires the following Java components before the installation of the XenMobile software:
Oracle Java SE 7 JDK (JDK download edition) update 11 and higher
Java Cryptography Extension (JCE) unlimited strength jurisdiction policy files 7
From your XenMobile server, go to http://www.oracle.com/technetwork/java/javase/downloads/java-archive-downloads-javase7-521261.html#jdk-7u4-oth-JPR to download Java. You may be asked to register on the Java's website before you are allowed to download the file. Please note, that the Java versions are very specific. You should check with the Citrix XenMobile documentation to check if updates to the versions of Java have occurred since the time of writing. The registration page is as follows:

The Java download registration Page
Once Java is downloaded, simply double-click the installation file on the XenMobile server to install it, as shown in the following screenshot:

The Java installation file
After you download the Java file, you must additionally download JCE. The following is the link to Oracle's web page from where you can download the additional Java components needed to install XenMobile:
http://www.oracle.com/technetwork/java/javase/downloads/jce-7-download-432124.html
The following page opens up:

Download JCE encryption files
After you download and extract the JCE package, copy the local_policy.jar and US_export_policy.jar files to the <java-home>\jre\lib\security folder and overwrite the existing files. This means that on most of the systems you will replace the files in the C:\Program Files\Java\jre7\lib\security directory.
You can see from the following screenshot that we are moving the files from the downloaded and extracted archive into our Java home directory. Select Move and Replace when prompted:

Replace Java encryption files with JCE strong encryption files
You are now ready to install the Citrix XenMobile software on our server. You will use the installation file that was sent to you from Citrix after you registered to obtain the software on step 2.You can install the software by performing the following steps:
Double-click on the installation file.
Click on Next > to continue with the installation, as shown in the following screenshot:

The XenMobile Setup wizard
Click on Next > to install XenMobile Database server and XenMobile Application server. If you have your own database server, you may uncheck the Database server option:

The XenMobile Setup Wizard
If you did not uncheck the installation of the database server, you will be asked to continue to install the PostgreSQL server, as shown in the following screenshot:
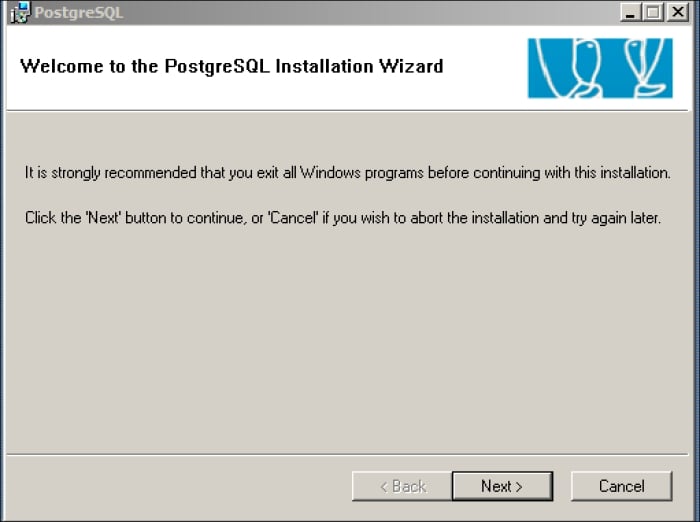
The PostgreSQL Installation Wizard
Review the default installation options. There is no need to change them. You may select additional options if you require them.
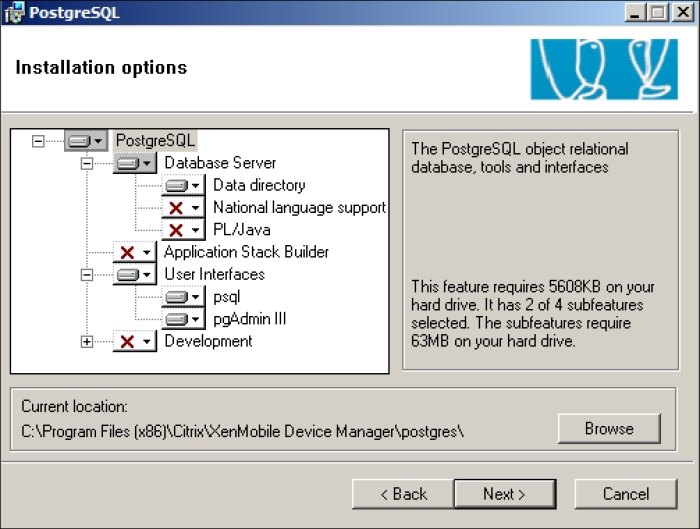
The PostgreSQL Installation Wizard
You will be prompted to create a user. Click on Yes to accept this message, as shown in the following screenshot:
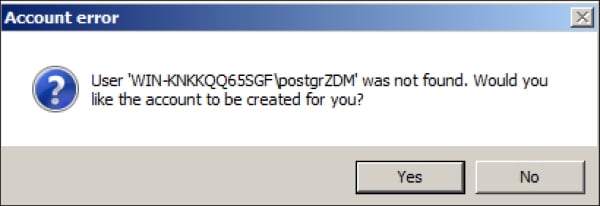
Creating ZDM database user
You will be asked for any additional components which you would like to install for the SQL server. You may select any additional components you may need, however XenMobile just needs the default components. You may click on Next > to continue, as shown in the following screenshot:
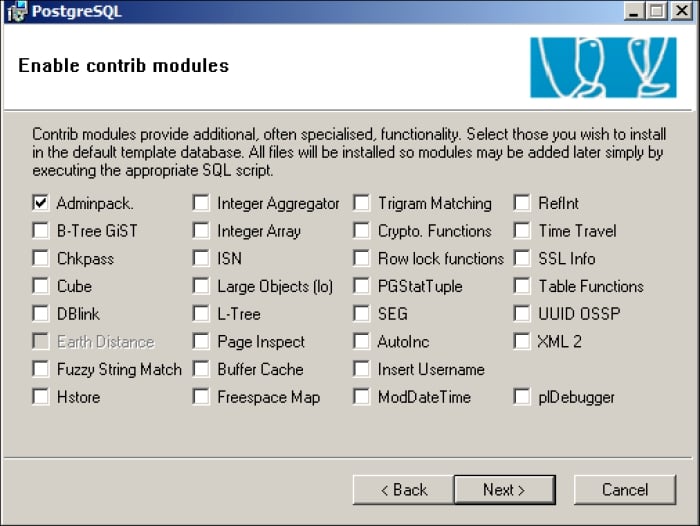
The additional database components
You need to add your licensed file for XenMobile that you received from Citrix at this point. If you do not have a licensed file you may simply click on Next >, as shown in the following screenshot:

Citrix XenMobile licensing
You must enter the name of your XenMobile server. This name should be a fully qualified DNS name assigned to you by XenMobile. You need to make sure the name of the server is fully resolvable by an external DNS from the Internet.

Citrix XenMobile final installation components
You need to enter your SQL server's admin username. If you used the default settings, the username will be
postgres. Please note, that you do not have to use this as the password, you can choose any password you like.You also need to enter your password that you set yourself earlier during the installation.
You will be asked to accept the name of the database. The default name is
ZDM. You should not change this name. You must keep the default name of the database asZDM.Click on Continue. The installation can take up to 15 minutes to complete.
Once your server is rebooted, ensure you do not have any errors appearing on the screen. XenMobile can take up to 5 minutes after the server is started for the application to get fully loaded, so be patient.
By this time, you should have a working installation of XenMobile MDM and should be free to play around and discover more about it. Open up a web browser (all the major web browsers that support Java Version 7 will work) and go to: https://localhost/zdm. You will be taken to the following screenshot:
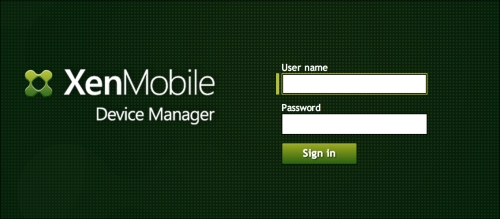
The XenMobile MDM's login screen
A mobile device policy is something which your organization can use to manage mobile devices. Policies can be used to distinguish mobile devices between corporate and BYOD devices. They can be used to automate the provisioning of devices into an organization and assign security policies. Before you can configure policies, you must configure your XenMobile server with basic configuration settings. In this section, we will show you how to configure XenMobile.
When you log in to XenMobile for the first time, you will open up a browser and go to https://server_ip_address/zdm. You will enter the username and password you had set during the initial installation. Once you log in, you are presented with a dashboard with a quick view of your system, as shown in the following screenshot:

The dashboard
Don't worry if this looks empty, we will soon enroll devices and start configuring policies. As we enroll devices, our dashboard will start displaying more relevant information.
Select the Option button on the top-right side of the screen. This will bring up the server options page, as shown in the following screenshot. This is where we will enter the basic server and administrative information for our XenMobile server as follows:

Server options
Initial parameters are default, but they can easily be changed based on the needs of an organization. Most options are self-explanatory, however, we will cover the more popular and complex options in further steps.
Apple iOS devices or Google android devices can be jailbroken or rooted. Jailbreaking or rooting a device gives users access to settings and lets them install applications that have not been approved by the manufacturers. This may include Internet tethering applications to allow users to use their devices as mobile modems, tweaking voice settings, or installing applications that are only available in different countries.
Many threats by mobile devices on iOS and Android platforms are caused by software that requires the system to be rooted (Android) or jailbroken (iOS). Rooted and jailbroken applications do not go through the same verification process as normal applications. XenMobile can detect if these devices violate compliance and block them from accessing corporate applications and other resources. The configurations options are shown in the following screenshot:

Blocking Jailbroken and Rooted devices
These options allow the administrator to:
To configure blocking of jailbroken or rooted devices on your system, by navigating to the Security submenu
Select Enable if you want to block jailbroken or rooted devices
XenMobile allows granularity over what type of users and mobile devices you want to manage. In addition, it allows you to set up specific groups of users that will manage the XenMobile server along with specific access rights. This is perfect for setting up specific access rights for desktop administrators and other junior administrators to manage the MDM system. The following screenshot shows how Xenmobile administrators can select different types of differentiated access models:

Blocking Jailbroken and Rooted devices
In addition to the role-based access, XenMobile can use LDAP or Microsoft AD to obtain the users or groups that will be managing the system. Administrators always have the option of using built-in users and groups to manage XenMobile as well. To use AD, open the LDAP Configuration window and add in your AD credentials, as shown in the following screenshot:
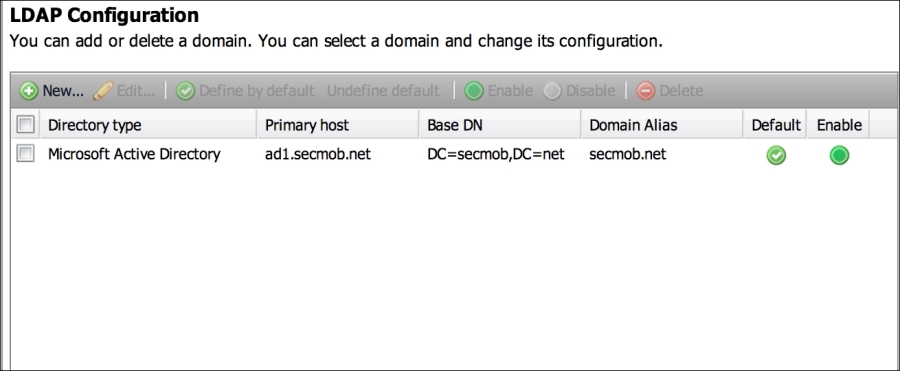
Configuring AD
Many of the advanced features require XenMobile to be configured to be able to relay an e-mail from an e-mail server. The e-mail server must be configured to accept SMTP from XenMobile and forward e-mails to external receipts on behalf of XenMobile.
E-mail settings are configured under the Notification Server options, as shown in the following screenshot:

XenMobile SMTP Configuration
Select a new server to configure the SMTP server. XenMobile can use open relay servers or servers that require explicit authentication. If you are using an open relay server, be sure to check the No Authentication option. The options for setting up the SMTP server are shown in the following screenshot:

SMTP options
As we have completed selecting and configuring the options, we may now click on the Save button at the bottom of the screen.
Congratulations! You are ready to start enrolling devices, configuring policies, and using the advanced features of XenMobile. Now, we will look at all these aspects and start to embed XenMobile in our organization.
XenMobile allows administrators to enroll devices in numerous ways. The most common way to enroll devices are: sending the user an e-mail, sending a user an SMS link, allowing the user to download the enrollment application, or importing a CSV file for bulk enrollment. All the enrollment options can be found by clicking on the Enrollment tab on the main dashboard, as shown in the following screenshot:
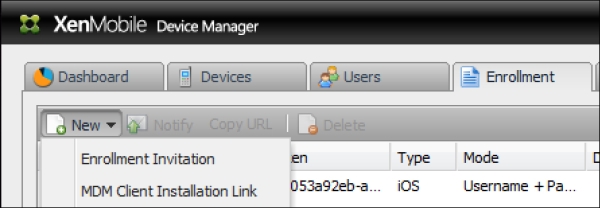
Enrolling options
When administrators enroll devices, they will typically start off creating templates for e-mails and text messages. This allows administrators to set custom messages to users. Specific users or groups of users from a local database or an active directory can enroll devices. We can examine the enrollment options, as shown in the following screenshot:

Enrolling devices
Lastly, it is possible that an administrator wants to enroll multiple devices at the same time. They can do this using the bulk import tool by importing a formatted CSV file. The CSV file will allow administrators to import multiple devices for multiple users and categorize them as personal or corporate devices. When XenMobile parses through the CSV file, it will send out an e-mail or text message to the user giving them further instructions on how to complete the enrollment. In the following screenshot, we can see the option to input a CSV File into XenMobile:

Enrolling devices via the CSV file
Most mobile security policies require a passcode to be set on the device. The first policy which we will create is to set a passcode, by performing the following steps:
Navigate to Policies | iOS | Configurations. (we are selecting iOS but you can apply these steps to any mobile OS).
Navigate to New Configurations | Profiles and Settings | Passcodes. We can see the passcode option, along with other configuration options that are available to us in the following screenshot:
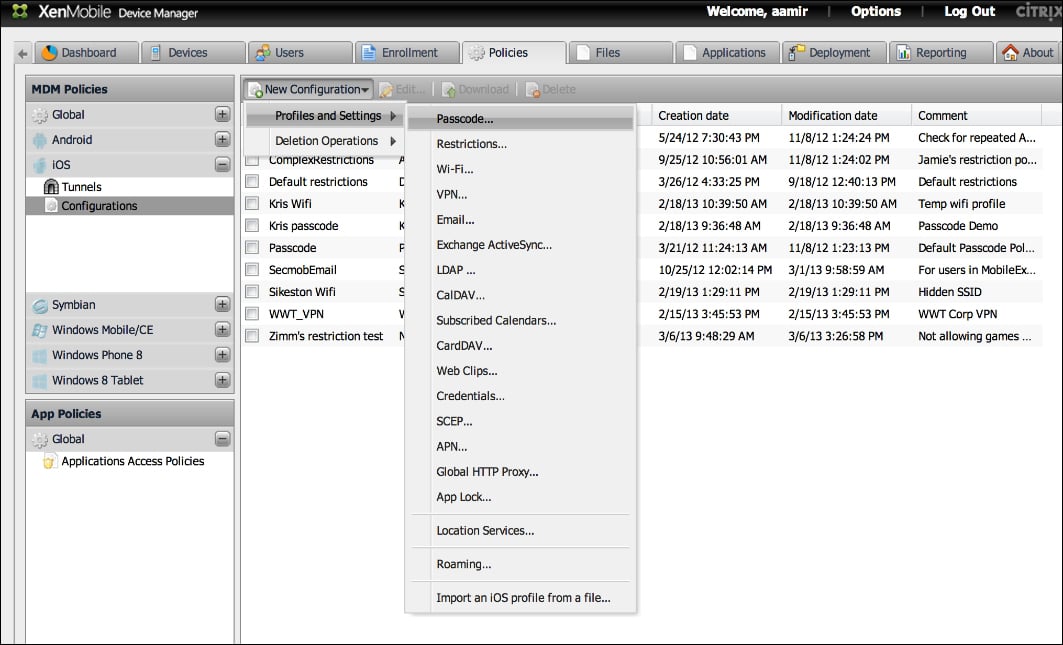
Configuring the Passcode policies
Select Passcode… and create a custom name for this policy.
Click on the Policy tab and configure the passcode policy options. The following screenshot shows us the passcode policy options, which we can set as a Xenmobile administrator:

Configuring the Passcode policies
iOS restrictions enable administrators of XenMobile to control features for voice dialing and camera usage, limiting Siri usage, YouTube, document syncing to iCloud, and other iOS specific features. Some features only work with the latest version of iOS. In addition, there are features that work with using the Apple Configurator.
Most mobile security policies require a passcode to be set on the device. The next policy we will create is to set a passcode.
Navigate to Policies | iOS | Configurations. (we are selecting iOS but you can apply these steps to any mobile OS)
Select Restrictions. The following screenshot shows iOS restrictions. The restriction options are specific to the selected OS and also show the applicable features for the selected OS:

iOS restrictions
iCloud restrictions specifically manage if data can be stored on iCloud. Apple uses iCloud to store data, documents, and photos. Photos on iCloud can be streamed across multiple devices for a user. Many corporations want to ensure that data is not being backed up to a user's personal cloud service. iOS restrictions can manage cloud storage options for iCloud. If a XenMobile adminstrator is concerned about other cloud storage platforms such as Dropbox and Box.net, they need to implement application specific policies (if available) for those specific applications. The iOS restrictions are currently only compatible with Apple's iCloud offering, and not with any third-party solutions. The following screenshot depicts iOS iCloud restrictions, which the XenMobile administrators can configure for their organization:

iCloud restrictions
Apple devices, by default, allow the user to accept and trust unsigned certificates or connections to untrusted servers. If you are a corporation and have your own data servers, you need to inform the Apple devices to trust your server. Therefore, Apple gives the ability to trust third-party certificates. Attackers also use third-party certificates to gain access to mobile platforms. They do this by tricking users into browsing to websites on their mobile phones or having them connect to rogue wireless networks. Therefore, some organizations may want to restrict non-trusted HTTPS prompts and only allow access to trusted sites.
In addition, administrators have the option of disabling JavaScript in the web browser, potentially reducing the likelihood of Java-based exploits. The security and web restrictions policies that can be configured on iOS devices are shown in the following screenshot:

The Security and web Restrictions
Most of the Android devices offer a small subset of restrictions as compared to Apple devices. Android devices also have limited methods for enforcing restrictions. One notable exception is Samsung devices, which offer more granular restrictions than most other Android devices when they are using the Samsung Android SAFE (Samsung Android for Enterprises) architecture. Samsung SAFE gives administrators the ability to provide access to specific built-in applications, hardware restrictions on camera, and wireless settings. In addition, using the SAFE architecture we can manage and restrict over-the-air upgrades: factory reset options, voice dialing, and screenshot captures.
Samsung SAFE allows administrators to provide restrictions on how much data a particular device should use and take action after a predetermined threshold has been met. Restrictions based on network access can come in handy when corporations are being charged for data. XenMobile can help administrators using Samsung devices to properly manage the device data. The following screenshot shows the data and network restrictions that can be configured by XenMobile administrators using the Samsung SAFE architecture:

Samsung SAFE Restrictions
Most mobile security policies require a passcode to be set on the device. Passcode policies enable encryption on devices and secure transactions such as mobile payment through NFC and certificates. We will create the next policy, by performing the following steps:
Navigate to Deployment | iOS Base Package | Edit.
Select Edit. We will edit a base package and add a passcode policy, as shown in the following screenshot:

Deploying a Policy
Select Group of Users. Select the users you want the policy to be applied to.
Select Resources. Add your passcode policy from the available resource pool to the deployment pool.
Select and configure any additional resources you may want to deploy.
Click on Finish.
You have now configured XenMobile, set up server options, enrolled devices, and configured basic policies. In the next section, we will discuss the top features of XenMobile and learn how we can use these features to embed mobile devices into our organization in an efficient and secured manner.
As you start to use XenMobile, you will realize that there is a wide variety of things that you can do with it. This section will teach you all about the most commonly performed tasks and most commonly used features in XenMobile.
XenMobile has one of the most important features of reporting the modules available in the mobile device manager software packages. Reporting gives XenMobile administrators a way to track devices, features, and violations in a mobile policy.
The process to access the reporting module is as follows:
Log in to your XenMobile server (
http://server_ip_address/zdm).
The login screen
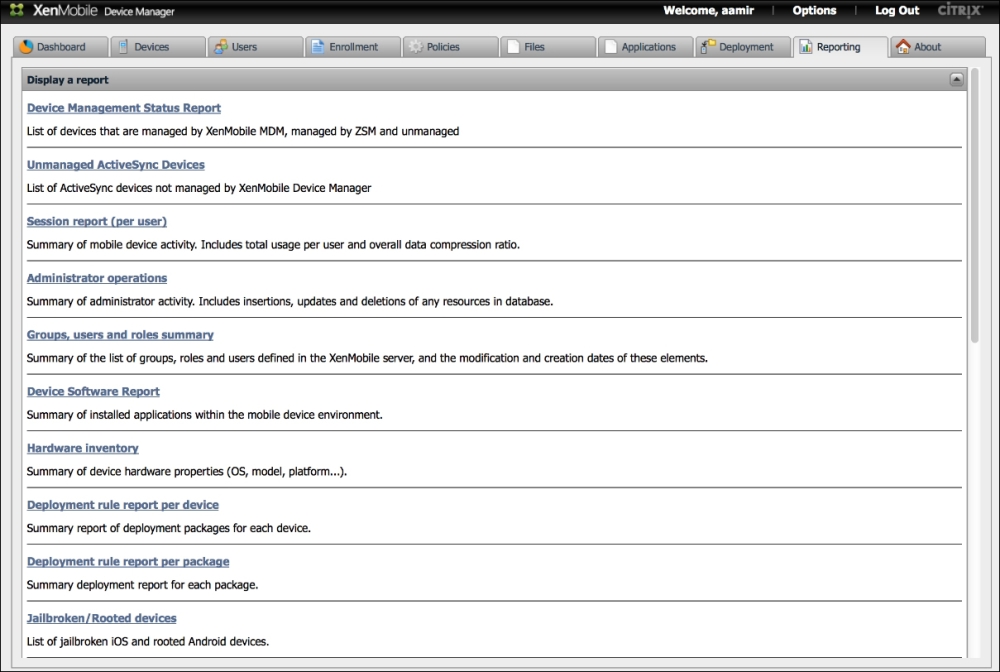
XenMobile has numerous reporting options that can be used to track the status of mobile devices, installed applications, and policy compliance. Click on the Reporting tab to see the reporting screen, as shown in the following screenshot:
Reports
Select a report.
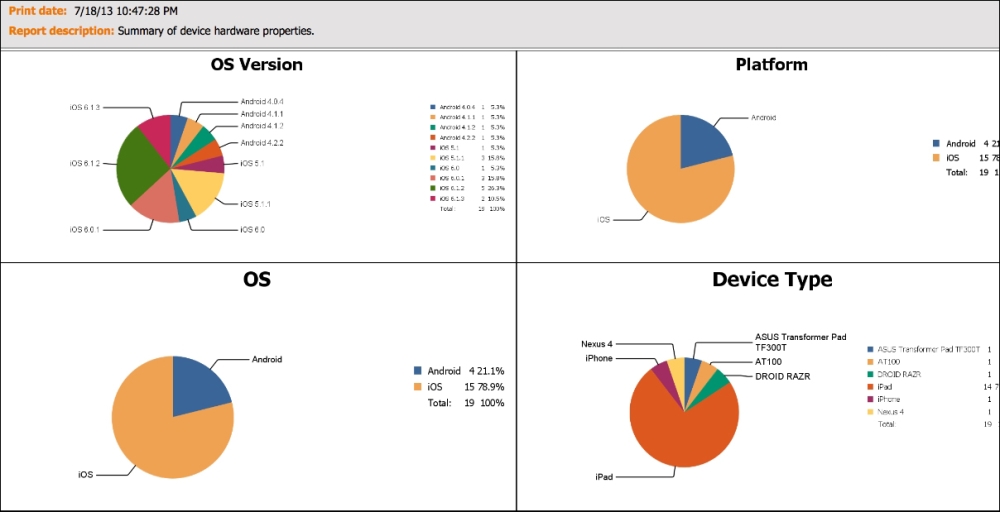
There are many reports, which you will find interesting. Most of them are self-explanatory. For example, hardware inventory will give you a breakdown of devices, OS, and models. Other reports that are popular are for jailbroken devices and rooted devices that show possible violations of default security settings, which could make the device vulnerable to external attacks. Overall, the reporting section will be used to review the current state of mobile devices in your organization. The following screenshot shows an example of types of devices in an organization by OS and platform (these reports can be exported into the PDF format):
Reports
If you have internally developed iOS apps (.ipa or any iOS apps that you have licensed to distribute, you can upload those apps directly to the device manager database and deploy those apps to users' devices. XenMobile allows administrators to distribute applications to users by allowing an organization to run its own internal application stores. In addition, XenMobile allows administrators to install on or remove the applications from Google and Apple devices via the push method. The push method is an automatic installation or removal of applications to the mobile device without the need for the user to go to an application store to install an application, or manually deleting an application. The installation process is as follows:
Log in to your XenMobile server at
http://server_ip_address/zdm.Click on the Application tab.
Navigate to New | New App.
You have a few options here, which you can select. They are as follows:
Push Remove Application: This option removes the installed application
Do not backup: This option will not back up an application or application data
Install the application via push or make it available via the internal Enterprise AppStore.
Install External Apps from AppStore.
You will now be able to install and manage applications on mobile devices in your organization, as shown in the following screenshot. The following screenshot displays the XenMobile's application store. The table shown in the following screenshot displays applications for every platform. At the time of writing this book, we couldn't filter this view to show only applications for specific platforms:
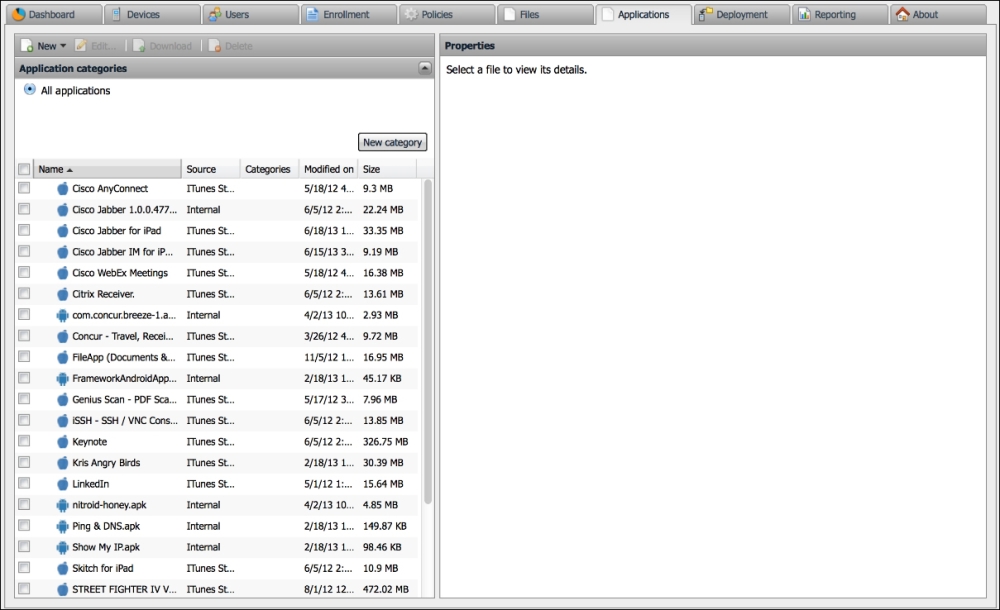
The Application store
Xenmobile provides you the unique ability to import your own applications, or link to an AppStore application for iOS devices. Lastly, you have the ability to add a volume purchase program (VPP) license file. A VPP license file allows an organization to purchase a bulk set of licenses of a single application. Therefore, their users do not have to download the same application and pay for it individually. Currently, VPP is only available for iOS applications of Apple platforms.
Secure Mobile Gateway provides granular access control for e-mail and calendar applications on devices that support Microsoft ActiveSync. You can configure Secure Mobile Gateway to allow or block access to Microsoft Exchange servers from mobile devices based on numerous device characteristics. They include the ownership of the devices, installed applications, devices rooted or jailbroken status, applications installed, and other conditions. When a device is blocked or allowed, it is reported on the XenMobile ZDM dashboard, so that the administrators have one unified view of the status of the devices.
The benefit of Secure Mobile Gateway is that it ensures that a user won't bypass your XenMobile policies that are being enforced on devices. A user who does not agree with your policies may decide to skip enrollment. He may have somehow decided that he does not need corporate applications that are being pushed or other device centric policies. However, typically most users will need access to their e-mail from their devices. If a user somehow figures out the necessary settings and credentials to configure his device manually, Secure Mobile Gateway can intercept that connection and make policies decisions based on an organization's needs. In other words, you could stop a user from accessing e-mails until he enrolls in the XenMobile MDM solution.
XenMobile Secure Mobile Gateway provides access to controls of SSL (HTTPS) ActiveSync requests made by mobile devices against backend exchange Client Access Servers (CAS).
Secure Mobile Gateway uses rules to allow or block access. A device client request is evaluated against the organization's polices. XenMobile Secure Mobile Gateway will make the determination if the mobile device is allowed to connect with the organization's Microsoft Exchange server. Xenmobile will then determine whether to allow or block access to the e-mail server from the mobile device based on the mobile device's status and the organization's security policy.
You can also use Secure Mobile Gateway to encrypt e-mail attachments that pass through the Exchange server, to ensure that only users with approved managed devices can view company documents securely and safely on their devices.
To install Secure Mobile Gateway on Windows 2008 servers you must perform the following steps:
Configure the Microsoft Forefront Threat Management Gateway.
Install Citrix Secure Mobile Gateway on the server running Microsoft Forefront Threat Management Gateway as an ISAPI plugin.
Use the Citrix SMG Installer application that came with your software.
Once Secure Mobile Gateway is installed, you can configure the instructions of Secure Mobile Gateway under the XenMobile server options.

Secure Mobile Gateway Options
We gave some basic highlights on how to install Secure Mobile Gateway. It should be noted that the installation of the Secure Mobile Gateway requires the administrator to have access on the Exchange environment to install the software. Additionally, Citrix's XenMobile documentation should be referred to for updates or changes. The following screenshot outlines how the administrators can quickly manage and view the status of the devices managed via Secure Mobile Gateway:
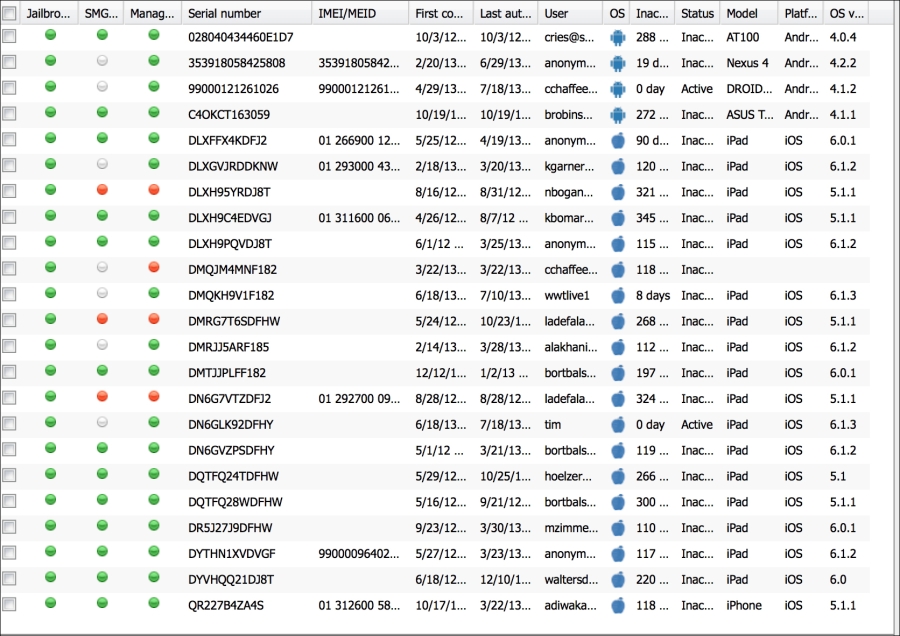
Device Status when managed via SMG
The XenMobile service manager, or commonly referred to as ZSM is an add-on for Blackberry environments. It requires the installation of Blackberry Enterprise Server (in most cases). It allows XenMobile to access Blackberry services and remotely manage, lock, and wipe Blackberry devices. Please note, that ZSM is normally used to manage Blackberry devices prior to version 10 of Blackberry OS. Most Blackberry devices running Blackberry OS 10 can communicate directly with ActiveSync. However, Blackberry OS 10 can still be managed via Blackberry Enterprise Servers, and in those cases it can still be used with ZSM.
To use ZSM, simply install the ZSM file onto the Blackberry device you plan to manage. You may need to complete additional steps on your Blackberry Enterprise Server that are dependent on your specific business configuration.
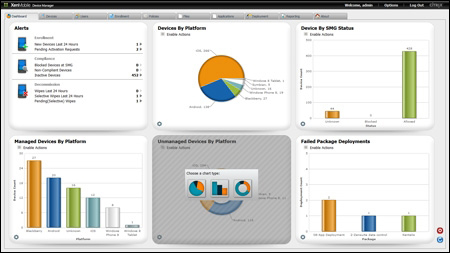
Citrix XenMobile MDM Dashboard is a way to have a quick view of the status of the current system. The dashboard can be customized by using different graphs and charts that open up based on the settings for the user authenticating the system. The following screenshot is an example of the XenMobile dashboard:
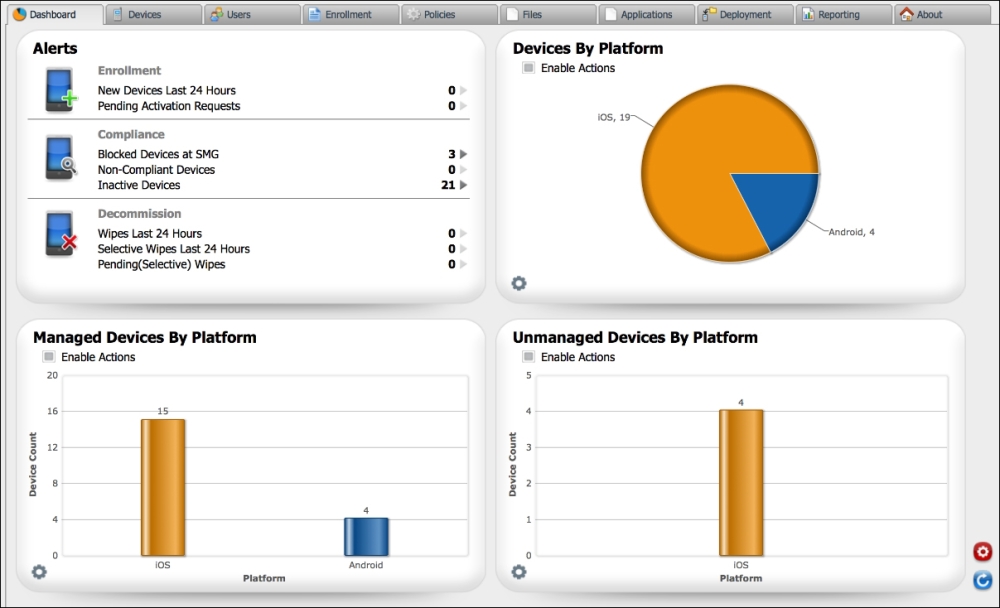
Dashboard
The dashboard's Alerts section gives an administrator the option to monitor the following alerts:
New enrollments
Non compliance
Inactive devices
Secure Mobile Gateway blocked users
Device wipes (completed, full, selective, and pending)
The following screenshot shows the current alerts for recent events:
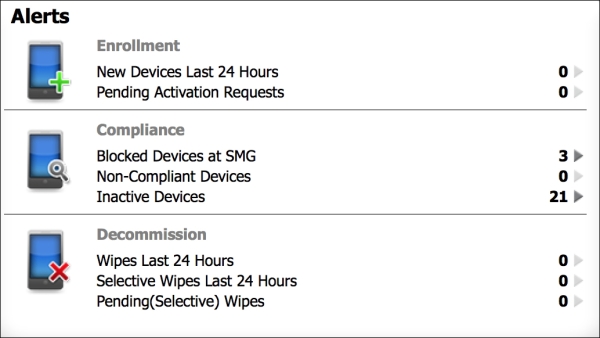
Alert Status
Additional alerts that can be configured on the Dashboard include:
Device Actions: It is an embedded dashboard widget that lets administrators interact with multiple devices and send alerts and messages to those devices.
Charts: It allows administrators to view mobile devices and group devices in multiple views. In addition, charts lets an administrator group devices by their functionality in an organization, such as employee owned or BYOD devices, as well as other categories. It is a great tool for administrators to quickly gain an understanding of devices on their network, as well as to categorize and compare other devices they have in their organization. For example, charts may be used by administrators to compare how many iPhones have been updated to the latest iOS software and how many are running older firmware. The following are the other device categories:
Devices by platform: This displays BYOD devices by their operating system, such as iOS, Blackberry, or Android.
Managed devices by platform: This displays BYOD and corporate managed devices by their operating system, such as iOS, Blackberry, or Android.
Unmanaged devices by platform: This option displays devices that were previously managed by XenMobile, but are no longer managed by the system, nor do they have corporate certificates. The reason these devices fall into this category is because they were previously managed but now have been wiped.
Device by Secure Mobile Gateway status: This option gives administrators status of the devices that have interacted with Secure Mobile Gateway. This option will allow administrators to view what devices have been managed or blocked by Secure Mobile Gateway.
Devices blocked by reason: This option allows administrators to view all the devices that are blocked. This option breaks down for administrators why devices are blocked and how many devices have violated a security policy, or do not have access to corporate resources. Some examples are the devices blocked because they fail a security policy, have blacklisted applications or invalid certificates that can be categorized and viewed by administrators.
Device ownership: This option allows administrators to view all the devices and verify if they are corporate managed devices or BYOD devices.
Android Touchdown license status: This option displays the status of touchdown licenses on Android devices.
Failed package deployments: These options will allow administrators to view what packages or applications have failed to install on mobile devices and which devices they failed to install on.
Citrix XenMobile MDM Dashboard gives administrators the power to customize the dashboard which we explored earlier. Each administrator's dashboard is customized to their own view and setup. The following screenshot is an example of a dashboard that has been customized with the options that were discussed in this section:
A customized Dashboard by different administrators
Citrix XenMobile MDM Dashboard gives administrators a quick way to handle common management tasks related to XenMobile. In the following example, we will examine how administrators can perform actions on a device from the dashboard, by performing the following steps:
Click on the Devices tab.
Select the device you want to perform a task on and right-click on the device:

Alert Status
Now that we know how to quickly access the menu to perform device actions, let's examine what security options are available.
Select the Security menu.

Alert Status
The Security menu allows us to perform the following options:
Lock: Administrators can lock devices from this screen. If a passcode exists on a device, it will be required to unlock it.
Selective Wipe: This option will wipe all the corporate and managed data. The user's personal data, applications, and pictures will be left intact on the device.
Full Wipe: This option will completely wipe the devices and then the devices will be reset to default factory settings.
Locate: This option determines the location of the device using cellular tower triangulation and, if available, GPS. The results will be displayed on a map. It is important to note that this feature is highly dependent on the device's settings and capabilities. Furthermore, administrators may have legal restrictions on how they track and locate people in their organization.
We just explained the top features in Citrix XenMobile. XenMobile has over 300 features and within the context of this book we cannot cover all of them. However, the features we covered are the most popular and widely used. In the next section, we will cover people and places you should get to know that will familiarize you with some of the resources which will help you in learning more about the other features available in XenMobile and start implementing them in your organization.
If you need help with Citrix XenMobile MDM, here are some people and places which will prove very useful.
Homepage: http://www.citrix.com/products/xenmobile/overview.html
Manual and documentation: http://support.citrix.com/proddocs/topic/cloudgateway/xmob-mdm-landing-page-con.html
The following are some of the tutorials on how to get started with XenMobile:
A six minute video from NunoQueirosAlves on an overview of XenMobile MDM is found at http://www.youtube.com/watch?v=d75qHTkVRuE
An official video from Citrix on how to integrate XenMobile into the enterprise (this is a 46 minute video which will give you an in-depth, advanced look at many features associated with the product) is found at http://www.youtube.com/watch?v=o4vQ6lNXx9E
A video that highlights how to enroll mobile devices with XenMobile is found at http://www.youtube.com/watch?v=U0cl9Z6DLZg
Official mailing list: It is the XenMobile's mailing list, which has been replaced by forums
Official forums: http://forums.citrix.com/category.jspa?categoryID=302
User FAQ: Refer to the official forums. Product marketing FAQ can be found at http://www.citrix.com/products/xenmobile/features/mdm.html
World wide technology: It provides expert mobile professional services to install and implement XenMobile at http://www.wwt.com
The following are the influential blogs on XenMobile products:
Dr. Chaos (dark security and total chaos) is a resource for mobile security and BYOD found at http://www.drchaos.com/
The official Citrix mobility blog is found at http://blogs.citrix.com/tag/xenmobile/
World wide technology's official blog is found at https://www2.wwt.com/blogs
Follow the official XenMobile's Twitter account at https://twitter.com/XenMobile
Follow Dr. Chaos, the author of this book at https://twitter.com/aamirlakhani
Follow Aman Diwakar, the Cyber expert at https://twitter.com/DDOS
For more open source information, follow Packt at http://twitter.com/#!/packtopensource