


 Download code from GitHub
Developing a Spatial Analysis Platform with WPS
In this chapter, you'll learn how to use the Web Processing Service (WPS) to run geospatial processing on your data and return the results to your web app. We'll start out by installing the WPS plugin on your GeoServer instance, and you'll learn how it works. Then you'll use the WPS request builder to create some simple WPS requests. You'll explore the process chaining technique with a more complex example, and finally, we'll integrate the complex WPS request into OpenLayers.
In this chapter, we will cover the following topics:
- Installing and learning the basics of WPS
- WPS request builder
- Process chaining
- OpenLayers integration
Installing and learning the basics of WPS
Let's get started by installing and learning the basics of WPS. We'll start by installing the plugin and noticing changes in the web administration interface within GeoServer. You'll learn about the WPS standard and basic structure, and finally, we'll look at a simple WPS request.
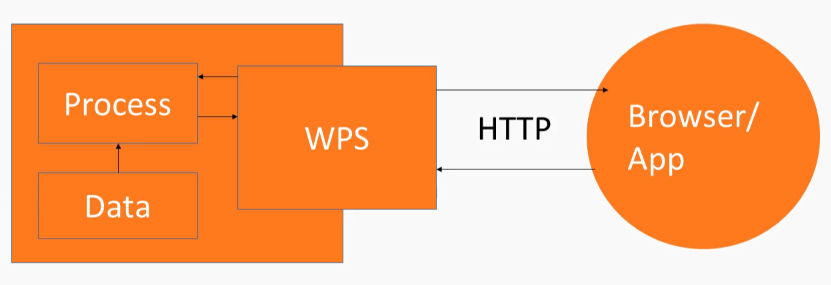
WPS is an interface standard, similar to WMS and WFS; however, the data output by WPS is dynamically created by a process or set of processes run by the WPS server; in our case, GeoServer. Like WFS, a request can be sent synchronously or asynchronously via HTTP POST or HTTP GET. The WPS standard defines the format of the expected input and output of the processes it interfaces with, so the data that you send in needs to match the expected data format of the service.
An example of this could be a buffer process that takes, as an input, a geographical coordinate expressed as JSON, and produces a polygon overlay that is perhaps produced as GML, and then that is displayed on a map in a web app, as shown in the following diagram:
First we need to install the WPS plugin with GeoServer, as this capability is not available in GeoServer without the plugin. The way that you do that is the same as for other plugins and GeoServer. You go to the released download page (http://geoserver.org/release/stable/), and the Extensions section is at the bottom. You download the WPS services zip archive, and expand it, and then pull it into the WEB-INF plugins directory. WPS can be used with HTTP GET and HTTP POST.
The following is an HTTP GET WPS request:
http://localhost:8080/geoserver/ows?service=wps&version=1.0.0&request=GetCapabilities
After we've installed the WPS plugin, we can now send a WPS request to GeoServer, and, through this URL, we're using the get capabilities operation within WPS which, like WFS or WMS, just gives us an XML representation of all of the processes that the WPS server supports.
And you can see, here we have many processes, such as this envelope process, which you may recognize from other GIS packages you might have used, as shown in the following code snippet:
<wps:Process wps:processVersion="1.0.0">
  <ows:Identifier>geo:envelope</ows:Identifier>
  <ows:Title>Envelope</ows:Title>
  <ows:Abstract>
    Returns the smallest bounding box polygon that contains a geometry.
    For a point geometry, returns the same point.
  </ows:Abstract>
</wps:Process>
Here's a polygon extraction process, as shown in the following code snippet, and these are namespaces that correspond to the underlying code that's used to create the WPS service:
<wps:Process wps:processVersion="1.0.0">
  <ows:Identifier>ras:PolygonExtraction</ows:Identifier>
  <ows:Title>Polygon Extraction</ows:Title>
  <ows:Abstract>
    Extracts vector polygons from a raster, based on regions which are
    equal or in given ranges
  </ows:Abstract>
</wps:Process>
This is created before we install the plugin. It's more or less outside of our control, unless we want to do coding in Java, I guess. So, there are some different namespaces here, such as ras:PolygonExtraction, vec:VectorZonalStatistics, and so on. These are not something you'll be modifying, really, but it's good to know that there are different operations within different namespaces in WPS.
After we've installed the WPS plugin, we also have some additional options in our GeoServer instance. This process status is connected to WPS. We have a WPS Settings area, and a Security area, and in our Demos we now have the ability to create requests with a WPS request builder and Demo requests.
Just a word about WPS syntax: the syntax, similarly to when we were using WFS and WMS, is defined on a specification, and you can get the details of the specification if you go through the documentation. Open Geospatial (http://docs.opengeospatial.org/is/14-065/14-065.html#15) is the best place to look for that. You can see that this execution type request (WPS GetCapabilities request), as shown in the following diagram, will be the main operation that we'll be using to run different kinds of processes:
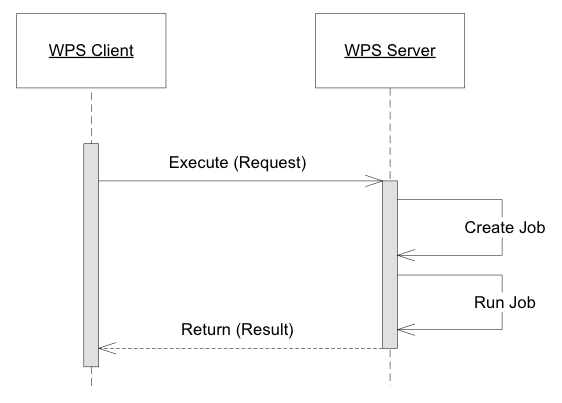
The processes are those geometric operations that we noticed, and they get a capabilities document response. And you'll get a better example of how an execute operation is defined in the WPS XML, but I will mention that you'll see the identifier or come up a lot, which can be used to identify a process or identify a reference, which will be usually some kind of external data. We'll also see some kind of XML about the response and how to format that.
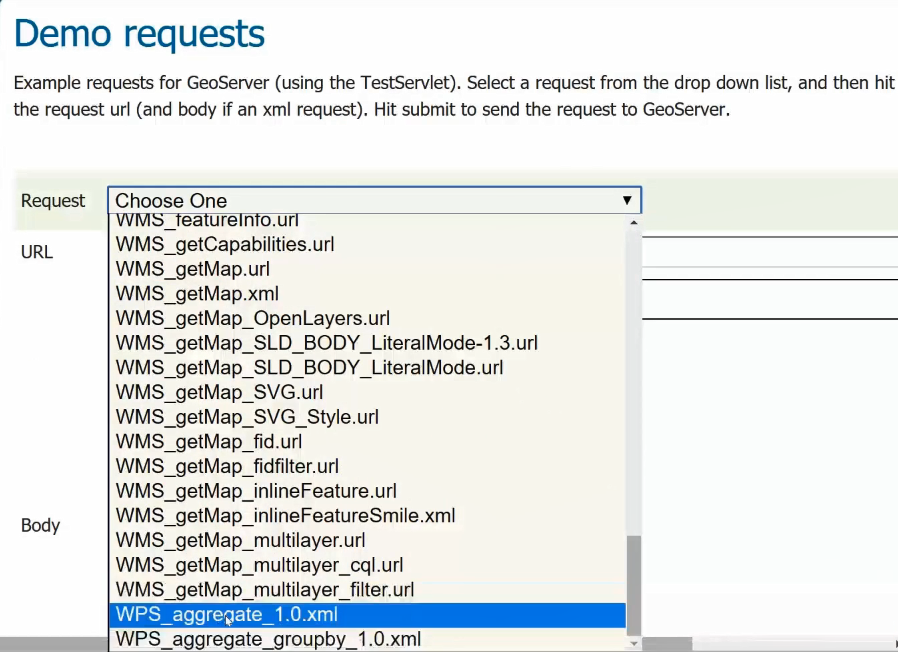
So, let's take a look at a simple WPMS, or WPS request, through the Demo requests area of GeoServer. We've used this in the past with WFST, and we have these WPS options now, after installing WPS, as shown in the following screenshot:
Let's try to check out a WPS request. The following code will be sent as a HTTP POST request via the following XML:
<?xml version="1.0" encoding="UTF-8"?><wps:Execute version="1.0.0" service="WPS" xmlns:xsi="http://www.w3.org/2001/XMLSchema-instance" xmlns="http://www.opengis.net/wps/1.0.0" xmlns:wfs="http://www.opengis.net/wfs" xmlns:wps="http://www.opengis.net/wps/1.0.0" xmlns:ows="http://www.opengis.net/ows/1.1" xmlns:gml="http://www.opengis.net/gml" xmlns:ogc="http://www.opengis.net/ogc" xmlns:wcs="http://www.opengis.net/wcs/1.1.1" xmlns:xlink="http://www.w3.org/1999/xlink" xsi:schemaLocation="http://www.opengis.net/wps/1.0.0 http://schemas.opengis.net/wps/1.0.0/wpsAll.xsd">
  <ows:Identifier>gs:Aggregate</ows:Identifier>
  <wps:DataInputs>
    <wps:Input>
      <ows:Identifier>features</ows:Identifier>
      <wps:Reference mimeType="text/xml"
       xlink:href="http://geoserver/wfs" method="POST">
        <wps:Body>
          <wfs:GetFeature service="WFS" version="1.0.0"
           outputFormat="GML2"
           xmlns:sf="http://www.openplans.org/spearfish">
            <wfs:Query typeName="topp:states"/>
          </wfs:GetFeature>
        </wps:Body>
      </wps:Reference>
    </wps:Input>
    <wps:Input>
      <ows:Identifier>aggregationAttribute</ows:Identifier>
      <wps:Data>
        <wps:LiteralData>PERSONS</wps:LiteralData>
      </wps:Data>
    </wps:Input>
    <wps:Input>
      <ows:Identifier>function</ows:Identifier>
      <wps:Data>
        <wps:LiteralData>Count</wps:LiteralData>
      </wps:Data>
    </wps:Input>
    <wps:Input>
      <ows:Identifier>function</ows:Identifier>
      <wps:Data>
        <wps:LiteralData>Average</wps:LiteralData>
      </wps:Data>
    </wps:Input>
    <wps:Input>
      <ows:Identifier>function</ows:Identifier>
      <wps:Data>
        <wps:LiteralData>Sum</wps:LiteralData>
      </wps:Data>
    </wps:Input>
    <wps:Input>
      <ows:Identifier>function</ows:Identifier>
      <wps:Data>
        <wps:LiteralData>Min</wps:LiteralData>
      </wps:Data>
    </wps:Input>
    <wps:Input>
      <ows:Identifier>function</ows:Identifier>
      <wps:Data>
        <wps:LiteralData>Max</wps:LiteralData>
      </wps:Data>
    </wps:Input>
    <wps:Input>
      <ows:Identifier>singlePass</ows:Identifier>
      <wps:Data>
        <wps:LiteralData>false</wps:LiteralData>
      </wps:Data>
    </wps:Input>
  </wps:DataInputs>
  <wps:ResponseForm>
    <wps:RawDataOutput mimeType="application/json">
      <ows:Identifier>result</ows:Identifier>
    </wps:RawDataOutput>
  </wps:ResponseForm>
</wps:Execute>
You can see Identifier identifying the Aggregate operation or process, and gs is the namespace. This just means that this is a GeoServer-specific WPS process, and there will be some features that are given as input into this process. In this case, the features are coming from the WFS service on the GeoServer, and there are a couple of other parameters that are defined here in input and identifier areas, along with literal data. Here you can see the output format; the raw data output will be expressed as JSON. So now, if we Submit this request, in return we will get the aggregation results expressed in JSON, which is as follows:

This is aggregating some information about states and population. So now, you've seen a simple WPS request. In the next section, you'll see how to create a WPS request with a request builder.
WPS request builder
In the previous section, you installed and learned the basics of WPS. In this section, you'll learn about the GeoServer WPS request builder tool in the web administration interface, and how you can use it to generate requests based on WPS processes and parameters. Throughout this section, we'll create a single request in the builder. We'll look at processes and select process. Next, we'll consider and select inputs, layer, reference, text, and subprocess, and view the constructed XML request. Finally, we'll select a format for output and examine the results. As discussed in the previous section, the request builder is accessed from the demos page. The first step is to choose a process, just as shown in the following screenshot:
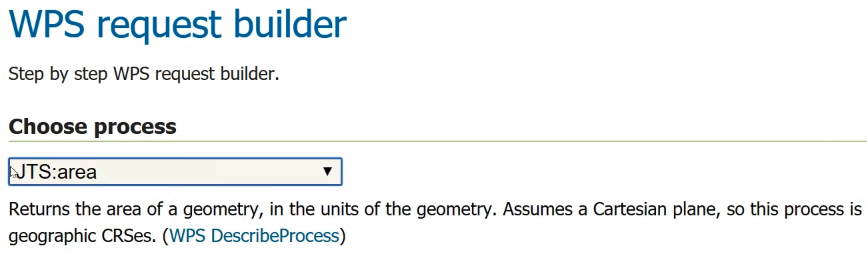
JTS refers to the Java Topology Suite namespace, I believe, and this area process is just a process that happens to be attached to that package; it's part of GeoServer. JTS:area returns the area of a geometry, in the units of the geometry, as shown in the preceding screenshot, so the input here is a geometry.
The geometry can be directly input as XML, GML, or any of the following formats:
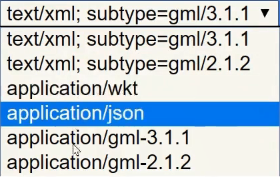
Another option would be to REFERENCE the geometry. You can get it from GeoServer, as follows:
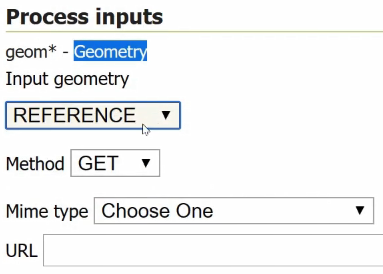
You just need to put a URL in there to get the correct geometry.
With all of these different options, it's best to break the problem down into smaller units, so you can test and make sure you're getting the output that you're expecting.
There's an option in here, SUBPROCESS, which I've found to not work. Theoretically, you could use some kind of process chaining in here; for example, you could use gs:CollectGeometries, which turns a collection into a geometry, and then the geometry would be useful for that area process. Unfortunately, I have not had any success with this, so I'm not going to get into using that subprocess here to create process chaining in the builder, but I will say that you can select a subprocess and, sometimes, you can get some kind of XML output.
One of my favorite things to do with the request builder is to just get XML output. For instance, we can see what the actual request would look like as created by the request builder, as shown in the following code, and then copy and paste that into an XML document, edit it, and make it actually work:
<?xml version="1.0" encoding="UTF-8"?><wps:Execute version="1.0.0" service="WPS" xmlns:xsi="http://www.w3.org/2001/XMLSchema-instance" xmlns="http://www.opengis.net/wps/1.0.0" xmlns:wfs="http://www.opengis.net/wfs" xmlns:wps="http://www.opengis.net/wps/1.0.0" xmlns:ows="http://www.opengis.net/ows/1.1" xmlns:gml="http://www.opengis.net/gml" xmlns:ogc="http://www.opengis.net/ogc" xmlns:wcs="http://www.opengis.net/wcs/1.1.1" xmlns:xlink="http://www.w3.org/1999/xlink" xsi:schemaLocation="http://www.opengis.net/wps/1.0.0 http://schemas.opengis.net/wps/1.0.0/wpsAll.xsd">
  <ows:Identifier>JTS:area</ows:Identifier>
  <wps:DataInputs>
    <wps:Input>
      <ows:Identifier>geom</ows:Identifier>
      <wps:Data>
        <wps:ComplexData mimeType="text/xml;
          subtype=gml/3.1.1"><![CDATA[Some text]]>
        </wps:ComplexData>
      </wps:Data>
    </wps:Input>
  </wps:DataInputs>
  <wps:ResponseForm>
    <wps:RawDataOutput>
      <ows:Identifier>result</ows:Identifier>
    </wps:RawDataOutput>
  </wps:ResponseForm>
</wps:Execute>
Let's try that gs:CollectGeometries process under the Choose process dropdown, because I know that we can use an existing GeoServer layer there, and we can view the output. Select tiger:giant_polygon from the Process inputs dropdown.
There are a couple of different options for output; let's get it in JSON by selecting application/json from the Process outputs dropdown.
Select the Execute process button, and you can see successful output, as shown in the following screenshot:

So, this is useful as a kind of testing tool to build up parts of your process if you're creating a complex process with process chaining, which we'll be learning about in the next section. If you want to preview the GeoJSON, one nice site to do it at is http://geojsonlint.com/, and you just paste in your GeoJSON. If it's valid, it'll show up on the map, as shown in the following screenshot; if it's not, it'll give you a pretty good error message about why it's not working:
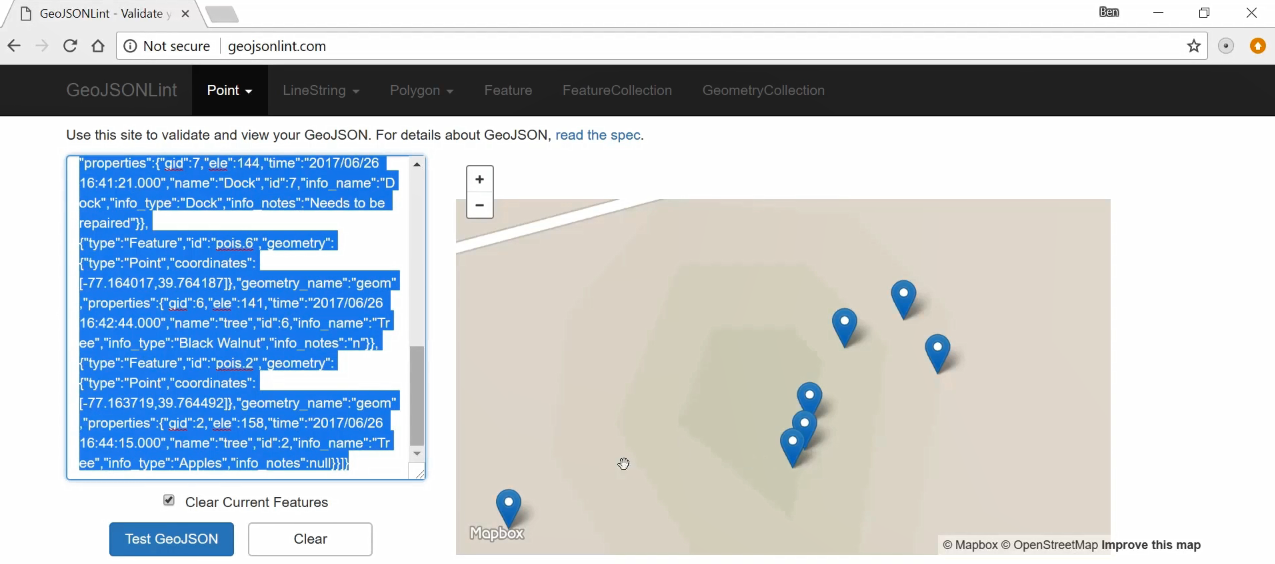
Also, QGIS is always helpful when you're going through a process and are able to preview data output.
In this section, you learned about building a WPS request with request builder, and about some of the parts of a WPS request, especially input formats. In the next section, you'll learn more about building a complex request with process chaining, and we can bring some of the XML we created with our request builder into the more complex process-chained WPS request.
Process chaining
In the previous section, you learned about creating WPS requests with WPS request builder. In this section, you'll learn how to make more complex WPS requests with process chaining. First, we'll take a look at a chain process request in plain XML. Next, we'll create an even more complex request. Finally, we'll add this request to a minimal OpenLayers web app to test the results of POST.
Here is our first process-chained XML, and you can see that the first WPS process is started here with this wps:Execute operation. The identifier is gs:CollectGeometries, so it's the gs:CollectGeometries process that we're running here, as shown in the following code:
<?xml version="1.0" encoding="UTF-8"?>
<wps:Execute version="1.0.0" service="WPS" xmlns:xsi="http://www.w3.org/2001/XMLSchema-instance" xmlns="http://www.opengis.net/wps/1.0.0" xmlns:wfs="http://www.opengis.net/wfs" xmlns:wps="http://www.opengis.net/wps/1.0.0" xmlns:ows="http://www.opengis.net/ows/1.1" xmlns:gml="http://www.opengis.net/gml" xmlns:ogc="http://www.opengis.net/ogc" xmlns:wcs="http://www.opengis.net/wcs/1.1.1" xmlns:xlink="http://www.w3.org/1999/xlink" xsi:schemaLocation="http://www.opengis.net/wps/1.0.0 http://schemas.opengis.net/wps/1.0.0/wpsAll.xsd">
  <ows:Identifier>gs:CollectGeometries</ows:Identifier>
  <wps:DataInputs>
    ...
    // Full code in the code bundle
  </wps:ResponseForm>
</wps:Execute>
But the interesting thing is that when you look at wps:Input of CollectGeometries, you can see it's getting the features parameter from wps:Reference. So, this is not wps:Execute, yet it still is wps:Reference, but it's referencing a text/xml type that includes an wps:Execute operation in it, which is a little bit convoluted, but that's just how it's set up. And this is usually how you're going to refer to process-chained processes, with XML inside of other processes.
So, we have our second wps:Execute operation here, inside a wps:Body section, and this is using the BufferFeatureCollection process, which also has a features input parameter:
<wps:Body>
  <wps:Execute version="1.0.0" service="WPS">
   <ows:Identifier>gs:BufferFeatureCollection</ows:Identifier>
    <wps:DataInputs>
      <wps:Input>
        <ows:Identifier>features</ows:Identifier>
        <wps:Reference mimeType="text/xml" xlink:href="http://geoserver/wfs" method="POST">
          <wps:Body>
            <wfs:GetFeature service="WFS" version="1.0.0" outputFormat="GML2" xmlns:learning-geoserver="http://packtpub.com/learning-geoserver">
              <wfs:Query srsName="EPSG:2272" typeName="learning-geoserver:pois"/>
            </wfs:GetFeature>
          </wps:Body>
        </wps:Reference>
      </wps:Input>
Here, for features, we're also using wps:Reference, but rather than having an additional WPS request or WPS section inside of wps:Reference, we're using wfs. This section in here is actually just a valid wfs defined by the WFS standard:
<wfs:GetFeature service="WFS" version="1.0.0" outputFormat="GML2" xmlns:learning-geoserver="http://packtpub.com/learning-geoserver">
  <wfs:Query srsName="EPSG:2272" typeName="learning-geoserver:pois"/>
</wfs:GetFeature>
So anything that you would put, for example, in a wfs:Query section on WFS would be valid, and in this section of this XML. We're just using a regular wfs:Query, getting all of the points of interest in the learning-geoserver:pois workspace. Some things to be aware of here are, again, data types, so we're going to be outputting the following little portion as text XML-based wfs-collection:
<wps:RawDataOutput mimeType="text/xml; subtype=wfs-collection/1.0">
  <ows:Identifier>result</ows:Identifier>
</wps:RawDataOutput>
That is just the way this buffer features collection process returns data, and, of course, gs:CollectGeometries will turn that collection into geometries. So, be aware of data formats. You'll be using a lot of different formats through a process-chained operation. A lot of the time, you'll be changing between different formats, so of course, the spatial reference will be important. In this case, we'd have trouble doing some of these operations if we're not using a linear spatial reference, and we end up having to change or reproject the spatial reference into a different system later on, which you'll see in the next section, with OpenLayers.
The namespaces are also very important. Because this is just a feature of XML, you have to explain what your tag is referring to so that all the different data types appear in their own way. If you are using XML namespaces correctly, it separates out portions of the XML in the correct way so that the services you're feeding it to understand how to read the data.
You can see many namespaces are defined up here; not all of them are necessary, but you can see that wfs is there, defining this little section and the syntax for this section, which comes from a WFS standard:
<wps:Reference mimeType="text/xml" xlink:href="http://geoserver/wfs" method="POST">
  <wps:Body>
    <wfs:GetFeature service="WFS" version="1.0.0" outputFormat="GML2" xmlns:learning-geoserver="http://packtpub.com/learning-geoserver">
      <wfs:Query srsName="EPSG:2272" typeName="learning-geoserver:pois"/>
    </wfs:GetFeature>
  </wps:Body>
</wps:Reference>
Here is the result of this as GML:
<wps:RawDataOutput mimeType="text/xml; subtype=gml/3.1.1">
  <ows:Identifier>result</ows:Identifier>
</wps:RawDataOutput>
So, that's our first XML example of a WPS request. Let's look at our second example, as follows:
<ows:Identifier>JTS:difference</ows:Identifier>
  <wps:DataInputs>
    <wps:Input>
      <ows:Identifier>a</ows:Identifier>
      <wps:Reference mimeType="text/xml; subtype=gml/3.1.1" xlink:href="http://geoserver/wps" method="POST">
        <wps:Body>
          <wps:Execute version="1.0.0" service="WPS">
             <ows:Identifier>gs:CollectGeometries</ows:Identifier>
            <wps:DataInputs>
              <wps:Input>
                <ows:Identifier>features</ows:Identifier>
                <wps:Reference mimeType="text/xml" xlink:href="http://geoserver/wps" method="POST">
This is our second WPS request, and it will be even more complex than the last one, with process chaining. In the last process chain, we look at this gs:CollectGeometries section and everything below it. In this process-chained operation, we're using this difference process, which is based on a JTS namespace, and this takes two wps:Input parameters:
<ows:Identifier>JTS:difference</ows:Identifier>
Each of these inputs gives geometry in GML, and this process will take the difference of these geometries and give us that as a separate geometry feature collection or single geometry in GeoJSON format:
<wps:RawDataOutput mimeType="application/json">
  <ows:Identifier>result</ows:Identifier>
</wps:RawDataOutput>
Now I'm moving over into OpenLayers. We can run a very simple WPS request as follows:
<!DOCTYPE html>
<html lang="en">
<head>
  <title>WPS-Request Example</title><!-- Required meta tags -->
  <meta charset="utf-8">
  <meta name="viewport" content=
 "width=device-width, initial-scale=1, shrink-to-fit=no">
  <!-- OL stylesheet -->
  <link rel="stylesheet" href="https://openlayers.org/en/v4.4.2/css/ol.css" type="text/css">
</head>
<body>
  <h1>WPS-Request Example</h1>

<!-- OpenLayers JS dependency, debug build -->
<script type="text/javascript" src="https://openlayers.org/en/v4.4.2/build/ol-debug.js"></script>
<!-- Begin wps-request Javascript -->
<script type="text/javascript">
The preceding code is based on a stripped-down OpenLayers app, which sends an HTTP POST request with XML. We can start with this, doing incremental testing to build up a chained WPS request in the OpenLayers code. So, it's pretty stripped down; there's not a whole lot going on there. We just have our postData with all of the WPS text XML body, which is as follows:
postData = '<?xml version="1.0" encoding="UTF-8"?><wps:Execute version="1.0.0" service="WPS" xmlns:xsi="http://www.w3.org/2001/XMLSchema-instance" xmlns="http://www.opengis.net/wps/1.0.0" xmlns:wfs="http://www.opengis.net/wfs" xmlns:wps="http://www.opengis.net/wps/1.0.0" xmlns:ows="http://www.opengis.net/ows/1.1" xmlns:gml="http://www.opengis.net/gml" xmlns:ogc="http://www.opengis.net/ogc" xmlns:wcs="http://www.opengis.net/wcs/1.1.1" xmlns:xlink="http://www.w3.org/1999/xlink" xsi:schemaLocation="http://www.opengis.net/wps/1.0.0 http://schemas.opengis.net/wps/1.0.0/wpsAll.xsd"> <ows:Identifier>gs:Aggregate</ows:Identifier><wps:DataInputs><wps:Input><ows:Identifier>features</ows:Identifier><wps:Reference mimeType="text/xml" xlink:href="http://geoserver/wfs" method="POST"><wps:Body><wfs:GetFeature service="WFS" version="1.0.0" outputFormat="GML2" xmlns:sf="http://www.openplans.org/spearfish"><wfs:Query typeName="topp:states"/></wfs:GetFeature></wps:Body></wps:Reference></wps:Input><wps:Input><ows:Identifier>aggregationAttribute</ows:Identifier><wps:Data><wps:LiteralData>PERSONS</wps:LiteralData></wps:Data></wps:Input><wps:Input><ows:Identifier>function</ows:Identifier><wps:Data><wps:LiteralData>Count</wps:LiteralData></wps:Data></wps:Input><wps:Input><ows:Identifier>function</ows:Identifier><wps:Data><wps:LiteralData>Average</wps:LiteralData></wps:Data></wps:Input><wps:Input><ows:Identifier>function</ows:Identifier><wps:Data><wps:LiteralData>Sum</wps:LiteralData></wps:Data></wps:Input><wps:Input><ows:Identifier>function</ows:Identifier><wps:Data><wps:LiteralData>Min</wps:LiteralData></wps:Data></wps:Input><wps:Input><ows:Identifier>function</ows:Identifier><wps:Data><wps:LiteralData>Max</wps:LiteralData></wps:Data></wps:Input><wps:Input><ows:Identifier>singlePass</ows:Identifier><wps:Data><wps:LiteralData>false</wps:LiteralData></wps:Data></wps:Input></wps:DataInputs><wps:ResponseForm><wps:RawDataOutput mimeType="application/json"><ows:Identifier>result</ows:Identifier></wps:RawDataOutput></wps:ResponseForm></wps:Execute>';
Then, postData is sent via this XML HTTP request object posted to GeoServer. Then we'll get a response in as an alert, which can be achieved with the following code:
url = 'http://localhost:8080/geoserver/wps';
var req = new XMLHttpRequest();
req.open("POST", url, true);
req.setRequestHeader('Content-type', 'text/xml');
req.onreadystatechange = function() {
  if (req.readyState != 4) return;
  if (req.status != 200 && req.status != 304) {
    alert('HTTP error ' + req.status);
    return;
   }
  alert(req.responseText);
  if (req.readyState == 4) return;
};
req.send(postData);
So, we can test that out, and you can see the following result of that operation, which is in JSON; it's the data corresponding to the request:

Taking that one step further, we just add the XML from the more complex chained operation that we showed in the second example XML previously. Now, if we run this process-chained POST request, running this more complex process-chained POST request will sometimes require some time before it returns a result. Here you can see the result as GeoJSON:

Again, the spatial reference system is linear, so we're seeing much longer coordinates than we would normally see, but we're getting a successful result from our complex process-chained operation.
You've seen now how to create a complex process-chained operation. In the next section, we'll look at full integration of that WPS request into OpenLayers, as well as the result.
OpenLayers integration
In the previous section, you learned how to create and test complex WPS requests. In this section, you'll round off your understanding of WPS by fully integrating requests and responses with OpenLayers. We'll be using the example of determining where to plant apple trees on a farm using some of the data that we've worked with in previous sections. We will first cover the GeoJSON OpenLayers class, and then we'll look at how the WPS response is read into OpenLayers with that. Then we'll cover reprojection of the data with Proj4JS in particular, and finally, we'll view the result. You can refer to the following documentation for more information:
http://openlayers.org/en/latest/apidoc/module-ol_format_GeoJSON-GeoJSON.html#writeFeatureObject
We're going to use the GeoJSON class to read data into our OpenLayers app, and it's useful here to take a look at some of the methods that are available, such as readFeature and readFeatures. That distinction is important, since readFeatures takes an array of OpenLayers features that consists of multiple features:
readFeatures(source, opt_options) -> {Array.<module:ol/Feature~Feature>}
On the other hand, readFeature only takes a single feature:
readFeature(source, opt_options) -> {module:ol/Feature~Feature}
You might want to check out some of these other methods as well. Let's take a look at the code. We have our app example that we were working with in the previous section, and we've now added a dependency for Proj4JS by adding the following line:
<script src="https://cdnjs.cloudflare.com/ajax/libs/proj4js/2.4.4/proj4.js"></script>
PROJ, by the way, is the standards-based, open source-based way of doing projections by reprojecting data, and it's used by many different software packages. This Proj4JS, of course, is the JavaScript version of PROJ, and since we're working with EPSG 2272 data in our WPS operation so that we can do some linear-based operations, we need to reproject that data as EPSG: 4326, compatible with OpenLayers.
The first thing we need to do is tell PROJ how to handle this data format, and you can find a proj4 string at http://spatialreference.org/, which is a great source, but a PROJ string is a standardized way where PROJ can know some details of the coordinate system or projection system, and that way, it can translate between different projections and coordinate systems:
proj4.defs('EPSG:2272', '+proj=lcc +lat_1=40.96666666666667 +lat_2=39.93333333333333 +lat_0=39.33333333333334 +lon_0=-77.75 +x_0=600000 +y_0=0 +ellps=GRS80 +datum=NAD83 +to_meter=0.3048006096012192 +no_defs');
var proj2272 = ol.proj.get('EPSG:2272');
So, we've taken care of some PROJ details here, creating this new variable, which is our PROJ-defined projection system. Our view is using EPSG: 4326:
var view = new ol.View({
  center: [-77.163785, 39.7641],
  zoom: 19,
  projection: new ol.proj.Projection({
    code: 'EPSG:4326',
    units: 'degrees',
    axisOrientation: 'neu',
    global: true
  })
});
If we don't use 4326 or 3857, we won't be able to use the OpenStreetMap source-based map. We're also pulling in a WMS from our GeoServer instance, which is the points of interest that we worked with previously, and that'll give us a bit of a reference for the result of this WPS operation:
var wms = new ol.layer.Image({
  //extent: [-13884991, 2870341, -7455066, 6338219],
  source: new ol.source.ImageWMS({
    url: host + '/wms',
    params: {'LAYERS': 'learning-geoserver:pois'},
    ratio: 1,
    serverType: 'geoserver'
  })
});

var map = new ol.Map({
  target: "map",
  layers: [osm, wms],
  view: view
});
The user will click on a button, which will go to the submit function, and so it will submit the WPS request, which is what we covered in the previous section. It's in XML format, and it will be posted to the server. Upon return, with our response, it will be reading that into a GeoJSON object. Importantly, here, you can see that dataProjection is in this proj2272 system, while we want it to be projected into EPSG:4326. So, there'll be a coordinate system translation going on there:
  url = host + '/wps';
  var req = new XMLHttpRequest();
  req.open("POST", url, true);
  req.setRequestHeader('Content-type', 'text/xml');

  req.onreadystatechange = function() {
    if (req.readyState != 4) return;
    if (req.status != 200 && req.status != 304) {
      alert('HTTP error ' + req.status);
      return;
    }

    var format = new ol.format.GeoJSON();
    response = req.response;

    var feature = (format.readFeatures(response, {
      dataProjection: proj2272,
      featureProjection: 'EPSG:4326'
    }));

    var vectorSource = new ol.source.Vector({
      features: feature
    });

    var vectorLayer = new ol.layer.Vector({
      source: vectorSource
    });

    // console.log((new ol.format.GeoJSON()).writeFeatures(vectorLayer.getSource().getFeatures()));

    map.addLayer(vectorLayer);

    if (req.readyState == 4) return;
  };
  req.send(postData);
}
We're just doing normal OpenLayers stuff in the preceding code, creating a vectorSource and a vectorLayer objects with our source set there. We've commented out this console.log line, but it's useful to do things like this for debugging. This will write the features of that GeoJSON object as GeoJSON, and we can use GeoJSON lint or QGIS to test and look at the result. The most important thing here is to notice whether the coordinates have been successfully reproductive, and then finally, with the map object, we'll just use the addLayer method to add vectorLayer to our map. So, let's take a look at this in action:
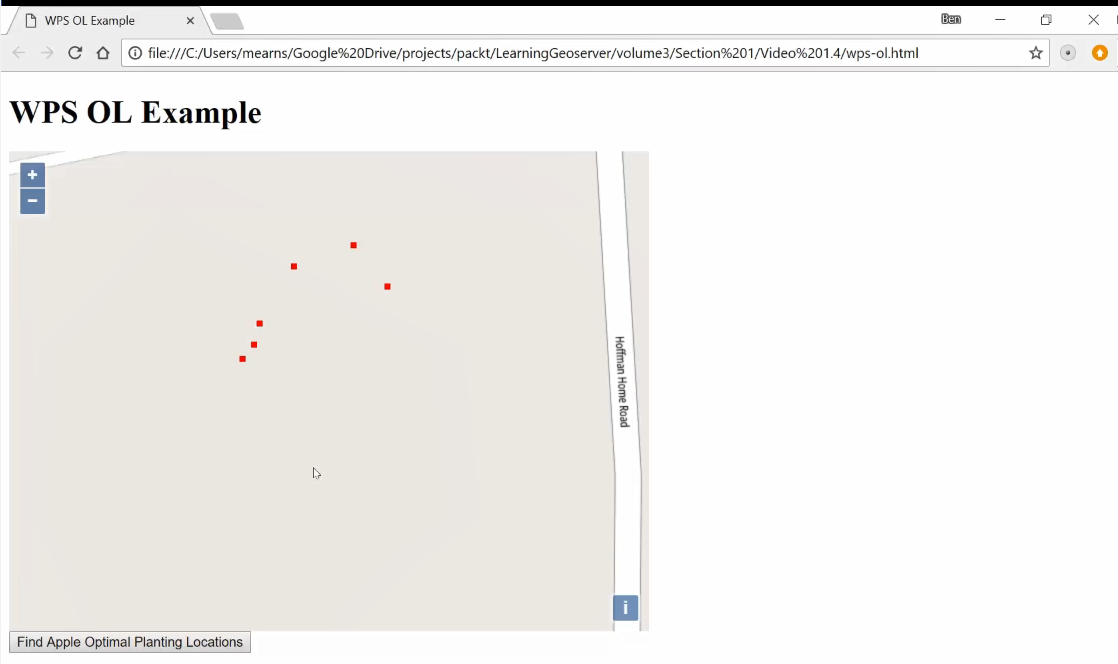
When you first bring up the app, you'll just see the points of interest and the base map. Now, to POST the WPS request, click the Find Apple Optimal Planning Locations button:
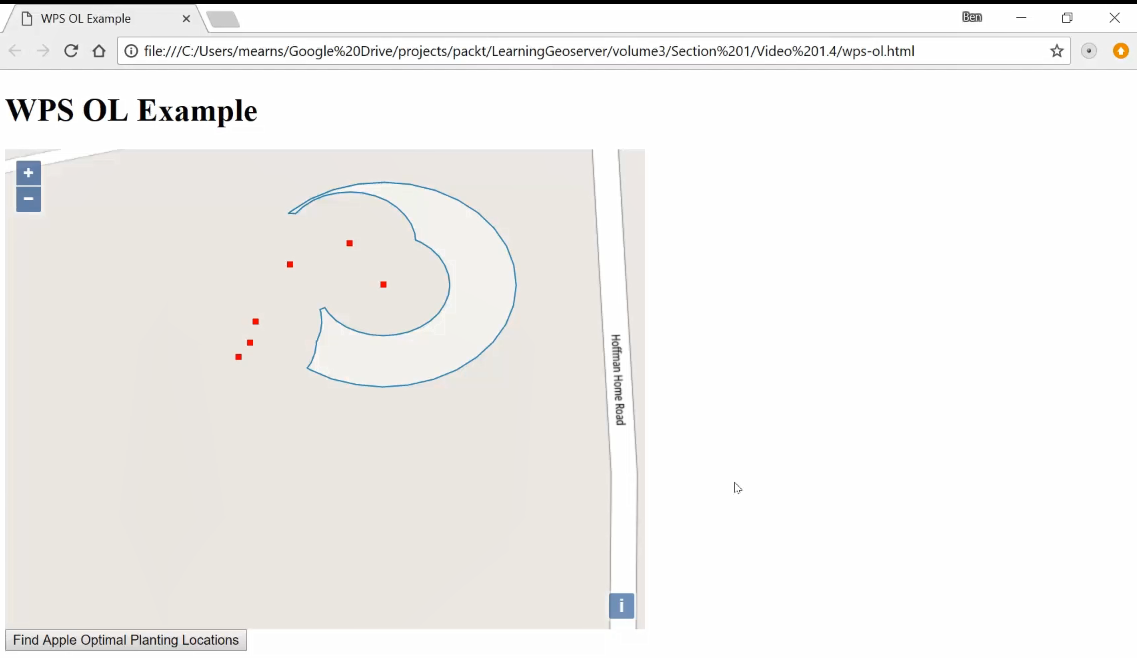
We want to find where the best place to plant apple trees is. Some of these trees are black walnut trees, which are not beneficial to apple trees and, in fact, may harm them, while some of these other trees are other apple trees, which we want to have close to the new apple trees for pollination purposes. And with WPS, we get this response, based on the location of the apple trees and the black walnut trees, of an area in which we can plant new apple trees.
Summary
In this chapter, we learned to use WPS to run geospatial processing on your data and return the results to our web app. We installed the WPS plugin on our GeoServer instance, and learned how it works. We used the WPS request builder to create some simple WPS requests. We also explored the process-chaining technique with a more complex example, and integrated the complex WPS request into OpenLayers.
In the next chapter, you'll learn about the technique of tile caching, and how you can harness tile caching to improve the performance of your app.