


In this chapter, we will discuss and evaluate the basic 3D physics and mathematics concepts in an effort to gain a basic understanding of Unreal Engine 4 physics and real-world physics. To start with, we will discuss the units of measurement, what they are, and how they are used in Unreal Engine 4. In addition, we will cover the following topics:
The scientific notation
2D and 3D coordinate systems
Scalars and vectors
Newton's laws or Newtonian physics concepts
Forces and energy
For the purpose of this chapter, we will want to open Unreal Engine 4 and create a simple project using the First Person template by following these steps.
When we first open Unreal Engine 4, we will see the Unreal Engine launcher, which contains a News tab, a Learn tab, a Marketplace tab, and a Library tab. As the first title suggests, the News tab provides you with the latest news from Epic Games, ranging from Marketplace Content releases to Unreal Dev Grant winners, Twitch Stream Recaps, and so on. The Learn tab provides you with numerous resources to learn more about Unreal Engine 4, such as written documentation, video tutorials, community wikis, sample game projects, and community contributions. The Marketplace tab allows you to purchase content, such as FX, weapons packs, blueprint scripts, environmental assets, and so on, from the community wikis and Epic Games. Lastly, the Library tab is where you can download the newest versions of Unreal Engine 4, open previously created projects, and manage your project files.
Let's start by first launching the Unreal Engine launcher and choosing Launch from the Library tab, as seen in the following image:

For the sake of consistency, we will use the latest version of the editor. At the time of writing this book, the version is 4.7.6. Next, we will select the New Project tab that appears at the top of the window, select the First Person project template with Starter Content, and name the project Unreal_PhyProject:

Now that we have the game engine open, we can now continue with our lesson.
To begin this section, we want to first define measurement and what exactly we will measure in the context of Unreal Engine 4. In a general sense, the definition of measurement is determining the size, length, or the amount of something (such as distance), the length/width/height of an object, or the volume of a particular space. In the context of Unreal Engine 4, we will measure the lengths of each component of a 3D vector in the 3D space and the X, Y, and Z dimensions. For the 2D game world, we will measure the X and Y axes. In the real world, we can use the U.S. Standard and the European Standard units of measurement to measure distance.
In the U.S., we can use the standard of lengths that involve the use of inches (in), feet (ft), yards (yd), and miles, whereas in Europe, there is the standard of lengths in place that includes millimeters (mm), centimeters (cm), meters (m), and kilometer (km). For our convenience and as a point of reference, here are a set of conversion charts between the U.S. and the European units of measurements. For more conversions, refer to this free conversion website at http://converter.eu/length/.
The following table shows the U.S. Conversions:
|
1 ft |
12 in |
|
1 in |
0.0833333 ft |
|
1 yd |
3 ft |
|
1 yd |
36 in |
|
1 Mile |
1,760 yd |
|
1 Mile |
5,280 ft |
|
1 Mile |
63359.999 in |
The following table shows the European Conversions:
|
1 mm |
0.1 cm |
|
1 cm |
10 mm |
|
1 cm |
0.0099999 m |
|
1 m |
100 cm |
|
1 m |
1000 mm |
|
1 mm |
0.000999999 m |
|
1 km |
1000000 mm |
|
1 km |
100000 cm |
|
1 km |
1000 m |
The following table shows U.S. to European Conversions:
|
1 in |
25.4 mm |
|
1 in |
2.54 cm |
|
1 in |
0.0254 m |
|
1 in |
0.0000254 km |
|
1 ft |
304.8 mm |
|
1 ft |
30.48 cm |
|
1 ft |
0.3048 m |
|
1 ft |
0.0003048 km |
|
1 yd |
914.4 mm |
|
1 yd |
91.44 cm |
|
1 yd |
0.9144 m |
|
1 yd |
0.0009144 km |
|
1 Mile |
1609344 mm |
|
1 Mile |
160934.4 cm |
|
1 Mile |
1609.3439999999998 m |
|
1 Mile |
1.609344 km |
Now that we have a strong understanding of the real-world units of measurement, we are now ready to discuss how Unreal Engine 4 uses these units of measurement to determine distances and sizes of objects.
Back in the days of the UDK or Unreal Engine 3, the units of measurement were based on what was called Unreal Units (uu), where one uu equaled 0.75 in, or 16 units equaled 1 ft. In Unreal Engine 4, the measurement has changed to where 1 uu is equal to 1 cm by default, but the engine allows you to change the conversion ratio between an Unreal Unit and a meter in its World settings, as shown in the following screenshot:

The value of 100.0 in this property equates an Unreal Unit to 1 cm. For example, by changing the World to Meters property to the value of 1 (as shown before), it will equate 1 uu to 1 m and a value of 1,000 will result in 1 uu equaling 1 mm. For the purposes of this project, we will leave the default value of 100 so that an Unreal Unit will equal 1 cm, but for future reference, this is the World settings property you would want to alter in order to change this conversion ratio.
When you work on any game engine, it is very important and useful to know the common measurements that are used in your game world. Each game is different, and the scaling of that game world will be different depending on whether or not the developers are going for realistic scaling measurements, but for the purposes of this book, the following measurements will be for a game world that is going for realism. Remembering that by default, 1 uu is equal to 1 cm in Unreal Engine 4, here are some of the common measurements that you can implement in your game world. An additional note is that all the following dimensions are set under the assumption that your player character is roughly 6 ft tall or 180 uu.
The dimensions of a player character are 180(uu)H, 60(uu)W, 60(uu)D. These are dimensions for a larger character that is roughly 6 ft tall, so you may need to adjust these values accordingly based on your character's height.

The wall height is 300(uu)H to 400(uu)H. A value of 400 uu will produce a slightly taller wall, whereas a value of 300 uu will result in a slightly shorter wall, but any value between 300 uu and 400 uu will work just fine.

The wall depth (thickness)is 10(uu)D to 20(uu)D. The value of the wall thickness depends greatly on the material that the wall is made of. For example, a brick wall would be thicker than a wall made of plaster.
The dimensions of doors and doorways are 210(uu)H – 230(uu)H / 110(uu)W – 140(uu)W. The value of the door and the doorway depth (thickness) depends on the value of the wall thickness.

Staircases
The step height is 15(uu)H
The step length/depth is 30(uu)D
The value of the staircase width will depend on the area that the staircase is placed in, so the dimensional measurement of width will vary. The following image has a step length of 30(uu)L, a step height of 15(uu)H, a step width of 200(uu)W, and 20 steps in total:

If you open a blank map in Unreal Engine 4 or the different viewports in the editor, you will notice a grid. This grid can change dynamically depending on the current unit snapping measurement applied in the editor. The spacing between each grid square will determine the number of units an object will move when you place or transform objects in the editor. Back in Unreal Engine 3 or the UDK, the grid snapping would follow the power of 2 (2/4/8/16/32/64/128/256/512/1024/2048), but in Unreal Engine 4, the grid snapping follows these values (1/5/10/50/100/500/1000/5000/10000). The main reason for this change is due to the fact that Unreal Engine 4 uses the value of an Unreal Unit equaling 1 cm instead of 1 uu equaling 0.75 in. This is similar to what it did in Unreal Engine 3 or the UDK.
By default, the unit snapping grid follows the notion that 1 uu equals 1 cm, but if we were to follow the power of 2 unit snapping scale, we have this option. In Editor Preferences under the Level Editor section, there is an option for Viewports. Under Viewports, there is a subsection labeled Grid Snapping and an option to enable/disable the Use Power of Two Snap Size, as shown in the following screenshot:

When it comes to unit snapping, follow the measurement that works best for you. Unit snapping is a very important aspect when it comes to placing assets in your game world. It can be a lifesaver when it comes to avoiding clipping or Z fighting between two objects. Unit snapping is also crucial when it comes to creating proper distances between objects, such as creating hallways or alleyways between buildings. In the end, it will save a lot of time and effort to take unit snapping into consideration at the beginning stages of level development and particularly during the white box stages of level design. There will also be specific instances when placing objects in our game world where unit snapping is not necessary, such as placing debris on the ground, placing paper on a desk, or any other objects that don't require specific distances between themselves and other in-game objects. When it comes to these instances, Unreal Engine 4 gives us the ability to toggle unit snapping on and off by clicking on the grid icon, as shown in the following screenshot. Lastly, we can also snap our objects to the grid or the floor of our environment by pressing the End key. Alternatively, we can press Ctrl + End to snap an actor to the grid. If we ever need to change the key bindings for these actions, we can navigate to the Edit Menu | Editor Preferences | Keyboard Shortcuts to make any changes.

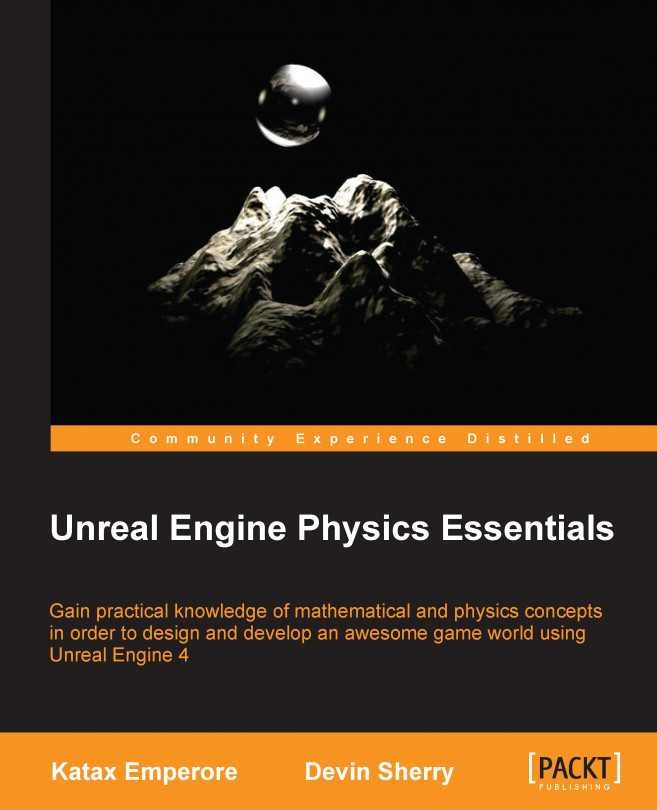
For both character and environmental artists, it is very important to know how to change the units of measurement in the third-party 3D modeling so that when assets are exported from the art program and then imported to Unreal Engine 4, the scale is correct and as intended by the artist. Keeping in mind that Unreal Engine 4 uses the measurement conversion of 1 uu equaling 1 cm by default, we want to make sure that the units of measurement in our 3D art program uses the same conversion.
To change the units of measurement in 3ds Max (2013 version), select the Customize option and then Units Setup. Here, click on the System Unit Setup button and change the units of measurement as follows:
In Maya, we can change the units of measurement by clicking on Window from the toolbar. Now, select Settings/Preferences from the drop-down window and then Preferences. In the Preferences dialogue box, select Settings. Under Working Units, we can change the linear units to centimeter.


In this section, you learned about the basic unit conversions between the U.S. and European units and how these units translate into Unreal Engine 4's Unreal Units. Additionally, we briefly discussed the common measurements for our game world for our player character, walls, staircases, and doors/doorways. Moreover, we took an in-depth look at unit snapping in Unreal Engine 4 and the significance of the tool when it comes to object placement and creating our game world. Lastly, we looked at how to convert or change the units of measurement in 3D art programs, such as 3ds Max and Maya so that artists can ensure that their models are exported and imported to the correct scale when placed in Unreal Engine 4.
Now that we have a better understanding of the units of measurement and how they translate into Unreal Engine 4, we can now move forward to briefly discuss scientific notation.
This is a method in which we can easily write very large or significantly small numbers without having to express the entire length of the number, meaning writing a bunch of zeroes. The use of scientific notation is not very common when you use Unreal Engine 4 as a designer or an artist, but as a programmer or a technical designer who uses blueprints or even C++ coding in the engine, the use of scientific notation can deem itself useful.
Let's take a look at some examples of both large and small numbers that are expressed in their scientific notation. To keep things as simple as possible, these examples will use the base of 10 for ease of clarity:
1,000 (1 thousand) – 1 * 10^3
100,000 (1 hundred thousand) – 1 * 10^5
1,000,000 (1 million) – 1 * 10^6
.01 (1 hundredth) – 1 * 10^-2
.001 (1 thousandth) – 1 * 10^-3
.0001 (1 ten thousandth) – 1 * 10^-4
The main logic behind using scientific notation is to take a very large or small number and convert it to an easy to read/write expression. For an example that isn't a power of 10, the number 0.5 converted to scientific notation would read as 5 * 10^-1. We reached this expression by moving the decimal point in 0.5 once to the right-hand side making the number into 5. The goal of using scientific notation is to reach the base number, meaning a number between 1 and 9. As we had to move the decimal point to the right-hand side, we know that the expression would read as a negative exponent, whereas if we were to move the decimal point to the left-hand side, the exponent would be positive. The number 5 is our base, and we multiply it by 10 with an exponent that is equal to the number of times we moved the decimal point to reach the said base. In our case, it would be 1. Lastly, we know that the exponent would be negative because we are dealing with 0.5, a number less than 1, and we had to move the decimal point to the right-hand side. As a result, our scientific notation of 0.5 would be 5 * 10^-1. Here are a few more examples of large and small numbers as expressed in the scientific notation:
642,300,544,000 – 6.42300544 * 10^11
.00002055 – 2.055 * 10^-5
8,549,248.5004 – 8.549285004 * 10^6
.0125174 – 1.25174 * 10^-2
In this section, we briefly looked at the scientific notation and how it's used, along with providing examples of large and small numbers that are expressed using its scientific notation. Now that we have discussed the scientific notation, let's go ahead and move on to our next topic: 2D and 3D coordinate systems.
In Unreal Engine 4, the use of 2D and 3D coordinate systems are used to determine the positions of actors in our game world. In a 2D coordinate system, we can determine an actor's position based on the X and Y axes, left-right, and up-down respectively. In a 3D coordinate system, along with the X and Y dimensions, we can determine the actor's position based on the Z axis: the inclusion of depth.

In Unreal Engine 4, the 3D axes are labeled differently, as displayed in the preceding image. Instead of the "up" axis being the y axis, in Unreal Engine 4, the "up" axis is labeled as the z axis. The "forward" axis is then the y axis instead of being the z axis, as depicted in the preceding image.
It should also be discussed that Unreal Engine 4 uses a left-handed coordinate system, which means that the positive direction for the X axis is on the right-hand side, the positive direction for the Z axis is upward, and the positive direction for the Y axis is forward. In the left-handed coordinate system, the positive rotation of an axis is always in the clockwise direction. We can see this reflected in the transform section of the details panel when an object is selected and is either moved or rotated.

In Unreal Engine 4, the X axis is labeled as a red-colored arrow; the Y axis is labeled as the green arrow, and the Z axis as the blue arrow. In the editor, you can toggle the transformation type of a selected object between translation, rotation, and scale by either repeatedly pressing on the spacebar or by toggling between the W (translation), E (rotation), and R (scale) keys. The viewport depicted in the preceding image is known as the perspective viewport. This is the only 3D viewport in Unreal Engine 4 and can be accessed using the Alt + G shortcut. When you work on a 3D game, Unreal Engine 4 offers three 2D viewports: the top, side, and front perspective viewports to take advantage of when you place objects in your game world.
This perspective presents the 3D world from a top-down view (using the 2D coordinate system) with the X and Y axes that is similar to the previous image of the 2D coordinate system, where the Y axis represents up and down and the X axis represents left and right. This perspective can be accessed with the Alt + J shortcut or by clicking on the drop-down list labeled Perspective and selecting the Top option, as shown in the following screenshot:

This perspective presents the 3D world from a side view perspective with the Z and Y axes using the 2D coordinate system. It effectively looks at the world from the left-hand side to the right-hand side. In this perspective, the Z axis represents up and down, whereas the Y axis represents left and right. This perspective can be accessed with the Alt + K shortcut or by the same method that is used to access the other three perspectives.

This perspective presents the 3D world from the front perspective with the Z and X axes using a coordinate system. It essentially views the world from the front to back side. In this perspective, the Z axis represents up and down, whereas the X axis represents left and right. This perspective can be accessed with the Alt + H short cut or by the same method that is used to access the other three perspectives.

Lastly, let's briefly discuss how rotation works in 3D programs, such as Unreal Engine 4. In the real world, the three different types of rotation of an object are Yaw, Pitch, and Roll. These rotations are defined as follows:
In the real world, the pitch, yaw, and roll rotations of an object can be visualized by looking at how a plane can rotate, as shown in the following image:

In this section, we discussed the purposes of both 2D and 3D coordinate systems, their differences, and their uses in Unreal Engine 4. Furthermore, we took some time to go through the four perspectives offered in the engine: perspective, top, side, and front. Lastly, we looked at how to transform actors in our 3D world. With the concepts of 2D and 3D coordinate systems underneath our belt, you can now move forward and learn more about scalars and vectors.
These are definitions to describe the motion of objects. Both are unique. In mathematics, scalars are defined as quantities that are described as a single numerical value, whereas vectors are defined as quantities that are described as a numerical value and direction. The examples of scalar quantities include length, area, volume, speed, mass, temperature, and power, whereas the examples of vector quantities include direction, velocity, force, acceleration, and displacement.
In Unreal Engine 4, the use of scalar and vector values is very common, especially in blueprints and materials. In the context of the material editor, scalar values are simply numerical values, whereas vectors are actually the colors of RGBA or red, green, blue, and alpha. In the Material editor, we can use both scalar and vector parameters to influence the color and intensity of the material itself.

In the preceding screenshot, we are using a vector parameter node in our material to dictate the color of the material itself. By default, the vector parameter in the material editor contains the values for red, green, blue, and alpha; the alpha value controls the opacity of the color. In the material example, the scalar parameter controls the strength of the emissive value of the material. By increasing or decreasing this value, the material's brightness will get brighter or dimmer. To recreate this, we can right-click on our Content Browser, select Material and name this MAT_Example, and double-click on the material to open the Material editor. Perform the following steps:
Right-click on an empty space in the Material editor and search for the Vector parameter. Set its RGBA values to
1.0,0.5,2.0, and1.0respectively. We can name this parameter asMaterial Color.Next, let's right-click and search for the Scalar parameter. Then, set its numerical value to
5and name this parameter asMaterial Color Intensity.To create a multiply node, we can either right-click and search for this node, or just hold the M key and left-click on the blank space in the Material editor to create the multiply node.
Now, we can multiply the color output Material Color vector by the numerical output of the Material Color Intensity scalar and plug the result into the Emissive Color input of the material itself to create a bright and intensive purple material.
For additional color, we can plug the color output of the Material Color vector parameter into the Base Color input of the material as well.
In the Blueprints of Unreal Engine 4, the scalar and vector parameters serve similar purposes (as seen in the material editor). The vector variable in blueprint scripting holds the values for X, Y, and Z values and is used to dictate the location and direction, whereas the rotator variables holds the Roll, Pitch, and Yaw rotation values. When it comes to scalar variables in blueprints, there are many options to use (such as integers or floats) because scalar values are only numerical values with no direction associated to them.

As shown in the preceding image, we can split the structure pin for the rotator and vector variables by right-clicking on the vector values and selecting Split Struct Pin. So, we can edit each direction individually using float scalars to affect each. At the same time, instead of using individual scalar values by right-clicking on one of the split float values and selecting the Recombine Struct Pin option, we can also recombine the structure pin for these variables so that we can edit these values with vectors or rotators respectively.
Another interesting use of materials and blueprints is that you can dynamically change the value of the scalar and vector parameters in the event graph or the construction script of the blueprint.

As shown in the preceding image, we can create a dynamic material instance from a static mesh in our blueprint that uses the material example we made earlier, which uses the vector and scalar parameters. Here, we can set the Material Color vector parameter, split the color structure into four unique float values of RGBA (red, green, blue, and alpha) and then use the random float in the range node to create random colors for the material.
To recreate this, we first need to create a new blueprint by right-clicking on our content browser and selecting the Blueprint class and then Actor to create an actor-based blueprint. Next, double-click on this new blueprint to open the Blueprint editor. Perform the following steps:
Select the Viewport tab at the top of the editor so that we can add our components for this example blueprint. For the base of this blueprint actor, we want to add a scene component to the root of the actor so that the other actors we add can be attached to this component.
From the Add Component tab, select the Scene component option and name it
ROOT.Now, we want to add the shape of a plane to our blueprint so that we can see our material on an object. Under the
StarterContentfolder in Shapes, select the Shape_Plane Static mesh so that it is highlighted in the content browser.With the Shape_Plane mesh highlighted, let's go back to our blueprint. Under the Add Component tab, there will be an option for Static Mesh (Shape_Plane). Name this component whatever you like and rotate/orient the mesh in the 3D viewport as necessary.
Now, back in our Content Browser, let's select our material so that it is highlighted. Then, back in the blueprint, we can apply this material to our plane mesh by selecting the plane in the Components tab and clicking on the arrow next to the Element 0 option in the Materials section.
With our material applied to our Static Mesh, we can now navigate to our Construction Script to script the behavior that will randomly change the color of this material each time the blueprint initializes.
In the Construction Script tab, let's grab the Get variable of our plane static mesh by keeping CTRL pressed and clicking and dragging the variable from the variables section to the left-hand side of the editor. From this variable pin, we can search for Create Dynamic Material Instance. Make sure that the material we created is selected for the Source Material variable in that node.
From the return value of the Create Dynamic Material Instance node, we can promote this value to a variable that we can then reference in the blueprint whenever we like. Name this variable whatever you like.
Now, we can drag the pin from the variable output of the newly promoted material instance variable and search for the Set Vector Parameter node. Here, we need to provide this node with the name of the vector parameter that we want to change and color values that we want to enter. If you remember, we named our vector parameter
Material Color.To randomize the color, we need to drag from the value input variable of the Set Vector Parameter Value node and search for
Make Linear Color. For the RGB values, we can use Random Float in range nodes that have a minimum value of 0.5, a maximum value of 1.0, and a constant alpha value of 1 to randomize the color.Now, when we repeatedly click on the Compile button at the top, we can see the color of the material change each time.

In this section, we discussed the important differences between the values of vectors and scalars, their definitions in the case of real-world mathematical quantities and in the realm of Unreal Engine 4. In addition, we looked at some in-engine examples of how to use scalars and vectors in materials and blueprints. We also looked at how to incorporate scalars and vectors so that it can dynamically change the color of a material. With a base understanding of scalars and vectors in our pockets, we can now discuss Newton's laws of physics.
The base of all that we know about real-world physics comes from the principles developed by Sir Isaac Newton, also known as Newton's three laws of motion. When we recreate real-world physics in video games, it is very important that we understand these laws and how they affect objects in our game world. Keep in mind that not all games use realistic physics, but these laws of motion are still important to grasp when you develop any game world.
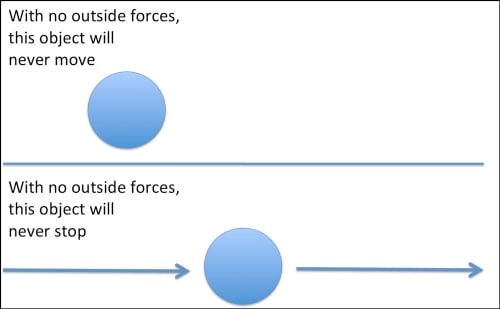
Isaac Newton's first law of motion, also known as the Law of Inertia, states that every object in a state of uniform motion tends to remain in that state of motion unless an external force is applied to it. In other words, an object in motion tends to stay in motion unless acted upon by another force.
In the real world, there are external forces (such as ground and air friction) that act on objects in motion that eventually cause this object to stop completely, or forces such as a person pushing or pulling on an object that can cause acceleration, or for the move to increase in speed over time. In a vacuum, there is no friction. As a result, an object in motion in an infinite vacuum space would continue to move at the same rate unless it is acted on by some external force.
In Unreal Engine 4, the blueprint assets that utilize the Projectile component, such as bullets, rockets, or any other kind of projectiles used in our game, can edit the coefficient of friction and other physics-based properties. From the first person project that was created earlier in the chapter, we can navigate to the Content folder in the Content Browser and then to the FirstPersonBP folder and select the Blueprints folder. In this folder, we can select the FirstPersonProjectile blueprint. Then, in the Viewport, we can select the Projectile component to view some of the physics properties, as shown in the following screenshot:

By increasing the Friction property, we can cause this projectile to come to a stop more quickly, whereas decreasing this property will result in the projectile coming to a stop over a longer period of time. We can alter this property until we can get the behavior we want. For more examples of physics-based properties featured in the Unreal Engine 4 blueprints, feel free to investigate the FirstPersonCharacter blueprint and select the CharacterMovement component.
This states that the relationship between an object's mass (m), its acceleration (a), and the applied force (F) is F = ma or an applied force is equivalent to the mass of the object and its applied acceleration. Acceleration and force are vectors, (remember that a vector is both a numerical value and a direction). In this law, the directional force vector is the same as the direction of the acceleration vector.
In more simple words, this law focuses on the principle that a change in an object's velocity can only occur if this object is accelerating in a particular direction, and a positive or negative acceleration can only take place if an external force is acting on it.

In Unreal Engine 4, we can use blueprints to apply forces to physics objects and override properties (such as acceleration and mass) through different available components. For example, the CharacterMovement component in the FirstPersonCharacter blueprint has a property labeled as Max Acceleration, and if we increase or decrease this property, we can see how quickly the player accelerates from a stationary position to its maximum walk speed.

Isaac Newton's third law of motion and one of the more commonly known law states that for every action there is an equal and opposite reaction. In other words, when an object applies force to another object, an equal and opposite force is applied as well.

In Unreal Engine 4, we can see this law of motion in action by playing in the editor and clicking on the left mouse button while aiming at the ground to see the ball bounce in the opposite direction that it was fired at and moving at a speed equal to the one in which it was fired at, except that we have friction applied to this projectile, so it loses some of its initial velocity due to the friction.

To bring all of these laws of motion together, what we can do is add a box collision component to the FirstPersonCharacter blueprint, set its Collision Presets to BlockAll, and attach it to the FirstPersonCamera component by dragging it onto the FirstPersonCamera component in the Components tab.

Now if we play in the editor, we can start running into the physics cubes in the FirstPersonExampleMap (which is default to the First Person project template) and see forces applied to them, which is equal to the mass of the player multiplied by the players' current acceleration value.
In this section, we discussed the three laws of motion developed by Sir Isaac Newton and their application in the real world and in Unreal Engine 4. For each of these three laws, we examined each by providing working examples of each, using blueprints in Unreal Engine 4. Now that we have a strong understanding of these principles, we can tackle the last subject of this chapter: forces and energy.
One of the most important concepts regarding energy is that it's a property of objects that can be transferred from one object to another, but it cannot be created or destroyed. All forms of energy follow the conservation of energy aspect and can be converted to different types of energy. There are many types of energy that exist in the real world. Here are a few examples:
These are just a few examples of energy that exist in the real world, so feel free to perform additional research on the concept of energy because this section will only cover the surface of the topic. When it comes to the concept of energy and the conservation of energy, Unreal Engine 4 follows these properties as well through its built-in physics engine.
As discussed in the previous section of this chapter regarding the Newtonian principles, forces are any interaction that tends to change the motion of an object. This can also be referred to as concepts (such as pushing and pulling) and contains a magnitude and direction, making it a vector quantity. Forces can be caused by gravity, magnetism, wind, or even the pushing or pulling of an object by a person or machine.

In Unreal Engine 4, we can add forces through blueprint scripting, and we can perform this in a few ways. The first method is a function called Add Force. This acts a lot like a thruster and adds a linear burst of energy in the specified direction.

You can add this type of force to any component associated with our blueprint, or you can apply this force to any component that is hit by a component of our blueprint. We can also see that there is a bone name property in this function. This means that we can apply force to a bone if one exists in our blueprint.
The second method of applying forces to our blueprint components or to components in our game world is through the Add Radial Force function:

This function allows you to specify a location in the 3D space. Here, the source of the radial force begins and then specifies a radius and strength using Float values. Lastly, we can apply one of the two methods of Falloff for the radius, which is either a constant fall-off or a linear fall-off. All bodies in this radius will be affected by this force, so make sure that you take this into consideration when you apply radius and strength values.
In this section, we looked at forces and energy and how they are applied in the real-world and in Unreal Engine 4. Additionally, we investigated the different types of energy that exist in the real world. Furthermore, we looked at different examples on how to apply forces in blueprints with the Add Force and Add Radial Force functions. Lastly, we discussed the properties of these two functions and how they alter the force that is applied.
In this chapter, we discussed a handful of mathematical and physics-based concepts that are necessary to grasp in order to understand how physics works in Unreal Engine 4. We looked at the different units of measurement that exist in the American and European standards of length and how they convert from one to another. We also looked at Unreal Units (uu). Then, we discussed the common measurements for walls, doorways, characters, and stairs.
Next, you learned a little bit about scientific notation, how it works, and how it is used. We looked at some basic and advanced examples of conversions from numerical to scientific notations.
Additionally, you learned about the 2D and 3D coordinate systems and how they are used in the real world and in Unreal Engine 4. We also investigated the different 2D and 3D viewports that exist in Unreal Engine 4 and the important functions they serve when you create game worlds.
Furthermore, you learned about the scalar and vector properties and how they are applied in the real world and in Unreal Engine 4. We also looked at examples of how the values of scalars and vectors are used in the Material editor and in blueprints.
We also looked at each of the three Newtonian laws of motion and provided real-world and Unreal Engine 4 examples for each law.
Lastly, you learned about the different forces and energy that exist in the real-world and provided examples on how to apply forces in blueprints.
Now that we have a base understanding of real-world mathematics and physics concepts and how they are used in Unreal Engine 4, we can now move on to the Physics Asset Tool (PhAT) in Unreal Engine 4.