


 Download code from GitHub
Building Your Game
As we start on our journey of building mobile games using the Unity game engine, it’s important that you are familiar with the engine itself before we dive into the specifics of building things for mobile platforms. Although there is a chance that you’ve already built a game and want to transition it to mobile, there will also be those of you who haven’t touched Unity before or may not have used it in a long time. This chapter will act as an introduction to newcomers and a refresher for those coming back, and it will provide some best practices for those who are already familiar with Unity. While you may skip this chapter if you’re already familiar with Unity, I think it’s also a good idea to go through the project so that you know the thought processes behind why the project is made in the way that it is, so that you can keep it in mind for your own future titles.
In this chapter, we will build a 3D endless runner game in the same vein as Imangi Studios LLC’s Temple Run series. In our case, we will have a player who will run continuously in a certain direction and dodge the obstacles that are in their way. We can also add additional features to the game easily, as the game will endlessly have new things added to it.
This chapter will be split into several topics. It will contain simple, step-by-step processes for you to follow. Here is an outline of our tasks:
- Setting up the project
- Creating the player
- Moving the player through a C# script
- Improving scripts using attributes and XML comments
- Update function versus FixedUpdate function
- Having the camera follow our player
- Creating a basic tile
- Making the game endless
- Creating obstacles
Technical requirements
This book utilizes Unity 2022.1.0b14 and Unity Hub 3.3.1, but the steps should work with minimal changes in future versions of the editor. If you would like to download the exact version used in this book, and there is a new version out, you can visit Unity’s download archive at https://unity3d.com/get-unity/download/archive.
You can also find the system requirements for Unity at https://docs.unity3d.com/2022.1/Documentation/Manual/system-requirements.html in the Unity Editor system requirements section.
You can find the code files for this chapter on GitHub at https://github.com/PacktPublishing/Unity-2022-Mobile-Game-Development-3rd-Edition/tree/main/Chapter01.
Setting up the project
Now that we have our goals in mind, let’s start building our project:
- To get started, open Unity Hub on your computer.
- From startup, we’ll opt to create a new project by clicking on the New button.
- Next, under Project Name, put in a name (I have chosen
MobileDev), and under Templates, make sure that 3D is selected. Afterward, click on CREATE and wait for Unity to load up:
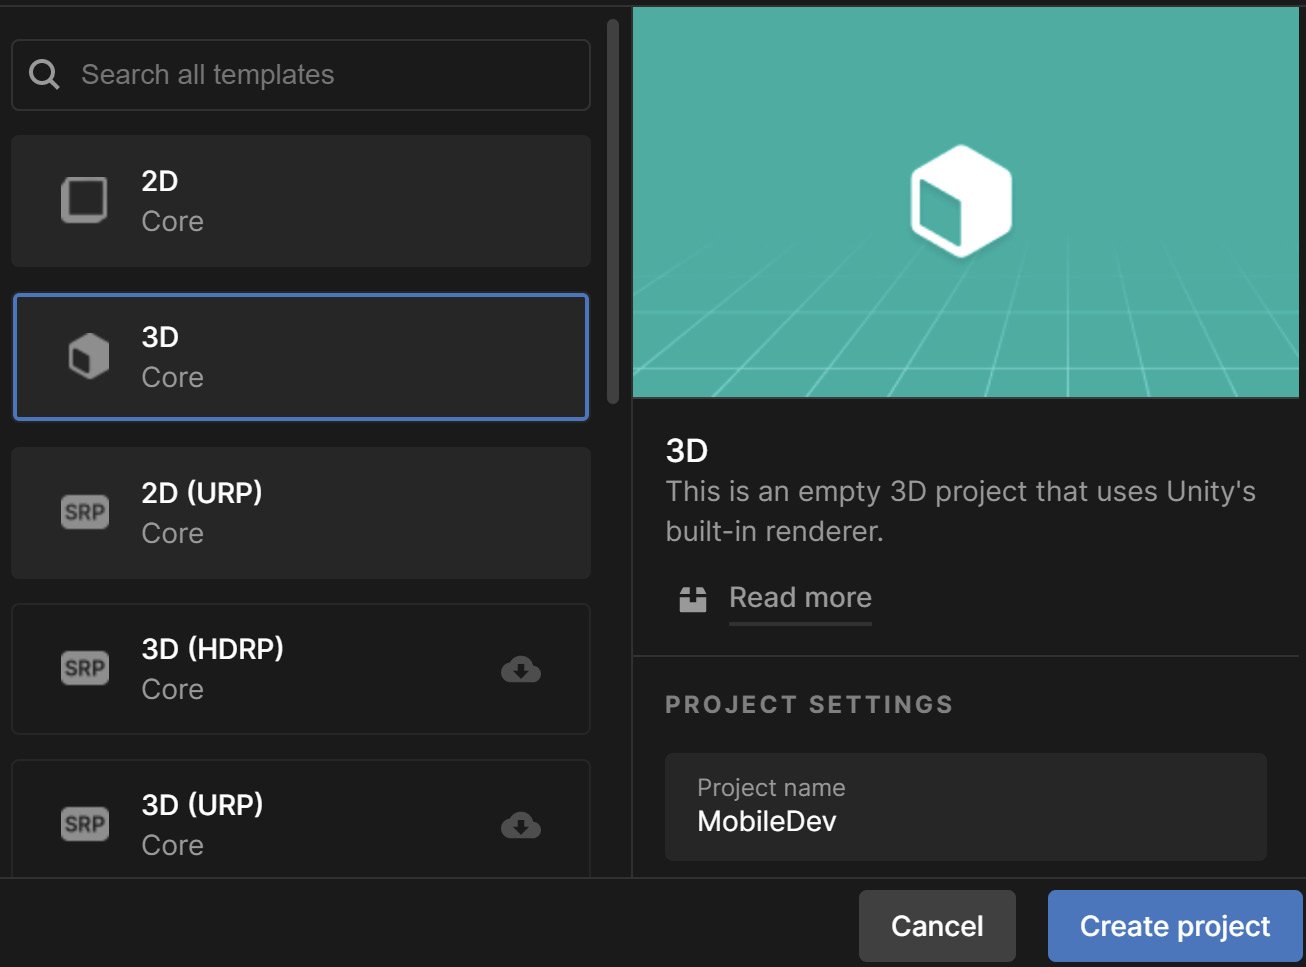
Figure 1.1 – Creating a 3D project
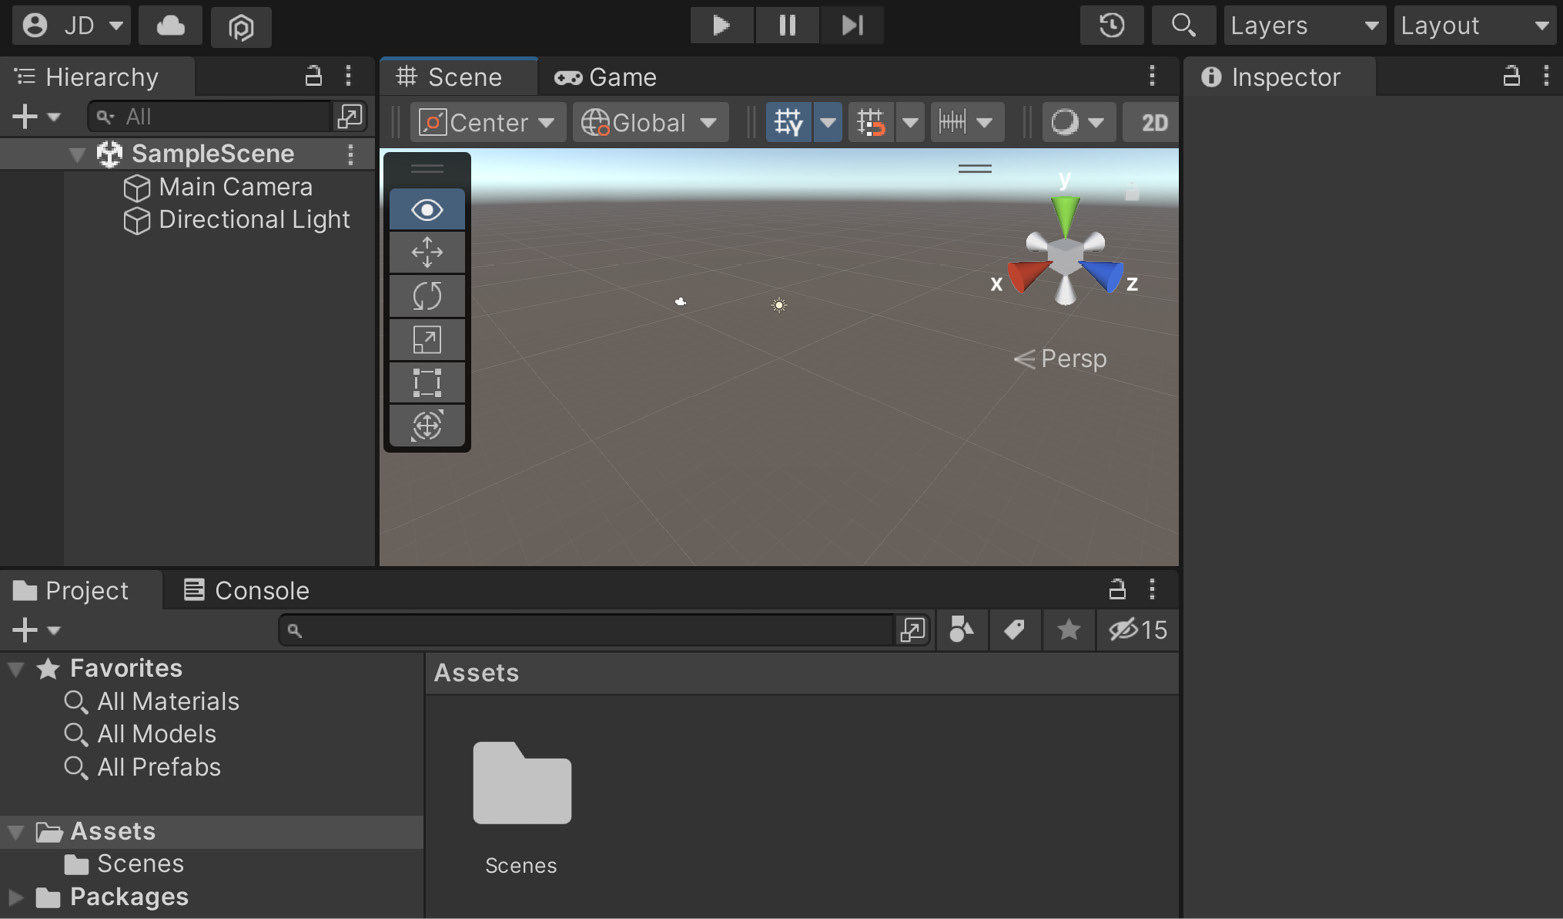
Figure 1.2 – The Unity Editor
- If your layout doesn’t look the same as in the preceding screenshot, go to the top-right section of the toolbar and select the drop-down menu there that reads Layout. From there, select Default from the options presented:
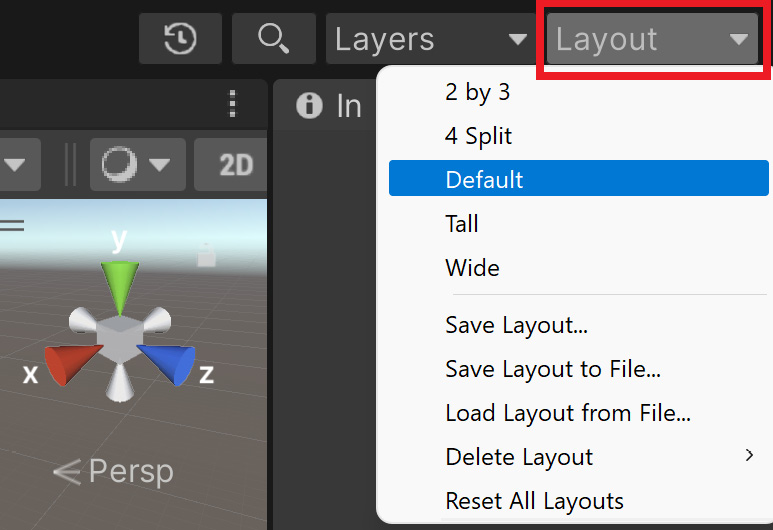
Figure 1.3 – The Layout button
We now have opened Unity for the first time and have the default layout displayed!
Tip
If this is your first time working with Unity, then I highly recommend that you read the Unity’s interface section of the Unity Manual, which you can access at https://docs.unity3d.com/Manual/UsingTheEditor.html.
Now that we have Unity open, we can actually start building our project.
Creating the player
To get started, we’ll build a player that will always move forward. Let’s start with that now:
- To get started, we will create some ground for our player to walk on. To do that, go to the top menu and select GameObject | 3D Object | Cube.
- From there, we’ll move over to the Inspector window and change the name of the object to
Floor. Then, for the Transform component, set Position to (0,0,0). This can be done by either typing the values in or right-clicking on the Transform component and then selecting the Reset Position option. - Then, we will set the Scale values of the object to (
7,0.1,10):
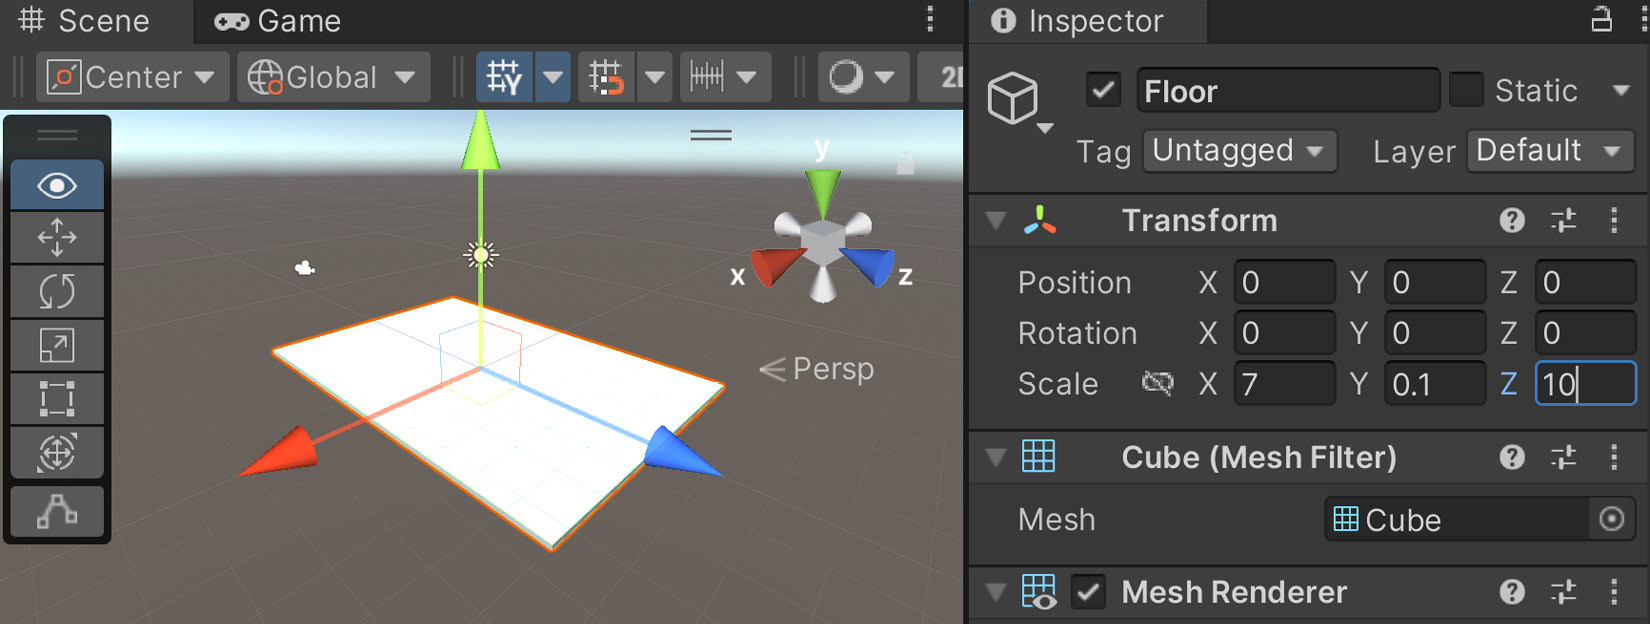
Figure 1.4 – Creating the ground
In Unity, by default, 1 unit of space is representative of 1 meter in real life. So, our Scale values will make the floor longer than it is wide (X and Z), and we have some size on the ground (Y), so the player will collide and land on it because we have a Box Collider component attached to it by default.
Note
The Box Collider component is added automatically when creating a Cube object and is required to have objects collide with it. For more information on the Box Collider component, check out https://docs.unity3d.com/Manual/class-BoxCollider.html.
- Next, we will create our player, which will be a sphere. To do this, we will go to GameObject | 3D Object | Sphere.
- Rename the sphere to
Playerand set the Transform component’s Position values to (0,1,-4):
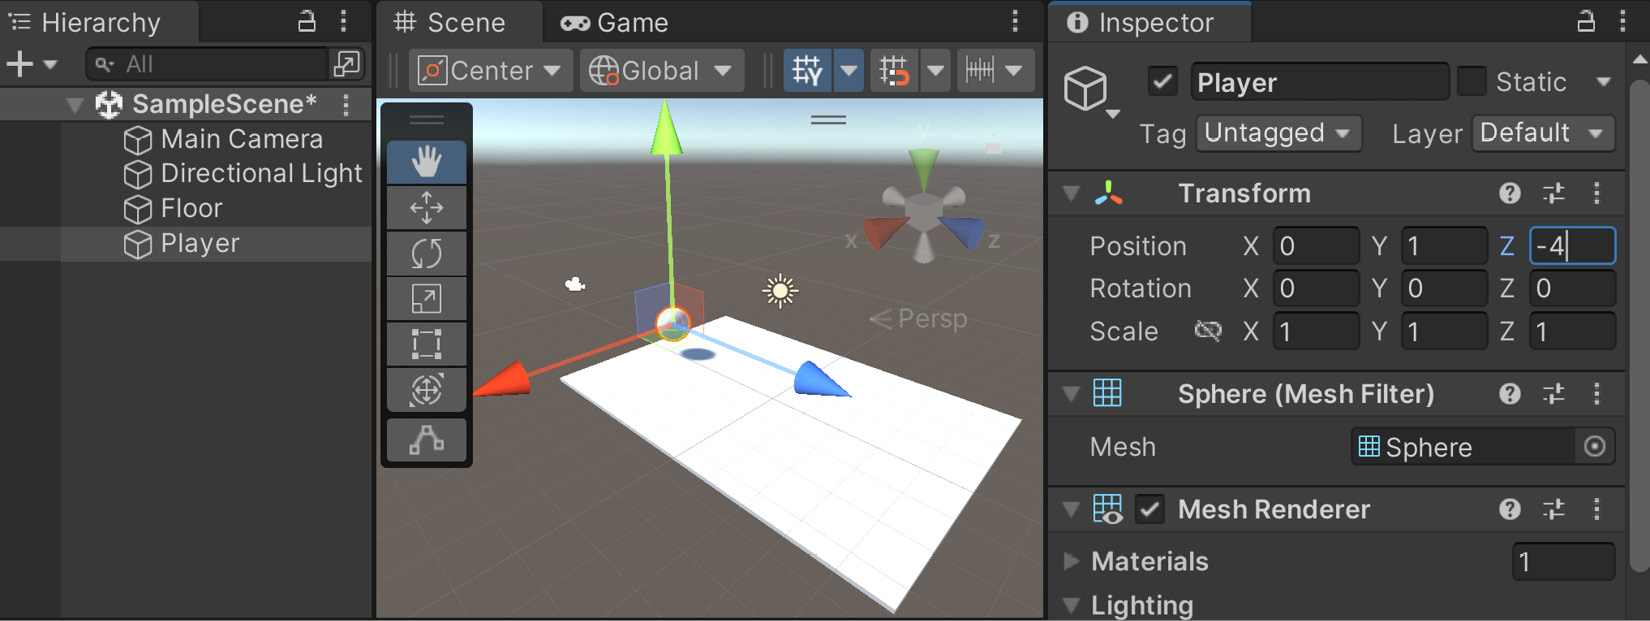
Figure 1.5 – Positioning the player
This places the ball slightly above the ground and shifts it back to near the starting point. Note that the camera object (see the camera icon) is pointing toward the ball by default because it is positioned at (0, 1, -10).
- We want the ball to move, so we will need to tell the physics engine that we want to have this object react to forces, so we will need to add a Rigidbody component. To do so, with the Player object selected, go to the menu and select Component | Physics | Rigidbody. To see what happens now, let’s click on the Play button, which can be seen in the middle of the first toolbar:
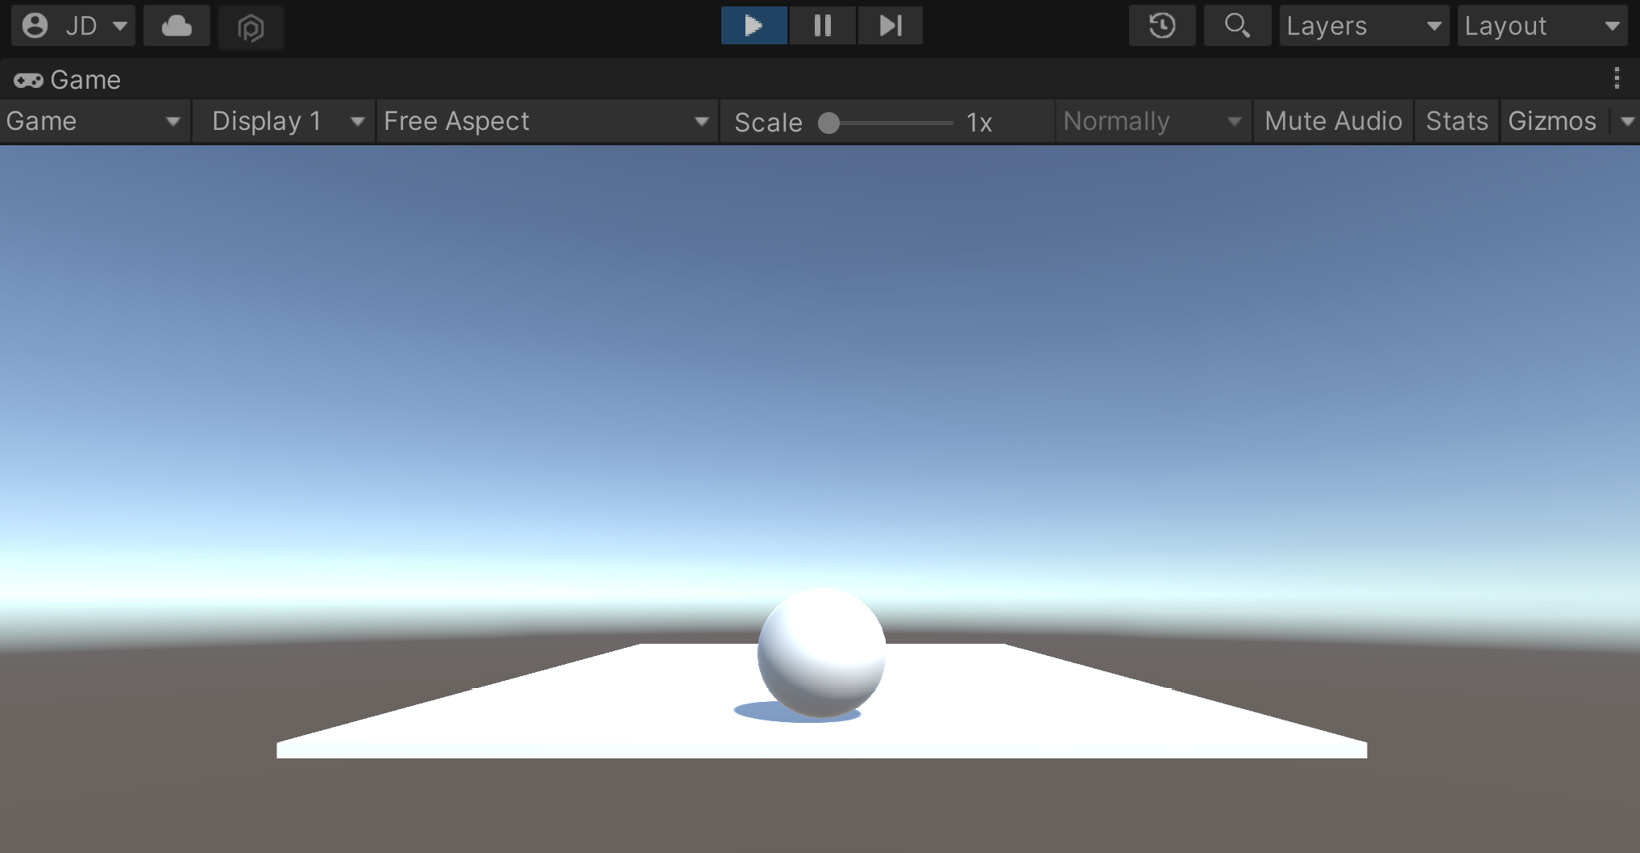
Figure 1.6 – Current state of the game
As in the preceding screenshot, you should see the ball fall down onto the ground when we play the game.
Tip
You can disable/enable having the Game tab take up the entire screen when being played by clicking on the Maximize On Play button at the top, or by right-clicking on the Game tab and then selecting Maximize.
- Click on the Play button again to turn the game off and go back to the Scene tab, if it doesn’t happen automatically.
We now have the objects for both the floor and the player in the game and have told the player to react to physics! Next, we will add interactivity to the player through the use of code.
Moving the player through a C# script
We want the player to move, so in order to do that, we will create our own piece of functionality in a script, effectively creating our own custom component in the process:
- To create a script, we will go to the Project window and select the Create button in the top-left corner of the menu by clicking on the + icon, and then we will select Folder:
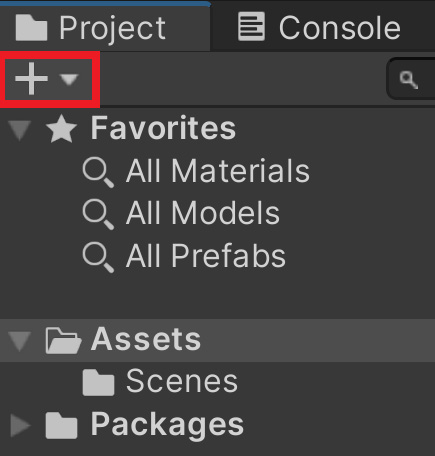
Figure 1.7 – Location of the + icon
Tip
You can also access the Create menu by right-clicking on the right-hand side of the Project window. With this method, you can right-click and then select Create | Folder.
- From there, we’ll name this folder
Scripts. It’s always a good idea to organize our projects, so this will help with that.
Tip
If you happen to misspell the name of an item in the Project window, you can rename it by either right-clicking and selecting the Rename option or selecting the object and then single-clicking on the name.
- Double-click on the folder to enter it, create a script by going to Create | C# Script, and rename the newly created item to
PlayerBehaviour(no spaces).
Note
The reason I’m using the behaviour spelling instead of behavior is that all components in Unity are children of another class called MonoBehaviour, and I’m following Unity’s lead in that regard.
- Double-click on the script to open up the script editor (IDE) of your choice and add the following code to it:
using UnityEngine;
public class PlayerBehaviour : MonoBehaviour
{
    // A reference to the Rigidbody component
    private Rigidbody rb;
    // How fast the ball moves left/right
    public float dodgeSpeed = 5;
    // How fast the ball moves forward  automatically
    public float rollSpeed = 5;
    // Start is called before the first frame update
    void Start()
    {
        // Get access to our Rigidbody component
        rb = GetComponent<Rigidbody>();
    }
    // Update is called once per frame
    void Update()
    {
        // Check if we're moving to the side
        var horizontalSpeed =
            Input.GetAxis("Horizontal") * dodgeSpeed;
        rb.AddForce(horizontalSpeed, 0, rollSpeed);
    }
}
In the preceding code, we have a couple of variables that we will be working with. The rb variable is a reference to the GameObject’s Rigidbody component that we added previously. It gives us the ability to make the object move, which we will use in the Update function. We also have two variables, dodgeSpeed and rollSpeed, which dictate how quickly the player will move when moving left/right or when moving forward, respectively.
Since our object has only one Rigidbody component, we assign rb once in the Start function, which is called when the GameObject is loaded into the scene at the beginning of the game.
Then, we use the Update function to check whether our player is pressing keys to move left or right based on Unity’s Input Manager system. By default, the Input.GetAxis function will return to us a negative value, moving to -1 if we press A or the left arrow. If we press the right arrow or D, we will get a positive value up to 1 returned to us, and the input will move toward 0 if nothing is pressed. We then multiply this by dodgeSpeed in order to increase the speed so that the movement of the object is easier to see.
Note
For more information on the Input Manager, check out https://docs.unity3d.com/Manual/class-InputManager.html.
Finally, once we have that value, we will apply a force to our ball’s horizontalSpeed units on the X axis and rollSpeed on the Z axis.
- Save your script and return to the Unity Editor.
- We will now need to assign this script to our player by selecting the
Playerobject in the Hierarchy window, and then in the Inspector window, we will drag and drop thePlayerBehaviourscript from the Project window to be on top of thePlayerobject.
Note
Note that when writing scripts, if we declare a variable as public, it will show up in the Inspector window for us to be able to set it. We typically set a variable as public when we want designers to tweak the values for gameplay purposes, but it also allows other scripts to access the property in code. By default, variables and methods are private, which means they can only be used within the class. For more information on access modifiers, check out https://docs.microsoft.com/en-us/dotnet/csharp/language-reference/keywords/access-modifiers.
If all goes well, we should see the script appear on our object, as follows:
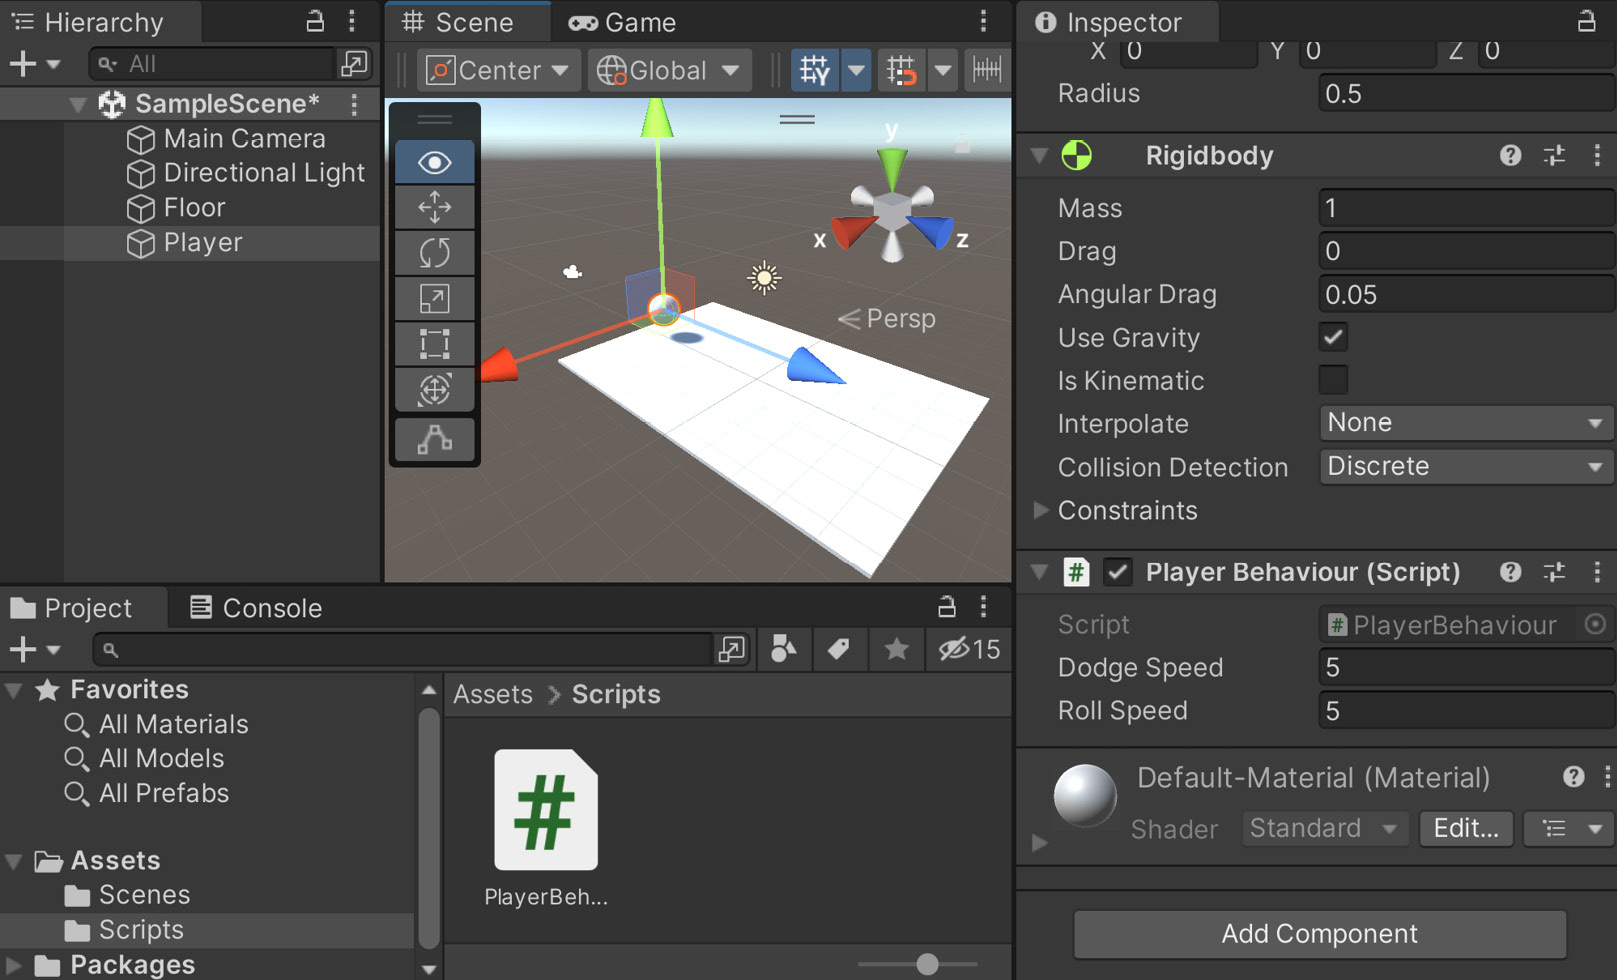
Figure 1.8 – The PlayerBehaviour component added
- Save your scene by going to File | Save. Afterward, play the game and use the left and right arrows to see the player moving according to your input, but no matter what, moving forward by default:
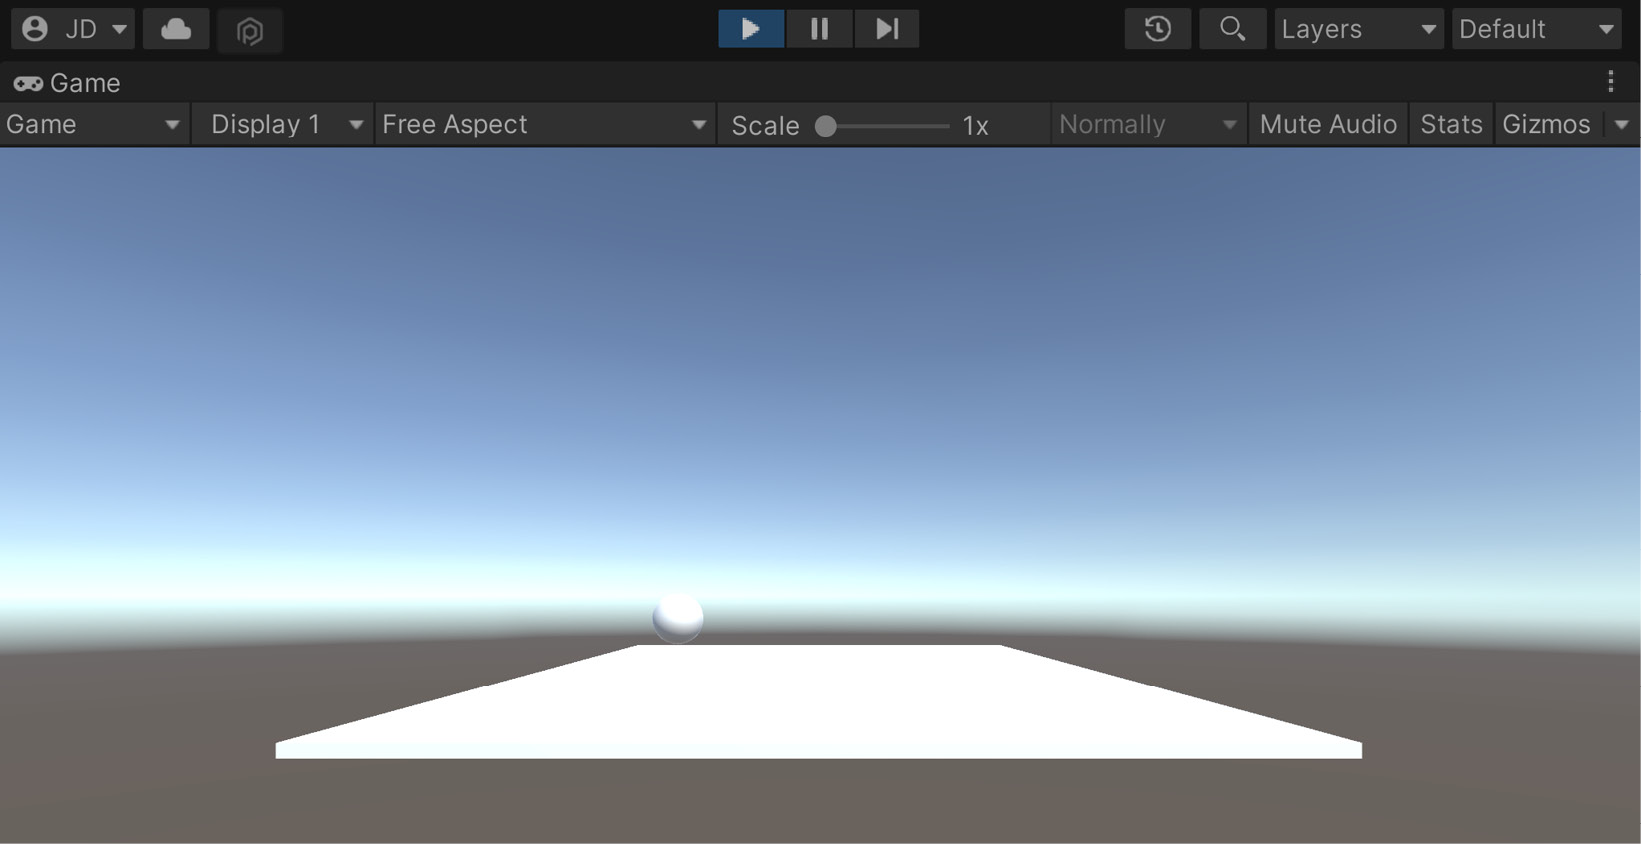
Figure 1.9 – The current state of the game
Now you can see that the ball moves automatically, and our input is received correctly!
Improving our scripts with attributes and XML comments
We could stop working with the PlayerBehaviour class script here, but I want to touch on a couple of things that we can use in order to improve the quality and style of our code. This becomes especially useful when you start building projects in teams. As you’ll be working with other people, some of them will be working on code with you. Then, there will be designers and artists who will not be working on code with you but will still need to use the things that you’ve programmed.
When writing scripts, we want them to be as error-proof as possible. Making the rb variable private starts that process, as now the user will not be able to modify that anywhere outside of this class. We want our teammates to modify dodgeSpeed and rollSpeed, but we may want to give them some advice as to what it is and/or how it will be used. To do this in the Inspector window, we can make use of something called an attribute.
Using attributes
Attributes are things we can add to the beginning of a variable, class, or function declaration, which allow us to attach additional functionality to them. There are many of them that exist inside Unity, and you can write your very own attributes as well, but right now, we’ll talk about the ones that I use most often.
The Tooltip attribute
If you’ve used Unity for a period of time, you may have noted that some components in the Inspector window, such as Rigidbody, have a nice feature—if you move your mouse over a variable name, you’ll see a description of what the variables are and/or how to use them. The first thing you’ll learn is how we can get the same effect in our own components by making use of the Tooltip attribute. If we do this for the dodgeSpeed and rollSpeed variables, it will look something like this:
[Tooltip("How fast the ball moves left/right")]
public float dodgeSpeed = 5;
[Tooltip("How fast the ball moves forward  automatically")]
public float rollSpeed = 5;
Save the preceding script and return to the editor:

Figure 1.10 – Tooltip attribute example
Now, when we highlight the variable using the mouse and leave it there, the text we placed will be displayed. This is a great habit to get into, as your teammates can always tell what it is that your variables are being used for without having to actually look at the script itself.
Note
For more information on the Tooltip attribute, check out https://docs.unity3d.com/ScriptReference/TooltipAttribute.html.
The Range attribute
Another thing that we can use to protect our code is the Range attribute. This will allow us to specify a minimum and maximum value for a variable. Since we want the player to always be moving forward, we may want to restrict the player from moving backward. To do that, we can add the following highlighted line of code:
[Tooltip("How fast the ball moves forward  automatically")]
[Range(0, 10)]
public float rollSpeed = 5;
Save your script, and return to the editor:
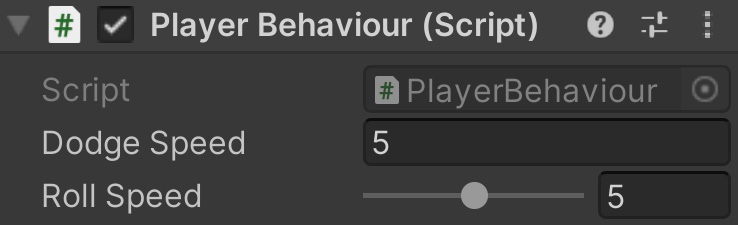
Figure 1.11 – Range attribute example
We have now added a slider beside our value, and we can drag it to adjust between our minimum and maximum values. Not only does this protect our variable from being changed to an invalid state but also makes it so that our designers can tweak things easily by just dragging them around.
The RequireComponent attribute
Currently, we are using the Rigidbody component in order to create our script. When working as a team member, others may not be reading your scripts but are still expected to use them when creating gameplay. Unfortunately, this means that they may do things that have unintended results, such as removing the Rigidbody component, which will cause errors when our script is run. Thankfully, we also have the RequireComponent attribute, which we can use to fix this.
It looks something like this:
using UnityEngine;
[RequireComponent(typeof(Rigidbody))]
public class PlayerBehaviour : MonoBehaviour
By adding this attribute, we state that when we include this component in a GameObject and it doesn’t have a Rigidbody component attached to its GameObject, the component will be added automatically. It also makes it so that if we were to try to remove the Rigidbody component from this object, the editor will warn us that we can’t, unless we remove the PlayerBehaviour component first. Note that this works for any class extended from MonoBehaviour; just replace Rigidbody with whatever it is that you wish to keep.
Now, if we go into the Unity Editor and try to remove the Rigidbody component by right-clicking on it in Inspector and selecting Remove Component, the following message will be seen:
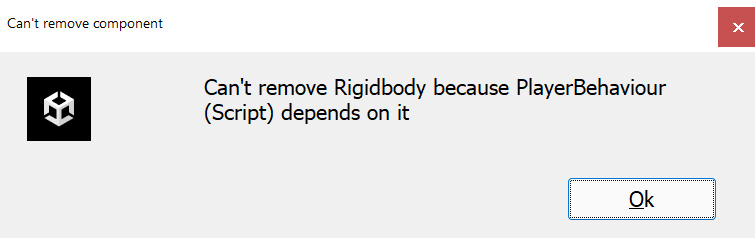
Figure 1.12 – Can’t remove component window
This is exactly what we want, and this ensures that the component will be there, allowing us not to have to include if checks every time we want to use a component.
Note that, previously, we did not use a Tooltip attribute on the private rb variable. Since it’s not being displayed in the editor, it’s not really needed. However, there is a way that we can enhance that as well: using XML comments.
XML comments
We can achieve a couple of nice things with XML comments that we otherwise couldn’t with traditional comments, which we were using previously. When using variables/functions instead of code in Visual Studio, we will now see a comment about it. This will help other coders on your team with additional information and details to ensure that they are using your code correctly.
XML comments look something like this:
/// <summary>
/// A reference to the Rigidbody component
/// </summary>
private Rigidbody rb;
It may appear that a lot more writing is needed to use this format, but I did not actually type the entire thing out. XML comments are a fairly standard C# feature, so if you are using MonoDevelop or Visual Studio and type ///, the action will automatically generate the summary blocks for you (and the param tags needed, if there are parameters needed for something such as a function).
Now, why would we want to do this? Well, if you select the variable in IntelliSense, it will display the following information to us:
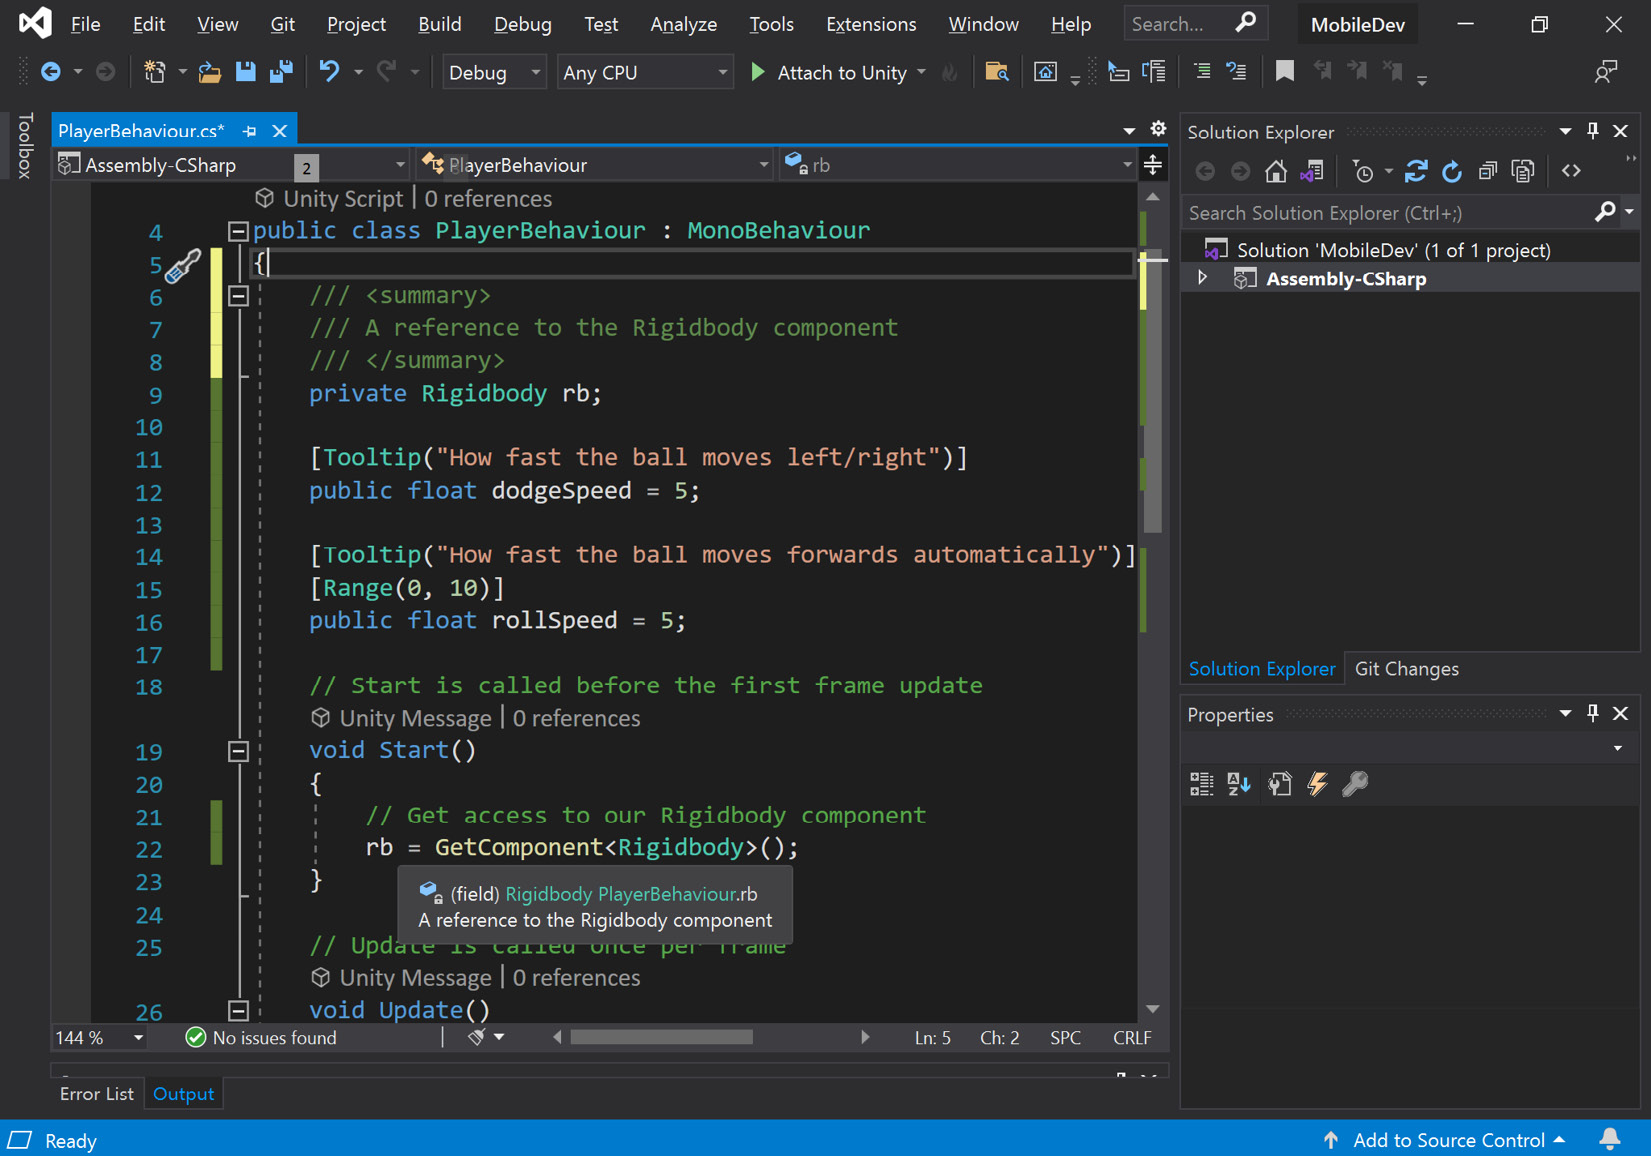
Figure 1.13 – An example of tooltips from XML comments
This is a great help when other people are trying to use your code and it is how Unity’s staff write their code. We can also extend this to functions and classes to ensure that our code is more self-documented.
Unfortunately, XML comments do not show up in the Inspector, and the Tooltip attribute can’t be used for some aspects of projects such as functions. With that in mind, I use Tooltip for public instructions and/or things that will show up in the Inspector window and XML comments for everything else.
Note
If you’re interested in looking into XML comments more, feel free to check out https://msdn.microsoft.com/en-us/library/b2s063f7.aspx.
Now that we have looked at ways of improving the formatting of our code; let’s look at how we can improve the performance by looking at some of the different Update functions Unity provides.
Update function versus FixedUpdate function
The next thing to look at is our movement code. You may have noticed that we are currently using the Update function in order to move our player. As the comment above it states, the Update function is called once per frame that the game is running. One thing to consider is that the frequency of Update being called is variable, meaning that it can change over time. This is dependent on a number of factors, including the hardware that is being used. This means that the more times the Update function is called, the better the computer is. We want a consistent experience for all of our players, and one of the ways that we can do that is by using the FixedUpdate function.
FixedUpdate is similar to Update with some key differences. The first is that it is called at fixed timesteps, meaning the same time between calls. It’s also important to note that physics calculations are done after FixedUpdate is called. This means code-modifying physics-based objects should be executed within the FixedUpdate function generally, apart from one-off events such as jumping:
/// <summary>
/// FixedUpdate is a prime place to put physics
/// calculations happening over a period of time.
/// </summary>
void FixedUpdate()
{
    // Check if we're moving to the side
    var horizontalSpeed = Input.GetAxis("Horizontal") *
                           dodgeSpeed;
    rb.AddForce(horizontalSpeed, 0, rollSpeed);
}
By adjusting the code to use FixedUpdate, the ball should be much more consistent in its movement speed.
Note
For more information on FixedUpdate, check out https://docs.unity3d.com/ScriptReference/MonoBehaviour.FixedUpdate.html.
Putting it all together
With all of the stuff we’ve been talking about, we can now have the final version of the script, which looks like the following:
using UnityEngine;
/// <summary>
/// Responsible for moving the player automatically and
/// receiving input.
/// </summary>
[RequireComponent(typeof(Rigidbody))]
public class PlayerBehaviour : MonoBehaviour
{
    /// <summary>
    /// A reference to the Rigidbody component
    /// </summary>
    private Rigidbody rb;
    [Tooltip("How fast the ball moves left/right")]
    public float dodgeSpeed = 5;
    [Tooltip("How fast the ball moves
        forward  automatically")]
    [Range(0, 10)]
    public float rollSpeed = 5;
    // Start is called before the first frame update
    public void Start()
    {
        // Get access to our Rigidbody component
        rb = GetComponent<Rigidbody>();
    }
    /// <summary>
    /// FixedUpdate is a prime place to put physics
    /// calculations happening over a period of time.
    /// </summary>
    void FixedUpdate()
    {
        // Check if we're moving to the side
        var horizontalSpeed = Input.GetAxis("Horizontal") *
                              dodgeSpeed;
        rb.AddForce(horizontalSpeed, 0, rollSpeed);
    }
}
I hope that you also agree that this makes the code easier to understand and better to work with. Now, we can move on to additional features in the game!
Having the camera following our player
Currently, our camera stays in the same spot while the game is going on. This does not work very well for this game, as the player will be moving while the game is going on. There are two main ways that we can move our camera. We can just move the camera and make it a child of the player, but that will not work due to the fact that the camera would have the same rotation as the ball, which would cause the camera to spin around constantly and likely cause dizziness and disorientation for the players. Due to that, we will likely want to use a script to move it instead. Thankfully, we can modify how our camera looks at things fairly easily, so let’s go ahead and fix that next:
- Go to the Project window and create a new C# script called
CameraBehaviour. From there, use the following code:using UnityEngine; /// <summary> /// Will adjust the camera to follow and face a target /// </summary> public class CameraBehaviour : MonoBehaviour { [Tooltip("What object should the camera be looking at")] public Transform target; [Tooltip("How offset will the camera be to the target")] public Vector3 offset = new Vector3(0, 3, -6); /// <summary> /// Update is called once per frame /// </summary> private void Update() { // Check if target is a valid object if (target != null) { // Set our position to an offset of our // target transform.position = target.position + offset; // Change the rotation to face target transform.LookAt(target); } } }
This script will set the position of the object it is attached to to the position of a target with an offset. Afterward, it will change the rotation of the object to face the target. Both of the parameters are marked as public, so they can be tweaked in the Inspector window.
- Save the script and dive back into the Unity Editor. Select the Main Camera object in the Hierarchy window. Then, go to the Inspector window and add the
CameraBehaviourcomponent to it. You may do this by dragging and dropping the script from the Project window onto the GameObject or by clicking on the Add Component button at the bottom of the Inspector window, typing in the name of our component, and then hitting Enter to confirm once it is highlighted. - Afterward, drag and drop the
Playerobject from the Hierarchy window into the Target property of the script in the Inspector window:
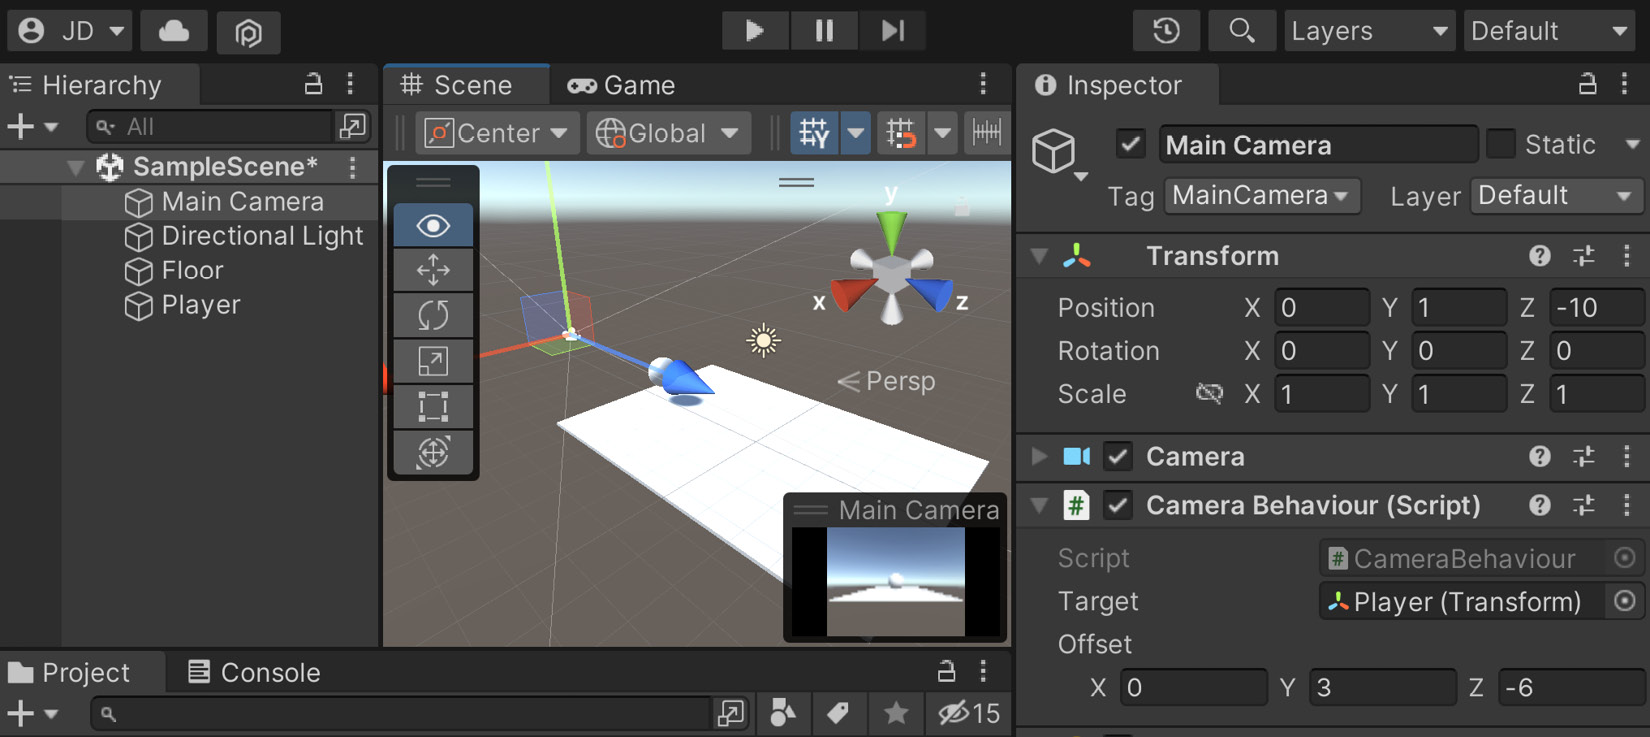
Figure 1.14 – CameraBehaviour component setup
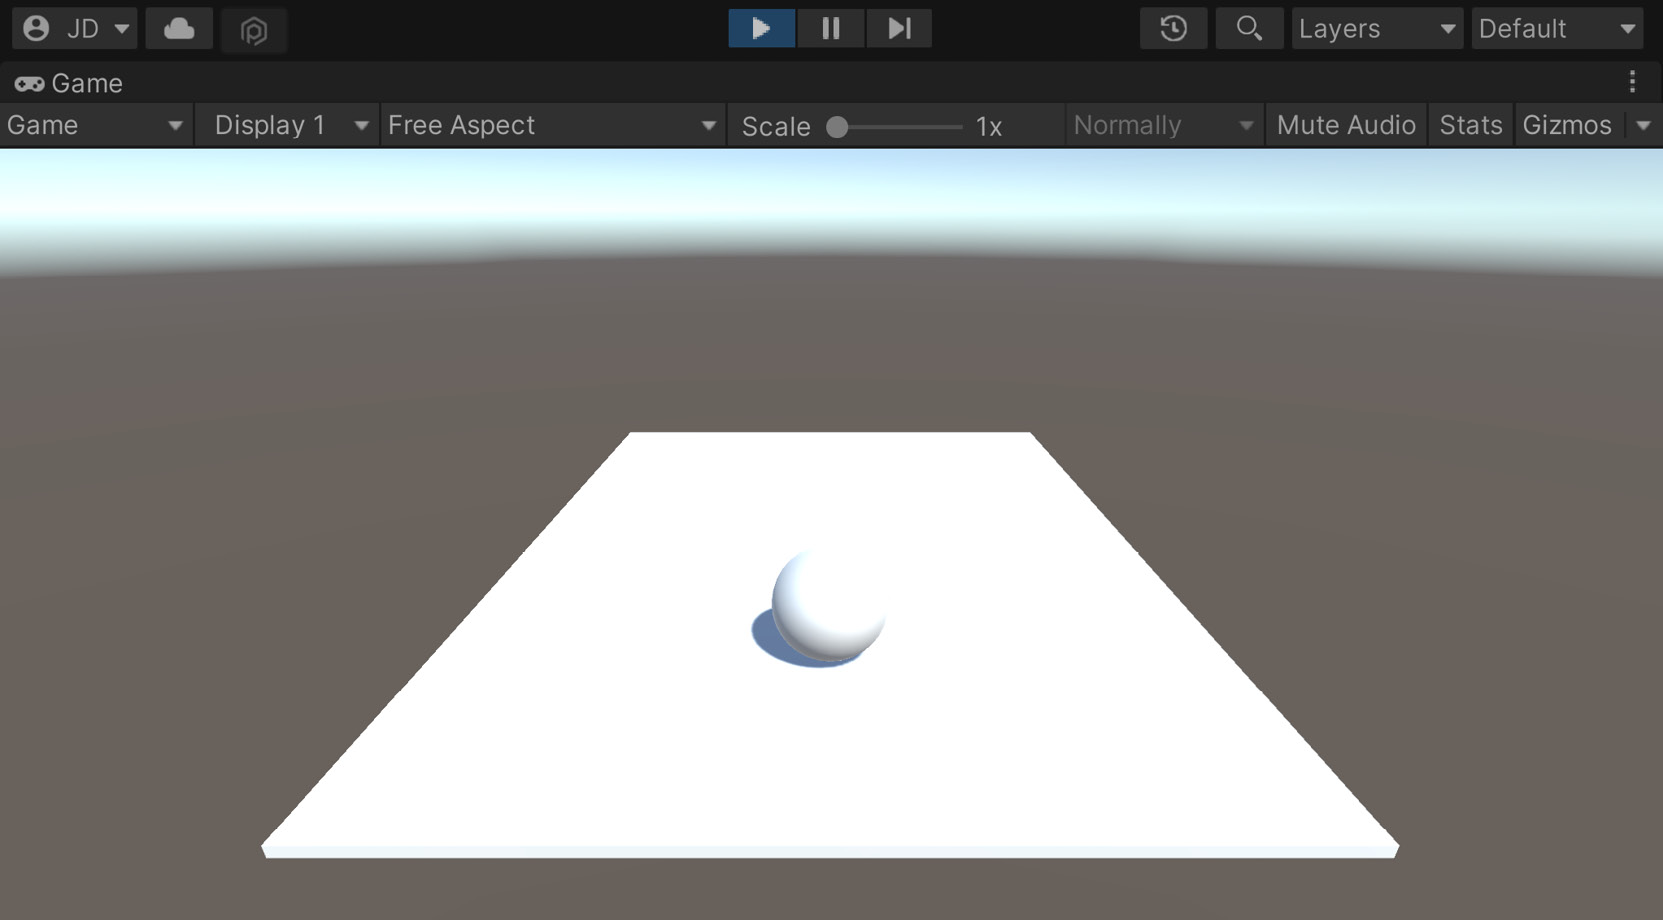
Figure 1.15 – The current state of the game
The camera now follows the player as it moves. Feel free to tweak the variables and see how it affects the look of the camera to get the feeling you’d like best for the project. After this, we can have a place for the ball to move toward, which we will be covering in the next section.
Creating a basic tile
We want our game to be endless, but in order to achieve that, we will need to have pieces that we can spawn to build our environment; let’s do that now:
- To get started, we will first need to create a single repeatable piece for our runner game. To do that, we’ll add some walls to the floor we already have. From the Hierarchy window, select the Floor object and duplicate it by pressing Ctrl + D in Windows or Command + D on macOS. Rename this new object
Left Wall. - Change the Left Wall object’s Transform component by adjusting the Scale values to (
1,2,10). From there, select the Move tool by clicking on the button with arrows on the tools overlay or by pressing the W key.
Note
A recent addition to Unity is the concept of Overlays, which have replaced the original toolbar. For more information about them and how to use them, check out https://docs.unity3d.com/2022.1/Documentation/Manual/overlays.html.
For more information on Unity’s built-in shortcuts, check out https://docs.unity3d.com/Manual/UnityHotkeys.html.
- We want this wall to match up with the floor, so hold down the V key to enter Vertex Snap mode. In Vertex Snap mode, we can select any of the vertices on a mesh and move them to the same position as another vertex on a different object. This is really useful for making sure that objects don’t have holes between them.
- With Vertex Snap mode on, select the inner edge and drag it until it hits the edge of the floor. Alternatively, you can set the Position values to (
3,0.95,0):
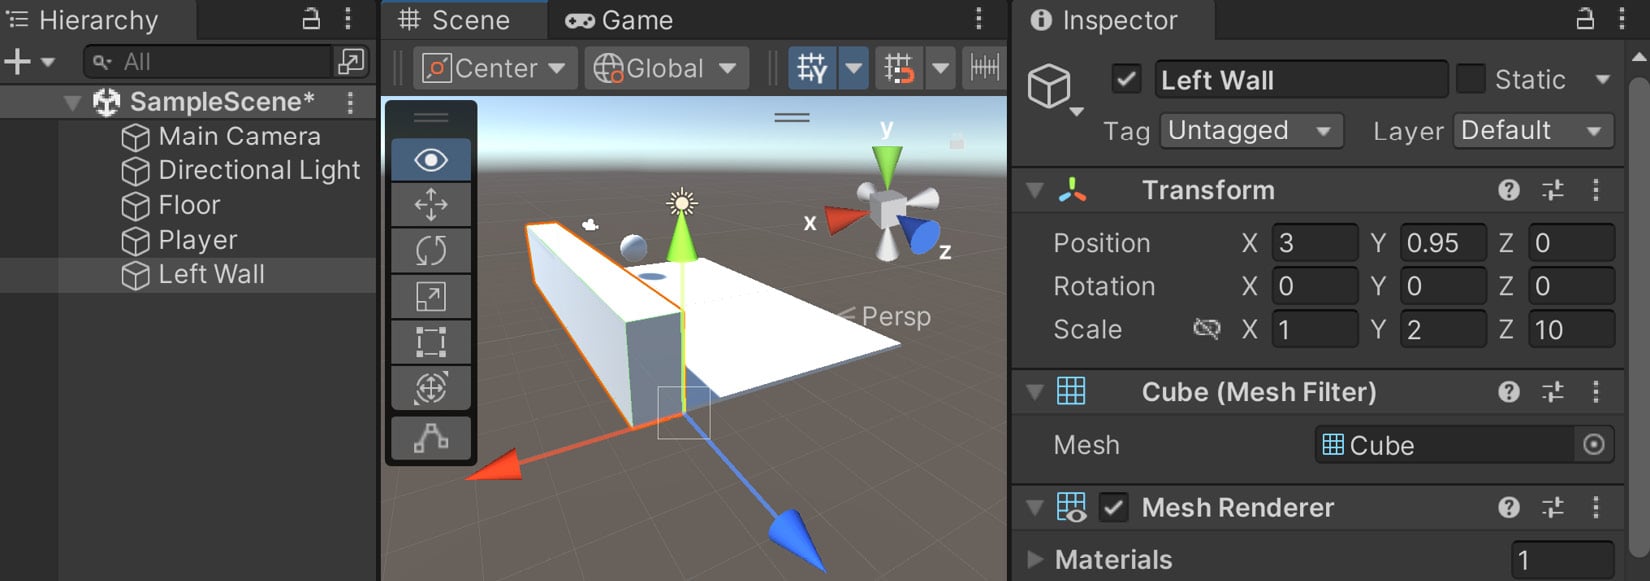
Figure 1.16 – Left Wall setup
Note
For more information on moving objects through the scene, including more details on Vertex Snap mode, check out https://docs.unity3d.com/Manual/PositioningGameObjects.html.
- Then, duplicate this wall and put the other object on the other side (
-3,0.95,0), naming itRight Wall:
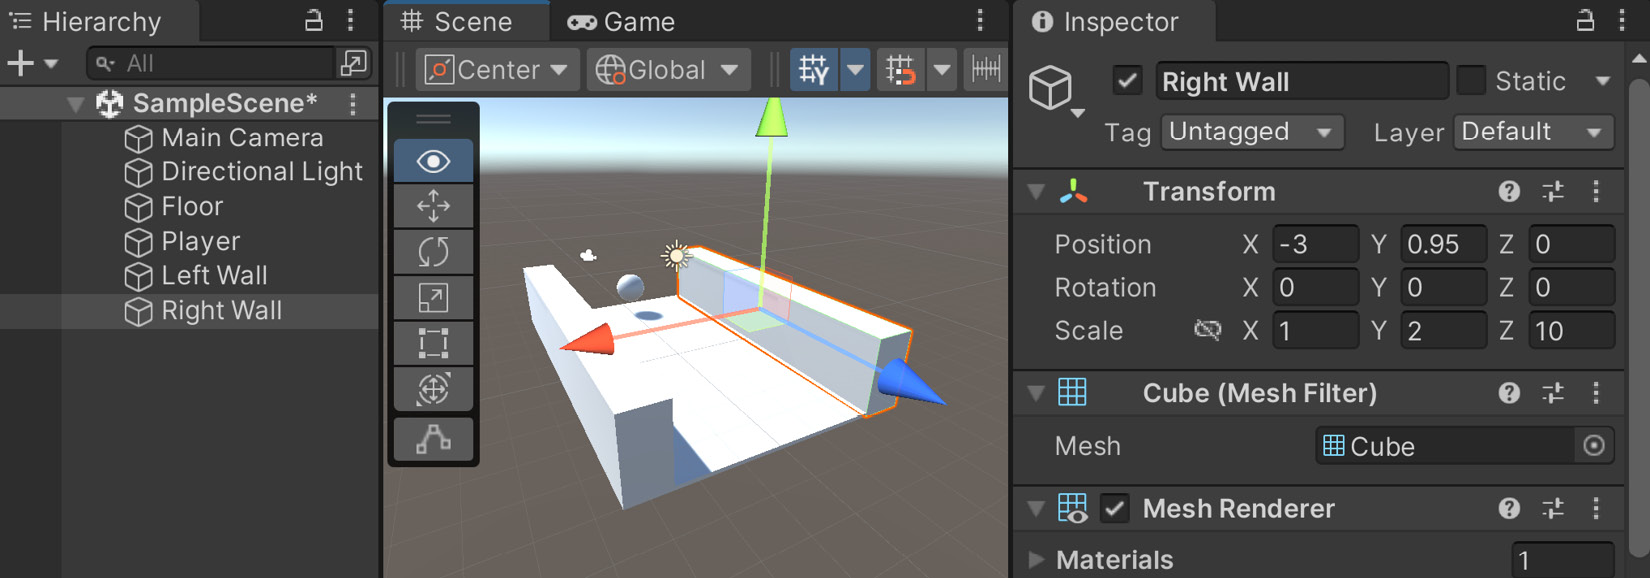
Figure 1.17 – Right Wall setup
As you can see in the preceding screenshot, we now protect the player from falling off the left and right edges of the play area. Due to how the walls are set up, if we move the Floor object, the walls will move as well.
Note
For information on moving Unity’s camera or navigating to the Scene view, check out https://docs.unity3d.com/Manual/SceneViewNavigation.html.
The way this game is designed, after the ball rolls past a single tile, we will no longer need it to be there anymore. If we just leave it there, the game will get slower over time due to us having so many things in the game environment using memory, so it’s a good idea to remove assets we are no longer using. We also need to have some way to figure out when we should spawn new tiles to continue the path the player can take.
- Now, we also want to know where this piece ends, so we’ll add an object with a trigger collider in it. Select GameObject | Create Empty and name this object
Tile End. - Then, we will add a Box Collider component to our Tile End object. Under Box Collider in the Inspector window, set the Scale values to (
7,2,1) to fit the size of the space the player can walk in. Note that there is a green box around that space showing where collisions can take place. Set the Position property to (0,1,10) to reach past the end of our tile. Finally, check the Is Trigger property so that the collision engine will turn the collider into a trigger, which will be able to run code events when it is hit, but will not prevent the player from moving through it:
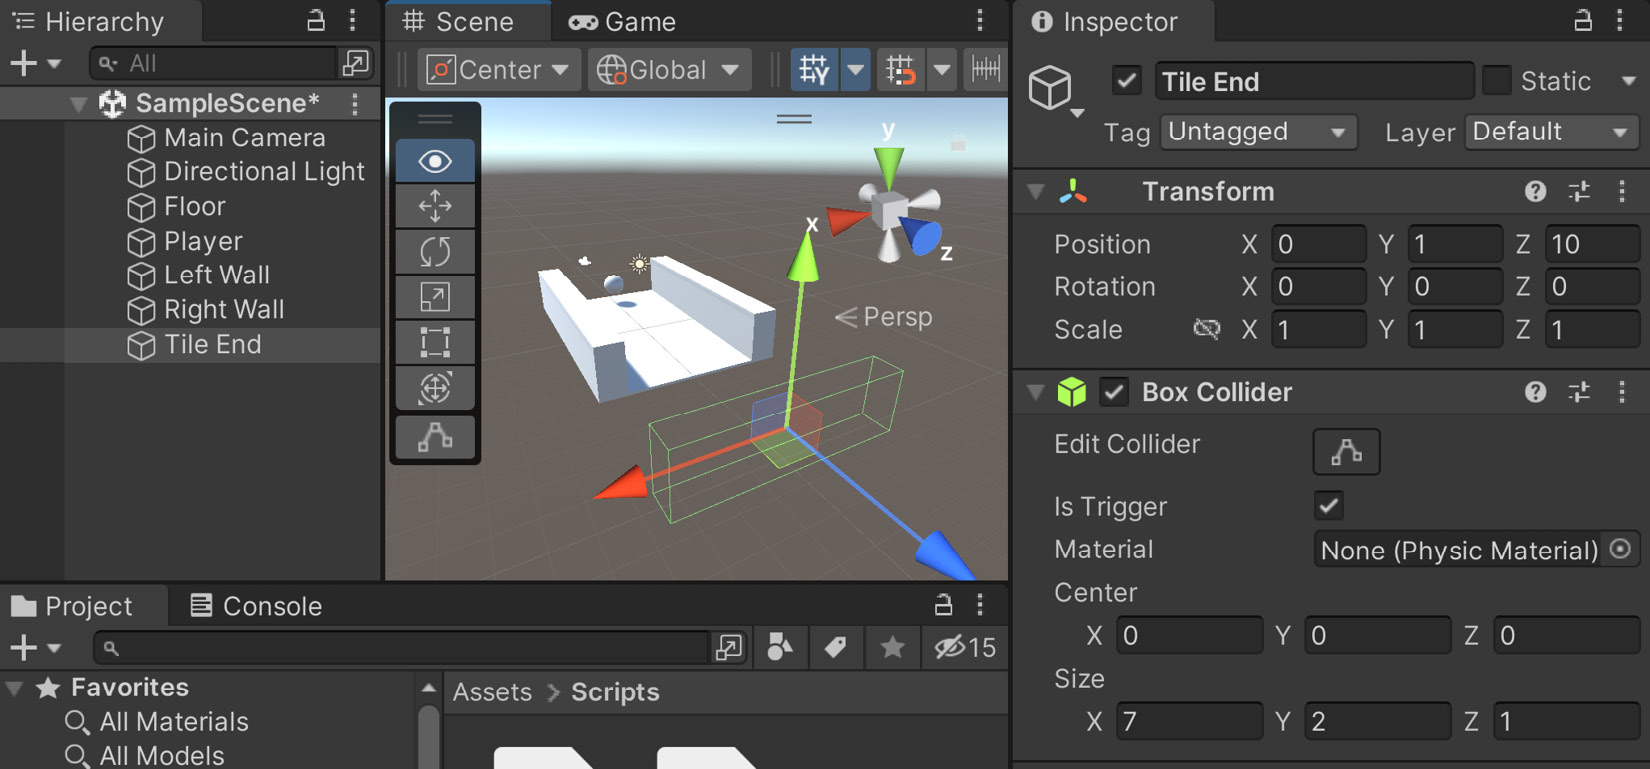
Figure 1.18 – Caption
As I mentioned briefly before, this trigger will be used to tell the game that our player has finished walking over this tile. This is positioned past the tile due to the fact that we want to still see tiles until they pass what the camera can see. We’ll tell the engine to remove this tile from the game, but we will dive more into that later on in the chapter.
- Now that we have all of the objects created, we want to group our objects together as one piece that we can create duplicates of. To do this, let’s create an empty GameObject instance by going to GameObject | Create Empty and naming the newly created object
Basic Tile. Set the Position values of this new object to (0,0,0). - Then, go to the Hierarchy window and drag and drop the Floor, Tile End, Left Wall, and Right Wall objects on top of it to make them children of the Basic Tile object.
- Currently, the camera can see the start of the tiles, so to fix that, let’s set the Basic Tile Position values to (
0,0,-5). As you can see in the following screenshot, now the entire tile will shift back:
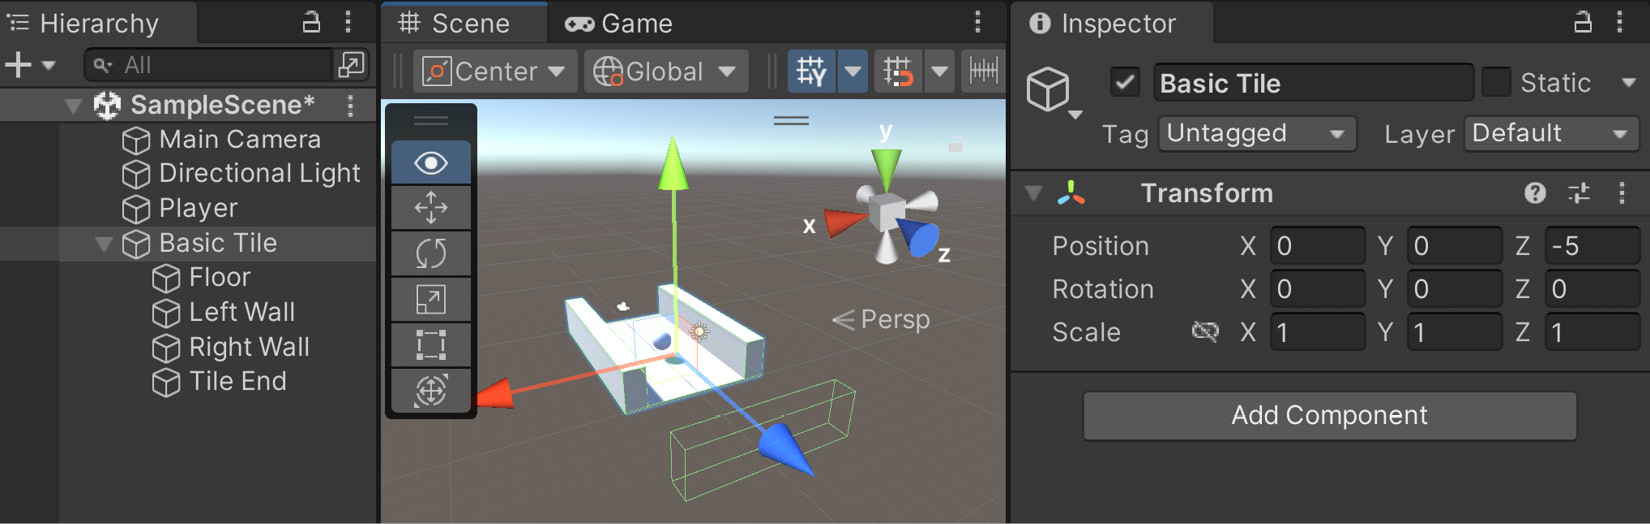
Figure 1.19 – Shifting the tile back
- Finally, we will need to know at what position we should spawn the next piece, so create another empty GameObject by going to GameObject | Create Empty or by pressing Ctrl + Shift + N. Make the new object a child of Basic Tile as well, give it the name
Next Spawn Point, and set its Position values to (0,0,5).
Note
Note that when we modify an object that has a parent, the position is relative to the parent, not its world position.
As you can see, the spawn point position will now be on the edge of our current title:
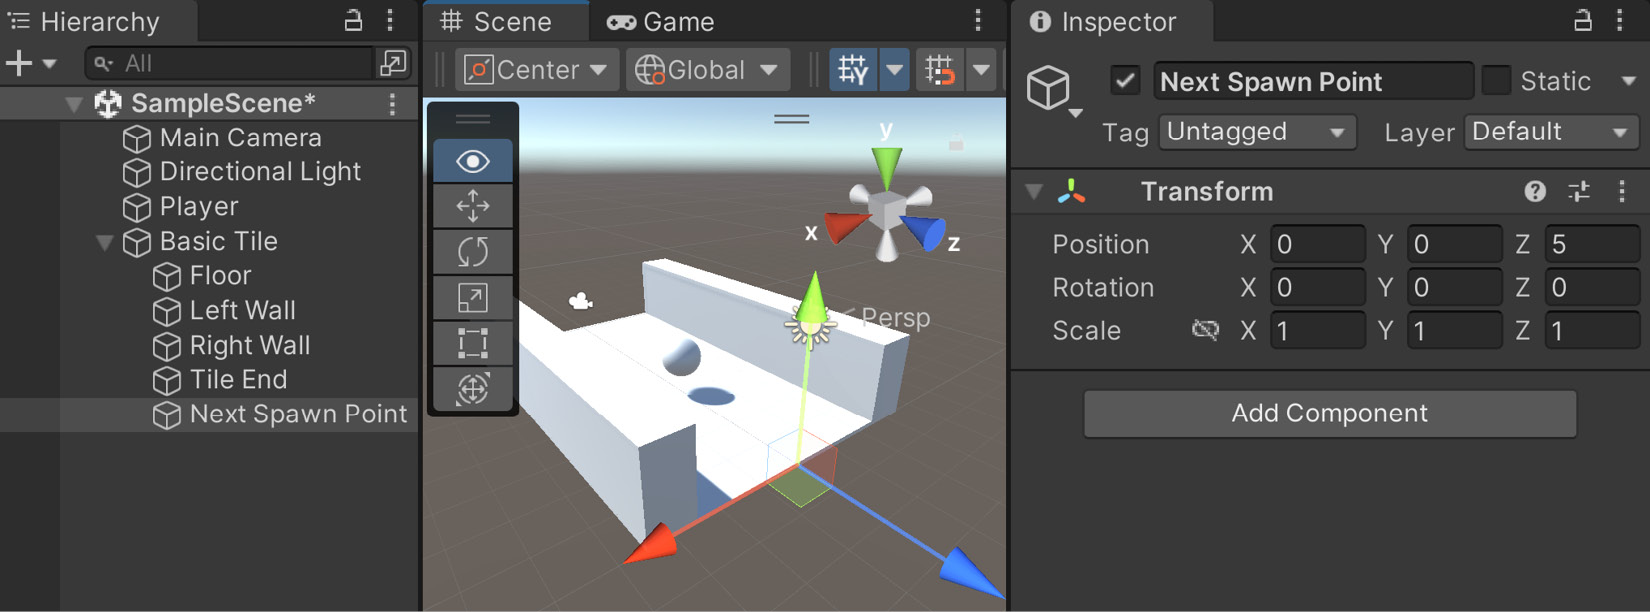
Figure 1.20 – Next Spawn Point position
- Now we have a single tile that is fully completed. Instead of duplicating this a number of times by hand, we will make use of Unity’s concept of Prefabs. Prefabs, or prefabricated objects, are blueprints of GameObjects and components that we can turn into files, which can be duplicated. There are other interesting features that Prefabs have, but we will discuss them as we make use of them.
From the Project window, go to the Assets folder and then create a new folder called Prefabs. Then, drag and drop the Basic Tile object from the Hierarchy window to the Project window inside the Prefabs folder. If the text for the Basic Tile name in the Hierarchy window becomes blue, we will know that it was made correctly:
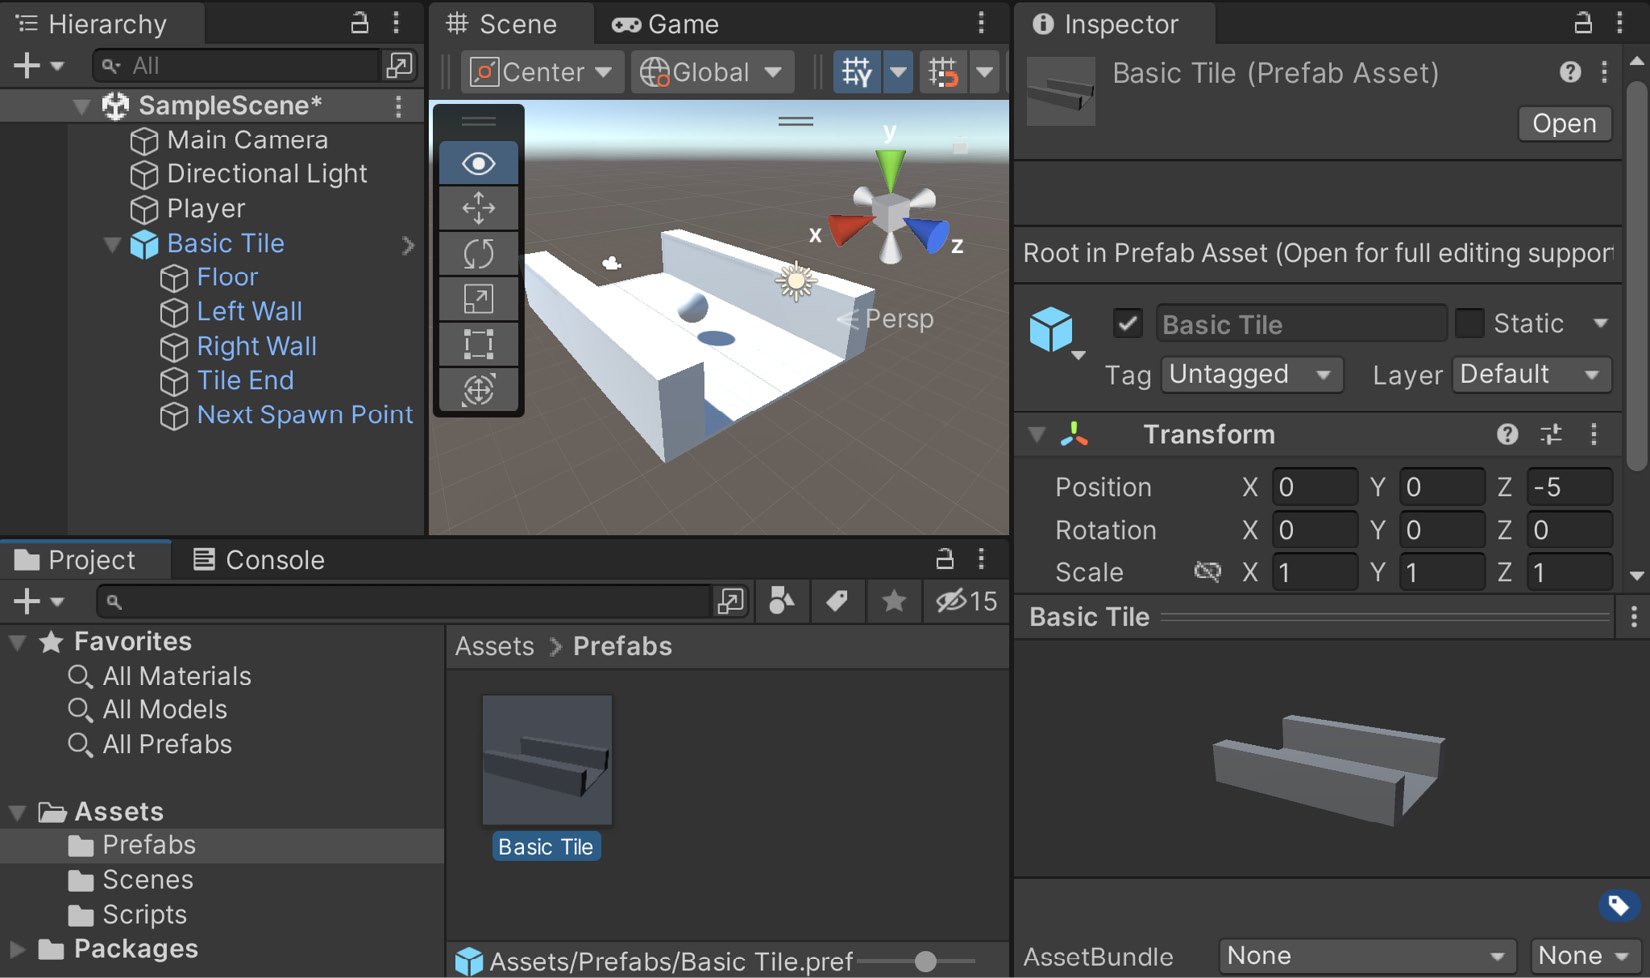
Figure 1.21 – Basic Tile Prefab created
We now have a tile prefab that we can create duplicates of through code to extend our environment.
Making it endless
Now that we have a foundation, let’s make it so that we can continue running instead of stopping after a short time by spawning copies of this basic tile in front of each other:
- To start off with, we have our prefab, so we can delete the original Basic Tile in the Hierarchy window by selecting it and then pressing the Delete key.
- We need to have a place to create all of these tiles and potentially manage information for the game, such as the player’s score. In Unity, this is typically referred to as a
GameManager. From the Project window, go to the Scripts folder and create a new C# script calledGameManager. - Open the script in your IDE and use the following code:
using UnityEngine;
/// <summary>
/// Manages the main gameplay of the game
/// </summary>
public class GameManager : MonoBehaviour
{
    [Tooltip("A reference to the tile we want to
        spawn")]
    public Transform tile;
    [Tooltip("Where the first tile should be placed
        at")]
    public Vector3 startPoint = new Vector3(0, 0, -5);
    [Tooltip("How many tiles should we create in
        advance")]
    [Range(1, 15)]
    public int initSpawnNum = 10;
    /// <summary>
    /// Where the next tile should be spawned at.
    /// </summary>
    private Vector3 nextTileLocation;
    /// <summary>
    /// How should the next tile be rotated?
    /// </summary>
    private Quaternion nextTileRotation;
    /// <summary>
    /// Start is called before the first frame update
    /// </summary>
    private void Start()
    {
        // Set our starting point
        nextTileLocation = startPoint;
        nextTileRotation = Quaternion.identity;
        for (int i = 0; i < initSpawnNum; ++i)
        {
            SpawnNextTile();
        }
    }
    /// <summary>
    /// Will spawn a tile at a certain location and
    /// setup the next position
    /// </summary>
    public void SpawnNextTile()
    {
        var newTile = Instantiate(tile,
            nextTileLocation, nextTileRotation);
        // Figure out where and at what rotation we
        /// should spawn the next item
        var nextTile = newTile.Find("Next Spawn
            Point");
        nextTileLocation = nextTile.position;
        nextTileRotation = nextTile.rotation;
    }
}
This script will spawn a number of tiles, one after another, based on the tile and initSpawnNum properties.
- Save your script and dive back into Unity. From there, create a new
empty GameObjectand name itGame Controller, optionally resetting the position if wanted for organizational purposes. Drag and drop it at the top of the Hierarchy window. For clarity’s sake, go ahead and reset the position if you want to. Then, attach the Game Manager script to the object and then set the Tile property by dragging and dropping the Basic Tile prefab from the Project window into the Tile slot:
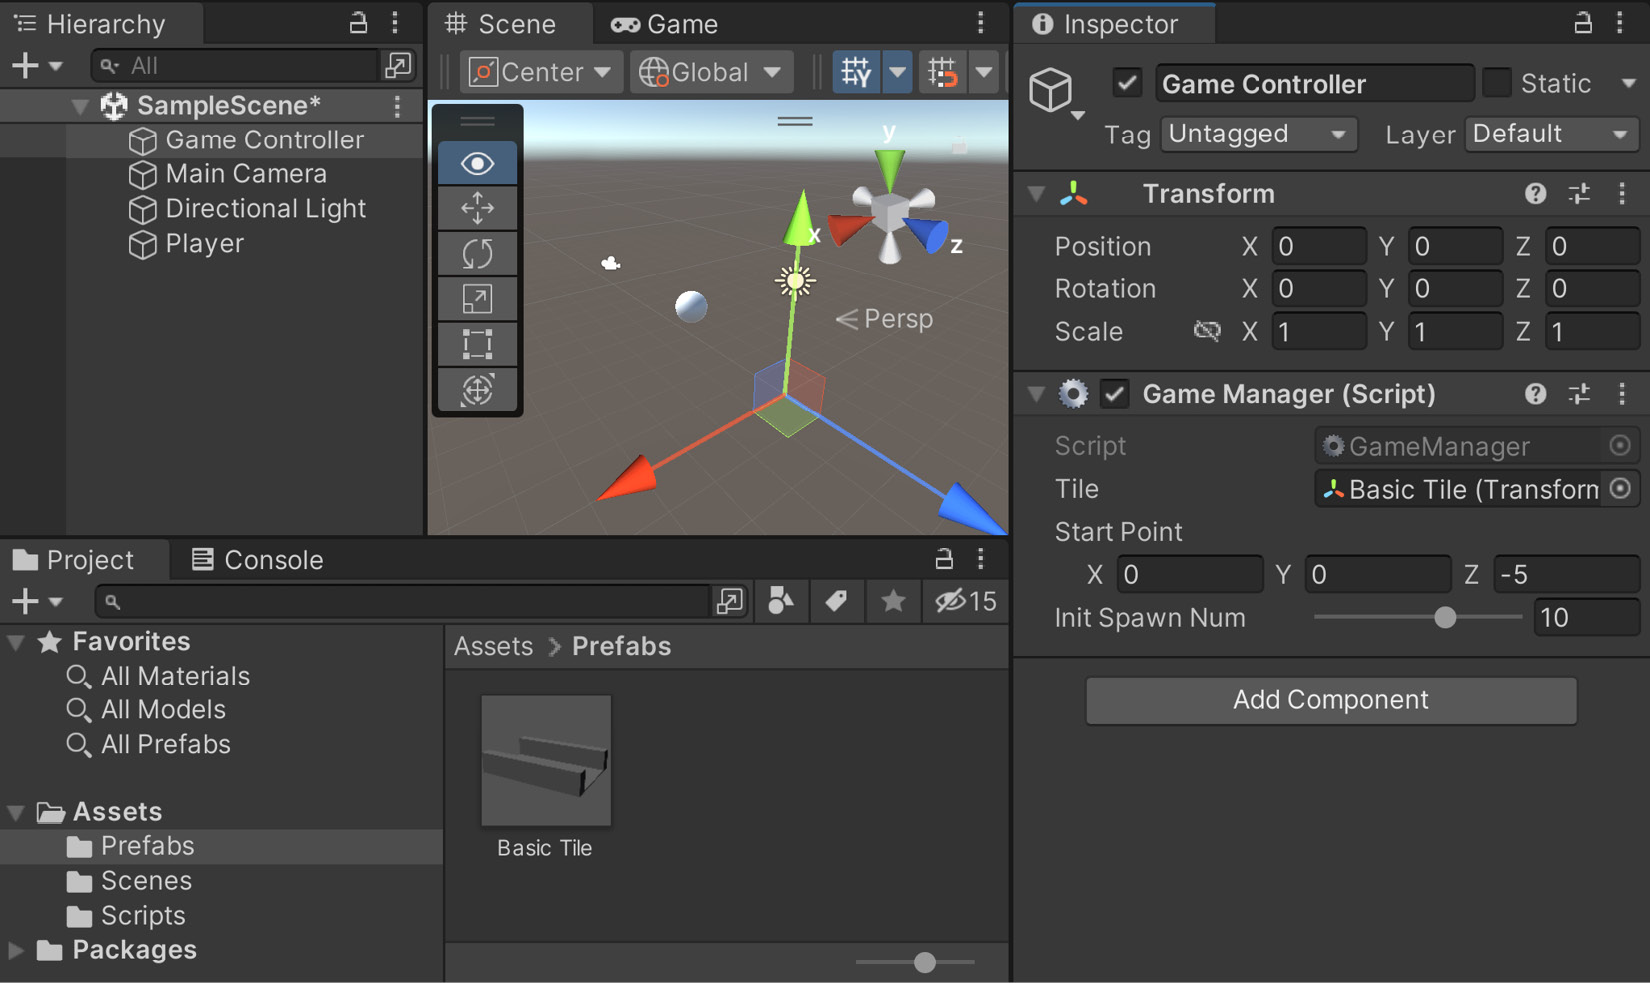
Figure 1.22 – Assigning the Tile property
- Save your scene and run the project:
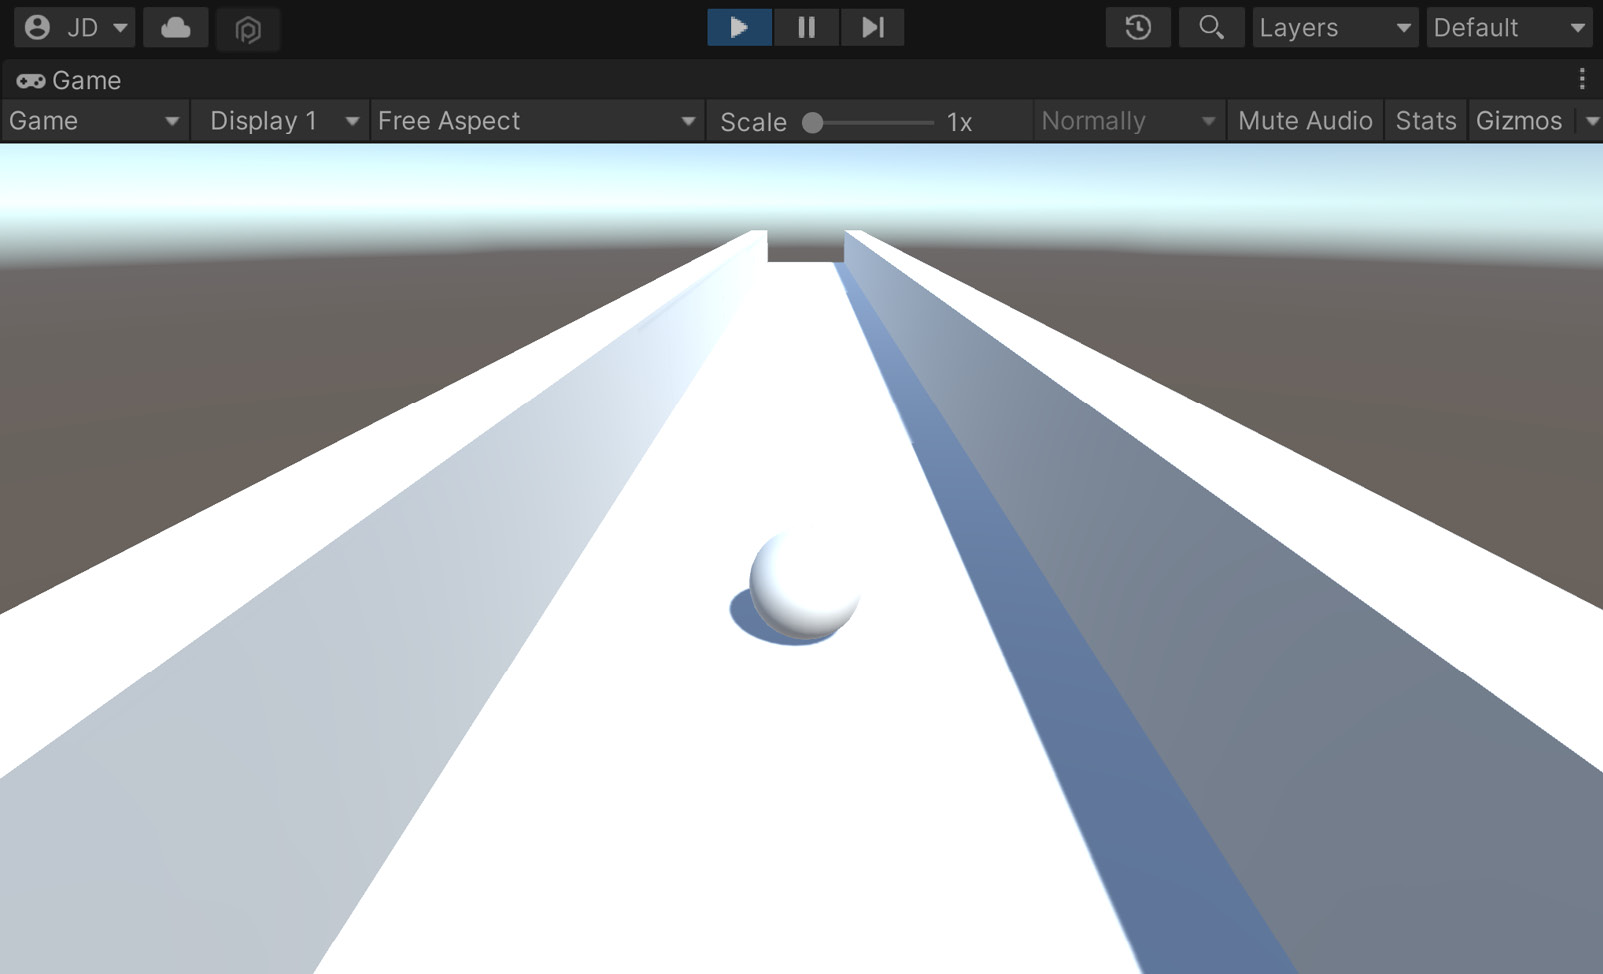
Figure 1.23 – The current state of the game
Great, but now we will need to create new objects after these, and we don’t want to spawn a crazy number of these at once. It’s better that once we reach the end of a tile, we create a new tile and remove it. We’ll work on optimizing this more later, but that way, we always have about the same number of tiles in the game at any given time.
- Go into the Project window and from the Scripts folder, create a new script called
TileEndBehaviour, using the following code:using UnityEngine; /// <summary> /// Handles spawning a new tile and destroying this /// one upon the player reaching the end /// </summary> public class TileEndBehaviour : MonoBehaviour { [Tooltip("How much time to wait before destroying " + "the tile after reaching the end")] public float destroyTime = 1.5f; private void OnTriggerEnter(Collider other) { // First check if we collided with the player if(other.gameObject.GetComponent <PlayerBehaviour>()) { // If we did, spawn a new tile var gm = GameObject.FindObjectOfType <GameManager>(); gm.SpawnNextTile(); // And destroy this entire tile after a // short delay Destroy(transform.parent.gameObject, destroyTime); } } } - Now, to assign it to the prefab, we can go to the Project window and then go into the Prefabs folder. From there, double-click on the Basic Tile object to open up its editor. From the Hierarchy tab, select the Tile End object and then add a Tile End Behaviour component to it:
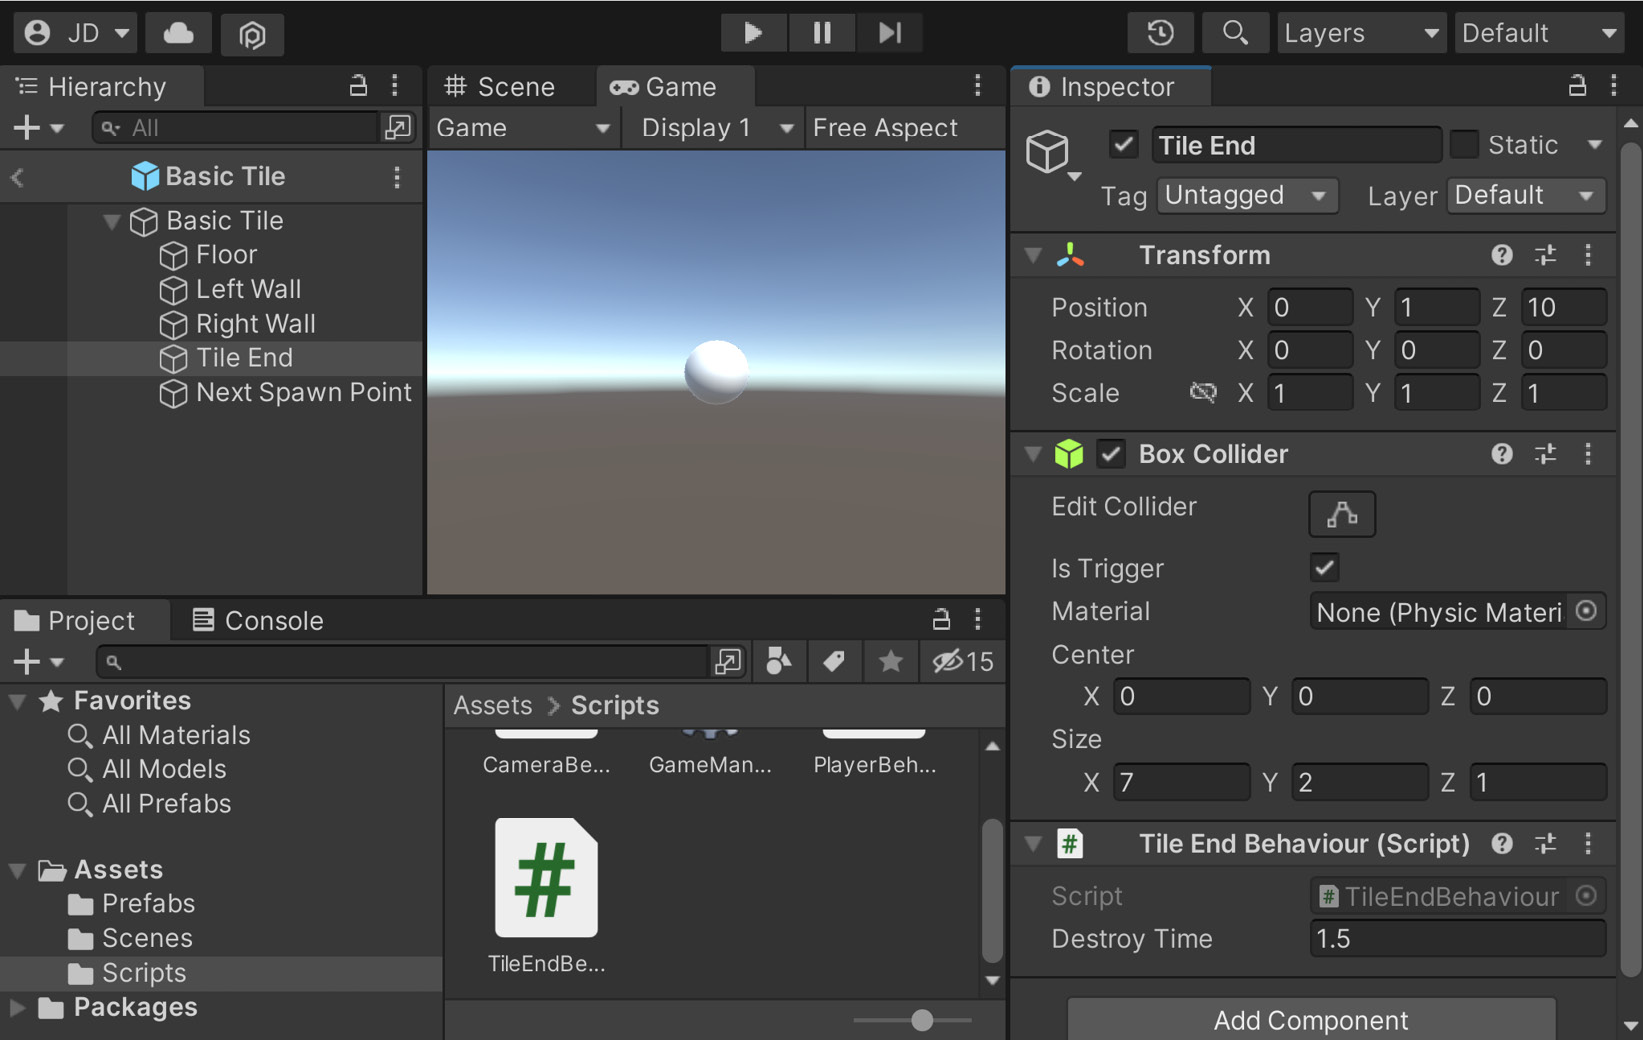
Figure 1.24 – Adding the Tile End Behaviour
- Click on the left arrow next to the prefab name to return to the basic scene:
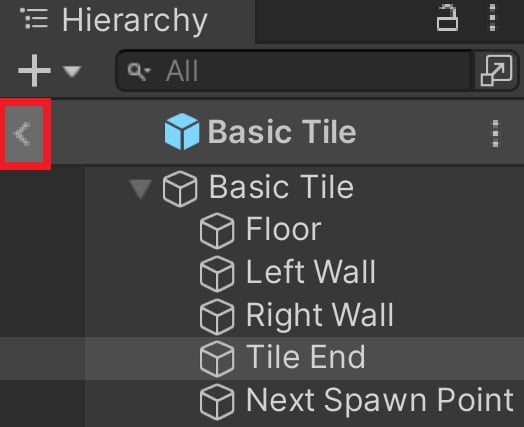
Figure 1.25 – Left Arrow location
Tip
You can also open the prefab editor by selecting a prefab object from the Project window, going to the Inspector tab, and clicking the Open Prefab button.
- Save your scene and play. You’ll now note that as the player continues to move, new tiles will spawn as you go; if you switch to the Scene tab while playing, you’ll see that as the ball passes the tiles, they will destroy themselves:
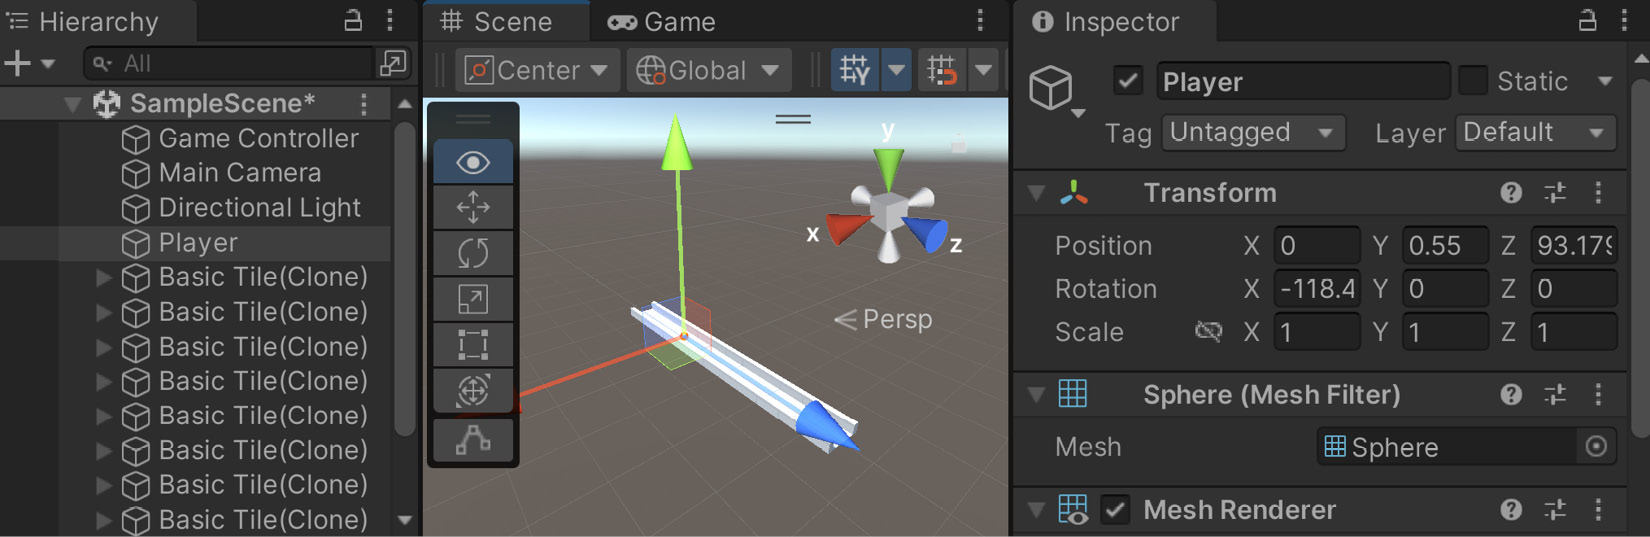
Figure 1.26 – Tiles automatically being destroyed
This will ensure that there will be tiles in front of the player to visit! But of course, this is just an endless straight line. In the next section, we will see how to make the game much more interesting.
Creating obstacles
It’s great that we have some basic tiles, but it’s a good idea to give the player something to do, or in our case, something to avoid. This will provide the player with some kind of challenge and a basic gameplay goal, which is avoiding obstacles here. In this section, you’ll learn how to customize your tiles to add obstacles for your player to avoid. So, let’s look at the steps:
- Just like we created a prefab for our basic tile, we will create a single obstacle through code. I want to make it easy to see what the obstacle will look like in the world and make sure that it’s not too large, so I’ll drag and drop a Basic Tile prefab back into the world.
- Next, we will create a cube by going to GameObject | 3D Object | Cube. We will name this object
Obstacle. Change the Scale value of Y to2and position it above the platform at (0,1,0.25):
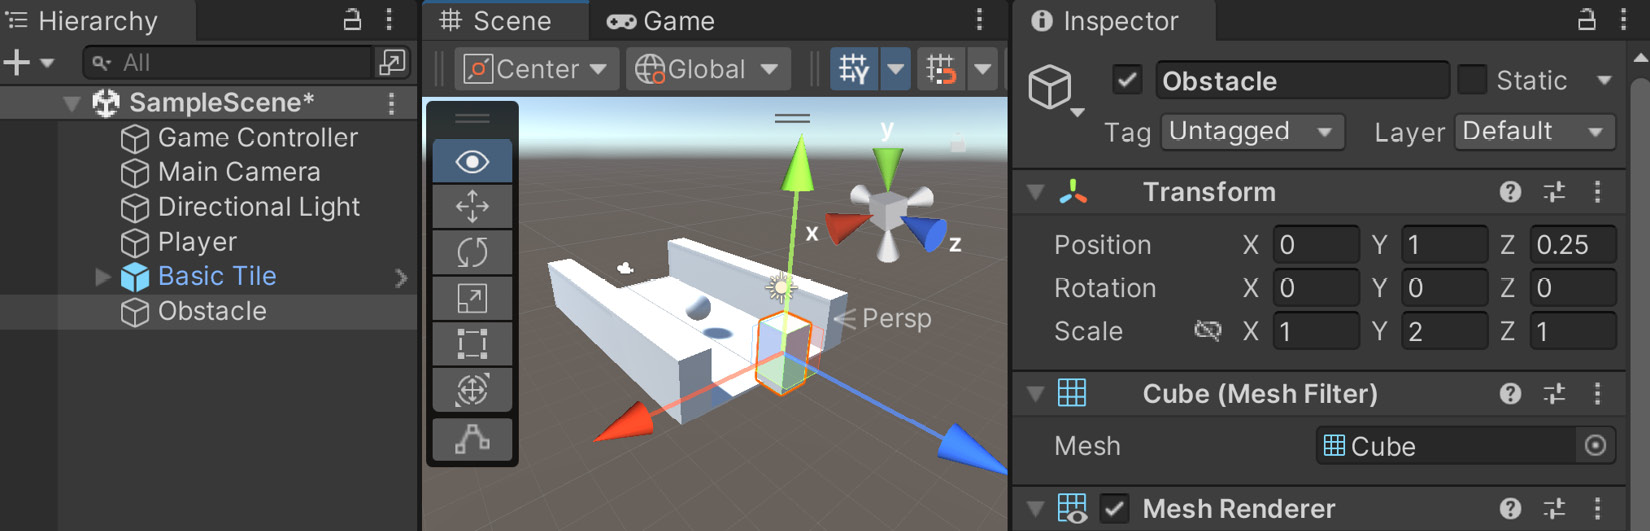
Figure 1.27 – Adding obstacles
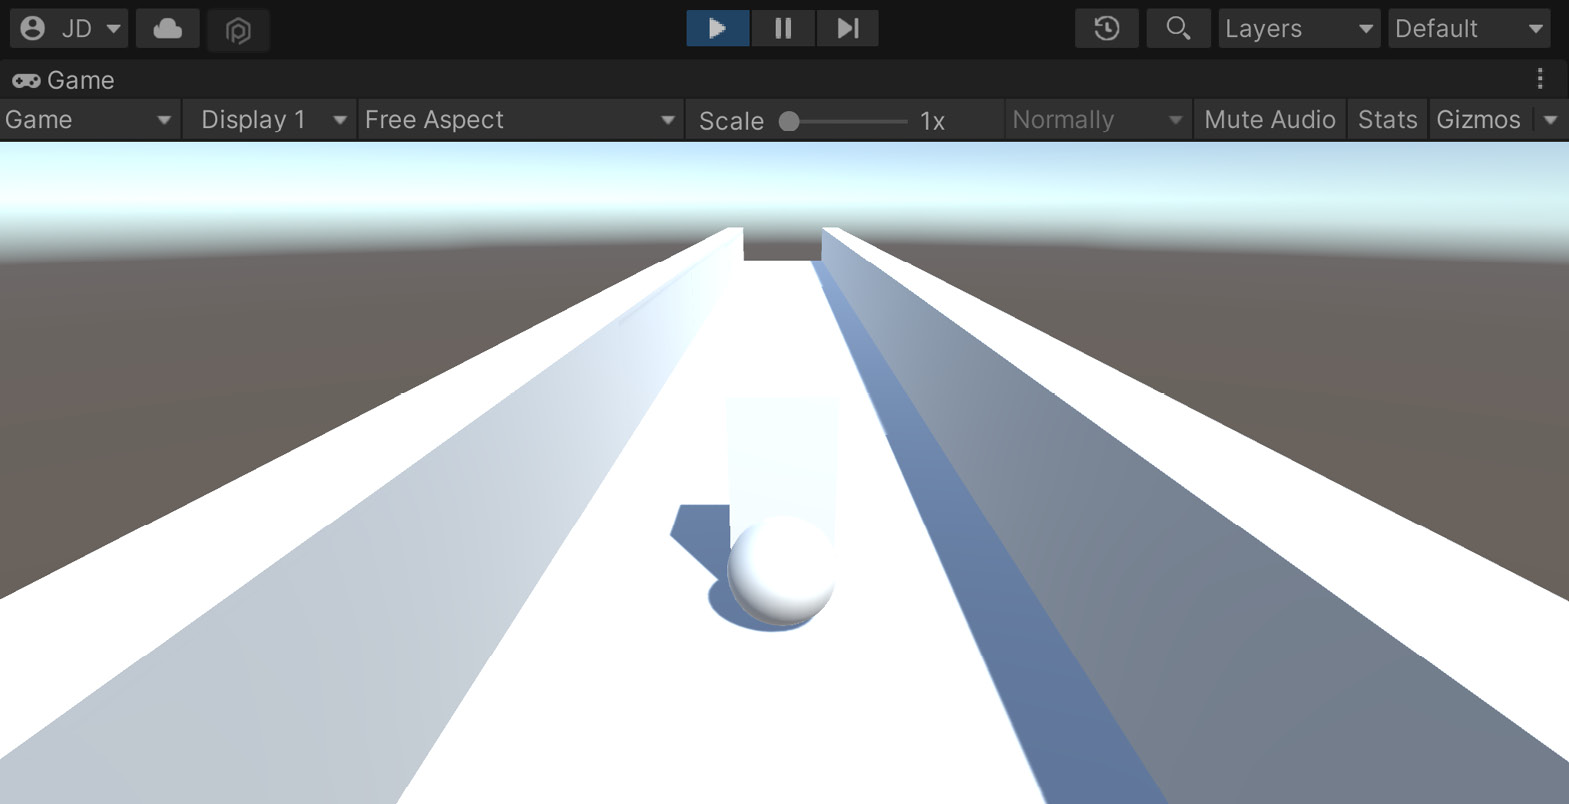
Figure 1.28 – Obstacles stop the player
- As you can see in the preceding screenshot, the player gets stopped, but nothing really happens. In this instance, we want the player to lose when they hit this obstacle and then restart the game; to do that, we’ll need to write a script. From the Project window, go to the Scripts folder and create a new script called
ObstacleBehaviour. We’ll use the following code:using UnityEngine; using UnityEngine.SceneManagement; // LoadScene public class ObstacleBehaviour : MonoBehaviour { [Tooltip("How long to wait before restarting the game")] public float waitTime = 2.0f; private void OnCollisionEnter(Collision collision) { // First check if we collided with the player if (collision.gameObject.GetComponent <PlayerBehaviour>()) { // Destroy the player Destroy(collision.gameObject); // Call the function ResetGame after // waitTime has passed Invoke("ResetGame", waitTime); } } /// <summary> /// Will restart the currently loaded level /// </summary> private void ResetGame() { // Get the current level's name string sceneName = SceneManager.GetActiveScene().name; // Restarts the current level SceneManager.LoadScene(sceneName); } } - Save the script and return to the editor, attaching the script to the
ObstacleGameObject we just created. - Save your scene and try the game:
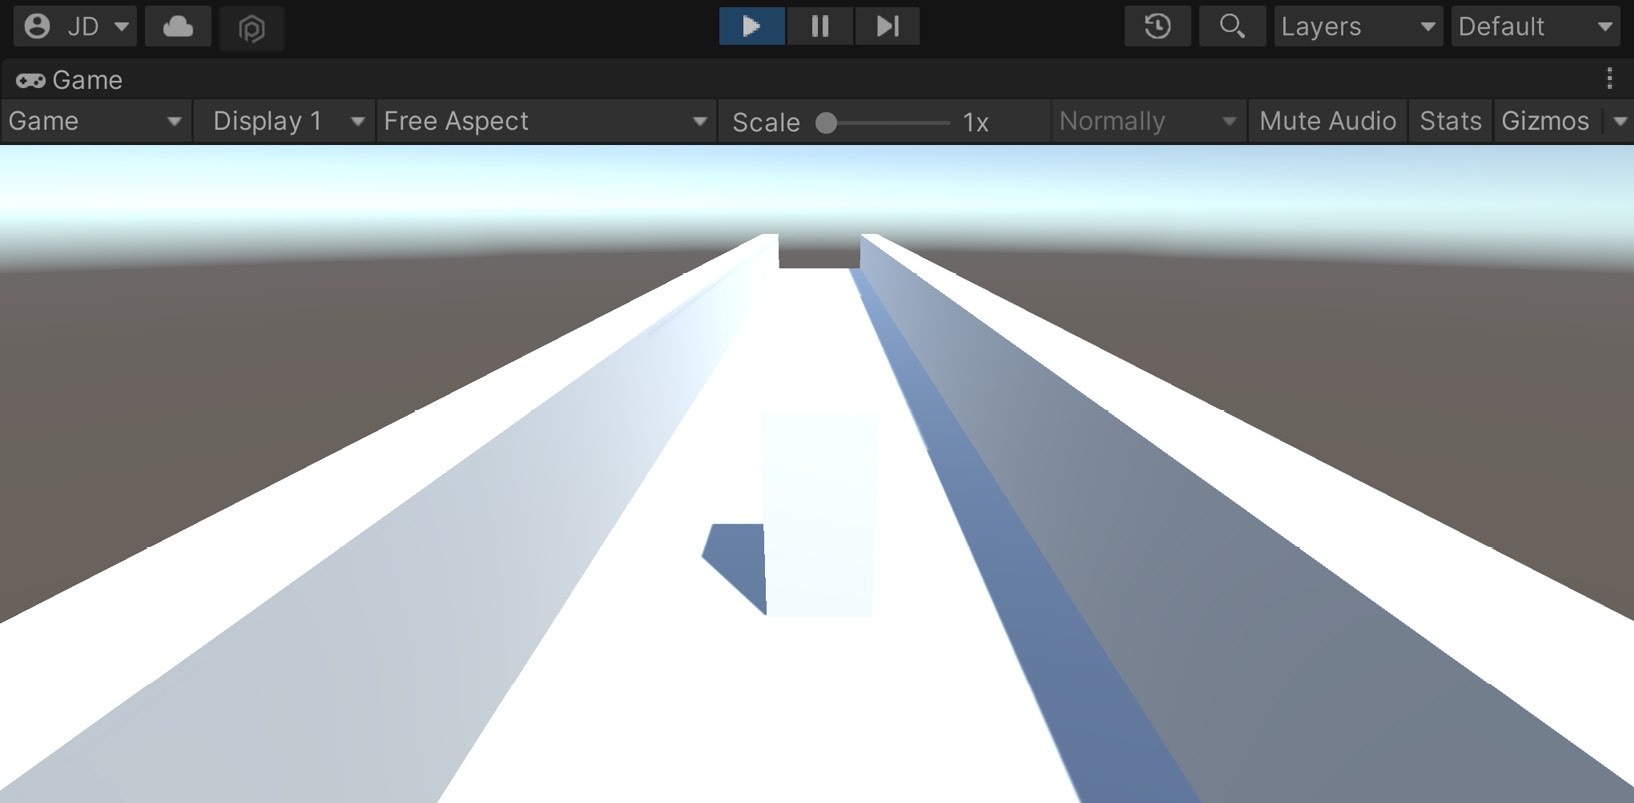
Figure 1.29 – Obstacles destroy the player
As you can see in the preceding screenshot, once we hit the obstacle, the player gets destroyed, and then after a few seconds, the game starts up again. You’ll learn how to use particle systems and other things to polish this up, but at this point, it’s functional, which is what we want.
- Now that we know it works correctly, we can make it a prefab. Just as we did with the original tile, go ahead and drag and drop the Obstacle object from Hierarchy into the Project tab and into the Prefabs folder:
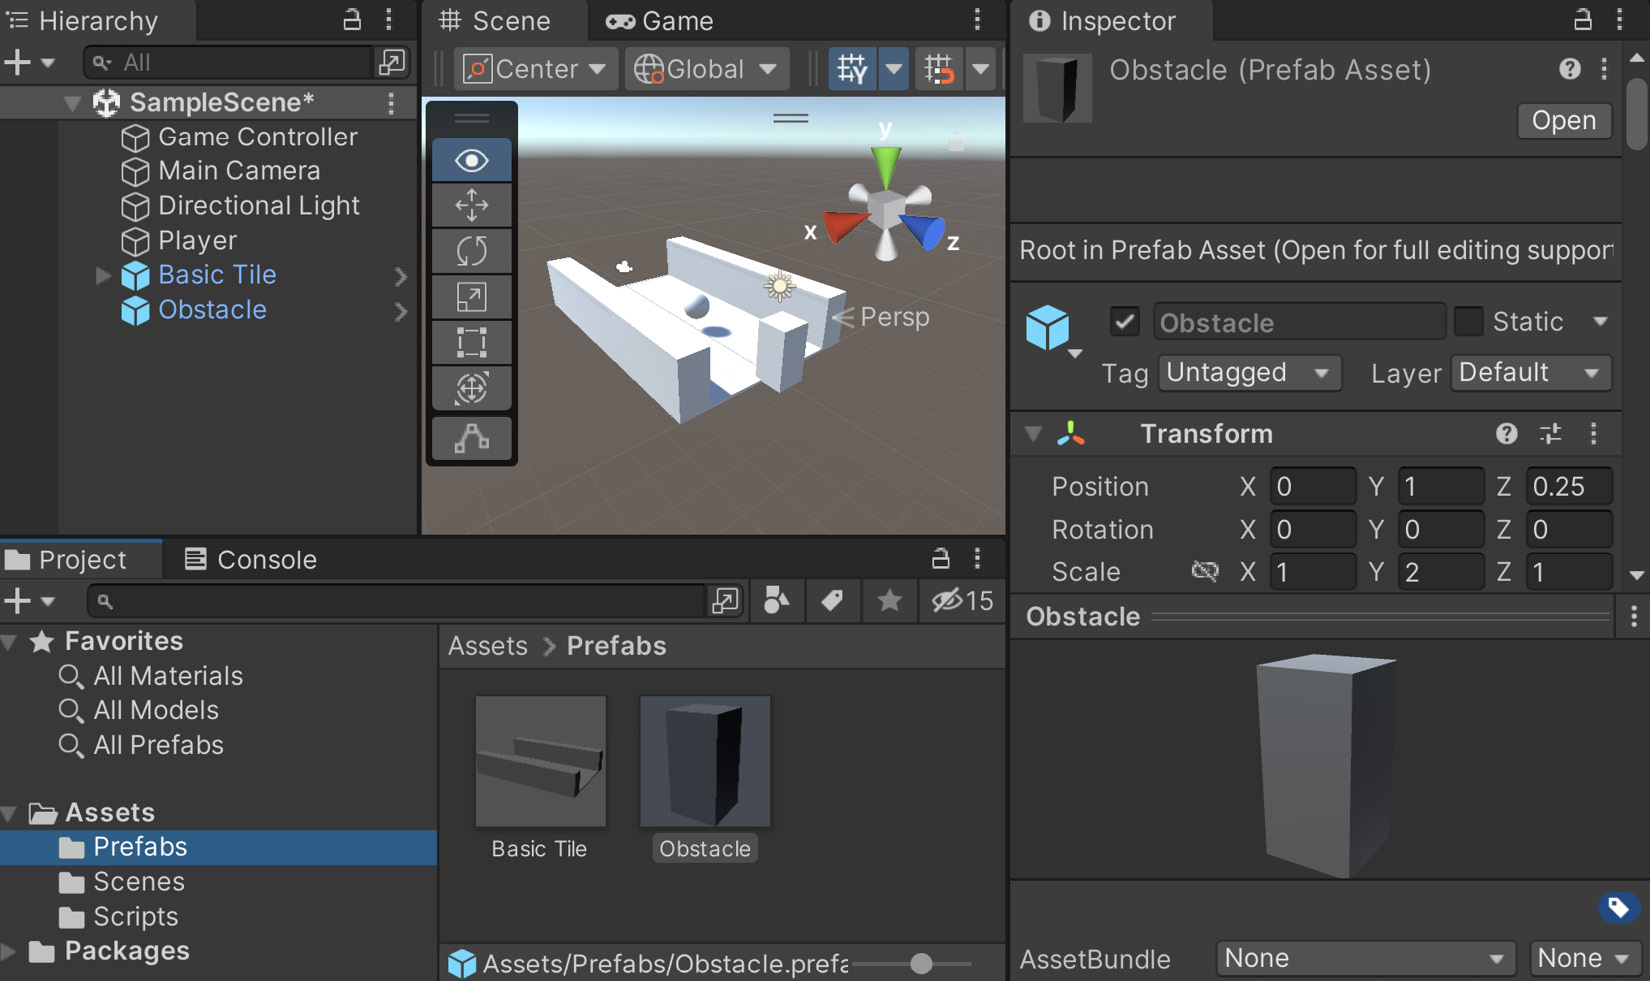
Figure 1.30 – Creating the Obstacle prefab
- Next, we will remove the Obstacle object, as we’ll spawn it upon creating the tile. To do so, select the Obstacle object in the Hierarchy window and then press the Delete key.
- We will make markers to indicate where we would possibly like to spawn our obstacles. Expand the Basic Tile object to show its children and then duplicate the
Next Spawn Pointobject and move the new one’s Position to (0,1,4). We will then rename the objectCenter. - Afterward, to help see the objects within the Scene window, go to the Inspector window and click on the gray cube icon, and then on the Select Icon menu, select whichever of the color options you’d like (I went with blue). Upon doing this, you’ll see that we can see the text inside the editor if we are close to the object (but it won’t show up in the Game tab by default):
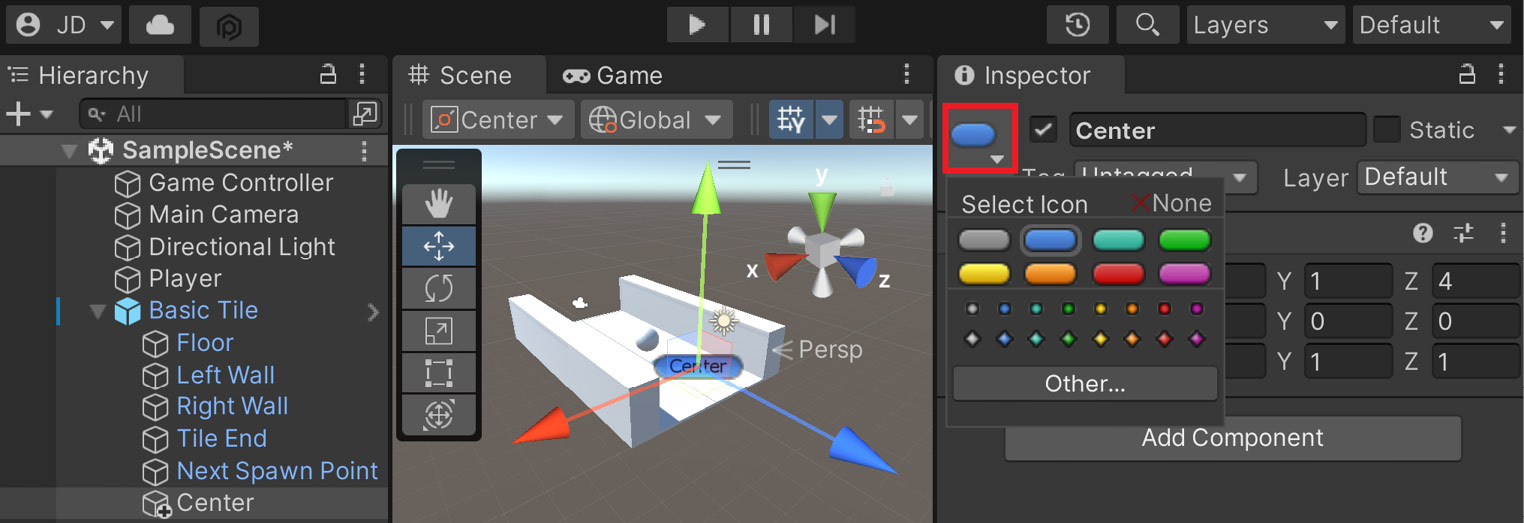
Figure 1.31 – Creating a Center marker
- We want a way to get all of the potential spawn points we will want in case we decide to extend the project in the future, so we will assign a tag as a reference to make those objects easier to find. To do that, at the top of the Inspector window, click on the Tags dropdown and select Add Tag.... From the menu that pops up, press the + button and then name it
ObstacleSpawn:
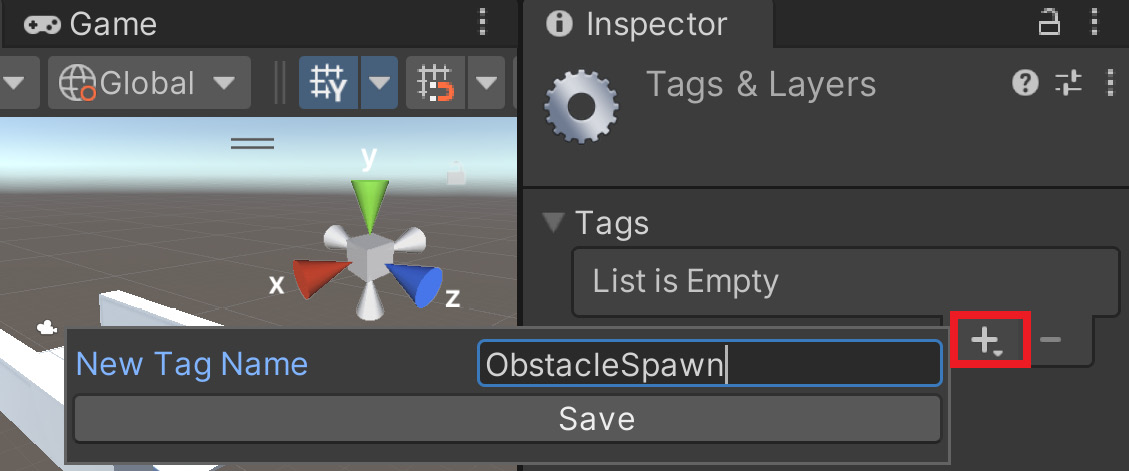
Figure 1.32 – Creating the ObstacleSpawn tag
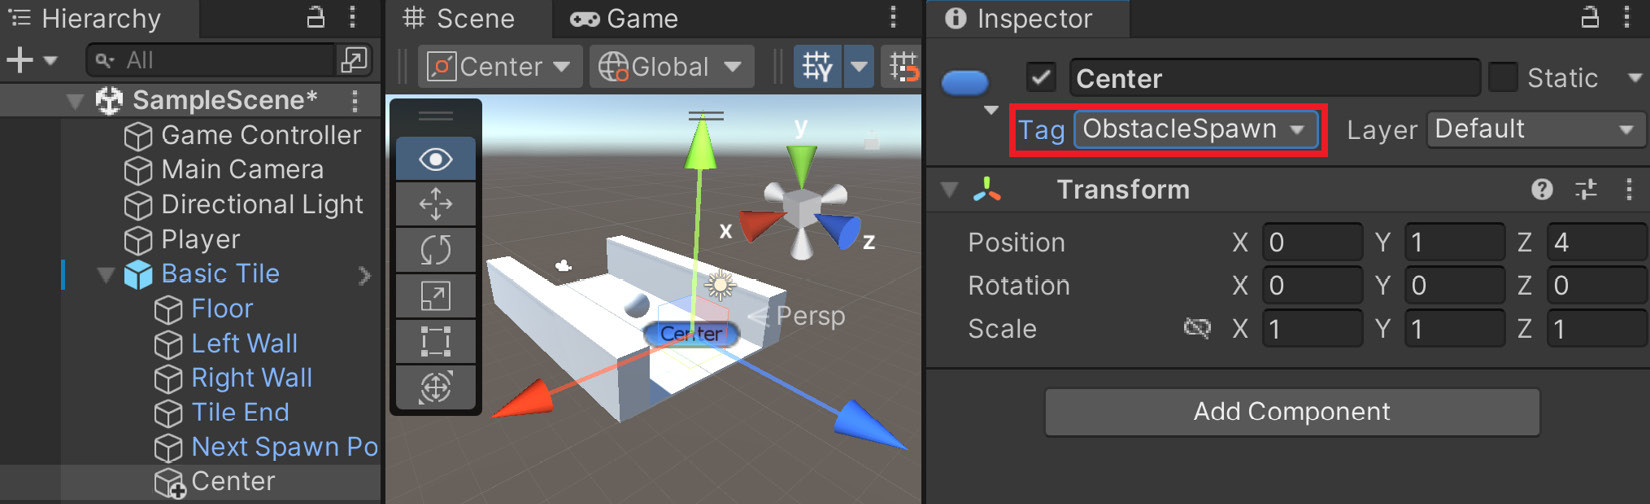
Figure 1.33 – Assigning the tag to the Center object
Note
For more information on tags and why we’d want to use them, check out https://docs.unity3d.com/Manual/Tags.html.
- Go ahead and duplicate this twice and name the others
LeftandRight, moving them two units to the left and right of the center to become other possible obstacle points:

Figure 1.34 – Creating the Left and Right markers
- Note that these changes don’t affect the original prefab, by default; that’s why the objects are currently black text. To make this happen, select Basic Tile, and then in the Inspector window under the Prefab section, click on Overrides and select Apply All:
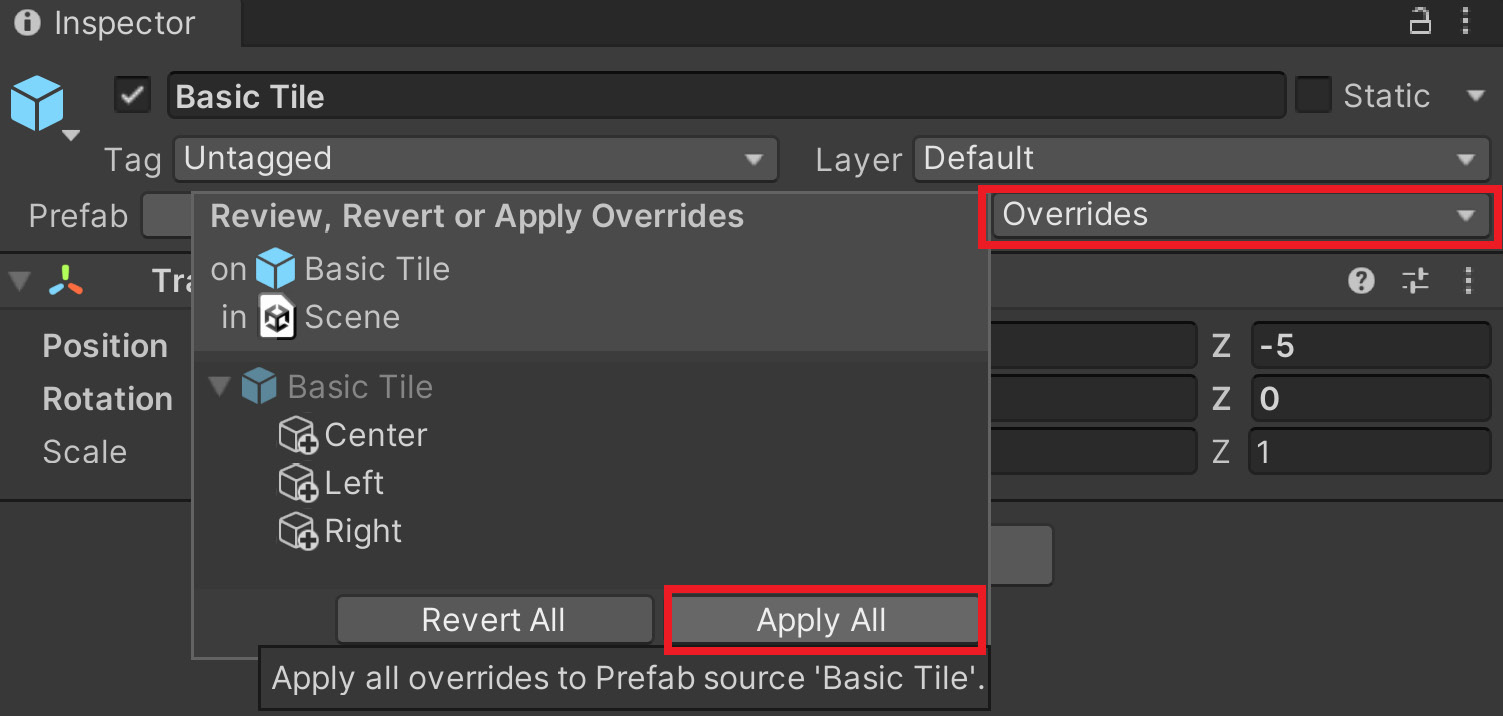
Figure 1.35 – Applying changes to the prefab
- Now that the prefab is set up correctly, we can go ahead and remove it by selecting it in the Hierarchy window and pressing Delete.
- We then need to go into the
GameManagerscript and make some modifications. To start with, we will need to introduce some new variables:/// <summary> /// Manages the main gameplay of the game /// </summary> public class GameManager : MonoBehaviour { [Tooltip("A reference to the tile we want to spawn")] public Transform tile; [Tooltip("A reference to the obstacle we want to spawn")] public Transform obstacle; [Tooltip("Where the first tile should be placed at")] public Vector3 startPoint = new Vector3(0, 0, -5); [Tooltip("How many tiles should we create in advance")] [Range(1, 15)] public int initSpawnNum = 10; [Tooltip("How many tiles to spawn with no obstacles")] public int initNoObstacles = 4;
The first of these variables is a reference to the obstacle that we will be creating copies of. The second is a parameter of how many tiles should be spawned before spawning obstacles. This is to ensure that the player can see the obstacles before they need to avoid them.
- Then, we need to modify the
SpawnNextTilefunction in order to spawn obstacles as well:/// <summary> /// Will spawn a tile at a certain location and setup /// the next position /// </summary> /// <param name="spawnObstacles">If we should spawn an /// obstacle</param> public void SpawnNextTile(bool spawnObstacles = true) { var newTile = Instantiate(tile, nextTileLocation, nextTileRotation); // Figure out where and at what rotation we should // spawn the next item var nextTile = newTile.Find("Next Spawn Point"); nextTileLocation = nextTile.position; nextTileRotation = nextTile.rotation; if (spawnObstacles) { SpawnObstacle(newTile); } }
Note that we modified the SpawnNextTile function to now have a default parameter set to true, which will tell us whether we want to spawn obstacles or not. At the beginning of the game, we may not want the player to have to start dodging immediately, but we can tweak the value to increase or decrease the number we are using. Because it has a default value of true, the original version of calling this in the Start function will still work without an error, but we will be modifying it later on.
- Here, we ask whether the value is
trueto call a function calledSpawnObstacle, but that isn’t written yet. We will add that next, but first, we will be making use of theListclass and we want to make sure that the compiler knows whichListclass we are referring to, so we need to add ausingstatement at the top of the file:using UnityEngine; using System.Collections.Generic; // List
- Now we can write the
SpawnObstaclefunction. Add the following function to the script:private void SpawnObstacle(Transform newTile) { // Now we need to get all of the possible places // to spawn the obstacle var obstacleSpawnPoints = new List<GameObject>(); // Go through each of the child game objects in // our tile foreach (Transform child in newTile) { // If it has the ObstacleSpawn tag if (child.CompareTag("ObstacleSpawn")) { // We add it as a possibility obstacleSpawnPoints.Add(child.gameObject); } } // Make sure there is at least one if (obstacleSpawnPoints.Count > 0) { // Get a random spawn point from the ones we // have int index = Random.Range(0, obstacleSpawnPoints.Count); var spawnPoint = obstacleSpawnPoints[index]; // Store its position for us to use var spawnPos = spawnPoint.transform.position; // Create our obstacle var newObstacle = Instantiate(obstacle, spawnPos, Quaternion.identity); // Have it parented to the tile newObstacle.SetParent(spawnPoint.transform); } } - Lastly, let’s update the
Startfunction:/// <summary> /// Start is called before the first frame update /// </summary> private void Start() { // Set our starting point nextTileLocation = startPoint; nextTileRotation = Quaternion.identity; for (int i = 0; i < initSpawnNum; ++i) { SpawnNextTile(i >= initNoObstacles); } }
Now, as long as i is less than the value of initNoObstacles, it will not spawn a variable, effectively giving us a buffer of four tiles that can be adjusted by changing the initNoObstacles variable.
- Save the script and go back to the Unity Editor. Then, assign the
Obstaclevariable of the Game Manager (Script) component in the Inspector window with the Obstacle prefab we created previously:
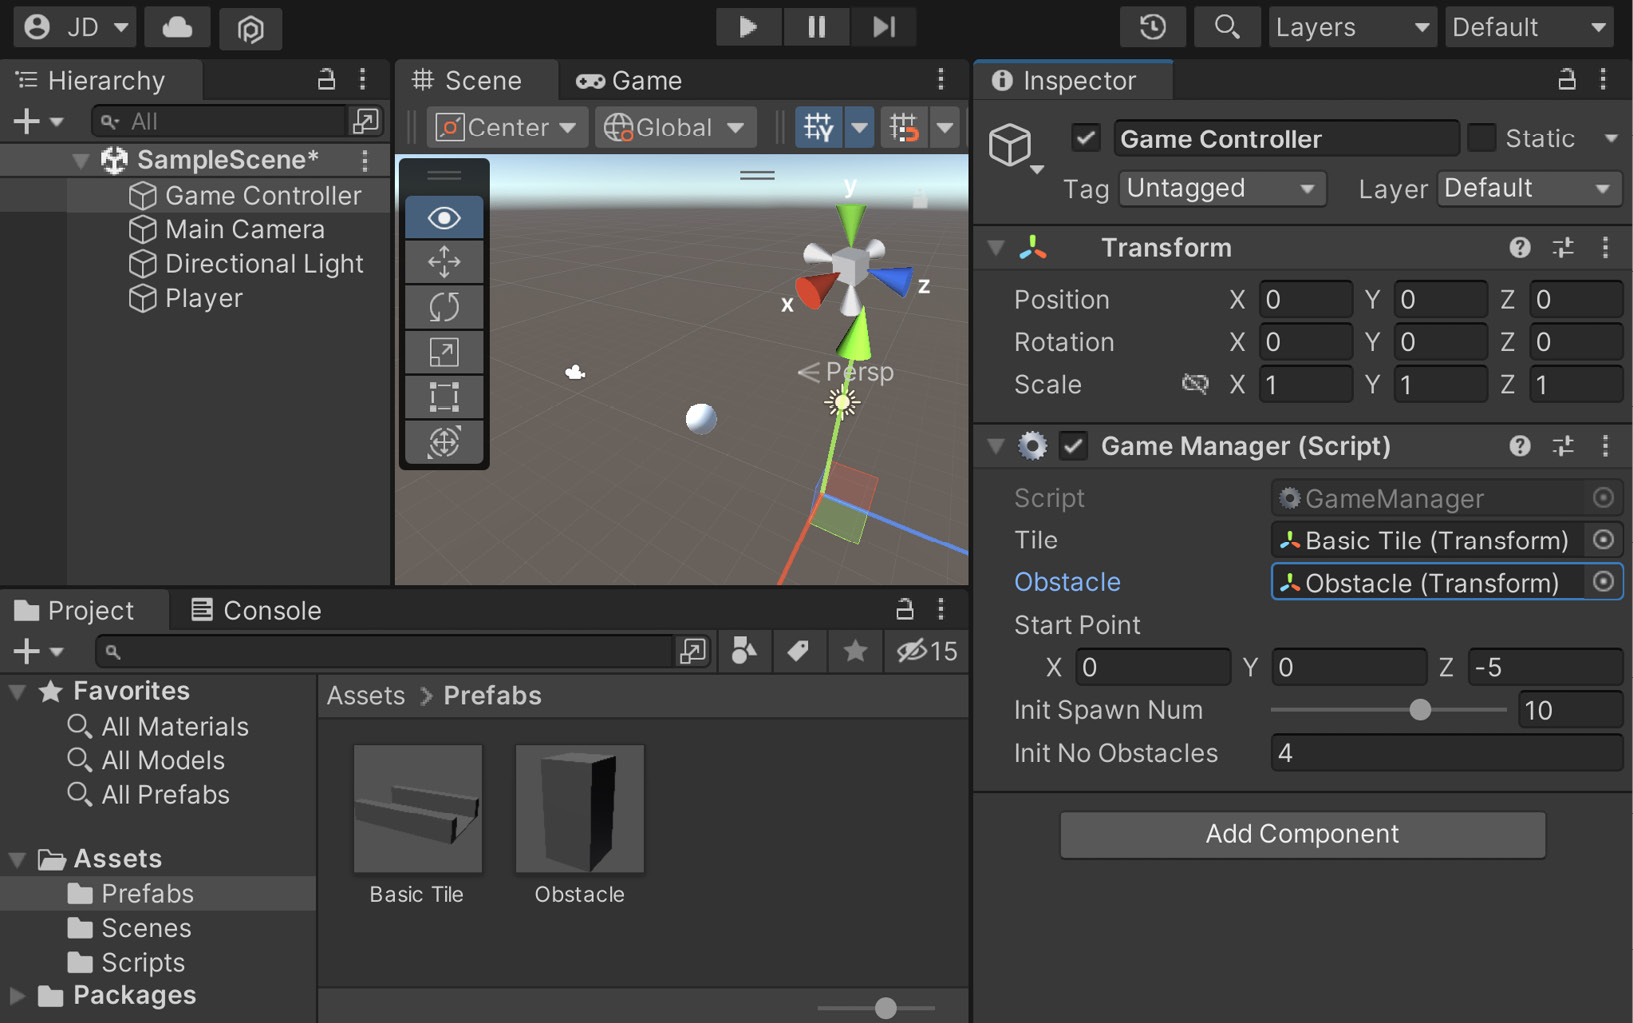
Figure 1.36 – Assigning the Obstacle property
- It’s a bit hard to see things currently due to the default light settings, so let’s go to the Hierarchy window and select the Directional Light object. A directional light acts similar to how the Sun works on Earth, shining everywhere from a certain position.
- With the default settings, the light is a bit too bright and the shadows are too dark by default, so in the Inspector window, I changed Intensity to
0.5and then the Realtime Shadows | Strength property to0.5:
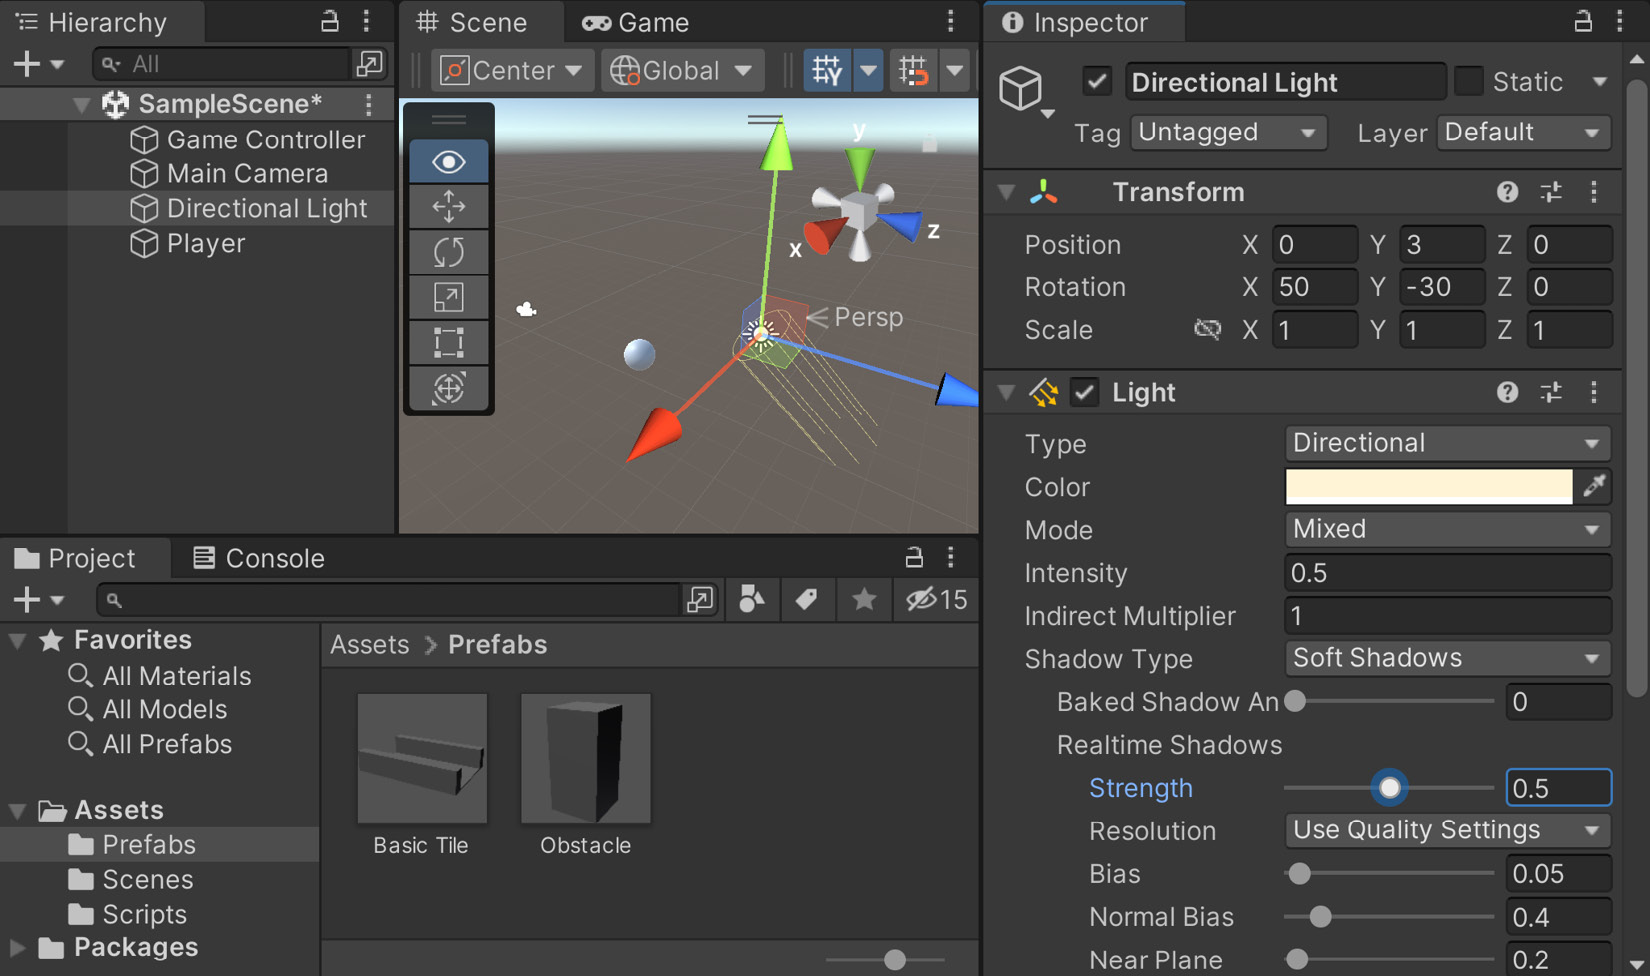
Figure 1.37 – Adjusting the Directional Light
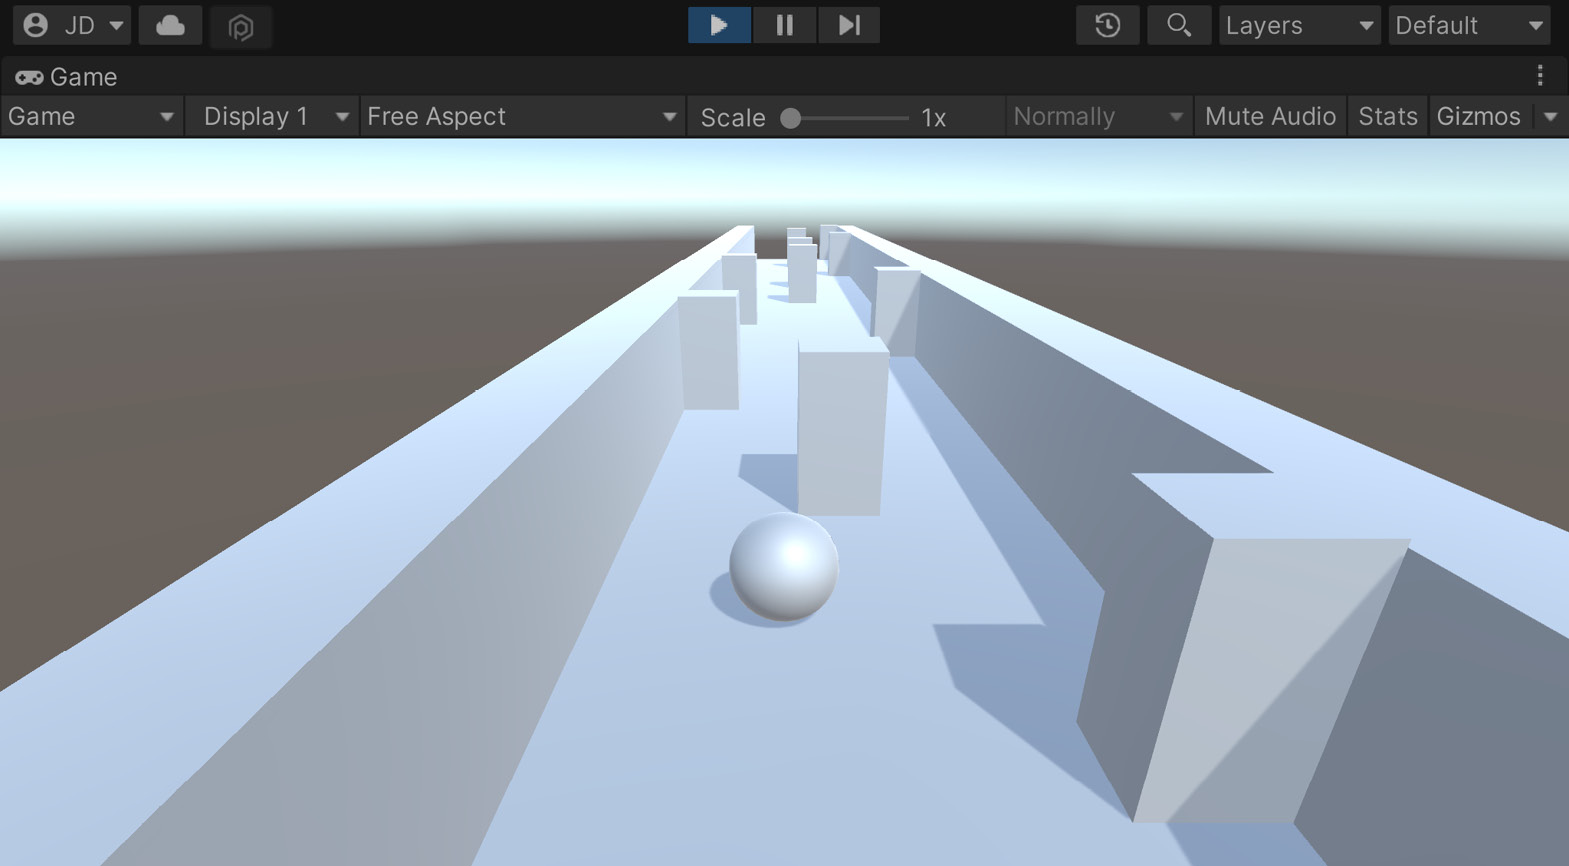
Figure 1.38 – The current state of the game
As you can see in the preceding screenshot, we now have a number of obstacles for our player to avoid!
Note
For more information on directional lights and the other lighting types that Unity has, check out https://unity3d.com/learn/tutorials/topics/graphics/light-types?playlist=17102.
Summary
There you have it! A solid foundation – but just that, a foundation. However, that being said, we covered a lot of content in this chapter. We discussed how to create a new project in Unity, and we built a player that will move continuously, as well as take inputs to move horizontally. We then discussed how we can use Unity’s attributes and XML comments to improve our code quality and help us when working in teams. We also covered how to have a moving camera. We created a tile-based level design system where we created new tiles as the game continued, randomly spawning obstacles for the player to avoid.
Throughout this book, we will explore more that we can do to improve this project and polish it while changing it to make for the best experience possible on mobile platforms. However, before we get to that, we’ll actually need to figure out how to deploy our projects, which is what we will be working on in the next chapter.