Download code from GitHub
2. Dealing with React Events
This chapter will provide you the knowledge about hooking JavaScript events in React applications. You will be able to identify best practices for wiring JavaScript events to component functions; you will get to practice binding JavaScript events to React framework through multiple hands-on approaches; and use alternate component declaration syntax to minimize bind issues.
Introduction – Talking to JavaScript with React
In the previous chapter, we designed our first standalone basic React application. The React framework allows you to create rich interactive web applications where users expect an interface that responds quickly to their actions. Often, when you are designing such interactive web applications, there is proper feedback expected within a fraction of a second for even a simple button click. Visualize this scenario:
you click a submit button after filling out a form on a web application, but nothing visible happens after you click the button.
From there, you might do one of two things, either sit and wait for some sort of feedback or furiously hit the button repeatedly, waiting for some sort of feedback or acknowledgment.
Now, you might get some feedback if the form redirects to a new page, or you might receive an error message with the form being submitted multiple times. In either of those scenarios, the developer who created that application has now created a user experience that feels nearly hostile to the end user, one that robs the user of valuable feedback and a way for them to understand how to properly use the application.
The good news is that these are all easily solvable problems in React. We can build our applications in a way that allows the users to be aware of each interaction they have with the site by providing some sort of feedback to the user so that they stay interested and use your application instead of giving up in frustration. You can start giving the user real-time feedback, gently guiding them along as they fill out the form and click the submit button or when they move the focus or cursor away from a field.
In this chapter, we are going to focus on how to intertwine our React components and JavaScript events in a way that really allows for the rich user experience on the web that most people expect nowadays. We will set up event listeners and handlers in our JSX code, and we will build functions in our components that will allow us to handle those events appropriately and change the state of our components. We will start off by designing how we want our component to function before we move into developing the code for the component.
Designing the State of Our Application
A typical pattern in modern web applications is that when there is a form with multiple input fields, one input field might rely on another input field. For example, a password field may affect a password confirmation field by requiring that the two fields match with each other. While this validation is being performed, there is another validation happening which will prevent the user from clicking the submit button if there are errors. In addition, there will be other fields that will affect each other. For example, a password field may require the password to be different from the username entered. For the purpose of our example, we are going to build a form where someone can sign up for an account. They will need to enter:
- A username
- A password
- A password confirmation
- An email address
In terms of validations, we will want to make sure that:
- The username is filled out.
- The password is filled out.
- The password matches the confirmation.
- The email address is at least in the format of (someusername)@(somedomain.com).
- The submit button is grayed out if there are any errors.
Note
We are intentionally using an overly simplistic method of validating email addresses here to avoid complexity.
Quick UI Examples
Let's go through some User Interface (UI) examples to better understand the flows and events that will happen here. This is how the form will look when the user opens the page:

Figure 2.1: UI form example
If the username is blank, an error message shows up at the top of the page, as shown in the following figure:

Figure 2.2: Error message while validating the username field
If the passwords don't match, the following error message will pop up:

Figure 2.3: Error message while validating the password field
If there are multiple errors in the same form, both the error messages will pop up:

Figure 2.4: Error messages while validating the username and password fields
These are just a few of the examples that we will be dealing with along the way. The purpose of these examples was to illustrate the general flow for the forms that we are going to build in the following section and make it easier for us to visually relate to. Let's start by building the states and validations in the form.
Getting Started – Building Our Baseline Component
To get started with our baseline component, let's think about each of the pieces that we will build and eventually put together to create this form. We are going to build a small component to represent our form and slowly build onto this component to compose it into something more functional.
We will start off with a class-based component since, typically, these interactions will require a certain amount of state manipulation and it's easier if we build the component for that purpose from the start. As discussed in Chapter 1, Getting Started with React, let's go to the Node.js command prompt and start a new Create React App project for this to keep everything separate and easy to follow. We will start off by changing the contents of App.js to just be a simple boilerplate class component. We do this to make it easier for us to iterate on this project and establish a baseline for our UI:
import React, {Component} from 'react';
class App extends Component {
  render() {
    return (
      <div className="App">
        Test App
      </div>
    )
  }
};
export default App;
This should just give us our standard shell App display:

Figure 2.5: Our baseline component
Typically, for components such as these, we also want them to be able to interact with the user in some way, which typically necessitates some form of simple state management. Now, before we can jump into coding the constructor and the basic state representation, we need to first discuss what we are going to build.
To figure out what we will need to include as properties in our state, we will need to take a look at the design and do a little bit of noun extraction to figure out the state of our component.
Note
Noun extraction is the process of exploring the mockup, design, or documentation to find the nouns and use them to inform the general properties or attributes that an object has. It can also be used to identify the objects themselves.
In this case, our form has the following nouns attached to it:
- Username
- Password
- Password confirmation
- A list of errors
We can also make a few assumptions based on the design that will tell us the types for our nouns as well. For example, nearly all of those nouns are strings, with the exception of the list of errors, and even that is just a simple list of strings.
Exercise 2.01: Writing the Starter State for Our Code
Now that we have the general flow designed, we can use that to extrapolate out how the state should be initialized and declared in our constructor. We need to build our initial form and create a scaffold before we can start doing anything more complex, so that will be the objective of this exercise:
- Start off your component in
src/App.jswith the boilerplate code discussed in Chapter 1, Getting Started with React and build a constructor:class App extends Component { constructor(props) { super(props); } }Build out an initial state for your code referencing the design from earlier. Define the state by setting a state property on the object inside of the constructor, and that state needs to be a JavaScript object with each of the appropriate fields in it:
this.state = {
  username: '',
  password: '',
  passwordConfirmation: '',
  email: '',
  errors: []
};
We will also write this into its own function to help us keep our render function nice and lean, so let's write our
displayForm()function. It must include theusername,password,passwordConfirmation, andemailfields that we created in our initial state. - Create a text input for each of those strings and a button to submit the form:
App.js
17  <div>
18    Username: <input type="text" /><br />
19    Password: <input type="text" /><br />
20    Password Confirmation: <input type="text" /><br />
21    Email: <input type="text" /><br />
22    <br />
23    <button>Submit</button>
24  </div>
The complete code for this step is available at: https://packt.live/35qT2L3
- Next, modify our
renderfunction to use this new form:render() { return ( <div className="App"> Create Account <hr /> {this.displayForm()} </div> ) } } export default App;When we save and reload from here, we should expect to see the form showing up on our page:

Figure 2.6: Starter Component
This gives us an initial form to work with, built entirely in React and ready to hook into the next functionality we need to start adding: our event handlers.
Event Handlers in React
We will be adding a few validations that we will be attaching to our baseline component. We do not want these validations to happen after the user clicks Submit button, because at that point the user has already filled out much of the form and that can make for a bad user experience. It also should not return back to the user with the list of validation issues on form submission. Instead, we are going to have each of these triggers along the way and then we are going to listen to a button click event to simulate submitting the form. We will talk about a few different events, such as onClick and onBlur, and get comfortable with interacting with them. This will also give us a good amount of room to experiment and help us become comfortable with properly dealing with JavaScript events in React and some of the gotchas we will run into along the way. Event handlers in React manipulate DOM elements similarly to how JavaScript does. However, there are two major differences:
The naming convention for React events is camelCase and not lowercase.
As an event handler, since React uses JSX, you pass a function rather than a string.
For example, take the HTML for an onClick handler:
<button onClick="this.submitForm()">Submit</button>
It's slightly different in React with JSX:
<button onClick="{this.submitForm}">Submit</button>
Let's start off with event handlers in React.
onClick
To begin understanding and working with event handlers in React, we will start off with the simplest and most common: the click event handler. The onClick handler is used to define what event fires off when a DOM object is clicked, so we are not going to do anything too crazy.
In React, this is the JSX code that sets up the event handler onClick:
<button onClick={this.submitForm}>Submit</button>
But how is the event argument being passed? Nothing here appears to be doing that. You must see this through the lens of treating functions like arguments as well and also visualize a little bit of the code magic that is happening behind the scenes. For example, when you set up an event handler in React, you are essentially seeing the end result of that getting translated to an equivalent call() statement:
(target element).addEventListener("click", function(event) {
  (target handler function).call((target handler context), event);
});
That means that, at runtime, the call before this.submitForm is getting roughly translated to this:
this.submitForm(event);
With this bit of knowledge, let's write our first event handler in React through an exercise.
Exercise 2.02: Writing Our First Event Handler
The objective of this exercise is just to get moving with adding a basic event handler to our baseline component. We will use the form created in Exercise 2.01, Writing the Starter State for Our Code of this chapter.
- Let's head back to the
displayForm()function, built in the previous exercise, and find the button in the form. Here, add theonClickhandler:displayForm() { return( <div> Username: <input type="text" /><br /> Password: <input type="text" /><br /> Password Confirmation: <input type="text" /><br /> Email: <input type="text" /><br /> <br /> <button onClick={this.submitForm}>Submit</button> </div> ); }We will call this click handler
submitFormand reference it inside our component class since this will be an event handler local to this component. - Next, write the
submitForm()function:submitForm(event) { console.log("Submitting the form now..."); }Now when the button is clicked, we will get something showing up in our JavaScript logs telling us that the button was properly clicked. If you set everything up correctly, you should see some output in your web console indicating that the button was clicked:

Figure 2.7: JavaScript Logs for the Starter Component
Since we wrapped our code in a form, we want to make sure that the
Submitbutton doesn't automatically try to submit the form and reload the page, so we put a quickevent.preventDefault()call at the top of the function to prevent that behavior. - Modify the
submitFormfunction to include aconsole.logstatement that will output the event:submitForm(event) { console.log("Submitting the form now..."); console.log(event); }When we click the button here, we will see a lot more input into the JavaScript console. Specifically, we should now be seeing details about the JavaScript event that our code is now listening for and reacting to:

Figure 2.8: JavaScript for events
If you take a look at the output you can see a lot of details about the request and the event, but this, of course, begs the question: what do target and currentTarget refer to? The target and currentTarget properties of the event will always refer to the DOM elements, not the React components, so you will need a separate way to identify the element that triggered the event.
onBlur
Another event handler that is very frequently used in React is onBlur. This event performs the validation for each field as that field loses focus. This means when you tab out of that particular field for the form, the validation occurs because we are assuming at that point that the user is done editing that field. We will add the onBlur event handler to the form that we have built in the previous sections in a bit. But for now, let's look at how the onBlur event is written in HTML and in React with JSX.
Here it is in HTML:
Username: <input type="text" onblur="myFunction()" />
It's slightly different in React with JSX:
Username: <input type="text" onBlur={this.validateUsernameOnBlur} />
The form that we have built so far is broken up into multiple different fields. A lot of these fields will be repeating the previous implementations as we go along, so there will not be a great deal of unique code to write. Let's add the onBlur event in action through the following example.
We will start with modifying the Username text field of our form and add an onBlur event as shown below:
displayForm() {
  return (
    <div>
      Username: <input type="text" onBlur={this.validateUsernameOnBlur} /><br />
      Password: <input type="text" /><br />
      Password Confirmation: <input type="text" /><br />
      Email: <input type="text" /><br />
      <br />
      <button onClick={this.submitForm}>Submit</button>
    </div>
  );
}
We will write our validateUsernameOnBlur function in our component by adding a quick validation on the input field's value, which you will be able to get through a property on the event's target object:
validateUsernameOnBlur(event) {
  console.log("I should validate whatever is in ", event.target.value);
}
It is always preferable to start off the event handlers with a quick console.log statement, as it helps in validating the events that are being fired off without having to trace through more complicated code later.
In this function, you can see that we are explicitly checking for the event argument, and then in our console.log statement, we are trying to get the value of the text input, which we can fetch by referencing the event's target object and pulling the value out of it:
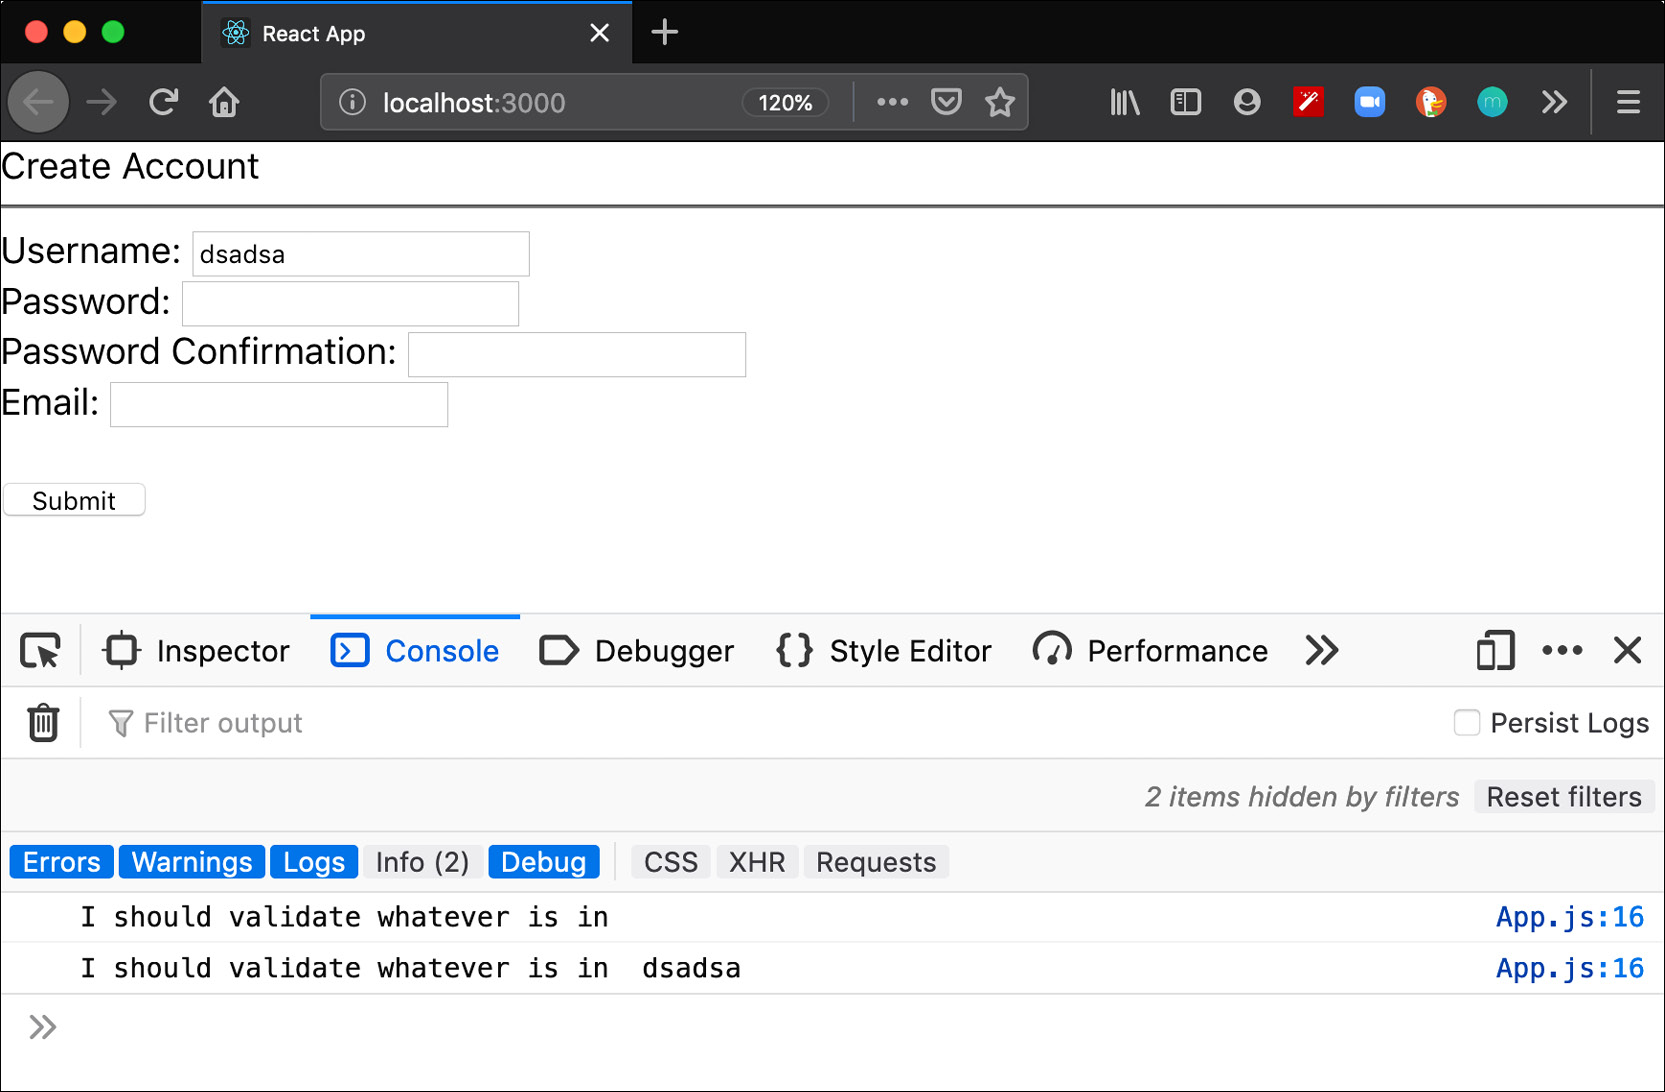
Figure 2.9: Console statement
As we can see in the preceding screenshot, the console.log statement gives us the form value we entered into the text box at the time of tabbing away from that field or clicking on another field, which is exactly what we want. We will see the implementation in much more detail in a bit but for now, let's go a step ahead and understand the context of these event handlers.
Context of Event Handlers
While building a form, you will be interacting very heavily with event handlers, and understanding the context of this property will prevent you from scratching your head down the line when you get error messages such as this is undefined. Especially in the case of forms, you will be dealing very heavily with event handlers and event handlers will change the context of this property. Now, if we want to set the new state in our baseline component of the form we created earlier, we will have to call out this.setState in our validateUsernameOnBlur function. However, if you try to do that, you are going to hit a this is undefined error message. For example, take changing our validateUsernameOnBlur function to the following:
validateUsernameOnBlur(event) {
  console.log("I should validate whatever is in ", event.target.value);
  this.setState();
}
The preceding code results in the following error:

Figure 2.10: TypeError in the console statement
The reason is that because the event handler code is essentially wrapping up the call and calling our event handler function for us, it's losing the context of the function, which should essentially be the component. Instead, the context becomes undefined. The this is undefined error message can be hard to track down if you don't know what you are looking for. The error message is ambiguous as this keyword is not explained.
The good news is that this is an incredibly simple thing to solve. We can explicitly tell JavaScript to bind the context of this keyword to the component itself instead of allowing the event handler to show us the context. There are two common ways to address this:
- In-line bind statements
- Constructor bind statements
In-line Bind Statements
The simplest method to add a context to our baseline component is to add bind(this) call to the end of our event handler declaration in the input field like so:
displayForm() {
  return (
    <div>
      Username: <input       type="text" onBlur={this.validateUsernameOnBlur.bind(this)} /><br />
      Password: <input type="text" /><br />
      Password Confirmation: <input type="text" /><br />
      Email: <input type="text" /><br />
      <br />
      <button onClick={this.submitForm}>Submit</button>
    </div>
  );
}
Make that change and the code will start working again when you select a field other than the username field. This is a shortcut to solve this problem if you only need the bind in a single place, but is not a great strategy if we have to write in-line bind statements multiple times in the code, especially for repeat calls to the same functions. We will see another way to bind this concept to the component next.
Constructor Bind Statements
We use constructor bind statements to tell JavaScript explicitly that when we reference the this.validateUsernameOnBlur function in our component, it should always have the context of the component bound to it when this is referenced.
Since the constructor in the class-based components is used to declare the state of a component, when we are calling this.state() in the constructor, we should bind our event handlers explicitly inside of our constructor to avoid doing repetitive tasks, especially for the same functions, to save ourselves a little bit of extra time and effort. This requires us to add the following line to the constructor:
this.validateUsernameOnBlur = this.validateUsernameOnBlur.bind(this);
Note
Constructors have been discussed in detail in Chapter 4, React Lifecycle Methods.
Now we can go back to our displayForm() function and remove the in-line bind statement instead:
displayForm() {
  return (
    <div>
      Username: <input type="text" onBlur={this.validateUsernameOnBlur} /><br />
      Password: <input type="text" /><br />
      Password Confirmation: <input type="text" /><br />
      Email: <input type="text" /><br />
      <br />
      <button onClick={this.submitForm}>Submit</button>
    </div>
  );
}
Our code will otherwise remain identical. If you try this again, you should again see the focus change work and not result in any additional errors. Let's practice this in the following exercise.
Exercise 2.03: Building our Username Validator
In this exercise, we will put the code we just talked about into our component that we created previously. We will add the bind statement to the constructor and call our validateUsernameOnBlur function from our displayForm function when the form input hits the onBlur event. To do so, let's go through the following steps:
- Drop our constructor since we can specify the initial state in a different way. Instead, we will use JavaScript fields to define the state by setting a state field on the class:
class App extends Component { state = { username: '', password: '', passwordConfirmation: '', email: '', errors: [] }; validateUsernameOnBlur = this.validateUsernameOnBlur.bind(this); - Write the
validateUsernameOnBlur()function. Nothing here should be new:validateUsernameOnBlur(event) { console.log("I should validate whatever is in ", event.target.value); this.setState(); } - Call the
onBlurevent handler inside thedisplayForm()function, without needing an in-line bind statement:displayForm() { return ( <div> Username: <input type="text" onBlur={this.validateUsernameOnBlur} /><br /> Password: <input type="text" /><br /> Password Confirmation: <input type="text" /><br /> Email: <input type="text" /><br /> <br /> <button onClick={this.submitForm}>Submit</button> </div> ); } - Call the
submitFormfunction, which is active while theSubmitbutton is pressed:submitForm(event) { console.log("Submitting the form now..."); console.log(event); } - Call
displayFormfrom therendermethod:render() { return ( <div className="App"> Create Account <hr /> {this.displayForm()} </div> ) }The resulting class structure looks like the following:
App.js
3  class App extends Component {
4    state = {
5      username: '',
6      password: '',
7      passwordConfirmation: '',
8      email: '',
9      errors: []
The complete code can be found here: https://packt.live/2PsyyMu
The output is as follows:

Figure 2.11: Form component
Another way to define our components is to use some relatively newer syntax (the public field syntax) to define our class component, the properties in the component, and the functions in the component. This allows us to define our functions in such a way that they remember the binding of this keyword regardless of how they are passed or called via event handlers.
Exercise 2.04: Using Alternative Class Declarations to Avoid Binds
In this exercise, we will use an alternative class declaration so that we can avoid the bind statements altogether. We will use the displayForm component that we created previously. We will drop the constructor and we will see how to specify the initial state in a different way using arrow functions and declaring the fields inside it. To do so, let's go through the following steps:
- Drop our
constructorsince we can specify the initial state in a different way. Instead, we will use JavaScript fields to define the state by setting a state field on the class:class App extends Component { state = { username: '', password: '', passwordConfirmation: '', email: '', errors: [] }; } - Redefine the
validateUsernameOnBlur()function by changing the function to instead be a field on the class as well. You will need to use the arrow function syntax, mentioned in Chapter 1, Getting Started with React, to make this work:validateUsernameOnBlur = (event) => { console.log("I should validate whatever is in ", event.target.value); this.setState(); }The only major difference here is that we are defining the function in a similar way to how we define other arrow functions. The advantage here is that this function now has this bound appropriately, so we don't need to worry about explicitly binding.
- Call the
onBlurevent handler inside thedisplayForm()function:displayForm() { return ( <div> Username: <input type="text" onBlur={this.validateUsernameOnBlur} /><br /> Password: <input type="text" /><br /> Password Confirmation: <input type="text" /><br /> Email: <input type="text" /><br /> <br /> <button onClick={this.submitForm}>Submit</button> </div> ); } - Call the
submitFormfunction, which is active while theSubmitbutton is pressed:submitForm(event) { console.log("Submitting the form now..."); console.log(event); } - Call
displayFormfrom therendermethod:render() { return ( <div className="App"> Create Account <hr /> {this.displayForm()} </div> ) }The resulting class structure looks like the following:
App.js
1  class App extends Component {
2    this.state = {
3      username: '',
4      password: '',
5      passwordConfirmation: '',
6      email: '',
7      errors: []
8    };
The complete code can be found here: https://packt.live/2UXLBrr
The output is as follows:

Figure 2.12: Validation in the form component
Unfortunately, this is still a syntax proposal and is not guaranteed to be supported in every environment that you may be working in, so for now, we will stick with the more widely available syntax. If you are working in a Create React App project, though, and feel more comfortable using the proposed fields syntax instead, that remains an option. Create React App will create a project with the appropriate Babel config to use the public class fields syntax by default.
Now let's look at the ways to handle our validation, but we are going to go with an approach that is more aligned with common React best practices.
Form Validation in React
We need to finish creating the validation check to make sure the username is not empty when the mouse cursor moves away from the field. We will need to do a few things to achieve this functionality:
We will need to build a rendering function that displays the list of form errors. We will need to hook the validateUsernameOnBlur() function to validate the username and update the state where appropriate.
The first task is simple enough that we should be able to build it without really needing to update much else, so we will start there.
Exercise 2.05: Creating a Validation for Input Fields
We are still working with the same form that we have been working with this entire chapter. We will continue to iterate on this form now by adding a little more validation for the username field. The list of errors that we have is a relatively simple thing to display; all we need to do is iterate over the list of errors, and then for each of those, we need to just display a simple quick string. React has a little gotcha that we will run into when building out lists of elements dynamically: each individual item requires a separate entry for the key of the item. This allows React to quickly identify each item uniquely and update the DOM representing that item when it changes:
- Write a
displayErrors()function that, given a list of errors from our state, maps over each. You will need to set the key property and determine some way to uniquely identify each element as a value for the key property:displayErrors() { return ( <div className="errors"> {this.state.errors.map((err, i) => <p key={`err-${i}`}>{err}</p>)} </div> ); }We start off with a simple-enough function signature; there are no arguments that we are passing along. Instead, we just have a simple map call where we are passing each error and the index of the iteration. This allows us to set a unique key for each item, which we then render with a simple
<p>tag. - Add the
displayErrors()call to our mainrenderfunction:render() { return ( <div className="App"> Create Account {this.displayErrors()} <hr /> {this.displayForm()} </div> ) } - Recreate
src/App.cssand add a single bit of CSS to it:.errors { color: red; } - Change our
src/App.jsfile to import this CSS file near the top:import "./App.css";
Since we don't want to write multiple validations every single time for each field that needs to be validated to ensure that it's not blank, we will start off by refactoring our code to move the not-empty check into a new function.
- Create a new function to validate whether the field is blank or not:
validateNotEmpty(fieldName, value) {
  if (value.length <= 0) {
    return `${fieldName} must be filled out.`;
  }
 }
We will want to include not just the value that we need to validate, but also the field name to be able to generate the appropriate error message. We check the value supplied to make sure it's not blank, and then if it is, we will return a string back with the appropriate error message.
- Modify our
validateUsernameOnBlur()function call from Exercise 2.04, Using Alternative Class Declarations to Avoid Binds to a new helper function to perform the validation:validateUsernameOnBlur(event) { const username = event.target.value; const errors = this.state.errors; errors.push(this.validateNotEmpty("Username", username)); this.setState({ username, errors }); }The bulk of the function stays the same, but now writing a
validatePasswordOnBlurfunction becomes significantly easier for us. - Copy our
validateUsernameOnBlurfrom the previous step and change username where appropriate to password:validatePasswordOnBlur(event) { const password = event.target.value; const errors = this.state.errors; errors.push(this.validateNotEmpty("Password", password)); this.setState({ password, errors }); } - We will add the constructor again in this step. Use the
bindstatement in the constructor:constructor(props) { super(props); this.state = { username: '', password: '', passwordConfirmation: '', email: '', errors: [] }; this.validateUsernameOnBlur = this.validateUsernameOnBlur.bind(this); this.validatePasswordOnBlur = this.validatePasswordOnBlur.bind(this); } - Change our
renderfunction as well to modify the password field to use this new validation function:displayForm() { return ( <div> Username: <input type="text" onBlur={this.validateUsernameOnBlur} /><br /> Password: <input type="text" onBlur={this.validatePasswordOnBlur} /><br /> Password Confirmation: <input type="text" /><br /> Email: <input type="text" /><br /> <br /> <button onClick={this.submitForm}>Submit</button> </div> ); } - Write our
validateEmailOnBlur()function. The code invalidateEmailOnBlur()is simple enough and follows the same format we have been using:validateEmailOnBlur(event) { const email = event.target.value; const errors = this.state.errors; errors.push(this.validateEmailFormat("Email", email)); this.setState({ email, errors }); } - Split the field's value on a
@character and verify that both sides have at least one character in them:validateEmailFormat(fieldName, value) { let [lhs, rhs] = value.split('@'); lhs = lhs || ''; rhs = rhs || ''; if (lhs.length <= 0 || rhs.length <= 0) { return `${fieldName} must be in a standard email format.`; } } - Modify the email text field in the
displayForm()function:Email: <input type="text" onBlur={this.validateEmailOnBlur} /><br /> - Add validations for our password confirmation to ensure it matches the password by writing a
validatePasswordConfirmationOnBlur()function, adding it torender, and adding the binds for the last two validation functions we wrote. First, let's write thevalidatePasswordConfirmationOnBlur()function:validatePasswordConfirmationOnBlur(event) { const passwordConfirmation = event.target.value; const errors = this.state.errors; if (passwordConfirmation !== this.state.password) { errors.push("Password must match password confirmation."); } this.setState({ passwordConfirmation, errors }); } - Add the call to our new function for
displayForm()to our password confirmation field:Password Confirmation: <input type="text" onBlur={this.validatePasswordConfirmationOnBlur} /><br /> - Finally, make sure all these functions are appropriately bound in our constructor (we have added two of these already, but we will include all four for the sake of completeness):
this.validateUsernameOnBlur = this.validateUsernameOnBlur.bind(this);
this.validatePasswordOnBlur = this.validatePasswordOnBlur.bind(this);
this.validatePasswordConfirmationOnBlur =      this.validatePasswordConfirmationOnBlur.bind(this);
this.validateEmailOnBlur = this.validateEmailOnBlur.bind(this);
Now, when you run through the form and break all the rules we have established here, you should see all of the error messages show up at the top of the form:

Figure 2.13: Form component with the error messages
The great news is that any other event handlers you may want to write along the way are going to hinge on the same rules that you have just learned about here. It is important to become comfortable with writing event listeners and with knowing how and when to bind functions to avoid weird issues as you write more complicated code.
Now that we have explored how to build React event handlers and to dynamically modify what we are rendering; we need to put it into practice the concepts we have learned so far.
Activity 2.01: Create a Blog Post Using React Event Handlers
In this activity, we are going to build out an application that keeps track of the number of characters entered into a text area. This will require us to hook into a new event that we have not used yet and change the text and element rendered to the page to display the total length of the field. Specifically, we are going to make a text area that, unless the user has entered at least 100 characters, will not allow you to submit the form and post the text.
Here, we will build a new React application with Create React App and then build a text area, adding the length of the field next to it:
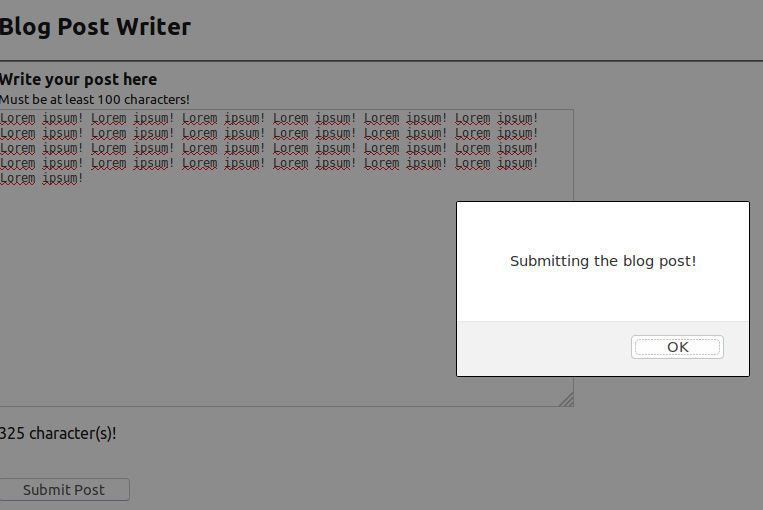
Figure 2.14: Blog Post
The following steps will help to complete the activity:
- Create your project, called
fieldlength, via the Create React App CLI. - Delete all the unnecessary files for our project.
- Build the
AppReact component as a class component but leave it blank. - Give the component an initial state with a single element in the state; this will store the input from the
textarea. - Add a
textareato the component. - Add a function that will act as the event handler. This function will need to accept an event as an argument and should update the state of the component by setting the input from the
textarea. Add this to thetextarea. - The event handler you need to use here is up to you; if you need a hint, look for one that can react to changes to your form or input to the form.
- Add a function that will return
Ncharacters, wrapped inside JSX, whereNis the length of the input in thetextarea. - Add the function above to the display of your component.
- Add a
submitbutton to make the app look like a blog post editor. - Include some instructions for the user that the post must be
100characters. - Write a validation function to monitor the length of the field.
Hint: Try to use a callback with
setStatefor the best results. - Create an alert box to visually notify the user before submitting a blog post.
- Verify that as you type text into the
textarea; the display is now updated.Note
The solution for this activity can be found on page 609.
Summary
Over the course of this chapter, we have covered everything you need to be able to confidently use JavaScript events to their fullest in your React applications. While we only covered two event handlers, the reality is that all the event handlers you write will function by the same rules and be subject to the same general usage guidelines. Using this information, you will be able to write code that is efficient, dynamic, and provides the kind of rich user experience that anyone using your web application will truly appreciate. In the next chapter, we will learn how to achieve conditional rendering in React.