


 Download code from GitHub
Working with Angular 4
This chapter is an in-depth guide to configuring the front-end application of our MEAN stack web application using the Angular 4 JavaScript framework. We will explain how to upgrade from an existing Angular 2 application to Angular 4, as well cover how to generate components and routes using Angular-CLI.
In this chapter, we will cover the following recipes:
- Upgrading from Angular 2 to Angular 4 using NPM
- Generating a new Angular project using Angular-CLI
- Configuring Angular-CLI project settings
- Working with generators in Angular-CLI
- Ejecting Angular-CLI from your project
- Generating new routes in Angular-CLI
- Defining a home page in your Angular routes
- Handling 404 errors in an Angular project
- Creating nested routes in Angular
- Creating sibling routes in Angular
- Programmatic page redirection in Angular
- Route preloading with Angular modules
- Running tests in Angular-CLI
Introduction
The revolution in JavaScript over the past 10 years has brought web applications leaps and bounds ahead of the preceding generation. These gains are perhaps most clearly visible through the use of JavaScript web application frameworks, such as Angular.
Angular is already considered to be the most popular and widely deployed web application framework to date. As a robust and fully featured framework, Angular provides a comprehensive approach to web application development that can be very appealing for developers looking a convention oriented JavaScript development environment. Angular’s reliability, modularity, and the ease with which it extends the web client experience are many of the reasons why developers choose Angular for the frontend layer of their web application stack.
"Node.js and AngularJS continue to be the most commonly used technologies in this category."
2017 Stack Overflow Developer Survey - Top Frameworks
You can visit the following links to learn more about about Angular's popularity compared to other frameworks:
Upgrading to Angular 4 using NPM
For folks with existing Angular 2 applications, we will discuss the upgrade process to move from Angular 2 to Angular 4, which we will use for the rest of the recipes covered in this book. If you are starting from scratch with a new Angular 4 project, you may wish to skip this recipe and instead start with the Generating a new Angular project using Angular-CLI recipe. If you are interested in a comprehensive list of detailed changes that come with upgrading to Angular 4, please refer to the What's New in Angular 4 Appendix in the back of this book.
Getting ready
Unlike some frameworks, there is no explicit upgrade command in Angular-CLI to move from Angular 2 to 4. Instead, the actual upgrading is done via updating the underlying NPM dependencies in our web application's package.json file. We can do this upgrade manually, but the simplest method is to use the NPM CLI to tell it exactly what packages we want it to install and save them to our project's package.json file.
How to do it...
Let’s take a look at the NPM commands for upgrading to Angular 4 in different environments:
- On the Mac OSX and Linux environments, the following is the NPM command to upgrade to Angular 4:
npm install @angular/{common,compiler,compiler-cli,core,forms,http,platform-browser,platform-browser-dynamic,platform-server,router,animations}@latest typescript@latest --save
- On the Windows environment, the following is the NPM command to upgrade to Angular 4:
npm install @angular/common@latest @angular/compiler@latest @angular/compiler-cli@latest @angular/core@latest @angular/forms@latest @angular/http@latest @angular/platform-browser@latest @angular/platform-browser-dynamic@latest @angular/platform-server@latest @angular/router@latest @angular/animations@latest typescript@latest --save
How it works...
The commands mentioned in the preceding section may seem very different, but in reality they both do exactly the same thing. Both install all the Angular 4's libraries to your node_modules directory and save the dependencies in your package.json file.
This installation command may take a few minutes to complete, but after it is done, your package.json file will be only file that's updated by this process:
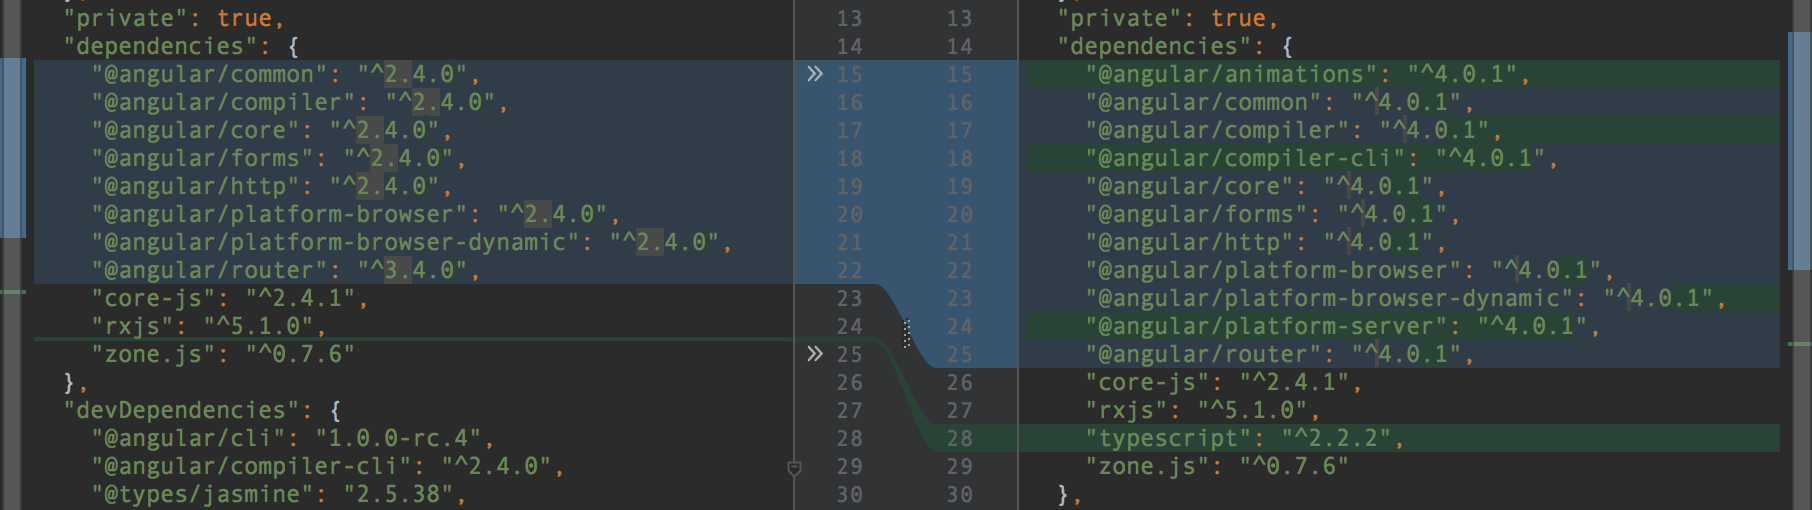
The amazing thing about this upgrade process is that this is pretty much all there is to it. Upon restarting your Angular application, you should now have your legacy Angular 2 application running on Angular 4. If your application leveraged any of the deprecated or changed APIs mentioned in the What's New in Angular 4 Appendix, you may see a compiler error at this time. You will need to review the change list and find the deprecation that is the closest match to the exception you are encountering and resolve that before trying again.
There’s more…
Working with dependencies in Angular can be tricky if you haven't had to manage a web application framework as robust as Angular before. Let's look at few of the most common types of dependency and package-related issues developers can get stuck on when upgrading their Angular applications.
Taking advantage of optional dependencies
One of the best parts about removing libraries, such as animations, from Angular 4's core dependencies is that we can now decide whether we want to or not. If our application doesn't need any animation capability, it is completely safe for us to not include it as a dependency in our package.json or as a part of our NPM install upgrade command. If we change our mind later, we can always install the animation library when the need arises. Depending on the functionality of your web application, you may also be able to do without the router, forms, or HTTP libraries.
Once your upgraded Angular 4 application successfully compiles, ensure that you take time to check that all your existing automated tests and the application functionality itself continue to function as expected. Assuming that your application is functioning properly, you will be enjoying an approximately 25% smaller generated file size as well as access to the new APIs and features.
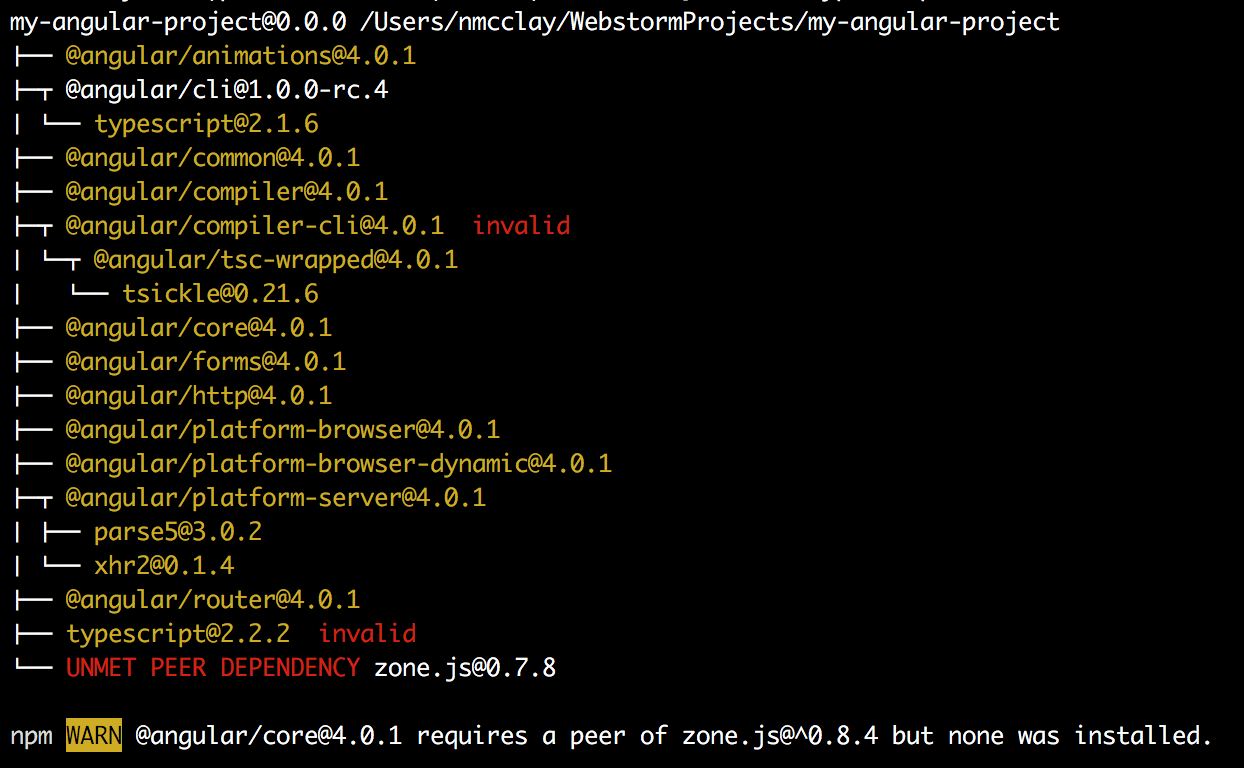
Peer dependency warnings after upgrade
Angular 4 also depends on a number of other JavaScript libraries to function; some of those libraries are peerDependencies within Angular's own dependencies. That means that they must be fulfilled by your application in order for Angular to function. Some of these dependencies, such as TypeScript, were actually provided in the NPM install command; however, some of them, such as Zone.js, are not. These peerDependencies can vary even between minor version differences of Angular, so if you do see one of these warnings, your best bet is to manually update your package.json dependency for that library and try again:
Now that our Angular application is upgraded to Angular 4, we will move on to using Angular 4 for the rest of this book's Angular content. From now on, when I use the term Angular, it is specifically in reference to Angular 4. This conforms with Google’s own usage of the name, always using Angular generically to be the latest major SemVer version of the Angular framework.
https://angular.io/presskit.html.
Generating a new Angular project using Angular-CLI
For developers starting with Angular 4 from scratch, this section will cover how to use the Angular-CLI utility to generate a new project. There are many ways to create a new Angular project, but a very popular convention for getting started is to use a dedicated CLI utility. Angular-CLI is an all-in-one new project initializer and everything that we will need to run our new application locally. It includes a standalone web server, live reload server, and test runner to use in local development. We will use Angular-CLI in many of the examples throughout this book when working with Angular. There are also many useful features in Angular-CLI besides creating new projects, which we will discuss later in this chapter.
Getting ready
To create a new Angular project, we will use the Angular-CLI command-line utility. To install this utility, you must first have Node.js version 8.4.0 or greater installed locally as well as NPM version 4 or greater. You can check your local Node.js and NPM versions with the following commands:
node --version
npm --version
Node.js version management can be an important aspect of maintaining consistent application builds, especially in a team environment. Angular-CLI doesn’t come with a predefined Node.js version management system, so adding a configuration file to your project for a Node.js version management utility, such as NVM, Nodenv, or Nodist, to your project early can help you solve configuration headaches down the road.
How to do it...
Let's look at the following steps to create an Angular project:
- To install Angular-CLI, simply run the following command:
npm install -g @angular/cli
- This may take several minutes to install Angular-CLI locally and make it ready and available to use in your project. Wait until the command prompt is ready, before proceeding to generate a new Angular project using Angular-CLI.
- To create a new Angular application, simply type ng new, followed by the name of your new application--in this case, I am using my-angular-project:
ng new my-angular-project
- This will create a new project folder called my-angular-project and preinstall everything that we need to run our new Angular application locally.
How it works...
There are many options available when working with commands in Angular-CLI. For example, let's look at what other options are available for the new command:
ng new --help
This will show you all the available optional flags you can pass when initializing your project.
Now that we have our new Angular project set up, we can start the application locally using the built-in web server capability of Angular-CLI. Start the web server by calling the serve command:
ng serve
After running this command, you can actually see Angular compile all the default modules necessary to run your new application, including a message that tells you where to find your project in your local web browser:
** NG Live Development Server is running on http://localhost:4200 **
There's more...
NPM scripts are a great way to run common actions in your Angular application. In fact, Angular-CLI sets up your project with some predefined scripts tailored for it. By opening the package.json file in your project, you can find the scripts configuration, which should look very similar to this:
"scripts": {
   "ng": "ng",
   "start": "ng serve",
   "build": "ng build",
   "test": "ng test",
   "lint": "ng lint",
   "e2e": "ng e2e"
 },
From here, you can see that ng serve is mapped to the start command in NPM. The start script is a special type of script command that is available by default in NPM, whereas other commands, such as lint, are nonstandard, and, therefore, must be called using the run command in NPM:
npm start
npm run lint
Editing these NPM script commands are a great way to automate passing flags to your application configuration. For example, to make Angular-CLI automatically open your default web browser with your application during the startup, you could try updating your start command, as follows:
“start”: “ng serve --open”,
Now, whenever you run npm start, your Angular application will automatically boot up with your custom options, and a web browser pointing to the correct host and port will open.
Cannot read property 'config' of null
TypeError: Cannot read property 'config' of null
There are many hidden dot-files in a newly created Angular application. If you created a new project and moved its app contents and structure to a new location for reorganization, this error means that you have missed or accidentally deleted the hidden .angular-cli.json file. If you are encountering this error after your project creation, it probably means that the project wasn’t created in exactly the directory you wanted. Instead of moving the project, an easy fix is to provide the --directory flag when you create a new project:
ng new my-angular-project --directory my-angular-project
Now that our application is running, let’s take a look at the project structure of the newly created Angular application. Your project structure should look very similar to the following example:
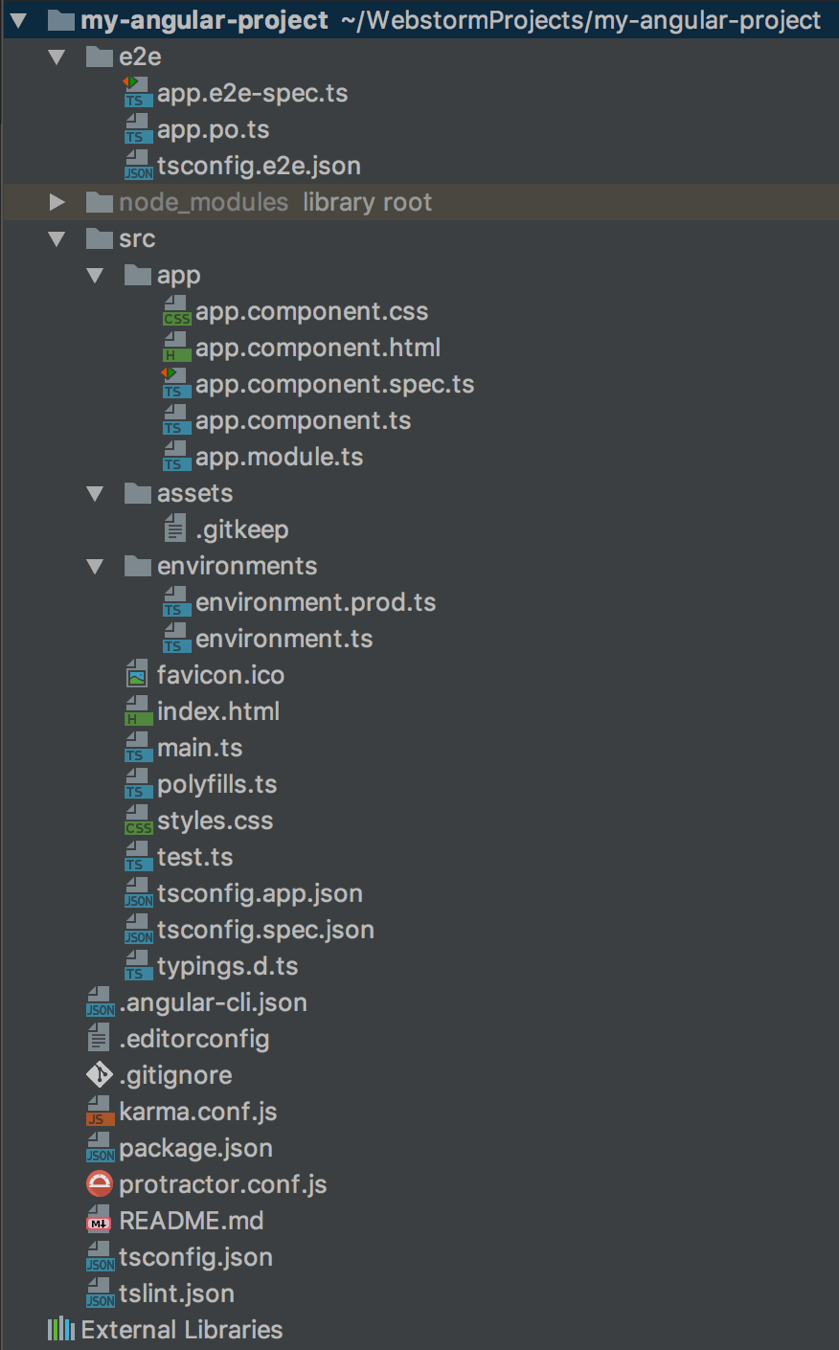
There are a lot of files in a new Angular application. Many are specific configuration files, which we won’t touch on in this book. Most of the content we will work with in this book will be focused on the /src directory and the content within it. This directory is the default location for virtually all of our Angular project structures, which we will start stubbing out in the next section.
However, before we continue, you may wish to fulfill the age-old tradition of creating a Hello World app. Simply open the /src/app/app.component.ts file to change the title property to 'Hello World!':
export class AppComponent {
    title = 'Hello World!';
}
After saving, your application will automatically reload using live-reload to show your changes in your web browser. Live-reload is another feature that comes out of the box with Angular-CLI that makes development much easier to iterate and see changes rapidly in the frontend of your application.
Tips for resolving port collision
Port collision is a problem that can happen when the port you are attempting to run your app on is already in use:
Port 4200 is already in use. Use '--port' to specify a different port.
This often happens if you accidentally leave open a previous instance of your application while trying to start another. On Unix systems, you can find and kill orphaned processes using the ps and grep commands:
ps aux | grep angular
This will return a process list you can consult to find your rogue Angular-CLI process:
nmcclay 88221 0.0 1.8 3398784 296516 ?? S 7:56PM 0:12.59 @angular/cli
Now that you have found your process, you can stop it with the kill command:
Kill 88221
Another common cause of this error can be running multiple different web applications locally. In this case, the best option is to simply change the default port used in the NPM start command of your package.json file:
“start”: “ng serve --port 4500”,
Configuring Angular-CLI project settings
The .angular-cli.json file in the root of our project serves as a configuration file for our Angular-CLI application instance. We can customize these configurations manually by editing the file itself, but we can also read and write from it using the Angular-CLI commands get and set.
How to do it...
Let's follow the steps below to learn how to read and write from our Angular application's configuration file using Angular-CLI:
- To get the name of an Angular-CLI application, we would use:
ng get project.name
- You can see how the project.name value maps to the content of our .angular-cli.json file:
{
    ...
    "project": {
     "name": "my-angular4-project"
    },
    ...
 }
- We can also write to this configuration file using the set command:
ng set project.name=my-awesome-angular-project
Note that any configuration changes here will not be picked up by live reload, and will require an entire restart of your Angular-CLI web server to be picked up by your application.
Working with generators in Angular-CLI
We can build many parts of our Angular application using the Angular-CLI utility. Components, views, routes, controllers, and services can all be generated in this manner. Scaffolding out new functionality using a CLI helps us to save time when building our application by automatically creating the required boilerplate content and putting it exactly where we want it in our project.
We will use Angular-CLI as the preferred method for scaffolding out a new Angular functionality through the rest of the book.
How to do it...
Let's follow the steps below to create a new button component in our Angular application using Angular-CLI generate:
- Angular-CLI's scaffolding command is ng generate, or the alias ng g. The generate command's function is to create stubs of ready-to-customize content for our application from blueprints within Angular-CLI.
ng g component my-button
- After running generate, the command line will show an output of what content has been added to our project:
installing component
create src/app/my-button/my-button.component.css
create src/app/my-button/my-button.component.html
create src/app/my-button/my-button.component.spec.ts
create src/app/my-button/my-button.component.ts
update src/app/app.module.ts
How it works...
If we look at our project, we can see that Angular-CLI has automatically scaffolded out a my-button directory that contains stubs for all of the files that make up our button component. This includes its class boilerplate, my-button.component.ts, its template, my-button.component.html, its style sheet, my-button.component.ts, and its test file, my-button.component.spec.ts:

These stub files are very generic, but they cover virtually all the boilerplate code involved in creating a new component in Angular. Another detail handled for us is the actual importing of the component into our application through app.module.ts:
...
import { MyButtonComponent } from './my-button/my-button.component';

@NgModule({
...
  declarations: [
    AppComponent,
    MyButtonComponent
  ],
...
})
export class AppModule { }
The module declarations section here has automatically been updated for us by the generate command, so all that we need to do is invoke the component within a template of our application:
<app-my-button></app-my-button>
If we look back at our application, we will see the words my-button works printed out from wherever in our app we have invoked the component.
We can create many types of content using the generate command. The syntax for scaffolding out a new piece of content is always the same, as follows:
ng generate <blueprint> <name>
You can find a complete list of all the available blueprints and examples of their usage in the following table:
| Blueprint | Angular-CLI |
| Component | ng generate component my-new-component |
| Directive | ng generate directive my-new-directive |
| Pipe | ng generate pipe my-new-pipe |
| Service | ng generate service my-new-service |
| Class | ng generate class my-new-class |
| Guard | ng generate guard my-new-guard |
| Interface | ng generate interface my-new-interface |
| Enum | ng generate enum my-new-enum |
| Module | ng generate module my-module |
Many of these generated blueprint types create simple boilerplate files in the root of our app module directory. However, Component, Directive, Pipe, Service, and Guard also scaffold out additional useful files.
There's more...
There are many types of content you can scaffold out with Angular-CLI's generators. Let's take a look at how we can generate new services in our Angular application using Angular-CLI's generate command.
Generating new services with Angular-CLI is very similar to generating components, but with the following few key differences:
ng g service my-store
installing service
create src/app/my-store.service.spec.ts
create src/app/my-store.service.ts
WARNING Service is generated but not provided, it must be provided to be used
Scaffolding a new service generates fewer files than a component and also nests the service at the root of our application directory by default instead of nesting it in its own namespace. The warning that is presented after creating our service stub files notifies us that, unlike components, services have to be manually provided to our application. Unlike components that are naturally isolated from each other, services can have explicit dependencies and load order requirements that Angular-CLI is unable to predict. In general, adding these services to your application is easily done by importing and adding the service to the provider list:
...
import { MyStoreService } from './my-store.service';

@NgModule({
  ...
  providers: [
    MyStoreService
  ]
  ...
})
export class AppModule { }
With the service provided to your application, it is now available for use.
Generating guards: Guards generated with Angular-CLI also show the warning that they are not provided by default. Adding a generated guard to your application is identical to adding a service.
Ejecting Angular-CLI from your project
While the convention-oriented approach of Angular-CLI can be a positive thing for many developers, sometimes, you may find the need to manually take back control of your build process and project configuration. Luckily, there is an easy way to convert an Angular-CLI project to a generic project using the eject command.
Getting ready
Let's take back control of our Angular application's build process from Angular-CLI. We may need this to do a variety of tasks, including customizing WebPack builds or just getting more granular control of our local web server runs. Ironically, we will use Angular-CLI to remove our application from Angular-CLI's control.
How to do it...
Perform the following steps to remove Angular-CLI from your project:
- First, you must remove your start script from your package.json file, as it will be overwritten in this process.
- Then, run the ng eject command:
==========================================================================
Ejection was successful.

To run your builds, you now need to do the following commands:
 - "npm run build" to build.
 - "npm run test" to run unit tests.
 - "npm start" to serve the app using webpack-dev-server.
 - "npm run e2e" to run protractor.

Running the equivalent CLI commands will result in an error.

==========================================================================
Some packages were added. Please run "npm install".
How it works...
Your project has been fully converted over to a standard Angular project, with a fully defined build toolchain ready in a new webpack.config.js file. Note that this conversion is a one-way process, and should only be done if you are ready to take full control of your application's build process.
The build process that remains is actually a standard WebPack based build. We will discuss WebPack builds and how to customize them for your application more in Chapter 9, Build Systems and Optimizations.
Generating new routes in Angular-CLI
Now we are ready to start really digging into the details of routing in Angular; how to create new routes and how to redirect to routes in your application, including error handling. We'll also cover how to nest routes and use route preloading to speed up your application navigation.
Creating new routes: Routing in Angular is handled by the optional Angular router package and must be imported into your application to be used.
Getting ready
To mount the router to the root of our application, we must first import the RouterModule from the router and call the forRoot method to tell the router that we are setting up routes on the root of our web application:
import { NgModule } from '@angular/core';
import { FormsModule } from '@angular/forms';
import { HttpModule } from '@angular/http';
import { RouterModule } from '@angular/router';
import { AppComponent } from './app.component'

@NgModule({
  ...
    imports: [
  BrowserModule,
  FormsModule,
  HttpModule,
  RouterModule.forRoot([])
],
...
})
export class AppModule { }
With the router set up on the root of our web application, we are now able to provide a mapping between the Universal Resource Indentifier (URI) of the route that we want to show in the browser and the component we want to be rendered on that route. For the sake of simplicity, we will imagine we are building a simple blog website and will stub out two components: posts and authors. Posts will show all the available blog posts on our blog, whereas authors will show a list of all authors of blog posts on our blog:
ng g component posts
ng g component authors
This will scaffold out the two components as well as add them to our app module so that we can start routing to them.
How to do it...
After scaffolding the two components and adding them to our app module, let’s follow these steps to add our routes:
- First, we will need to create the route map between these components and the two routes we want to create: /posts and /authors. We will do this by passing an array of route configuration objects into the forRoot method of our RouterModule. This configuration tells the router that the /posts route will resolve with the PostsComponent, and the /authors route will resolve with the AuthorsComponent:
@NgModule({
  ...
  imports: [
    ...
    RouterModule.forRoot([
      {
        path: "posts",
        component: PostsComponent
      },
      {
        path: "authors",
        component: AuthorsComponent
      }
    ])
  ],
  ...
})
export class AppModule { }
- With our routes and components now properly associated, we just need to provide an outlet, where this content can be presented, and links to make navigating to it more easily. We can add both of these to our app.component.html template, as follows:
<nav>
  <a routerLink="/posts">Posts</a>
  <a routerLink="/authors">Authors</a>
</nav>
<router-outlet></router-outlet>
How its works...
Instead of a traditional href attribute, we tell the router to navigate to a route we've configured by attaching the routerLink directive to it. This directive takes a path string that matches a path configured with our router. Next, we provide the outlet where our content will be presented through when a route is active with the router-outlet directive. With these two elements in place, we can see two folders called Posts and Authors in our app folder; clicking on either link will add the posts works! text for /posts and authors works! for /authors.
By updating the template within our components, we can change the content that shows up when the user navigates to the associated route. We can also change the template in app.component.html to alter the shared master template that is used by both routes. We will explore this topic more in the next chapter when we upgrade our application's styling.
Defining a home page in your Angular routes
Often, we will want our web application to have a specific home page for our application. We will simply define a home page route in our Angular route configuration.
How to do it...
We can define a home page with our RouterModule configuration that will be served when the user loads the top level of our application, as follows:
- First, we will generate a new component for controlling our home page. We will create this component using the Angular-CLI generate command:
ng generate component home
- Next, we'll simply add our HomeComponent to our /src/app/app.module.ts route configuration:
...
import { HomeComponent } from './home/home.component';

@NgModule({
  declarations: [
    AppComponent,
    AuthorsComponent,
    PageNotFoundComponent,
    AuthorComponent,
    HomeComponent
  ],
  imports: [
    BrowserModule,
    BrowserAnimationsModule,
    FormsModule,
    HttpModule,
    RouterModule.forRoot({
      path: "",
      component: HomeComponent
    },{
      path: "posts",
      component: PostsComponent
    },{
      path: "authors",
      component: AuthorsComponent
    }),
    PostsModule
  ],
  providers: [],
  bootstrap: [AppComponent]
})
export class AppModule { }
- Now when we visit http://localhost:4200 in your local browser, you will see the text home works! displayed.
How it works...
By setting the path to an empty string, we will define it as the index route for our router. We can then provide it any component we want to present to the user, but what if we wanted to use a route you have already defined in your application as your home page? For example, in our blog application, we will want to serve the posts component as the home page of our application. This configuration is possible through the use of the redirectTo property in the route configuration:
RouterModule.forRoot([
    {
      path: "",
      component: PostsComponent
    },
    {
      path: "posts",
      redirectTo: ""
    }
    ...
])
With the preceding configuration, the PostsComponent will be served for all visitors on the home page of our application, and anyone who navigates to /posts will be redirected to our home page. We can also create a link to our home page in the same manner as linking to any other route of our application:
<a routerLink="">Home</a>
There's more...
When working with multiple modules in your Angular application, you may want to route to a specific module from the home page of your application. To accomplish this, you just need to provide a redirectTo route as a string that is registered with your module's route configuration, and the flag pathMatch: 'full':
{
  path: "",
  redirectTo: "/posts",
  pathMatch: 'full'
},
This flag tells Angular how much of the path has to match before triggering the redirect. In this case, we want it when the path is completely empty to redirect to the /posts route.
Handling 404 errors in an Angular project
A common problem with web applications is a user landing on an invalid URI; this error, known as the venerable 404 - page not found error, is a common fallback error case when the application is unable to redirect or resolve a route in an application. Let's configure our Angular application to handle these error cases.
How to do it...
In Angular, we can use our RouterModule configuration to catch any route that doesn't match our configuration by defining a wildcard route in our configuration, as follows:
RouterModule.forRoot([
  ...
    {
      path: "**",
      component: PageNotFoundComponent
    }
])
How it works...
By setting the path as **, we will catch any route that is not first served by the routes defined above this wildcard route configuration. We then direct the user to a new component we generated with ng g component page-not-found to serve the user a 404 message informing them that the page they have attempted to reach is not available.
Creating nesting routes in Angular
Having nested children routes in an application is a very common way to present detailed information within a category. Routes inside Angular can be configured to have nested parent-child relationships in your route configuration.
Getting ready
In our case, we may want to have a specific blog post route that is accessible by a unique ID under our /posts route. We will also need to provide a way to pass an ID parameter along to our component so that it can look up the details we would want to present to the user for that specific blog post.
How to do it...
To add a child route to our router module, we will need to update its route configuration:
- First, we must define children routes using the children property in the route configuration:
RouterModule.forRoot([
    ...
    {
      path: "posts",
      component: PostsComponent,
      children: [{
        path: ":id",
        component: PostComponent
      }]
    }
    ...
])
- Once we have set up our child route, we can retrieve our ID parameter in our new PostComponent.ts using the ActivatedRoute class from the Angular router:
import { Component, OnInit } from '@angular/core';
import {ActivatedRoute} from "@angular/router";

@Component({
  selector: 'app-post',
  templateUrl: './post.component.html',
  styleUrls: ['./post.component.css']
})
export class PostComponent implements OnInit {
  postId = null;
  constructor(private route:ActivatedRoute) {
    route.params.subscribe(
      params =>{
        this.postId = parseInt(params['id']);
      }
    );
  }
}
- Now that we have the ID parameter, we can use it in our template:
<p>
  post works! - {{postId}}
</p>
- Finally, we will also need to provide another outlet within the template of PostsComponent to surface our specific post template:
<p>
  posts works!
</p>

<router-outlet></router-outlet>
How it works...
The children property of our /posts route configuration is itself a new router configuration that we can nest under a specific route in our root router configuration. By setting the path to :id, we are declaring that whatever value is passed as the next segment of the URI beyond /posts will be made available as a parameter in our controller known as params['id'].
We receive the route parameters from the router as an observable that must be resolved before we can retrieve the ID. This sort of asynchronous data handling will be something that we will explore more in Chapter 3, Working with Data, but for now suffice to say that this is just a means of resolving this property so that we have it available to our component. Since the ID parameter could, in theory, be any type of data, here we parse it into a number. We will need to add a case to handle when this result is invalid, but we will return to that problem in a future section.
Creating sibling routes in Angular
When we nest a route as a child route, we declare to Angular that it must be surfaced through a router-outlet inside our parent component. Depending on the context of our application, that might be what we want, but what if we wanted to render the component at the root level of our application? This is a case where a sibling route with a nested path would be more appropriate.
How to do it...
Let’s take a look at the following code to create module with sibling routes:
- First, we will generate a new module for controlling our sibling routes. This will be useful in future chapters of this book for isolating the routing control for our blog posts:
ng generate module posts
- Instead of defining our related route as a child of "posts", we will define it at the same level. To distinguish the route for Angular we will provide the :id dynamic segment:
...
@NgModule({
  imports: [
    ...
    RouterModule.forRoot([{
      path: "posts",
      component: PostsComponent
    }, {
      path: "posts/:id",
      component: PostComponent
    }])
    ...
})
export class PostsModule { }
- Now when Angular resolves the route, if it doesn't have any dynamic segments it will be served by PostsComponent, otherwise it will end up being served by PostComponent.
How it works...
Here, we can see that both PostsComponent and PostComponent are at the root of our router configuration. However, the path for PostComponent is nested one level deeper to /posts/:id, so it will display as a nested URI in the browser. This approach will only allow PostComponent to be served in our root router-outlet, instead as a child of PostsComponent.
With that, we can now navigate to /posts/123, and we will see our post template rendering on the page with the post works - 123 text. By changing the URL to /posts/456, we will see that our id parameter updates to show us the text post works - 456. However, if we put in /posts/foobar, we will see our page render with the text post works - NaN due to a type conversion failure. In the next section, we will validate and properly handle this case.
There's more...
Another valid way to approach child routing is through the use of modules and the forChild method of the RouterModule. This approach lets any given module manage its own child routing tree under the root module's router:
...
RouterModule.forChild([
  {
    path: 'posts',
    component: PostsComponent,
    children: [{
      path: ':id',
      component: PostComponent
    }]
  }
])
...
A good reason to choose modular routing over simply nesting child routes in your root module is to keep your routing configuration clean and decoupled from the deep nesting of routes. Modular routes are easier to refactor and manage as your application grows, whereas simple nested children route configurations are a bit easier and faster to implement.
Programmatic page redirection in Angular
In our preceding example, we passed a dynamic parameter from a route to a component. However, because this parameter can be anything that is provided as the URI segment after /posts, we will need to handle the error case for what happens when this value is invalid. The easiest thing to do here is to check whether the value is indeed a valid number, and if it is not, redirect the user to the 404 page we created.
How to do it...
Let's add a 404 page to our application for when a user attempts to access an invalid route:
- We can redirect a user to our 404 page using the Angular router's navigateByUrl method:
...
export class PostComponent implements OnInit {
  postId = null;
  constructor(private route:ActivatedRoute, private router:Router) {
    route.params.subscribe(
      params =>{
        this.postId = parseInt(params['id']);

        if (isNaN(this.postId)) {
           this.router.navigateByUrl("/404")
        }
      }
    );
  }
}
- To prevent the browser's URL from showing the /404 route name, we will provide the skipLocationChange flag:
...
if (isNaN(this.postId)) {
   this.router.navigateByUrl("/404", { skipLocationChange: true })
}
...
- Now when we land on an invalid route, we will see the 404 page content without updating the browser's URL.
How it works...
Since /404 isn't a defined route in our application, it gets picked up by our wildcard path route configuration. Additionally, it exhibits an unintended behavior; the URL in the browser points at /404. Even worse, if the user navigates back to their browser from this page, they will re-trigger the logic that redirected them and will not be able to easily return to their preceding page. Yikes!
We generally don't want 404 errors to appear to have redirected the user at all, so we need to tell the router to not update our router location for this transition. We can do that by passing along the skipLocationChange option in our navigateByUrl redirect.
Route preloading with Angular modules
Angular's route loading is considerably optimized through its AoT template generation. However, you can actually tune and refine Angular's router preloading options through some configuration options in your router. These options are most interesting when you are optimizing your web application for mobile contexts where your application's load performance has a very high impact on your application's user experience.
Getting ready
Let's make our posts module a lazy loading module so that our application will start more quickly. We'll pair that module loading behavior with Angular's module preloading capability so that our app will still launch quickly, but will also load the posts module in the background after the application has started up without waiting for the user to navigate to /posts.
How to do it...
- To take advantage of route preloading, we first have to turn it on in our root router configuration. By default, the Angular router comes with one of two preloading strategies; preload everything with PreloadAllModules, or preload nothing with NoPreloading:
...
import {RouterModule, PreloadAllModules} from '@angular/router';

@NgModule({
  ...
  imports: [
    BrowserModule,
    FormsModule,
    HttpModule,
    RouterModule.forRoot(ROUTES, { preloadingStrategy: PreloadAllModules })
  ],
  ...
})
export class AppModule { }
- Now that we have enabled preloading on our root router configuration, we have to enable lazy loading modules. For our router configuration, we must provide our lazy loaded child module in a string format using the loadChildren property. We also must provide the name of the module class itself to be invoked by the preloading strategy:
...
const ROUTES = [{
   path: "posts"
   loadChildren: "posts/posts.module#postModule"
}];
...
- With this configuration in place, the application will automatically start preloading this posts, lazy loading module after it initially bootstraps the Angular application.
How it works...
The point of lazy loading is that it delays the startup cost associated with loading a module until the application makes a specific call to load it. This lowers the overall start up cost of the application, but the potential downside is that the module will be a bit slower to get started when the user attempts to access it. By pairing this with a preloading strategy, we are actually having our cake and eating it too by asking Angular to preload the lazy loading module after startup, but before the user would potentially fetch the module.
Running tests in Angular-CLI
The component, directive, pipe, service, and guard generators in Angular-CLI also create a unique test file stub as well as their class' boilerplate files. These test files are very basic, but they are all differently pre-configured to test their unique type of content.
How to do it...
Let's see what sort of test results we get from these generated boilerplate tests by running them with the test command in Angular-CLI:
ng test
How it works...
When you run the test command, Angular will run through each of these generated test files and check whether they exist and initialize properly. These simple tests don't know enough about the functionality of your application to do much else, but they are helpful as a place to start writing your own tests. They also provide a small amount of coverage that all the individual parts of your application can properly initialize on its own. You should look at these automatically generated test stubs as a ready-made space for you to add your own tests for your application.


