


 Download code from GitHub
1. Introducing PHP
Introduction
Welcome to the world of Hypertext Preprocessor (PHP). PHP is a popular programming language that's used all over the internet to create web pages/websites and applications. A web page is a single page, while multiple web pages together are commonly referred to as a website or web application. PHP powers sites such as Facebook, Wikipedia, and WordPress.
PHP was created as a scripting language to allow rich dynamic content (content can come from other PHP pages or can be dynamic in nature and come from external sources such as a database). PHP is an interpreted language, which means you do not have to compile it and create an executable file. Instead, PHP files are interpreted line by line by the web server running PHP.
Compiled languages cannot run directly after each change. Instead, they require an interpreter to compile the code into a program that can be executed. Interpreted languages, on the other hand, can be reloaded as soon as there is a change in the code, allowing for changes to be seen quickly.
PHP is used along with HTML, JavaScript, and CSS to create dynamic web applications. Since PHP is easy to learn, it has a huge developer community around the world. This has led to more and more developers releasing open source projects, frameworks, and resources. For instance, PHP Framework Interop Group, otherwise known as PHP-FIG, (https://packt.live/2oJ0FvY) has created a series of standard recommendations that most developers use to write their code. GitHub houses many open source projects for others to use, and sites such as https://packt.live/2oaK3gt have many videos on web development.
Getting Started with PHP Web Development
PHP is a server-side scripting language. Server-side scripting is a way that web servers can respond to client requests via HTTP. The way this works is that a client (a browser) requests a URL. This request is then sent by a web server to a script. The script then reads this request and, depending on the code in the script, returns the contents of a page.
This process happens every time a web page is visited. When working with forms, data is sent from the client to the server. The data is processed and a response is returned. A common example is that on Facebook, you enter a status update and press Enter. The text is sent via a POST request to the server, checked by the scripts on the server, and then saved to a database. The web page is then updated with the new post. PHP sites can also be API services, which may be called either from JavaScript scripts (as AJAX calls, for instance) or from other services. In those and similar cases, there is no browser request involved.
The following tools are needed for web development:
- A browser such as Google Chrome, Firefox, or Microsoft Edge.
- A text editor such as Microsoft Visual Studio Code, or an Integrated Development Environment (IDE) such as PHP Storm.
- A server to run PHP Apache or NGINX can be used, as well as PHP's built-in server.
Built-in Templating Engine
PHP was created to write applications for the web. It can be written alongside HTML to create dynamic pages. We will see examples of this in a moment.
A PHP templating engine is a way to allow PHP code to output its content alongside HTML content. This gives flexibility to pages. Any page intended to use PHP code has a .php extension instead of an .html extension. This informs the web server to expect PHP content.
A PHP file has a .php extension, and it can contain HTML, JavaScript, and CSS, along with PHP. Since the PHP interpreter needs to know where the code is placed in a PHP file, PHP code is written between two special tags (<?php...?>). These tags are called opening and closing tags. A typical PHP file looks like this:
1  <!DOCTYPE html>
2  <html lang="en">
3  <head>
4      <meta charset="UTF-8">
5      <meta name="viewport" content="width=device-width, initial-scale=1.0">
6      <meta http-equiv="X-UA-Compatible" content="ie=edge">
7     <title>My First PHP Page</title>
8  </head>
9  <body>
10     <div>
11         <h1>The Heading</h1>
12         <p>
13             <?php
14             // your php code goes here
15             ?>
This page starts off with HTML declaring the doctype, which tells the browser to expect HTML content, followed by meta tags that inform the browser to expect UTF-8 content and a meta tag to use the latest rendering engine and zooming levels.
Note
HTML is covered in detail later in the chapter.
Alternatively, short open tags are also available in PHP, but they are turned off by default. This can be changed by editing a .phpini configuration file when using Apache (this goes beyond the scope of this introduction). Short codes look like this:
<?
// php code here
?>
In short, opening and closing tags inform the PHP interpreter when to start and stop interpreting the PHP code line by line.
Since PHP is a useful web development tool, you will often be working in the browser. However, you will also need to be familiar with the interactive shell.
PHP in the Interactive Shell
Interactive shells are known by a few different names. On Windows, they are referred to as Command Prompt. On Linux/Mac, Terminal is the name given to the computer application that allows commands to be issued and understood by the shell and picked up by PHP.
The interactive shell allows a PHP script to run without a browser. This is how scripts are commonly executed on a server.
Exercise 1.1: Printing Hello World to the Standard Output
In this exercise, we will print a simple statement using the interactive shell. The interactive shell can be used to execute PHP code and/or scripts. Before we begin, ensure that you have followed the installation steps in the preface. Follow these steps to complete the exercise:
- Open a Terminal/Command Prompt on your machine.
- Write the following command to start PHP's interactive shell and hit Enter:
php -a
You will obtain the following output:

Figure 1.1: Getting started with the interactive shell
Interactive shellwill appear on the prompt, and it changes tophp >. Now, you've entered in PHP's interactive shell and can run PHP code and execute scripts. We will explore more interactive shells in upcoming exercises. - Write the following command:
echo "Hello World!";
We will shortly explain what
echomeans. Once you hit Enter, you will seeHello World!printed on the shell, as shown in the following screenshot:
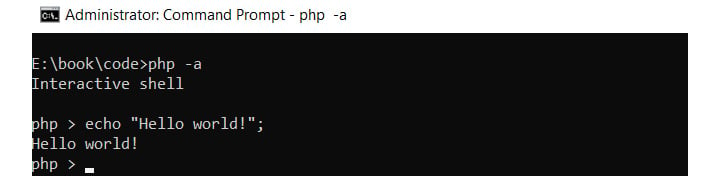
Figure 1.2: Printing output to the console
Congratulations! You have executed your first PHP code.
echo is a PHP construct that prints anything passed to it. In the exercise, we passed Hello World!. Since Hello World! is a string, we have double quotes wrapped around it. You can use echo to print strings, variables, and other things.
The echo construct is one way to print to the screen. Another way is to use print('Hello world!'). While this will display the string passed to it, the main difference between echo and print is that print only accepts a single argument.
There are also functions that look inside a variable, such as print_r($item). This will output the value of any variable passed to the function. This should not be used to display a message to the screen, but instead it should be used when you need to know the contents of a variable.
One important thing to note here is the semicolon at the end of the line. In PHP, the semicolon is mandatory at the end of each statement. PHP will throw an error if a statement does not end with a semicolon.
By now, you should have got the idea that we can execute basic statements in the interactive shell. We will try some more of these later in this chapter. All the functions that we can execute in PHP scripts can be executed from the interactive shell.
Now, we will run a PHP file to output Hello World rather than coding directly using the shell.
Exercise 1.2: Printing Hello World by Executing a PHP File
By now, you have learned how to use the echo statement. Let's now go ahead and create your first PHP script. We will print the same statement as before, but we will use a PHP file this time. Follow these steps:
- Create a folder named
bookon your machine. Create another folder inside it namedchapter1. It is recommended that you follow this approach for further chapters as well. - Create a file named
hello.phpinside thechapter1folder. - Open the
hello.phpfile using a code editor such as Visual Studio Code or Sublime Text. - Write the following code in
hello.phpand save it:<?php echo "Hello World!"; ?>
- Now, open the Terminal and move to the
chapter1folder. Usecdfollowed by the folder name to move into the folder. To go up a folder, use../. - Run the following command in Command Prompt:
php hello.php
You will see
Hello World!printed on the screen, just like in the following screenshot:

Figure 1.3: Printing output to the Terminal
First, we have PHP's opening tag. The PHP interpreter will start processing lines one by one after it. The only line of code we have here is the echo statement to which we are passing the Hello World! string. The PHP interpreter processes it and then this string is printed on the Terminal.
All PHP files will be written like this. Some will have HTML and other code, while some may not. Also, remember that there can be multiple opening and closing tags in a single file. These can be placed anywhere in the file.
So, you've learned how to use the interactive shell and how to print simple strings using the echo statement. We will now learn about creating and using variables in PHP.
Assigning and Using Variables
Just as with any other programming language, variables in PHP are used to store data. A key point of difference is that all variable names in PHP must start with the dollar sign, $.
Variables must start with a letter. They cannot start with a number or symbol, but they can contain numbers and symbols.
Data stored in variables can be of the following types:
- Integer – whole numbers
- Boolean – true or false
- Float – floating-point number
- String – letters and numbers
The data that is stored in a variable is called the value of the variable.
Creating and Assigning Variables to Print Simple Messages on the Web Browser
Consider the following example, in which we are assigning a value to a variable:
<?php
$movieName = "Avengers: Endgame";
?>
Here, a variable named $movieName has been created, and its value is the string "Avengers: Endgame". Since the value is a string, double or single quotes are required around it. = is called the assignment operator. The code basically translates to the following: Assign the value on the right-hand side of the assignment operator to the variable on the left-hand side.
Here are some more examples of creating variables:
<?php
$language = "PHP";
$version = 7.3;
echo $language;
echo $version;
?>
If you run the preceding script, you will see PHP7.3 printed. Earlier, we were directly printing values using the echo statement, but now we have assigned the values to a variable. The value is now stored in the variable. One other thing to note is that since 7.3 is a number, it does not need quotation marks.
Suppose you have "PHP" written 50 times on a page. If you had to change it to "JavaScript," you would have to replace it in all 50 places. But if the same text, "PHP", is assigned to a variable, you only need to change it once and the change will be reflected everywhere.
There are some rules that must be followed while creating variables:
- All variable names in PHP must start with the dollar sign (
$). - A variable name cannot start with a number. It must be either a letter or an underscore. For example,
$1nameand$@nameare not valid variable names. - Only A-z, 0-9, and _ are allowed in variable names.
- Variable names are case sensitive; for example,
$nameand$NAMEare different.
Variable names must be chosen thoughtfully. They should make sense to someone else reading the code. For example, in an application, if you have to create a variable that stores a user's bank balance, a variable name such as $customerBalance is far more obvious than $xyz.
Unlike languages such as Java and .NET, PHP does not need to declare variables before using them. This means you can just create a variable whenever it's needed, although it's considered a best practice where possible to define your variables at the top of your scripts to make it clear their intent.
PHP also has what are called predefined variables. These are provided by PHP and are available to use by anyone.
One such variable is $argv. This is a list of arguments passed through the Terminal by a script. Rather than executing the script on its own, you can pass values to a script that will be available to use in the $argv variable.
Exercise 1.3: Using Input Variables to Print Simple Strings
In this exercise, we will alter the script from the previous exercise and use the input variables to print strings. Follow these steps:
- Reopen the
hello.phpfile using your favorite code editor. - Replace the code with the following code and save the file:
<?php
$name = $argv[1];
echo "Hello ". $name
?>
Don't worry about the syntax at the moment.
- Now, go to the Terminal inside the
chapter1folder. - Run the following command:
php hello.php packt
You will see the following output on the Terminal:

Figure 1.4: Printing output to the console
What just happened? The hello.php script printed the value you passed to it. Let's examine how it worked.
You passed the value packt through the command line. This is called passing arguments. You can send multiple arguments shared by a space and these will all be available to the PHP script. But how?
Here comes $argv. $argv is a predefined variable, and once you execute a script, it gets filled with the values passed by the use. It is a list of values after the php keyword on the Terminal. If no arguments are passed, the list only contains the filename. In our case, the list will have two values: hello.php and packt.
Coming back to the script, in the first line of code, we are assigning a value to the $name variable. What is this value? $argv is an array (more about that in later chapters, but basically, an array is a list of things) containing two values. With arrays, the counting begins from 0 instead of 1. So, the first value in $argv is hello.php, which can be taken out using $argv[0]. We need the second value (must be character variables), hence we used $argv[1]. Now, the packt argument passed to the file is stored in the $name variable.
In the second line, we are concatenating the text Hello and the $name variable. The dot operator (.) is used to concatenate multiple values. After concatenation, the string becomes Hello packt, which is then printed by the echo statement.
Note
You can read about more predefined variables and their usage at https://packt.live/2nYJCWN.
You can use either single or double quotes for strings. However, there is a difference between them. You can use variables inside double-quoted strings, and they will be parsed. By this I mean that the value of the variable will be executed rather than simply displaying the name of the variable. On the other hand, single quotes do not do any additional parsing and display the content between the quotes as it is. For this reason, single quotes are slightly faster, and it is recommended to use them.
In the last exercise, we saw how to use the predefined $argv variable. We will use one more predefined variable in this exercise called $_GET. This allows information to be passed to the address bar, and PHP can read it. They are known as query strings
Query strings are key-value pairs that are separated by an ampersand (&). So, ?a=1&b=2 is also a valid query string.
Exercise 1.4: Using the Built-in Server to Print a String
In this exercise, we will use the built-in server to print Hello Packt using the companyName=Packt query string. This will allow you to start using the browser to view the output of your code, rather than just using the interactive shell. Follow these steps:
- Reopen the
hello.phpfile using your favorite code editor. - Replace the code with the following code and save the file:
<?php
$name = $_GET['companyName'];
echo "Hello ". $name;
?>
- Go to the Terminal and go inside the
chapter1folder. - Run the following command to run PHP's built-in web server:
php -S localhost:8085
- Now, open the browser and enter the following in the address bar and hit Enter:
http://localhost:8085/hello.php?companyName=Packt
You will see the following output on your screen:

Figure 1.5: Printing output to the browser
This is somewhat like the previous exercise, but rather than using the Terminal, we used the browser.
Notice the URL in the browser. After the filename, we have appended ?companyName=Packt. The ? denotes that what follows is a query string. In our code, a variable named companyName with a value of Packt is being passed to the PHP file.
Coming to the code now, in the first line, we have $_GET['companyName']. $_GET is also a predefined variable that is populated when any PHP string with a query string is executed. So, by using $_GET['companyName'], we will get the value Packt, which will be stored in the $name variable. Remember that you can extract any value from the query string using the respective key.
The next line then combines them and displays the result on the browser.
Now that we have started to use the browser to view the output of our work, let's take a quick look at HTML. As discussed earlier, PHP and HTML are often used hand-in-hand, so an understanding of HTML will prove useful as you become more familiar with PHP.
HyperText Markup Language
HyperText Markup Language (HTML) is a language whose meaning is defined via tags and attributes in a hierarchical way. It is used for creating documents such as web pages on the World Wide Web, which are usually displayed in a web browser. They can include texts, links, pictures, and even sound and video.
HTML uses different tags and attributes to define the layout of a web document such as forms.
A tag is an HTML element enclosed by < and >, such as <body>, <p>, and <br>. It consists of an opening tag and an ending tag, with content in-between. For example, consider the following line of HTML:
<p>A paragraph</p>
The opening tag is <p> and the closing tag is </p>, while the content is A paragraph.
An attribute of the HTML element provides additional information about the element and is described by its name and value and has the following syntax: name[="value"]. Specifying the value is optional. For example, the following hyperlink has an attribute with the name href, and the value /home:
<a href="/home">Home</a>
Any HTML document requires the document type declaration, <!DOCTYPE html>, and the <title> tag, like this:
<!DOCTYPE html><title>The document title</title>
There is a list of optional tags that many developers use to create the structure of an HTML document, which are <html>, <head>, and <body>. The <html> tag is the root tag of the HTML document, which is placed immediately after the document type declaration. It will contain the other two optional tags: <head> and <body>. The <head> tag is used for the page metadata and includes <meta> tags to describe the encoding character set used in document for example, it includes the <title> tag, and external resources, such as styles, fonts, and scripts. The <body> block is used to render its contents in a browser window and includes the largest variety of HTML tags.
The aforementioned HTML tags can be seen in any HTML document.
Here's a list of the most frequently used tags:
<div>: This tag defines a section in an HTML document. It is usually used as a wrapper element for other HTML elements.<h1>to<h6>: The heading tags are used to define the heading of the HTML document.<h1>defines the most important headings (they also use the biggest font size), while<h6>defines the least important headings. They can be used anywhere in an HTML document.<p>: The paragraph tag is used to define paragraph content in an HTML document.<em>: The emphasis tag is used to emphasize text.<b>and/or<strong>: The bold tag is used to specify bold content.<a href="..."> Link name </a>: The anchor tag is used to link one page to another page.<ul>and<li>: The unordered list and list item tags are used to list the content without order (like a bulleted list).<ol>: This tag is used to represent a numbered list<br>: The line break tag is used to break the line.<img>: The image tag is used to add an image element to an HTML document.<hr>: The horizontal rule tag is used to display the horizontal line in an HTML document.<table>: The table tag is used to create a table in an HTML document.<tr>: The table row tag is used to define a row in an HTML table.<th>: The table heading cell tag defines the header cell in a table.<td>: The table data cell tag defines the standard cell in a table.<form>: The form tag is used to create an HTML form.<input>: The input tag is used to collect and submit user data (such as forms from a browser).<select>and<option>: The select input tag is used to select an option value from a drop-down list.<label>: The label tag prints the label for a form input.
Consider the following HTML block:
<!DOCTYPE html>
<html lang="en">
<head>
    <meta charset="utf-8">
    <title>HTML Document Title</title>
</head>
<body>
<h1>Heading Text</h1>
<p>A paragraph</p>
<form method="post">
    <input type="text" name="domain">
    <input type="submit" value="Send">
</form>
</body>
</html>
Let's have a look at the HTML elements in this block:
<!DOCTYPE html>declares the document type to HTML5.<html lang="en">is the opening tag for the root element of the HTML document. Thelangattribute is pointing to the document content language.<head>opens the metadata block.<meta charset="utf-8">declares the character set used in the HTML document.<title>HTML Document Title</title>sets the title toHTML Document Title.<body>opens the HTML document content block.<h1>Heading Text</h1>adds aHeading Textheading.<p>A paragraph</p>adds a paragraph containing the textA paragraph.<form method="post">opens the form block, declaring the method that will be used to send its data (more about this in Chapter 6, Using HTTP).<input type="text" name="domain">adds a text input field calleddomain. The "domain" value is the name of the input type.<input type="submit" value="Send">adds a submit button withSendon it.</form>,</head>,</body>, and</html>are the closing tags for the<form>,<head>,<body>, and<html>tags.
The preceding code will render the following web page:

Figure 1.6: Layout of the web page
We can access the file with a GET request. Submitting the form will result in a POST request:

Figure 1.7: Methods used
Request types and form data submission will be covered in Chapter 6, Using HTTP.
Cascading Style Sheets
Cascading Style Sheets (CSS) is the language for defining the styles of web pages. It is possible to change color, font, and so on using CSS. While the HTML describes the structure of a web page, CSS describes what the page will look like on various devices and screen types.
Nowadays, it is very common to use a CSS framework because it contains some presets to make the web pages compatible across browsers, and offers a number of tools, such as a grid system, to make the creation of page layout easier and to implement responsiveness.
One such framework is Bootstrap, and using it is as simple as including the generated and minified CSS file in the HTML document:
<link href="https://stackpath.bootstrapcdn.com/bootstrap/4.3.1/css/bootstrap.min.css" rel="stylesheet">
Including the CSS file in the original HTML document will make the browser render the page a bit differently:

Figure 1.8: Rendering the web page
As you can see, the font is different, but no other major changes are visible. This is because the CSS rules from the linked file do not match any of the elements to decorate. The Bootstrap documentation (https://packt.live/2N1LHJU) shows what it is capable of. Usually, the class attributes are used to match the target HTML elements. Therefore, by simply adding class="btn btn-primary" to the submit input, we will get the button formatted according to the defined style:

Figure 1.9: Adding CSS to a button
We didn't need to define a single CSS rule. The button was rendered according to the already-defined rules from the Bootstrap framework. If we inspect the submitted input styles in Developer Tools (Chrome), we will see the following cascade that is applied to the HTML element:
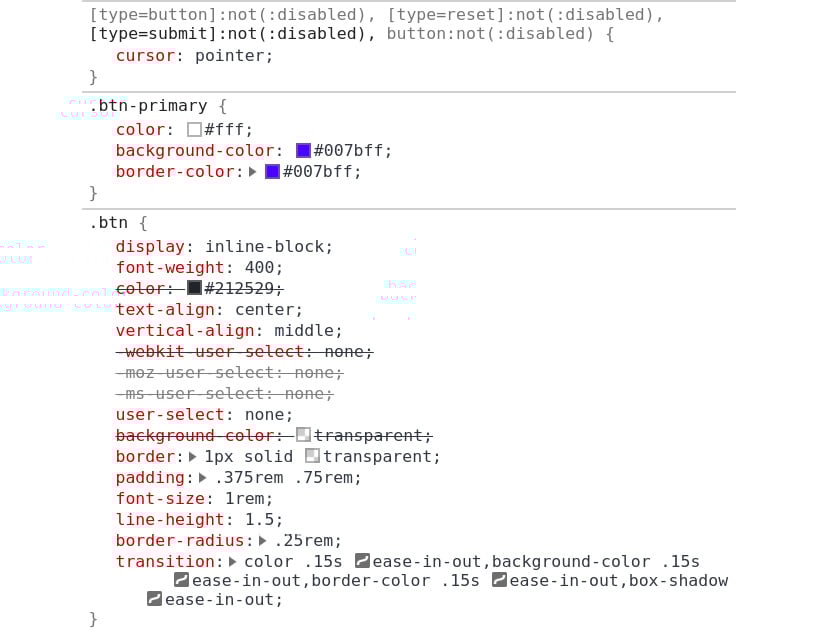
Figure 1.10: Inspecting the submit input styles in Developer Tools
Of course, we can create an additional CSS file and link it to the HTML document, overwriting some of the Bootstrap declarations.
Exercise 1.5: Creating a Login Form Page Using Bootstrap
You are required to create a simple login page using the Bootstrap framework. Follow these steps:
- Create a file called
login-form.html. - Declare the document type as HTML5 and open the root HTML element:
<!DOCTYPE html>
<html lang="en">
- Add the head block containing the page title, the link to the Bootstrap CSS framework, and the meta tag required by the CSS framework:
<head>
    <title>Login form</title>
    <link href="https://stackpath.bootstrapcdn.com/bootstrap/4.3.1/css/      bootstrap.min.css" rel="stylesheet">
    <meta content="width=device-width, initial-scale=1, shrink-to-fit=no"       name="viewport">
</head>
- Open the
bodyelement and add the containerdiv, aligning the contents to thecenter:<body> <div class="container d-flex justify-content-center">
- Open the form element and add the form title – an H1 centered text heading:
    <form method="post">
        <div class="text-center mt-4">
            <h1 class="h3 mb-3 font-weight-normal">Authenticate</h1>
        </div>
- Add the first form label and input group for the username:
        <div class="form-label-group mb-3">
            <label for="inputUser">Username</label>
            <input class="form-control" id="inputUser" name="username"               placeholder="Username" type="text">
        </div>
- Add the password-related label and input tags:
        <div class="form-label-group mb-3">
            <label for="inputPassword">Password</label>
            <input class="form-control" id="inputPassword" name="password"                placeholder="Password" type="password">
        </div>
- Add the button that will submit the form:
<button class="btn btn-lg btn-primary btn-block" type="submit">Login</button>
- Close all opened tags.
Note
The final file can be referred at https://packt.live/2MBLNZx.
Open the file in the browser. The expected output is as follows:
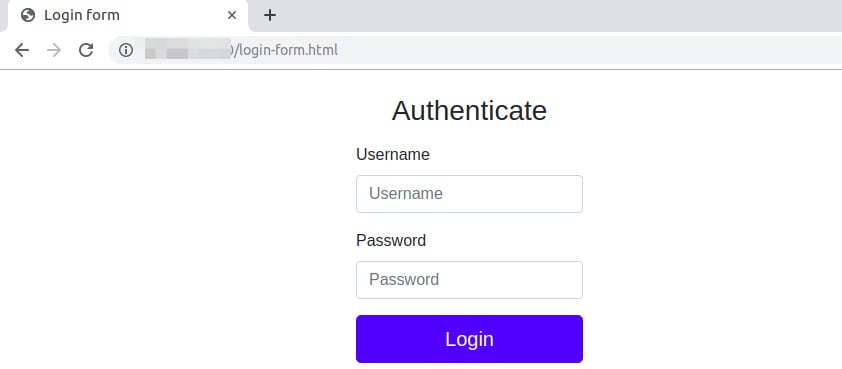
Figure 1.11: The login page
The form is rendered using the default styles of Bootstrap, which are far richer than the browser's defaults.
In this exercise, you rendered an HTML page, including some of the most widely used HTML elements, such as the form element, and you used the Bootstrap CSS file:
<h1>Hello <?php echo $name; ?></h1>
In this case, the Packt string is stored in the $name variable, and the output Hello Packt will be printed in heading 1 (in the biggest font size).
Note
The file extension will be .php.
This is possible because PHP scans the script file and will only run the code between the opening tag (<?php or <?=) and the closing tag (?>) when the closing tag is present, replacing it with the code output, if any.
Exercise 1.6: Printing PHP Code Output between HTML Tags
In this exercise, we will use the built-in server to print Hello Packt using the companyName=Packt query string. Follow these steps:
- Reopen the
hello.phpfile using your favorite code editor. - Replace the code with the following code and save the file:
<h1><?php echo "Hello ". $_GET['companyName'];?>!</h1>
<hr>
- Now, open the browser and enter the following in the address bar and hit Enter:
http://localhost:8085/hello.php?companyName=Packt
You will see the following output on your screen:
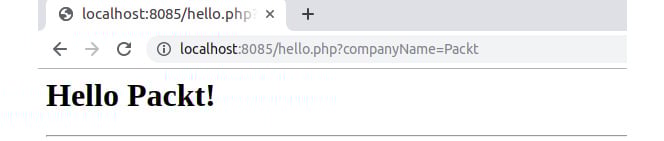
Figure 1.12: Printing output to the browser
As we can see, PHP has such a degree of flexibility that it allows us to use parts of PHP code inside other types of content.
Let's now have a look at other predefined variables available in PHP.
Using the Server Variable
$_SERVER is an already populated predefined array made available by PHP. It contains information about the server and the environment. The information available in $_SERVER differs from server to server, so the fields may vary depending on the environment.
Exercise 1.7: Displaying Server Information
In this exercise, we will use $_SERVER to print the server information to the browser. Follow these steps:
- Go to the
chapter1folder. - Create a new file named
server.phpin the folder. - Write the following PHP code in the file and save it:
<?php
echo '<pre>';
print_r($_SERVER);
echo '</pre>';
?>
- Open your browser and type the following URL in the address bar:
http://localhost:8085/server.php
You will see a screen like the following:

Figure 1.13: Printing details to the browser
In the preceding code, we used the print_r statement to print the contents of $_SERVER. Since it is an array containing multiple entries, we used PHP's print_r function instead of echo to display its contents. The pre tags above and below it separates each item out on to a new line, making it easier to read.
In the browser, we can see that it has printed a lot of information. We have port information, file locations, and many other fields. As mentioned earlier, the information on your system may vary.
Other Predefined Variables
Here are some often-used predefined variables and their usage:
$_POST: We used$_GETearlier in this chapter.$_POSTis similar, but with one difference.$_GETfetches you the values from a query string, whereas$_POSTcontains the data from a form on any PHP page. You will use it more in later chapters.$_FILES: If a file is uploaded from a form on a page, its information is available in the$_FILESarray.$_COOKIE: This allows basic text information to be stored as a cookie on the client's browser to be saved for later. A common example of this is if you log in to a website and tickRemember me, a cookie will be saved on the browser, which will be read on the next visit.$_REQUEST: This contains the combined information of$_GET,$_POST, and$_COOKIE.$_SESSION: These are session variables that are used to maintain state in the application. They allow values to be saved in memory for the duration of a session. This could be a username that is saved and displayed on the page while the session exists.$GLOBALS: This contains all variables that are available to a script. It includes variables, data from$_GET,$_POST, any file upload data, session info, and cookie information.
Assignment by Value and by Reference
It is very important to be aware of different ways in which values can be assigned to a variable. In PHP, there are two ways to do it: assignment by value and assignment by reference. Let's look at each of these one by one.
Assignment by reference means assigning a reference of a variable using an ampersand with a variable like this: $var = &$othervar;. Assignment by reference means that both variables end up pointing at the same data, and nothing is copied anywhere.
Assignment by value means a value will be assigned to a new variable but has no reference back to any other variables. It's a standalone variable with a value.
Exercise 1.8: Assigning a Variable by Reference and Changing its Value
In this exercise, we will assign a variable by reference. Then, we will change the other variable's value and ensure that the original variable's value has also changed. Follow these steps:
- Move inside the
chapter1folder on your system. - Create a new file named
assignment.phpin this folder. - First, we will declare a
$animal1variable and assign the valueCatto it. Then, we declare another variable,$animal2, and assign the$animal1variable to it. This means that the value of$animal1is copied to the$animal2variable. We then confirm this by echoing both variables in line 10, where we see that both variables have the valueCat:<?php // Assignment by value echo 'Assignment by value'; echo '<br>'; $animal1 = 'Cat'; $animal2 = $animal1; echo $animal1 . ' - ' . $animal2; echo '<br>';
- Next, when we write
$animal2 = 'Dog', we change the value of the$animal2variable toDogand then again print both the variables. Now, we can see that although the value of$animal2has changed, it did not have any effect on$animal1. This is what we call assignment by value. The value is just copied from one variable to the other, and both variables remain independent:$animal2 = 'Dog'; echo $animal1 . ' - ' . $animal2; echo '<br>';
Now, let's look at assignment by reference. "By reference" means that the new variable becomes an alias of the older variable. Hence, changing the value of the new variable changes the value of the older variable.
- Now, we will declare another variable,
$animal3, with the value set toElephant. Next, we create a new variable,$animal4, and assign the value of the$animal3variable to it. While doing the assignment, note the ampersand (&) before the variable name. This ampersand tells PHP to assign the$animal4variable to the$animal3variable by reference. In the code, we will verify the value of both the variables by printing values of both variables, and they are the same:// Assignment by reference echo 'Assignment by reference'; echo '<br>'; $animal3 = 'Elephant'; $animal4 = &$animal3; echo $animal3 . ' - ' . $animal4; echo '<br>'; $animal4 = 'Giraffe';
- To see assignment by reference in action, we change the value of
$animal4toGiraffe. After this, we print both variables again and can see clearly that changing the value of$animal4has changed the value of$animal3as well:echo $animal3 . ' - ' . $animal4; ?>
- Now, open the browser and point to our file by opening this URL:
http://localhost:8085/assignment.php
You should see a screen like this:
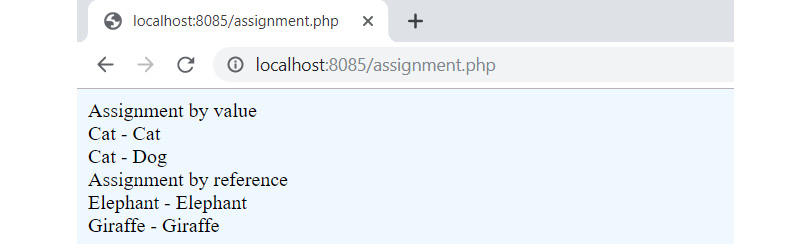
Figure 1.14: Printing output to the browser
Unless specified, variables are always assigned by value in PHP.
Using isset to Check for Variable Declaration
At times, we need to check whether a variable has been set, especially in cases where there is some user input from a form, and we need to verify it before saving it to the database. isset is a built-in PHP function that returns true for declared variables with values other than null.
Null data types are used when a variable has no value.
Let's do an exercise.
Exercise 1.9: Using isset to Check whether a Variable Has Been Set
In this exercise, we will use PHP's isset function to check whether a variable has been set. Follow these steps:
- Go to the
chapter1folder on your system. - Create a new file named
isset.php. - Write the following code in
isset.phpand save the file:<?php $name1 = ''; $name2 = null; echo 'checking $name1 : '; var_dump(isset($name1)); echo '<br>'; echo 'checking $name2: '; var_dump(isset($name2)); echo '<br>'; echo 'checking undeclared variable $name3: '; var_dump(isset($name3)); ?>
- Now, run the built-in PHP web server using the
php -S localhost:8085command. Make sure that you are in thechapter1folder. - Open the following URL in your browser:
http://localhost:8085/isset.php
You should see a screen like this:

Figure 1.15: Printing the output
var_dump is a built-in PHP function that is used to print a variable's value and type. It's useful to see the contents of a variable and also what data type it contains. You can then make decisions about how to work with the variable based on this information.
isset is a built-in PHP function that determines whether a variable is declared and is different to NULL.
In the preceding code, we have declared two variables, $name1 and $name2. $name1 is an empty string and $name2 is set to null. $name3 is not declared. Then, we use PHP's var_dump function to print $name1, $name2, and $name3. Since PHP does not require declaring variables, we can use $name3.
On printing the values, we can see that the isset function returned true for $name1, which means a valid value is set for $name1. This is because $name1 has a valid value – an empty string. But it is returning false for $name2 because it is set to null, meaning that $name2 is not set.
Lastly, we dumped info about an undeclared variable, $name3. Since this is not declared at all, the isset function returned false, meaning this variable is also not set.
isset is a handy function, and you will be using it a lot when working with data.
A related function to isset is unset, which clears the value of a variable.
Activity 1.1: Displaying Query Strings in the Browser
In this activity, we will apply the knowledge gained from the earlier exercises and use variables to retrieve query strings from a URL and print the relevant information to the browser.
You will create a simple application that allows users to view movie information in the browser. Once you complete the activity, you should have an output similar to the following:

Figure 1.16: Expected outcome
These steps will help you complete the activity:
- Create a file named
movies.php. - Capture query string data in the file to store the details of the movies, such as movie names, actor/actress names, and release year.
- Create a basic HTML structure and then display the captured query strings.
- Go to the Terminal and execute the command to start the built-in web server.
- After the web server is up and running, open the PHP page and append your query strings to the URL in your browser.
Note
The solution for this activity can be found via this link.
Summary
In this chapter, we learned what PHP is and where it stands in the market today. We also explored PHP's built-in templating engine and the interactive shell. The templating engine allows us to mix PHP and HTML in the same file. Then, using Terminal, we learned that we can run a PHP script using its built-in web server, which allows the output of a script to be viewed in a browser by going to the server's IP address (localhost in this case) and filename.
We learned how to create and assign variables – by value and by reference. We also saw how to use PHP's predefined variables and how they are used.
Finally, we learned how to run PHP's built-in web server and use query strings in our code. Appending data to the query string allowed us to pass extra data to the PHP script, where it could be displayed or modified by the script.
In the next chapter, we will take a look at different types used in PHP programming.


