


Kali Linux and Wireless Networking
In this chapter, we will cover the following recipes:
- Installing Kali Linux
- Installing Kali Linux on a PC
- Installing Kali Linux in a virtual environment
- Updating Kali Linux
- Preparing for wireless pentesting
Introduction
In today's world, one of the most common ways to share information is through the use of wireless communications. Wi-Fi is used in many locations, including the home, the workplace, airports, coffee shops, retail shops, and many other areas too numerous to name.
With the popularity of this type of communication, it is a forgone conclusion that there is a lot of valuable information that is traversing these networks. It is due to this information and the inherent weaknesses in these networks that they are common targets for those wishing to steal access, or information, or both.
In this book, our intention is twofold, with one objective being to introduce you to the tools in Kali Linux designed to audit wireless network, and the other to show some of the different attacks that are possible. This approach will serve to give you not only information on the attacks and how they work, but also give you valuable insight into reducing the likelihood or effectiveness of these attacks.
Getting started with Kali
Kali Linux is intended for both those who will perform pentesting and forensics; however in this book, we will be focusing on the former more than the latter. In fact, on the topic of pentesting, we will be focusing on using only those tools used to test and breach the security of wireless networks or devices.
In order to get the most out of this book and understand how it is used to penetrate wireless networks, you should have some basic skills in place to make things easier. It is expected that if you are going to start this journey into auditing wireless networks you should, at the very least, have the following skills:
- Good understanding of the TCP/IP protocol and IPv4
- Knowledge of the Open Systems Interconnect (OSI) model
- Understanding of network frame types (that is, IEEE 802.3, 802.11, and so on)
- Knowledge of radio frequencies and technologies is helpful, but optional
- Experience setting up and working with wireless devices and networks
- Hands-on experience working with Kali Linux is helpful, but we will fill in the gaps in your knowledge along the way
- Experience working with virtualization is optional if you intend to make use of it for hosting your setup
- Experience troubleshooting networks
- Comfort using the command line
Again, of these last few points, lack of them will not hurt you, but possessing them will go a long way in helping you both in this book and in your pentesting career.
Installing Kali Linux
Preparing to install Kali Linux onto a computer system is similar to other OS you may have encountered, starting with ensuring you have the right system requirements.
Getting ready
To get things started, let's look at the minimum hardware requirements that you will need to have in place to even get the product to install:
- Minimum of 10 GB hard drive space for the Kali OS
- For i386 and amd64 systems 512 MB of RAM
- CD/DVD drive or USB boot support
- An active internet connection is desirable
Again, keep in mind what is listed here represents the bare bones minimum and you will want to exceed these by as wide a margin as possible to ensure decent to excellent performance. Personally, I would recommend having at least 4 GB of RAM, if not more (I personally have 8 GB or 16 GB in the systems I use respectively, but I have used 4 GB of memory in the past and been fine).
How to do it...
Once you have confirmed or upgraded your system's hardware as needed you now need to choose how you will install Kali. Kali offers several different ways to install and run the product each having its own benefits, but also with their own drawbacks as well. However, for this book we will assume one of two options, these being physical installation on a PC and within a virtual environment.
Virtualized versus physical
The question of using virtualization instead of installing directly on a system is one issue that you should consider. Virtualization is a common option that has been employed for many years by organizations large and small, with many organizations using it liberally for various needs. For many the driving force for moving to virtualization can be many factors, including consolidation of systems, saving power, optimizing hardware usage, isolation of applications and systems, ease of management as well as testing just to name a few.
However, for a penetration tester, the use of virtualization tends to be a bit different.
One of the motives on the pentester side is being able to run your testing environment in different configurations on top of a host. For example, running Microsoft Windows as a host with one or more Kali environments running as guests in a virtualized environment on top of the system allows for consolidation, along with the ability to have specialized configurations as needed.
Another reason for the move to virtualization is to make use of what is known as isolation or sandboxing. Basically, this means that the guest system is separated from the host system allowing both access off of system to the network and internet without letting the two potentially interfere with one another. This would be vital in situations when the tools and skills being used in the guest may have the ability to harm or compromise the host or other systems.
Of course, you don't get something for nothing and not everything is ideal in every situation and virtualization is not any different. One area which can prove problematic is in relation to hardware support. In some cases, physical devices may not be able to function in the way you need them to function due to the virtualization technology. One example is wireless networking and Bluetooth; these technologies may require that Kali is run directly on the hardware instead of within a virtual environment. While this limitation is not common it can be frustrating. Of course, I would be remiss if I didn't mention that there are workarounds and it is possible to get some hardware options to work in a virtualized environment that wouldn't otherwise, but these workarounds can be very complex and specialized, and are beyond the scope of this work.
Pre-installation checklist
Much like many operating systems which are available, Kali has some unique and specific points that need to be considered in order to make the installation proceed properly. Fortunately, Kali keeps its installation requirements fairly simple, but there are definitely things that could impact your experience and make Kali operate in a less than stellar manner.
To make sure we get the optimal installation and performance, here is an example of a checklist of items to consider:
- Will you install Kali to the hard drive or will you run it from removable media?
- How much memory is currently on the system? More memory makes for a better experience and better performing Kali system. On my own personal system, I run with 8 GB and Kali runs beautifully. If you run Kali off of something other than the hard drive, more memory may allow for better performance as more of Kali can be kept in memory.
- What applications will you be running? If you will be installing additional applications into Kali, you may need to adjust your configuration to account for their inclusion. Some utilities require special hardware (such as wireless devices) to be present in order to function properly. If you rely on these functions or will use them in the future, ensure that all your hardware is compatible or can be upgraded.
- What type of hard drive do you have? I have run Kali off of both traditional drives and SSD and, of the two, SSDs run much better and make for a more satisfying experience and performance.
- Software support for your favorite applications and devices is very broad with Kali and has only increased over time. Applications have been included with Kali which cover many uses and situations you may run into, but you can add to this as needed.
Choosing an installation option
After we have assessed our system's suitability for an installation of Kali we now need to consider how it will be installed. It is likely that more than a fair share of you reading this book will have extensive experience in a Windows environment and, as such, you will have almost always installed an OS to a hard drive directly. However, as we just learned Kali, offers additional installation options. We now need to make a determination of which path we are going to take in regards to installation location.
Let's look at the main options and what makes each a good choice or bad choice:
- Installing to a flash drive without persistence: This is a suitable installation method if you wish to use Kali to perform forensics, as it will not alter the host and therefore not affect potential evidence on the system. It is also a very suitable installation method if you wish to have Kali assist you with network or host troubleshooting. It may also be ideal if you want to have a portable environment that you can run on any system without having to worry about changes to the host or to the flash drive itself.
- Installing to a flash drive with persistence: This installation method is suitable for situations where you want to be able to carry Kali with you for troubleshooting, forensics or to have a portable pentesting kit, but you wish to be able to save files and make changes to the system without losing those changes every time you shut the system down.
- Installing to a hard drive: This is extremely popular and useful because it offers the best performance, since the files don't need to be loaded into memory each boot. This installation also offers the ability to save files and make changes without losing either upon reboot. It is ideal if you want to have a system that retains changes, especially if you tend to tweak a system to your own needs.
- Installing as a virtualized environment: This option is just like installing to a hard drive except the OS is being installed into a virtualized environment that allows changes to the Kali guest.
- Running from a CD or DVD: I've included this here because this is another option similar to installing Kali to a non-persistent flash drive. This tends to be slower in operation than any other method covered here.
If very specific hardware, such as high-powered graphics cards, will be used for cracking passwords, it is recommended that the installation of Kali Linux be installed on a desktop computer. If there is a need to carry the operating system from customer site to customer site, or there is a desire to test wireless devices, a laptop is recommended. The installation of the operating system is the same for laptop and desktop computers.
My choice of laptop was based on a couple main issues namely hardware support and power. By choosing a slightly older system I didn't have to worry about Kali supporting the hardware, nor did I have to worry about having to look for solutions to make the system work, it just did. In regards to power, I am referring to the fact that Linux traditionally doesn't need the most powerful hardware to get good performance. In fact, Linux has traditionally been known to run on older hardware without the problems other operating systems would experience. However, I made sure I didn't go back so far that I would be constrained with the tools I need to use. I have found that hardware that has been manufactured in the last five years or less will generally be OK to run Kali in most cases.
Hard drive selection
One of the areas you don't want to cut corners on when choosing a system for Kali is that of the hard drive. It is usually a good idea to get a drive that has at least 150 GB of space, but you should consider drives larger than this if possible, as you will undoubtedly install other tools that aren't included in Kali (not to mention the data you generate will take up space as well).
Keep in mind that, as a penetration tester, you will be not just asked, but required to keep your findings confidential and, for many tests, this means wiping the hard drive to be safe. While it is possible to clean an installed OS so it is returned to its base or original unaltered state, you still may want to wipe the drive. The suggestion would be to set up the system the way you desire then image it so you can effectively wipe a drive then restore your original image at will. Always keep in mind that losing control of or leaking information is something that will not only upset your client, but open you up to lawsuits, loss of reputation, loss of career, and bad karma. Basically, take the proper precautions with the data you have gathered both during and after a test.
First, the use of an SSD drive will typically result in the reduction of battery drain on a system to some degree. This reduction in battery drain results in longer mobile use when you can't plug into a wall.
Second, SSD drives are faster than traditional hard drives by a substantial amount. SSD drives result in faster read and write times than a traditional hard drive. Being able to retrieve and manipulate data faster is a tremendous benefit for a penetration tester (or anyone for that matter).
Lastly, SSD drives can take a lot more of a beating than older traditional drives. The lack of a spinning disk inside the computer means that moving and transporting the drive plus system is a lot less likely to result in drive failure.
These are the things I considered when moving to a solid-state and I don't feel like I made a bad choice.
Network cards and wireless
Something you need to consider with Kali is how you will be connecting to networks as well as what types of tests you may be performing. Namely, what we are considering in this section is your choice of network interface, that is, wired or wireless. Wireless is a common inclusion on just about any class of device you will run into today (or those made in the last 10 years). On the other hand, wired network connections on devices have become less common with many notebooks and laptops dropping them altogether.
In the case of wireless networking, you may find that many of the wireless network cards which are either included in your device or are added via other means such as USB will work with Kali without issue or can be corrected by acquiring the right drivers from the manufacturer. The following figure shows one example of a popular USB wireless network adapter:
The other form of wireless you may perform some testing with is Bluetooth, in which case you probably will need to acquire an additional adapter for this purpose. The reason for purchasing another adapter is that fact that Bluetooth, by default, only extends out to 30 feet or 10 meters in range. If you need greater range to enable the scanning of a larger area you can acquire an Industrial Bluetooth adapter which extends scanning range to 1000' or more.
Installing Kali Linux on a PC
So, with our system requirements and considerations in mind and a half hour or so to spare, we are now ready to install Kali. With your desired hardware in hand you will first need to obtain a copy of Kali Linux from https://www.kali.org/, which is designed for your hardware. Currently, Kali is supported on i386, amd64, as well as ARM (both armel and armhf) platforms.
Getting ready
Prior to installing, you will need to download the version which is appropriate for your hardware, such as amd64 for 64-bit based systems.
So, let us start the installation process to create our Kali system.
How to do it...
- Starting the installation process requires that you boot the system from the DVD or flash drive you prepared with Kali, either through burning the ISO file to the media or preparing a USB drive with the files.
- You start the installation by booting from the media of your choice. The actual process for booting from removable media such as DVD or USB will vary depending on your hardware so check with your vendor as to how to do this on your system.
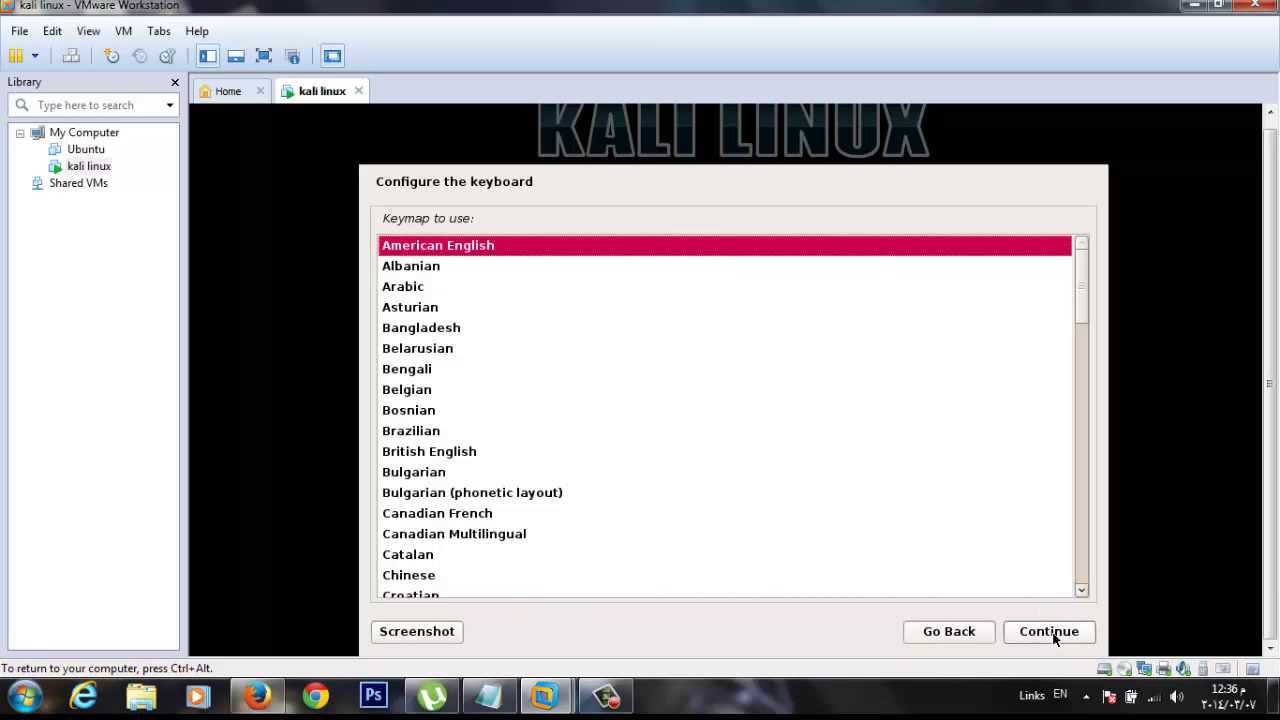
- Once booted from the media of your choice, you will be prompted which type of install you wish to perform. You can choose from either a graphical or a text mode install. In the interest of presenting a better view of the process we will use the graphical mode here.
- Once you've chosen the installation mode select language, location, and keyboard layout for your region.
- Once these options are chosen, the installation script will copy the image to the hard drive of your system and perform a cursory scan of your hardware looking for network interfaces.
- Once prompted, choose a hostname for the system.
- Next, provide a full name for a non-root user for the system.
- A default user ID will be created, based on the full name you provided. If the name is not acceptable, you can choose a new name if you prefer.
- When prompted, choose a time zone.
- Next, the installer will now probe your disks and offer you two choices. You can choose to use the entire drive to be dedicated to Kali or use the Logical Volume Manager (LVM) to customize the installation. It is recommended that you choose to use the entire drive if you are unfamiliar with LVM
- Depending on your needs, you can choose to keep all your files in a single partition the default or to have separate partitions for one or more of the top-level directories.
- After you click Continue, the installer will proceed with the installation.
- Configure network mirrors. Kali uses a central repository to distribute applications. You'll need to enter any appropriate proxy information as needed.
- Next, install GRUB. GRUB is the boot loader for Linux. If you don't have one, you will need to install GRUB.
- Finally, click Continue to reboot into your new Kali installation.
Once the installation of your software is completed, you can log in with the credentials you set during the installation process.
Installing Kali in a virtual environment
Installing Kali within a virtual environment is another option and one that is not much more difficult than installing it on a hard drive. In this recipe, we will create our own virtual machine with Kali. The goal at the end of this recipe is to have our own fully configured, operational, and customized virtual machine which will run the Kali distro.
Getting ready
Something to be aware of if you choose to virtualize Kali and use it for wireless network testing is that you will need to configure your virtual environment to work with an external adapter on the host system. In most cases, you will need to use an external USB wireless adapter and find out how to configure your virtualization software to use a technique commonly known as USB Passthrough. Since this is unique to a virtualization software package, we will not be covering this process here.
How to do it...
The steps documented here were performed using VMware Player, but is fairly similar on other virtualization platforms such as VirtualBox. However, no matter the virtualization platform, you will need to download either the 32 bit or 64 bit ISO file from the Kali website.
- In your software, you will need to create a new virtual machine.
- Choose the ISO file you downloaded when prompted.
- Select Guest Operating System which many virtualization packages will auto-detect, but you may need to adjust the settings in some cases.
- Set name and location of the new virtual machine.
- Set disk space (20 GB is good enough, but more is better).
- Review the hardware configuration and start the virtual machine.
- Select Graphical Install go through normal selection of the language, time zone, hostname, and so on.
- When prompted for disk partition, select hard-drive and select all-in-one.
- Click on finish partitioning and write changes to disk, choose yes to write.
- Set the network mirror and the boot-loader.
- Wait for the installation to finish.
Updating Kali Linux
After you have installed Kali Linux, it is not a bad idea to update the distribution to ensure you have the latest version of all the tools and to apply any patches and other fixes that may have been released. You should not only engage in applying updates to a system after you install it, but you should also do it on a regular basis for the same reasons. The reality is that updates and patches are released fairly regularly, so it is best to make it a habit of checking for these, so you don't miss anything or leave yourself insecure.
How to do it...
In order to keep Kali up-to-date, the process is very simple. To run a quick check for updates, run the following commands.
- Open up a Command Prompt.
- Enter the following command: apt-get update
- Press Enter
- After the command completes, enter the following command: apt-get dist-upgrade
- Press Enter
This process will take a few minutes (or longer) depending on your internet connection and how many updates need to be downloaded. If you keep your system up-to-date and check regularly, you can expect the process not to take as long as it does the first time you undertake it.
Preparing for wireless pentesting
After we have installed Kali we need to do a few things to get ourselves ready to properly pentest within the wireless world. One of the first things we have to do is prepare our system is to get information on our wireless devices as well as acquire and adapters or antennas we made need to perform our testing properly.
Let's learn some basics about the wireless devices (or network adapters) connected to your system.
How to do it...
First, let's see how to identify a wireless adapter:
- One of the first pieces of information you should have in hand is the name and type of your network connection. This information will prove extremely helpful later on, when you are using the various utilities and scripts as well as ensuring that you have the proper and optimal adapters to get the best results from your test.
- So, let's cover how to locate and identify your current network adapters and which information is going to be useful later on during our penetration testing.
Using ifconfig to identify a network adapter.
Within Linux exists a command that can easily assist us in identifying our wireless connection and its state, this command is ifconfig. This command, accessible via the command line, reveals network connection information about each adapter present on the system and their associated names.
To run the command, simply type in the following at the Kali command line:
Ifconfig
- Press Enter
- The results you will retrieve from the command will look somewhat like the following:
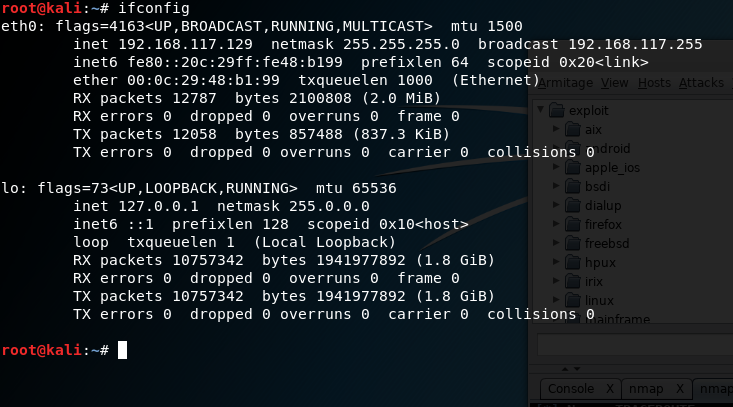
As you can see in the preceding screenshot, we have a lot of information. So, let's break it down.
The first piece of information you should note is the name of the network connections which, in this case, are named eth0 and lo. You can have names such as eth1 or other labels in these places based on the network type. For our purposes, we should see an adapter labeled wlan0 or wlan1 or something starting with the wlan prefix indicating wireless. For the purposes of our analysis, we will use the eth0 adapter; the lo adapter is the loopback virtual adapter and is not of use for us here.
You should also notice in this line the word UP or DOWN, which will tell you if the adapter is online or offline.
The second piece of important information is the line starting with the label inet. This line gives us information about the current configured IPv4 address and associated netmask and other details. The line directly under it is giving the same sort of information, but for IPv6.
The next line gives us a piece of information labeled ether, which is the network adapter's Media Access Control (MAC) address, which is also known as the physical address of the adapter.
The balance of the lines gives detailed information about the network configuration and transfer of data. We will ignore these for right now.
You should always familiarize yourself with the contents of at least the first three lines for each adapter (for our purposes, just your wireless adapter will suffice). All of this information will come in handy later on when you are using the various tools and scripts to attack a wireless network:
- Selecting a network adapter.
- One of the next actions you will need to take is to select a wireless network adapter or items you need to perform your test. While you can use the adapters that are built into your notebook or other device, they do lack some capabilities in some cases.
- Some features that may not be present in internal adapters, but may be desirable to have are:
- Ability to support an external antenna
- Ability to perform packet injection (needed for some attacks)
- Incompatible chipsets on some cards may not work with some specific utilities
- Lack of support for new wireless standards
- Lack of support for different frequencies
This is a short list of features which lack of support or capability for can limit your ability to accurately and completely perform your test.
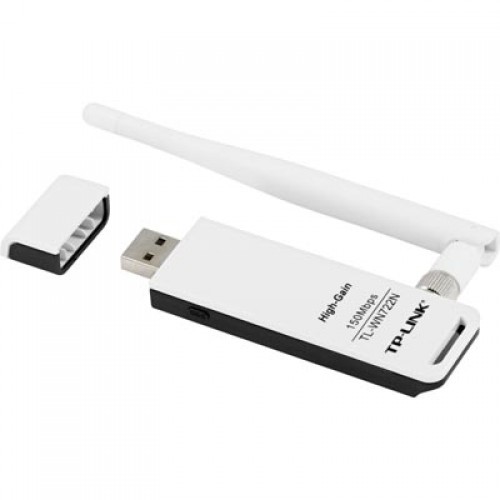
It is with this in mind that I will show an example of an adapter that is fairly common and works quite well. The following image is an example of an adapter by TP-Link that supports many of the capabilities on the list noted here:
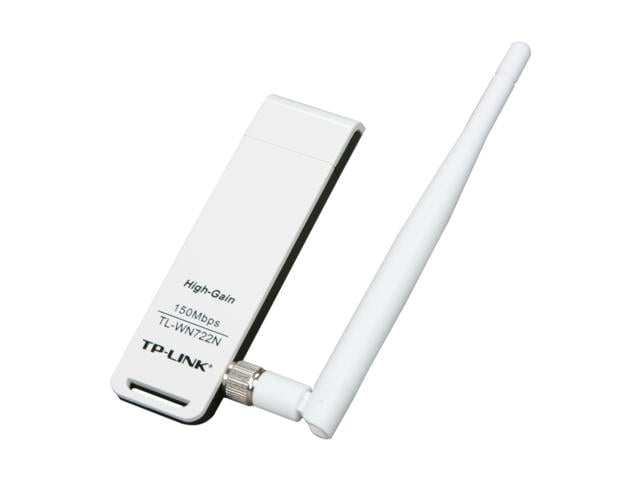
As you can see from the preceding photograph the most notable feature of this adapter is its use of an external antenna, designed to provide better performance. You can even replace the antenna on this adapter to provide different amounts of coverage and performance.
So, how do you know which is the right adapter for you? In most cases, you can get away with the internal wireless network adapters, but not always. If you intend to perform advanced attacks on wireless networks, increase the range and power of your test.
There's more...
To add to the concept of the recipe, you can refer to the following section for more understanding.
Bluetooth adapters
If you will be testing using Bluetooth you will want to obtain an adapter to be able to perform this type of testing effectively. While it's true that most devices, such as notebooks, tablets, desktops and other computing platforms, include Bluetooth support these all tend to be short range (on average 10 meters or 30 feet) and do not support vital features, such as packet injection (which we will learn about later).
Some examples of a Bluetooth adapter that can be very useful in pentesting are the Sena UD100 and the Ubertooth One.
The first, the Sena UD100, is a USB Bluetooth adapter that supports both packet injection and an external (replaceable) antenna. By default, the adapter supports a range of up to 1000 feet (meaning it can pick up devices to that limit or further with an antenna upgrade).

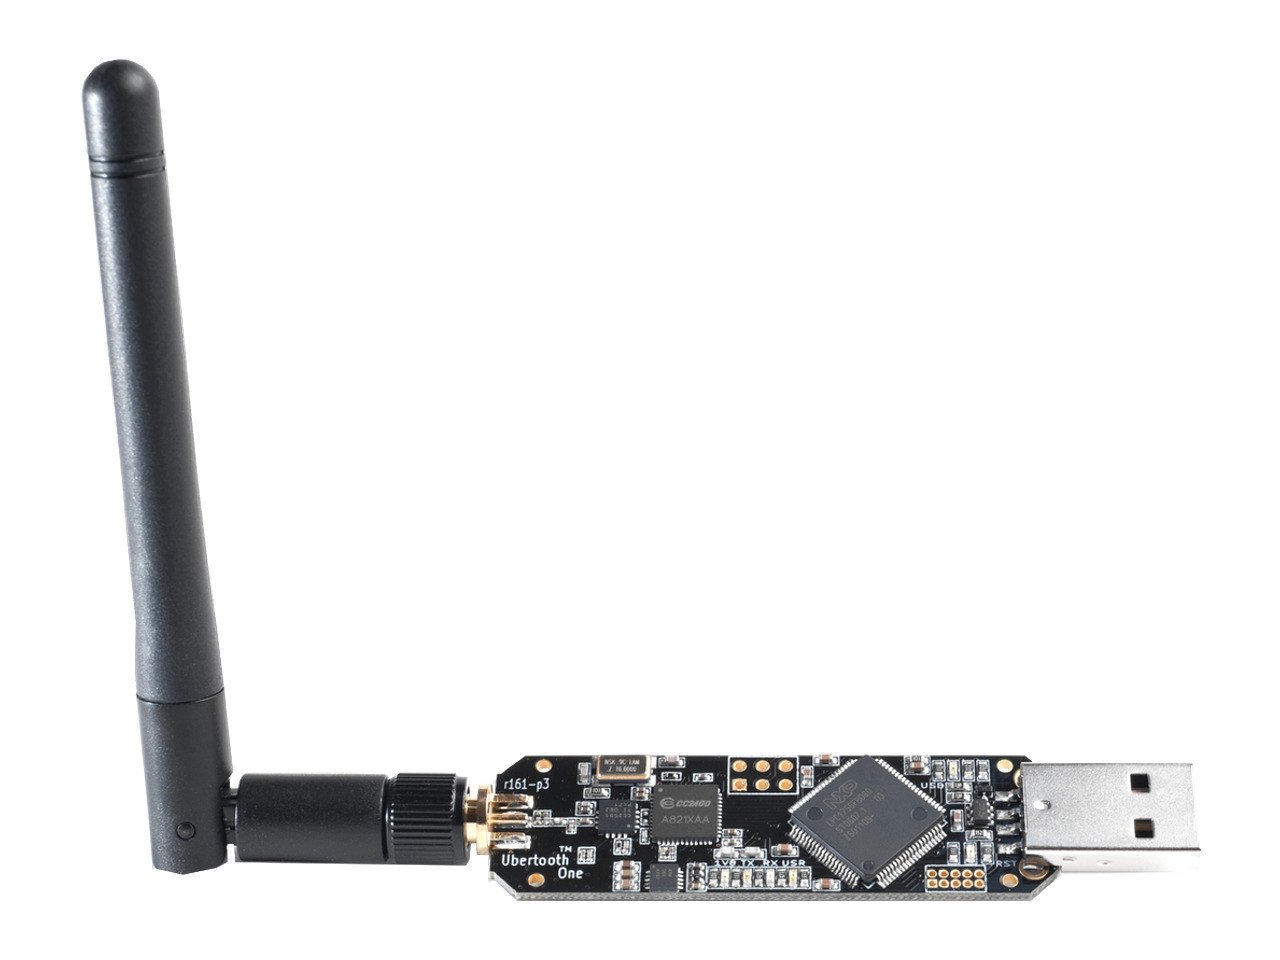
The other adapter known as the Ubertooth One is more of a development board than it is a standard adapter, but it can be used for our testing as well. Essentially, the adapter is not only a network card, but is an open source (both hardware and software) system that can be used to develop and implement your own features. The following is an image of the Ubertooth One.
So, how do you decide whether you need a Bluetooth adapter? In most cases, if you are intending to scan long range, perform packet injections, or do anything beyond just detecting Bluetooth-enabled devices, you will probably need to acquire an adapter.