


 Download code from GitHub
What Is React Native?
Building high-quality apps for multiple platforms is the holy grail of app development. Since React Native was published, it has been challenged in very competitive environments because it seemed to be this holy grail for a long time. Its performance was much better than the performance of any of the competitors (Ionic, Cordova) back when it was released by Facebook in 2015 and its development speed is much faster than creating separate Android and iOS apps.
Since 2015, a lot has happened regarding React Native. Facebook open sourced the framework, a lot of contributors and even big companies such as Microsoft, Discord, and Shopify invested heavily in React Native, and new competitors such as Flutter of Kotlin Multiplatform Mobile evolved.
In 7 years, a lot of companies migrated their apps to React Native successfully, while others failed in doing so, migrated back to native development, or finally chose other multiplatform technologies.
In 2022, React Native is used in more products than ever and it has become a lot more developer friendly than in the early days. It is not only available for iOS and Android but also for macOS, Windows, web, VR, and other platforms. Most importantly, and despite many rumours claiming otherwise, Facebook is still betting heavily on React Native.
The React Native core team at Facebook just completed a rewrite of more than 1,000 React Native screens in its main application, including Dating, Jobs, and Marketplace, which is visited by more than 1 billion users each month. This means React Native powers important and business-critical parts of the biggest and most used app in the world, which is the ultimate proof of it being a stable and supported framework.
As you can see, React Native has become very powerful and is widely used. But you have to know how to leverage its strengths and how to deal with its weaknesses to create a high-quality app and a well-run software product. This book contains learnings, best practices, and basic architectural and processual concepts you need to know about to be able to decide on the following things:
- When to use React Native for your project
- How to set up your React Native project to work on a bigger scale
- How to use React Native to create a world-class product
- How to organize your team in a software project with React Native
- How to support your development team with useful tools and processes
This chapter contains a very brief introduction to the main concepts of React as the foundation on which React Native was built, of React Native itself, and of the Expo framework, which is a set of tools and libraries built on top of React Native. We will focus on the key concepts that are relevant for understanding the content that will be covered later in this book.
If you already have a very good understanding of how React, React Native, and Expo work, feel free to skip this chapter.
In this chapter, we will cover the following topics:
- Exploring React
- Understanding React basics
- Introducing React Native
- Introducing Expo
Technical requirements
To try out the code examples in this chapter, you need to set up a small React app for the Exploring React and Understanding React basics sections, and a React Native app for the Introducing React Native section. This requires you to install various libraries, depending on what OS you are working with. Both https://reactjs.org/ and https://reactnative.dev/ provide step-by-step guides for setting up the development environment correctly.
You can find the code in the book’s GitHub repository:
Exploring React
On https://reactjs.org/, React is defined as a JavaScript library for building user interfaces. The main catchphrases used on the home page are declarative, component-based, and learn once, write anywhere.
When React was first introduced at the JSConf US conference in May 2013 by Jordan Walke of Facebook, the audience was so skeptical that Facebook decided to start a React tour to convince people of the benefits of this new library. Today, React is one of the most popular frameworks for creating web applications, and it’s used not only by Facebook itself, but also by many other big players such as Instagram, Netflix, Microsoft, and Dropbox.
In the next section, I will show you how React works, what makes it so special compared to other similar frameworks and approaches, and how it is related to React Native.
Tip
If you already have Node and Node Package Manager installed, you can set up a new app by using the following command in the terminal:
npx create-react-app name-of-your-app
Understanding React basics
To get started, open a project in your IDE so that we can explore a simple example. This is what a React app returning a simple Hello World message looks like:
function App() {
  return (
    <div>
      <p>Hello World!</p>
    </div>
  )
}
The first thing that comes to mind when seeing these code lines is probably that this looks just like XML/HTML! Indeed, it does, but these tags get converted into JavaScript by a preprocessor, so it’s JavaScript code that looks like XML/HTML tags. Hence the name JSX, which is short for JavaScript XML.
The JSX tags can be used much like XML/HTML tags; you can structure your code using the different types of tags, and you can style them using CSS files and the className attribute, which is the React equivalent of HTML’s class attribute.
On the other hand, you can insert JavaScript code anywhere in the JSX, either as a value for an attribute or inside a tag. You just have to put curly brackets around it. Please have a look at the following code, which uses a JavaScript variable inside JSX:
function App() {
  const userName = 'Some Name';
  return (
    <div>
      <p>Hello {userName}!</p>
    </div>
  )
}
In this example, we are greeting a user whose name we have previously stored in a userName variable by inserting this userName variable into our example code’s JSX.
These JSX tags are really handy, but what if I have some part of the code that I want to reuse throughout the code, such as a special kind of button or a sidebar element? This is where the component-based catchphrase from the ReactJS home page comes into play.
Understanding React components
Our example includes one component called App. In this case, it’s a functional component. It’s also possible to use class components in React but most of the following examples will use the more common functional components. React allows you to write custom components and use them exactly like a normal JSX tag in another part of the code.
Let’s say we want to have a button that opens an external link to the ReactJS home page upon being clicked. We could define a custom ReactButton component like this:
function ReactButton() {
  const link = 'https://reactjs.org';
  return (
    <div>
      <a href={link} target="_blank" rel="noopener noreferrer">
        Go To React
      </a>
  </div>
  )
}
Then, we can use the button in the main component, using the empty tag notation as it doesn’t have any child components:
function App() {
  const userName = 'Some Name';
  return (
    <div>
      <p>Hello {userName}!</p>
      <ReactButton/>
    </div>
  )
 }
As you can see, every component in React has to implement the return function to render a view in the app. The JSX code can only be executed when it is called by the return function, and there has to be one JSX tag that wraps all the other tags and components. There is no need to explicitly implement how the view should behave when the content changes – React automatically handles this. This is what we mean when we describe React as being declarative.
So far, we have seen why React is defined as a declarative, component-based JavaScript library for building user interfaces. But we haven’t talked about one of the main advantages of React yet: how it efficiently rerenders views. To understand this, we need to have a look at props and state.
Understanding React props and state
A prop is a parameter that is transferred from a parent component to a child component. Let’s say we want to create a WelcomeMessage component that shows a welcoming text, including the username from the App component.
This component could look like this:
function WelcomeMessage(props) {
  return (
    <div>
      <p>Welcome {props.userName}!</p>
      <p>It's nice to see you here!</p>
    </div>
  )
 }
Then, we can include it in the App component:
function App() {
  const userName = "Some Name";
  return (
    <div>
      <WelcomeMessage userName={userName}/>
      <ReactButton/>
    </div>
  )
 }
The name of the prop is used like an attribute on the JSX tag of the child component. By using props as a parameter for the child component, all those attributes are automatically accessible in the child component, such as username in our example.
What makes React so efficient is the fact that any time the value of a prop changes, only those components that are affected by that change are rerendered. This massively reduces the rerendering costs, especially for large applications with many layers.
The same goes for state changes. React provides the possibility to turn any component into a stateful component by implementing the state variable in class components or the useState Hook (more on Hooks in Chapter 3, Hello React Native) in functional components. The classical example of a stateful component is a Counter:
function Counter () {
  const [numClicks, setNumClicks] = useState(0);
  return (
    <div>
      <p>You have clicked {numClicks} times!</>
      <button onClick={() => setNumClicks(numClicks+1)>
        Click Me
      </button>
    </div>
  )
 }
The numClicks state variable is initialized with a value of 0. Any time the user clicks on the button and the internal state of the Counter component changes, only the content of the <p> tag is rerendered.
ReactDOM is responsible for comparing all the elements in the UI tree with the previous ones and updating only the nodes whose content has changed. This package also makes it possible to easily integrate React code into existing web apps, regardless of what language they are written in.
When Facebook decided to become a mobile-first company in 2012, this learn once, write anywhere approach of React was applied to the development of mobile applications, which led to the emergence of React Native in 2013, where it is possible to write apps for iOS or Android using only JavaScript or TypeScript.
Now that we have learned what React is and how it works in general, let’s learn more about React Native.
Introducing React Native
React Native is a framework that makes it possible to write React code and deploy it to multiple platforms. The most well known are iOS and Android, but you can use React Native to create apps for Windows, macOS, Oculus, Linux, tvOS, and much more. With React Native for Web, you can even deploy a mobile application as a web app using the same code.
Tip
If you don’t want to spend an hour setting up the development environment for creating a new React Native app and trying out the code examples, you could install the Expo CLI using npm or yarn:
npm install -g expo-cli OR yarn global add expo-cli
After that, setting up a new React Native app just takes running one command in the terminal:
expo init NameOfYourApp
Pro tip: The default package manager for a new app created by running expo init is yarn. If you want to use npm instead, add --npm to the expo init command.
In the next section, you will learn how cross-platform development is made possible in the React Native framework.
React Native basics
As React Native is heavily based on React, the code looks much the same; you use components to structure the code, props to hand over parameters from one component to another, and JSX in a return statement to render the view. One of the main differences is the type of basic JSX components you can use.
In React, they look a lot like XML/HTML tags, as we have seen in the previous section. In React Native, the so-called core components are imported from the react-native library and look different:
import React from 'react';
import {ScrollView, Text, View} from 'react-native';
const App = () => {
  return (
   <ScrollView contentInsetAdjustmentBehavior="automatic">
        <View>
           <Text>Hello World!</Text>
        </View>
     </ScrollView>
  );
};
export default App;
React Native does not use web views to render the JavaScript code on the device like some other cross-platform solutions; instead, it converts the UI written in JavaScript into native UI elements. The React Native View component, for example, gets converted into a ViewGroup component for Android, and into a UIView component for iOS. This conversion is done via the Yoga engine (https://yogalayout.com).
React Native is powered by two threads – the JavaScript thread, where the JavaScript code is executed, and the native thread (or UI thread), where all device interaction such as user input and drawing screens happens.
The communication between these two threads takes place over the so-called Bridge, which is a kind of interface between the JavaScript code and the native part of the app. Information such as native events or instructions is sent in serialized batches from the native UI thread over the Bridge to the JavaScript thread and back. This process is shown in the following diagram:
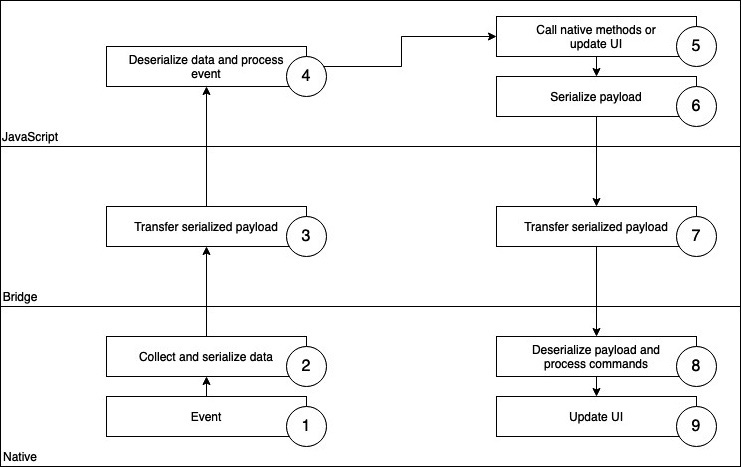
Figure 1.1 – React Native Bridge
As you can see, events are collected in the native thread. The information is then serialized and passed to the JavaScript thread via the Bridge. In the JavaScript thread, information is deserialized and processed. This also works the other way round, as you can see in Steps 5 to 8 of the preceding diagram. You can call methods, which are provided by native components, or React Native can update the UI when necessary. This is also done by serializing the information and passing it to the native thread via the Bridge. This Bridge makes it possible to communicate between native and JavaScript in an asynchronous way, which is great to create real native apps with JavaScript.
But it also has some downsides. The serialization and deserialization of information, as well as being the only central point of communication between native and JS, makes the bridge a bottleneck that can cause performance issues in some situations. This is why React Native was completely rewritten between 2018 and 2022.
The new React Native (2022)
Because of the architectural problems mentioned previously, the React Native core was rearchitectured and rewritten completely. The main goal was to get rid of the Bridge and the performance issues tied to it. This was done by introducing JSI, the JavaScript interface, which allows direct communication between native and JavaScript code without the need for serialization/deserialization.
The JS part is truly aware of the native objects, which means you can directly call methods synchronously. Also, a new renderer was introduced during the rearchitecture, which is called Fabric. More details on the React Native rearchitecture will be provided in Chapter 3, Hello React Native.
The rearchitecture made the awesome React Native framework even more awesome by improving its out-of-the-box performance significantly. At the time of writing, more and more packages are being adapted to the new React Native architecture.
More React Native advantages
Ever since it was open-sourced in 2015, there has been a huge and ever-growing community that develops and provides a lot of add-on packages for a multitude of different problems and use cases. This is one of the main advantages that React Native has over other, similar cross-platform approaches.
These packages are mostly well maintained and provide nearly all native functionality that currently exists, so you only have to work with JavaScript to write your apps.
This means using React Native for mobile app development makes it possible to reduce the size of the developer team greatly, as you no longer need both Android and iOS specialists, or you can at least reduce the team size of native specialists significantly.
And the best thing about working with these well-maintained packages is that things such as the React Native core rewrites come to your app automatically when the packages are updated.
Additionally, the hot reload feature speeds up the development process by making it possible to see the effect of code changes in a matter of seconds. Several other tools make the life of a React Native developer even more comfortable, which we will look at in more detail in Chapter 9, Essential Tools for Improving React Native Development.
Now that we understand what React and React Native are, and how they are related to each other, let’s have a look at a tool that makes the whole development process much easier – Expo.
Introducing Expo
There are several ways to set up a new React Native app. For the example project in this book, we will use Expo. It’s a powerful framework built on top of React Native that includes many different tools and libraries. Expo uses plain React Native and enhances it with a lot of functionality.
While React Native is a very lean framework when it comes to core components and native functionality, Expo provides nearly every functionality that you can think of using in your app. It provides components and APIs for nearly all native device functions, such as video playback, sensors, location, security, device information, and a lot more.
Think of Expo as a full-service package that makes your life as a React Native developer a lot easier. Since everything comes with a downside, Expo adds some size to your final app bundle, because you add all the libraries to your app whether you use them or not.
It also uses a somehow modified version of React Native, which is normally one or two versions behind the latest React Native version. So, when working with Expo, you have to wait for the latest React Native features a couple of months after they are released.
I would recommend using Expo if you want to achieve results at maximum speed and don’t have to optimize your bundle size.
When setting up a new project with Expo, you can choose between two different types of workflows – a bare workflow and a managed workflow. In both workflows, the framework provides you with easy-to-use libraries for including native elements such as the camera, the filesystem, and others. Additionally, services such as push notification handling, over-the-air feature updates, and a special Expo build service for iOS and Android builds are available.
If you choose the bare workflow, you have a plain React Native app and can add the Expo libraries you need. You can also add other third-party libraries, which is not possible in the managed workflow. There, you only write JavaScript or TypeScript code in the IDE of your choice; everything else is handled by the framework.
On their home page (https://docs.expo.dev/), Expo suggests that you start with a managed workflow for a new app because it is always possible to switch over to a bare workflow, if necessary, by using the expo eject command in the CLI. This necessity can arise if you need to integrate a third-party package or library that is not supported by Expo, or if you want to add or change native code.
After initializing the app, you can run it by using the expo start command. This will start up the Metro bundler, which compiles the JavaScript code of the app using Babel. Additionally, it opens the Expo Developer CLI interface, where you can choose which simulator you want to open the app in, as shown in the following screenshot:
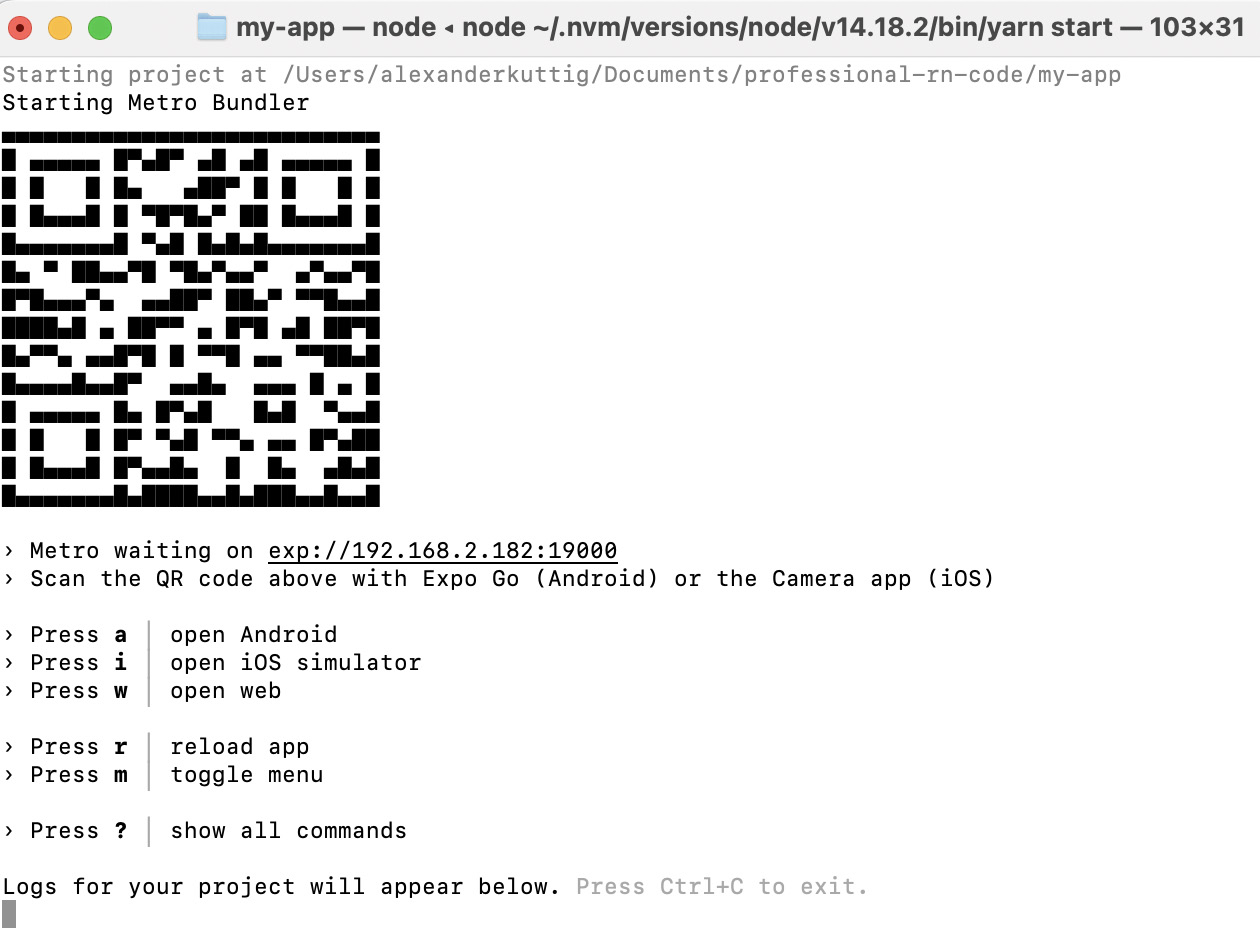
Figure 1.2 – Expo CLI Interface
Expo Developer Tools provides access to the Metro bundler logs. It also creates key bindings for multiple options regarding how to run the app, such as iOS or Android simulators. Finally it creates a QR code that can be scanned with the Expo Go app. Expo even supports creating web applications from React Native code for most use cases.
With Expo, it’s very easy to run your app on a hard device – just install the Expo app on your smartphone or tablet and scan the QR code, as described previously. It’s also possible to run the app on several devices or simulators at the same time.
All these features make Expo a very handy and easy-to-use framework for mobile app development with React Native.
Summary
In this chapter, we introduced the main concepts of the JavaScript library React. We have shown that React is declarative, component-based, and follows a learn once, write everywhere approach. These concepts are the base for the cross-platform mobile development framework React Native.
You saw the main advantages of this framework, namely the huge community that provides additional packages and libraries, the fact that a lot of operating systems besides iOS and Android are available, and the usage of native elements via the Bridge or JSI. Last but not least, you discovered Expo as one way of setting up a React Native app, and you know when to use which Expo workflow.
In the next chapter, we will briefly talk about the most important facts and features of JavaScript and TypeScript.
