


 Download code from GitHub
Getting Familiar with Xcode
Welcome to iOS 13 Programming for Beginners. I hope you will find this a useful introduction to writing and publishing iOS 13 apps on the App Store.
This book is divided into four parts. Each is designed to accomplish a specific set of goals.
In Section 1, Swift, you start by learning Swift 5.1, which is the latest version of the Swift language. Swift is the programming language used to write apps for all Apple hardware. You'll see how common programming tasks are accomplished in Swift. At the end of this part, you should have a working knowledge of the Swift language.
In Section 2, Design, you'll create the design of an iOS 13 application from scratch using storyboards. This is accomplished using Xcode's Interface Builder, and coding is kept to a minimum. At the end of this part, you should have a clear idea of the app's user interface and flow.
Section 3, Code, will focus on coding. You will learn many important iOS app development concepts, and as you go along, you'll learn strategies and techniques that you can use in your own apps.
Section 4, Features, covers the exciting new technologies first introduced by Apple at WWDC 2019, such as Dark Mode, Catalyst, SwiftUI, and Sign In with Apple. You'll also learn how to create resources for App Store submission, submit your app to the App Store, and beta test your app.
The app you'll write is a restaurant reservation app named Let's Eat. This app was originally written by Craig Clayton, who wrote the previous edition of this book. I have updated this app for the latest version of Xcode and iOS.
In this chapter, we'll cover the following topics:
- Downloading and installing Xcode from the App Store
- Understanding the Xcode user interface
- Running the app in the Simulator
- Using an iOS 13 device for development
Technical requirements
To do the exercises for this chapter, you will need the following:
- An Apple Mac computer running macOS 10.15 Catalina
- An Apple ID (if you don't have one, you will create one in this chapter)
- Optionally, an iOS device running iOS 13
The Xcode project for this chapter is in the Chapter01 folder of the code bundle for this book, which can be downloaded here:
https://github.com/PacktPublishing/iOS-13-Programming-for-Beginners.
You'll start by downloading Xcode, Apple's integrated development environment for developing iOS apps from the App Store.
Check out the following video to see the code in action:
Downloading and installing Xcode from the App Store
Before you begin writing iOS Apps, you need to download and install Xcode from the App Store. Perform the following steps:
- Open the App Store on your Mac (it's in the Apple menu).
- In the search field in the top-right corner, type Xcode and press the Return key.
- You should see Xcode in the search results. Click Get and click Install.
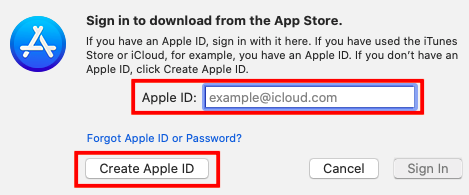
- If you have an Apple ID, type it in the Apple ID text box. If you don't have one, click the Create Apple ID button and follow the step-by-step instructions to create one:
https://support.apple.com/en-us/HT204316#appstore.
- Once Xcode has been installed, launch it. You should see the following Welcome to Xcode screen:
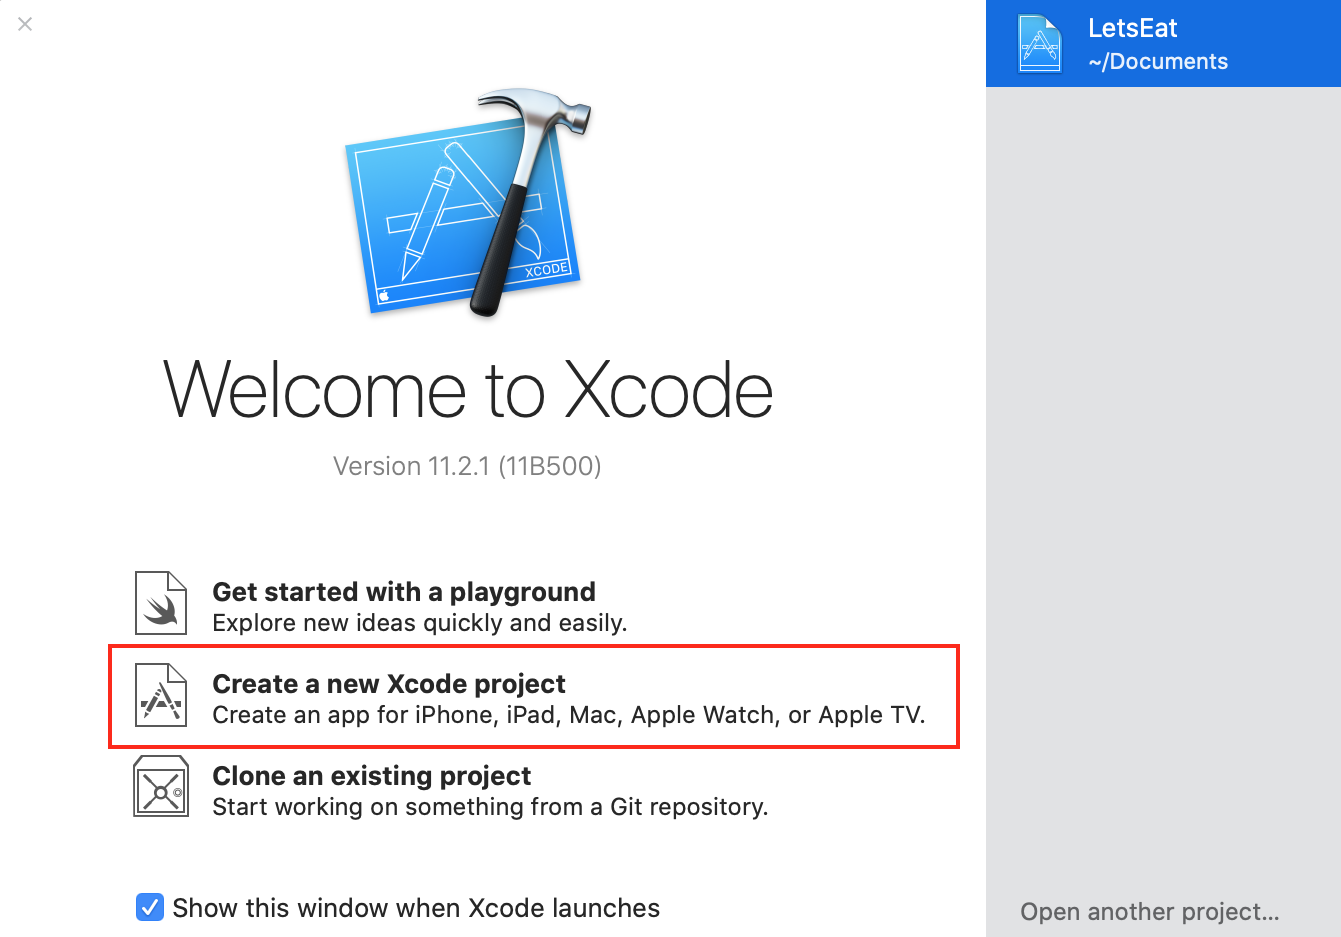
If this is the first time you have launched Xcode, you will see No Recent Projects in the right-hand panel. If you have previously created projects, then you will see them listed in the right-hand panel. Click Create a new Xcode project in the left-hand pane.
- You will see the new project screen as follows:
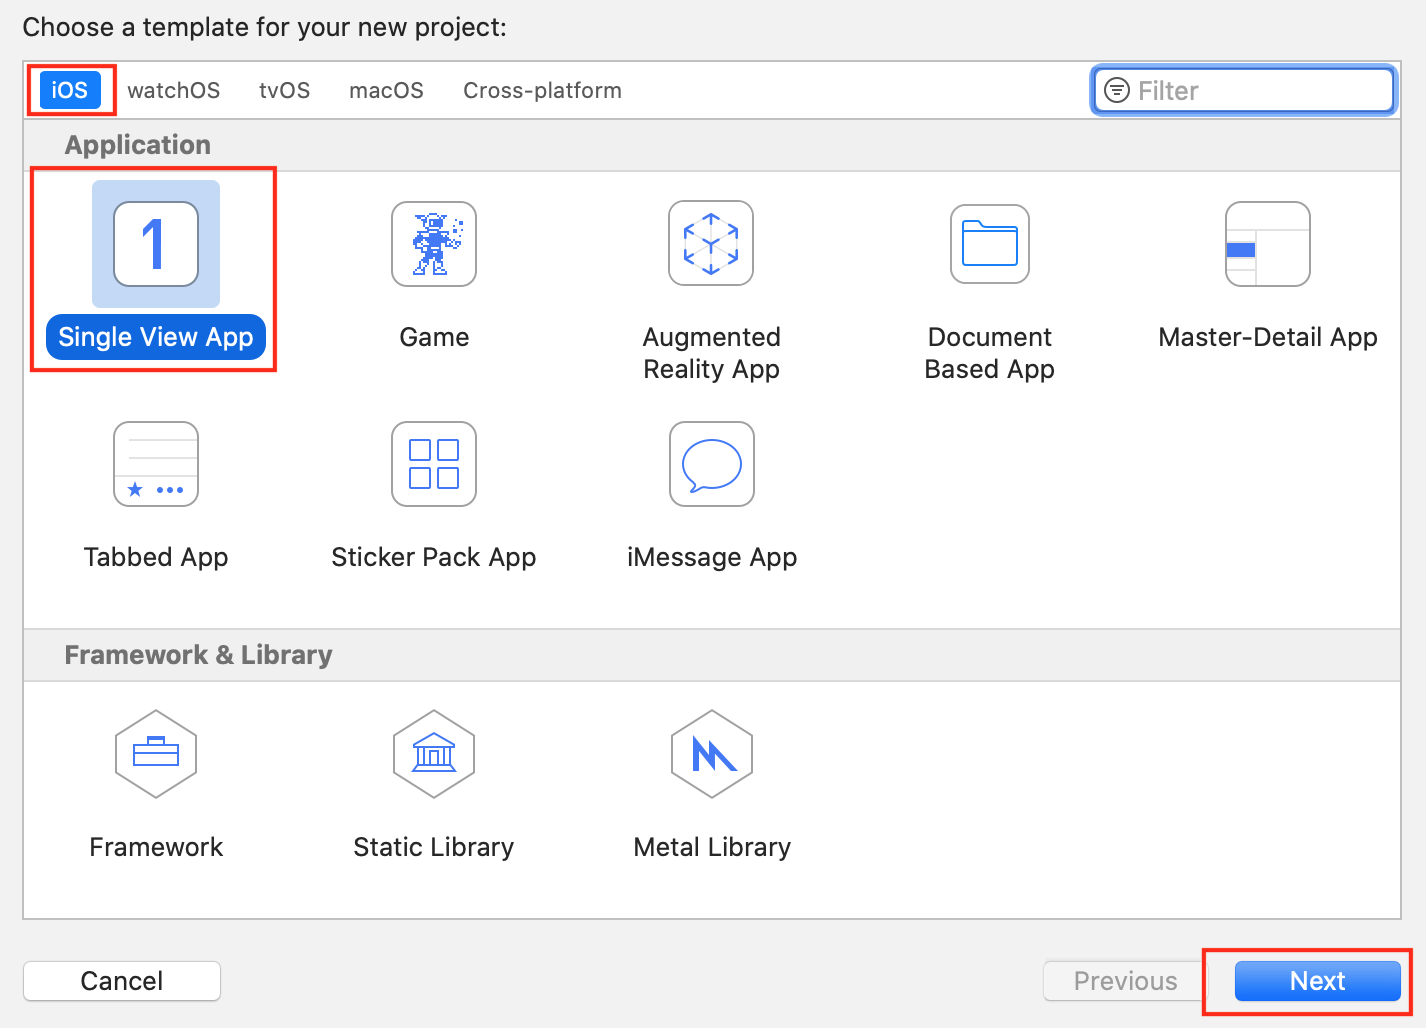
Across the top of this screen, you can select one of the following items: iOS, watchOS, tvOS, macOS, and Cross-platform. iOS should already be selected. Then, choose Single View App and click on Next.
- You will see an options screen for a new project:

This options screen has the following eight items to complete or choose:
- Product Name: The name of your app. Enter ExploringXcode in the text field.
- Team: The Developer Account Team for this project. Leave it as it is for now.
- Organization Name: The name of your company. Just put your own name here for now.
- Organization Identifier: Used in conjunction with the Product Name to create a unique identifier for your app on the App Store. Normally, reverse DNS notation is used. Enter com.myname for now.
- Bundle Identifier: Automatically created by combining your Product Name and your Organization Identifier. Used to uniquely identify your app on the App Store.
- Language: The programming language to be used. Set this to Swift.
- User Interface: Set this to Storyboard.
- Checkboxes: These checkboxes are used to include code for core data, unit tests, and UI tests. Leave them unchecked for now.
Click Next when you're done.
- Choose a location to save your project, such as the Desktop or Documents folder, and click Create:
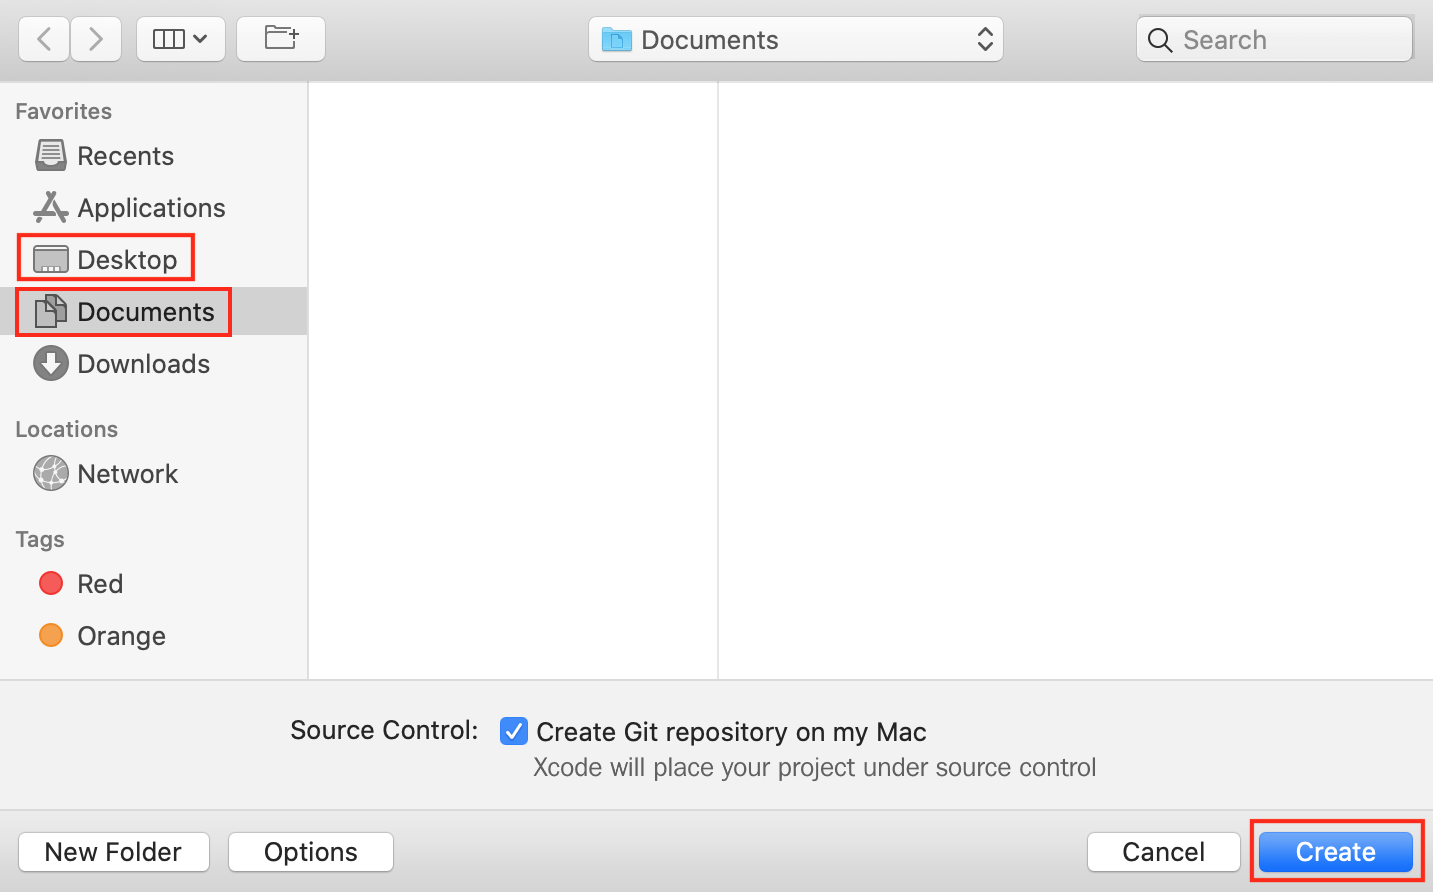
- If you see a dialog box saying No author information was supplied by the version control system, click Fix.
- You will see the Source Control preference screen as follows:
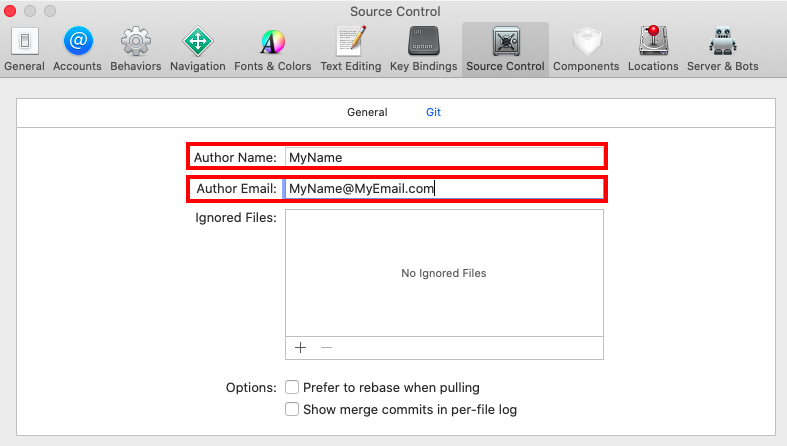
Enter the following information:
- Author Name: Your own name
- Author Email: Your email address
- The Xcode main window will appear.
Fantastic! You have now successfully downloaded and installed Xcode, and in the next section, we will study the Xcode user interface.
Understanding the Xcode user interface
Xcode is the tool you use to write apps, and you will learn about the Xcode user interface in this section. You'll become familiar with the structure of a project in Xcode and learn how to navigate between and use basic project components.
Let's go over each of the different parts:
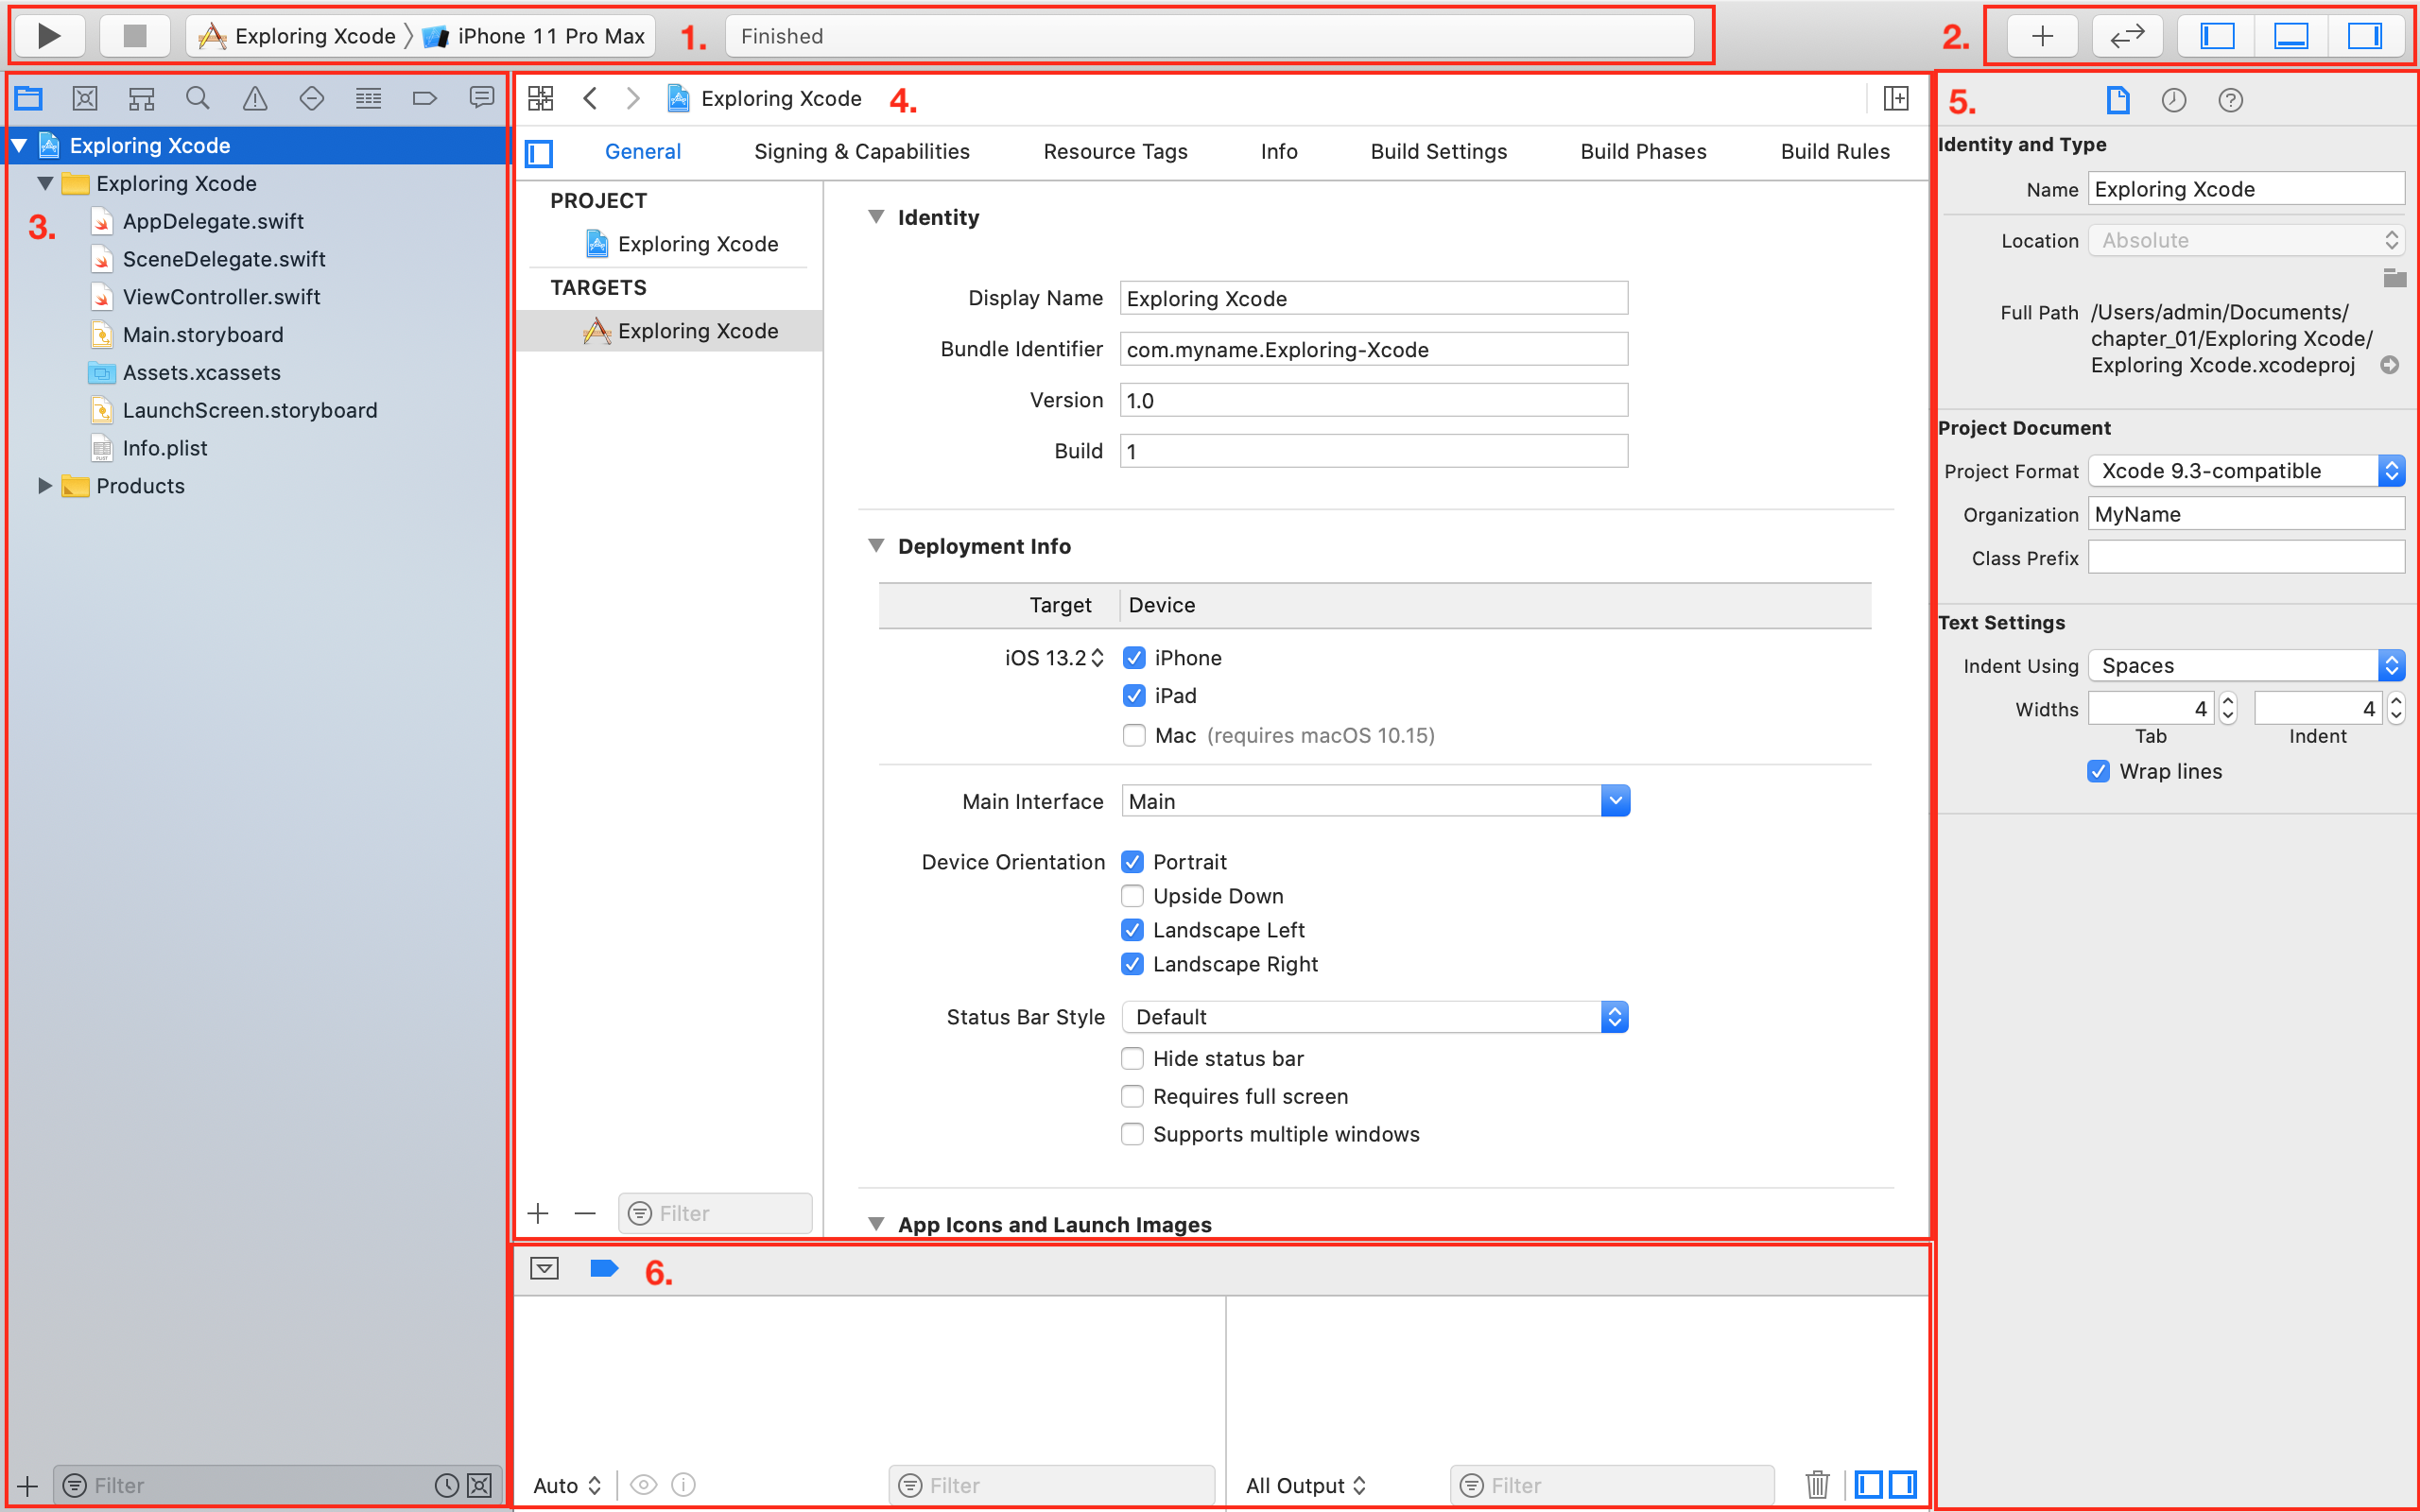
The following are the elements shown in the preceding screenshot:
- Toolbar: Used to build and run your apps, and view the progress of running tasks. Contains the Play button (1), the Stop button (2), the Scheme menu (3), and the Activity View (4):

- The Play button is used to build and run your app.
- The Stop button stops any currently running apps.
- The Scheme menu shows the specific target to be built (Exploring Xcode), and the destination (Simulator or device) to run the target on (iPhone Simulator). Schemes and destinations are distinct. Schemes specify the settings for building, running, testing, profiling, analyzing, and archiving your project. Destinations specify installation locations for your app. Typically, a scheme exists for each target in your project. Destinations exist for physical devices and simulators.
- The Activity View displays the progress of running tasks.
- Window Pane buttons: Used to configure your work environment. Contains the Object library (1), Version Editor (2), and Navigator, Debug, and Inspector buttons (3):

- The Library button displays user interface elements, code snippets, and other resources.
- The Version Editor button shows versions of the same file.
- The Navigator, Debug, and Inspector buttons toggle the Navigator area, the Debug area and the Inspector area on and off.
- Navigator area: Provides quick access to the various parts of your project. The Project navigator is displayed by default.
- Editor area: Allows you to edit source code, user interfaces, and other resources.
- Inspector area: Allows you to view and edit information about items selected in the Navigator area or Editor area.
- Debug area: Contains the debug bar, the variables view, and the Console.
Don't be overwhelmed by all the different parts, you'll learn about them in more detail in later chapters. Now that you are familiar with the Xcode interface, we will run the app you just created in the Simulator, which displays a representation of your iOS device.
Running the app in the Simulator
The Simulator gives you an idea of how your app would look and behave if it were running on a device. It can model a number of different types of hardware—all the screen sizes and resolutions for both iPad and iPhone—so you can simulate your app on every device you're developing for.
To run the app in the Simulator, perform the following steps:
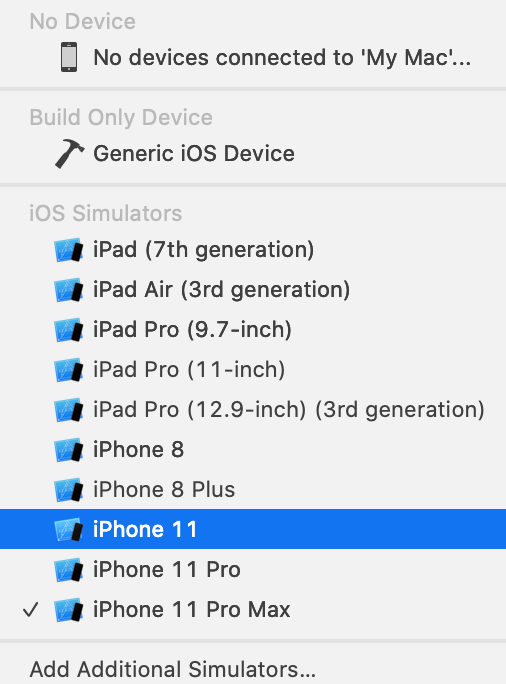
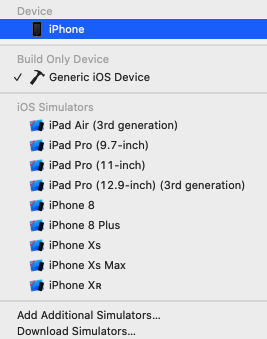
- Click the Scheme menu in the toolbar and you will see a list of Simulators. Choose iPhone 11 from this menu:
- Click the Play button to install and run your app on the currently selected Simulator. You can also use the command + R keyboard shortcut.
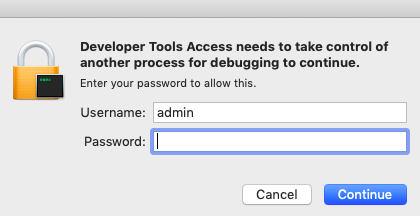
- If you see the Developer Tools Access dialog box, enter the Mac's admin Username and Password and click Continue:
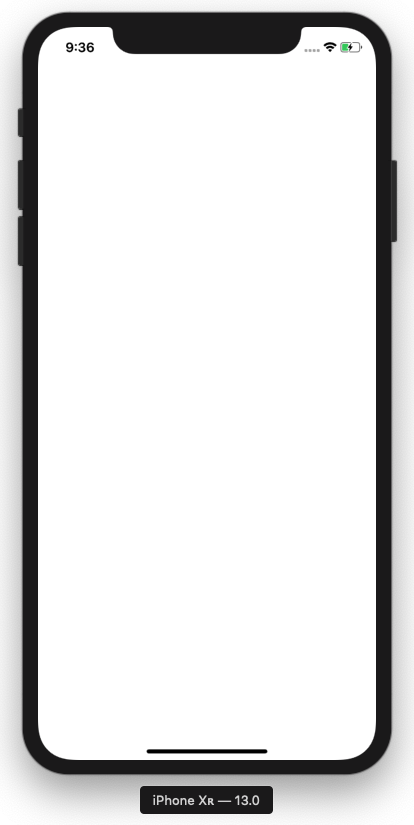
- The Simulator app will launch and show a representation of an iPhone 11. Your app displays a white screen, as you have not yet added anything to your project:
- Switch back to Xcode and click on the Stop button (or type Command - .) to stop the currently running project.
You have just created and run your first iOS app in the Simulator! Great job!
If you look at the Scheme menu, you may be wondering about what the No Device and Build Only Device menu items are for. Let's take a look at them.
Understanding the No Device and Build Only Device menu items
You learned how to choose a Simulator in the Scheme menu to run your app in the previous section. But what are the No Device and Build Only Device menu items for? Well, Xcode not only allows you to run apps on the Simulator, but it also allows you to run apps on actual iOS devices, and prepare apps for submission to the App Store.
By clicking the Scheme menu in the toolbar, you will see the entire menu, and at the top of the menu are the No Device and Build Only Device sections:

The No Device section currently displays text stating No devices connected to 'My Mac'... because you currently don't have any iOS devices connected to your computer. If you were to plug in an iOS device, it would appear in this section, and you would be able to run the apps you develop on it for testing. Running your apps on an actual device is recommended as the Simulator will not accurately reflect the performance characteristics of an actual iOS device, and does not have some hardware features and software APIs that actual devices have.
The Build Only Device section has only one option, Generic iOS Device. This is used when you need to archive your app prior to submitting it to the App Store. You'll learn how to do this in the last chapter of this book.
Now let's see how to build and run your app on an actual iOS 13 device. The vast majority of the instructions in this book do not require you to have an iOS device though, so if you don't have one, skip the next section and go straight to Chapter 2, Simple Values and Types.
Using an iOS 13 device for development
Although you'll be able to go through most of the exercises in this book using the Simulator, it is recommended to build and test your apps on an actual iOS device, as the Simulator will not be able to simulate some hardware components and software APIs.
https://help.apple.com/simulator/mac/current/#/devb0244142d.
In addition to your device, you'll need an Apple ID or a paid Apple Developer account to build and run your app on your device. You'll use the same Apple ID that you used in the App Store for now:
- Use the USB cable to connect the iOS device to your Mac.
- In the Scheme menu, choose your device (iPhone in this case):
- Wait for Xcode to finish indexing and processing, which will take a while. Once complete, Ready will be displayed in the status window.
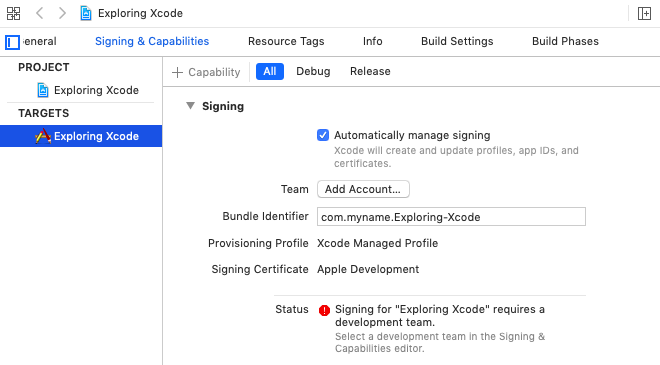
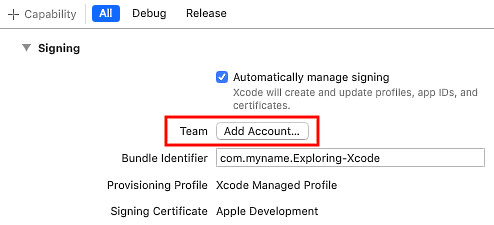
- Run the project by hitting the Play button (or use command + R). You will get the following error: Signing for "Exploring Xcode" requires a development team:
This is because a digital certificate is required to run the app on an iOS 13 device, and you need to add an Apple ID or a Developer account to Xcode so the digital certificate can be generated.
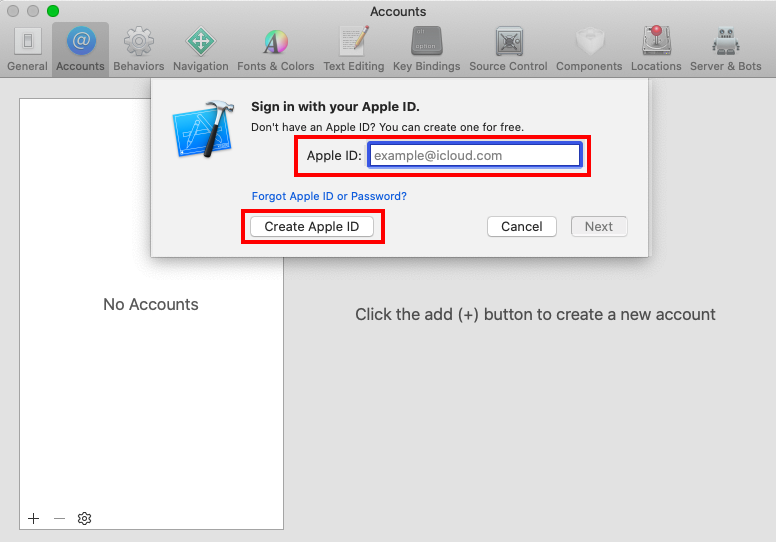
- Click the Add Account... button:
- The Xcode Preferences window appears with the Accounts pane selected. Enter your Apple ID and click Next. Note that you can create a different Apple ID if you wish using the Create Apple ID button:
- Enter your password when prompted. After a few minutes, the Accounts pane will display your account settings:
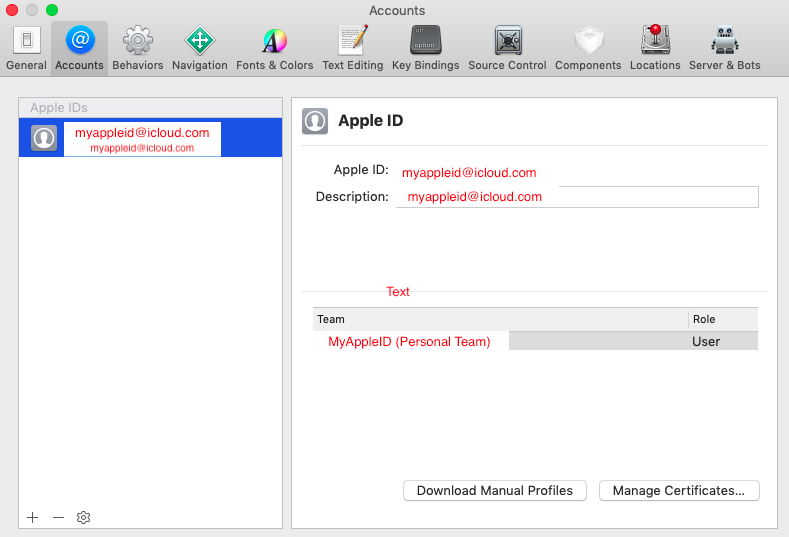
- Close the Preferences window when you're done by clicking the red button in the top-left corner.
- In Xcode's editing area, Click Signing & Capabilities. Make sure Automatically manage signing is ticked and Personal Team is selected from the Team pop-up menu:
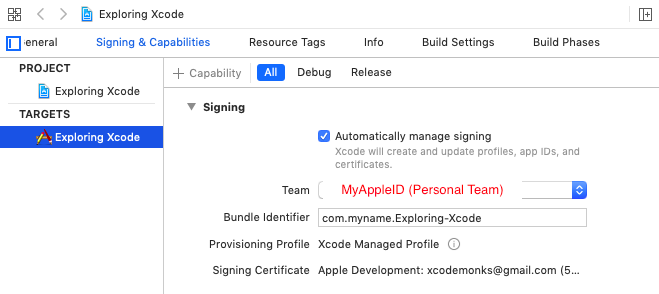
- If you still see errors in this screen, try changing your Bundle Identifier by typing some random characters into it, for example, com.12345myname.Exploring-Xcode.
- Everything should work now when you build and run, and your app will be installed on your iOS device. However, it will not launch and you will see the following message:
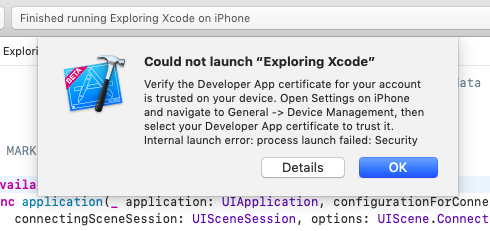
This means you need to trust the certificate that has been installed on your device.
In the next section, we will see how to do that.
Trusting the Developer App certificate on your iOS device
A Developer App certificate is a special file that gets installed on your iOS device along with your app. Before your app can run, you need to trust it. Let's do that now:
- On your iOS 13 device, tap Settings.
- Tap General.
- Tap Device Management:

- Tap Apple Development:

- Tap Trust "Apple Development: ":

- Tap Trust:

- You should see the following, which shows the app is now trusted:

- Click the Play button in Xcode to build and run again. You'll see your app launch and run on your iOS device.
Congratulations! Note that you have to connect your iOS 13 device to your Mac using the USB cable to build and run your app, so in the next section we'll see how we can connect over Wi-Fi.
Connecting an iOS device wirelessly
Unplugging and replugging your iOS device using USB gets pretty cumbersome after a while, so you'll configure Xcode to connect to your iOS device over Wi-Fi as follows:
- Make sure your Mac and iOS device are on the same wireless network.
- Choose Window | Devices and Simulators from the menu bar:

- Click on the checkbox marked Connect via network:

Awesome! Your iOS device is now connected wirelessly to Xcode, and you no longer need the USB cable connected.
Summary
In this chapter, you learned how to download and install Xcode on your Mac. You familiarized yourself with the different parts of the Xcode user interface. You created your first iOS app, selected a Simulator, and built and ran the app. You learned what the Generic iOS Device menu item is for. You also learned how to connect an iOS device to Xcode via USB so that you can run the app on it, how to add an Apple ID to Xcode so the necessary digital certificates can be created and installed on your device, and how to trust the certificate on your device. Finally, you learned how to connect to your device over Wi-Fi, so you no longer need to plug and unplug your device every time you want to run an app.
You now know how to download and install Xcode from the App Store, the different panels in Xcode, how to add Developer credentials, and how to connect an iOS device for development using USB and Wi-Fi.
In the next chapter, we'll start exploring the Swift language using Swift Playgrounds, and learn how simple values and types are implemented in Swift.


