


 Download code from GitHub
What Is Flutter and Why Should I Use It?
In this chapter, you will learn the basics of the Flutter framework, the reasons for its creation, and what the future of Flutter may hold. You will learn about the thriving Flutter community, how it is contributing to the continued evolution of Flutter, and how and why Flutter has grown so quickly in the last few years. Along the way, you will see how to build (and run!) your first Flutter project, experience the excellent Flutter documentation, and see how Flutter is designed to work across a range of platforms including iOS, Android, web, Windows, and macOS.
The following topics will be covered in this chapter:
- What is Flutter?
- Hello Flutter – a first glimpse of Flutter
- Widgets, widgets, everywhere
- Building and running Flutter
Technical requirements
In this chapter, we will create, build, and run a Flutter application. To do this, you will need to set up your system so that it can do this.
Specifically, you will need to set up your system so that it has the following:
- The latest stable Flutter software development kit (SDK) installed and added to your path
- An integrated development environment (IDE) where you can view and edit Flutter code
- Android Studio and/or Xcode so that you can use the Android and iOS development tools and iOS simulators/Android emulators
The chapter will give you some guidance on how to set up your system, but as you will discover, the Flutter documentation is excellent and includes very accurate and up-to-date getting started guides: https://flutter.dev/docs/get-started/install.
Feel free to set up your system now or at the specific points required during this chapter.
You can find the source code for this chapter on GitHub at https://github.com/PacktPublishing/Flutter-for-Beginners-Third-Edition.
What is Flutter?
Since the advent of the Apple App Store (and subsequently, the Google Play Store), there has been a way for organizations to share programs with mobile users in a very controlled and managed way. Much like websites on the internet, mobile apps have proliferated to encompass all aspects of our life. And much like websites, over the years, developers have iteratively discovered and learned the best ways to create reliable, scalable, and intuitive mobile apps.
As developers have learned to work within the mobile ecosystem, they have followed similar design patterns and framework ideas that were created to deal with the web ecosystem. Much like the complications of developing code for multiple browsers on the web, in the mobile ecosystem, there has been the challenge of developing code that can work on both iOS and Android devices, with the dream always being to have one code base that works across all devices, and even the web.
Flutter is a framework that is the culmination of this learning. Like most other frameworks, developers use a programming language specified by the framework and structure their code in a way that aligns with the needs of the framework so that ultimately, the developer creates the least amount of “boilerplate” code and can focus on their business needs. Examples of “boilerplate” code would be how to manage touch input, how to connect to the internet, and how to package the app code so that it works with the App Store, Play Store, or web hosting service.
Flutter is a relatively new framework, yet on Google Trends, Flutter comes out above all of its competitor frameworks such as React Native, Xamarin, Swift, and Kotlin, and the outlook for the next few years is highly positive.
When choosing a new programming language or framework, developers and software companies need to assess certain key aspects of the language or framework to ensure it is easy to pick up and that it has a bright, long-term future. Investing time and money into the learning of a new solution, and then developing a code base and development processes around that language and framework, is incredibly expensive. If that solution becomes outdated after a short period, there is poor support and documentation, there is a lack of new developers available to take the product forward, or the solution has scaling issues or usability problems, then that investment is wasted. For a small start-up or a low-funded project, it can even be terminal. With that in mind, let’s look at some of the aspects that suggest Flutter may be a good long-term investment.
Backed by Google
Flutter, and the Dart programming language it depends on, were created by Google, and although they are open source, they continue to be strongly backed by Google. This ensures the framework has all the tools it needs to succeed in the community, with support from the Google team, presence at big events such as Google I/O, Flutter Forward, and investment into continuous improvement in the code base.
From the launch of the first stable release during the Flutter Live Event at the end of 2018, the growth of Flutter is evident:
- Flutter apps have been installed on hundreds of millions of devices
- More than 700,000 Flutter apps have been released
- Flutter has been used by more than 5 million developers
- It is the 18th most popular software repository on GitHub
Not only has Google backed Flutter, but they have also put it at the heart of their plans. Important Google apps such as Google Ads and Google Pay are Flutter apps, and Google’s future replacement for Android, Fuchsia OS, is built around Flutter.
Fuchsia OS and Flutter
It’s not a secret anymore that Google has been working on a new operating system (OS) called Fuchsia OS, which has long been rumored as a potential future replacement for the Android OS. One thing to pay attention to is that Fuchsia OS may be a universal Google OS that runs on more than just mobile phones, and this would directly affect Flutter adoption. This is because Flutter will be the primary method of developing mobile apps for the new Fuchsia OS, and, not only this, Fuchsia also uses Flutter as its UI rendering engine. With the system targeting more devices than just smartphones, as seems to be the case, Flutter will certainly have a lot of improvements.
The growth of the framework’s adoption is directly related to the new Fuchsia OS. As it gets closer to launch, Google needs to have mobile apps targeting the new system. For example, Google has announced that Android apps will be compatible with the new OS, making the transition to and adoption of Flutter significantly easier.
However, a framework, no matter how good, benefits from a well-designed and elegant programming language that allows developers to focus on the “what” of their app rather than the “how.” The success of Flutter is very much linked to the Dart programming language that the framework uses throughout.
Dart
The Dart programming language was first unveiled by Google at the GOTO conference in 2011, and Dart 1.0 was released at the end of 2013. Initially viewed as a replacement for JavaScript (the main web programming language), the uptake of Dart by developers was relatively low. However, thanks to the emergence of Flutter and its reliance on Dart, the Dart programming language has seen a huge rise in usage.
So, why did the Flutter project choose the Dart programming language? Since its inception, one of Flutter’s main goals was to be a high-performance alternative to existing cross-platform frameworks and also to significantly improve the mobile developer’s experience.
With this in mind, Flutter needed a programming language that allowed it to accomplish these goals, and Dart is the perfect match for the following reasons:
- Dart compilation: Dart is flexible enough to provide different ways of executing the app code depending on the circumstances. Flutter uses Dart ahead-of-time (AOT) compilation with performance in mind when compiling a production-ready version of the application, and it uses just-in-time (JIT) compilation with a sub-second compilation of code in development time, aiming for fast feedback for code changes. Dart JIT and AOT refer to when the compilation phase takes place. In AOT, code is compiled during the build process and before running the code; in JIT, code is compiled while running (check out the Dart introduction section in the next chapter).
- High performance: Due to Dart’s support for AOT compilation, Flutter does not require a slow bridge between realms (for example, non-native Flutter code to native device code), which makes Flutter apps responsive and allows a fast startup.
- Garbage collection: Flutter uses a functional-style flow with short-lived objects, and this means a lot of short-lived allocations. Dart garbage collection works without locks, helping with fast allocation.
- Easy to learn: Dart is a flexible, robust, modern, and advanced language. The language has been adapted as Flutter has become more popular, with lots of syntax improvements to simplify the development experience (syntactic sugar), and fundamental design changes that help with Flutter app creation. Although it is still evolving, the language has a well-defined object-oriented framework with familiar functionalities to dynamic and static languages, an active community, and very well-structured documentation.
- Declarative UI: In Flutter, you use a declarative style to lay out widgets, which means that widgets are immutable and are only lightweight “blueprints.” To change the UI, a widget triggers a rebuild on itself and its subtree, creating a new blueprint that, for the most part, matches the previous blueprint with some changes. This is in contrast to the imperative style (the most common), where you explicitly change specific component properties through function calls after they are created Declarative UI.
We will explore this a lot more throughout this book, but if you want to understand the concept of the Flutter declarative UI at this point, then take a look at the official introduction to declarative UI from Flutter: https://flutter.dev/docs/get-started/flutter-for/declarative.
- Dart syntax for layout and styling: Different from many frameworks that have separate syntax for layout and styling, in Flutter, the layout and styling are specified inline within the Dart code. This gives greater flexibility and reduces the developer’s cognitive load. The use of HTML, JavaScript, and CSS for web page design is an example of the opposite approach where the functionality, layout, and styling are managed through different syntax. Developers need to know HTML, JavaScript, and CSS to create a complete web page. Flutter also has great tools for debugging layout, as well as investigating and refining the rendering performance of your code.
These are great reasons why Dart fits perfectly with Flutter. However, there is an area of Flutter that we haven’t yet explored and is probably the main reason that you are learning and using it, and explains why it is a game-changer in the app development world: a single code base for multiple platforms. Let’s take a look at that now.
One code base to rule them all
The primary goal of the Flutter framework is to be a toolkit for building apps that are equivalent in performance, usability, and features to native apps (apps created directly for iOS or Android) while using only a single code base. You may have heard it stated often that there are big advantages to having a single code base. Let’s see why that is the case:
- Multiple languages to learn: If a developer wants to develop for multiple platforms, they must learn how to do something in one OS and programming language, and later, the same thing in another OS and programming language. The developer then needs to decide whether to focus on one platform for a certain period, causing a mismatch of features/bug fixes between the apps, or constantly switch between platforms, impacting productivity and potentially introducing bugs.
- Long/more expensive development cycles: If you decide to create multiple development teams to avoid the previous issues, there are consequences in terms of cost, multiple deadlines, different capabilities of native frameworks, and disparate sets of bug reports.
- Inconsistency: Different native capabilities, or different development teams developing features in slightly different ways, may lead to inconsistencies between apps, annoying users, and making bug reporting more complicated to diagnose.
Flutter is not the first attempt to create a single code base and there are existing frameworks available that have similar promises. However, they can suffer from some serious drawbacks:
- Performance: Some frameworks use workarounds to allow consistency of user experience across platforms. One of these is to have a web page running inside a native app using a web view (a built-in web browser). This tends to have much worse performance than native apps, leading to a poor user experience.
- Design constraints: Some frameworks are based on languages that were designed before the mobile experience was created. This can mean they are not designed well for certain user interactions or certain device capabilities, leading to complicated or obscure code, and the inherent maintenance issues this can cause.
- Not quite one code base: Although some frameworks suggest a single code base approach to app development, once you get into the details, you will find that you still need to write some platform-specific code, which causes code duplication and allows single platform bugs to creep in.
Now, let’s see how Flutter solves these problems.
Bi-directional communication between Flutter to native
Bi-directional communication between Flutter and native refers to the ability of a Flutter application to communicate with a native application (for example, Android or iOS) and vice versa. Flutter is a mobile app SDK for building high-performance, high-fidelity apps for iOS, Android, and the web using a single code base. Native apps, on the other hand, are built specifically for one platform and are written using that platform’s native language. With bi-directional communication, you can integrate Flutter widgets into an existing native app, or use native components within a Flutter app. This allows for a more seamless user experience and can improve performance by leveraging the strengths of both Flutter and native platforms.
For example, you can use Flutter to build a UI while using native code to access platform-specific features such as cameras, sensors, or storage. Flutter provides several mechanisms for bi-directional communication with native code, such as platform channels, method channels, and event channels.
Overall, bi-directional communication between Flutter and native is a powerful feature that allows developers to create sophisticated mobile applications that leverage the strengths of both Flutter and native platforms.
High performance
At the time of writing, it is hard to say that Flutter’s performance is always better in practice than other frameworks, but it’s safe to say that it aims to be. For example, its rendering layer was developed with a high frame rate in mind. As we will see in the Flutter rendering section, some of the existing frameworks rely on JavaScript and HTML rendering, which might cause overheads in performance because everything is drawn in a web view.
Some use original equipment manufacturer (OEM) widgets but rely on a bridge to request the OS API to render the components, which creates a bottleneck in the application because it needs an extra step to render the user interface (UI). See the Flutter rendering section for more details of the Flutter rendering approach compared to others.
Some points that make Flutter’s performance great are as follows:
- Flutter owns the pixels: Flutter renders the application pixel by pixel (see the next section), interacting directly with the Skia graphics engine or the new Impeller rendering engine.
- No extra layers or additional OS API calls: As Flutter owns the app rendering, it does not need additional calls to use the OEM widgets, so there’s no bottleneck.
- Flutter is compiled to native code: Flutter uses the Dart AOT compiler to produce native code. This means there’s no overhead in setting up an environment to interpret Dart code on the fly, and it runs just like a native app, starting more quickly than frameworks that need some kind of interpreter.
Full control of the UI
The Flutter framework chooses to do all the UI by itself, rendering the visual components directly to the canvas and requiring nothing more than the canvas from the platform. Most of the time, frameworks just reproduce what the platform offers in another way. For example, other web view-based cross-platform frameworks reproduce visual components using HTML elements with CSS styling. Other frameworks emulate the creation of the visual components and pass them to the device platform, which will render the OEM widgets like a natively developed app. We are not talking about performance here, so what else does Flutter offer by not using the OEM widgets and doing the job all by itself?
Let’s see:
- Ruling all the pixels on the device: Frameworks limited by OEM widgets will reproduce, at most, what a native-developed app would as they use only the platform’s available components. On the other hand, frameworks based on web technologies may reproduce more than platform-specific components, but may also be limited by the mobile web engine available on the device. By getting control of the UI rendering, Flutter allows the developer to create the UI in their own way by exposing an extensible and rich Widgets API, which provides tools that can be used to create a unique UI with no drawbacks in performance and no limits in design.
- Platform UI kits: By not using OEM widgets, Flutter can break the platform design, but it does not. Flutter is equipped with packages that provide platform design widgets – the Material set in Android and Cupertino in iOS. We will learn more about platform UI kits in Chapter 5, Building Your User Interface through Widgets.
- Achievable UI design requirements: Flutter provides a clean and robust API with the ability to reproduce layouts that are faithful to the design requirements. Unlike web-based frameworks that rely on CSS layout rules that can be large and complicated and even conflicting, Flutter simplifies this by adding semantic rules that can be used to make complex but efficient and beautiful layouts.
- Smoother look and feel: In addition to native widget kits, Flutter seeks to provide a native platform experience where the application is running, so fonts, gestures, and interactions are implemented in a platform-specific way, bringing a natural feel to the user, similar to a native application.
We refer to visual components as widgets. This is also what Flutter calls them. We will discuss more about this in the Widgets, widgets, everywhere section in this chapter.
Open source framework
Having a big company such as Google behind it is a huge benefit to a framework such as Flutter (see React, for example, which is maintained by Facebook). In addition, community support becomes even more important as it becomes more popular.
By being open source, the community and Google can work together to do the following:
- Help with bug fixes and documentation through code collaboration
- Create new educational content about the framework
- Support documentation and usage
- Make improvement decisions based on real feedback
- Share resources to make bug fixes and develop new features
Improving the developer experience is one of the main goals of the framework. Therefore, in addition to being close to the community, the framework provides great tools and resources for developers. Let’s take a look.
Developer resources and tooling
The focus on developers in the Flutter framework goes from documentation and learning resources to providing tools to help with productivity:
- Documentation and learning resources: Flutter websites are rich for developers coming from other platforms as they include many examples and use cases – for example, the famous Google Codelabs (https://codelabs.developers.google.com/?cat=Flutter).
- IDE integration: Flutter and Dart have a completed, integrated IDE experience with Android Studio, IntelliJ, and Visual Studio Code. Within this book, we will show examples from Visual Studio Code, but these examples will work very similarly in Android Studio and IntelliJ.
- Command-line tools: Dart has tools that help with analyzing, running, and managing dependencies and these are also part of Flutter. In addition, Flutter has commands to help with debugging, deploying, inspecting layout rendering, and integration with IDEs through Dart plugins. Here’s a list of the various commands:

Figure 1.1 – Available commands in Flutter
- Quick setup: Flutter has the
createcommand, as shown in the preceding screenshot, which allows you to create a new and fully functional Flutter project with minimal input. IDEs also offer a Flutter project creation menu option, replicating the command-line functionality. - Environment issue diagnostics: Flutter comes with the
flutter doctortool, which is a command-line tool that guides the developer through the system setup by indicating what they need to set up a Flutter environment. We will see this tool in action when we set up the project environment very soon. Theflutter doctorcommand also identifies connected devices and whether there are any upgrades available. - Hot reload: This is a huge benefit to developers and a feature that is getting a lot of attention. By combining the capabilities of the Dart language (such as JIT compilation) and the power of Flutter, it is possible for the developer to instantly see design changes made to code in the simulator or device. In Flutter, there is no specific tool for layout preview. Hot reload makes this unnecessary.
Now that we have learned about the benefits of Flutter, let’s do some exploring.
Hello Flutter – a first glimpse of Flutter
It’s about time we started getting our hands dirty with some code. Flutter comes with a simple Hello World app that we will get running and then look at in some detail. First of all, though, we need to get your system ready for some Flutter action!
Installing Flutter
Flutter is very easy to install. Head over to the Flutter docs web pages to install Flutter and Dart for your OS: https://flutter.dev/docs/get-started/install.
The installation documentation for Flutter is comprehensive, with explanations and any potential issues described there. Ensure that you read the installation documentation fully and complete all the steps so that your system is correctly prepared for our journey into Flutter.
Download the SDK and place it somewhere on your filesystem. Note that downloading Flutter will also download a compatible version of Dart and the relevant dart command-line tool. You should not need to download Dart separately.
Updating your PATH
The installation documentation also explains how to update your PATH so that you can run Flutter commands from your command line. Please follow these instructions – you will be using the command line regularly to interact with Flutter and Dart.
With everything installed and PATH set up, you should run the flutter doctor command to see how ready your system is for Flutter. You will do this from your command line/Terminal:
C:\src\flutter>flutter doctor
Here is an example of the output:
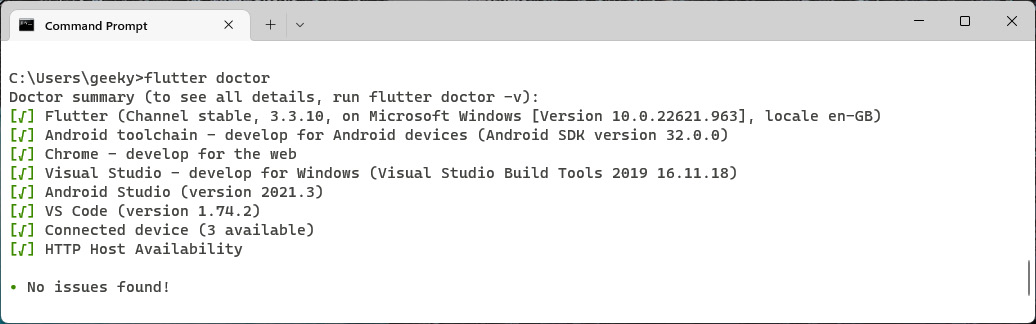
Figure 1.2 – flutter doctor command-line output
You are likely to see errors in the flutter doctor report at this point because we haven’t set up our development environment yet.
If you are unable to run flutter doctor, then it is likely an issue with your PATH, as mentioned previously. Double-check that the path to your Flutter folder is correct and points to the flutter/bin subfolder. Also, try closing your command line/Terminal and opening it again because PATH, in some situations, is only updated when the command line/Terminal is opened.
Development environment
As mentioned previously, Flutter has excellent support in Android Studio, IntelliJ, and Visual Studio Code. This book will generally be agnostic of IDE, but where required, we will show examples from Visual Studio Code.
All three IDEs can be downloaded from the internet. Android Studio and Visual Studio Code are free, and IntelliJ has both a free Community Edition and a paid-for Ultimate Edition.
If you are planning to work with Android devices (and because Flutter is cross-platform I expect you will), then you will need to download and install Android Studio regardless of the IDE you decide to develop code with. This is because installing Android Studio also installs the Android SDK, Android SDK command-line tools, and Android SDK build tools. These are required by Flutter when interacting with Android devices, running Android emulators, and building the app ready for use on the Android Play Store.
On macOS devices, you will also need to install and configure Xcode so that you can build your app for iOS. Follow the instructions provided in the Flutter getting started documentation to ensure Xcode is configured correctly.
Important note
You can only build iOS apps on Macs. This is a restriction imposed by Apple and is imposed on all app development, not just Flutter. If this is an issue, then there are options such as cloud-based Mac instances you can use, or virtualization software that allows you to run a Mac virtual machine. Exploring this is beyond the scope of this book. However, when developing Flutter apps, you can build and test quite happily on Android for the vast majority of the time, only switching to iOS for late-stage testing.
Once you have both your IDE installed and Android Studio (or just Android Studio if that is your IDE of choice) and Xcode installed and configured (if you are on a Mac), then rerun flutter doctor to check everything is ready to go.
Hello world!
With the Flutter development environment configured, we can start using Flutter commands. The typical way to start a Flutter project is to run the following command:
flutter create <output_directory>
Here, output_directory will also be the Flutter project name if you do not specify it as an argument. By running the preceding command, the folder with the provided name will be generated with a sample Flutter project in it. We will analyze the project in a few moments. First, it is good to know that there are some useful options to manipulate the resulting project from the flutter create command.
To find out the options for any command, you can simply run the following:
flutter <command> -h
Therefore, by running the -h option on the flutter create command, you will be able to see which additional options are available, just like this:
flutter create -h
The main ones are as follows:
--org: This can be used to change the owner organization of the project. If you already know Android or iOS development, this is a reverse domain name, and it is used to identify package names on Android and as a prefix in the iOS bundle identifier. The default value iscom.example.-s,--sample=<id>: Most of the official examples for widget usage have a unique ID that you can use to quickly clone the example to your machine. Whenever you are exploring the Flutter docs website (https://docs.flutter.dev), you can take a sample ID from it and use it with this argument.-i,--ios-language, and-a,--android-language: These are used to specify the language for the native part code of the project, and are only used if you plan to write native platform code.--project-name: Use this to change the project’s name. It must be a valid Dart package identifier. If you do not specify this parameter, it will try to use the same name as the output directory name.
Valid Dart package identifiers
As specified in the Dart documentation, “Package names should be all lowercase, with underscores to separate words, `just_like_this`. Use only basic Latin letters and Arabic digits: [a- z0-9_]. Also, make sure the name is a valid Dart identifier – that it doesn’t start with digits and isn’t a reserved word.”
Let’s create a typical Flutter project with the following command:
flutter create hello_world
Once this command has finished running, open the newly created folder in your IDE; you should see a structure similar to this:
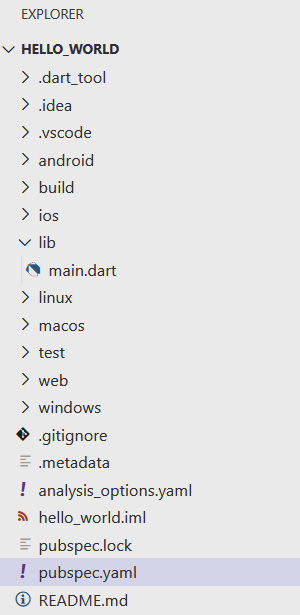
Figure 1.3 – Typical Flutter project structure
Upon listing the basic structure elements, we get the following:
android/ios: This contains the platform-specific code. If you already know the Android project structure from Android Studio, there is no surprise here. The same goes for Xcode iOS projects. Similarly, there arelinux,macos,web, andwindowsfolders for the other platforms that Flutter supports. Although we will focus less on these platforms in this book, the concepts we are going explore apply across all the Flutter platforms.hello_world.iml: This is a typical IntelliJ project file that contains theJAVA_MODULEinformation used by the IDE. Similarly, there is a.ideafolder containing IntelliJ settings, and a.vscodefolder for Visual Studio Code settings.- A
libfolder: This is the main folder of a Flutter application and is where you will spend the vast majority of your time; the generated project will contain at least amain.dartfile you can start working on. We will be checking this file in detail soon. pubspec.yamlandpubspec.lock: Thispubspec.yamlfile is what defines a Dart package. This is one of the main files of the project and defines the app build number. It also lists dependencies on external plugins, images, fonts, and more. We will be looking at this in more detail in Chapter 5, Building Your User Interface through Widgets.README.md: This is a standardREADMEdocument that is very common in open source projects. It allows you to document how to set up and use your code so that other developers can easily get your code running.- A
testdirectory: This contains all the test-related files of the project. Here, we can add unit and widget tests to ensure we do not introduce bugs into our app as we develop it. analysis_options.yaml: This file configures an analyzer that will look into your code for common bugs. It also allows you to configure your default code styles (known aslints, which are enforced throughlinter) so that other developers adhere to your preferences, allowing easier code maintenance.
Now that you have created your first Flutter project (congratulations, by the way!), you should explore the IDE so that you can start to get a feel for the structure of a Flutter project.
Now, I’m sure you are keen to delve more into your shiny new Flutter project, especially this mysterious main.dart file. However, before we do, we need to look at a few key aspects of Flutter, starting with widgets.
Widgets, widgets, everywhere
Flutter widgets are a core part of the framework and are used constantly throughout your code. You will hear the saying “Everything is a widget,” and that is almost true in Flutter. In this section, we will see how Flutter renders the user interface and then how Flutter applies the widgets idea to app development to create awesome UIs.
Widgets can be understood as the visual (but not only that) representation of parts of the application. Many widgets are put together to compose the UI of an application. Imagine it as a puzzle in which you define the pieces.
Widgets intend to provide a way for your application to be modular, scalable, and expressive with less code and without imposing limitations. The main characteristics of the widgets UI in Flutter are composability and immutability.
Flutter rendering
One of the main aspects that makes Flutter unique is the way that it draws the visual components to the screen. A key differentiator to existing frameworks is how the application communicates with the platform’s SDK, what it asks the SDK to do, and what it does by itself:
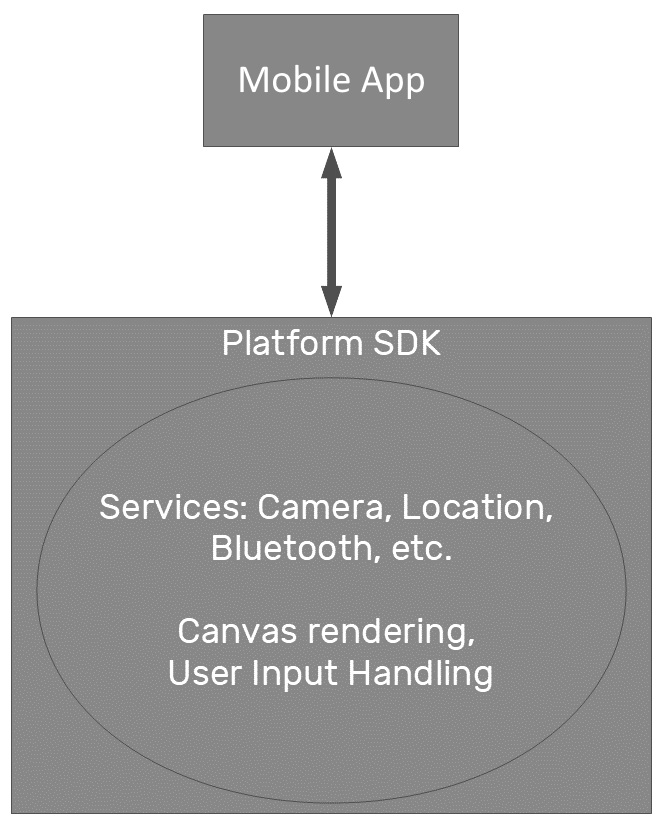
Figure 1.4 – How Flutter communicates with the platform’s SDK
The platform SDK can be seen as the interface between applications and the OS and services. Each system provides its own SDK with capabilities and is based on a programming language (that is, Kotlin/Java for the Android SDK and Swift/Objective C for the iOS SDK).
Flutter – rendering by itself
Flutter chooses to do all the rendering work by itself. The only thing it needs from the platform’s SDK is access to Services APIs and a canvas to draw the UI on:
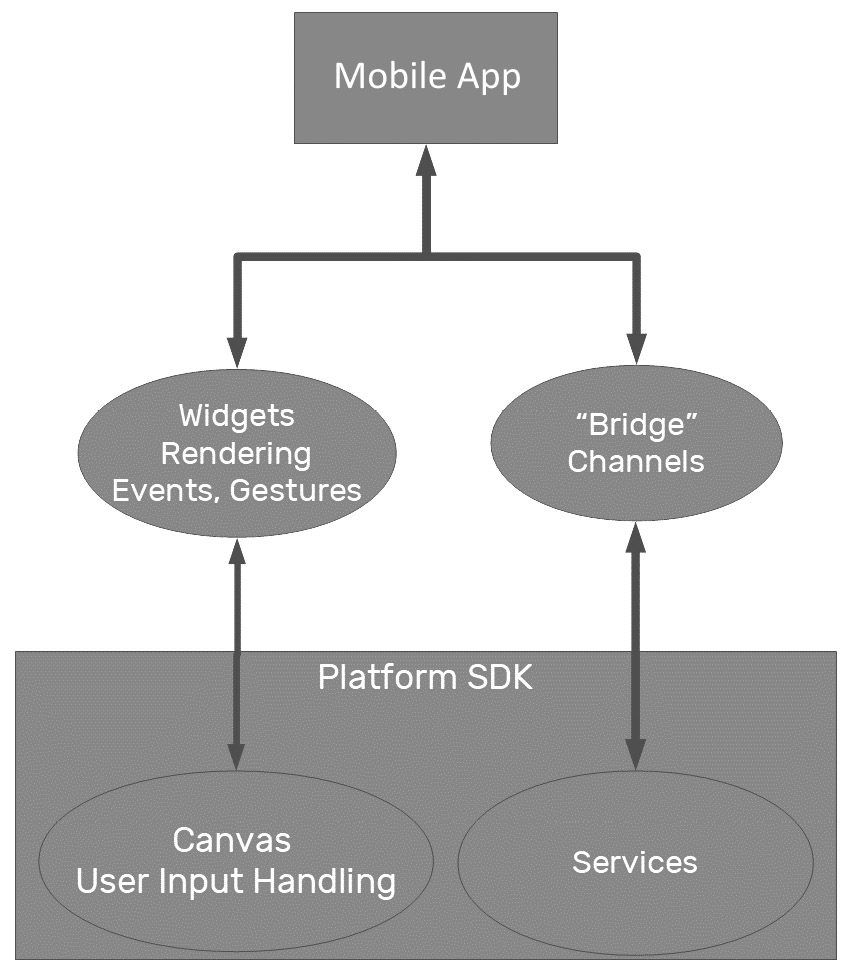
Figure 1.5 – Flutter access to services and the canvas
Flutter moves the widgets and rendering to the app, from where it gets its customization and extensibility. Through a canvas, it can draw anything and also access events to handle user inputs and gestures by itself.
Composability
For the widget user interface structures, Flutter chooses composition over inheritance, intending to keep each widget simple and with a well-defined purpose. Meeting one of the framework’s goals, flexibility, Flutter allows the developer to make many combinations to achieve incredible results.
Composition versus inheritance
Inheritance derives one class from another. For example, you may have a class such as Vehicle and subclasses of Car and Motorbike. The Car and Motorbike classes would inherit the abilities of the Vehicle class and then add their own specializations. In this instance, Car is a Vehicle and Motorbike is a Vehicle.
Composition defines a class as the sum of its parts. For example, you may have an Engine class and a Wheel class. In this model, a Car is composed of an Engine, four Wheels, and other specializations; a Car has an Engine and a Car has Wheels. Composability is less rigid than inheritance and allows for things such as dependency injection and modifications at runtime.
Immutability
Flutter is based on the reactive style of programming, where the widget instances are short-lived and change their descriptions (whether visually or not) based on configuration changes, so it reacts to changes and propagates these changes to its composing widgets, and so on.
A Flutter widget may have a state associated with it, and when the associated state changes, it can be rebuilt to match the representation.
The terms state and reactive are well known in the React style of programming, disseminated by Facebook’s famous React library.
Don’t worry if this is a concept you have not experienced. It is surprisingly intuitive and we will explore it via many examples throughout this book.
Everything is a widget
Flutter widgets are everywhere in an application. Maybe not everything is a widget, but almost everything is. Even an app is a widget in Flutter, and that’s why this concept is so important. A widget represents a part of a UI, but it does not mean it’s just visible. It can be any of the following:
- A visual/structural element that is a basic structural element, such as the
ButtonorTextwidgets - A layout-specific element that may define the position, margins, or padding, such as the
Paddingwidget - A style element that may help colorize and theme a visual/structural element, such as the
Themewidget - An interaction element that helps respond to user interactions in different ways, such as the
GestureDetectorwidget
An example widget
OK, enough theory – let’s have a quick look at a widget so that you can get a feel for what we are referring to. Open your IDE and take a look at that mysterious lib/main.dart file we mentioned earlier. Around line 7, you will see a section like this:
class MyApp extends StatelessWidget {
  @override
  Widget build(BuildContext context) {
    return MaterialApp(
      title: 'Flutter Demo',
      theme: ThemeData(
        primarySwatch: Colors.blue,
      ),
      home: const MyHomePage(title: 'Flutter Demo Home
        Page'),
    );
  }
}
Not only is this your first example of a Flutter widget, but it is also your first chance to see Dart. If you are from a Java, C++, or Objective-C background, then it should look relatively familiar to you. Components of code are held in class definitions that describe fields and methods, with inheritance through the extends keyword:
class MyApp extends StatelessWidget { We will explore this syntax in a lot more detail in later chapters, but it is easiest to think of a class as a blueprint. This class blueprint says what information or data can be stored and how it can be accessed and manipulated. Extending another class, or blueprint, simply overlays the blueprint you are extending onto your new blueprint. If this is all new to you, then it is highly recommended that you explore object-oriented programming concepts after you complete this chapter as that will give you a strong foundation on which to build your Flutter knowledge.
The MyApp class runs the whole show and is itself a widget. In this instance, it is StatelessWidget, as you can see from the extends section. We will explore StatelessWidget (and its alter ego, StatefulWidget) in more detail later on, but for the moment, it’s sufficient to know that StatelessWidget holds no state – it exists to compose other widgets that may or may not hold their own state.
You can see this composition in the build method, as defined by this piece of code:
Widget build(BuildContext context) { In this build method, the MyApp widget simply returns another widget, MaterialApp, which itself will have a build method that may also return widgets. Ultimately, you will reach leaf widgets that will render graphics to the display. The build method updates the display and is called when some external activity happens – for example, the user interacts with the device, some data is sent from a database, or a timer is triggered at a set time.
Widgets are the basic building blocks of an interface. To build a UI properly, Flutter organizes the widgets in a widget tree.
The widget tree
This is another important concept in Flutter layouts. It’s where widgets come to life. The widget tree is the logical representation of all the UI’s widgets. It is computed during layout (measurements and structural information) and used during rendering (frame to screen) and hit testing (touch interactions), and this is the thing Flutter does best. By using a lot of optimization algorithms, it tries to manipulate the tree as little as possible, reducing the total amount of work spent on rendering, aiming for greater efficiency:
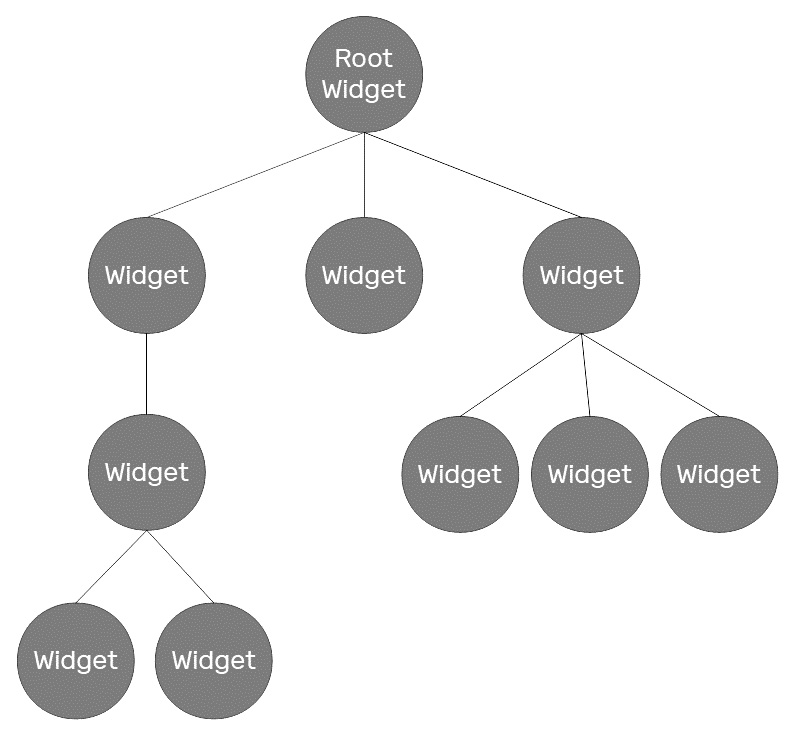
Figure 1.6 – Example widget tree
Widgets are represented in the tree as nodes. Each widget may have a state associated with it; every change to its state results in rebuilding the widget and the child involved.
As you can see, the tree’s child structure is not static, and it’s defined by the widget’s description. The children relations in widgets are what makes the UI tree; it exists by composition, so it’s common to see Flutter’s built-in widgets exposing child or children properties, depending on the purpose of the widget.
The element tree
The widget tree does not work alone in the framework. It has the help of the element tree – a tree that relates to the widget tree by representing the built widget on the screen. This means every widget will have a corresponding element in the element tree after it is built.
The element tree has an important task in Flutter. It helps map onscreen elements to the widget tree. It also determines how widget rebuilding is done in update scenarios. When a widget changes and needs to be rebuilt, this will cause an update on the corresponding element. The element stores the type of the corresponding widget and a reference to its children elements. In the case of repositioning, for example, a widget, the element will check the type of the corresponding new widget, and if there is a match, it will update itself with the new widget description.
You have now learned the basics of how to put a Flutter app together. Before you learn how to run our hello_world Flutter app, let’s look at the build process and options in some more detail.
Building and running Flutter
The way an application is built is fundamental to how it will perform on the target platform. This is an important step regarding performance. Even though you do not necessarily need to know this for every kind of application, knowing how the application is built helps you understand and measure possible improvements.
As we have already pointed out, Flutter relies on the AOT compilation of Dart for release mode and the JIT compilation of Dart for development/debug mode. Dart is one of only a few languages that are capable of being compiled to both AOT and JIT, and Flutter gets the most of this advantage. Let’s look at the different build options available, why you should use each one, and how the capabilities of Dart lead to an optimal developer and user experience.
Debug mode
During development, Flutter uses JIT compilation in debug mode. Debug mode compilation is optimized for fast feedback, and therefore sacrifices execution speed and binary size (the size of the app when installed on a device). However, due to the power of Dart’s compiler, interactions between the code and the simulator/device are still fast, and debugging tools allow developers to step into the source code and analyze the widget’s layout.
Release mode
In release mode, debugging information is not necessary, and the focus is performance. Flutter uses a technique that is common to game engines. By using AOT mode, Dart code is compiled to native code, and the app loads the Flutter library and delegates rendering, input, and event handling to it through the Skia or Impeller rendering engines.
Skia versus Impeller
Skia is an open source library that provides APIs for 2D graphics. It is the primary rendering engine in Flutter and is used by Google Chrome, Android, Firefox, and many others. It is also backed by Google, similar to Dart and Flutter.
However, the unique way that Flutter uses Skia has led to some minor display issues. Additionally, Skia is solely a 2D rendering engine, which limits the potential domains that Flutter can be used for.
To solve these problems, the Flutter team has created a new rendering engine called Impeller, which removes the display issues, provides support for 3D, and is designed to harness the capabilities of modern graphics APIs.
At the time of writing, Impeller is the default rendering engine for iOS apps, with Android support being actively developed, and web support on the development roadmap.
Profile mode
Sometimes, you need to analyze the performance of your app. Profile mode retains just enough debugging ability to create a profile of your app’s performance while attempting to be a true reflection of your app’s real-world performance. This mode is only available on physical devices because emulators will not have representative performance characteristics.
Supported platforms
At the time of writing, Flutter supports ARM Android devices running at least on Jelly Bean 4.1.x version, and iOS devices from iPhone 4S or newer. As you would expect, Flutter apps can be run on device emulators, and debugging works equally well on physical and emulated devices.
Additionally, Flutter has web and desktop support (Windows, macOS, and Linux). As you can see, the vision for Flutter is to allow developers to have a single code base for mobile, web, and desktop!
We are not going to go into more detail on Flutter’s compilation aspects as they are beyond the scope of this book. For more information, you can read https://docs.flutter.dev/resources/faq#run-android and https://docs.flutter.dev/resources/faq#run-ios.
The pubspec.yaml file
The pubspec.yaml file in Flutter is a file that is used to define Dart packages. Besides that, it contains an additional section for configurations specific to Flutter. Let’s see the pubspec.yaml file’s content in detail:
name: hello_flutter
description: A new Flutter project.
publish_to: 'none'
version: 1.0.0+1
The beginning of the file is simple. As we already know, the name property is defined when we execute the pub create command. Next is the default project’s description; feel free to change this to something more interesting. Note that if you do so, your IDE may suddenly run the flutter pub get command. We’ll see why in a bit.
Description during create
Like many parts of the pubspec.yaml file, you can specify the description while running the flutter create command by using the –description argument.
The publish_to property is used if you are creating a package that you wish to share with others. We will explore this notion in later chapters when we start to use plugins for our apps. By default, packages are published to the official Dart package repository, pub.dev.
If you set the publish_to field to none, this means that the package will not be published to, or listed in, the Dart package repository. This is useful for private packages that are only intended for internal use within an organization. If you are writing a mobile app instead of a package or plugin, then you would set this to none.
The version property follows the Dart package conventions: the version number, plus an optional build version number separated by +. In this example, the version number is 1.0.0 and the build number is 1.
In addition to this, Flutter allows you to override these values during the build. We will take a more detailed look at this in Chapter 13, Releasing Your App to the World.
Then, we have the dependencies section of the pubspec file:
environment:
  sdk: ">=3.1.0 <4.0.0"
dependencies:
  flutter:
    sdk: flutter
  cupertino_icons: ^1.0.2
dev_dependencies:
  flutter_test:
    sdk: flutter
  flutter_lints: ^2.0.0
We start with the environment property. This specifies the version of Dart that your code will work with. This entry is specifying that your code will need version 3.1.0 of Dart or above, but will not run on Dart 4.0.0. As per standard versioning, you would expect that if Dart 4.0.0 is released, it will have some backward-incompatible changes that may stop your code from compiling. This happened when Dart was updated from 1.x.x to 2.x.x. By restricting your allowed Dart versions, your code will not need to support Dart 3.x.x until you are ready to do so.
Important note
Dart 2.12 was a significant milestone for Dart because it introduced the concept of null safety. Code written before Dart 2.12 was released will have certain syntax differences and potentially be more prone to bugs around the nullness of variables. We will explore null safety in Chapter 2, An Introduction to Dart.
Additionally, Dart 3.0 introduced new language features such as interfaces and records, which will be used throughout this book. Ensure that any projects you create are using Dart 3.0 or later so that you can get full null safety and the latest Dart language features.
Then, we have the dependencies property. This starts with the main dependency of a Flutter application, the Flutter SDK itself, which contains many of Flutter’s core packages.
As an additional dependency, the generator adds the cupertino_icons package, which contains icon assets that are used by the built-in Flutter Cupertino widgets (there’s more on that in the next chapter). Cupertino is the name given to widgets that follow the iOS design guidelines.
As you add other dependencies (and I would bet my hat that you will add a lot of dependencies), they will also appear here.
The dev_dependencies property contains the flutter_test package dependency provided by the Flutter SDK itself, which contains Flutter-specific extensions to Dart’s test package. We will explore this in Chapter 12, Testing and Debugging.
Additionally, it contains the flutter_lints dependency. As we mentioned in the Hello World! section, linter uses lints to enforce a recommended code style.
In the final block of the file, there’s a dedicated flutter section:
flutter:
  uses-material-design: true
# To add assets to your application, add an assets section, like this:
# assets:
#     - images/a_dot_burr.jpeg
#     - images/a_dot_ham.jpeg
# ...
# To add custom fonts to your application, add a fonts section here,
# fonts:
#     - family: Schyler
#       fonts:
#         - asset: fonts/Schyler-Regular.ttf
#         - asset: fonts/Schyler-Italic.ttf
#           style: italic
This flutter section allows us to configure resources that are bundled in the application to be used during runtime, such as images, fonts, music, sound effects, and videos.
Let’s have a closer look:
uses-material-design: We will see the Material widgets provided by Flutter in the next chapter. Much like Cupertino is the name used for the iOS design guidelines, Material is the name given to the Android/Google design guidelines. In addition to them, we can use Material Design icons (https://material.io/tools/icons/?style=baseline), which are in a custom font format. For this to work properly, we need to activate this property (set it totrue) so that the icons are included in the application.assets: This property is used to list the resource paths that will be bundled with the final application. Theassetsfiles and folders can be organized in any way; what matters for Flutter is the path to the files. You specify the path of the file relative to the project’s root. This is used later in Dart code when you need to refer to an asset file. Here’s an example of adding a single image:assets: images/home_background.jpeg
Often, you will want to add many images, and listing them individually would be onerous. An alternative is to include a whole folder:
assets:
  images/
You must add the / character at the end of the path, which is used to specify that you want to include all files in that folder. Note that this doesn’t include subfolders; they would need to be listed as well:
assets:
  images/
  images/icons/
fonts: This property allows us to add custom fonts to the application. More on this will be covered in Chapter 6, Handling User Input and Gestures, in the Custom fonts section.
We will learn how to load different assets throughout this book whenever we need to. You can read more about asset specification details on the Flutter docs website: https://flutter.io/docs/development/ui/assets-and-images.
Running the generated project
The hello_world application that we created earlier has a counter to demonstrate the React style of programming in Flutter. We will look at Dart code in more detail in the next chapter, but let’s look at the main.dart file a little bit more before we try running the application.
The lib/main.dart file
We explored the main.dart file earlier to look at a widget. This file is also the entry point of the Flutter application:
void main() => runApp(MyApp());
The main function is the Dart entry point of an application; this is where the execution of your app will start. Flutter then takes over the execution in the runApp function, which is called by passing your top-level (or root) widget as a parameter. This is the widget we saw earlier – the MyApp widget.
Flutter run
To execute a Flutter application, we must have a connected device or simulator. You can see if your system has been set up correctly to use simulators or emulators by running the flutter doctor tool. The flutter emulators tool can then be run, which will show which emulators/simulators are on your system. The following command lets you know the existing Android and iOS emulators that can be used to run the project:
flutter emulators
You will get something similar to the following output:
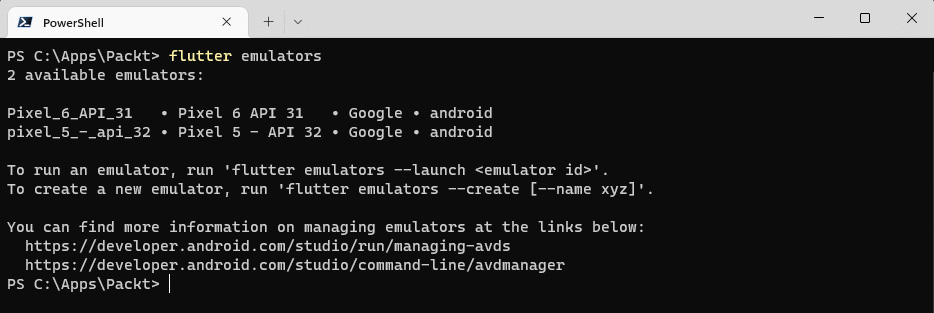
Figure 1.7 – Output from the flutter emulators command
You can then choose to run the emulator/simulator using the command shown in the output or start the emulator or simulator using the Android Studio or Xcode simulator functionality. In this scenario, you could run the following:
flutter emulators --launch Pixel_6_API_31
You can learn how to manage your Android emulators at https://developer.android.com/studio/run/managing-avds. For iOS device simulators, you should use the Xcode Simulator developer tool.
Emulator versus simulator
You will notice that Android has emulators and iOS has simulators. The Android emulator mimics the software and hardware of an Android device. In contrast, the iOS simulator only mimics the software of an iOS device, using the full hardware available on the machine it is running. Therefore, it is highly recommended that you test your app on a true iOS device before releasing it to the world to ensure there are no hardware issues, such as excessive memory consumption.
Alternatively, you can choose to run the app on a physical device. You will need to set up your device for development, so for the moment, it is probably easier to use an emulator or simulator.
After asserting that we have a device connected that can run the app, we can use the following command from the project folder to run the app on the device:
flutter run
You will see an output similar to the following:
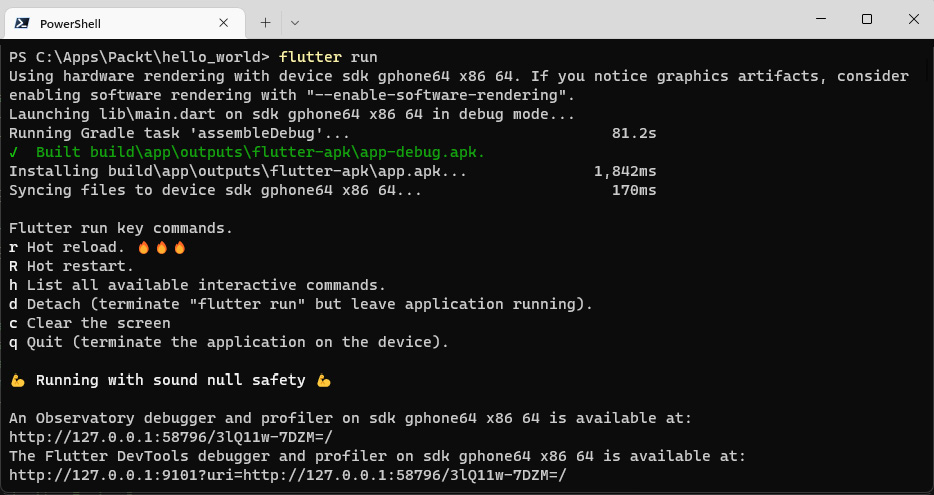
Figure 1.8 – Output from the flutter run command
This command starts the debugger and makes the hot reload functionality available. The first run of the application will generally take a little longer than subsequent executions.
The emulator or simulator should start up and after a pause to load the OS, it should run your Flutter application. If you see the following screen, then congratulations – you have just run your first-ever Flutter application and should be proud of yourself!
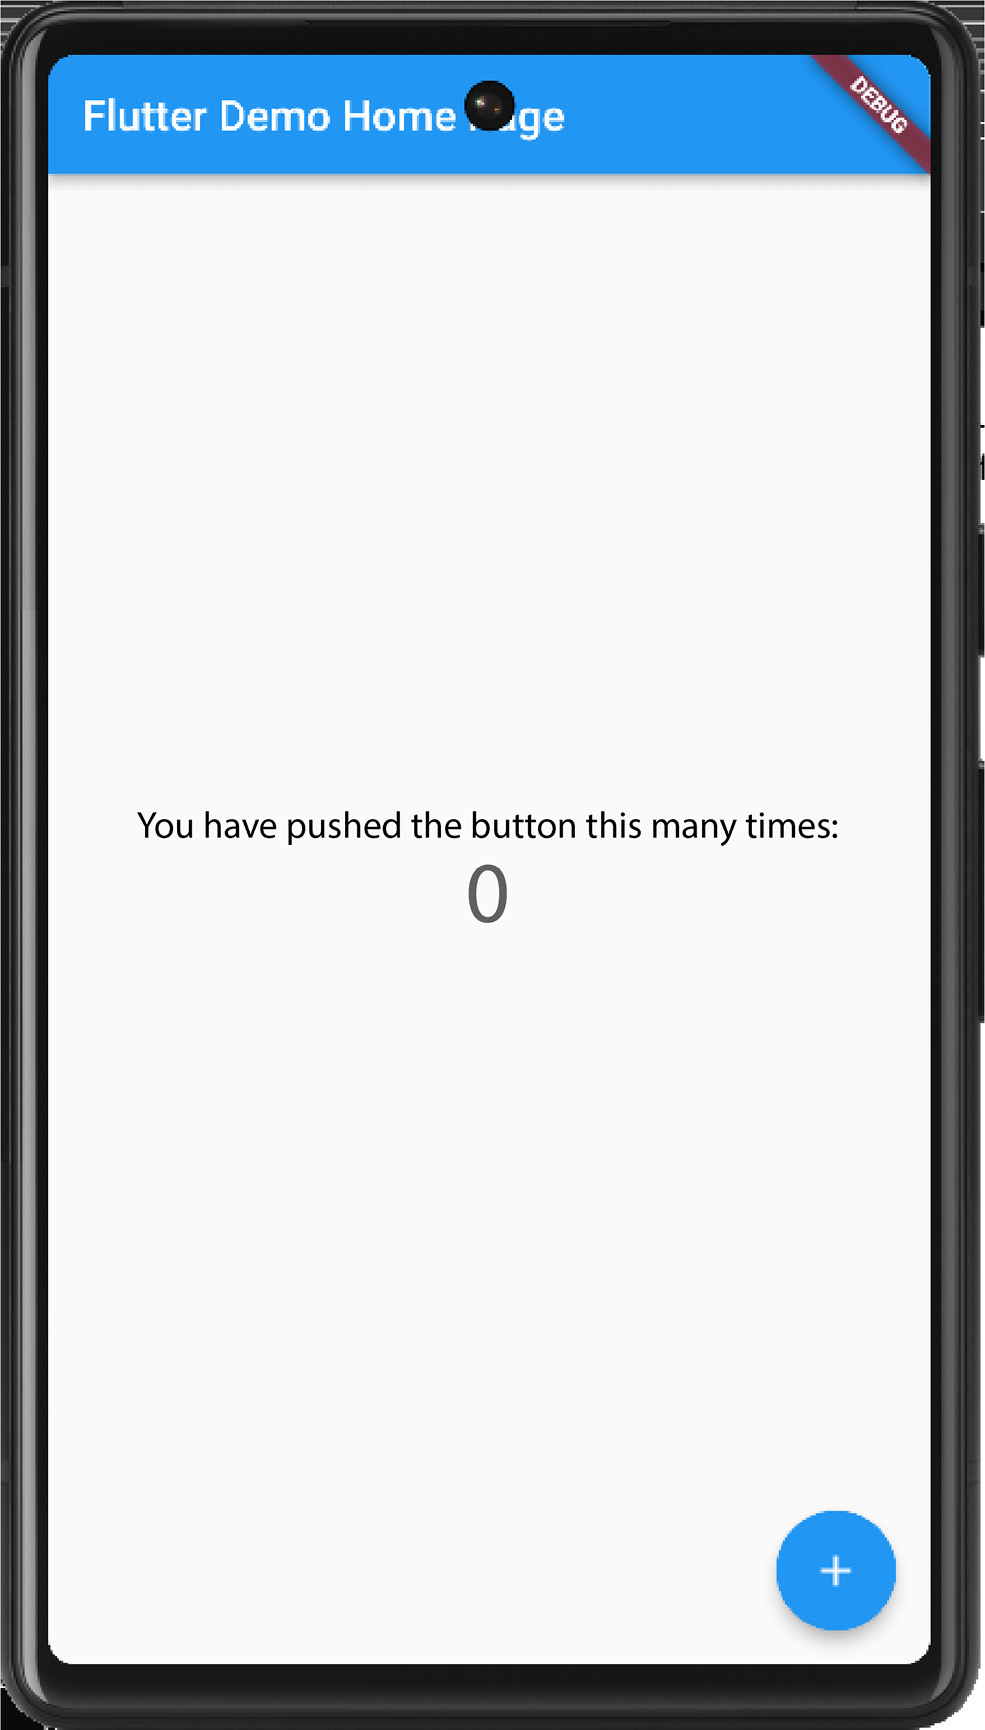
Figure 1.9 – Emulator displaying the Flutter app
The application is up and running; you can see a debug mark in the top-right corner. This shows that it’s not a release version running; the app is in debug mode, which means you have all the debug mode goodies available to you, such as hot reload and code debug facilities.
The preceding example was run on a Pixel 6 emulator. The same result can be achieved using an iOS simulator, or any other Android virtual device (AVD).
Summary
In this chapter, we started playing with the Flutter framework. First, we learned some important concepts about Flutter, mainly the concepts of widgets. We saw that widgets are the central part of the Flutter world. This is because the widget concept is everywhere, from rendering performance to the final result on the screen.
We also saw how to start a Flutter application project with the framework tools, the basic project structure of files, and the peculiarities of the pubspec.yaml file. We also started exploring the main.dart file, our first foray into the world of Dart coding. In the end, we saw how to run a project on an emulator or simulator.
In the next chapter, we will dive deeper into Dart. You had a sneak peek when we looked at widgets and you saw how similar it is to other common programming languages, such as Java, C#, and Swift. Dart is a great language, and I must confess it is my favorite language to work with. Hopefully, you will share some of this love by the end of the next chapter.
Questions
At the end of each chapter, you’ll find a set of questions like the ones in this section. These will focus on key pieces of information shared within each chapter to ensure you have retained the relevant knowledge.
If you are unable to answer any questions, then look back through this chapter for the relevant answers to refresh your knowledge:
- Which programming language is used for Flutter apps?
- Which company is the predominant backer of Flutter?
- What are the two types of compilation available in Dart?
- Name three reasons why having a single code base for multiple platforms is an advantage.
- What is the tool that checks your Flutter setup is correct?
- Which command will generate a new Flutter project?
- What is the purpose of the
pubspec.yamlfile? - Name the three build modes available when building a Flutter app.
Further reading
At the end of each chapter, there will be references for further reading so that you can extend your knowledge of the topics discussed within each chapter. These may be web links, books, or podcasts.
For this chapter, I recommend that you get a feel for the potential of Flutter apps. A great place to do this is Flutter Showcase: https://flutter.dev/showcase.
Have a play with the apps shown there, view the case studies, and start to appreciate just how amazing Flutter will be for your future apps.