


 Download code from GitHub
Installing and Configuring PowerShell 7
This chapter covers the following recipes:
- Installing PowerShell 7
- Installing PowerShell 7 Using Chocolatey
- Using the PowerShell 7 Console
- Building PowerShell 7 Profile Files
- Exploring Installation Artifacts
- Installing VS Code
- Installing the Cascadia Code Font
- Exploring PSReadLine
Introduction
Microsoft Windows PowerShell was first introduced to the public in 2003, and released formally, as Windows PowerShell v1, in 2006. Microsoft has released multiple versions of Windows PowerShell. Microsoft plans to support Windows PowerShell 5.1 for a long time, but no new features are likely.
In 2016, the PowerShell development team began working on an open-source version of PowerShell based on the open-source version of .NET Core (later renamed to just .NET). You can read the announcement by Jeffrey Snover here: https://azure.microsoft.com/blog/powershell-is-open-sourced-and-is-available-on-linux/. This new version is just PowerShell (or PowerShell 7).
The initial versions (PowerShell 6.X) represented, in effect, a proof of concept – you could run the core functions and features of PowerShell across the Windows, Mac, and Linux platforms. Those early versions also enabled the development team to implement all the necessary tooling to allow future development. But they were quite limited in supporting the rich needs of the IT professional community.
With the release of PowerShell 7.0 came improved parity with Windows PowerShell. A few modules did not work with PowerShell 7, and a few more operated via a compatibility mechanism. PowerShell 7.0 shipped in 2019 and was followed by version 7.1 and version 7.2 (released in late 2021). This book uses the term “PowerShell 7” to include PowerShell 7.0, 7.1, and 7.2. If there are version-specific issues, the chapters call those out specifically.
Microsoft does not include PowerShell 7 in Windows, thus you have to install it on each system. And as ever, you have options including direct from GitHub and via other installers such as Chocolatey.
Once you have installed PowerShell 7, you can use it just as you used the Windows PowerShell console to run commands or scripts. You can run it from a shortcut on the desktop, from the start panel, from a shortcut on the taskbar, or just run the executable. The name of the executable for PowerShell 7 is pwsh.exe (versus powershell.exe for Windows PowerShell).
Another important difference is that PowerShell 7 uses different profile file locations from Windows PowerShell. This feature allows you to customize your profiles to use the new PowerShell 7 features. And that, in turn, enables you to run both Windows PowerShell and PowerShell 7 side by side without interference.
Most IT pros who have used Windows PowerShell are familiar with the Integrated Scripting Environment (ISE). The ISE was a great tool you used with Windows PowerShell. However, you cannot use the ISE with PowerShell 7. A very worthy successor to the ISE is Visual Studio Code (VS Code), an open-source editing project that provides all the features of the ISE and a great deal more. Installation of VS Code is optional but relatively straightforward.
Microsoft also developed a new font, Cascadia Code, to coincide with the launch of VS Code. This font is a nice improvement over Courier or other mono-width fonts. All screenshots of working code in this book use this new font.
PSReadLine is a PowerShell module designed to provide color-coding of PowerShell scripts in the PowerShell 7 Console. The module, included with PowerShell 7 by default, makes editing at the command line easier and more on par with the features available in Linux shells. You can also use the later versions of PSReadLine with Windows PowerShell.
Systems used in the chapter
This chapter is all about getting you started with PowerShell 7 – installing and configuring your environment to make the most out of PowerShell 7. In this chapter, you use a single host, SRV1, as follows:

Figure 1.1: Host in use for this chapter
In later chapters, you will use additional servers and promote SRV1 to be a domain-based server rather than being in a workgroup.
Installing PowerShell 7
As mentioned, PowerShell 7 is not installed in Windows by default, at least not at the time of writing. The PowerShell team made PowerShell 7.1 available from the Microsoft Store, which is useful to install PowerShell 7.1 or later on Windows 10/11 systems. Windows Server does not support the Microsoft Store.
You have other methods of installing PowerShell 7 on your systems. The first option is to use the Install-PowerShell.ps1 script, which you download from GitHub, as shown in this recipe. You can also use this recipe on Windows 10 hosts. This approach has the advantage of being the most up-to-date source of the latest versions of PowerShell.
Getting ready
This recipe uses SRV1, a Windows Server workgroup host. There are no features of applications loaded on this server (yet).
You can use either the Windows PowerShell console or the ISE for this recipe.
How to do it...
- Setting an execution policy for Windows PowerShell
Set-ExecutionPolicy -ExecutionPolicy Unrestricted -Force - Updating help text for Windows PowerShell
Update-Help -Force | Out-Null - Ensuring the
C:\FooFolder exists$LFHT = @{ ItemType = 'Directory' ErrorAction = 'SilentlyContinue' # should it already exist } New-Item -Path C:\Foo @LFHT | Out-Null - Downloading PowerShell 7 installation script from GitHub
Set-Location -Path C:\Foo $URI = 'https://aka.ms/install-powershell.ps1' Invoke-RestMethod -Uri $URI | Out-File -FilePath C:\Foo\Install-PowerShell.ps1 - Viewing Installation Script Help
Get-Help -Name C:\Foo\Install-PowerShell.ps1 - Installing PowerShell 7.2
$EXTHT = @{ UseMSI = $true Quiet = $true AddExplorerContextMenu = $true EnablePSRemoting = $true } C:\Foo\Install-PowerShell.ps1 @EXTHT | Out-Null - Installing the preview and daily builds (for the adventurous)
C:\Foo\Install-PowerShell.ps1 -Preview -Destination C:\PSPreview | Out-Null C:\Foo\Install-PowerShell.ps1 -Daily -Destination C:\PSDailyBuild | Out-Null - Creating Windows PowerShell default profiles
# First the ISE $URI = 'https://raw.githubusercontent.com/doctordns/PACKTPS72/master' + '/scripts/goodies/Microsoft.PowerShell_Profile.ps1' $ProfileFile = $Profile.CurrentUserCurrentHost New-Item -Path $ProfileFile -Force -WarningAction SilentlyContinue | Out-Null (Invoke-WebRequest -Uri $URI -UseBasicParsing).Content | Out-File -FilePath $ProfileFile # Now profile for ConsoleHost $ProfilePath = Split-Path -Path $ProfileFile $ChildPath = 'Microsoft.PowerShell_profile.ps1' $ConsoleProfile = Join-Path -Path $ProfilePath -ChildPath $ChildPath (Invoke-WebRequest -Uri $URI -UseBasicParsing).Content | Out-File -FilePath $ConsoleProfile - Checking versions of PowerShell 7 loaded
Get-ChildItem -Path C:\pwsh.exe -Recurse -ErrorAction SilentlyContinue
How it works...
In step 1, you set the execution policy for Windows PowerShell to Unrestricted. This step, which produces no output, simplifies the installation and setup of PowerShell. In production, you may wish to set PowerShell’s execution policy to be more restrictive.
Most of the scripts in this book should run successfully using a more restrictive setting. To simplify things, this recipe sets the execution policy to Unrestricted.
In step 2, you update the help text files for Windows PowerShell, which produces output like this:
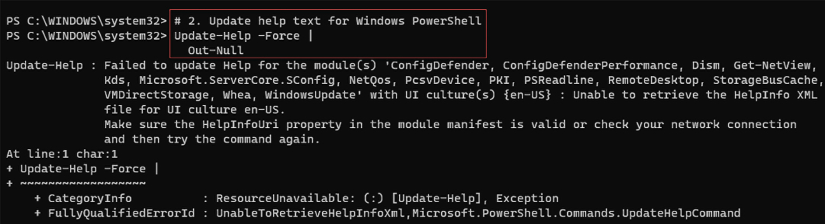
Figure 1.2: Updating help files
Note that after installing PowerShell 7, PowerShell prompts you to download help text (not shown in this figure) the first time you use Get-Help.
In step 3, you create a folder, C:\Foo. This book uses this folder as a place to put files used by the book’s recipes. For example, this recipe stores the PowerShell installation file in this folder from which you execute the script to install PowerShell 7. Also, note that this step mixes spatting, using hash tables, and direct parameter specification. You can always mix and match.
With step 4, you download the PowerShell installation script from GitHub. Although you can look in C:\Foo to examine the script, this step produces no output.
The installation script is a PowerShell script. In step 5, you use Get-Help to get details on the script, as shown here:

Figure 1.3: Getting help information from the installation script
In step 6, you use the installation script to install PowerShell 7 on SRV1, with output like this:

Figure 1.4: Installing PowerShell 7
PowerShell 7 is a work in progress. On most weekdays, the PowerShell team builds updated versions of PowerShell. Monthly, the team also releases preview versions of the next major version. At time of writing, the current preview is 7.3 Preview 3 – but that should change by the time you read this and the team releases new previews. The daily and preview builds are usually very stable and allow you to try out new features that may be in the next major release. The daily build enables you to view progress on a specific bug or feature. You may find it useful to install both of these. Note that if you install preview/daily builds as shown in this recipe, you also need to ensure you keep them up to date as time goes by – Microsoft’s update services do not update these side-by-side installations.
In step 7, you install the latest preview build along with the latest build of PowerShell, which looks like this:

Figure 1.5: Installing the preview and daily builds
PowerShell, like Windows PowerShell, uses profile files to enable you to configure PowerShell each time you run it (whether in the PowerShell console or as part of VS Code).
In step 8, you download sample PowerShell profile scripts and save them locally, which produces no output. This step assumes you are running the script from the ISE – the first part creates an ISE profile while the second establishes a PowerShell profile for the Console Host.
The executable name for PowerShell 7 is pwsh.exe. In step 9, you view the versions of this file as follows:
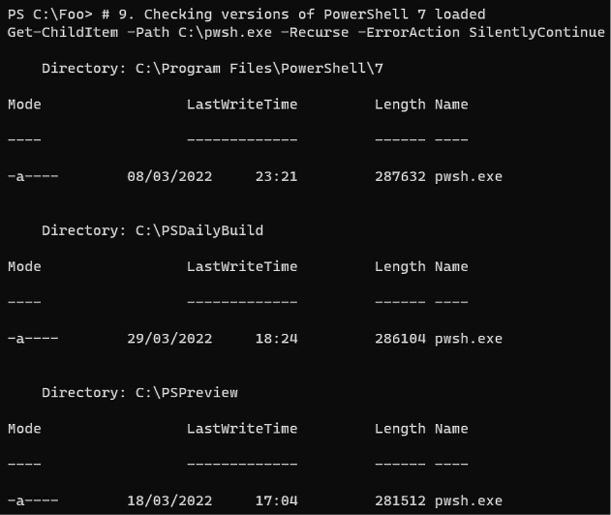
Figure 1.6: Checking PowerShell 7 versions loaded
As you can see, there are three versions of PowerShell 7 installed on SRV1: the latest full release, the latest preview, and the build of the day.
There’s more...
In step 1, you update the execution policy for Windows PowerShell. While this simplifies the installation and configuration of hosts, it may be unduly permissive for your environment, and you can change it as needed. Don’t forget, though, PowerShell’s execution policy is not truly a security mechanism – it just slows down an inexperienced administrator. For a good explanation of PowerShell’s Security Guiding Principles, see https://devblogs.microsoft.com/powershell/powershells-security-guiding-principles/.
In step 2, you updated the help files for Windows PowerShell. This step is optional, but later steps can prompt you to update your help files if you skip it. Installing the most up-to-date help files also adds many conceptual help topics to help you get more out of PowerShell.
In step 4, you use a shortened URL to download the Install-PowerShell.ps1 script. When you use Invoke-RestMethod, PowerShell discovers the underlying target URL for the script. The short URL allows Microsoft and the PowerShell team to publish a well-known URL and then have the flexibility to move the target location should that be necessary. The target URL, at the time of writing, is https://raw.githubusercontent.com/PowerShell/PowerShell/master/tools/install-powershell.ps1.
In step 6, you use the installation script to install PowerShell 7 on SRV2. This step installs PowerShell 7.2.2, as you can see, using an MSI. The MSI, which you install silently without any user notification, updates the system execution path to add the PowerShell 7 installation folder. At the time of writing, the latest released version of PowerShell is 7.2.2. In step 7, you install the latest preview build (a foretaste of things to come in the next version of PowerShell) and the daily build (for the brave). The code here retrieves the latest supported version of PowerShell 7, plus the preview and daily builds. When you run this recipe, the versions you install are going to be later than what is shown here.
In step 8, you create two sample profile files: an ISE profile and a profile for the console host. Windows PowerShell uses the profile when you launch the PowerShell console. PowerShell 7 also uses the profile (when you run PowerShell 7 in the console or Microsoft Terminal).
In step 9, you can see that you have installed PowerShell 7 (into C:\Program Files) and the latest daily build and preview versions. The specific file versions you see may differ from the output shown here, reflecting the relentless progress of the PowerShell team.
Installing PowerShell 7 Using Chocolatey
Chocolatey is a third-party package management tool for Windows. Chocolatey has a large set of packages you can install, and the Chocolatey tool (choco.exe) provides a rich set of management features. You can install Chocolatey on both Windows Client machines (Windows 10/11 and earlier versions) and, as this recipe demonstrates, you can also install Chocolatey on Windows Server.
Chocolatey has a very large online registry of Windows packages that you can install, simplifying the deployment of applications in your environment. Read more about the company and its products at its website, https://chocolatey.org/.
Getting ready
You run this recipe on SRV1 after you have installed PowerShell 7. The method shown here installs PowerShell 7 using an MSI package. In the Installing PowerShell 7 recipe, you installed PowerShell 7 using the MSI. With PowerShell already installed, this recipe installs Chocolatey but would fail gracefully attempting to reinstall PowerShell 7. If you want to test the installation of PowerShell 7 using Chocolatey, you should remove PowerShell 7.
Run this script using the PowerShell ISE.
How to do it...
- Downloading the installation script for Chocolatey
$ChocoIns = 'C:\Foo\Install-Chocolatey.ps1' $DI = New-Object System.Net.WebClient $DI.DownloadString('https://community.chocolatey.org/install.ps1') | Out-File -FilePath $ChocoIns - Viewing the installation help file
C:\Foo\Install-Chocolatey.ps1 -? - Installing Chocolatey
C:\Foo\Install-Chocolatey.ps1 - Configuring Chocolatey
choco feature enable -n allowGlobalConfirmation - Finding PowerShell (PWSH) on Chocolatey
choco find pwsh - Installing PowerShell 7 using
choco.exechoco install powershell-core –force
How it works...
In step 1, you download the Chocolatey installation script. You need this script to install Chocolatey. This step produces no output.
In step 2, you use Get-Help to view the help information for the Chocolatey install script, with output like this:
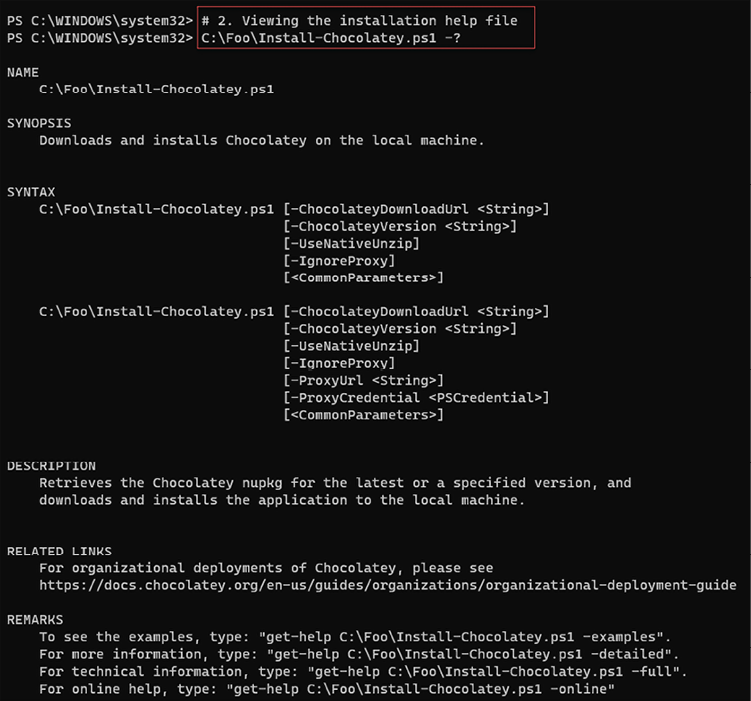
Figure 1.7: Viewing the Chocolatey installation script help details
In step 3, you use the installation script to download and install Chocolatey on SRV1. The output looks like this:
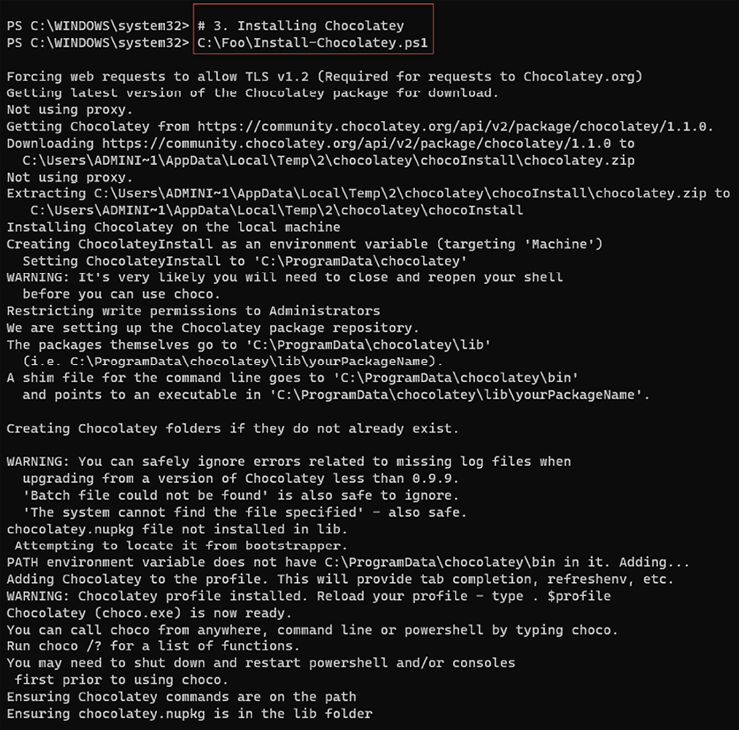
Figure 1.8: Installing Chocolatey
In step 4, you use choco.exe to set certain feature options with the following output:

Figure 1.9: Setting Chocolatey global options
In step 5, you use choco.exe to find PowerShell packages that you can install using Chocolatey.
The output looks like this:
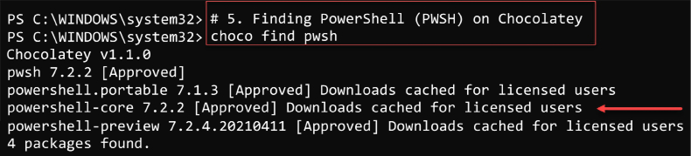
Figure 1.10: Finding PowerShell on Chocolatey
In step 6, you install PowerShell 7 using Chocolatey. There is a lot of output, which looks like this:
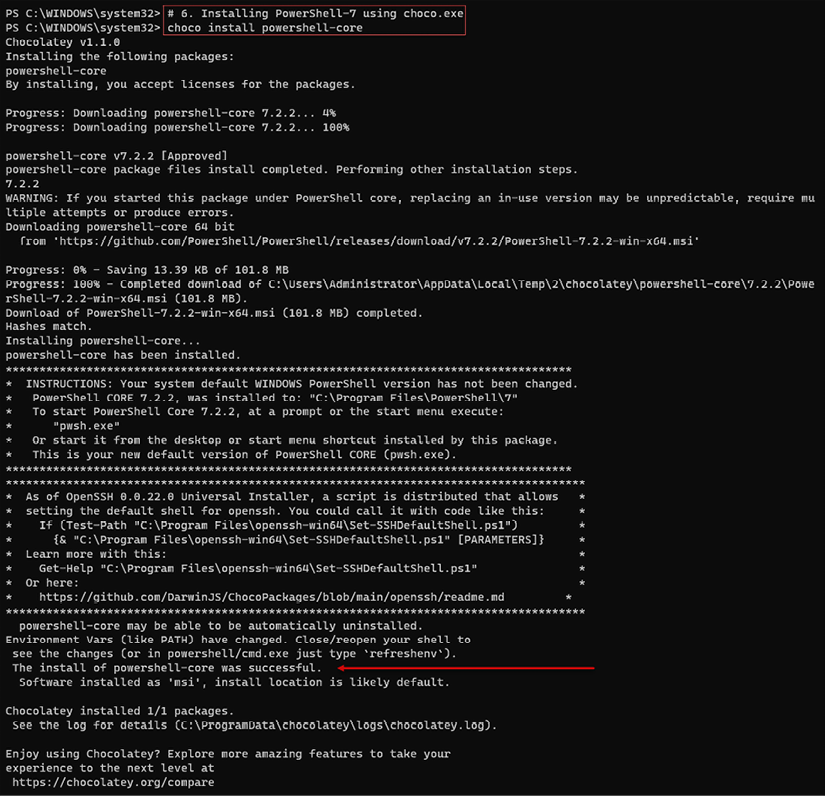
Figure 1.11: Installing PowerShell 7
There’s more...
In step 1, you open a new Windows PowerShell 7 console. Make sure you run the console as the local administrator.
In step 6, you install PowerShell 7 (7.2.2, as you can see in the output). The result shows the successful installation of PowerShell.
If you do not uninstall PowerShell 7, then when you run this step, you will see different output, indicating that you have already installed the product, and thus, the installation fails gracefully.
Using the PowerShell 7 Console
Once you have installed PowerShell 7, you can explore the PowerShell 7 console irrespective of your installation method. In the main, the PowerShell 7 console is similar to the Windows PowerShell console, but you should notice a few differences.
Getting ready
You run this recipe on SRV1 after you have installed PowerShell 7. You can install PowerShell 7 using the installation script (as in the Installing PowerShell 7 recipe), Chocolatey (as in the Installing PowerShell 7 using Chocolatey recipe), or any other mechanism. You run this recipe in the PowerShell 7 console – pwsh.exe.
How to do it...
- Viewing the PowerShell version
$PSVersionTable - Viewing the
$Hostvariable$Host - Looking at the PowerShell process (
PWSH)Get-Process -Id $PID | Format-Custom -Property MainModule -Depth 1 - Looking at resource usage statistics
Get-Process -Id $PID | Format-List CPU,*Memory* - Updating the PowerShell 7 help files
$Before = Get-Help -Name about_* Update-Help -Force | Out-Null $After = Get-Help -Name about_* $Delta = $After.Count - $Before.Count "{0} Conceptual Help Files Added" -f $Delta - Determining available commands
Get-Command | Group-Object -Property CommandType - Examining the Path Variable
$env:path.split(';')
How it works...
In step 1, you view the PowerShell version information contained in $PSVersionTable, which produces output like this:
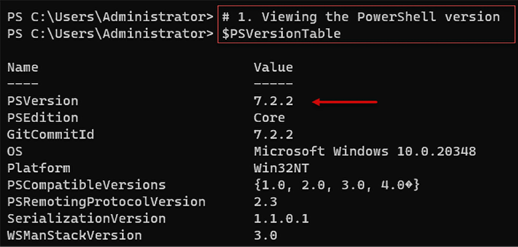
Figure 1.12: Viewing the $PSVersionTable variable
In step 2, you view the contents of the $Host variable, which contains details of the PowerShell host (i.e., the PowerShell 7 console), which looks like this:
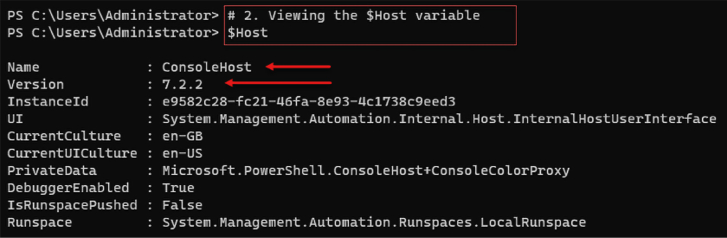
Figure 1.13: Viewing $Host
In step 3, you view the details of the PowerShell process (pwsh.exe) with output like this:
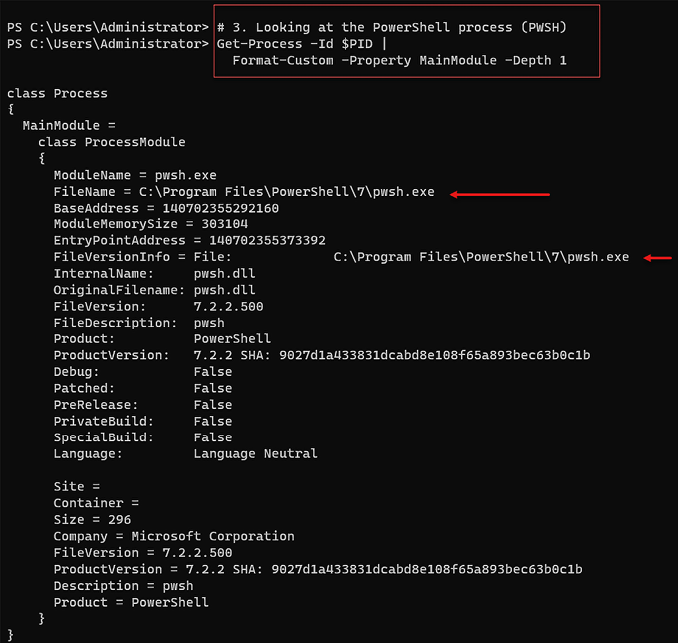
Figure 1.14: Viewing the pwsh process
In step 4, you can observe the resources used by this process by using Get-Process and viewing the resource-related properties, with output like this:
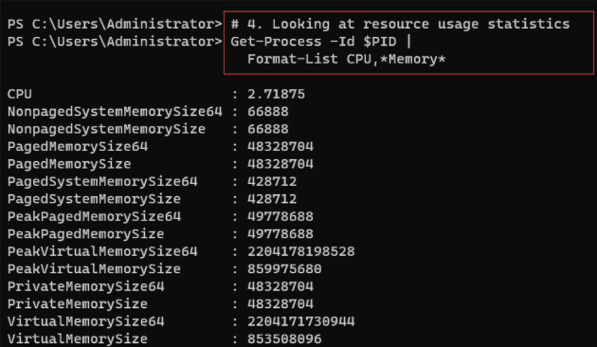
Figure 1.15: Viewing the pwsh resource usage
It is always useful to get the most up-to-date help files, which you can do using Update-Help. In step 5, you update the PowerShell 7 help files and count the number of conceptual help files resulting from updating help. The output of this step looks like this:
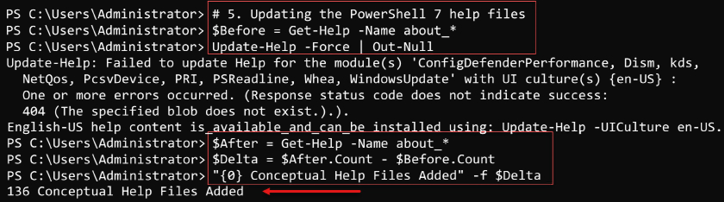
Figure 1.16: Updating the PowerShell 7 help files
In step 6, you use Get-Command to determine the number of commands available to a newly installed version of PowerShell 7.2.2 (in this case!) on a freshly installed version of Windows Server 2022. The output looks like this:
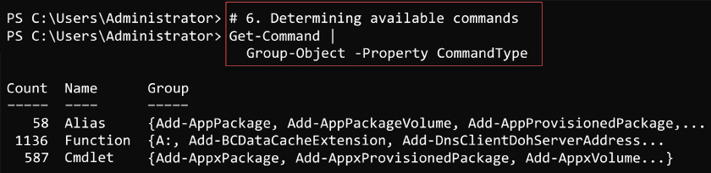
Figure 1.17: Updating the PowerShell 7 help files
In the final step, step 7, you review the contents of the path environment variable, with output like this:
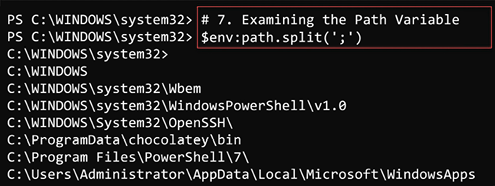
Figure 1.18: Viewing the available commands in PowerShell 7
There’s more...
In step 1, you examine the $PSVersion built-in variable. At the time of writing, the latest released version of PowerShell 7 is 7.2.2, as you can see in the output. However, when you run this step, you may discover you have installed a later version.
You run pwsh.exe to start PowerShell 7 via the console. PowerShell has a built-in variable, $PID, which holds the Windows process ID for the current PowerShell console. This variable can be useful if you have multiple consoles open at one time. You can use Get-Process, as shown in step 2, specifying the process ID, to get details of this PowerShell process.
Building PowerShell 7 Profile Files
Profile files are PowerShell scripts that PowerShell runs at startup. They are easy to create and support a range of deployment scenarios. They enable you to customize your PowerShell environment. See this article on Microsoft’s PowerShell Community blog for more details on PowerShell profile files: https://devblogs.microsoft.com/powershell-community/how-to-make-use-of-powershell-profile-files/.
In this recipe, you examine profile files, download a sample PowerShell profile file, and install it on SRV1. This profile is just for the console. In a later recipe, you install VS Code and create a VS Code-specific profile.
Getting ready
You run this recipe on SRV1 after you have installed PowerShell 7. You should begin this recipe by opening up a PowerShell 7 console.
How to do it...
- Discovering the profile filenames
$ProfileFiles = $PROFILE | Get-Member -MemberType NoteProperty $ProfileFiles | Format-Table -Property Name, Definition - Checking for the existence of each PowerShell profile file
Foreach ($ProfileFile in $ProfileFiles){ "Testing $($ProfileFile.Name)" $ProfilePath = $ProfileFile.Definition.split('=')[1] If (Test-Path -Path $ProfilePath){ "$($ProfileFile.Name) DOES EXIST" "At $ProfilePath" } Else { "$($ProfileFile.Name) DOES NOT EXIST" } "" } - Discovering a Current User/Current Host profile
$CUCHProfile = $PROFILE.CurrentUserCurrentHost "Current User/Current Host profile path: [$CUCHPROFILE]" - Creating a Current User/Current Host profile for the PowerShell 7 console
$URI = 'https://raw.githubusercontent.com/doctordns/PacktPS72/master/' + 'scripts/goodies/Microsoft.PowerShell_Profile.ps1' New-Item $CUCHProfile -Force -WarningAction SilentlyContinue | Out-Null (Invoke-WebRequest -Uri $URI).Content | Out-File -FilePath $CUCHProfile - Exiting from the PowerShell 7 console
Exit - Restarting the PowerShell 7 console and viewing the profile output at startup
Get-ChildItem -Path $PROFILE
How it works...
In step 1, you use the $Profile built-in variable to obtain the filenames of the four profile files in PowerShell, with output like this:
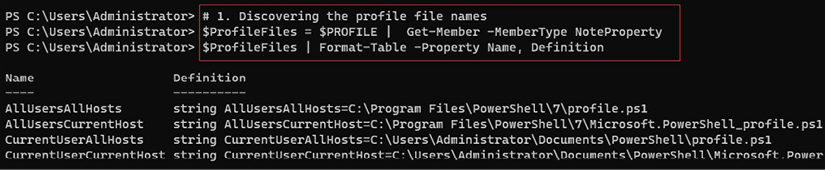
Figure 1.19: Obtaining the PowerShell profile filenames
In step 2, you check to see which, if any, of the four profiles exist, with output like this:
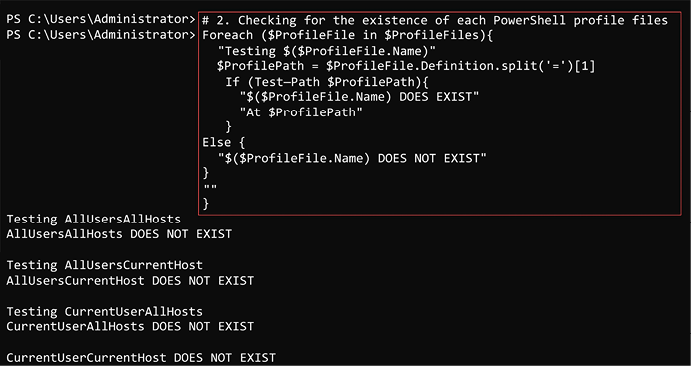
Figure 1.20: Checking for the existence of the profile files
The profile file most IT pros use is the Current User/Current Host profile (aka $Profile). In step 3, you discover the filename for this profile file, with the following output:

Figure 1.21: Viewing the name of the Current User/Current Host profile file
In step 4, you download a sample PowerShell console profile file from GitHub. This step creates no output. After making a new profile file, in step 5, you exit PowerShell 7. After restarting the console, in step 6, you view the details of this profile file. The output from this step looks like this:

Figure 1.22: Viewing the name of the Current User/Current Host profile file
There’s more...
In step 1, you view the built-in profile filenames. As you can see, PowerShell has four profile files you can use. These files enable you to configure a given PowerShell host or all hosts for one or all users. As you can see in step 2, none of the four profile files exist by default.
In step 4, you create the Current User/Current Host profile file based on a code sample you download from GitHub. This profile file is a starting point and demonstrates many things you can do in a profile file.
In step 6, you view the profile file you created earlier. Also, notice that the prompt has changed – the current working directory when you start PowerShell is now C:\Foo.
Exploring Installation Artifacts
Installing PowerShell 7 creates some artifacts that may be useful to better understand how PowerShell 7 and Windows PowerShell differ. The installation folder for PowerShell, as well as the folders holding PowerShell modules, are different from Windows PowerShell.
Getting ready
You run this recipe on SRV1 after you have installed PowerShell 7 and have added a profile file.
How to do it...
- Checking the version table for the PowerShell 7 console
$PSVersionTable - Examining the PowerShell 7 installation folder
Get-ChildItem -Path $env:ProgramFiles\PowerShell\7 -Recurse | Measure-Object -Property Length -Sum - Viewing the PowerShell 7 configuration JSON file
Get-ChildItem -Path $env:ProgramFiles\PowerShell\7\powershell*.json | Get-Content - Checking the initial Execution Policy for PowerShell 7
Get-ExecutionPolicy - Viewing module folders
$I = 0 $ModPath = $env:PSModulePath -split ';' $ModPath | Foreach-Object { "[{0:N0}] {1}" -f $I++, $_ } - Checking the modules
$TotalCommands = 0 Foreach ($Path in $ModPath){ Try { $Modules = Get-ChildItem -Path $Path -Directory -ErrorAction Stop "Checking Module Path: [$Path]" } catch [System.Management.Automation.ItemNotFoundException] { "Module path [$path] DOES NOT EXIST ON $(hostname)" } $TotalCommands = 0 foreach ($Module in $Modules) { $Cmds = Get-Command -Module ($Module.name) $TotalCommands += $Cmds.Count } } - Viewing the totals of the commands and modules
$Mods = (Get-Module * -ListAvailable | Measure-Object).count
"{0} modules providing {1} commands" -f $Mods,$TotalCommands
How it works...
In step 1, you start the PowerShell 7 console on SRV1. The console should look like this:
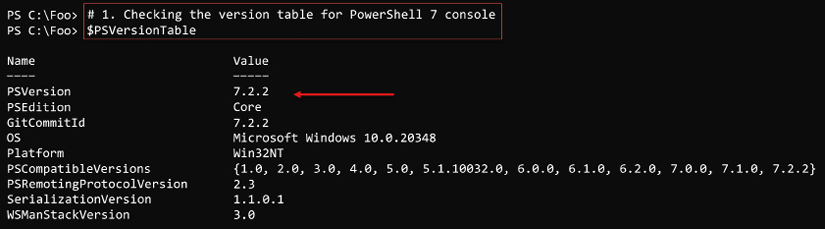
Figure 1.23: Checking PowerShell Version information
In step 2, you use Measure-Object to determine how many files exist in the PowerShell installation folder and how much space those files occupy on the disk. The output of this step looks like this:
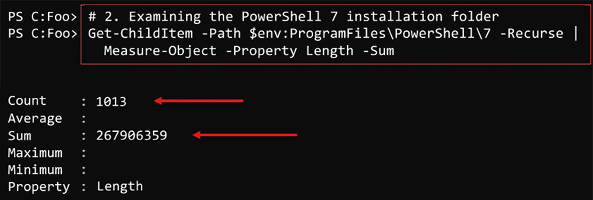
Figure 1.24: Examining the PowerShell 7 installation folder
PowerShell 7 uses the PWSH.JSON file (in the installation folder) to hold certain key settings. In step 3, you examine this file for PowerShell 7.2.2, with output like this:
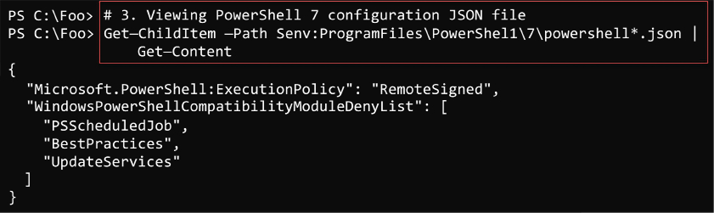
Figure 1.25: Viewing the PWSH.JSON configuration file
In step 4, you check the current execution policy for PowerShell 7, with output as follows:

Figure 1.26: Checking the PowerShell 7 execution policy
PowerShell 7, by default, loads modules from a series of folders as described in the PowerShell variable $PSModulepath variable. In step 5, you display the default module folders for PowerShell 7, with output like this:
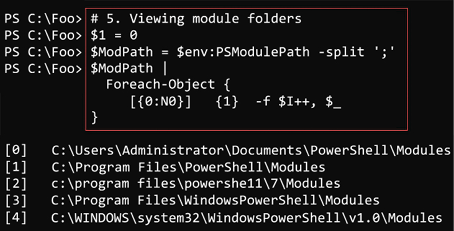
Figure 1.27: Viewing the module folders for PowerShell 7
In step 6, you look at the modules in each module path and determine the total number of commands available via these modules. The output from this step looks like this:
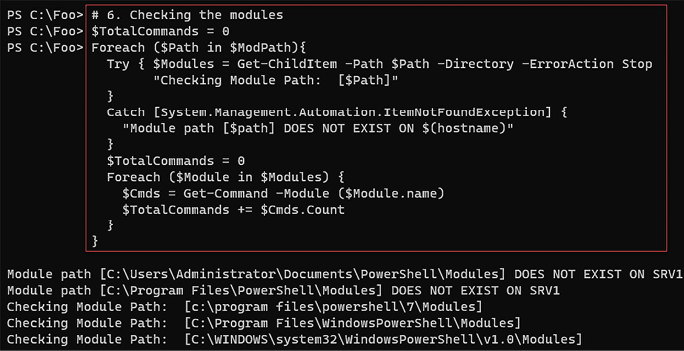
Figure 1.28: Counting the commands available
In the final step in this recipe, step 7, you view the number of modules and commands provided in those modules, with output like this:

Figure 1.29: Counting the commands available
There’s more...
In step 1, you open a new Windows PowerShell console and view the PowerShell version details. In this case, this is version 7.2.2, although, by the time you read this, the PowerShell team may have created newer versions.
As you can see in step 2, the PowerShell pwsh.json file contains both the execution policy and a list of modules that PowerShell 7 should never attempt to load (as these three modules are known to not work with PowerShell 7, even using the Windows PowerShell compatibility mechanism). For reasons best known to themselves, the owners of these modules have declined the opportunity to port them over to work with PowerShell 7, although that may change.
In step 4, you view the current PowerShell 7 execution policy. Note that this policy is independent of the Windows PowerShell execution policy.
In step 5, you view the current module folders. This step uses .NET composite formatting and the PowerShell -f operator. PowerShell provides you with numerous ways to output this information that you may use, including simple variable expansion. Using the method shown in this step can give you more control over the formatting. You can see another example of this type of formatting in step 7.
Installing VS Code
The Windows PowerShell ISE was a great tool that Microsoft first introduced with Windows PowerShell v2 (and vastly improved with v3). This tool has reached feature completeness, and Microsoft has no plans for further development.
However, in its place is Visual Studio Code or VS Code. This open-source tool provides an extensive range of features for IT pros and others. For IT professionals, this should be your editor of choice. VS Code is highly customizable, as the range of extensions demonstrates. While there is a learning curve (as for any new product), VS Code contains all the features you found in the ISE and a lot more.
VS Code, and the available extensions, are works in progress and are constantly evolving and improving. Each new release brings additional features. A recent addition from Draw.IO, for example, is the ability to create diagrams directly in VS Code. Take a look at this post for more details on this diagram tool: https://tfl09.blogspot.com/2020/05/over-weekend-i-saw-tweet-announcing-new.html.
There is a wealth of extensions you might be able to use, depending on your workload. For more details on VS Code, see https://code.visualstudio.com/. And for more information on the many VS Code extensions, you might be able to use https://code.visualstudio.com/docs/editor/extension-gallery#:~:text=You%20can%20browse%20and%20install,on%20the%20VS%20Code%20Marketplace.
For many IT pros using PowerShell 7, an important extension is the PowerShell Integrated Console. This extension implements a separate PowerShell host, the Visual Studio Code Host. This extension implements the same four profile file files, which you can view. However, the AllUsers/This host and Current User/This Host profile files have the name Microsoft.VSCode_profile.ps1. These profile files mean you can use the PowerShell Console host (and its associated profile files) by default but use the VS Code Host when you edit PowerShell files. It is easy to get confused at first. Remember that you only see the VS Code host by default when you open a PowerShell file.
Getting ready
You run this recipe on SRV1 after you have installed PowerShell 7. You run the first part of this recipe in the PowerShell 7 console. Once you have completed installing VS Code, you do the remainder of this recipe using VS Code.
How to do it...
- Downloading the VS Code installation script from the PS Gallery
$VscPath = 'C:\Foo' $RV = "2.8.5.208" Install-PackageProvider -Name 'nuget' -RequiredVersion $RV -Force| Out-Null Save-Script -Name Install-VSCode -Path $ VscPath Set-Location -Path $ VscPath - Reviewing the installation help details
Get-Help -Name C:\Foo\Install-VSCode.ps1 - Running the installation script and adding in some popular extensions
$Extensions = 'Streetsidesoftware.code-spell-checker', 'yzhang.markdown-all-in-one', 'hediet.vscode-drawio' $InstallHT = @{ BuildEdition = 'Stable-System' AdditionalExtensions = $Extensions LaunchWhenDone = $true } .\Install-VSCode.ps1 @InstallHT | Out-Null - Exiting from VS Code by clicking on
File/Exit. - Restarting VS Code as an administrator.
- Click on
Start, typecode,and hit return. - Opening a VS Code Terminal and running PowerShell 7 as administrator.
- Use the Terminal menu to open a new terminal.
- Creating a profile file for VS Code
$SAMPLE = 'https://raw.githubusercontent.com/doctordns/PACKT-PS7/master/' + 'scripts/goodies/Microsoft.VSCode_profile.ps1' (Invoke-WebRequest -Uri $Sample).Content | Out-File $Profile - Updating local user settings for VS Code
# 8. Updating local user settings for VS Code $JSON = @' { "workbench.colorTheme": "Visual Studio Light", "powershell.codeFormatting.useCorrectCasing": true, "files.autoSave": "onWindowChange", "files.defaultLanguage": "powershell", "editor.fontFamily": "'Cascadia Code',Consolas,'Courier New'", "workbench.editor.highlightModifiedTabs": true, "window.zoomLevel": 1 } '@ $Path = $Env:APPDATA $CP = '\Code\User\Settings.json' $Settings = Join-Path $Path -ChildPath $CP $JSON | Out-File -FilePath $Settings - Creating a shortcut to VS Code
$SourceFileLocation = "$env:ProgramFiles\Microsoft VS Code\Code.exe" $ShortcutLocation = "C:\foo\vscode.lnk" # Create a new wscript.shell object $WScriptShell = New-Object -ComObject WScript.Shell $Shortcut = $WScriptShell.CreateShortcut($ShortcutLocation) $Shortcut.TargetPath = $SourceFileLocation # Save the Shortcut to the TargetPath $Shortcut.Save() - Creating a shortcut to PowerShell 7
$SourceFileLocation = "$env:ProgramFiles\PowerShell\7\pwsh.exe" $ShortcutLocation = 'C:\Foo\pwsh.lnk' # Create a new wscript.shell object $WScriptShell = New-Object -ComObject WScript.Shell $Shortcut = $WScriptShell.CreateShortcut($ShortcutLocation) $Shortcut.TargetPath = $SourceFileLocation #Save the Shortcut to the TargetPath $Shortcut.Save() - Building an updated Layout XML file
$XML = @' <?xml version="1.0" encoding="utf-8"?> <LayoutModificationTemplate xmlns="http://schemas.microsoft.com/Start/2014/LayoutModification" xmlns:defaultlayout= "http://schemas.microsoft.com/Start/2014/FullDefaultLayout" xmlns:start="http://schemas.microsoft.com/Start/2014/StartLayout" xmlns:taskbar="http://schemas.microsoft.com/Start/2014/TaskbarLayout" Version="1"> <CustomTaskbarLayoutCollection> <defaultlayout:TaskbarLayout> <taskbar:TaskbarPinList> <taskbar:DesktopApp DesktopApplicationLinkPath="C:\Foo\vscode.lnk" /> <taskbar:DesktopApp DesktopApplicationLinkPath="C:\Foo\pwsh.lnk" /> </taskbar:TaskbarPinList> </defaultlayout:TaskbarLayout> </CustomTaskbarLayoutCollection> </LayoutModificationTemplate> '@ $XML | Out-File -FilePath C:\Foo\Layout.Xml - Importing the start layout XML file. Note: You get an error if this is not run in an elevated session
Import-StartLayout -LayoutPath C:\Foo\Layout.Xml -MountPath C:\ - Creating a profile file for the PWSH 7 consoles
$ProfileFolder = Join-Path ($Env:homeDrive+ $env:HOMEPATH) 'Documents\PowerShell' $ProfileFile2 = 'Microsoft.PowerShell_Profile.ps1' $ConsoleProfile = Join-Path -Path $ProfileFolder -ChildPath $ProfileFile2 New-Item $ConsoleProfile -Force -WarningAction SilentlyContinue | Out-Null $URI2 = 'https://raw.githubusercontent.com/doctordns/PACKT-PS7/master/' + "scripts/goodies/$ProfileFile2" (Invoke-WebRequest -Uri $URI2).Content | Out-File -FilePath $ConsoleProfile - Logging off
logoff.exe - Logging into Windows to observe the updated taskbar
How it works...
In step 1, you get the VS Code installation script from the PS Gallery, which produces no output. In step 2, you view the help information from the Install-VSCode.ps1 script file, with output like this:
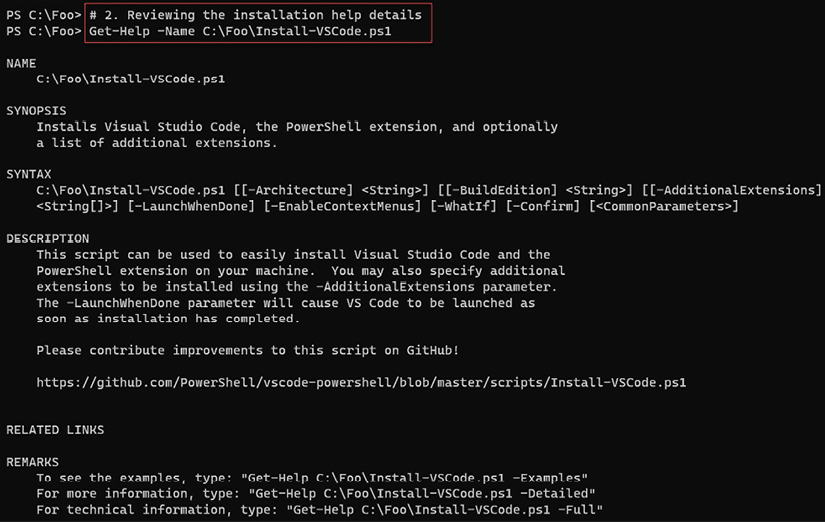
Figure 1.30: Viewing the Install-VSCode.ps1 help information
In step 3, you install VS Code, with output that looks like this:
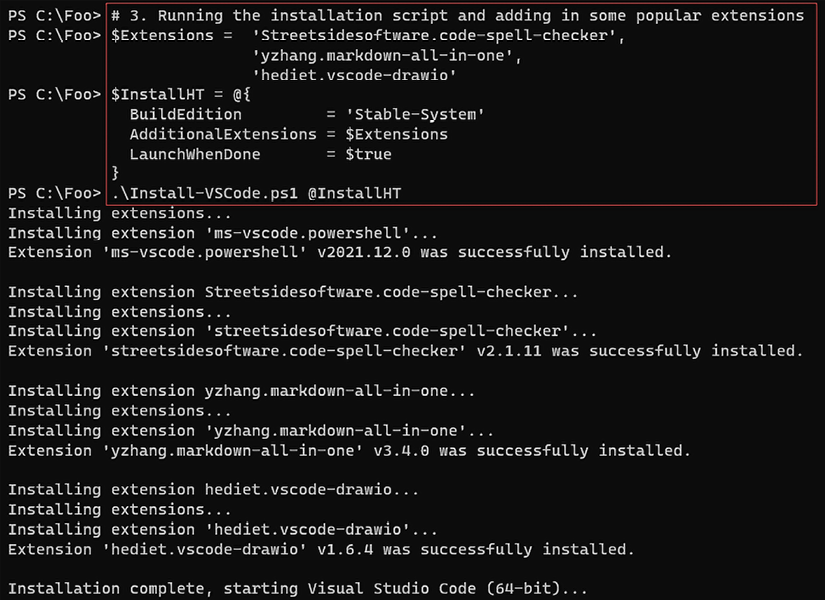
Figure 1.31: The PowerShell 7 console
After installing VS Code, the installation script starts VS Code (as an ordinary user) with output that looks like this:
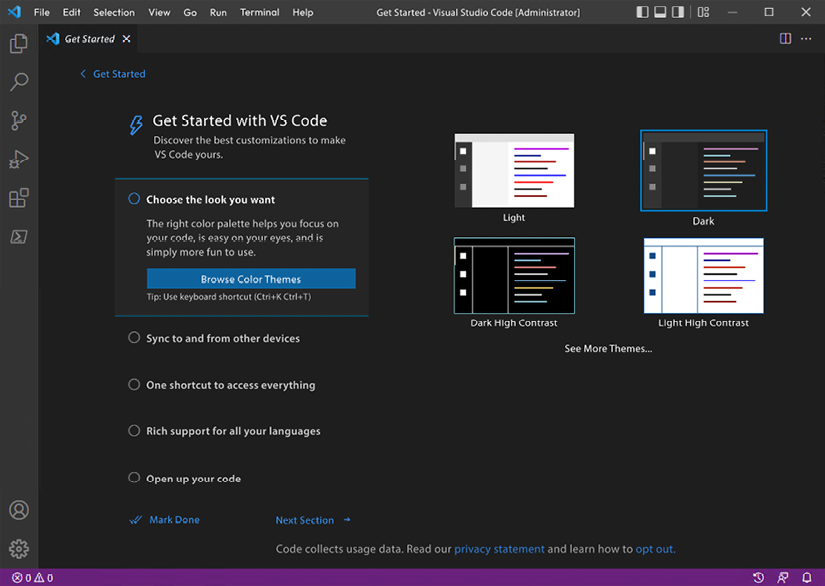
Figure 1.32: The initial VS Code window
In step 4, you exit out of this VS Code instance, and in step 5, you restart VS Code but run it as an administrator. With these two steps, you open VS Code as an administrator.
In step 6, you use the VS Code GUI to create a new terminal, with output like this:
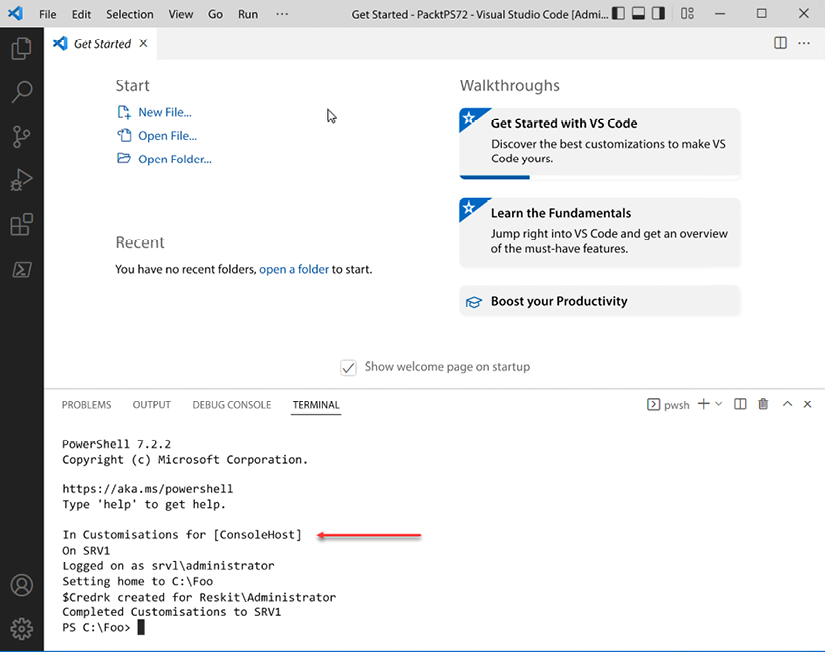
Figure 1.33: Running a new terminal
In the next steps, which generate no console output, you configure VS Code for your environment. In step 7, you create a new profile file specifically for the VS Code PowerShell extension. In step 8, you update the VS Code local user settings. In step 9, you create a shortcut to the VS Code executable (code.exe) and save it in C:\Foo. In step 10, you create a new shortcut for the PowerShell 7 console, which you also store in C:\Foo. In step 11, you build an XML file describing the Windows toolbar. In step 12, you import the new start bar layout (but note it does not take effect until you log in again). Then in step 13, you create profiles for the new PowerShell 7 console, also based on the downloaded profile file. Finally, in step 14, you log off SRV1.
In step 15, you log in again to Windows as the local administrator. When you log in, you can see the new Windows toolbar, with shortcuts for the PowerShell 7 console and VS Code, like this:
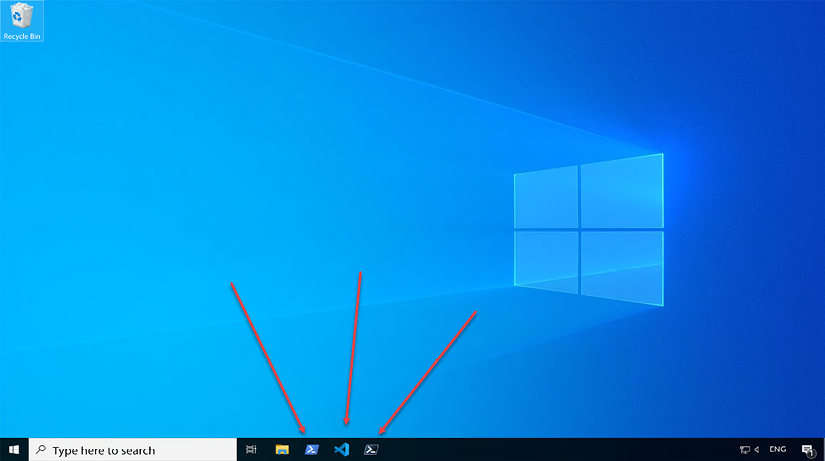
Figure 1.34: Viewing the updated Windows toolbar
There’s more...
In step 1, you open a new Windows PowerShell 7 console. Make sure you run the console as the local administrator.
In step 15, you can see the updated Window toolbar with shortcuts to the Windows PowerShell console, VS Code, and the PowerShell 7 console.
Installing the Cascadia Code Font
Fonts, like color schemes in general, are a very personal thing. Some people love the comic sans font, for example, while others loathe it. Some love dark themes, and others don’t. For programming, including PowerShell (with the console, VS Code, and possibly even Notepad), fixed-width fonts are easier to use. But the choice of which font is always a personal preference.
As part of the Visual Studio Code launch, Microsoft also created a new and free font that you can download and use at the PowerShell 7 console and inside VS Code. This recipe shows how you can download the font, install it, and set this font to be the default in VS Code.
This recipe shows how to install the Cascadia Code font, but you can choose many great fonts. See this article on (arguably!) the ten best fonts for use with VS Code: https://toastofcode.com/best-fonts-for-programming-with-vscode/.
And should you want to use a different font for VS Code, you can adapt this recipe to make use of whatever font you wish. Or use the VS Code settings menus to change the font as you may want.
How to do it...
- Getting download locations
$CascadiaRelURL = 'https://github.com/microsoft/cascadia-code/releases' $CascadiaRelease = Invoke-WebRequest -Uri $CascadiaRelURL $Fileleaf = ($CascadiaRelease.Links.href | Where-Object { $_ -match $CascadiaFont } | Select-Object -First 1) $CascadiaPath = 'https://github.com' + $FileLeaf $CascadiaFile = 'C:\Foo\CascadiaFontDL.zip' - Downloading the Cascadia Code font file archive
Invoke-WebRequest -Uri $CascadiaPath -OutFile $CascadiaFile - Expanding the font archive file
$FontFolder = 'C:\Foo\CascadiaCode' Expand-Archive -Path $CascadiaFile -DestinationPath $FontFolder - Installing the Cascadia Code font
$FontFile = 'c:\Foo\CascadiaCode\ttf\CascadiaCode.ttf'
$FontShellApp = New-Object -Com Shell.Application
$FontShellNamespace = $FontShellApp.Namespace(0x14)
$FontShellNamespace.CopyHere($FontFile, 0x10)
How it works...
In step 1, you determine the location of the latest release of the font and set a variable to the location to download the font.
In step 2, you use Invoke-WebRequest to download the font archive. Then in step 3, you use Expand-Archive to expand the archive. Finally, in step 4, you install the Cascadia font.
The steps in this recipe produce no console output – but you can see the change in VS Code after you run these steps.
There’s more...
In step 1, you determine the location of the latest release of the Cascadia Code font on GitHub. The font is heavily used and has been subject to minor updates and improvements over time. This step ensures you get the latest version. The remaining steps expand the downloaded archive and then install the font. Once you complete this recipe, you should observe the font inside VS Code.
In step 2, you download the latest version of the font – but as a ZIP archive, which, in step 3, you expand and then install (in step 4).
Exploring PSReadLine
Early versions of PowerShell were monochrome, although the terminal (conhost.exe) did provide some limited coloring. These versions of Windows PowerShell also lacked some of the cool features found in Linux shells.
With PowerShell 4, PowerShell included a new module, PSReadLine. The module provides a command-line editing experience that is on a par with the best of the Linux command shells (e.g., BASH). The PSReadLine module provides additional console editing features within both PowerShell 7 and Windows PowerShell.
When you type into a PowerShell console, PSReadLine intercepts your keystrokes to provide syntax coloring, simple syntax error notification, etc. PSReadLine enables you to customize your environment to suit your personal preferences. Some key features of the module include:
- Syntax coloring of the command-line entries
- Multiline editing
- History management
- Customizable key bindings
- Highly customizable
For an overview of PSReadLine, see https://learn.microsoft.com/powershell/module/psreadline/about/about_psreadline. And for more details, you can view the PSReadLine’s GitHub README file: https://github.com/PowerShell/PSReadLine/blob/master/README.md.
There are several minor issues you may need to understand. One issue is the naming of this module. The original name of the module was PSReadline. At some point, the module’s developers changed the module’s name to PSReadLine (capitalizing the L character in the module name). Unfortunately, that change caused Update-Help to fail since there is case sensitivity in module names). You can fix this by manually updating the module’s folder name from PSReadline to PSReadLine.
Another issue arises if you use VS Code. The PSReadLine module ships natively with PowerShell 7. If you use VS Code’s PowerShell Integrated Terminal, you cannot load any newer version of PSReadline. At least until the development team updates the PowerShell extension to utilize the updated version of PSReadLine. This is by design. For most IT pros, this probably does not matter much. But you may find later versions of PSReadLine contains features you want – if so, you should be able to use the Preview (i.e., beta!) version of the PowerShell extension, which supports the latest version of PSReadLine.
A final issue relates to changes made at V2. With the module’s V2 release, the dev team made some changes that were not backward compatible. But be aware that some older scripts may need adjusting. Many blog articles, for example, use the older V1 syntax for Set-PSReadLineOption, which fails with later versions of the module. You may still see the old syntax if you use your search engine to discover examples. Likewise, some of the examples in this recipe fail should you run them utilizing PSReadline V1. Over time, though, the documentation and blog posts should catch up.
You run this recipe on SRV1 after you have installed PowerShell 7. Run this recipe in VS Code after configuring VS Code and loading the Cascadia Code font.
How to do it...
- Getting commands in the PSReadline module
Get-Command -Module PSReadLine - Getting the first 10 PSReadLine key handlers
Get-PSReadLineKeyHandler | Select-Object -First 10 Sort-Object -Property Key | Format-Table -Property Key, Function, Description - Discovering a count of unbound key handlers
$Unbound = (Get-PSReadLineKeyHandler -Unbound).count "$Unbound unbound key handlers" - Getting the PSReadline options
Get-PSReadLineOption - Determining the VS Code theme name
$Path = $Env:APPDATA $CP = '\Code\User\Settings.json' $JsonConfig = Join-Path $Path -ChildPath $CP $ConfigJSON = Get-Content $JsonConfig $Theme = $ConfigJson | ConvertFrom-Json | Select-Object -ExpandProperty 'workbench.colorTheme' - Changing the VS Code colors
If ($Theme -eq 'Visual Studio Light') {
  Set-PSReadLineOption -Colors @{
    Member    = "'e[33m"
    Number    = "'e[34m"
    Parameter = "'e[35m"
    Command   = "'e[34m"
  }
}
How it works...
In step 1, you use Get-Command to discover commands in the PSReadLine module, with
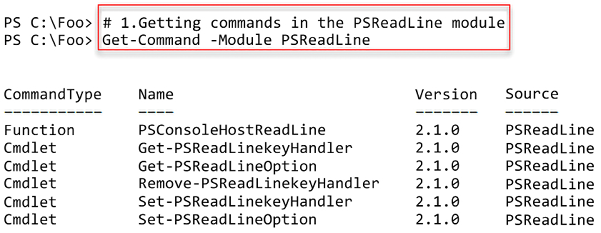
Figure 1.35: Discovering commands in the PSReadLine module
In step 2, you use Get-PSReadLineKeyHandler to discover some of the key handlers implemented by PSReadline, with output like this:
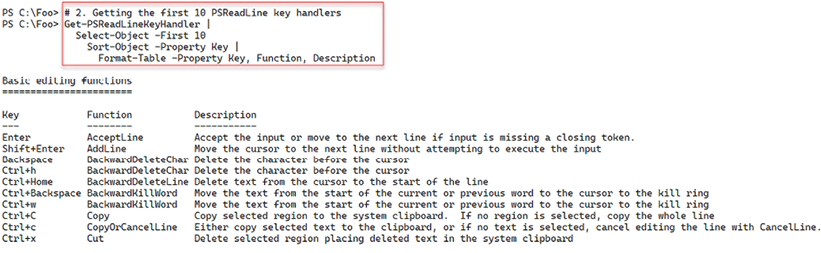
Figure 1.36: Viewing ten PSReadLine key handlers
In step 3, you calculate how many key handers are unbound and are available for you to use. The output from this step is:

Figure 1.37: Counting unbound key handlers
PSReadLine has many options you can set. In step 4, you use the Get-PSReadLineOption command to view the option settings, with output like this:
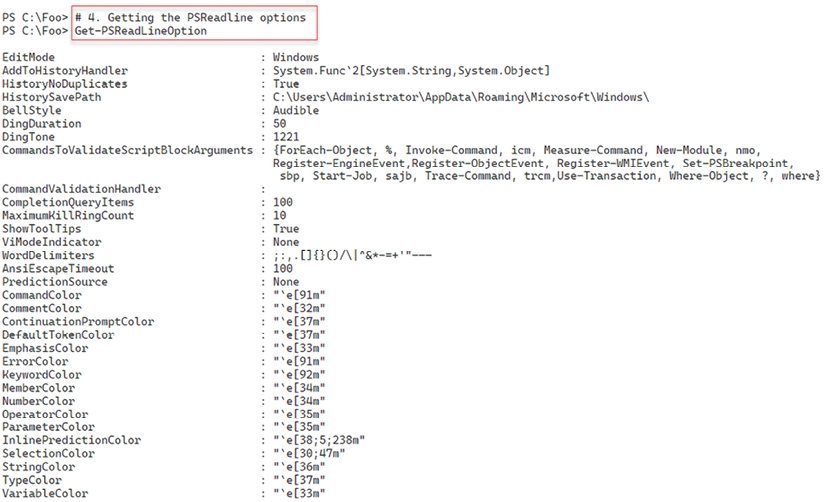
Figure 1.38: Counting unbound key handlers
In step 5, you determine the current VS Code theme, and in step 6, you change the PowerShell token colors, but only if the theme set is the Visual Studio Light theme. These two steps produce no console output.
There’s more...
In step 1, you open a new Windows PowerShell console. Make sure you run the console as the local administrator.
In step 3, you view the first ten of the PSReadLine’s key handlers. Using PowerShell, PSReadLine captures specific keyboard sequences (e.g., Alt + L) and uses an assigned key handler to carry out some action. Typing Alt + L clears the terminal window (in VS Code and the PowerShell console). PSReadline implements a range of key handers with plenty of room for you to customize the editing experience and provide significant customization of the shell. As you can see in step 3, you can use over 100 key combinations to implement your own customizations.
The screenshots throughout most of this book use this color theme. You could extend your profile files to update token colors each time you start a VS Code terminal.
Join our community on Discord
Join our community’s Discord space for discussions with the author and other readers:

