Download code from GitHub
Writing Terraform Configurations
When you start writing Terraform configurations, you will notice very quickly that the language provided by Terraform is very rich and allows for a lot of manipulation.
In the recipes in this chapter, you will learn how to use the Terraform language effectively to apply it to real-life business scenarios. We will discuss how to use providers by specifying their version, and adding aliases to use multiple instances of the same provider. Then we will discuss how to make the code more dynamic with variables and outputs, and we will consider the use of built-in functions and conditions.
Finally, we will learn how to add dependencies between resources, add custom checks with pre- and postconditions, and check the provisioned infrastructure.
All the code examples explained in this book are for illustrative purposes only. Their purpose is to provision cloud infrastructure resources, which may have a cost depending on the cloud used. I strongly suggest that you delete these resources either manually or via the terraform destroy command, which we’ll look at in detail in the recipe Destroying infrastructure resources in Chapter 6, Applying a Basic Terraform Workflow. Additionally, in a lot of the code on the GitHub repository of this chapter, you’ll see the use of random resources, which allow you to have unique resources.
In this chapter, we will cover the following recipes:
- Configuring Terraform and the provider version to use
- Adding alias to a provider to use multiple instances of the same provider
- Manipulating variables
- Keeping sensitive variables safe
- Using local variables for custom functions
- Using outputs to expose Terraform provisioned data
- Calling Terraform’s built-in functions
- Using YAML files in Terraform configuration
- Writing conditional expressions
- Generating passwords with Terraform
- Managing Terraform resource dependencies
- Adding custom pre- and postconditions
- Using checks for infrastructure validation
Let’s get started!
Technical requirements
For this chapter, you need to have the Terraform binary installed on your computer. The source code for this chapter is available at https://github.com/PacktPublishing/Terraform-Cookbook-Second-Edition/tree/main/CHAP02.
Configuring Terraform and the provider version to use
The default behavior of Terraform is that, when executing the terraform init command, the version of the Terraform binary (also called the Command-Line Interface (CLI)) used is the one installed on the local workstation. In addition, this command downloads the latest version of the providers used in the code.
Also, as we learned in Chapter 1, Setting Up the Terraform Environment, in the Upgrading Terraform providers recipe, this command creates the Terraform dependencies file, .terraform.lock.hcl.
However, for compatibility reasons, it is always advisable to avoid surprises so that you can specify which version of the Terraform binary is going to be used in the Terraform configuration. The following are some examples:
- A Terraform configuration that uses language constructs introduced in version 0.12 must be executed with that or a greater version
- A Terraform configuration that contains new features, such as
countandfor_each, in modules must be executed with Terraform version 0.13 or greater
For more details about the HCL syntax, read the documentation at https://www.terraform.io/docs/configuration/syntax.html.
In the same way and for the same reasons of compatibility, we may want to specify the provider version to be used.
In this recipe, we will learn how to specify the Terraform version, as well as the provider version, that will be used.
Getting ready
To start this recipe, we will write a basic Terraform configuration file that contains the following code:
variable "resource_group_name" {
  default = "rg_test"
}
resource "azurerm_resource_group" "rg" {
  name     = var.resource_group_name
  location = "westeurope"
}
resource "azurerm_public_ip" "pip" {
  name                         = "bookip"
  location                     = "westeurope"
  resource_group_name          = azurerm_resource_group.rg.name
  allocation_method = "Dynamic"
  domain_name_label            = "bookdevops"
}
The source code of this Terraform configuration is available at https://github.com/PacktPublishing/Terraform-Cookbook-Second-Edition/blob/main/CHAP02/version/specific-version.tf.
This example code provides resources in Azure (a resource group and a public IP address).
For more details about the Terraform azurerm provider, read the following documentation: https://registry.terraform.io/providers/hashicorp/azurerm.
This Terraform configuration contains the improvements that were made to the HCL 2.0 language since Terraform 0.12 using the new interpolation syntax.
For more details about these HCL enhancements, go to https://www.slideshare.net/mitchp/terraform-012-deep-dive-hcl-20-for-infrastructure-as-code-remote-plan-apply-125837028.
Finally, when executing the terraform plan command with this configuration, we get the following error messages:

Figure 2.1: A Terraform plan without a specified version
This means that, currently, this Terraform configuration is not compatible with the latest version of the provider (version 2.56).
Now, we need to be aware of the following compliances:
- This configuration can only be executed if Terraform 0.13 (or higher) is installed on the local workstation.
- Our current configuration can be executed even if the
azurermprovider evolves with breaking changes.
Regarding the new features provided by Terraform 0.13, read the change log at https://github.com/hashicorp/terraform/blob/master/CHANGELOG.md and the upgrade guide at https://developer.hashicorp.com/terraform/language/v1.1.x/upgrade-guides/0-13.
The source code of this recipe is available at https://github.com/PacktPublishing/Terraform-Cookbook-Second-Edition/tree/main/CHAP02/version.
How to do it…
First, we specify the Terraform version to be installed on the local workstation:
- In the Terraform configuration, add the following block:
terraform { required_version = ">= 0.13,<=1" } - To specify the provider source and version to use, we need to add the
required_providerblock inside the sameterraformblock configuration:terraform { ... required_providers { azurerm = { version = "2.10.0" } } }
How it works…
When executing the terraform init command, Terraform will check that the version of the installed Terraform binary that executes the Terraform configuration corresponds to the version specified in the required_version property of the terraform block.
If it matches, it won’t throw an error as it is greater than version 0.13. Otherwise, it will throw an error:

Figure 2.2: Terraform version incompatibility
Regarding the specification of the provider version, when executing the terraform init command, if no version is specified, Terraform downloads the latest version of the provider. Otherwise, it downloads the specified version, as shown in the following two screenshots.
The following screenshot shows the provider plugin that will be downloaded from the specified source without us specifying the required version (at the time of writing, the latest version of the provider is 3.17.0):

Figure 2.3: Terraform init downloads the latest version of the provider
As we can see, the specific version of the azurerm provider (3.17.0) has been downloaded.
In addition, the following screenshot shows the azurerm provider plugin that will be downloaded when we specify the required version (2.10.0):

Figure 2.4: Terraform init downloads the specified provider version
As we can see, the specified version of the azurerm provider (2.10.0) has been downloaded.
For more details about the required_version block and provider versions, go to https://www.terraform.io/docs/configuration/terraform.html#specifying-required-provider-versions.
In the required_version block, we also add the source property, which was introduced in version 0.13 of Terraform and is documented at https://www.terraform.io/language/upgrade-guides/0-13#explicit-provider-source-locations.
There’s more…
In this recipe, we learned how Terraform downloads the azurerm provider in several ways. What we did here applies to all providers you may wish to download.
It is also important to mention that the version of the Terraform binary that will be used is specified in the Terraform state file. This is to ensure that nobody applies this Terraform configuration with a lower version of the Terraform binary, thus ensuring that the format of the Terraform state file conforms with the correct version of the Terraform binary.
In the next recipe, we will implement a provider alias to use multiple instances of the same provider.
See also
- For more information about the properties of the Terraform block, go to https://www.terraform.io/language/settings.
- For more information about the properties of the providers, go to https://www.terraform.io/language/providers/configuration.
- More information about Terraform binary versioning is documented at https://www.terraform.io/plugin/sdkv2/best-practices/versioning.
Adding alias to a provider to use multiple instances of the same provider
When we write Terraform configuration, some providers contain properties for resource access and authentication such as a URL, authentication token, username, or password.
If we want to use multiple different configurations of the same provider in one Terraform configuration, for example, to provision resources in multiple Azure subscriptions in the same configuration, we can use the alias provider property.
Let’s get started!
Getting ready
First, apply this basic Terraform code to create resources on Azure:
provider "azurerm" {
  subscription_id = "xxxx-xxx-xxx-xxxxxx"
  features {}
}
resource "azurerm_resource_group" "rg" {
  name     = "rg-sub1"
  location = "westeurope"
}
resource "azurerm_resource_group" "rg2" {
  name     = "rg-sub2"
  location = westeurope"
}
This Terraform configuration will create two Azure resource groups on the subscription that is configured by the provider (or in the default subscription on your Azure account).
In order to create an Azure resource group in another subscription, we need to use the alias property.
In this recipe, we will use the alias provider property, and to illustrate it we will provision two Azure resource groups in two different subscriptions in one Terraform configuration.
The requirement for this recipe is to have an Azure account, which you can get for free here: https://azure.microsoft.com/en-us/free/
We will also use the azurerm provider with basic configuration.
You can find your available active subscriptions (subscription IDs) at https://portal.azure.com/#view/Microsoft_Azure_Billing/SubscriptionsBlade.
The source code of this recipe is available here: https://github.com/PacktPublishing/Terraform-Cookbook-Second-Edition/tree/main/CHAP02/alias
How to do it…
Perform the following steps to use multiple instances from one provider:
- In
main.tf, update the initial Terraform configuration in theprovidersection:provider "azurerm" { subscription_id = "xxxx-xxx-xxxxx-xxxxxx" alias = "sub1" features {} } provider "azurerm" { subscription_id = "yyyy-yyyyy-yyyy-yyyyy" alias = "sub2" features {} } - Then update the two existing
azurerm_resource_groupresources:resource "azurerm_resource_group" "example1" { provider = azurerm.sub1 name = "rg-sub1" location = "westeurope" } resource "azurerm_resource_group" "example2" { provider = azurerm.sub2 name = "rg-sub2" location = "westeurope" } - Finally, to apply the changes, run the Terraform workflow with the
init,plan, andapplycommands.
How it works…
In Step 1, we duplicate the provider (azurerm) block and, on each provider, we add the alias property with an identification name. The first is sub1 and the second is sub2.
Then we add the different subscription_id properties to specify the subscription where the resource will be created.
In Step 2, in each azurerm_resource_group resource, we add the provider property with a value that corresponds to that of the alias of the desired provider.
Each azurerm_resource_group resource targets the subscription using the provider’s alias.
Finally, we run the terraform init, plan and apply commands. The screenshot below shows the terraform apply command:
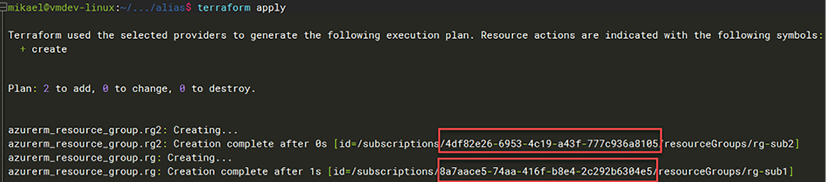
Figure 2.5: Running the apply command
We can see the two different subscriptions where the Azure resource group will be created.
See also
- The documentation of the provider
aliasis available at https://www.terraform.io/language/providers/configuration#alias-multiple-provider-configurations. - Here’s a great article on using the provider
alias: https://build5nines.com/terraform-deploy-to-multiple-azure-subscriptions-in-single-project/.
Manipulating variables
When you write a Terraform configuration where all the properties are hardcoded in the code, you often find yourself faced with the problem of having to duplicate it to reuse it.
In this recipe, we’ll learn how to make the Terraform configuration more dynamic by using variables.
Getting ready
To begin, we are going to work on the main.tf file, which contains a basic Terraform configuration:
resource "azurerm_resource_group" "rg" {
  name     = "My-RG"
  location = "West Europe"
}
As we can see, the name and location properties have values statically written in the code.
Let’s learn how to make them dynamic using variables.
The source code of this recipe is available at https://github.com/PacktPublishing/Terraform-Cookbook-Second-Edition/tree/main/CHAP02/variables.
How to do it…
Perform the following steps:
- In the same
main.tffile, add the following variable declarations:variable "resource_group_name" { description ="The name of the resource group" } variable "location" { description ="The name of the Azure region" default ="westeurope" } - Then, modify the Terraform configuration we had at the beginning of this recipe so that it refers to our new variables, as follows:
resource "azurerm_resource_group" "rg" { name = var.resource_group_name location = var.location } - Finally, in the same folder that contains the
main.tffile, create a new file calledterraform.tfvarsand add the following content:resource_group_name = "My-RG" location = "westeurope"
How it works…
In Step 1, we wrote the declaration of the two variables, which consists of the following elements:
- A variable name: This must be unique to this Terraform configuration and must be explicit enough to be understood by all the contributors of the code.
- A description of what this variable represents: This description is optional but is recommended because it can be displayed by the CLI and can also be integrated into the documentation, which is automatically generated.
- A default value: This is optional. Not setting a default value makes it mandatory to enter a value.
Then, in Step 2, we modified the Terraform configuration to use these two variables. We did this using the var.<name of the variable> syntax.
Finally, in Step 3, we set values for the variables in the terraform.tfvars file, which is used natively by Terraform.
The result of executing this Terraform configuration is shown in the following screenshot:
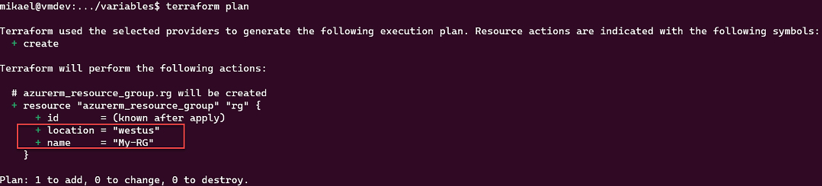
Figure 2.6: Using the terraform.tfvars file
There’s more…
Setting a value for the variable is optional in the terraform.tfvars file since we have set a default value for the variable.
Apart from this terraform.tfvars file, it is possible to give a variable a value using the -var option of the terraform plan and terraform apply commands, as shown in the following command:
terraform plan -var "location=westus"
So, with this command, the location variable declared in our code will have a value of westus instead of westeurope.
In addition, in the 0.13 version of Terraform, we can now create custom validation rules for variables, which makes it possible for us to verify a value during the terraform plan execution.
In our recipe, we can complete the location variable with a validation rule in the validation block as shown in the following code:
variable "location" {
  description ="The name of the Azure location"
  default ="westeurope"
  validation {
    condition = contains(["westeurope","westus"], var.location)          error_message = "The location must be westeurope or westus."
  }
}
In the preceding configuration, the rule checks if the value of the location variable is westeurope or westus.
If you put in an invalid value for the location variable, such as francecentrale, the validation rule will display The location must be westeurope or westus:
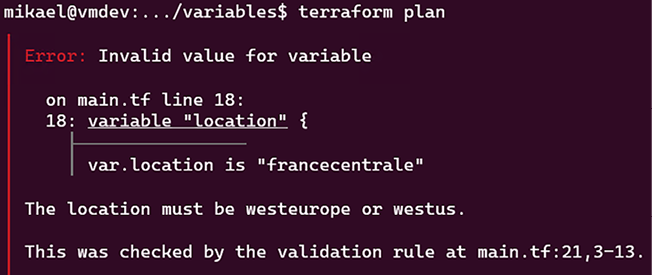
Figure 2.7: Variable validation
For more information about variable custom rules validation, read the documentation at https://www.terraform.io/docs/configuration/variables.html#custom-validation-rules.
Finally, there is another alternative to setting a value to a variable, which consists of setting an environment variable called TF_VAR_<variable name>. In our case, we can create an environment variable called TF_VAR_location with a value of westus and then execute the terraform plan command in the classical way.
Note that using the -var option or the TF_VAR_<name of the variable> environment variable doesn’t hardcode these variables’ values inside the Terraform configuration. Terraform makes it possible for us to give values of variables on the fly. But be careful – these options can have consequences if the same code is executed with other values initially provided in parameters and if the plan’s output isn’t reviewed carefully.
See also
In this recipe, we looked at the basic use of variables. We will learn how to protect sensitive variables in the next recipe, and we will examine more advanced uses of these variables when we learn how to manage environments in Chapter 3, Scaling Your Infrastructure with Terraform, in the Managing infrastructure in multiple environments recipe.
For more information on Terraform variables, refer to the documentation at https://www.terraform.io/docs/configuration/variables.html.
Keeping sensitive variables safe
In the Manipulating variables recipe in this chapter, we learned how to use variables to make our Terraform configuration more dynamic. By default, all variables’ values used in the configuration will be stored in clear text in the Terraform state file, and this value will also be in clear text in the console output execution.
In this recipe, we will learn how to keep Terraform variable information safe from prying eyes by not displaying their values in clear text in the console output.
Getting ready
To start with, we will use the Terraform configuration available at https://github.com/PacktPublishing/Terraform-Cookbook-Second-Edition/tree/main/CHAP02/sample-app, which provisions an Azure Web App with custom app settings.
To illustrate this, we will add a custom application API key, which has a sensitive value, in the key-value app setting.
The source code of this recipe is available at https://github.com/PacktPublishing/Terraform-Cookbook-Second-Edition/tree/main/CHAP02/sample-app.
How to do it…
Perform the following steps:
- In the
main.tffile, which contains our Terraform configuration, inazurerm_linux_web_appwe will add anapp_settingsproperty that is set with theapi_keyvariable:resource "azurerm_linux_web_app" "app" { name = "${var.app_name}-${var.environment} -${random_string.random.result}” location = azurerm_resource_group.rg-app.location resource_group_name = azurerm_resource_group.rg-app.name service_plan_id = azurerm_service_plan.plan-app.id site_config {} app_settings = { API_KEY = var.api_key } } - Then, in
variable.tf, declare thecustom_app_settingsvariable:variable "api_key " { description = "Custom application api key" sensitive = true } - In
terraform.tfvars, we instantiate this variable with these values (as an example for this book):api_key = "xxxxxxxxxxxxxxxxx" - Finally, we run the
terraform plancommand. The following screenshot shows a part of this execution:
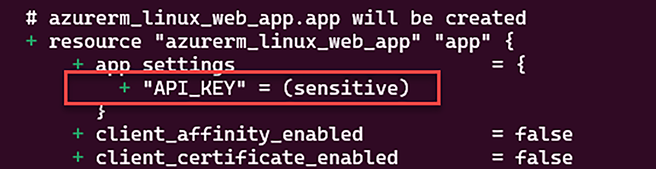
Figure 2.8: Terraform doesn’t display the sensitive variable value
- We can see that the value of the
api_keyproperty (which is in uppercase in the Terraform plan output) inapp_settingsisn’t displayed in the console output.
How it works…
In the recipe, we add the sensitive flag to the api_key variable, which enables the protection of the variable. By enabling this flag, the terraform plan command (and the apply command) doesn’t display the value of the variable in the console output in clear text.
There’s more…
Be careful! The sensitive variable property protects the value of this variable from being displayed in the console output, but the value of this is still written in clear text in the Terraform state file.
Then, if this Terraform configuration is stored in a source control such as Git, the default value of this variable or the tfvars file is also readable as clear text in the source code.
So, to protect the value of this variable in source control, we can set the value of this variable by using Terraform’s environment variable technique with the format TF_VAR_<variable name> as we learned in the previous recipe, Manipulating variables.
In our scenario, we can set the TF_VAR_api_key = "xxxxxxxxxxx" environment variable just before the execution of the terraform plan command.
One scenario in which the sensitive variable is effective is when Terraform is executed in a CI/CD pipeline; then, unauthorized users can’t read the value of the variable.
Finally, one best practice is to use an external secret management solution such as Azure Key Vault or HashiCorp Vault (https://www.vaultproject.io/) to store your secrets and use Terraform providers to get these secrets’ values.
See also
- Documentation for
sensitivevariables is available at https://www.terraform.io/language/values/variables#suppressing-values-in-cli-output. - For more information on
sensitivevariables, read the Terraform tutorial at https://learn.hashicorp.com/tutorials/terraform/sensitive-variables.
Using local variables for custom functions
In the Manipulating variables recipe in this chapter, we learned how to use variables to dynamize our Terraform configuration. Sometimes, this can be a bit tedious when it comes to using combinations of variables.
In this recipe, we will learn how to implement local variables and use them as custom functions.
Getting ready
To start with, we will use the following Terraform configuration:
variable "application_name" {
  description = "The name of application"
}
variable "environment_name" {
  description = "The name of environment"
}
variable "country_code" {
  description = "The country code (FR-US-...)"
}
resource "azurerm_resource_group" "rg" {
  name = "XXXX" # VARIABLE TO USE
  location = "West Europe"
}
resource "azurerm_public_ip" "pip" {
  name = "XXXX" # VARIABLE TO USE
  location = "West Europe"
  resource_group_name = azurerm_resource_group.rg.name
  allocation_method = "Dynamic"
  domain_name_label = "mydomain"
}
The goal of this recipe is to consistently render the names of the Azure resources. We must provide them with the following nomenclature rule:
CodeAzureResource - Name Application - Environment name - Country Code
The source code of this recipe is available at https://github.com/PacktPublishing/Terraform-Cookbook-Second-Edition/tree/main/CHAP02/localvariables.
How to do it…
Follow these steps:
- In the
main.tffile, which contains our Terraform configuration, we will add a local variable calledresource_name, along with the following code:locals { resource_name = "${var.application_name}-${var.environment_name}-${var.country_code}" } - We then use this local variable in the resources with the following code:
resource "azurerm_resource_group" "rg" {
 name = "RG-${local.resource_name}"
 location = "westeurope"
}
resource "azurerm_public_ip" "pip" {
 name = "IP-${local.resource_name}"
 location = "westeurope"
 resource_group_name = azurerm_resource_group.rg.name
 allocation_method = "Dynamic"
 domain_name_label = "mydomain"
}
How it works…
In Step 1, we created a variable called resource_name that is local to our Terraform configuration. This allows us to create a combination of several Terraform variables (which we will see the result of in the Using outputs to expose Terraform provisioned data recipe of this chapter).
Then, in Step 2, we used this local variable with the local.<name of the local variable> expression. Moreover, in the name property, we used it as a concatenation of a variable and static text, which is why we used the "${}" syntax.
The result of executing this Terraform configuration is as follows:

Figure 2.9: Using the locals variable
In the previous screenshot, we can see the output of executing the terraform plan command with the name of the resource group that we calculated with the locals variable.
There’s more…
The difference between a local variable and Terraform variable is that the local variable can’t be redefined in the Terraform variables file (tfvars), with environment variables, or with the -var CLI argument.
See also
- For more information on
localblock, look at the following documentation: https://www.terraform.io/docs/configuration/locals.html. - The Terraform locals learning lab is available at https://learn.hashicorp.com/tutorials/terraform/locals.
Using outputs to expose Terraform provisioned data
When using Infrastructure as Code tools such as Terraform, it is often necessary to retrieve output values from the provisioned resources after code execution.
One of the uses of these output values is that they can be used after execution by other Terraform configurations or external programs. This is often the case when the execution of the Terraform configuration is integrated into a CI/CD pipeline.
For example, we can use these output values in a CI/CD pipeline that creates an Azure App Service instance with Terraform and deploys the application to this Azure App Service instance. In this example, we can have the name of the Azure App Service instance as the output of the Terraform configuration. These output values are also very useful for transmitting information through modules, which we will see in detail in Chapter 5, Managing Terraform State.
In this recipe, we will learn how to implement output values in Terraform configuration to get the name of the provisioned Azure Web App in the output.
Getting ready
To proceed, we are going to add some Terraform configuration that we already have in the existing main.tf file.
The following is an extract of this existing code, which provides an app service in Azure:
...
resource "azurerm_linux_web_app" "app" {
  name                = "${var.app_name}-${var.environment}"
  location            = azurerm_resource_group.rg-app.location
  resource_group_name = azurerm_resource_group.rg-app.name
  service_plan_id     = azurerm_service_plan.plan-app.id
  site_config {}
}
...
The source code of this recipe is available at https://github.com/PacktPublishing/Terraform-Cookbook-Second-Edition/tree/main/CHAP02/sample-app.
How to do it…
To ensure we have an output value, we will just add the following code to the main.tf file:
output "webapp_name" {
  description = "Name of the webapp"
  value = azurerm_linux_web_app.app.name
}
How it works…
The output block of Terraform is defined by a name, webapp_name, and a value, azurerm_linux_web_app.app.name. These refer to the name of the Azure App Service instance that is provided in the same Terraform configuration. Optionally, we can add a description property that describes what the output returns, which can also be very useful for autogenerated documentation.
It is, of course, possible to define more than one output in the same Terraform configuration.
The outputs are stored in the Terraform state file and are displayed when the terraform apply command is executed, as shown in the following screenshot:

Figure 2.10: Terraform outputs
Here, we see two output values that are displayed at the end of the execution.
There’s more…
There are two ways to retrieve the values of the output to use them:
- By using the
terraform outputcommand in the Terraform CLI, which we will see in Chapter 6, Applying a Basic Terraform Workflow, in the Exporting the output in JSON recipe - By using the
terraform_remote_statedata source, which we will discuss in Using external resources from other state files recipe
Another consideration is that we can also expose an output that contains sensitive values with the goal of avoiding displaying their values in clear text in the console output. To do this, add the sensitive = true property to the output. The code below creates the output for the Azure App Service password:
output "webapp_password" {
  description = "credential of the webapp"
  value       = azurerm_linux_web_app.app.site_credential
  sensitive = true
}
The image below shows the execution of the Terraform configuration that contains this output:
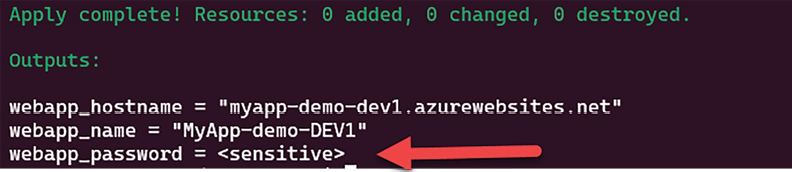
Figure 2.11: Sensitive output
We can see that the value of the webapp_password output isn’t displayed in the console.
Be careful; the output value will still be in clear text in the Terraform state file.
See also
- Documentation on Terraform outputs is available at https://www.terraform.io/docs/configuration/outputs.html.
Calling Terraform’s built-in functions
When provisioning infrastructure or handling resources with Terraform, it is sometimes necessary to use transformations or combinations of elements provided in the Terraform configuration.
For this purpose, the language supplied with Terraform includes functions that are built in and can be used in any Terraform configuration.
In this recipe, we will discuss how to use built-in functions to apply transformations to code.
Getting ready
To complete this recipe, we will start from scratch regarding the Terraform configuration, which will be used to provision a resource group in Azure. This resource group will be named according to the following naming convention:
RG-<APP NAME>-<ENVIRONMENT>
The result of this transformation will return a name that should be entirely in uppercase.
The source code for this recipe is available at https://github.com/PacktPublishing/Terraform-Cookbook-Second-Edition/tree/main/CHAP02/fct.
How to do it…
Perform the following steps:
- In a new local folder, create a file called
main.tf. - In this
main.tffile, write the following code:variable "app_name" { description = "Name of application" } variable "environement" { description = "Environement Name" } - Finally, in this
main.tffile, write the following Terraform configuration:resource "azurerm_resource_group" "rg-app" { name = upper(format("RG-%s-%s",var.app-name,var.environement)) location = "westeurope" }
How it works…
In Step 3, we defined the property name of the resource with a Terraform format function, which allows us to format text. In this function, we used the %s verb to indicate that it is a character string that will be replaced, in order, by the name of the application and the name of the environment.
Furthermore, to capitalize everything inside, we encapsulate the format function in the upper function, which capitalizes all its contents.
The result of executing these Terraform commands on this code can be seen in the following screenshot:

Figure 2.12: Terraform built-in function to capitalize text
Thus, thanks to these functions, it is possible to control the properties that will be used in the Terraform configuration. This also allows us to apply transformations automatically, without having to impose constraints on the user using the Terraform configuration.
See also
There are a multitude of predefined functions in Terraform. The full list can be found at https://www.terraform.io/docs/configuration/functions.html (navigate with the left menu to see all built-in functions):
- To read more details about the
formatfunction, refer to the documentation at https://www.terraform.io/language/functions/format. - To read more details about the
upperfunction, refer to the documentation at https://www.terraform.io/language/functions/upper.
Using YAML files in Terraform configuration
In the previous recipes, we learned that to set dynamic values inside Terraform configuration, we can use variables.
In some use cases, we must use an external source for configuration, such as JSON or YAML files, and we can imagine that these files are provided manually by external teams or generated automatically by external systems, and we can’t rewrite these files in Terraform variables.
The goal of this recipe is to show how to use a YAML file inside a Terraform configuration.
Let’s get started!
Getting ready
To complete this recipe, we have a YAML file named network.yaml with the following content:
vnet: "myvnet"
address_space: "10.0.0.0/16"
subnets:
- name: subnet1
  iprange: "10.0.1.0/24"
- name: subnet2
  iprange: "10.0.2.0/24"
This file contains the configuration of the Azure network with virtual network and subnets configuration, and it’s placed in the same folder as the Terraform configuration.
In our Terraform configuration, we will use this YAML file to provision the Azure virtual network and subnets.
The source code of this recipe is available at https://github.com/PacktPublishing/Terraform-Cookbook-Second-Edition/tree/main/CHAP02/yaml.
How to do it…
- First, in
main.tf, create alocalsvariable callednetworkthat calls the built-inyamldecodeTerraform function:locals { network = yamldecode(file("network.yaml")) } - Then call this
local.networkvariable and its subproperties, which are defined in the YAML file inside the Terraform resource:resource "azurerm_virtual_network" "vnet" { name = local.network.vnet location = azurerm_resource_group.rg.location resource_group_name = azurerm_resource_group.rg.name address_space = [local.network.address_space] dynamic "subnet" { for_each = local.network.subnets content { name = subnet.value.name address_prefix = subnet.value.iprange } } } - Finally, run the Terraform workflow with the
init,plan, andapplycommands. The following picture shows theplanexecution:

Figure 2.13: Terraform uses the YAML file
How it works…
In Step 1, we use the built-in Terraform function yamldecode, which takes on the parameters of the network.yaml file. This function decodes YAML content to Terraform key-value maps.
The result of this map is stored in a local variable named network.
Then in Step 2, we call this local variable by using local.network and use all the sub-keys as object notation, defined in the YAML configuration.
That is all for the Terraform configuration. Finally, we run the terraform init, plan, and apply Terraform commands.
The plan execution shows that Terraform uses YAML for configuration.
There’s more…
In this recipe, we saw how to decode a YAML file, but we can also encode a YAML file, from Terraform to YAML, by using the built-in yamlencode Terraform function (https://www.terraform.io/language/functions/yamlencode).
We learned an example of decoding a YAML file. With Terraform we can do the same operations with a JSON file using the built-in jsondecode and jsonencode functions.
However, it is better to use Terraform variables for Terraform variable validation by using the terraform validate command. Indeed, the YAML file will not be integrated into the validation of Terraform if it is badly formatted or if some information is missing – in these instances it will throw an error.
See also
- The documentation of the built-in
yamldecodefunction is available at https://www.terraform.io/language/functions/yamldecode. - The built-in
jsonencodefunction documentation is available at https://www.terraform.io/language/functions/jsonencode. - The built-in
jsondecodefunction documentation is available at https://www.terraform.io/language/functions/jsondecode.
Writing conditional expressions
When writing the Terraform configuration, we may need to make the code more dynamic by integrating various conditions. In this recipe, we will discuss an example of a conditional expression.
Getting ready
For this recipe, we will use the Terraform configuration we wrote in the previous recipe, the code for which is available at https://github.com/PacktPublishing/Terraform-Cookbook-Second-Edition/tree/main/CHAP02/fct.
We will complete this code by adding a condition to the name of the resource group. This condition is as follows: if the name of the environment is equal to Production, then the name of the resource group will be in the form RG-<APP NAME>; otherwise, the name of the resource group will be in the form RG-<APP NAME>-<ENVIRONMENT NAME>.
How to do it…
In the Terraform configuration of the main.tf file, modify the code of the resource group as follows:
resource "azurerm_resource_group" "rg-app" {
    name = var.environment == "Production" ? upper(format("RG-%s",var.app-name)) : upper(format("RG-%s-%s",var.app-name,var.environment))
    location = "westeurope"
}
How it works…
Here, we added the following condition:
condition ? true assert : false assert
The result of executing Terraform commands on this code if the environment variable is equal to Production can be seen in the following screenshot:
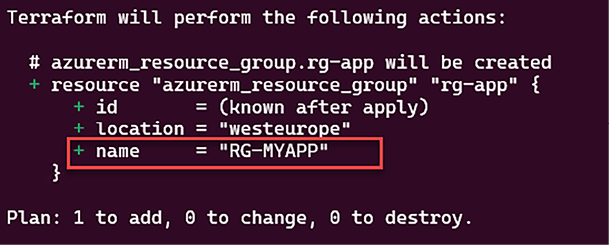
Figure 2.14: Conditional expression first use case
If the environment variable is not equal to Development, we’ll get the following output:
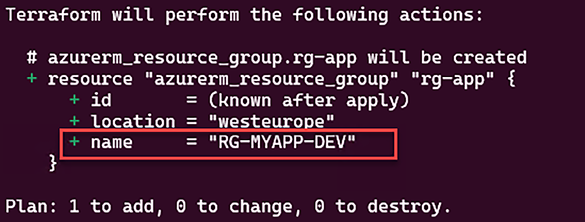
Figure 2.15: Conditional expression second use case
There’s more…
One of the usual use cases for conditional expressions is to implement a pattern of features flags.
With features flags, we can make the provisioning of resources optional in a dynamic way, as shown in the following code snippet:
resource "azurerm_application_insights" "appinsight-app" {
  count = var.use_appinsight == true ? 1 : 0
  ....
}
In this code, we have indicated to Terraform that if the use_appinsight variable is true, then the count property is 1, which will allow us to provision one Azure Application Insights resource. Conversely, where the use_appinsight variable is false, the count property is 0 and in this case, Terraform does not create an Application Insights resource instance.
See also
Documentation on conditional expressions in Terraform can be found at https://www.terraform.io/language/expressions/conditionals.
Generating passwords with Terraform
When provisioning infrastructure with Terraform, there are some resources that require passwords in their properties, such as account credentials, VMs, and database connection strings.
To ensure better security by not writing passwords as plaintext in the configuration, you can use a random Terraform provider, which allows you to generate a random string that can be used as a password.
In this recipe, we will discuss how to generate a password with Terraform and assign it to a resource.
Getting ready
In this recipe, we need to provision a VM in Azure that will be provisioned with an administrator password generated dynamically by Terraform.
To do this, we will use an already existing Terraform configuration that provisions a VM in Azure.
The source code for this recipe is available at https://github.com/PacktPublishing/Terraform-Cookbook-Second-Edition/tree/main/CHAP02/password.
How to do it…
Perform the following steps:
- In the Terraform configuration file for the VM, add the following code:
resource "random_password" "password" { length = 16 special = true override_special = "_%@" } - Then, in the code of the resource itself, modify the
passwordproperty with the following code:resource "azurerm_linux_virtual_machine" "myterraformvm" { name = "myVM" location = "westeurope" resource_group_name = azurerm_resource_group.myterraformgroup.name computer_name = "vmdemo" admin_username = "uservm" admin_password = random_password.password.result .... }
How it works…
In Step 1, we added the Terraform random_password resource from the random provider, which allows us to generate strings according to the properties provided. These will be sensitive, meaning that they’re treated as sensitive in the CLI by Terraform, so they will not be displayed to the user.
Then, in Step 2, we used its result (with the result property) in the password property of the VM.
The result of executing the terraform plan command on this code can be seen in the following screenshot:
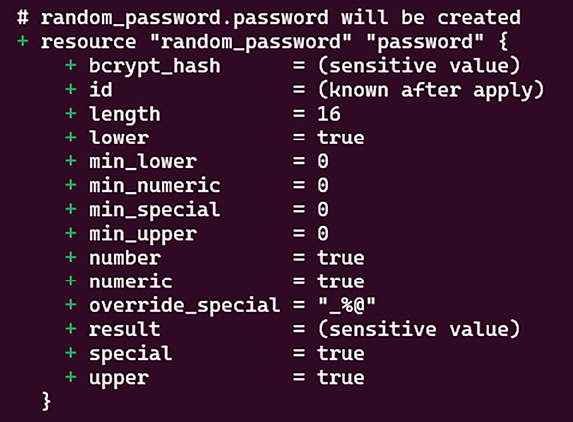
Figure 2.16: Generating a password with Terraform
As we can see, the result is (sensitive value).
Please note that the fact a property is sensitive in Terraform means that it cannot be displayed when using the Terraform plan and apply commands in the console output display.
On the other hand, it will be present in clear text in the Terraform state file.
See also
- To find out more about the
randomprovider, read the following documentation: https://registry.terraform.io/providers/hashicorp/random/. - Documentation regarding sensitive data in Terraform state files is available at https://www.terraform.io/docs/state/sensitive-data.html.
Managing Terraform resource dependencies
One of Terraform’s main features is to allow the parallelization of operations while considering resource dependencies.
In this recipe, we will learn how to create dependencies between resources. We will do this using both implicit and explicit dependencies.
Let’s get started!
Getting ready
To start this recipe, we will use the following Terraform configuration to provision an Azure resource group and, inside it, one Azure virtual network.
Here is the basic configuration:
resource "azurerm_resource_group" "rg" {
  name     = "rgdep"
  location = "westeurope"
}
resource "azurerm_virtual_network" "vnet" {
  name                = "vnet"
  location            = "westeurope"
  resource_group_name = "rgdep"
  address_space       = ["10.0.0.0/16"]
}
The problem with the above configuration is that there are no Terraform dependencies between the resource group and the virtual network. Since Terraform executes its operations according to its dependency graph calculation, during the apply execution the virtual network can be created before the resource group. However, this isn’t acceptable because the virtual network must be created after the resource group.
The goal of this recipe is to learn how to create dependencies between the Azure virtual network and the Azure resource group.
Find out more about the concept of dependencies at https://www.terraform.io/language/resources/behavior#resource-dependencies.
The source code of this recipe is available at https://github.com/PacktPublishing/Terraform-Cookbook-Second-Edition/tree/main/CHAP02/dep.
How to do it…
Perform the following steps:
- To create implicit dependencies, update the
azurerm_virtual_networkresource with the following code:resource "azurerm_virtual_network" "vnet" { name = "vnet" location = "westeurope" resource_group_name = azurerm_resource_group.rg.name address_space = ["10.0.0.0/16"] } - To create explicit dependencies, update the
azurerm_virtual_networkresource with the following code:resource "azurerm_virtual_network" "vnet" { name = "vnet" location = "westeurope" resource_group_name = "rgdep" address_space = ["10.0.0.0/16"] depends_on = [azurerm_resource_group.rg] }
How it works…
In the first configuration, we use an implicit dependency. By using the resource_group_name = azurerm_resource_group.rg.name property, Terraform creates a dependency that is waiting for the creation of the resource so it can know its name and pass it to the virtual network.
In the second configuration, we use an explicit dependency by using the depends_on meta-argument, which contains the list of resources that must be created before this current resource. Here, we explicitly set that the Azure resource group must be created before creating the Azure virtual network.
Finally, we execute the terraform apply command. The following image shows that this execution has dependencies:

Figure 2.17: Terraform uses implicit and explicit dependency
We can see the order of resource creation: the Azure resource group [1] is created before the Azure virtual network [2].
And when we run the terraform destroy command, the Azure virtual network is destroyed before the Azure resource group.
There’s more…
If we have the choice between using an implicit or explicit dependency, it’s recommended to use an implicit dependency as explained in this documentation: https://www.terraform.io/language/meta-arguments/depends_on#processing-and-planning-consequences
It is possible to display the Terraform resources graph’s dependencies by using the terraform graph command, which we will learn about in detail in Chapter 6, Applying a Basic Terraform Workflow, in the Generating the graph dependencies recipe.
See also
- The Terraform tutorial on dependencies is available at https://learn.hashicorp.com/tutorials/terraform/dependencies.
- The documentation on the
depends_onmeta-argument is available at https://www.terraform.io/language/meta-arguments/depends_on.
Adding custom pre and postconditions
In a previous recipe, Manipulating variables, we learned that it is possible to add condition validation inside the variable definition.
In Terraform version 1.2 and newer, it’s possible to add custom validation directly in resources, modules, or data sources with preconditions and postconditions.
These customs validations allow Terraform to set some custom rules during the execution of terraform plan. The precondition will be checked just before the rendering of the plan and the postcondition will be checked just after the rendering.
Let’s get started!
Getting ready
To complete this recipe, we will start with this basic Terraform configuration:
resource "azurerm_virtual_network" "vnet" {
  name                = "vnet"
  location            = azurerm_resource_group.rg.location
  resource_group_name = azurerm_resource_group.rg.name
  address_space       =  [var.address_space]
}
The above Terraform configuration creates an Azure virtual network.
The first check that we want to perform is to be sure that the address_space variable’s value is IP mask /16.
The second check is to verify that the region (location) of the virtual network is "westeurope".
The source code of this recipe is available at https://github.com/PacktPublishing/Terraform-Cookbook-Second-Edition/tree/main/CHAP02/prepostcond.
How to do it…
The following step shows you how to perform the first check, which is the verification of the IP address range:
- Update the Terraform configuration of the Azure virtual network with the code below:
resource "azurerm_virtual_network" "vnet" { ….. address_space = [var.address_space] lifecycle { precondition { condition = cidrnetmask(var.address_space) == "255.255.0.0" error_message = "The IP Range must be /16" } } } - Then, add the second check to verify the location by adding this configuration in the Azure virtual network:
resource "azurerm_virtual_network" "vnet" { name = "vnet" location = azurerm_resource_group.rg.location resource_group_name = azurerm_resource_group.rg.name address_space = [var.address_space] lifecycle { precondition { condition = cidrnetmask(var.address_space) == "255.255.0.0" error_message = "The IP Range must be /16" } postcondition { condition = self.location == "westeurope" error_message = "Location must be westeurope" } } } - Finally, run the Terraform workflow and check that no Terraform error is displayed in the console output.
How it works…
In Step 1, we added the first custom check, which corresponds to the precondition that will be run just before the plan. The precondition block is new inside the lifecycle block metadata. Let’s see this precondition in detail:
precondition {
      condition = cidrnetmask(var.address_space) == "255.255.0.0"
      error_message = "The IP Range must be /16"
}
The precondition block contains two properties:
- The
condition, that is, the code for the check. Here, we check that thecidrmaskof the value of theaddress_maskvariable is equal to “255.255.0.0", that is, that the IP range is/16. - The
error_message, that is, the error message that is displayed in the console output if the check returnsfalse.
To test this precondition, if we set the value of the address_space variable to "10.0.0.0/24", the terraform plan execution returns this output:
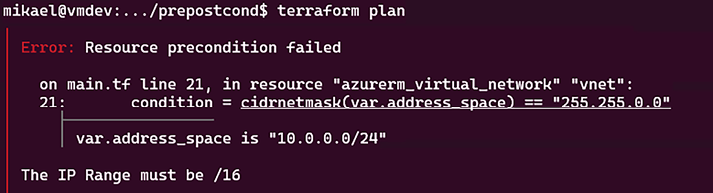
Figure 2.18: Precondition custom validation error
The error message is displayed and the terraform plan command doesn’t continue.
Then in Step 2, we add the check for testing the region (the data center’s location) of the Azure virtual network, which must be equal to “westeurope". To do this, we add a postcondition block inside the lifecycle metadata with the following configuration:
postcondition {
      condition = self.location  == "westeurope"
      error_message = "Location must be West Europe"
}
In the configuration above, we set the condition property by using the self keyword to refer to the current resource (in this case this is the Azure virtual network) and we set the error message.
Note that the self keyword can be used only on postconditions, at the moment that all properties are determined, which is only after the terraform plan command has been run.
To test this postcondition, we set the location to "westus" and we get this terraform plan output:
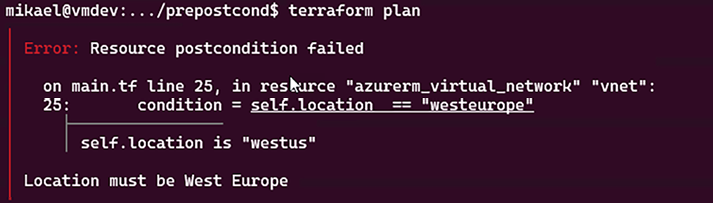
Figure 2.19: Postcondition custom validation error
We can see that the error message is displayed.
See also
- The documentation of the pre- and postconditions is available at https://www.terraform.io/language/meta-arguments/lifecycle#custom-condition-checks.
- Here’s a tutorial on pre- and postconditions on modules: https://learn.hashicorp.com/tutorials/terraform/custom-conditions.
- Here’s a blog post about pre and postconditions: https://spacelift.io/blog/terraform-precondition-postcondition.
- Ned Bellavance’s video on pre and postconditions is available here: https://www.youtube.com/watch?v=55ZLu8tSnvk.
Using checks for infrastructure validation
In the previous recipe, Adding custom pre and postconditions, we learned that it is possible to add pre- or postcondition validation inside the resource configuration.
In Terraform version 1.5 and newer, it’s possible to add infrastructure validation directly in the Terraform configuration, which allows us to check that the provisioned infrastructure is working as intended.
Let’s get started!
Getting ready
In this recipe, we will provision a new Azure App Service instance using a Terraform configuration and inside this same Terraform configuration, we will check that the provisioned App Service instance is running and returns an HTTP Status code equal to 200.
Note that in this recipe we will not go into detail about the Terraform configuration for the Azure App Service. We will only look directly at the availability check of the App Service.
So for this recipe, we will start with the Terraform configuration available at https://github.com/PacktPublishing/Terraform-Cookbook-Second-Edition/tree/main/CHAP02/sample-app, which we will copy into another folder called check.
In the recipe we will learn how to check the App Service instance’s availability. The source code of this recipe is available here: https://github.com/PacktPublishing/Terraform-Cookbook-Second-Edition/tree/main/CHAP02/check.
How to do it…
To check the provisioned infrastructure, perform the following steps:
- In the
main.tffile that is copied into thecheckfolder, add the following Terraform configuration:check "response" { data "http" "webapp" { url = "https://${azurerm_linux_web_app.app.default_hostname}" insecure=True } assert { condition = data.http.webapp.status_code == 200 error_message = "Web app response is ${data.http.webapp.status_code}" } } - In this folder, execute the basic Terraform workflow by running the
terraform init,plan, andapplycommands.
How it works…
In Step 1, we added the check block, which contains:
- A
dataHTTP source that performs an HTTP GET on the given URL. Here, we use the default hostname of the web app in the URL property. For more details about the data HTTP source block, refer to the documentation here: https://registry.terraform.io/providers/hashicorp/http/latest/docs/data-sources/http. - An
assertblock that evaluates the response of thedatasource by checking that the HTTP code is equal to200(status codeok). If this evaluation returnsfalse, then theassertblock displays the configurederror_message.
In Step 2, we run the Terraform workflow to create the Azure web app and check its availability. The following image shows the output of the terraform apply command:

Figure 2.20: Check infrastructure validation is successful
There’s more…
- Unlike the pre and postconditions, checking with the
checkblock does not block resource provisioning if the assertion returnsfalse. Instead, just a warning message in the output is displayed as shown in the following screenshot:

Figure 2.21: Check infrastructure validation on error with warning message
- Additionally, in this recipe, we demonstrated a check sample using a
datasource. However, thisdatasource isn’t mandatory and its use will depend on the specific requirements of your infrastructure checks. For more details about thecheckblock, read the tutorial at https://developer.hashicorp.com/terraform/tutorials/configuration-language/checks.
See also
- The
checkblock documentation is available at https://developer.hashicorp.com/terraform/language/checks.
Learn more on Discord
To join the Discord community for this book – where you can share feedback, ask questions to the author, and learn about new releases – follow the QR code below:
https://packt.link/cloudanddevops