


Chapter 1: Managing Meetings in Teams
Microsoft Teams is a hub for teamwork in Office 365. A key part of being successful in collaborative work is to stay on top of all meeting schedules and manage them promptly without any overlap. Microsoft Teams helps you to meet in a smarter way and to have focused meetings, which can eventually increase users' productivity.
Microsoft Teams delivers a unique end-to-end meeting experience that features the human element of face-to-face interaction, while helping people stay focused before, during, and after meetings to accomplish more together. Meetings in enterprises have changed drastically, with the majority of the workforce connecting remotely, and, in this chapter, we will cover the key features that are available in Microsoft Teams.
This chapter will cover the following main topics:
- The various meeting options available in Microsoft Teams to schedule or join meetings
- Creating surveys, polls, customer feedback, and employee satisfaction via Microsoft Forms
- Seamless document meeting notes via Microsoft OneNote
- Using the channel Calendar to stay up to date on a particular Teams channel
- How Microsoft Bookings helps in organizing meetings and appointments with stakeholders
Upon successful completion of these topics and getting hands-on with a few practice scenarios, you will be fully comfortable in managing your meetings effectively with Microsoft Teams.
Meeting options via Windows/Mac
Microsoft Teams provides various ways to schedule meetings via the Teams desktop client / Teams Web on your Windows/Mac, mobile devices, or iPad/tablet devices:
- Log in to Microsoft Teams using your credentials. On the left side, you will see the Calendar button. Click on New meeting and schedule a meeting.
- Click on the New meeting dropdown in the top-right corner and select Schedule meeting.

Figure 1.1 – New meeting drop-down menu
- You have an option to modify the view of the calendar to show meetings for a day, work week, or calendar week.

Figure 1.2 – Calendar view options
- Add a title for the Microsoft Teams meeting that gives a quick insight into the meeting for the recipients.
- Modify Time Zone if required.
- Require Registration allows the meeting organizer to request participants to register for an event.
Note
If you require the user to register for this event, we cannot add a channel to the meeting. The registration link can be modified.
- Add participants by typing in the first few letters of the recipients' names and Teams will pull out suggestions from the address book.

Figure 1.3 – Looking up recipients in the address book
- You will also notice that the availability of the participants is shown automatically based on the date and time that you choose. This helps you to adjust the meeting time directly, avoiding any decline responses. This availability feature is limited to internal organization members.

Figure 1.4 – Availability of participants
- To invite someone outside your organization, type in their email address and they will get a link to join as a guest. You can also add optional recipients.

Figure 1.5 – Inviting a guest
- Choose the start and end date and time from the date picker. Use the All day toggle bar if you wish to have the meeting for the whole day.

Figure 1.6 – Setting start and end times
- Scheduling Assistant is a key feature with Exchange, and this is available in Microsoft Teams as it is tightly integrated with your Exchange calendar.

Figure 1.7 – Scheduling Assistant
This feature helps you to show the free/busy information of the meeting recipients and helps you to decide on a suitable time at which all participants will be able to join the meeting.

Figure 1.8 – Using Scheduling Assistant
- There are a variety of options to choose from out of the box from Teams to set a meeting as a recurring meeting or choose a custom date.

Figure 1.9 – Create a recurring meeting
Channel Meeting
Teams meetings allow you to directly add a team channel where all the members of the channel will be auto-added to the meeting request. This allows you to post the meeting link in the channel to join the meeting and to collaborate.

Figure 1.10 – Adding a Teams channel to a meeting
- You can add a location according to your Rooms system, or by default, the meeting is created as an online meeting.
- Finally, add the agenda in the body of the meeting for the participants to be prepared well ahead of the meeting. You can use the default word editing options, such as Bold, Italics, Underline, and other formatting options, for clearer content.
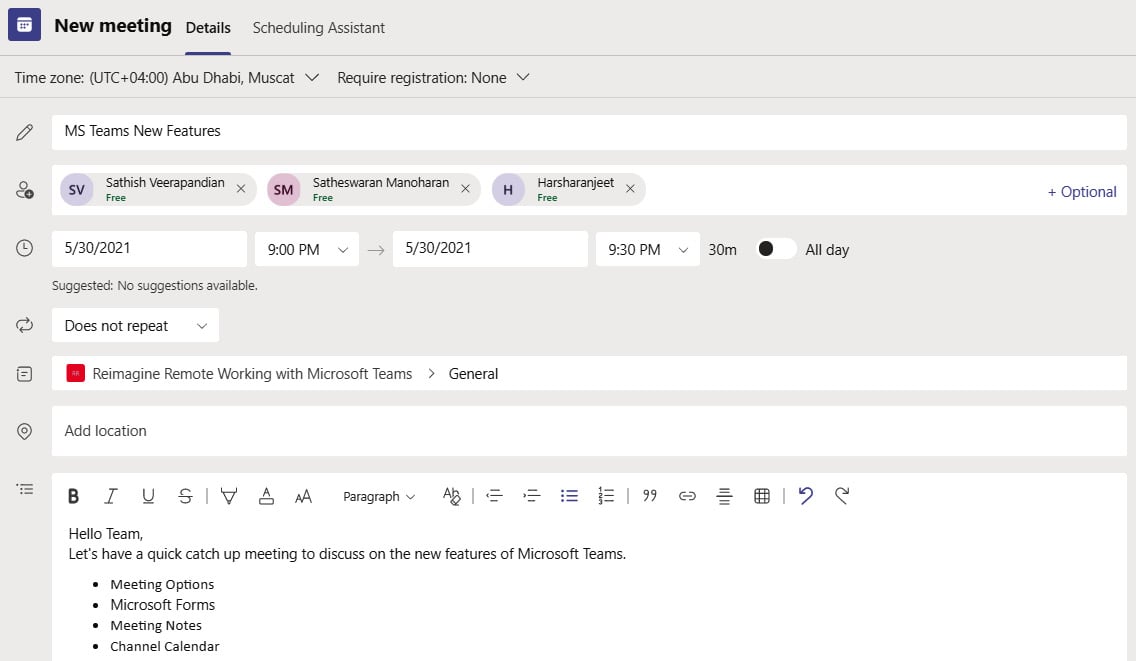
Figure 1.11 – Preview of the meeting request
Now all the participants who are added to the meeting should have an email with the meeting link to Join.
Meeting options are limited when initiating them through mobile devices; however, most of the settings are like the steps in this section.
Initiating a meeting
A Microsoft Teams meeting can be initiated from the Teams client directly, or from Outlook, as the Teams and Outlook calendars are completely integrated with each other.
Note
The Outlook plugin option is applicable only if it is enabled by your administrator.
To start a meeting, follow these steps:
- Click on the Calendar icon in the Teams client. You will notice that the meeting item has a Join option at the scheduled time. Click on Join.

Figure 1.12 – Calendar within Teams
- Teams allows you to configure your audio and video settings before the actual meeting starts. This option is not limited to the organizer, any participant who joins in the meeting will be allowed to choose their preferred audio and video options.
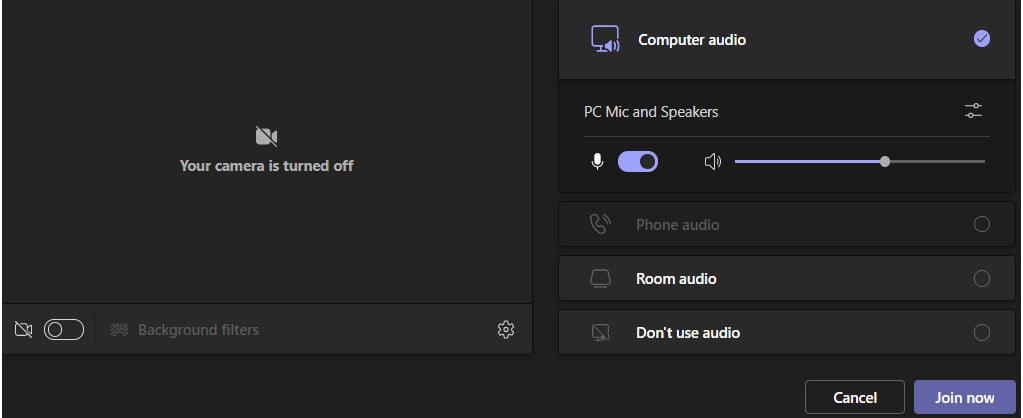
Figure 1.13 – Audio and video options
Turning video on and off
To turn video on and off and to see how to set up your preferences, follow these steps:
- You can choose to turn your video on or off during meetings. You can simply use the toggle button to turn on your video. Microsoft Teams remembers your initial settings for your later meetings. You can always change the settings based on your needs.

Figure 1.14 – How to toggle video on
- Once the video is turned on, you can choose from the variety of background filters that are available by clicking on Background filters. Microsoft Teams also allows you to add a personalized background filter (such as a company logo) to show as your background during the whole meeting.

Figure 1.15 – Background filters
- Click on the Settings button and choose your audio preference. Microsoft allows you to select your computer audio for voiceovers during the meeting, or a room system if your IT team has configured any room devices in your meeting rooms. More importantly, you can join as a silent audience by selecting the option Don't use audio. Please feel free to select the appropriate option for your voiceover. From this screen, Teams also allows you to adjust your computer's speaker volume.
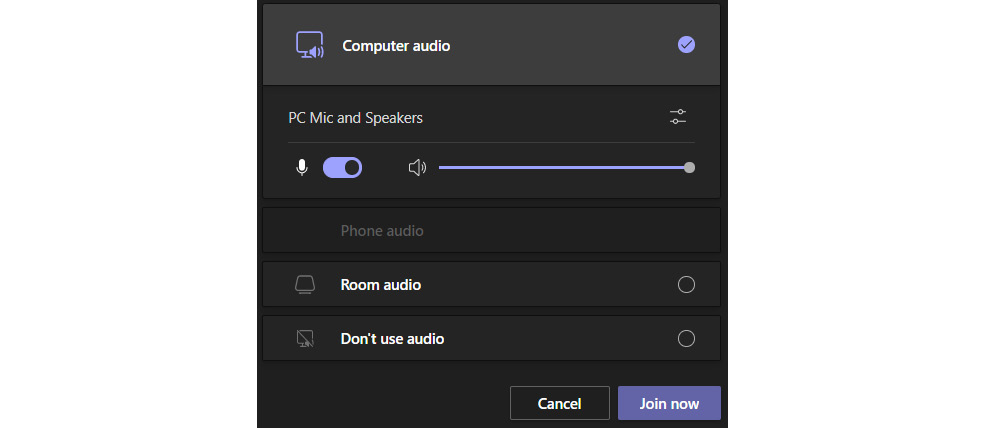
Figure 1.16 – Adjust speaker volume
Alternatively, you can open your Microsoft Outlook or Outlook Web Access, click on Calendar, and initiate the meeting from either of these clients.
Configuring meeting options
Once you have initiated the meeting, you can still change your audio or video preferences by clicking on the options in the top-right corner of your client.

Figure 1.17 – Options within an active meeting
Let's look at what each option icon allows you to do:
- Participants: Click on the Participants button to display all meeting participants, including the people who are invited and are yet to join.
- Conversation: Select the Conversation button to have an overview of the chat between participants within the meeting. You also have the option of adding files, emojis, GIFs, and stickers. Emojis, animated GIFs, and stickers are a great way to add some fun and express yourself in your communication! Teams has added new emoji galleries with over 800 emojis to choose from, including some you can personalize.
- Categorizing Messages: This is one of the most used features, to categorize a message before sending. As you can see in the following screenshot, if you categorize the messages as Urgent, every participant will be notified every 2 minutes for 20 minutes, so you can bring a critical message to everyone's attention.

Figure 1.18 – Categorizing messages
Select the …to configure further options such as screen recording, turning on live captions, and meeting notes.
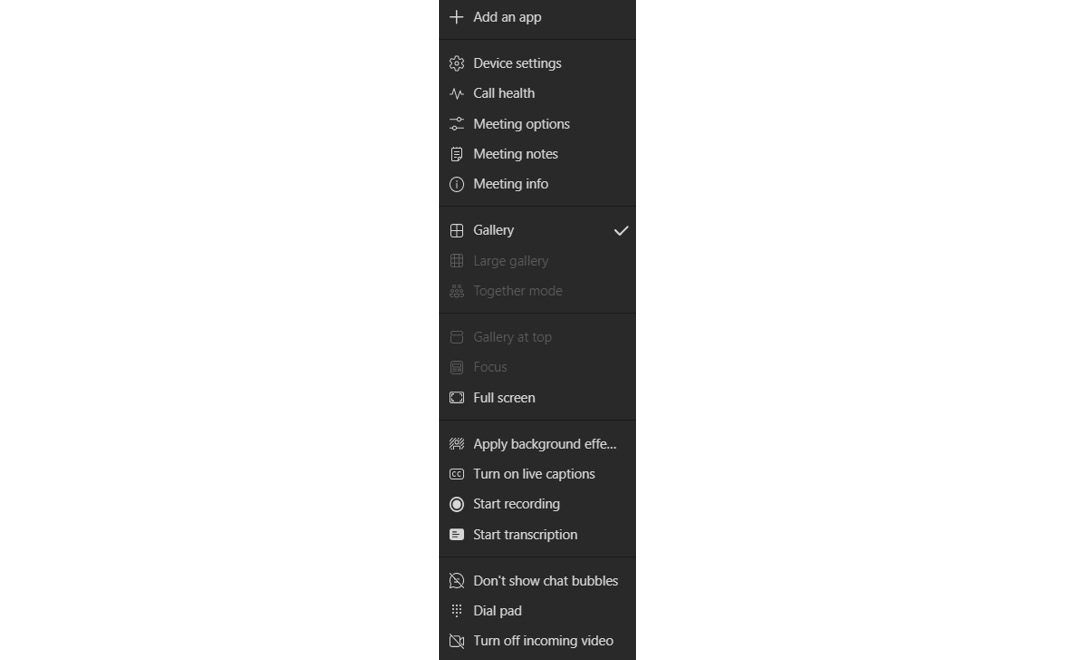
Figure 1.19 – Further meeting options
- Device settings: Device settings allows you to change the audio/video options at any time in the meeting.
- Meeting options: Although default participant settings are determined by a company's IT admin, the meeting organizer may want to change them for a specific meeting. The organizer can make these changes on the Meeting options web page.

Figure 1.20 – Meeting options
- Lobby Settings: It is very important to know that IT admins can set default policies; however, meeting organizers can always override the settings for their particular meeting. It can be very useful when you have a meeting with management users and you do not want them to have to wait in the lobby to get into the meeting. So, you can simply choose any one of the lobby settings based on the following screenshot and table.

Figure 1.21 – Bypassing the lobby
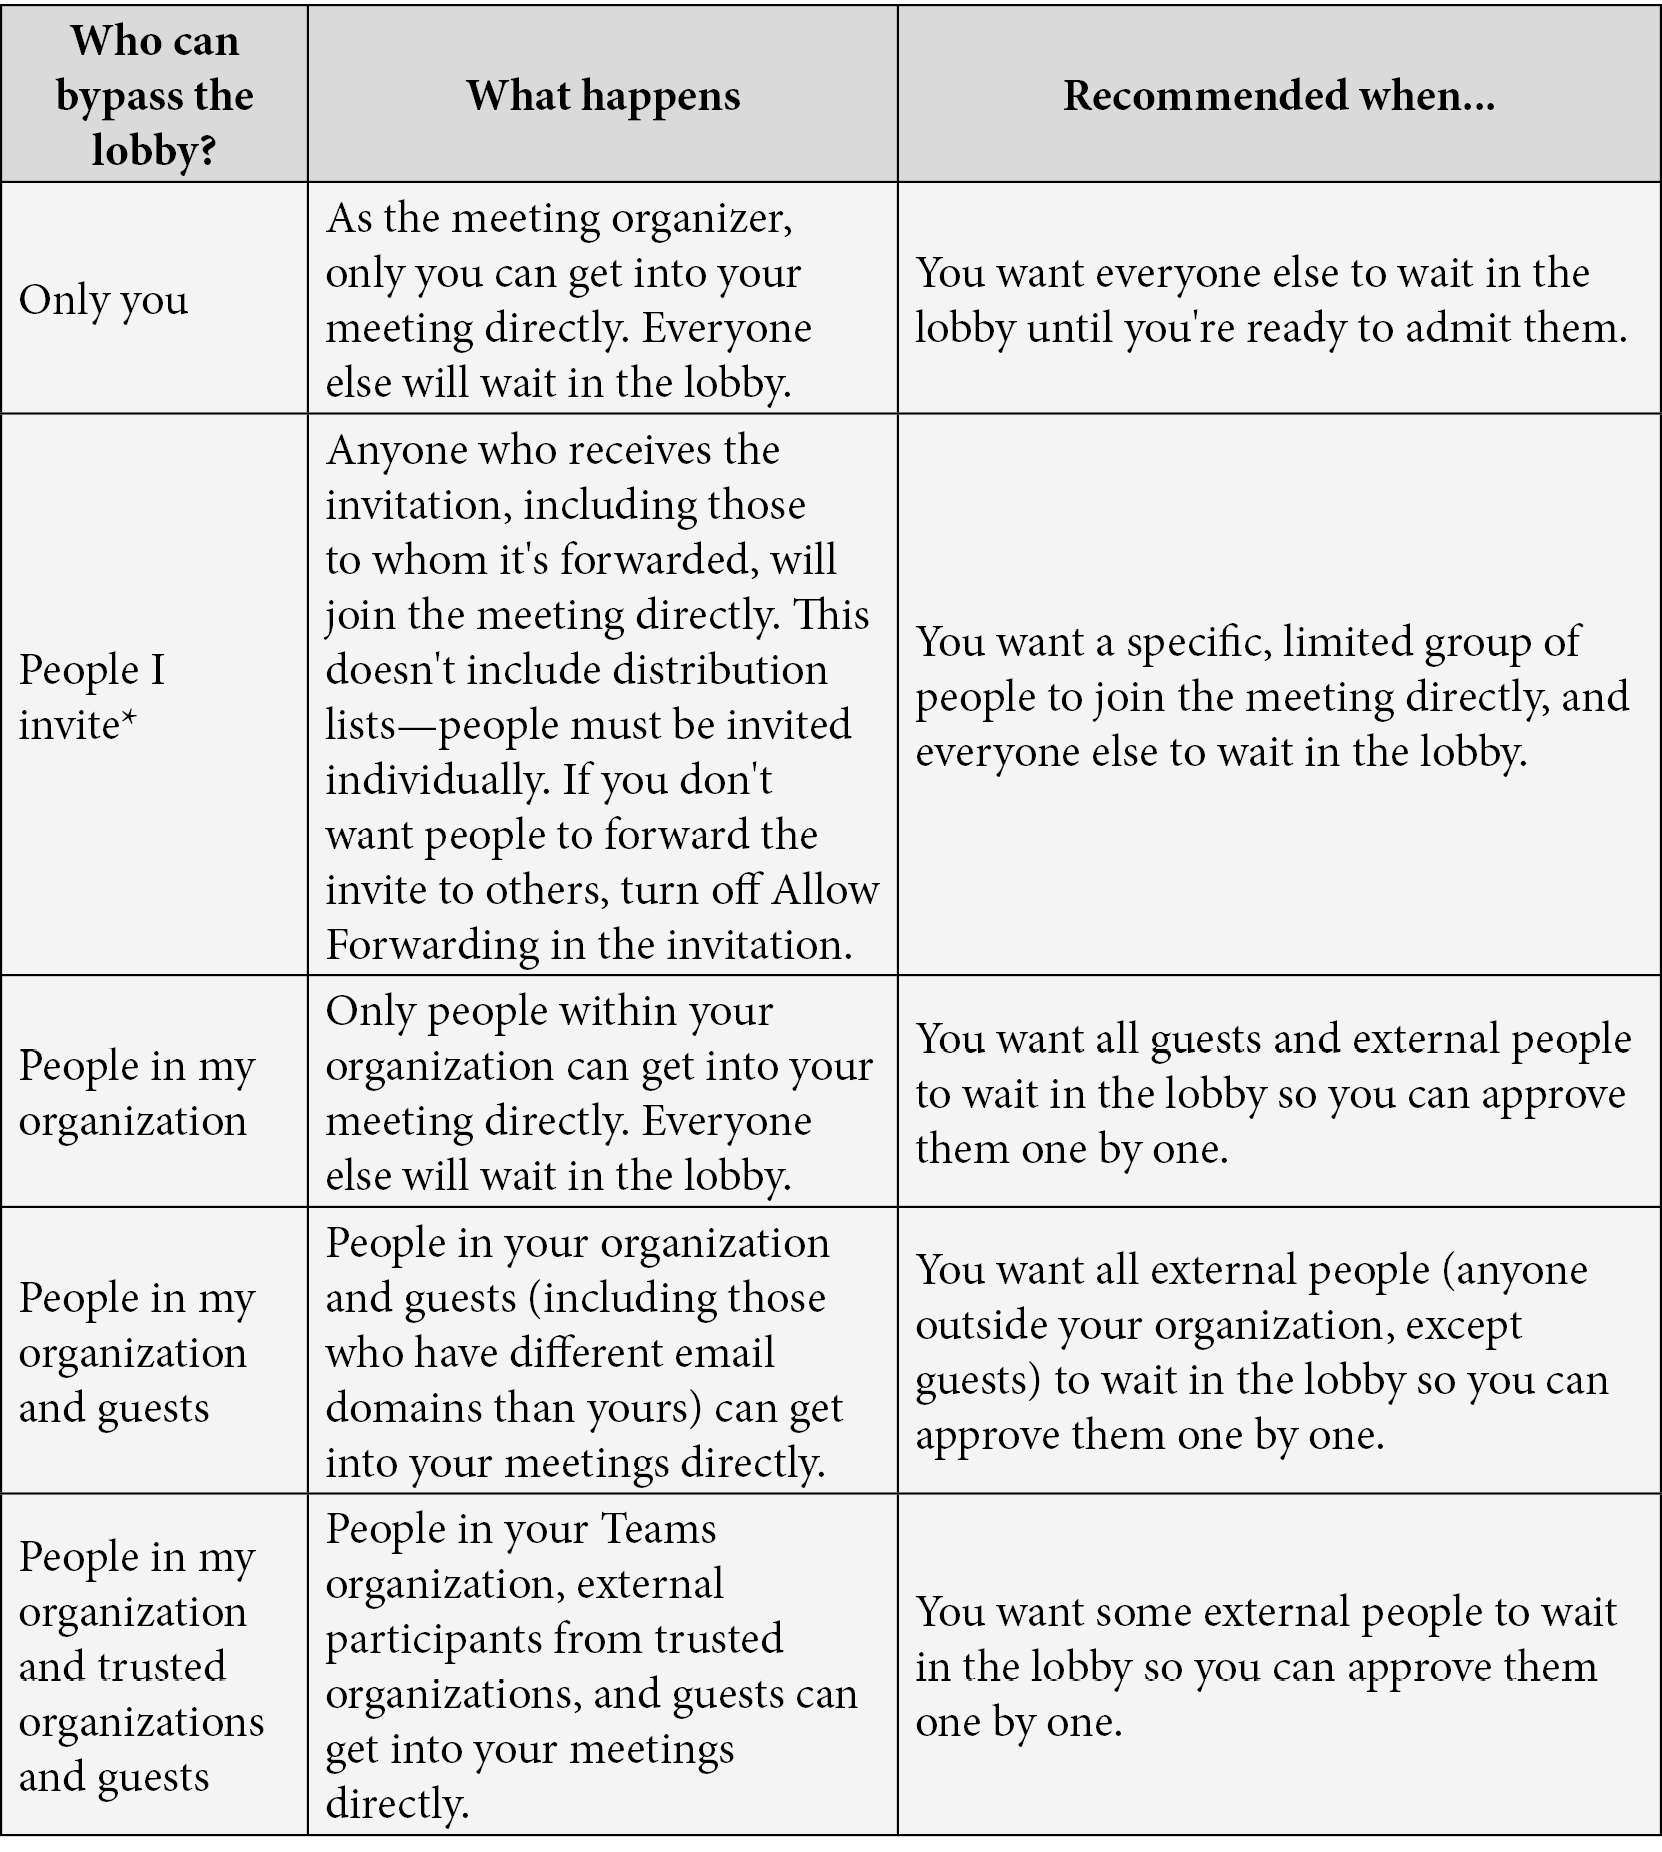
Figure 1.22 – Options for lobby settings
- Caller Bypass: You can allow callers who are dialing in using mobile to be auto-admitted into the meeting, thus bypassing the lobby.

Figure 1.23 – Allowing callers to bypass the Lobby
- Notifications: You may want to receive an alert when someone calling in by phone joins or leaves your meeting.
- Meeting Roles: Meetings can have participants who are internal to the organization or are external guests or vendors. It is vital for an organizer to know the roles of each participant, and Microsoft Teams allows you to preconfigure the settings once the meeting request is created. This can also be done during the meeting. There are two roles to choose from: presenter and attendee. Presenters can do just about anything that needs doing in a meeting, while the role of an attendee is more restricted. The following table outlines the abilities of an Organizer, Presenter, and Attendee:
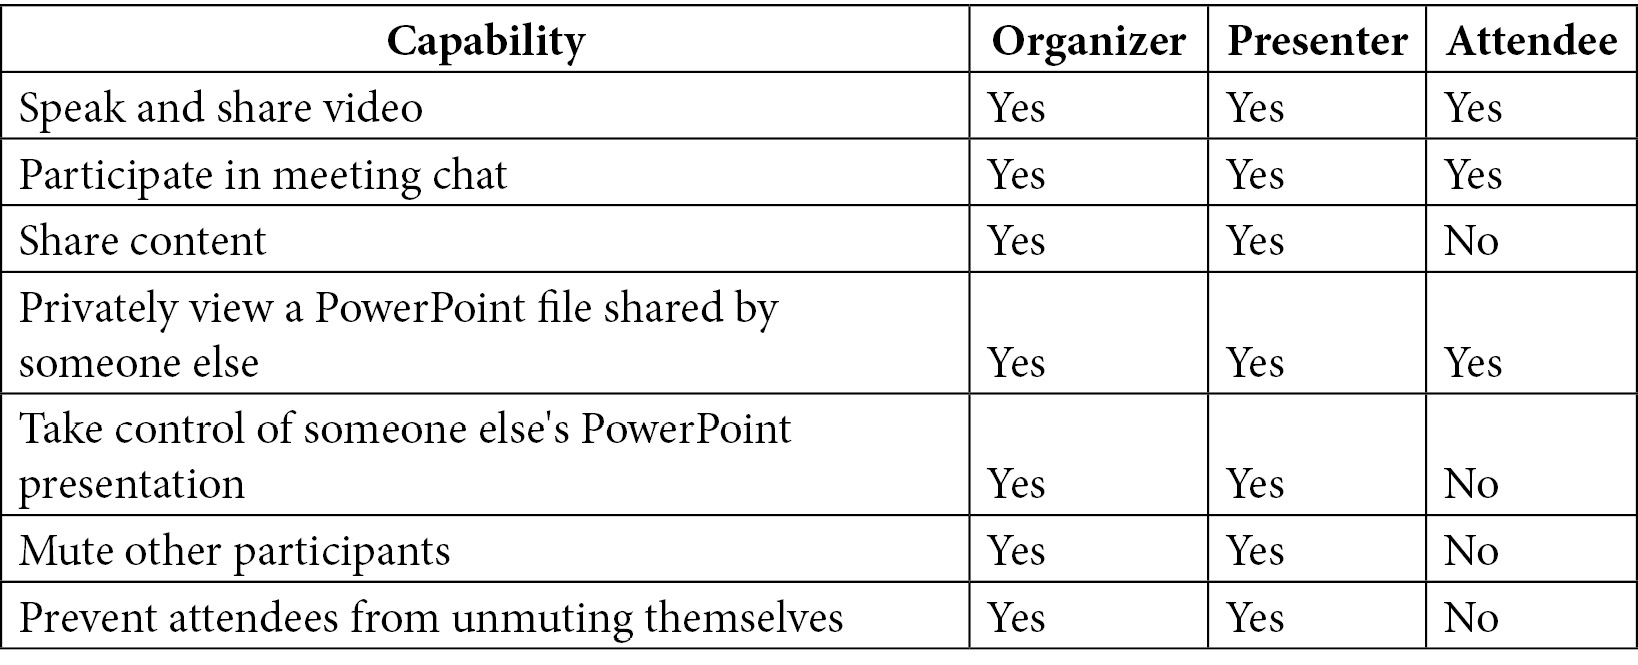
Figure 1.24 – Capabilities of meeting roles
Managing meeting roles
Microsoft Teams allows you to change meeting roles before the meeting or during the meeting. It is always recommended that the options are configured before the meeting to avoid last-minute changes.
Note
You'll need to send out the meeting invite before you can assign roles.
The next sections will go through how to manage meeting roles depending on when they are being modified.
Before the meeting
If managing roles before a meeting has started, follow these steps:
- Click on the Calendar tab on the Teams client, click on the meeting on the calendar, and click Edit.

Figure 1.25 – Select Edit
- Editing the meeting allows you to add/remove recipients and change the time, location, and room systems. It also allows you to configure roles for the participants of the meeting. To modify the roles, you can click on Meeting options.
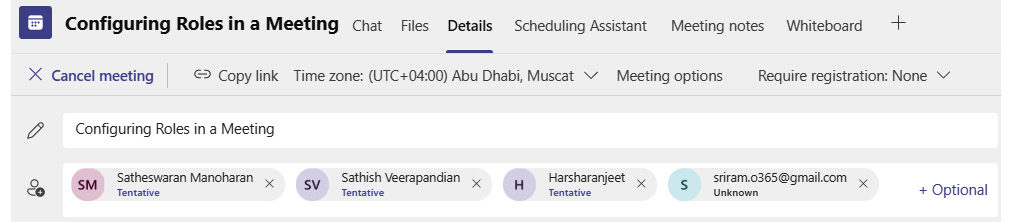
Figure 1.26 – Meeting options
This will open all available meeting options that you can customize. The good thing here is that you can even modify the other settings that are mentioned above in this console. In this example, I just wanted one of my colleagues to be the presenter and everyone else to be an attendee.
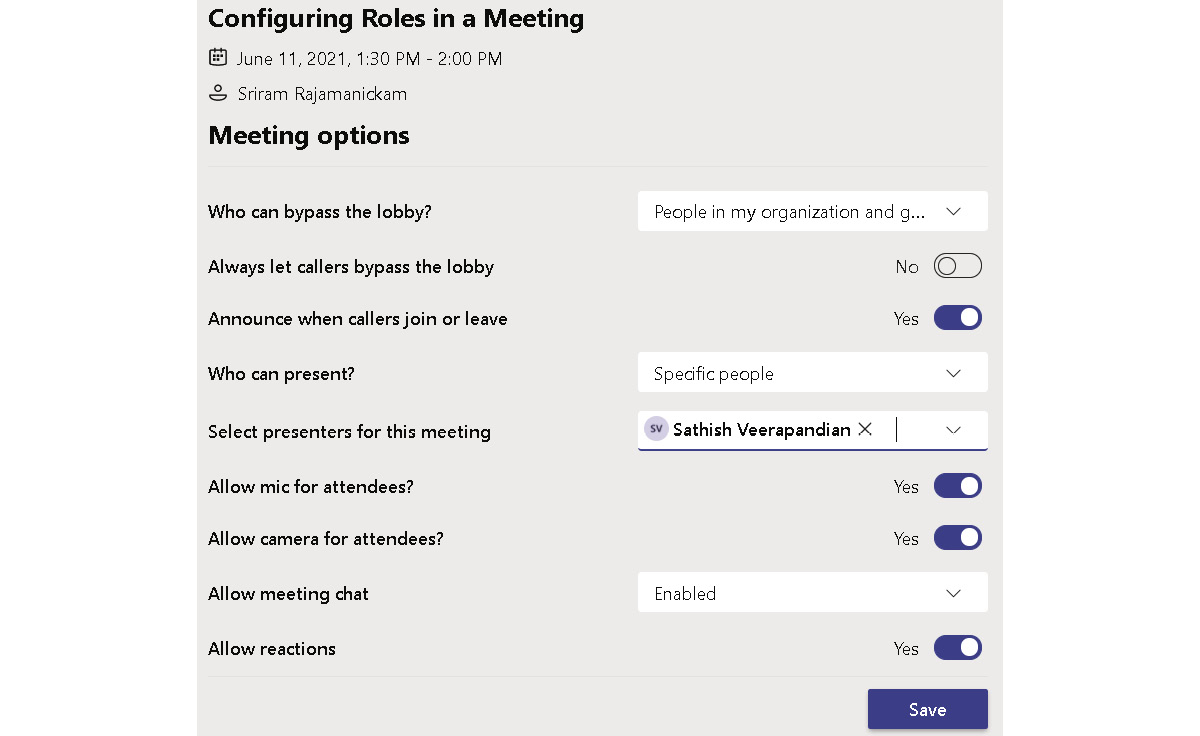
Figure 1.27 – Configuring Roles in a Meeting
Allowing camera and mic options for participants
Mostly all meeting conversations require bidirectional communication and face-to-face interaction allows a meeting to be more productive. However, it may cause certain inconveniences as remote working is continuing for many organizations, and sometimes participants join a meeting from a noisy environment. The Microsoft Teams client allows you to decide as an organizer to allow mic and camera for attendees. We can simply toggle the settings on/off. It also allows you to change these at any time during the meeting. To allow these options, click on the Meeting options icon during the meeting. When turned off, the participants' camera and mic will be grayed out.

Figure 1.28 – Toggling camera and mic for attendees
We can now join the meeting and see the experience we have created by clicking on the Join button on the meeting item.

Figure 1.29 – Joining the meeting
During the meeting
All the roles options mentioned in the previous section can be modified even after the meeting is started. Once the organizer or the presenter completes the presentation, if you would like other participants to turn on their mic or camera, the organizer or presenter is able to change the settings by clicking on Meeting options.
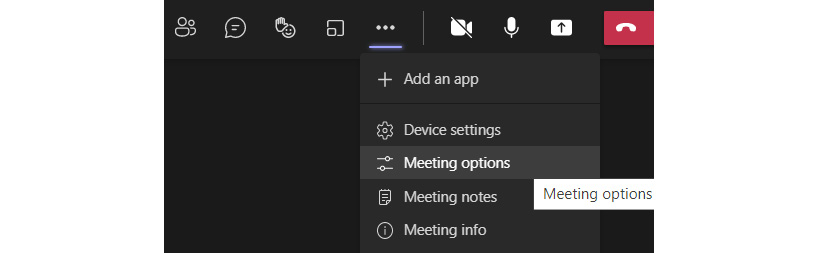
Figure 1.30 – Changing role options during a meeting
Sharing content during a meeting
As we have seen in the previous section on role configuration, you can define who is allowed to present their content during a meeting. Only the allowed participants will have Share content as an available option.
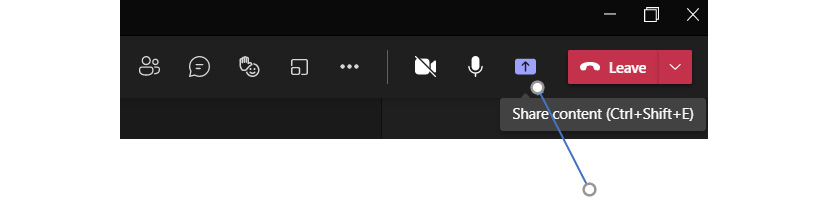
Figure 1.31 – Share content option during a meeting
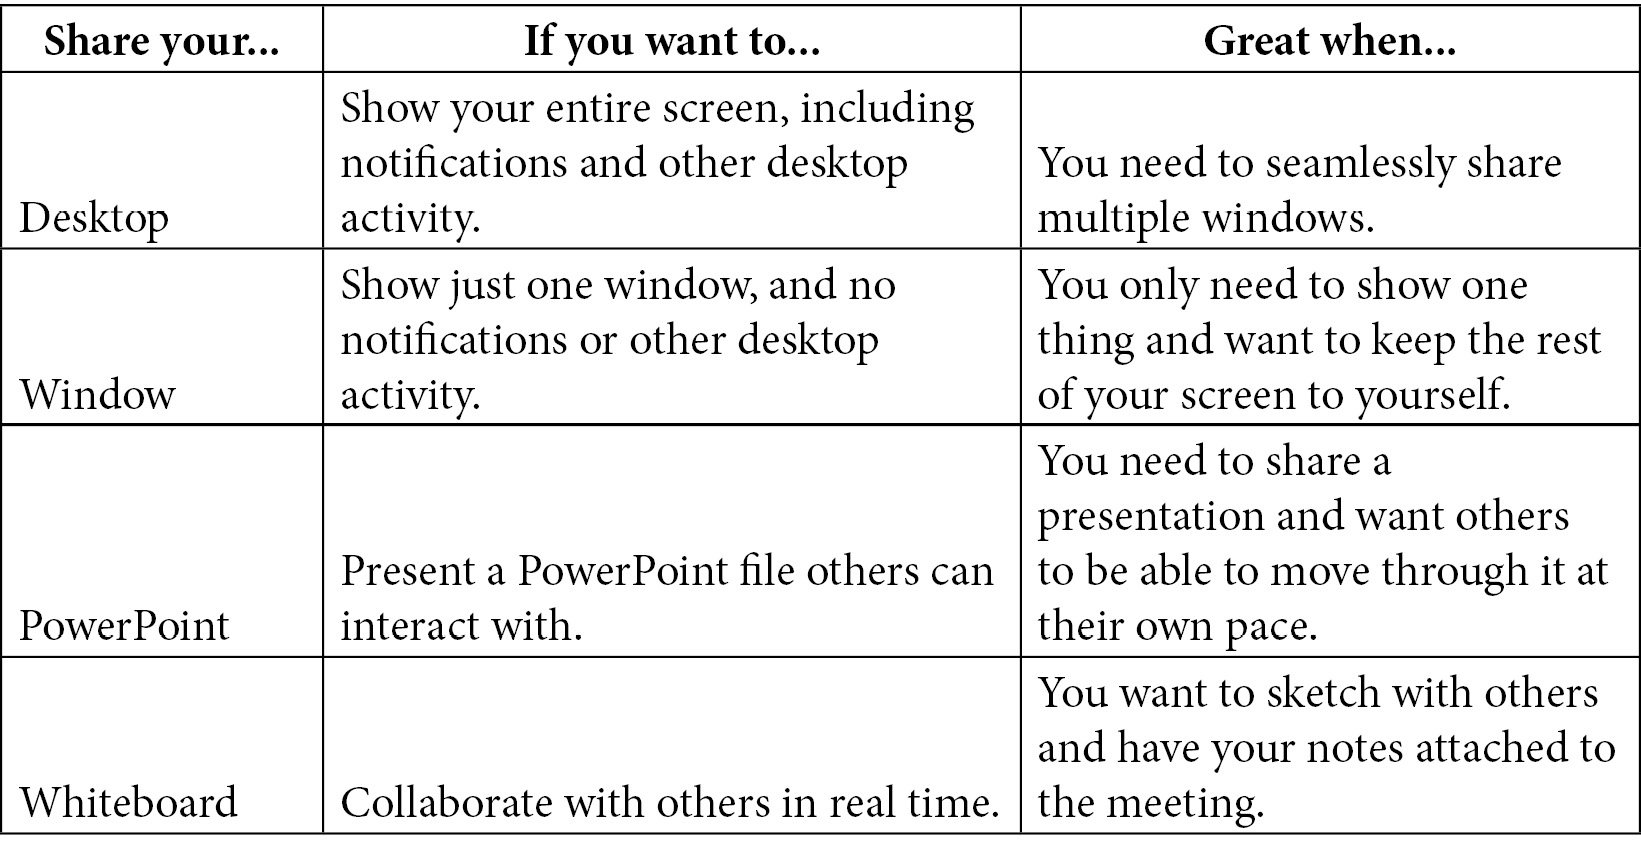
The organizer or presenter can share their desktop, Windows, PowerPoint, or Whiteboard. The following table describes the outcome of each sharing option that is available.
Organizers are allowed to include their computer audio when they present any audio files where all the participants in the meeting can hear the video and audio buffer from the organizer's computer.

Figure 1.32 – Include computer sound
If you choose to present your windows, Teams will show all the tools and files that are open on your system, and you can choose the desired one to present.
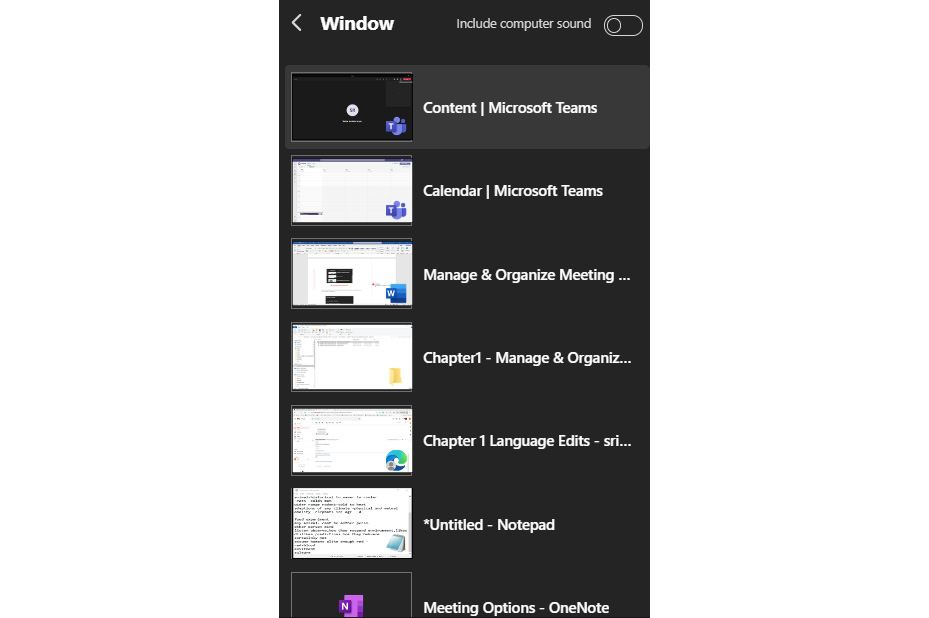
Figure 1.33 – Selecting which screen to share
If you choose to present a PowerPoint slide, Teams allows you to choose files from your computer or OneDrive.

Figure 1.34 – Presenting files from different locations
Presenter mode
The meeting organizer can customize the presenter mode by choosing whether they would like to present Content Only or Standout.
Note
Presenter mode is relatively new and Microsoft will be rolling out this option to tenants, so if it is not available in your organization, an IT admin should be able to guide you on the timeline of this option becoming available to end users.
- Standout mode shows the presenter in front of the content.
- Reporter mode displays content above the presenter's shoulder.
- Side-by-side mode has the content and the presenter displayed side by side.
Breakout rooms
Breakout rooms allow the organizer of the meeting to bring participants into smaller groups for lively brainstorming sessions. At times, it may be difficult to have a productive meeting, especially when you have a large audience with different areas of expertise in a single meeting. Breakout rooms easily create subgroups, and Teams allows you to add participants manually or automatically to these subgroups. We can set a timeline for each group, promote collaboration within groups, interact with participants, broadcast a message to the subgroups, and finally, close the breakout rooms.
Notes
These features are not currently available in breakout rooms:
Call me
Adding people to the meeting from the participants panel
Adding additional people to the meeting chat
Copying the Join meeting info
Let's see breakout rooms in action.
Creating breakout rooms
To create breakout rooms, a meeting should be initiated. In the top-right corner, you will have a Breakout rooms option.

Figure 1.35 – Enabling breakout rooms
Select the option to manually or automatically create breakout rooms. Automation will allow Microsoft Teams to auto-split the users based on the number of rooms selected.
Note
If automatic selection is selected, breakout rooms cannot be edited or modified, so it is recommended to go with manual selection and click Create rooms.
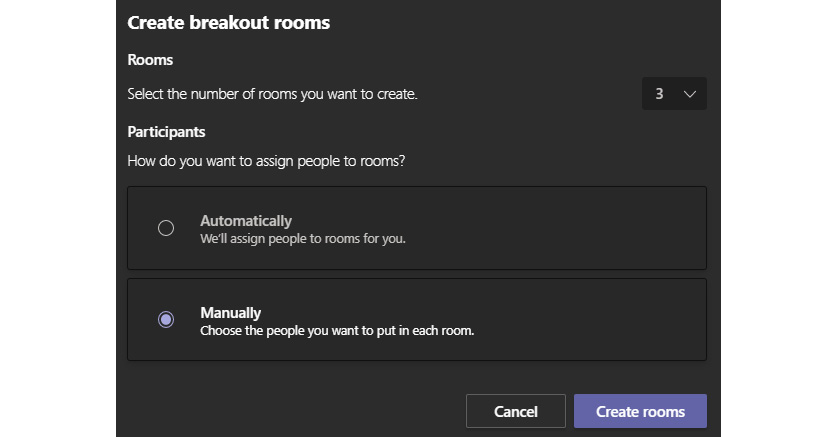
Figure 1.36 – Creating Breakout Rooms
Assigning people to breakout rooms manually
Based on the number of rooms selected on the previous screen, Teams will create the rooms and allow you to select participants to add to breakout rooms.
You can rename the rooms as per the logical naming convention that you would like to use.
Click on the Assign participants option and select users to add them to the room.
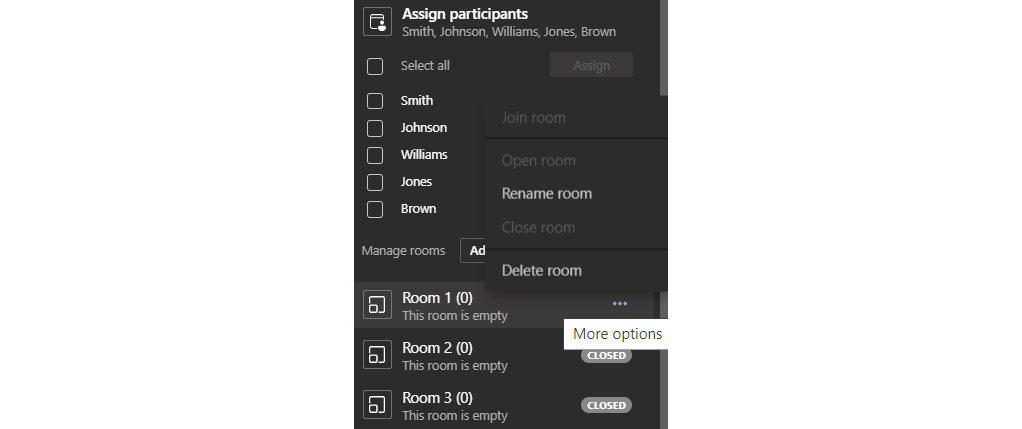
Figure 1.37 – Assign participants
Select the participants and click the Assign button to assign the users to the renamed group. The organizer can always assign members to different groups.
Note
Currently, participants who joined the meeting via PSTN or Teams devices cannot be assigned to rooms. We suggest using the main meeting as a breakout room for these people.
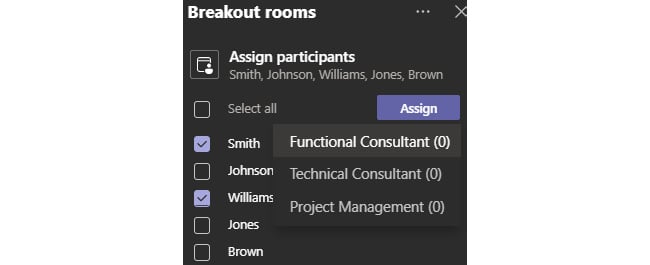
Figure 1.38 – Not all participants can be assigned to rooms
The organizer can join any room, which will allow them to interact in the respective breakout rooms.
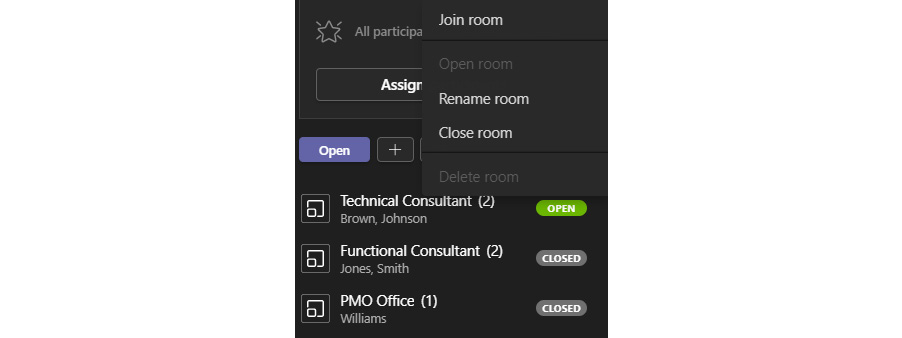
Figure 1.39 – Joining a room as the organizer
Sending announcements to breakout rooms
You may want to send announcements to give time updates, for example, or share discussion prompts. So, all individual rooms get a message labeled with the Important category, click on the  Announcement button:

Figure 1.40 – Sending an announcement
The organizer can navigate to the chat space on the Teams client and navigate to any breakout room that is created and collaborate normally, like in a Teams channel.

Figure 1.41 – An announcement across all rooms
Click on the Close room option on the breakout room to close all rooms to get back into the original meeting.
Note
Each and every breakout room will have an attendance report available for download so you can see the time spent in each room.
Once the meeting rooms are closed, the room members can no longer send any messages or collaborate further.
You now have a better understanding and have become familiarized with different options available in a Teams meeting. In the upcoming section, we will cover the highlights of channel meetings and channel notes.
Channel meetings and notes
We understand everyone who is using Microsoft Teams will already have multiple channels created by the organization's IT team or a user. We would like to give an overview of Teams channels to explain channel meetings and notes better.
Channel meetings and notes help in ad hoc meetings and provide a better collaboration experience. Channels are dedicated sections within a team to keep conversations organized by specific topics, projects, disciplines—whatever works for your team! Files that you share in a channel (on the Files tab) are stored in SharePoint. Channels are places where conversations happen and where the work gets done. Channels can be open to all team members or, if you need a more selected audience, they can be private. Standard channels are for conversations that everyone in a team can participate in and private channels limit communication to a subset of people in a team. Channels are most valuable when extended with apps that include tabs, connectors, and bots that increase their value to the members of the team.
Channel meetings are useful when you would like to have an ad hoc call immediately with all the stakeholders working on a project. The stakeholders will be added as part of the Teams channel that you have explicitly set up for the project, which can be private or public.
If you would like to schedule a meeting with the entire team, please remember to add the meeting channel when you create a meeting request via the Teams calendar, which will do the following in the backend:
- It will create a meeting link and post it in the channel so the channel members can directly add it to their calendar.
- It will send an email notification with the Team calendar info.
- Participants who accept or reject the meeting are automatically updated in the tracking, which can be accessed by the organizer.
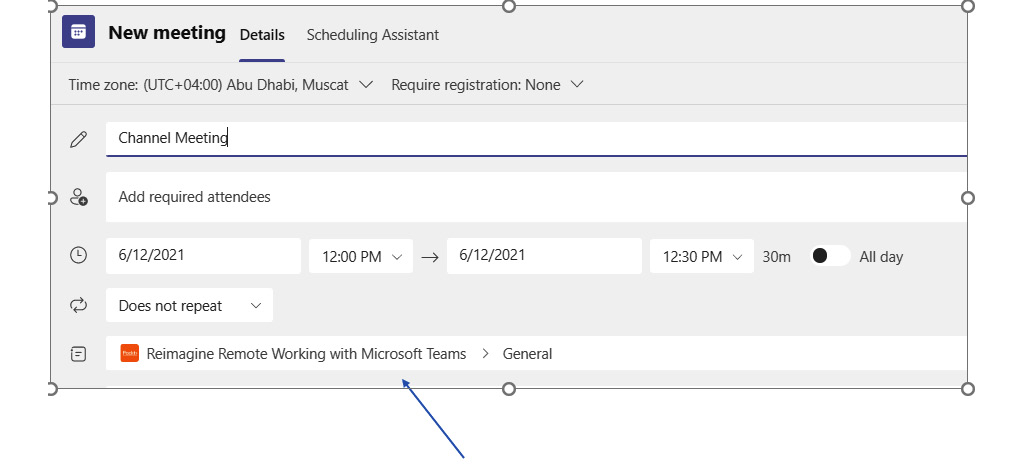
Figure 1.42 – Creating a new channel meeting
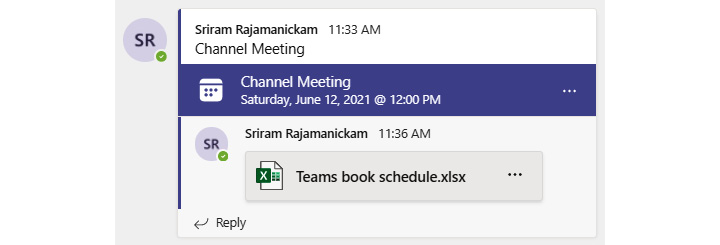
Figure 1.43 – Channel meeting join options
Ad hoc meeting in a channel
In the top-right corner of every team, you will find the option to meet or schedule a meeting. When you click on Schedule a meeting, Teams automatically adds all channel participants to the meeting:
- When you would like to make an important announcement on a project and would like to immediately meet the team, you can use the Meet now option, which will immediately add all users to the meeting and will prompt the users to join.

Figure 1.44 – Scheduling ad hoc meetings from a channel
- The Meet now option allows the organizer to copy the meeting link for sharing with other external participants.
- Start typing the name or phone number of someone you want to invite in the box under People at the top right. Select them when they appear in the list, and they'll get a call right away.
- Share the meeting via email.
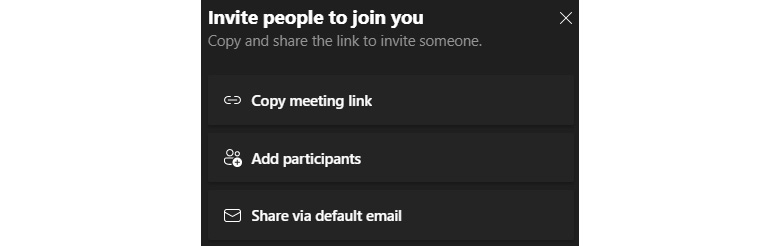
Figure 1.45 – Extending the meeting to additional participants who are not in the channel
Note
These options are extremely useful if you don't have an Outlook client installed and would like to set up professional meetings.
Meeting notes
Meeting notes are a great place to capture and share notes before, during, and after a Teams meeting. Meeting notes are very important when it comes to making meetings productive.
The following are the most important reasons to have meeting notes:
- Organizers and participants have a guide for reference.
- They serve as a reminder.
- They're a reference for participants who missed the meeting.
- They're time-saving.
- Corporate defense.
A few important things to remember
- Only people in the same organization as the meeting organizer will be able to start or access meeting notes.
- Meeting notes are available in meetings with up to 100 people.
- Only people who are invited to a meeting before notes are created will have access to them initially. Others can request access, and the owner of the notes will be notified via email.
Before a meeting
- Microsoft Teams allows you to edit meeting notes before a meeting is kicked off.
- To edit meeting notes, select Calendar in the Teams client, click on the meeting item, and then Edit. This takes to you to the Meeting Edit options.
- Notes will now be visible to all participants in the meeting for them to be prepared.
During and after a meeting
- Meeting notes are available to all the participants of the meeting during the actual meeting.
- The organizer and participants can click on the three dots in the top-right corner and access meeting notes anytime during and after the meeting by navigating to the meeting chat or channel chat window that is created.
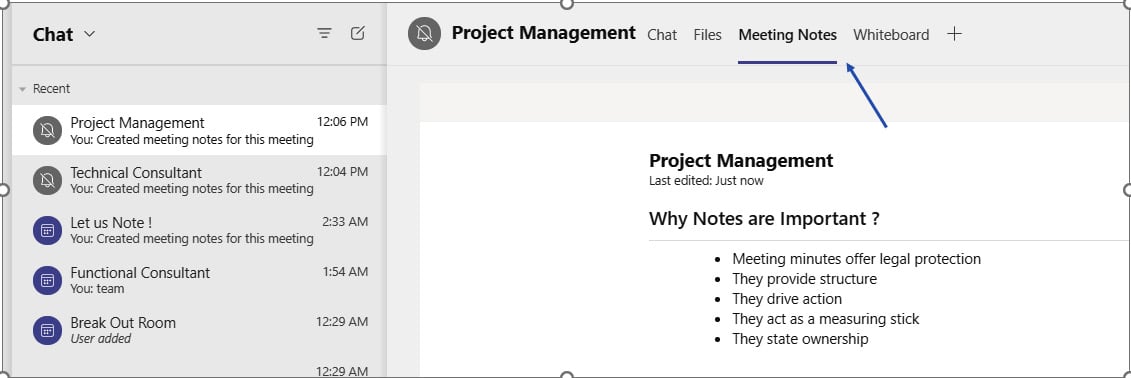
Figure 1.46 – Adding notes during and after a meeting
You now have a better understanding and have familiarized yourself with the various options for Teams channel meetings.
In the upcoming section, you will gain insights into the channel calendar, which is a new add-on in Microsoft Teams. The channel calendar helps you to organize the calendar of a Teams channel.
The channel calendar
Microsoft announced this feature as part of their Teams roadmap, and it was released in January 2021. The channel calendar allows you to add a calendar specifically to a channel. It was released to have more organized meetings by showing the calendar that is specific to a channel. The channel calendar was always available behind the scenes, but Microsoft decided to make it visible to all channel members. Setting up the channel calendar has the following benefits:
- The channel calendar allows team members to access channel meetings in the calendar grid.
- The channel calendar allows you to easily add a calendar item to the channel and shows it as a feed in the channel with the meeting link.
- Meetings created by adding the channel will be available and will show up in the channel calendar.
- When a meeting is created via channel meetings by adding a channel to a meeting, meeting requests only show up in the organizer's calendar. When we use Channel calendar, it is available to all users.
- When an event is created using the channel calendar, you are not able to remove the channel and it is grayed out, which makes sense as you want all the participants of the channel to be aware of the meeting.
The following steps add a channel calendar on Teams:
- To add a channel calendar, navigate to Teams Channel and click on the (+) symbol to add the channel calendar from the applications:

Figure 1.47 – Adding a channel calendar
- Search for
channel calendarin the apps search box and select Channel calendar. You will be prompted to change the name if required, so the calendar name is logical. You can then post the calendar to the group.
Figure 1.48 – Searching the channel calendar
- Once the channel calendar is added, provide a logical name for the calendar tab, which will be visible on your Teams client.

Figure 1.49 – Name the channel calendar
- The organizer can use the channel calendar on the Teams client and create a calendar request on the channel, which will be reflected on the channel calendar.

Figure 1.50 – Creating a calendar event
- The organizer can use the New Event directly on the channel calendar to create a calendar item:

Figure 1.51 – Add new event
Important limitations – channel calendar
Channel members will not receive a direct invite unless you add their names individually.
This is an important thing to note, as most users depend on the Outlook calendar. So, it is the organizer's responsibility to add the recipients explicitly to the meeting if they wish them to get an email notification and add the meeting to Outlook. Not doing this can sometimes mean a meeting is missed. The following limitations are to be remembered while using the Teams channel calendar:
- There is no private channel support.
- There can be only one calendar per channel.
- There is no guest access.
- There is no Outlook integration.
- There is no SharePoint calendar integration.
- Each time you schedule an event, it will create a post in the channel with a summary of the event details.
- Only members who have turned on notifications for that channel will receive a notification that an event was created.
- Only teams created before May 2018 can be added to an invite. If your team was created after May 2018, you can only add channels, Outlook groups, and individuals to an invite.
You now have a better understanding of, and are familiarized with, the various options on a Teams channel calendar.
In the upcoming section, you will learn about Microsoft Bookings, which is a powerful tool for businesses to manage customer bookings and schedules.
Microsoft Bookings
In this section, we will get a deep insight into Microsoft Bookings. As an overview, Microsoft Bookings provides individuals and businesses an end-to-end scheduling assistant and an appointments management system. Bookings are integrated into the Outlook calendar, which gives customers or business users the flexibility to book a time that is best suited for both parties:
- Automated email notifications reduce no-shows and improve customer satisfaction.
- Microsoft Bookings is highly customizable, which helps customers to book efficiently and allows business owners to be prepared before meetings.
- Bookings is integrated into the Office 365 suite of products, which means business owners can effectively use the powerful Microsoft Teams to virtually meet customers. Customers get a unique meeting link to the email address that they enter upon booking, which they can click on and join the meeting.
Note
It is not necessary for the customer to have an Office 365 identity; they are free to use their Gmail or AOL (and other) accounts to join.
There are three primary components of Bookings:
- A booking page where your customers and clients can schedule appointments with the staff member who is providing the service or running the appointment. This web-based scheduling page can be shared via a direct link, your Facebook page, and even through link embedding within your website.
- A web app that contains a set of web-based, business-facing pages where Bookings calendar owners and administrators within an organization can define appointment types and details, manage staff schedules and availability, set business hours, and customize how appointments are scheduled. These pages allow for versatility and the ability to customize a Bookings calendar to fit the diverse needs of the person or organization.
- A business-facing mobile app where Bookings calendar owners and administrators can see all their appointments, access customer lists and contact information, and make manual bookings on the go.
Licensing requirements
Bookings is available and active by default for Microsoft 365 Business Premium, Microsoft 365 Business Standard, A3, A5, E3, and E5 customers worldwide. Bookings is also available in Office 365 operated by 21Vianet.
Note
Before proceeding with Bookings, please ensure that your IT team has enabled the service for you. If you are the global administrator of your own tenant, and if you have any of the aforementioned licenses assigned, Bookings will work for you.
Client requirements
Bookings is an online service, so you do not need to download any client. Just go to the app launcher within the Microsoft 365 web experience. Administrators can also use the Bookings companion app to stay current with the latest information about customers and their appointments.
Let's get started with Bookings:
- To onboard yourself and set up Bookings, please visit the following onboarding URL
- Since this is first-time onboarding, it will prompt you to add a Bookings calendar with a few details about the business. For this demo, we can add a Bookings calendar name such as
DevOps Enterprise Supportand select the business type.
Figure 1.52 – Naming the business
- You are now ready to set up Bookings for your organization. In the left-hand pane, you have all the configurable items to have a seamless Bookings solution for your organization.

Figure 1.53 – Welcome page on Bookings
- Once the calendar is added for the first time using the onboarding link, you can use the direct URL:
- As an alternate approach, you can use the default Office 365 login, https://login.microsoftonline.com, select All apps, and click Bookings.
Follow these steps to add Bookings to the Teams client:
- Click on the three dots (…) on the Teams client.
- Search for the Bookings app in the search window.
- Click on the app and add the widget to your Teams client.
- The Bookings app will be available for quick access when you launch the Teams client every time.
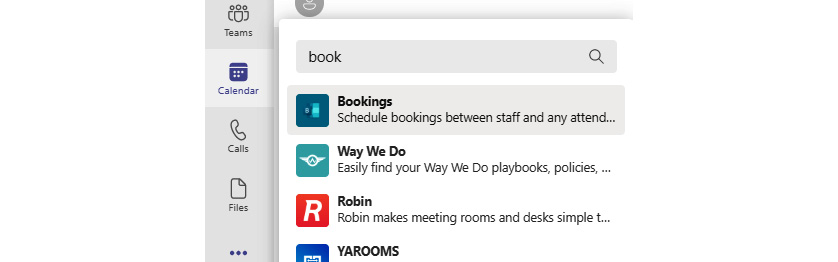
Figure 1.54 – Adding Bookings to your Teams client
Customizing Bookings
Let's start by setting up the company logo by clicking on the Add Logo tile in the top-left corner of your Bookings page. Select an image from your computer that is appropriate for the business. Once the logo is updated, it will allow you to choose a theme for the background color.
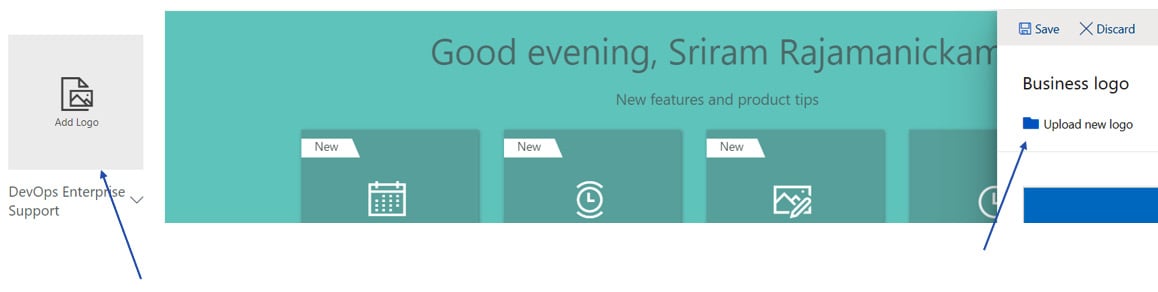
Figure 1.55 – Adding an organization logo
Business information
In Microsoft Bookings, the Business information page within the web app contains all the details that you would typically find on a business' "About us" page. These details include the relevant name, address, phone number, website URL, privacy policy URL, logo, and business hours.
The information you provide here will be displayed on the page customers and clients use to book appointments (known as the booking page) and in messages and reminders sent to them by Bookings. An example of this information on the booking page is highlighted here.
In Microsoft 365, select App launcher and then select Bookings.
- In the navigation pane, select Business Information.
- Enter a name suitable for the business and the phone number that you will need for the Bookings calendar.
- Type in the email address where you would like to get notifications in the Send customer replies to.
- For the website URL, please type the URL that is the home page of your business.
- You can mention the privacy policy and terms and conditions of your business.
- Finally, set the currency type for the service offering and click on Save.
Business hours
- By default, in the Microsoft Bookings app, business hours are set to 8 a.m. to 5 p.m. with 15 mins increments; however, you can tweak this as per the business needs.
- On the Business information page, under Business hours, use the dropdowns to select start and end times for each day.
- Click + or - to set the start and end times for Business hours.
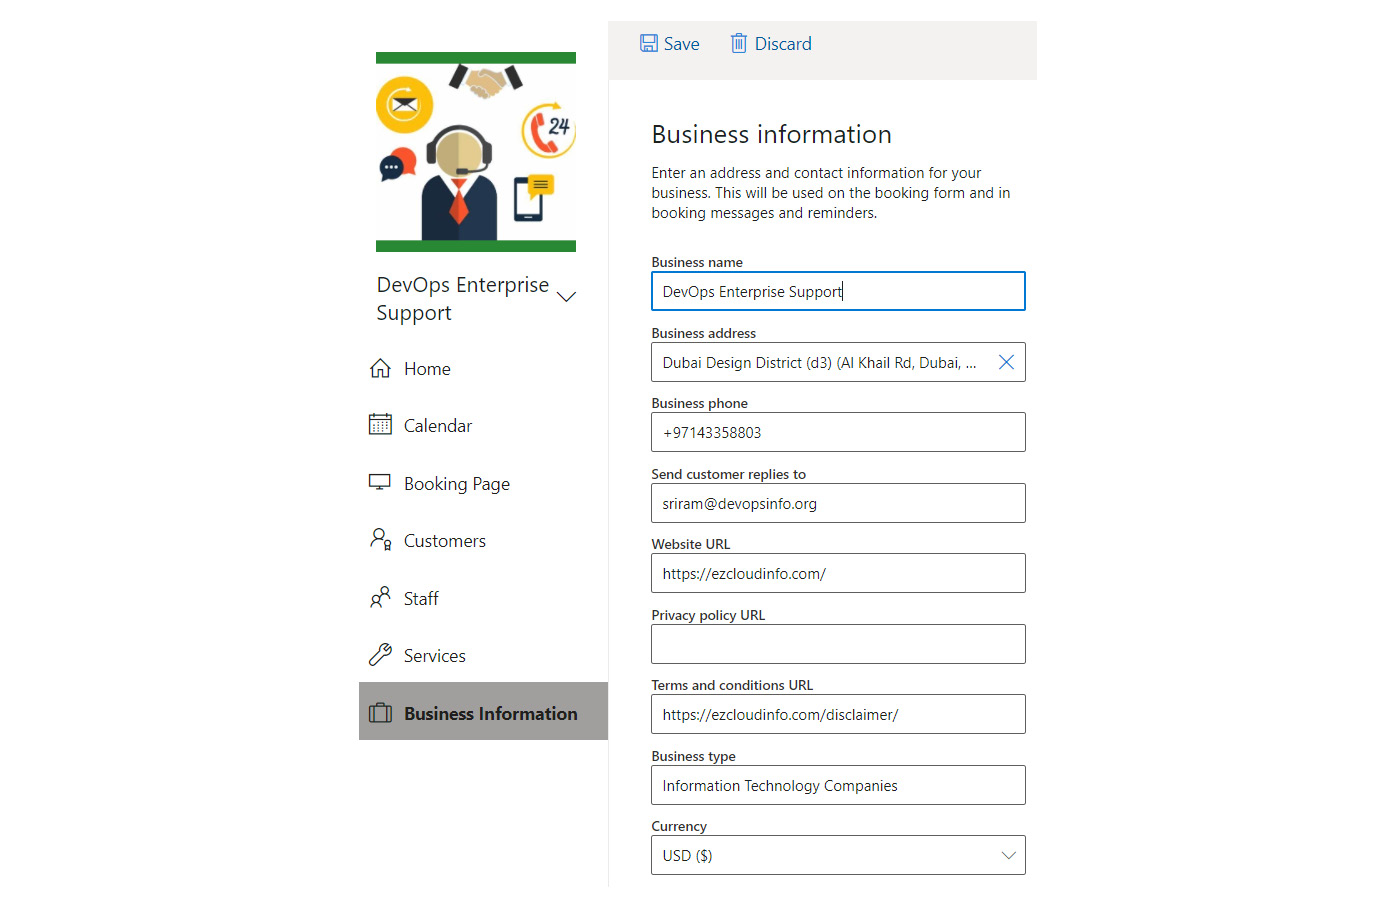
Figure 1.56 – Editing Business information
Setting off hours
The business needs to have off hours to take care of internal processes such as staff meetings and updating inventory. Bookings allows you to add off hours, where customers will not have time slots available for booking.
For example, if you have staff meetings every Thursday from 13:00 to 14:00 and want to block out that time so all your staff members can attend, you can do this:
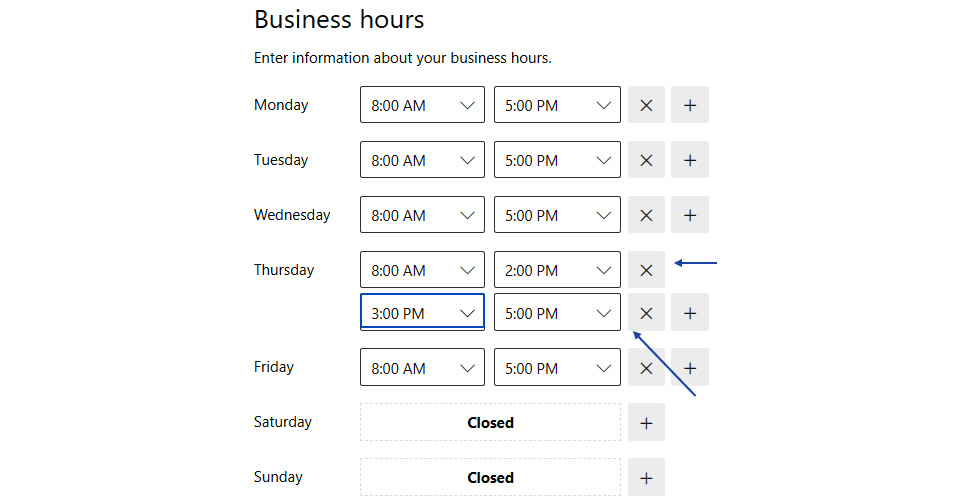
Figure 1.57 – Editing Business hours
To configure off hours, please follow these steps so customers don't see these times for booking appointments:
- On the Business information page, under Business hours, select a start and end time during which time staff can do their internal processes.
- Select + to create a new row for Thursday.
Configuring service details
- Service name: Enter the name of your service. This is the name that will appear in the drop-down menu on the calendar page.

Figure 1.58 – Editing Service name
- Description: It is good to give a description of the service offering, which will help the customer to pick a suitable service.

Figure 1.59 – Modifying the service description
- Default location: This location will be displayed on confirmation and reminder emails for both staff and customers, and it will be displayed on the calendar event created for the booking.

Figure 1.60 – Modifying the service location
- Add online meeting: Online meetings allow you to have a meeting online with Microsoft Teams. You can click on the toggle bar to adjust the settings.

Figure 1.61 – Enabling online meetings
- Default Duration: This helps to book the staff calendar for a time. In this case, we have selected 1 hour when the staff calendar won't be available during this time slot for other meetings.

Figure 1.62 – Duration to block the staff calendar
- Buffer time your customers can't book: Buffer time helps your staff with extra time for every appointment. It will help staff to cover internal processes.

Figure 1.63 – Buffer time for staff
- Maximum attendees per event: This setting allows you to create services that require the ability for multiple people to book the same appointment time and the same staff (such as a fitness class). The appointment time slot for the selected service, staff, and time will be available to book until the maximum number of attendees, specified by you, has been reached. The current appointment capacity and attendees can be viewed in the Calendar tab in the Bookings web app.
- Default price: This is the price that will be displayed on the Self-Service page. If Price not set is selected, then no price or reference to cost or pricing will appear.
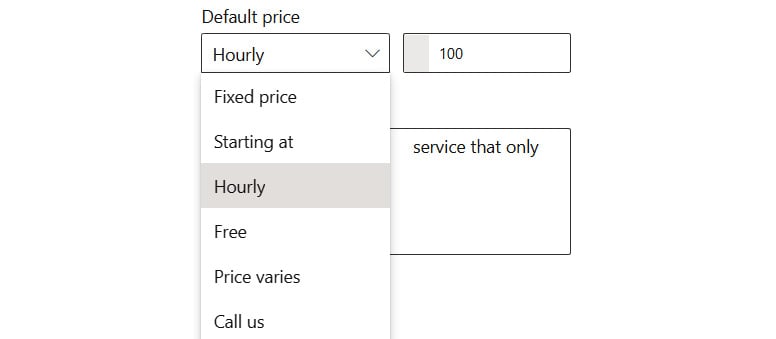
Figure 1.64 – Buffer time for staff
- Notes: This field appears in the booking event for booked staff, as well as on the event that appears on the Calendar tab in the Bookings web app.
- Custom Fields: This section allows questions to be added, or removed, if the customer needs to answer any questions to successfully book.
- Customer email, phone number, address, and notes are non-removable fields, but you can make them optional by deselecting Required beside each field.
- You can add a multiple-choice or text-response question by selecting Add a question.
- Custom fields can be useful when collecting information that is needed every time a specific appointment is booked. Examples include insurance provider prior to a clinic visit, loan type for loan consultations, major of study for academic advice, or applicant ID for candidate interviews.
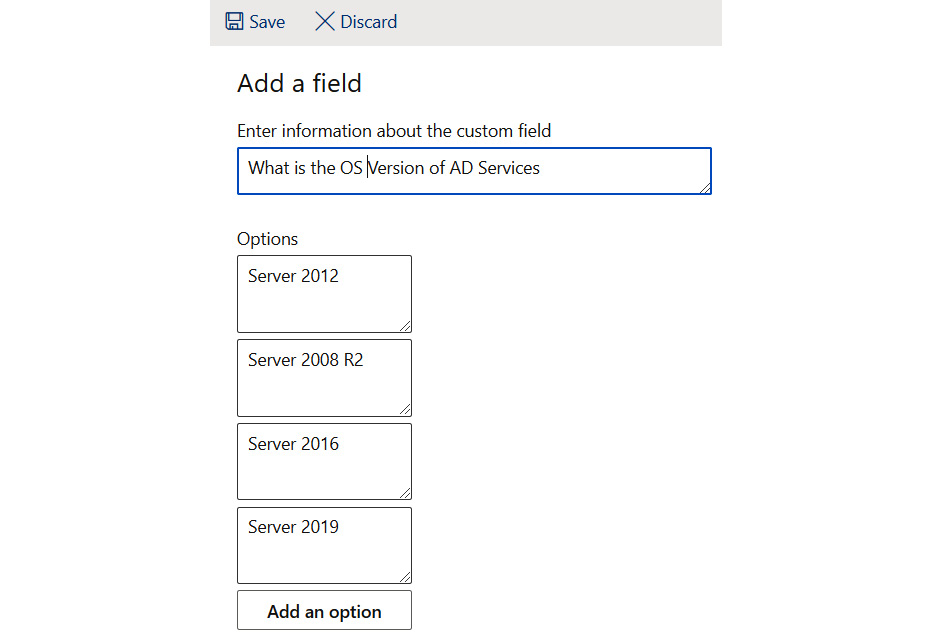
Figure 1.65 – Mandatory information to be provided by a customer
- Reminders and Confirmations: Both types of emails are sent out to customers, staff members, or both, at a specified time before the appointment. Multiple messages can be created for each appointment, according to your preference.
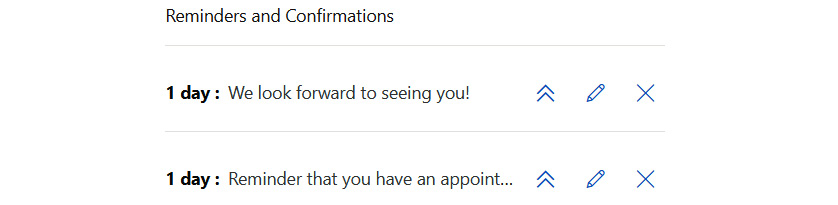
Figure 1.66 – Reminder and confirmation to customer
- Enable text message notifications for your customer: If selected, SMS messages are sent to the customer, but only if they opt in. Note that SMS notifications are currently only available in North America.
- Publishing options: Choose whether to have this service appear as bookable on the Self-Service page or to make the service bookable only on the Calendar tab within the Bookings web app.

Figure 1.67 – To show the service on the booking page
- Scheduling policy: This setting determines how appointment times are viewed, and the time during which bookings can be made or canceled.
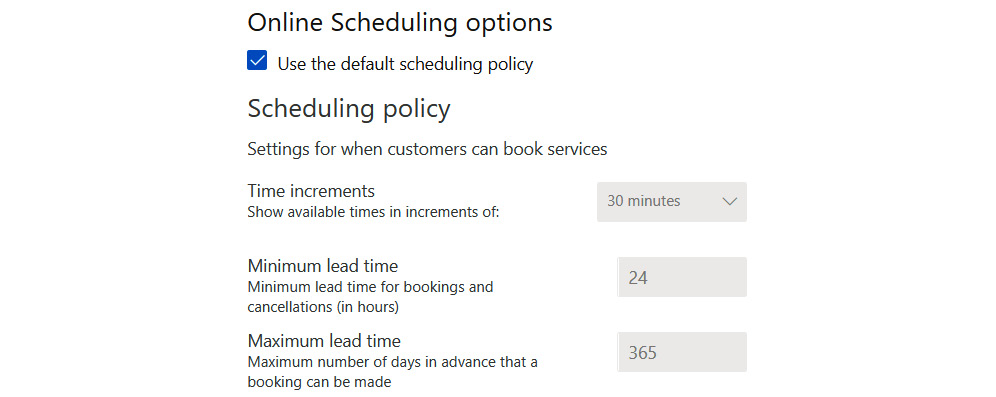
Figure 1.68 – Managing the Scheduling policy
- Email notifications: Sets when emails are sent to organization staff and to customers or clients.

Figure 1.69– To get the internal team notified about the booking
- Staff: Selecting this checkbox allows customers or clients to choose a specific staff member for their appointment.

Figure 1.70 – To allow customers to choose their preferred staff
- Enabled:
- Customers can choose from all staff assigned to the appointment when booking on the Self-Service page. Selecting the option of Anyone will make Bookings choose an available staff member at random to assign to the appointment.
- Disabled:
- Availability: The following options determine when the service can be booked:
- Bookable when staff are free: The service maintains availability based on when staff are free within business hours, with no extra time restrictions.
- Custom hours (recurring weekly): The service has an added layer of availability that can be further restricted (in addition to restricting by business hours or staff hours). Use this option when your service can only be provided or performed at a specific time.
- Set different availability for a Date Range: This setting impacts availability at a specific point in time, instead of on a recurring basis. For example, this could be used when a machine that is needed for the service is temporarily being serviced and unavailable, or when an organization is closed for a holiday.
- Assign Staff: Select the staff (provided you have added staff members to the Staff tab) who will be bookable for that specific service. Selecting no individual member of staff will result in all staff being assigned to the service.
- Manage staff:
- Go to the Manage staff page and select Add staff button.
- When adding staff from within your organization, type their name in the Add people field and select them when they appear in the drop-down menu. The other fields will automatically populate.
- Administrators can edit all settings, add and remove staff, and create, edit, or delete bookings.
- Viewers can see all the bookings on the calendar, but they cannot modify or delete them. They have read-only access to settings.
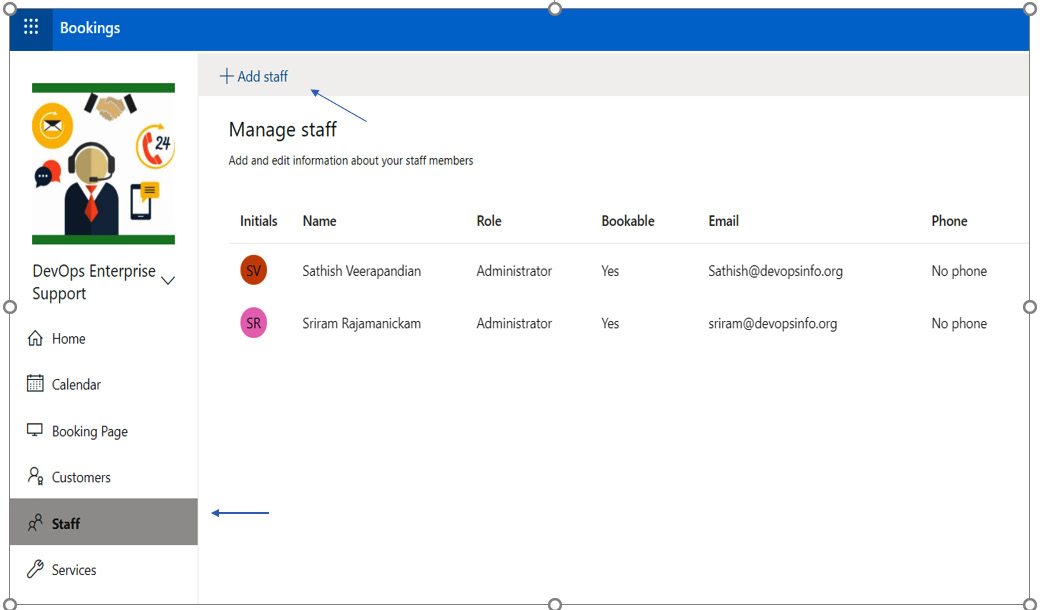
Figure 1.71 – Adding staff details
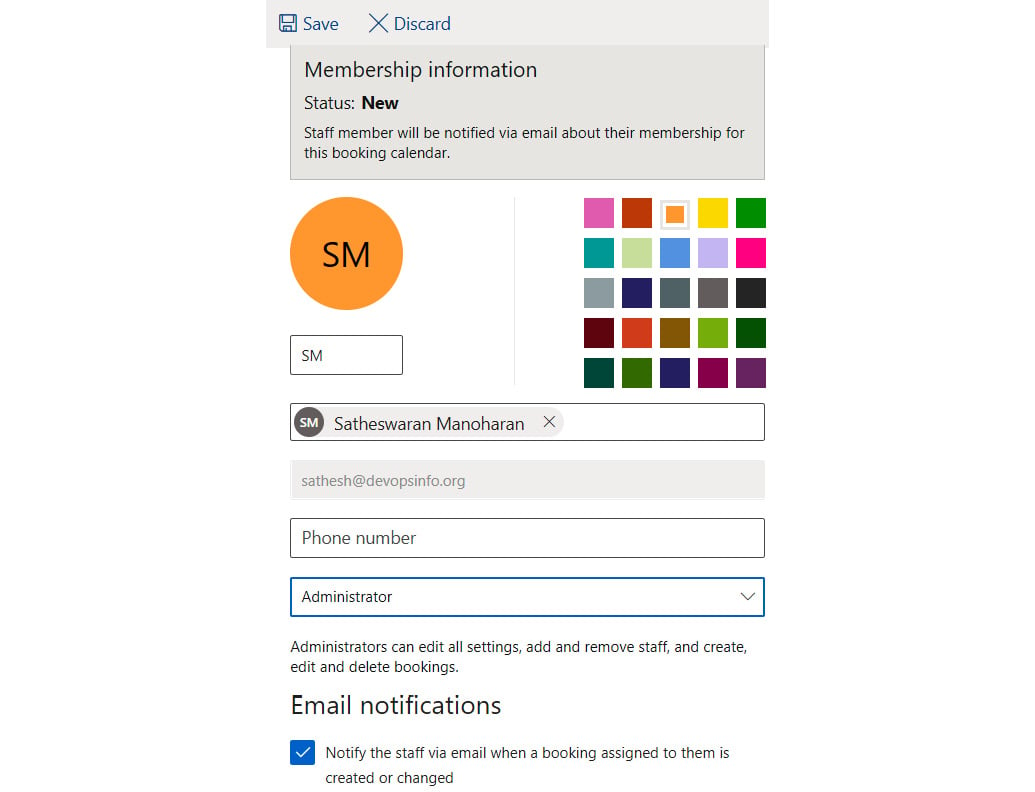
Figure 1.72: Updating the staff details
- Booking Page:
Click on Booking Page on the left side to configure booking controls.
- If you select Require a Microsoft 365 Account for booking, other customers with Gmail or an AOL ID won't be able to book.

Figure 1.73 – Booking page access control
- Booking page access control: Selecting Disable direct search engine indexing of booking page prevents your booking page from appearing in the search results of Google or other search engines.
- Customer data usage consent: When selected, text requesting the user's or customer's consent for your organization to use their data will appear on the Self-Service page. The box will have to be checked by the user in order to complete the booking.
- Availability: Availability helps you to customize the time ranges when the service is available; otherwise, it is restricted to the configured business hours.
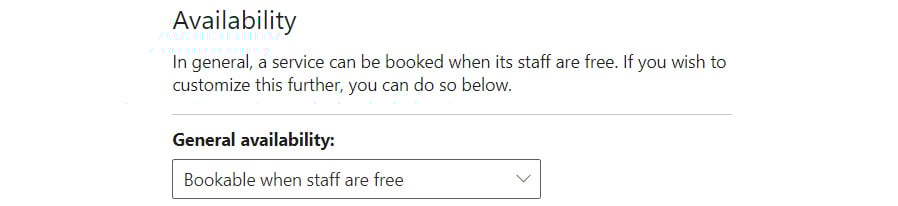
Figure 1.74 – Configuring Availability
- Customize your page: Choose colors and logos that appear on the Self-Service page for brandling.
- Region and time zone settings: Set your local time zone, which converts the time zone to the customer's time zone automatically whenever booking a meeting. For example, if an appointment is available at 5:00 p.m. GST, someone in IST will see the available time displayed as 6:30 p.m. IST.

Figure 1.75 – Time zone adoption
Publish/Unpublish
After configuring the settings, click on Publish/Unpublish at the top of the page to allow external parties to book meetings.

Figure 1.76 – Publishing the configuration
Staff calendar
As the business owner, you can have a quick glance at all your staff members' calendars to see their availability.

Figure 1.77 – Checking the staff calendar
Booking page for customers
As we have created a booking page, you can share this URL or embed this URL on the public website or Facebook feeds to have seamless booking for your customers:
https://outlook.office365.com/owa/calendar/DevOpsEnterpriseSupport@devopsinfo.org/bookings/
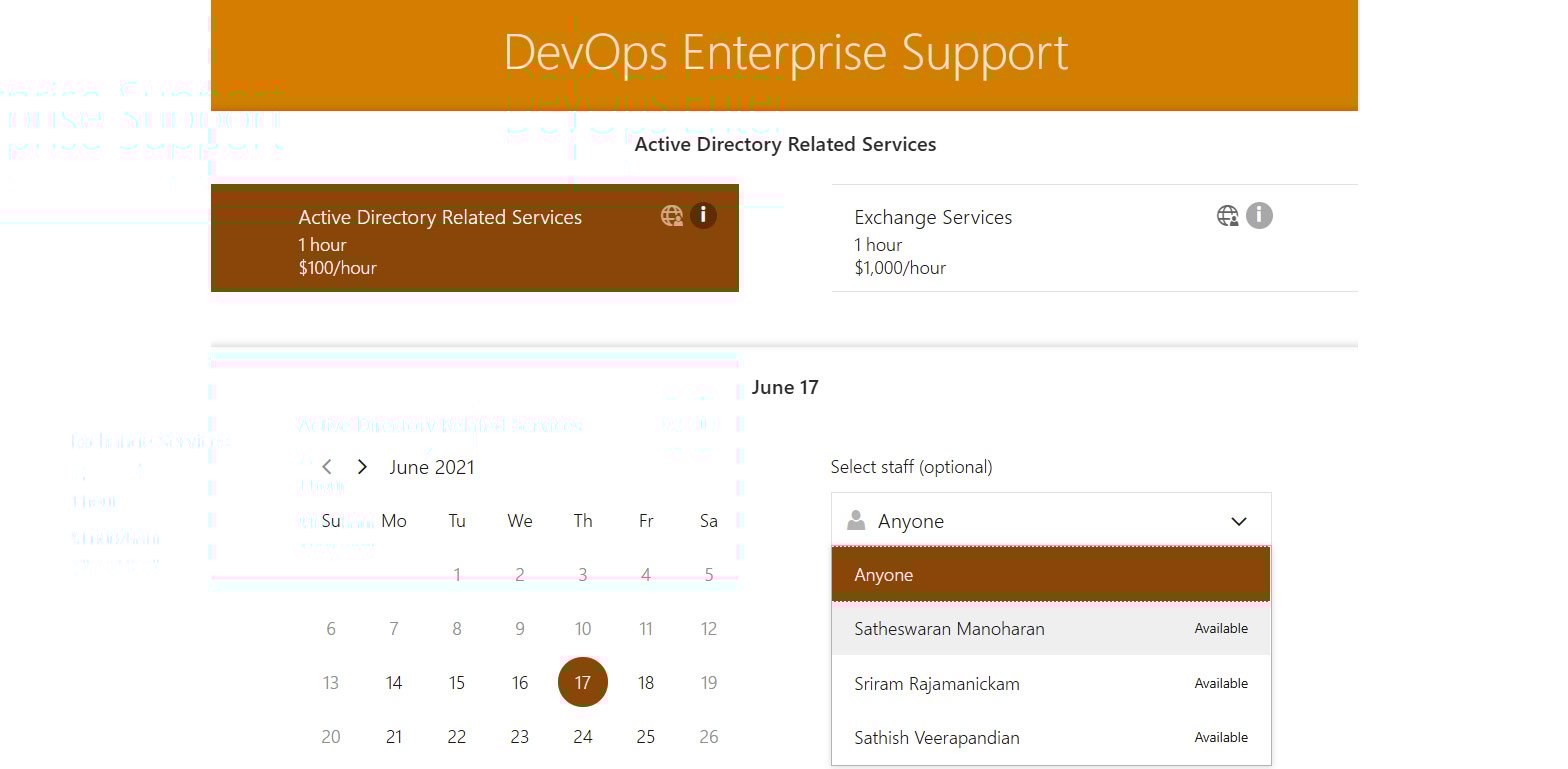
Figure 1.78 – Final look of the booking app
Note
Admins can use the Microsoft Bookings app on their Android/iOS platform to have a quick overview of all their booked sessions and be prepared to serve.
With remote working increasing, Microsoft Bookings helps small businesses to set up an easy solution for customers using Microsoft collaboration tools to connect with customers.
You now have a better understanding of, and are familiar with, the various options on Microsoft Bookings.
In the upcoming section, you will learn about Microsoft Forms, which is a powerful tool for corporate surveys or quizzes, to collect reports from staff or customers.
Microsoft Forms
In this section, we will cover an overview of Microsoft Forms. Microsoft Forms can be used as a corporate survey solution. The solution allows users to customize questions, with options such as getting the user's opinion on a product the organization is working on, HR-based surveys, and a lot more. It can also be used for creating corporate quizzes. Microsoft Forms is a free tool that does not require any licenses.
Accessing Forms
- Log in to Microsoft Online Services at https://login.microsoftonline.com using your corporate email address and password.
- Select All app launcher in the top-left corner of the web browser and click Forms.

Figure 1.79 – Accessing Microsoft Forms
- You will be redirected to the Forms welcome page, where you can start customizing the survey questions or quiz.
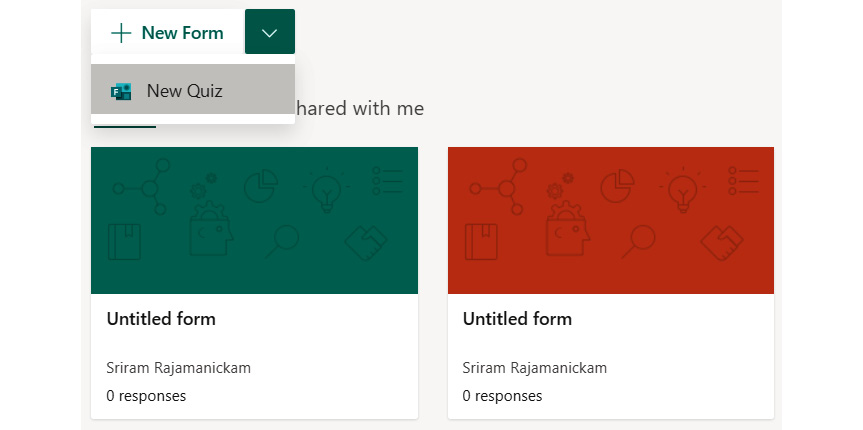
Figure 1.80 – Forms welcome page
Customizing Forms
- Click on New Form, which will allow you to create your own form. The first thing to do here is to set up a suitable title for your survey:

Figure 1.81 – Title for the survey
- In the top-right corner of this page, click on the three dots to go to the Forms Settings console.

Figure 1.82 – Forms Settings
- Select the targeted audience who can fill in the survey:
- Anyone can respond will be an anonymous survey where anyone with the link can fill in the survey.
- Only people in my organization can respond will allow only people who have signed in using their corporate identities to fill in the survey. Optionally, you can record a participant's name and allow only one response per person. Based on the requirement, these options should be carefully selected.
- Specific people in my organization can respond is targeted at a particular set of people who can fill in the survey.

Figure 1.83 – Survey audience options
- We can customize survey response options:
- Accept responses: This can be unchecked when the survey requires tweaking questions. Once checked, the intended recipients can start filling in the survey.
- Start date and End date: You can set up a start date and end date to lock down the survey start and end date. This allows you to close the survey or start the survey at the intended time.
- Shuffle questions: This can be turned on when you want to have the questions shuffled by the Forms engine automatically. By default, shuffling is turned off and a question order will be in place.
- Customize thank you message: You can send a customized message when the audience takes the survey.
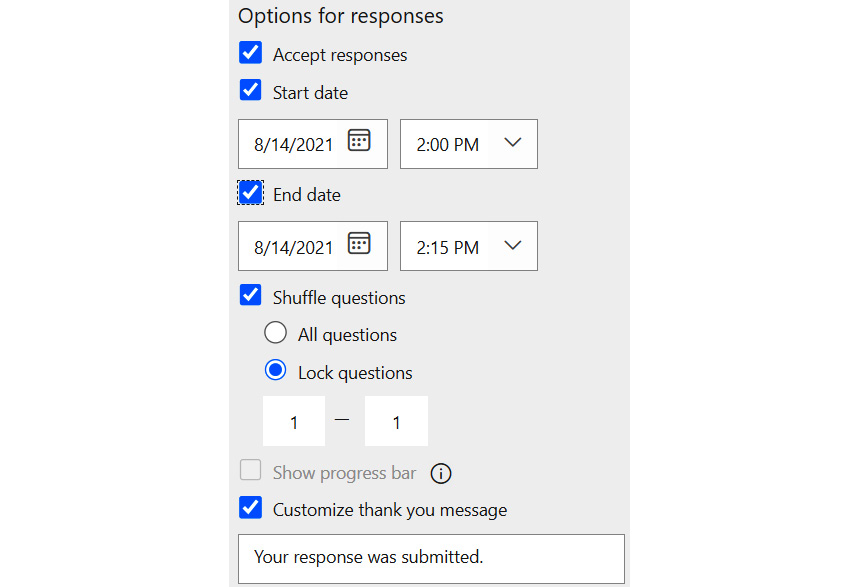
Figure 1.84 – Survey response options
- Response receipts: This allows you to inform the audience that their response has been recorded.

Figure 1.85 – Survey Response receipts options
- Microsoft Forms allows you to add survey questions in other languages. From the settings, you have an option to select Multilingual and add a primary language.
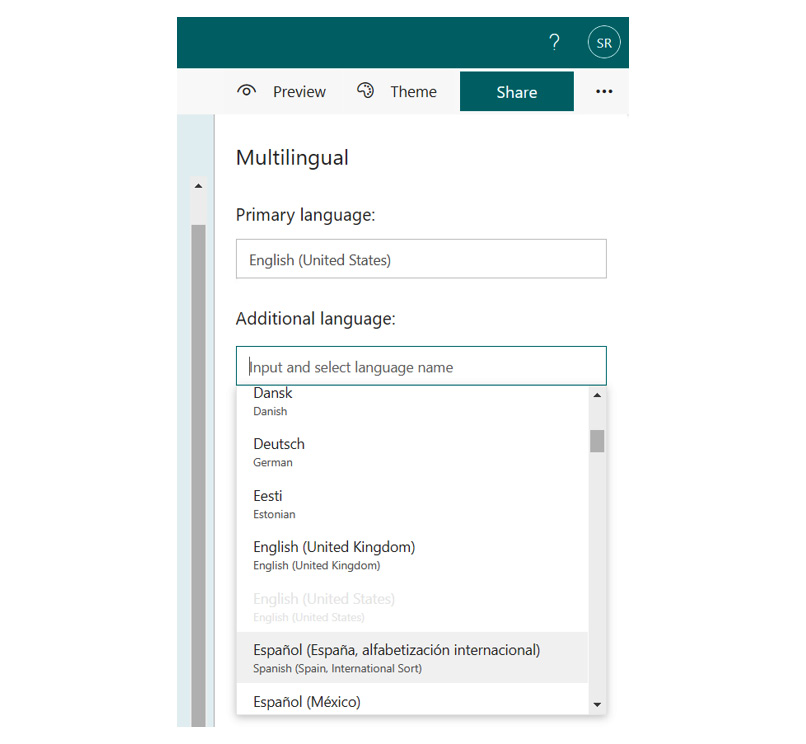
Figure 1.86 – Adding other languages
Configuring themes
Forms allows you to choose from the inbuilt theme which is built on this product by default. It does not restrict you to using the inbuilt themes. You can search Bing, upload your own theme, or search from your OneDrive location:
- In the top-right corner, you will see Theme, which will allow you to configure the theme for the survey.

Figure 1.87 – Configuring a theme

Figure 1.88 – Inbuilt themes
- Click on the (+) symbol to upload a customized theme from the following location:
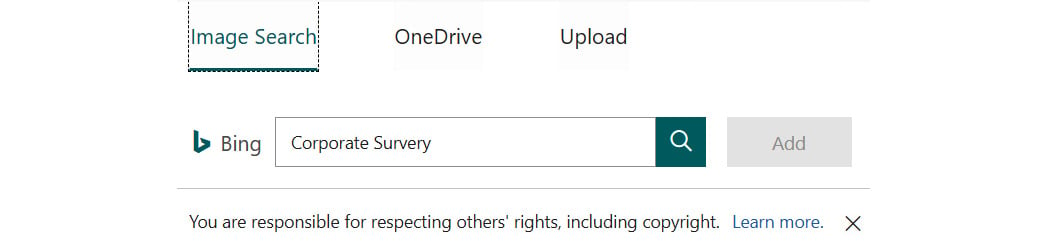
Figure 1.89 – Uploading custom themes
Configuring questions for a survey
Forms allow you to add multiple question types based on the business needs and the variety of answering options allowed.
- Click on the + symbol and add a question type.

Figure 1.90 – Adding survey questions
- Click on the + symbol, add a question type, and type in the question. The Forms engine will give suggestions based on the question you type. You can discard them and use your own.
- Multiple answers allows you to select multiple options for a question.
- Required makes the question mandatory, so the user cannot skip it and move on to the next question.

Figure 1.91 – Customizing a survey question
- Similarly, you can create multiple question types within a single survey. The following are some examples of this.

Figure 1.92 – Customizing a survey question
- You can add a subtitle to each question to provide a description of the question.
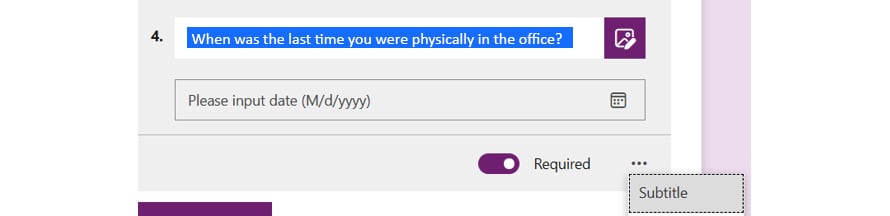
Figure 1.93 – Adding a subtitle
Configuring branching
In this section, we will cover the branching options of Forms, which allow you to directly bypass a question and go to the next section. One of the real use cases we recently came across was that our organization planned to provide Microsoft training for all cloud technologies. The list of technologies was from basic to expert level, so we used the branching logic to allow users to select their preferred training session and to book their training slots. Let's see branching in action:
- To create branching, go to questions and select Add branching.

Figure 1.94 – Adding branching
- As you can see in the following screenshot, you can configure a question so that you can directly bypass it and go to another question based on the selection.

Figure 1.95 – Configuring branching
- You can reset the branching if you have challenges with grouping by clicking in the top-right corner of the branching page.

Figure 1.96 – Reset branching
- Finally, you can preview the survey form and publish it.
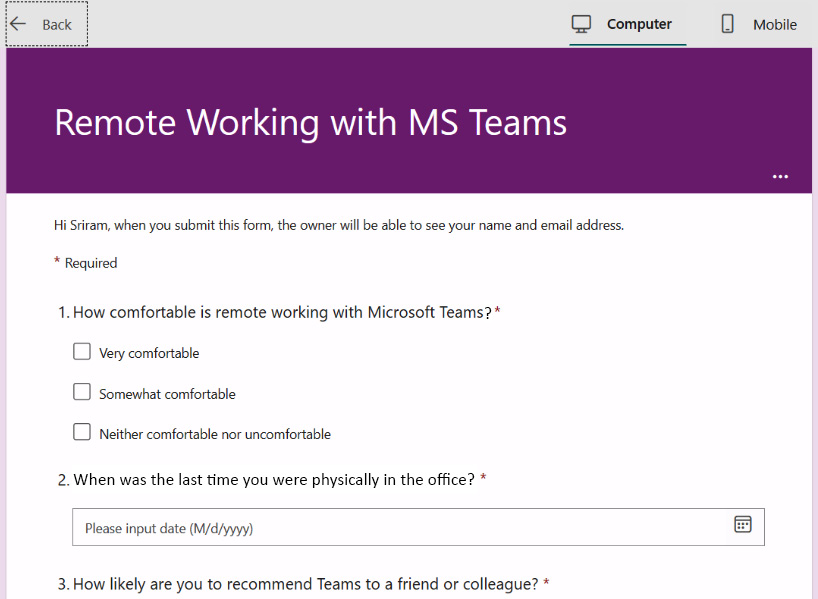
Figure 1.97 – Preview survey
Tracking responses
Once the survey is filled in, the survey creator will be notified of the responses and can log in to their portal and track the responses and export them into Excel to collect the required data.
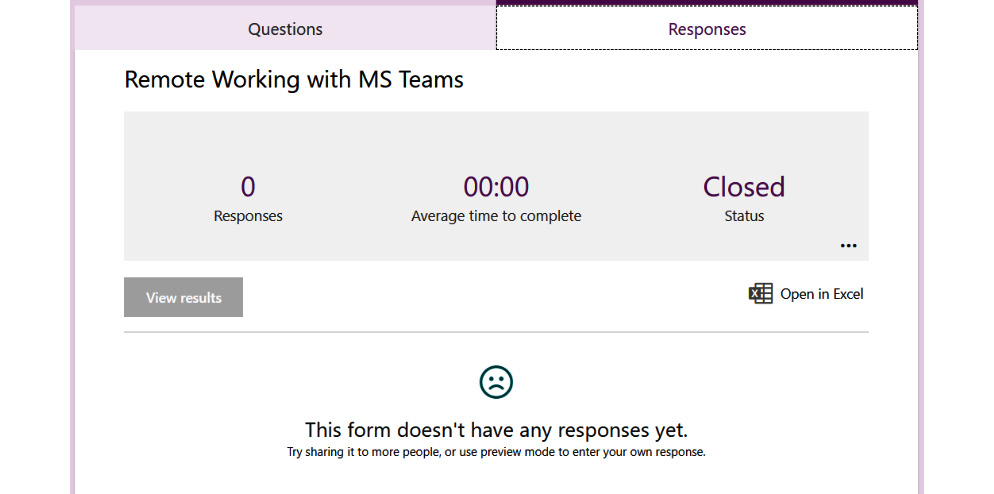
Figure 1.98 – Reviewing responses
You now have a better understanding of, and are familiar with, how to configure Microsoft Forms for your corporate surveys.
Summary
In this chapter, we have taken a deep dive into organizing Microsoft meetings, channel calendars, channel meetings, meetings notes, Microsoft Bookings, and Microsoft Forms. By practicing on your own Teams client, you should be able to get hands-on experience for the targeted topics. The way organizations work has drastically changed in recent years, and remote working is being adopted by many organizations. With the powerful tools in Microsoft Teams and the Office 365 stack, you will be able to organize your daily tasks and meeting schedules seamlessly. Microsoft Teams is a state-of-the-art tool that is currently available on the market for collaboration, so please read through the upcoming chapters for a lot of amazing features that can ease your day-to-day tasks.
In the upcoming chapter, we will learn about the project management tools that are available on the Office 365 stack and integration with Microsoft Teams.