


We want to include Silverlight 4 RIAs (Rich Internet Applications) in SharePoint 2010. RIAs provide rich experience for users, both through their browsers and outside them. Integrating Silverlight RIAs in SharePoint 2010 offers amazing opportunities to combine the power and flexibility offered by SharePoint with great user experiences. In fact, many interfaces shown in SharePoint 2010 are developed in Silverlight. We want to integrate Silverlight RIAs into SharePoint 2010. First, we must understand some of the fundamentals that are related to various tools and their configurations. In this chapter, we will cover many topics to help us understand the new tools and techniques involved in creating Silverlight RIAs for SharePoint 2010 sites. We will:
Understand the benefits of integrating Silverlight with SharePoint
Prepare the development environment to develop applications for SharePoint 2010 using Silverlight 4
Prepare the SharePoint 2010 server to host Silverlight applications
Create a Silverlight Line of Business RIA
Learn to add a Silverlight RIA to a SharePoint site
Understand the advantage of creating rich user experiences for SharePoint solutions
Work with shared documents to store a Silverlight application in SharePoint sites
Work with many Silverlight applications in a single page
Learn the differences between client and server code
The following list shows many benefits of integrating Silverlight with SharePoint 2010:
Rich UX: Silverlight RIAs can offer a rich user experience. You can take full advantage of the rich visual capabilities offered by Silverlight and include them in a SharePoint site. The rich and interactive content offers an incredible new world of possibilities in SharePoint. For example, you can offer an interactive balanced scorecard with animated graphs, rich navigation capabilities, and context menus.
Code runs on the client: You can take advantage of the power of the client computers accessing the SharePoint server. You can use threading and asynchronous calls to offer responsive user interfaces and to take advantage of modern multi-core microprocessors found in client computers. You can offer great response times without the need to wait for the server to load another page. You can take advantage of rich controls, animations, and exciting multimedia effects. The processing removes load from the server and enables you to use both the server and the client in your solutions. Additionally, Silverlight 4 is cross-browser capable and we can take advantage of the improved Out of Browser features to create applications that interact with the SharePoint 2010 server but run in the Windows desktop, out of the web browser.
Efficient applications: As you can work with the power offered by the client, you can process data without the need to make requests to the server all the time. This way, you can create load-balanced solutions.
Access to the Client OM (Client Object Model): When you have to access data and services offered by the SharePoint 2010 server, you don't need to create your own complex infrastructure. There is no need to add additional layers. You can take advantage of the new Client Object Model, also known as Client OM. As you can work with asynchronous calls to the Client OM, you can still offer great responsive applications when consuming services from the server. Users can interact with SharePoint data without requiring server calls as they would from traditional pages. Lots of the processing can be pushed down to the client. This way, as previously explained, you can remove load from the SharePoint server and create load-balanced solutions.
Leverage your existing Silverlight knowledge, components, and applications: You can build new capabilities quickly from existing Silverlight components and applications, integrating them with SharePoint 2010.
Considering the aforementioned benefits, we will work hard to learn all the possibilities offered by the integration of Silverlight and SharePoint 2010 in later parts of the book.
Now, when we design a new SharePoint 2010 solution, we will be able to consider Silverlight RIAs as new components for the global solution. We have to consider the aforementioned benefits of integrating Silverlight with SharePoint and decide which parts would be convenient to create as Silverlight RIAs.
This way, we can focus on preparing the SharePoint 2010 infrastructure and then we can access data and services offered by the server through Silverlight RIAs. For example, you can view the images found in an assets library defined in SharePoint through a Silverlight application.
We want to take full advantage of modern technologies. First of all, we must install the latest tools and begin working on configurations. Later, we will be able to use our existing knowledge to create different kinds of RIAs for SharePoint 2010, using Silverlight 4 — the newest kid-on-the-block from Microsoft.
Note
Silverlight 4 is backward-compatible with its previous version, Silverlight 3. Therefore, when an example uses a feature found only in Silverlight 4, you will find a note explaining this situation. Most of the examples work for both Silverlight versions. However, we will also take advantage of some of the new features found in Silverlight 4.
The only requirements underpinning the development and integration of RIAs into SharePoint 2010 sites are understanding the basics of the C# programming language, ASP.NET, XAML code, and the Visual Studio IDE. We will cover any other requirements in our journey through the creation of many different kinds of RIAs to run in a SharePoint 2010 site. First, we must download and install various Silverlight development tools. We need Visual C# 2010 Professional, Premium, or Ultimate installed, in order to successfully complete the installations explained in the following section. Visual C# 2010 allows us to choose the desired Silverlight version (for example, version 3 or version 4). The following sections and chapters will show Visual Studio 2010 Ultimate screenshots. If you use other versions, some elements that appear in the screenshots could be different but the steps are all valid for the aforementioned versions.
Follow these steps to prepare the development environment:
1. Download the following files:
Application's name
Download link
File name
Description
Silverlight 4 Tools for Visual Studio 2010
Silverlight4_Tools.exeWe must install Silverlight 4 Tools in order to create Silverlight 4 applications in the Visual Studio 2010 IDE, using XAML and C#. It will co-exist with previous Silverlight SDKs (Software Development Kits). This new version of Silverlight Tools also includes the WCF RIA Services package.
Silverlight 4 Offline Documentation (in CHM format)
Silverlight_Documentation.EXEWe must download and run this file to decompress its content, because we will need access to Silverlight 4 official documentation in due course.
Expression Blend for .NET 4
Blend_Trial_en.exeThis tool will enable us to create content that targets Silverlight 4 and to create rapid prototypes with the SketchFlow tool.
Silverlight Toolkit (Updated for Silverlight 4 compatibility)
Silverlight_4_Toolkit_April_2010.msiIt is convenient to download the latest stable release. This toolkit provides a nice collection of Silverlight controls, components, and utilities made available outside the normal Silverlight release cycle. It will be really helpful to use these controls to provide even more attractive user interfaces. Besides, it includes more Silverlight themes.
2. Run the installers in the same order in which they appear in the above table and follow the steps to complete the installation wizards.
3. Once the installations have successfully finished, run Visual Studio 2010 or Visual Web Developer 2010 (or later).
4. Select File | New | Project... or press Ctrl+Shift+N. Select Visual C# | Silverlight under Installed Templates in the New Project dialog box. You will see many Silverlight templates, including Silverlight Business Application and WCF RIA Services Class Library, as shown in the following screenshot:

Silverlight Toolkit is a Microsoft project offering many rich controls, components, and utilities that can help us to enhance our Silverlight UI (User Interface). As we want to create a very attractive UI for SharePoint, it is convenient to get familiar with its features. Follows these steps to see the controls in action and to change the values for many of their properties.
1. Select Start | All Programs | Microsoft Silverlight 4 Toolkit April 2010 | Toolkit Samples and your default web browser will display a web page with a Silverlight application displaying a list of the controls organized in ten categories as follows:
Controls
Data
DataForm
Data Input
DataVisualization
Input
Layout
Navigation
Theming
Toolkit
By default, the
default.htmweb page is located atC:\Program Files (x86)\Microsoft SDKs\Silverlight\v4.0\Toolkit\Apr10\Samplesin 64-bit Windows versions.2. Click on a control name under the desired category and the right panel will display the control with different values assigned for its properties, creating diverse instances of the control. For example, the following screenshot shows many instances of the
Ratingcontrol under the Input category.
3. Click on the buttons shown at the bottom of the web page and you will be able to see both the XAML and the C# code used to create the sample for the control. For example, the following screenshot shows the XAML code for the
DataGridcontrol example,DataGridSample.xaml. You can also click onDataGridSample.xaml.csand check the C# part. This control appears under the Data category.
Silverlight Toolkit also includes 11 themes that allow us to change and improve the overall look-and-feel for our Silverlight UI. They are:
Bubble Creme
Bureau Black
Bureau Blue
Expression Dark
Expression Light
Rainier Purple
Rainier Orange
Shiny Blue
Shiny Red
Twilight Blue
Whistler Blue
Click on Theme Browser under the Theming category and you will be able to select one of the themes shown in the previous list to preview the look-and-feel of many controls. The following screenshot shows the preview for the Whistler Blue theme:

So far, we have prepared the development environment. Now, it is time to make sure that we have the necessary configuration for the SharePoint 2010 server in which we are going to integrate Silverlight applications.
In order to complete all the examples that we will develop throughout this book, you must be an administrator of a SharePoint site collection. SharePoint Server 2010 or SharePoint Foundation 2010 must be installed in the same computer that runs Visual Studio 2010. You can check the necessary steps to perform a SharePoint Server 2010 or SharePoint Foundation 2010 installation for your development computer at http://msdn.microsoft.com/en-us/library/ee554869.aspx. Follow these steps to ensure that you are a site collection administrator:
1. Open your default web browser, view the SharePoint site, and log in with your username and password. You have to enter the SharePoint server URL. In our examples, we will use http://xpsgaston as our default SharePoint 2010 site. However, you have to replace it with your SharePoint 2010 site URL. Your default site will appear, in this case,http://xpsgaston/SitePages/Home.aspx, as shown in the following screenshot:

2. Click Site Actions | Site Permissions and a list of users with their permission levels will appear.
3. Now, click on Site Collection Administrators in the ribbon. A new dialog box with the names of the users with administrator rights on this site collection will appear.

4. If your user name appears in the text box, you are a Site Collection Administrator.
Once we have ensured that our username is a Site Collection Administrator, we can use Server Explorer in Visual Studio to browse a SharePoint site.
1. Start Visual Studio as a system administrator user. In Windows Server 2008 R2, 2008, and 2003, if you are already logged as Administrator on the machine you can simply run the application. However, in Windows 7 or Windows Vista, you can do it by right-clicking on its shortcut and selecting Run as administrator in the context menu that appears, as shown:

2. Activate the Server Explorer palette. If it isn't visible, you have to select View | Server Explorer in the main menu.
3. Click on the expand button for SharePoint Connections. If the name of your desired SharePoint 2010 server doesn't appear in the list, you can manually connect to the server. You can do it by right-clicking on SharePoint Connections and selecting Add Connection... in the context menu that appears. Then, you have to enter the URL for the server, for example,
http://xpsgastonand click OK in the dialog box that appears. If your user has the previously explained privileges, the server will appear in the list.
4. Now, click on the expand button for the SharePoint server and you will be able to browse its different nodes. Every component of a SharePoint site is represented by a node in the Server Explorer tree view. You can inspect the properties for each node, as shown in the following screenshot:

5. You can view some lists in your default web browser by right-clicking on a node and then selecting View in Browser in the context menu that appears. For example, you can do it for the node Home | Lists and Libraries | Site Pages and your default web browser will display all the pages. In this case, the URL shown is http://xpsgaston/SitePages/Forms/AllPages.aspx.

Now, we are going to create a very simple Silverlight LOB (Line-Of-Business) RIA that retrieves data, displays a grid with a list of projects, and allows the users to navigate through the data. Then, we are going to integrate this Silverlight UI in SharePoint.
1. Create a new Visual C# project using the Silverlight | Silverlight Application template. Use
SilverlightProjectsas the project's name.2. Deactivate the Host the Silverlight application in a new Web site checkbox in the New Silverlight Application dialog box. We want the Silverlight application to run in a simple HTML web page. As you have installed Silverlight 4 Tools, the dialog box will offer you a combo box with the possibility to choose the desired Silverlight version. Select Silverlight 4 as we want to take advantage of the new features offered by this version.

3. Add a new XML file to the project,
Projects.xml. The following lines define properties and values for fiveprojectinstances. This way, we have some data in XML format for our simple LOB application.<?xml version="1.0" encoding="utf-8" ?> <projects> <project projectId="0"> <title>Creating a Silverlight 4 UI</title> <estimatedDaysLeft>4</estimatedDaysLeft> <status>Delayed</status> <assignedTo>Jon Share</assignedTo> <numberOfTasks>5</numberOfTasks> </project> <project projectId="1"> <title>Creating a Complex Silverlight LOB RIA</title> <estimatedDaysLeft>5</estimatedDaysLeft> <status>Delayed</status> <assignedTo>James Point</assignedTo> <numberOfTasks>35</numberOfTasks> </project> <project projectId="2"> <title>Creating a New SharePoint Site</title> <estimatedDaysLeft>3</estimatedDaysLeft> <status>Delayed</status> <assignedTo>Vanessa Dotcom</assignedTo> <numberOfTasks>8</numberOfTasks> </project> <project projectId="3"> <title>Installing a New SharePoint 2010 Server</title> <estimatedDaysLeft>3</estimatedDaysLeft> <status>Delayed</status> <assignedTo>Michael Desktop</assignedTo> <numberOfTasks>25</numberOfTasks> </project> <project projectId="4"> <title>Testing the New Silverlight LOB RIA</title> <estimatedDaysLeft>4</estimatedDaysLeft> <status>Delayed</status> <assignedTo>Jon Share</assignedTo> <numberOfTasks>35</numberOfTasks> </project> </projects>
4. Add a new class to the project called
Projectin a new class file,Project.cs. The following lines define the new class, with six properties. This way, you will be able to create instances of this class to hold the values defined in the previously created XML file.public class Project { public int ProjectId { get; set; } public string Title { get; set; } public int EstimatedDaysLeft { get; set; } public string Status { get; set; } public string AssignedTo { get; set; } public int NumberOfTasks { get; set; } }5. Open
MainPage.xaml, define a new width and height for theGridas800and600, add the following controls located in the Toolbox under All Silverlight Controls, and align them as shown in the screenshot. Remember that Visual Studio 2010 allows us to drag-and-drop controls from the toolbox to the SilverlightUserControlin the design view and it will automatically generate the XAML code.
6. Apply data binding to the font size for the
DataGridcontrol,dataGridProjects. In order to do so, selectdataGridProjects, activate the Properties panel, display them in alphabetical order, right-click on the FontSize property, and select Apply Data Binding in the context menu that appears. Then, selectElementNamein Source,sliGridFontSize, and thenValuein Path. This way, when the user moves the slider, the font size for the data grid will change. The code that defines the data binding is as follows:FontSize="{Binding ElementName=sliGridFontSize, Path=Value}"7. The complete XAML markup code for
MainPage.xamlwill be similar to the following lines:<UserControl x:Class="SilverlightProjects.MainPage" xmlns="http://schemas.microsoft.com/winfx/2006/xaml/ presentation" xmlns:x="http://schemas.microsoft.com/winfx/2006/xaml" xmlns:d="http://schemas.microsoft.com/expression/blend/2008" xmlns:mc="http://schemas.openxmlformats.org/markup- compatibility/2006" mc:Ignorable="d" d:DesignWidth="800" d:DesignHeight="600" xmlns:data= "clr-namespace:System.Windows.Controls; assembly=System.Windows.Controls.Data" xmlns:dataInput= "clr-namespace:System.Windows.Controls; assembly=System.Windows.Controls.Data.Input"> <Grid x:Name="LayoutRoot" Background="White"> <data:DataGrid AutoGenerateColumns="True" Height="491" HorizontalAlignment="Left" Margin="12,56,0,0" Name="dataGridProjects" VerticalAlignment="Top" Width="776" FontSize="{ Binding ElementName=sliGridFontSize, Path=Value}" /> <dataInput:Label Height="38" HorizontalAlignment="Left" Margin="12,12,0,0" Name="label1" VerticalAlignment="Top" Width="376" FontWeight="Bold" FontSize="24" Content="Projects" /> <Slider Height="35" HorizontalAlignment="Left" Margin="158,553,0,0" Name="sliGridFontSize" VerticalAlignment="Top" Width="630" Value="11" Maximum="72" Minimum="11" /> <dataInput:Label Content="Font size" FontSize="20" FontWeight="Bold" Height="35" HorizontalAlignment="Left" Margin="12,553,0,0" Name="label2" VerticalAlignment="Top" Width="140" /> </Grid> </UserControl>8. Now, it is necessary to add code to retrieve data from the XML file and assign a value to the
ItemsSourceproperty of theDataGridcontrol. First, you have to add a reference toSystem.Xml.Linq.dll. Then, you can add the newInitializeGridmethod and call it from the class constructor as shown in the following lines forMainPage.xaml.cs.using System; using System.Collections.Generic; using System.Linq; using System.Net; using System.Windows; using System.Windows.Controls; using System.Windows.Documents; using System.Windows.Input; using System.Windows.Media; using System.Windows.Media.Animation; using System.Windows.Shapes; // Added using System.Xml.Linq; namespace SilverlightProjects { Silverlight LOB RIAcreatingpublic partial class MainPage : UserControl { private void InitializeGrid() { XDocument docProjects = XDocument.Load("Projects.xml"); var projectsData = from el in docProjects.Descendants("project") select new Project { ProjectId = Convert.ToInt32(el.Attribute("projectId").Value), Title = Convert.ToString(el.Element("title").Value), EstimatedDaysLeft = Convert.ToInt32(el.Element("estimatedDaysLeft").Value), Status = Convert.ToString(el.Element("status").Value), AssignedTo = Convert.ToString(el.Element("assignedTo").Value), NumberOfTasks = Convert.ToInt32(el.Element("numberOfTasks").Value) }; dataGridProjects.ItemsSource = projectsData; } public MainPage() { InitializeComponent(); InitializeGrid(); } } }9. Build and run the solution. The default web browser will appear showing a grid with headers and the five rows defined in the previously added XML file, as shown in the following screenshot:

It is a very simple Silverlight LOB RIA displaying a data grid with rows that are read from the XML file included in the project, Projects.xml.
First, we added the XML file with the definitions for the five projects. Then, we added a class with the necessary properties to hold the values defined in this XML file.
The InitializeGrid method loads the projects from the Projects.xml XML file (embedded and compressed in the .xap file).
XDocument docProjects = XDocument.Load("Projects.xml");
Then, it uses a LINQ to XML query to create instances of the Project class and assign values to their properties. Finally, it assigns this query to the ItemsSource property of the DataGrid:
dataGridProjects.ItemsSource = projectsData;
Note
C# 3.0 (Visual C# 2008) introduced LINQ and it is very useful for processing queries for many different data sources. The features of LINQ and its usage in real-life scenarios are described in depth in LINQ Quickly (A Practical Guide to Programming Language Integrated Query with C#) by N. Satheesh Kumar from Packt Publishing.
We can click on one of the headers and the grid will sort the data in ascending order. Then, we can click again to sort the data into descending order.
When we drag the slider located at the bottom, the font size for the grid will change, as shown in the following screenshot:

As previously explained, we can also take advantage of the themes included in Silverlight's Toolkit to offer the user a more exciting UI. Follow these steps to apply a theme to the main UserControl for the Silverlight UI:
1. Select Start | All Programs | Microsoft Silverlight 4 Toolkit | Binaries and Windows will open the folder that contains the Silverlight Toolkit binaries. By default, they are located at
C:\Program Files (x86)\Microsoft SDKs\Silverlight\v4.0\Toolkit\Apr10\Binin 64-bit Windows versions. Its parent folder contains theThemessub-folder,C:\Program Files (x86)\Microsoft SDKs\Silverlight\v4.0\Toolkit\Apr10\Themes. In 32-bit Windows versions, the default folders areC:\Program Files\Microsoft SDKs\Silverlight\v4.0\Toolkit\Apr10\BinandC:\Program Files\Microsoft SDKs\Silverlight\v4.0\Toolkit\Apr10\Themes.2. Add a reference to
System.Windows.Controls.Theming.Toolkit.dll. Remember that it is located in the aforementionedBinsub-folder.3. Add a reference to the DLL for the desired theme in the
Themessub-folder. For example, if you want to apply theShinyBluetheme, addSystem.Windows.Controls.Theming.ShinyBlue, located in the aforementionedThemessub-folder.4. Add the following line to include the namespace that defines the theme in the
UserControldefined inMainPage.xaml:xmlns:shinyBlue= "clr-namespace:System.Windows.Controls.Theming; assembly=System.Windows.Controls.Theming.ShinyBlue"
5. Add the following line before the definition of the main
Grid, LayoutRoot:<shinyBlue:ShinyBlueTheme>
6. Add the following line after the definition of the main
Grid, LayoutRoot:</shinyBlue:ShinyBlueTheme>
This way, the ShinyBlue theme will be applied to the main Grid, LayoutRoot and all its child controls. It wasn't necessary to make great changes to offer a more attractive rich user experience. Let's see the revised look in the following screenshot:

When we build a Silverlight project, Visual Studio or Expression Blend creates many folders with a lot of sub-folders and files.
In this case, we want to add the simple Silverlight RIA to a page in SharePoint 2010. Thus, we are interested in the SilverlightProjects.xap file. This is a compressed file, that is, a ZIP file with a .xap extension, and it contains all the necessary files for the Silverlight application.
You can find this file in the Debug or the Release sub-folder, according to your active solution configuration. For example, if the project is located in a SilverlightProjects folder, the relative path for the release SilverlightProjects.xap file would usually be ...\SilverlightProjects\Bin\Release. If you want to be sure about the location of the generated .xap file, you can follow these steps after building the project:
1. Activate the Solution Explorer.
2. Click on the Show All Files button, the second button located at the top of the Solution Explorer palette. Now, expand the
Binfolder and then theDebugorReleasesub-folder, according to your active solution configuration, as shown in the following screenshot:
3. Right-click on the
SilverlightProjects.xapfile and, and select Properties in the context menu that appears or press F4. The Properties palette will appear and you will be able to see the value for its Full Path property. This way, you can get the exact path for this file, as shown in the next screenshot. You will need it later to integrate it with SharePoint.
We now want to add the Silverlight RIA to a SharePoint site. This Silverlight application doesn't interact with the SharePoint services. It displays information about projects saved in the same .xap file.
In this case, we can add a Silverlight Web Part to a SharePoint site.
First, follow these steps to add the Silverlight RIA as a shared document in a SharePoint site:
1. Open your default web browser, view the SharePoint site, and log in with your username and password.
2. Click Site Actions | View All Site Content and SharePoint will display all sites, lists, and libraries in the active site.
3. Click on Shared Documents under Documents on the panel located at the left of the web page. SharePoint will display the shared documents library. These are the documents shared with the team.
4. Click on Add new document. The Upload Document dialog box will appear. Click on the Browse... button and enter the full path for the
SilverlightProjects.xapfile. Then, click Open and the document's name will be the.xapfile and its path, as shown in the next screenshot:
5. Click OK. Once the file finishes the upload process, the dialog box to define its properties as a shared document will appear. Enter
Silverlight projectsin Title andSilverlightin Managed Keywords.
6. Click on Save in the ribbon or on the button located at the bottom of the dialog box. The
.xapfile will appear in the Shared Documents list.
7. Right-click on the new document name,
SilverlightProjects, and select Copy Shortcut from the context menu that appears. This way, you will copy the URL for this shared document in the clipboard and you will be able to paste it when SharePoint asks you for its URL. In this case, the copied URL ishttp://xpsgaston/Shared%20Documents/SilverlightProjects.xap.
The .xap file is available as a shared document. Now, follow these steps to add a Silverlight Web Part to display the Silverlight RIA in a SharePoint site:
1. Click Site Actions | New Page and SharePoint will display a new dialog box requesting a name for the new page. Enter
Projects Gridand click on Create. SharePoint will display the Editing Tools for the new page.
2. Click Insert | Web Part in the ribbon and a new panel will appear. Select Media and Content in Categories and then Silverlight Web Part in Web Parts, as shown in the following screenshot:

3. Click Add. The Silverlight Web Part dialog box will appear. Paste the previously copied URL for the shared document, the
.xapfile. In this case, it ishttp://xpsgaston/Shared%20Documents/SilverlightProjects.xap, as shown in the next screenshot:
Note
If you don't have the URL for the the
.xapfile copied to the clipboard, you can open a new tab or a new browser window and access the shared documents as previously explained. Then, you can right-click on the desired document name and select Copy Shortcut from the context menu that appears. This way, you will be able to paste the URL in the Silverlight Web Part dialog box.Note
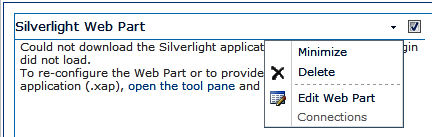
In certain SharePoint 2010 pre-release versions, the following error message could appear, Could not download the Silverlight application or the Silverlight Plugin did not load. To re-configure the Web Part or to provide a different Silverlight application (.xap), open the tool pane and then click Configure.
5. If the error appears, click on open the tool pane or click on the down arrow, located at the top and then select Edit Web Part.
6. The Silverlight Web Part pane will appear on the right. It will enable us to define many properties that affect the appearance and behavior for the Silverlight UI.
7. Enter
Projects List Viewerin Title.8. Click on Yes in Should the Web Part have a fixed height? and enter
600in Pixels.9. Click on Yes in Should the Web Part have a fixed width? and enter
800in Pixels.
10. Click OK. The title for the Web Part will change but the same error message will appear. Don't worry about that.
11. Click on the Save button in the ribbon. Now, the new page will appear displaying the previously created Silverlight RIA. However, the title won't appear as expected, as shown in the next screenshot:

12. Click Site Actions | Edit Page. This time, SharePoint will display the Silverlight RIA alive in the editing mode instead of the previously shown error message.
13. Click on the down arrow, located at the top, and then select Edit Web Part. The Silverlight Web Part pane will appear on the right.
14. Click on No. Adjust width to fit zone. in Should the Web Part have a fixed width?
15. Click OK and then on the Save button in the ribbon. Now, the new page will appear displaying the previously created Silverlight RIA with the title appearing as expected.

16. The Silverlight Web Part added to the page holds a running and active Silverlight application. Click on one of the grid rows and you will see the gradient animations for the selected theme. Click on a column header and the rows will be sorted according to it.

Following the previously explained steps, we can upload many Silverlight RIAs as shared documents and then add various Silverlight Web Parts to a single page. For example, we can rename the .xap file for the previous version of the SilverlightProjects application, without the application of the theme, to SilverlightProjectsNoTheme.xap. Then, we can follow the necessary steps to edit the page and add it as a new Silverlight Web Part to allow the users to choose between the different looks-and-feels to display the list of active projects.

This way, you can make many Silverlight applications available to SharePoint users by following very simple steps. SharePoint 2010 added the new Silverlight Web Part to simplify adding Silverlight applications as part of SharePoint pages.
When the user moves the slider, the font size for the data grid will change, as previously experienced with the Silverlight RIA running in a simple web page. However, this time, the application is running as a Silverlight Web Part in a SharePoint site, as shown. Each Silverlight Web Part offers a very responsive application to the user because they don't have to wait for server responses to refresh the Web Part.

It is easy for a SharePoint user to consume a Silverlight Application. Now, all the users that have access to the new page will be able to interact with the Silverlight UIs added to this page.
It is possible to add Silverlight applications to SharePoint through many different alternatives:
As a Silverlight Web Part
Included in a SharePoint Module
Included in a SharePoint Visual Web Part
The previous steps explained how to work with the first alternative. In the next chapters we will analyze the other two alternatives.
As previously explained, when we integrate Silverlight with SharePoint, there is going to be code running on both the client and the server. The Silverlight applications appear on the SharePoint pages. However, once the .xap files are downloaded, their code runs on the client. Each client will require the Silverlight 4 client runtime installed in order to be able to run the application. If it isn't installed, a message will appear indicating that it requires Silverlight.
When you see an animation in a Silverlight RIA, it is consuming processing power found in the client and it is not adding load to the SharePoint server. When you add code to interact with the SharePoint server, the requests consume processing power from the server. However, when the Silverlight application processes the results from a request this code is running on the client.
All the code that presents graphics on the screen runs on the client. When you move the mouse cursor over an element, the animations and the events run on the client. Therefore, you don't add huge processing power from the server when adding Silverlight applications to a SharePoint solution.
We learned a lot in this chapter about the integration of Silverlight 4 applications with SharePoint 2010 sites and solutions. Specifically, we prepared a development environment and the tools to work with Silverlight 4 RIAs. We configured the SharePoint 2010 server and added Silverlight Web Parts to a new page. We understood the differences between client and server code and the benefits of integrating Silverlight with SharePoint.
We created our first Silverlight RIA and then, we made it available in a SharePoint site. Now, we are ready to begin adding simple Silverlight RIAs as part of SharePoint solutions.
Now that we have learned about the principles of the integration of Silverlight with SharePoint, we are ready to learn the techniques to work with deploying and debugging for this integration process, which is the topic of the next chapter.
