In this chapter, we will cover the following topics:
Creating a new number sequence
Renaming the primary key
Merging two records
Adding a document handling note
Using a normal table as a temporary table
Copying a record
Building a query object
Using a macro in an SQL statement
Executing a direct SQL statement
Enhancing the data consistency check
Exporting data to an XML file
Importing data from an XML file
Creating a comma-separated value file
Reading a comma-separated value file
Using the date effectiveness feature
This chapter focuses on data manipulation exercises. Here, we will discuss how to work with query objects from X++ code. We will also discuss how to reuse macros in X++ SQL statements and how to send SQL statements directly to the database. This chapter will explain how to rename primary keys, how to merge and copy records, how to add document handling notes to selected records, and how to create and read XML and comma-separated files. The chapter ends with a recipe about the date effectiveness feature.
This chapter focuses on data manipulation exercises. Here, we will discuss how to work with query objects from X++ code. We will also discuss how to reuse macros in X++ SQL statements and how to send SQL statements directly to the database. This chapter will explain how to rename primary keys, how to merge and copy records, how to add document handling notes to selected records, and how to create and read XML and comma-separated files. The chapter ends with a recipe about the date effectiveness feature.
Number sequences in Dynamics AX are used to generate specifically formatted numbers for record identification. It could be anything from voucher numbers or transaction identification numbers to customer or vendor accounts.
When developing custom functionality, very often one of the tasks is to add a new number sequence to the system to support newly created tables. Dynamics AX contains a list of NumberSeqApplicationModule derivative classes, which holds the number sequence setup data for the specific module.
These classes are read by the number sequence wizard, which detects existing number sequences and proposes to create the missing ones or newly added ones. The wizard is normally run as part of the application initialization. It can also be rerun at any time later when expanding the Dynamics AX functionality used, where a setup of additional number sequences is required. The wizard also has to be rerun if new custom number sequences are added to the system.
In this recipe, we will add a new number sequence to the system. In a standard application, the customer group number is not driven by any number sequence, so we will enhance this by creating it.
Carry out the following steps in order to complete this recipe:
1. Open the
NumberSeqModuleCustomerclass in the Application Object Tree (AOT), and add the following code to the bottom of theloadModule()method:Note
Downloading the example code
You can download the example code files for all Packt books you have purchased from your account at http://www.packtpub.com. If you purchased this book elsewhere, you can visit http://www.packtpub.com/support and register to have the files e-mailed directly to you.
datatype.parmDatatypeId(extendedTypeNum(CustGroupId));
datatype.parmReferenceHelp("Customer group ID");
datatype.parmWizardIsContinuous(false);
datatype.parmWizardIsManual(NoYes::No);
datatype.parmWizardIsChangeDownAllowed(NoYes::Yes);
datatype.parmWizardIsChangeUpAllowed(NoYes::Yes);
datatype.parmWizardHighest(999);
datatype.parmSortField(20);
datatype.addParameterType(
NumberSeqParameterType::DataArea, true, false);
this.create(datatype);
2. Create a new job with the following code and run it:
static void NumberSeqLoadAll(Args _args)
{
NumberSeqApplicationModule::loadAll();
}
3. Run the number sequence wizard by clicking on the Generate button in Organization administration | Common | Number sequences | Number sequences, and click on the Next button, as shown in the following screenshot:

4. Click on Details to view more information. Delete everything apart from the lines where Area is Accounts receivable and Reference is Customer group. Note the number sequence codes, and click on the Next button:

5. On the last page, click on the Finish button to complete the set up:

6. The newly created number sequences can now be found in Organization administration | Number sequences | Number sequences, as shown in the following screenshot:

7. Open Organization administration | Number sequences | Segment configuration and notice the new Customer group reference:

8. Open Accounts receivable | Setup | Accounts receivable parameters and go to the Number sequences tab page. Here we should see the new number sequence code:

9. The last thing to do is to create a helper method for this number sequence. Locate the CustParameters table in the AOT and create the following method:
public server static NumberSequenceReference numRefCustGroupId()
{
return NumberSeqReference::findReference(
extendedTypeNum(CustGroupId));
}
We start the recipe by adding a number sequence initialization code into the NumberSeqModuleCustomer class. As we can understand from its name, it holds the initialization of all number sequences that belong to the Accounts receivable module.
The code in the loadModule() method defines the default number sequence settings to be used in the wizard, such as data type, description, highest possible number, and so on. Additional options, such as starting sequence number, number format, and others could also be added here. All mentioned options could be changed while running the wizard. The addParameterType() method is used to define number sequence scope. In the example we created a separate sequence for each Dynamics AX company.
Before we start the wizard, we need to initialize number sequence references. This is normally done as a part of the Dynamics AX initialization checklist, but in this example we have to execute it manually by calling the loadAll() method of the NumberSeqApplicationModule class.
Next, we will run the wizard. We will skip the welcome page and in the second step of the wizard, the Details button can be used to display more options. The options can also be changed later in the Number sequences form before or even after the number sequence is actually used. The last page shows an overview of what will be created. Once completed, the wizard creates new records in the Number sequences form for each company.
The newly created number sequence reference appears in the Segment configuration form. Here we can see that the Data area checkbox is checked, meaning that we will have separate number lists for each company. The number sequence setup can normally be located in the module parameter forms.
Most of you, who are familiar with the Dynamics AX application, have probably used the standard Rename function. This function allows us to rename the primary key of almost any record. It is irreplaceable if a record was saved by mistake or simply needs renaming. The function ensures data consistency that is, all related records are renamed too. It can be accessed from the Record information form (shown in the following screenshot), which can be opened by selecting Record info from the right-click menu on any record:
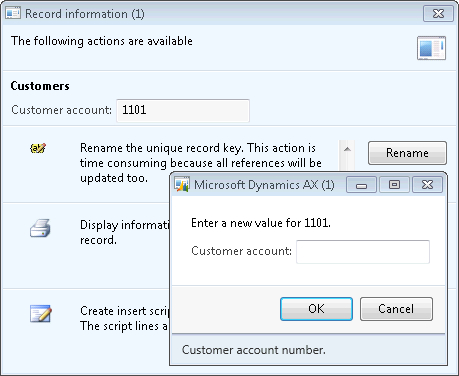
When it comes to manual mass renaming, this function might be very time-consuming. An alternative way of doing that is to create a job that automatically runs through all required records and calls this function automatically.
This recipe will explain how the record primary key can be renamed through the code. As an example, we will create a job that renames a customer account.
Carry out the following steps in order to complete this recipe:
1. Open Accounts receivable | Common | Customers | All customers and find the account that has to be renamed:

2. Click on Transactions in the action pane to check the existing transactions:

3. Open the AOT, create a new job named
CustAccountRename, and enter the following code. Use the previously selected account:static void CustAccountRename(Args _args) { CustTable custTable; select firstOnly custTable where custTable.AccountNum == '1103'; if (custTable.RecId) { custTable.AccountNum = '1103_'; custTable.renamePrimaryKey(); } }4. Run the job and check if the renaming was successful, by navigating to Accounts receivable | Common | Customers | All customers again, and finding the new account. The new account should have retained all its transactions and other related records, as shown in the following screenshot:

5. Click on Transactions in the action pane in order to see if existing transactions are still in place:

In this recipe, first we will select the desired customer account that is, 1103. Here we can easily modify the select statement to include more accounts for renaming, but for demonstration purposes, let's keep it simple. Note that only fields belonging to a table's primary key can be renamed in this way.
Then we call the table's renamePrimaryKey() method, which does the actual renaming. The method finds all the related records for the selected customer account and updates them with the new account. The operation might take a while depending on the volume of data, as the system has to update multiple records located in multiple tables.
For various reasons, data in the system such as customers, ledger accounts, configuration settings, and similar data may become obsolete. This could be because of changes in the business or it could simply be a user input error. For example, two salespeople could create two records for the same customer, start entering sales orders and post invoices. One of the ways to solve that is to merge both records into a single one.
In this recipe, we will explore how to merge one record into another one, including all related transactions. For this demonstration, we will merge two ledger reason codes into a single one.
Carry out the following steps in order to complete this recipe:
1. Open General ledger | Setup | Ledger reasons to find two reason code records to be merged. In this example we will use COUNTER and AUCTION:

2. Open the AOT, create a new job named
LedgerReasonMergewith the following code:static void LedgerReasonMerge(Args _args) { ReasonTable reasonTableDelete; ReasonTable reasonTable; ttsBegin; select firstOnly forUpdate reasonTableDelete where reasonTableDelete.Reason == 'COUNTER'; select firstOnly forUpdate reasonTable where reasonTable.Reason == 'AUCTION'; reasonTableDelete.merge(reasonTable); reasonTable.doUpdate(); reasonTableDelete.doDelete(); ttsCommit; }3. Run the job to merge the records.
4. Open the Ledger reasons form again and notice that one of the reasons were deleted and all related transactions have also been updated to reflect the change:

First, we retrieve both records from the database and prepare them for updating.
The key method in this recipe is the merge()method. It will ensure that all data from one record will be copied into the second one and all related transactions will be updated to reflect the change.
Finally, we save changes on the destination record and delete the first one.
All code has to be within the ttsBegin/ttsCommit pair as we perform several database update operations in one go.
Such a technique could be used to merge two, or even more, records of any type.
It is good practice to add some kind of note to the record when doing data renaming, merging, or any other data manipulation task, whether it's manual or automatic. Dynamics AX allows adding a note or a file to any record by using the so-called Document handling feature.
By default, it is enabled for all tables, but can be restricted to fewer tables by changing its configuration parameters.
Document handling can be accessed from the form action pane by clicking on the Attachments button, choosing Document handling from the File | Command menu or selecting the Document handling icon from the status bar. Document handling allows adding text notes or files to any currently selected record.
Dynamics AX also allows adding document handling notes from the code too, which helps developers or consultants to add additional information when doing various data migration or conversion tasks.
In this recipe, we will add a note to a vendor account.
Carry out the following steps in order to complete this recipe:
1. Open Accounts payable | Common | Vendors | All vendors, and locate the vendor account that has to be updated:

2. Open the AOT, create a new job named
VendAccountDocu, and enter the following code. Use the previously selected vendor account:static void VendAccountDocu(Args _args) { DocuRef docuRef; VendTable vendTable; vendTable = VendTable::find('3001'); docuRef.RefCompanyId = vendTable.dataAreaId; docuRef.RefTableId = vendTable.TableId; docuRef.RefRecId = vendTable.RecId; docuRef.TypeId = 'Note'; docuRef.Name = 'Imported'; docuRef.Notes = 'This vendor was imported.'; docuRef.insert(); }3. Run the job to create the note.
4. Click on the Attachments button in the form's action pane or select Document handling from the File | Command menu to view the note added by our code:

All the document handling notes are stored in the DocuRef table, where the three fields RefCompanyId, RefTableId, and RefRecId are used to identify the parent record. In our recipe, we will set those fields to the vendor company ID, vendor table ID, and vendor account record ID, respectively.
Next, we will set note type, name, and description, and insert the document handling record. In this way, we will add a note to the record. The code in this recipe could also be added to a separate method for further reuse.
Standard Dynamics AX contains numerous temporary tables, which are used by the application and could be used in custom modifications too. Although new temporary tables can also be easily created using the AOT, sometimes it is not effective. One of the cases could be when the temporary table is very similar or exactly the same as an existing one. The goal of this recipe is to demonstrate an approach for using standard non-temporary tables to hold temporary data.
As an example, we will use the vendor table to insert and display a couple of temporary records without affecting the actual data.
Carry out the following steps in order to complete this recipe:
1. In the AOT, create a new class named
VendTableTmpwith the following code:class VendTableTmp { } server static void main(Args _args) { VendTable vendTable; vendTable.setTmp(); vendTable.AccountNum = '1000'; vendTable.Blocked = CustVendorBlocked::No; vendTable.Party = 1; vendTable.doInsert(); vendTable.clear(); vendTable.AccountNum = '1002'; vendTable.Blocked = CustVendorBlocked::All; vendTable.Party = 2; vendTable.doInsert(); while select vendTable { info(strFmt( "%1 - %2", vendTable.AccountNum, vendTable.Blocked)); } }2. Run the class and check the results:

The key method in this recipe is in the setTmp() method. It is available on all tables, and it declares the current table instance to behave as a temporary table in the current scope. So in this recipe, we will first call the setTmp() method on the vendTable table to make it temporary in the scope of this method. That means any data manipulations will be lost once the execution of this method is over and actual table content will not be affected.
Next, we will insert a couple of test records. Here, we use the doInsert() method to bypass any additional logic, which normally resides in the table's insert() method.
The last thing to do is to check for newly created records by listing the vendTable table. We can see that although the table contains many actual records, only the ones which we inserted were displayed in the Infolog. Additionally, the two we inserted do not appear in the actual table records.
One of the tasks often used when manipulating data is record copying. For various reasons, an existing record needs to be modified and saved as a new one. The most obvious example could be when a user requires a function that allows him or her to quickly duplicate records on any of the existing forms.
There are several ways of copying one record into another in X++. In this recipe, we will explain the usage of the table's data() method, the global buf2buf() function, and their differences. As an example, we will copy one of the existing ledger account records into a new one.
Carry out the following steps in order to complete this recipe:
1. Open General ledger | Common | Main accounts, and find the account to be copied. In this example, we will use 211100:

2. Open the AOT, create a new job named
MainAccountCopywith the following code, and run it:static void MainAccountCopy(Args _args) { MainAccount mainAccount1; MainAccount mainAccount2; mainAccount1 = MainAccount::findByMainAccountId('211100'); ttsBegin; mainAccount2.data(mainAccount1); mainAccount2.MainAccountId = '211101'; if (!mainAccount2.validateWrite()) { throw Exception::Error; } mainAccount2.insert(); ttsCommit; }3. Open General ledger | Common | Main accounts again, and notice that there are two identical records now:

In this recipe, we have two variables—mainAccount1 for original record and mainAccount2 for the new one. First, we will need to find the original record by calling findByMainAccountId() on the MainAccount table.
Next, we will copy it to the new one. Here, we will use the data() table member method, which copies all data fields from one variable to another.
After that, we will set a new ledger account number, which is a part of a unique table index and must be different.
Finally, we call the insert() method on the table, if validateWrite() is successful. In this way, we have created a new ledger account record, which is exactly the same as the existing one apart from the account number.
As we saw before, the data() method copies all table fields, including system fields such as record ID, company account, created user, and so on. Most of the time, it is OK because when the new record is saved, the system fields are overwritten with the new values. However, this function may not work for copying records across companies. In this case, we can use another function called buf2Buf(). It is very similar to the table's data() method with one major difference. The buf2Buf() function copies all data fields excluding the system ones. The code in the function is as follows:
static void buf2Buf(Common _from, Common _to)
{
DictTable dictTable = new DictTable(_from.TableId);
FieldId fieldId = dictTable.fieldNext(0);
while (fieldId && ! isSysId(fieldId))
{
_to.(fieldId) = _from.(fieldId);
fieldId = dictTable.fieldNext(fieldId);
}
}
We can clearly see that during the copying process, all the table fields are traversed, but the system fields are excluded. We can also see that this function is slower than the internal data() method, as it checks and copies each field individually.
In order to use the buf2Buf() function, the code of the MainAccountCopy job could be amended as follows:
static void MainAccountCopy(Args _args)
{
MainAccount mainAccount1;
MainAccount mainAccount2;
mainAccount1 = MainAccount::findByMainAccountId('211100');
ttsBegin;
buf2Buf(mainAccount1, mainAccount2);
mainAccount2.MainAccountId = '211101';
if (!mainAccount2.validateWrite())
{
throw Exception::Error;
}
mainAccount2.insert();
ttsCommit;
}
Query objects are used to visually build SQL statements, which can be used by Dynamics AX reports, views, forms, and other objects. Normally, queries are stored in the AOT, but they can also be dynamically created from code. This is normally done when visual tools cannot handle complex and dynamic queries.
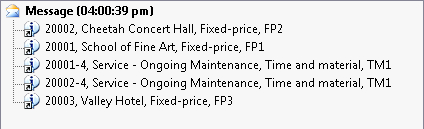
In this recipe, we will create a query dynamically from the code to retrieve project records from the project management module. We will select only the projects of type fixed price, starting with 2 in its number and containing at least one hour transaction.
Carry out the following steps in order to complete this recipe:
1. Open the AOT, create a new job named
ProjTableQuery, and enter the following code:static void ProjTableQuery(Args _args) { Query query; QueryBuildDataSource qbds1; QueryBuildDataSource qbds2; QueryBuildRange qbr1; QueryBuildRange qbr2; QueryRun queryRun; ProjTable projTable; query = new Query(); qbds1 = query.addDataSource(tableNum(ProjTable)); qbds1.addSortField( fieldNum(ProjTable, Name), SortOrder::Ascending); qbr1 = qbds1.addRange(fieldNum(ProjTable,Type)); qbr1.value(queryValue(ProjType::FixedPrice)); qbr2 = qbds1.addRange(fieldNum(ProjTable,ProjId)); qbr2.value(queryValue('2') + '*'); qbds2 = qbds1.addDataSource(tableNum(ProjEmplTrans)); qbds2.relations(true); qbds2.joinMode(JoinMode::ExistsJoin); queryRun = new QueryRun(query); while (queryRun.next()) { projTable = queryRun.get(tableNum(ProjTable)); info(strFmt( "%1, %2, %3", projTable.ProjId, projTable.Name, projTable.Type)); } }2. Run the job and the following screen should appear:

First, we create a new query object. Next, we add a new ProjTable data source to the query object by calling its addDataSource() member method. The method returns a reference to the QueryBuildDataSource object—qbds1. Here, we call the addSortField() method to enable sorting by project name.
The following two blocks of code create two ranges. The first is to show only projects of type fixed price and the second one is to list only records, where the project number starts with 2. Those two filters are automatically added together using the SQL and operator. QueryBuildRange objects are created by calling the addRange() member method of the QueryBuildDataSource object with the field ID number as argument. The range value is set by calling value() on the QueryBuildRange object itself. It is a good practice to use the queryValue() function to process values before applying them as a range. More functions such as queryNotValue(), queryRange(), and so on can be found in the Global application class. Note that these functions are actually shortcuts to the SysQuery application class, which in turn have even more interesting helper methods that might be handy for every developer.
Adding another data source to an existing one connects both data sources using the SQL join operator. In this example, we are displaying projects that have at least one posted hour line. We start by adding the ProjEmplTrans table as another data source.
Next, we need to add relations between the tables. If relations are not defined on tables, we will have to use the addLink() method with relation field ID numbers. In this example, relations on the tables are already defined so it is enough only to enable them by calling the relations() method with true as an argument.
Calling joinMode() with JoinMode::ExistsJoin as a parameter ensures that a record from a parent data source will be displayed only if the relation exists in the attached data source.
The last thing to do is to create and run the queryRun object and show the selected data on the screen.
It is worth mentioning a couple of specific cases when working with query objects from code. One of them is how to use the or operator and the other one is how to address array fields.
As you have already noted, regardless of how many ranges are added, all of them will be added together using the SQL and operator. In most cases it is fine, but sometimes complex user requirements demand ranges to be added using SQL or. There might be a number of workarounds, such as using temporary tables or similar tools, but we can use the Dynamics AX feature that allows passing a part of raw SQL string as a range.
In this case, the range has to be formatted in a similar manner as a fully qualified SQL where clause, including field names, operators, and values. The expressions have to be formatted properly before using them in a query. Here are some of the rules:
The expression must be enclosed within single quotes.
Inside, the whole expression has to be enclosed in parenthesis.
Each subexpression must be enclosed in parentheses too.
String values have to be enclosed within double quotes.
For enumerations use their numeric values.
For value formatting use various Dynamics AX functions, such as
queryValue(), Date2StrXpp(), or methods from theSysQueryclass.
Let us replace the code from the previous example:
qbr1.value(queryValue(ProjType::FixedPrice));
with the new code:
qbr1.value(strFmt(
'((%1 = %2) || (%3 = "%4"))',
fieldStr(ProjTable,Type),
ProjType::FixedPrice+0,
fieldStr(ProjTable,ProjGroupId),
queryValue('TM1')));
Notice that by adding zero to the enumeration in the previous code, we can force the strFmt() function to use the numeric value of the enumeration.
Now, the result will also include all the projects belonging to the group TM1 regardless of their type:
Some table fields in Dynamics AX are based on extended data types, which contains more than one array element. An example in a standard application could project sorting based on a ProjSortingId extended data type. Although such fields are very much the same as normal fields, in queries they should be addressed in a slightly different manner. In order to demonstrate the usage, let us modify the example by filtering the query to list only those projects containing the value South in the field labelled Sort field 2, which is the second value in the array.
First, let us declare a new QueryBuildRange object in the variable declaration section:
QueryBuildRange qbr3;
Next, we add the following code, right after the qbr2.value(...) code:
qbr3 = qbds1.addRange(
fieldId2Ext(fieldnum(ProjTable,SortingId),2));
qbr3.value(queryValue('South'));
Notice that we use the global fieldid2ext() function, which converts the field ID and the array number into a valid number to be used by the addRange() method. This function can also be used anywhere, where addressing the dimension fields is required.
Now, we can run this job, as the project list based on previous criteria will be reduced even more to match projects having only a specific Sort field 2:

In a standard Dynamics AX application, there are macros such as InventDimJoin and InventDimSelect, which are reused numerous times across the application. These macros are actually full or partial X++ SQL queries, which can be called with various arguments. Such approach saves developing time by allowing you to reuse pieces of X++ SQL queries.
In this recipe, we will create a small macro, which holds a single where clause to display only active vendor records. Then we will create a job, which uses the created macro for displaying a vendor list.
Carry out the following steps in order to complete this recipe:
1. Open the AOT, and create a new macro named
VendTableNotBlockedwith the following code:(%1.Blocked == CustVendorBlocked::No)
2. In the AOT, create a new job called
VendTableMacrowith the following code:static void VendTableMacro(Args _args) { VendTable vendTable; while select vendTable where #VendTableNotBlocked(vendTable) { info(strFmt( "%1 - %2", vendTable.AccountNum, vendTable.name())); } }3. Run the job and check the results, as displayed in the following screenshot:

First, we define a macro that holds the where clause. Normally, the purpose of defining SQL in a macro is to reuse it a number of times in various places. We use %1 as an argument. More arguments could be added here.
Next, we create a job with the select statement. Here, we use the previously created macro in a where clause and pass vendTable as an argument.
The query works like any other query, but the advantage is that the code in the macro can be reused elsewhere.
Note that although using a macro in a SQL statement can reduce the amount of code, too much code in it might decrease the SQL statement's readability for other developers. So keep it balanced.
Dynamics AX allows developers to build X++ SQL statements that are flexible enough to fit into any custom business process. However, in some cases, the usage of X++ SQL is either not effective or not possible at all.
One of the cases is when we run data upgrade tasks during an application version upgrade. The standard application contains a set of data upgrade tasks to be completed during the version upgrade. If the application is highly customized, then most likely the standard tasks have to be modified to reflect data dictionary customizations, or even a new set of tasks have to be created to make sure data is handled correctly during the upgrade.
Normally at this stage, SQL statements are so complex that they can only be created using database-specific SQL and executed directly in the database. Additionally, running direct SQL statements dramatically increases data upgrade performance because most of the code is executed on the database server where all data resides. This is very important while working with large volumes of data.
Another case when we would need to use direct SQL statements is when we want to connect to an external database using the ODBC connection. In this case, X++ SQL is not supported at all.
This recipe will demonstrate how to execute SQL statements directly. We will connect to the current Dynamics AX database directly using an additional connection and will retrieve the list of vendor accounts.
Carry out the following steps in order to complete this recipe:
1. In the AOT, create a new class named
VendTableSqlwith the following code:class VendTableSql { } server static void main(Args _args) { UserConnection userConnection; Statement statement; str sqlStatement; SqlSystem sqlSystem; SqlStatementExecutePermission sqlPermission; ResultSet resultSet; DictTable tblVendTable; DictTable tblDirPartyTable; DictField fldParty; DictField fldAccountNum; DictField fldDataAreaId; DictField fldBlocked; DictField fldRecId; DictField fldName; tblVendTable = new DictTable(tableNum(VendTable)); tblDirPartyTable = new DictTable(tableNum(DirPartyTable)); fldParty = new DictField( tableNum(VendTable), fieldNum(VendTable,Party)); fldAccountNum = new DictField( tableNum(VendTable), fieldNum(VendTable,AccountNum)); fldDataAreaId = new DictField( tableNum(VendTable), fieldNum(VendTable,DataAreaId)); fldBlocked = new DictField( tableNum(VendTable), fieldNum(VendTable,Blocked)); fldRecId = new DictField( tableNum(DirPartyTable), fieldNum(DirPartyTable,RecId)); fldName = new DictField( tableNum(DirPartyTable), fieldNum(DirPartyTable,Name)); sqlSystem = new SqlSystem(); sqlStatement = 'SELECT %3, %4 FROM %1 ' + 'JOIN %2 ON %1.%5 = %2.%6 ' + 'WHERE %7 = %9 AND %8 = %10'; sqlStatement = strFmt( sqlStatement, tblVendTable.name(DbBackend::Sql), tblDirPartyTable.name(DbBackend::Sql), fldAccountNum.name(DbBackend::Sql), fldName.name(DbBackend::Sql), fldParty.name(DbBackend::Sql), fldRecId.name(DbBackend::Sql), fldDataAreaId.name(DbBackend::Sql), fldBlocked.name(DbBackend::Sql), sqlSystem.sqlLiteral(curext(), true), sqlSystem.sqlLiteral(CustVendorBlocked::No, true)); userConnection = new UserConnection(); statement = userConnection.createStatement(); sqlPermission = new SqlStatementExecutePermission( sqlStatement); sqlPermission.assert(); resultSet = statement.executeQuery(sqlStatement); CodeAccessPermission::revertAssert(); while (resultSet.next()) { info(strFmt( "%1 - %2", resultSet.getString(1), resultSet.getString(2))); } }2. Run the class to obtain the list of vendors retrieved directly from the database:

We start the code by creating DictTable and DictField objects for handling the vendor table and its fields used later in the query. DirPartyTable table is used to get additional vendor information.
A new SqlSystem object also has to be created. It will be used to convert Dynamics AX types to SQL types.
Next, we set up an SQL statement with a number of placeholders for table or field names and field values to be inserted later.
The main query creation happens next when the query placeholders are replaced with the right values. Here we use the previously created DictTable and DictField type objects by calling their name() methods with the DbBackend::Sql enumeration as an argument. This ensures that we pass the name exactly how it is used in the database—some of the SQL field names are not necessary the same as field names within the application.
We also use the sqlLiteral() method of the previously created sqlSystem object to properly format SQL values to make sure they do not have any unsafe characters.
Once the SQL statement is ready, we initialize a direct connection to the database and run the statement. The results are returned into the resultSet object, and we get them by using the while statement and calling the next() method until the end of the resultSet object.
Note that we create an sqlPermission object of type SqlStatementExecutePermission here and call its assert() method before executing the statement. This is required in order to comply with Dynamics AX trustworthy computing requirements.
Another thing to mention is that when building direct SQL queries, special attention has to be paid to license, configuration, and security keys. Some tables or fields might be disabled in the application and may contain no data in the database.
The code in this recipe can be also used to connect to the external ODBC databases. We only need to replace the UserConnection class with the OdbcConnection class and use text names instead of the DictTable and DictField objects.
The standard Dynamics AX application provides an alternate way of building direct SQL statements by using a set of SQLBuilder classes. By using those classes, we can create SQL statements as objects as opposed to text. Next, we will demonstrate how to use the SQLBuilder classes. We will create the same SQL statement as before.
First in AOT, we create another class named VendTableSqlBuilder with the following code:
class VendTableSqlBuilder
{
}
server static void main(Args _args)
{
UserConnection userConnection;
Statement statement;
str sqlStatement;
SqlStatementExecutePermission sqlPermission;
ResultSet resultSet;
SQLBuilderSelectExpression selectExpr;
SQLBuilderTableEntry vendTable;
SQLBuilderTableEntry dirPartyTable;
SQLBuilderFieldEntry accountNum;
SQLBuilderFieldEntry dataAreaId;
SQLBuilderFieldEntry blocked;
SQLBuilderFieldEntry name;
selectExpr = SQLBuilderSelectExpression::construct();
selectExpr.parmUseJoin(true);
vendTable = selectExpr.addTableId(
tablenum(VendTable));
dirPartyTable = vendTable.addJoinTableId(
tablenum(DirPartyTable));
accountNum = vendTable.addFieldId(
fieldnum(VendTable,AccountNum));
name = dirPartyTable.addFieldId(
fieldnum(DirPartyTable,Name));
dataAreaId = vendTable.addFieldId(
fieldnum(VendTable,DataAreaId));
blocked = vendTable.addFieldId(
fieldnum(VendTable,Blocked));
vendTable.addRange(dataAreaId, curext());
vendTable.addRange(blocked, CustVendorBlocked::No);
selectExpr.addSelectFieldEntry(
SQLBuilderSelectFieldEntry::newExpression(
accountNum,
'AccountNum'));
selectExpr.addSelectFieldEntry(
SQLBuilderSelectFieldEntry::newExpression(
name,
'Name'));
sqlStatement = selectExpr.getExpression(null);
userConnection = new UserConnection();
statement = userConnection.createStatement();
sqlPermission = new SqlStatementExecutePermission(
sqlStatement);
sqlPermission.assert();
resultSet = statement.executeQuery(sqlStatement);
CodeAccessPermission::revertAssert();
while (resultSet.next())
{
info(strfmt(
"%1 - %2",
resultSet.getString(1),
resultSet.getString(2)));
}
}
In this method, we first create a new selectExpr object, which is based on the SQLBuilderSelectExpression class. It represents the object of the SQL statement.
Next, we add the VendTable table to it by calling its member method addTableId(). The method returns a reference to the vendTable object of type SQLBuilderTableEntry, which corresponds to a table node in an SQL query. We also add DirPartyTable as a joined table.
Then, we create a number of field objects of type SQLBuilderFieldEntry to be used later and two ranges to show only this company account and only active vendor accounts.
We use addSelectFieldEntry() to add two fields to be selected. Here we use the previously created field objects.
The SQL statement is generated once the getExpression() method is called, and the rest of the code is the same as in the previous example.
Running the class would give us results, which are exactly similar to the ones we got before.
It is highly recommended to run the standard Dynamics AX data consistency check from time to time, that is located in System administration | Periodic | Database | Consistency check, to check the system's data integrity. This function finds orphan data, validates parameters, and does many other things, but it does not do everything. The good thing is that it can easily be extended to match different scenarios.
In this recipe, we will see how we can enhance the standard Dynamics AX consistency check to include more tables in its data integrity validation.
Before we start, we need to create an invalid setup to make sure we can simulate data inconsistency. Open Fixed assets | Setup | Value models and create a new model, for instance, TEST:

Open Fixed assets | Setup | Fixed asset posting profiles and under the Ledger accounts group, create a new record with the newly created value model for any of the posting types:

Go back to the Value models form, and delete the previously created value model.
Now, we have a non-existing value model in the fixed asset posting settings.
Carry out the following steps in order to complete this recipe:
1. In the AOT, create a new class
AssetConsistencyCheckwith the following code:class AssetConsistencyCheck extends SysConsistencyCheck { } client server static ClassDescription description() { return "Fixed assets"; } client server static HelpTxt helpText() { return "Consistency check of the fixed asset module"; } public Integer executionOrder() { return 1; } public void run() { this.kernelCheckTable(tableNum(AssetLedgerAccounts)); }2. Open System administration | Periodic | Database | Consistency check, select the newly created Fixed assets option in the Module drop-down, and click OK to run the check:

3. Now the message displayed in the Infolog should complain about the missing value model in the fixed asset posing settings:

The consistency check in Dynamics AX validates only the predefined list of tables for each module. The system contains a number of classes derived from SysConsistencyCheck. For example, the CustConsistencyCheck class is responsible for validating the Accounts receivable module, LedgerConsistencyCheck
—for
General ledger, and so on.
In this recipe, we created a new class named AssetConsistencyCheck, extending the SysConsistencyCheck class for the fixed asset module. The following methods were created:
description()provides a name on the consistency check form.helpText()displays some explanation about the check.executionOrder()determines where in the list the check is located.run()holds the code to perform actual checking. Here we use thekernelCheckTable()member method, which validates the given table.
The classes we just mentioned can only be executed from the main Consistency check form. Individual checks could also be invoked as stand-alone functions. We just need to create an additional method to allow running of the class:
static void main(Args args)
{
SysConsistencyCheckJob consistencyCheckJob;
AssetConsistencyCheck assetConsistencyCheck;
consistencyCheckJob = new SysConsistencyCheckJob(
classidget(assetConsistencyCheck));
if (!consistencyCheckJob.prompt())
{
return;
}
consistencyCheckJob.run();
}
Briefly, eXtensible Markup Language (XML) defines a set of rules for encoding documents electronically. It allows the creation of all kinds of structured documents to exchange between systems. In Dynamics AX, XML files are widely used across the application. For example, user profiles can be exported as XML files. Business data, such as financial statements can also be exported as eXtensible Business Reporting Language (XBRL) files, which are based on XML.
Probably, the main thing that is associated with XML in Dynamics AX is the Application Integration Framework. It is an infrastructure that allows exposing business logic or exchanging data with other external systems. The communication is done by using XML formatted documents. By using the existing XML framework application classes prefixed with Axd, you can export or import data from or to the system in an XML format to be used for communicating with external systems. It is also possible to create new Axd classes using the AIF Document Service Wizard from the Tools menu to support the export and import of newly created tables.
Dynamics AX also contains a set of application classes prefixed with Xml, such as XmlDocument and XmlNode. Basically, those classes are wrappers around the System.XML namespace in the .NET framework.
In this recipe, we will create a new simple XML document by using the latter classes, in order to show the basics of XML. We will create the file with the data from the chart of the accounts table and will save it as an XML file.
Carry out the following steps in order to complete this recipe:
1. Open the AOT and create a new class named
CreateXmlFilewith the following code:class CreateXmlFile { } public static void main(Args _args) { XmlDocument doc; XmlElement nodeXml; XmlElement nodeTable; XmlElement nodeAccount; XmlElement nodeName; MainAccount mainAccount; #define.filename(@'C:\Temp\accounts.xml') doc = XmlDocument::newBlank(); nodeXml = doc.createElement('xml'); doc.appendChild(nodeXml); while select RecId, MainAccountId, Name from mainAccount { nodeTable = doc.createElement(tableStr(MainAccount)); nodeTable.setAttribute( fieldStr(MainAccount, RecId), int642str(mainAccount.RecId)); nodeXml.appendChild(nodeTable); nodeAccount = doc.createElement( fieldStr(MainAccount, MainAccountId)); nodeAccount.appendChild( doc.createTextNode(mainAccount.MainAccountId)); nodeTable.appendChild(nodeAccount); nodeName = doc.createElement( fieldStr(MainAccount, Name)); nodeName.appendChild( doc.createTextNode(mainAccount.Name)); nodeTable.appendChild(nodeName); } doc.save(#filename); info(strFmt("File %1 created.", #filename)); }2. Run the class. The XML file
accounts.xmlshould be created in the specified folder. Open it using any XML editor or viewer, such as Microsoft Internet Explorer, and review the created XML structure:
We start the recipe by creating a new XmlDocument using its newBlank() method, which represents an XML structure. Then we create its root node named xml using the createElement() method, and add the node to the document by calling the document's appendChild() method.
Next, we go through the MainAccount table and do the following for each record:
1. Create a new
XmlElementnode, which is named exactly as the table name, and add this node to the root node.2. Create a node representing the account number field and its child node representing its value. The account number node is created using
createElement(), and its value is created usingcreateTextNode(). ThecreateTextNode()method basically adds a value as text with no XML tags.3. Add the account number node to the table node.
4. Create a node representing the account name field and its child node representing its value.
5. Add the account name node to the table node.
Finally, we save the created XML document as a file.
In this way, we can create documents having virtually any structure.
In Dynamics AX, XML file importing is done in a very similar way as exporting. In this recipe, we will continue using the System.XML wrapper application classes. We will create a new class which reads XML files and displays the content onscreen. As a source file, we will use the previously created accounts.xml file.
Carry out the following steps in order to complete this recipe:
1. Open the AOT, and create a new class named
ReadXmlFilewith the following code. Use the document created in the previous recipe:class ReadXmlFile { } public static void main(Args _args) { XmlDocument doc; XmlNodeList data; XmlElement nodeTable; XmlElement nodeAccount; XmlElement nodeName; #define.filename(@'C:\Temp\accounts.xml') doc = XmlDocument::newFile(#filename); data = doc.selectNodes('//'+tableStr(MainAccount)); nodeTable = data.nextNode(); while (nodeTable) { nodeAccount = nodeTable.selectSingleNode( fieldStr(MainAccount, MainAccountId)); nodeName = nodeTable.selectSingleNode( fieldStr(MainAccount, Name)); info(strFmt( "%1 - %2", nodeAccount.text(), nodeName.text())); nodeTable = data.nextNode(); } }2. Run the class. The Infolog should display the contents of the
accounts.xmlfile on the screen:
In this recipe, we first create a new XmlDocument. We create it from the file and hence we have to use its newFile() method. Then we get all the document nodes of the table as XmlNodeList. We also get its first element by calling the nextNode() method.
Next, we loop through all the list elements and do the following:
1. Get an account number node as an
XmlElement.2. Get an account name node as an
XmlElement.3. Display the text of both nodes in the Infolog.
4. Get the next list element.
In this way, we retrieve the data from the XML file. A similar approach could be used to read any other XML file.
Comma-Separated Value (CSV) files are widely used across various systems. Although nowadays modern systems use XML formats for data exchange, CSV files are still popular because of the simplicity of their format.
Normally, the data in the file is organized so one line corresponds to one record, and each line contains a number of values normally separated by commas. Record and value separators could be any other symbol, depending on the system requirements.
In this recipe, we will learn how to create a custom comma-separated file from code. We will export a list of ledger accounts—the CSV format.
Carry out the following steps in order to complete this recipe:
1. Open the AOT, and create a new class named
CreateCommaFilewith the following code:class CreateCommaFile { } public static client void main(Args _args) { CommaTextIo file; container line; MainAccount mainAccount; #define.filename(@'C:\Temp\accounts.csv') #File file = new CommaTextIo(#filename, #io_write); if (!file || file.status() != IO_Status::Ok) { throw error("File cannot be opened."); } while select MainAccountId, Name from mainAccount { line = [ mainAccount.MainAccountId, mainAccount.Name]; file.writeExp(line); } info(strFmt("File %1 created.", #filename)); }2. Run the class. A new file named
accounts.csvshould be created in the specified folder. Open that file with Notepad or any other text editor to view the results:
In the variable declaration section of the main() method of the newly created CreateCommaFile class, we define a name for the output file, along with other variables. Normally, this should be replaced with a proper input variable. Here, we also define a standard #File macro, which contains a number of file-handling modes, such as #io_read, #io_write, #io_append, and so on, file types, delimiters, and other things.
Next, we create a new CSV file by calling the new() method on a standard CommaIo class. It accepts two parameters—filename and mode. For mode, we use #io_write from the #File macro to make sure a new file is created and opened for further writing. If a file with the given name already exists, then it will be overwritten. In order to make sure that a file is created successfully, we check if the file object exists and its status is valid, otherwise we show an error message.
In multilingual environments, it is better to use the CommaTextIo class. It behaves the same way as the CommaIo class does plus it supports Unicode, which allows us to process data with various language-specific symbols.
Finally, we loop though the MainAccount table, store all account numbers and their names in a container, and write them to the file using the writeExp() method.
In this way, we create a new comma-separated value file with the list of ledger accounts.
You probably already noticed that the main() method has the client modifier, which forces its code to run on the client. When dealing with large amounts of data, it is more effective to run the code on the server. In order to do that, we need to change the modifier to server. The following class generates exactly the same file as before, except that this file is created in the folder on the server's file system:
class CreateCommaFileServer
{
}
public static server void main(Args _args)
{
CommaTextIo file;
container line;
MainAccount mainAccount;
FileIoPermission perm;
#define.filename('C:\\Temp\\accounts.csv')
#File
perm = new FileIoPermission(#filename, #io_write);
perm.assert();
file = new CommaTextIo(#filename, #io_write);
if (!file || file.status() != IO_Status::Ok)
{
throw error("File cannot be opened.");
}
while select mainAccount
{
line = [
mainAccount.MainAccountId,
mainAccount.Name];
file.writeExp(line);
}
CodeAccessPermission::revertAssert();
info(strFmt("File %1 created.", #filename));
}
File manipulation on the server is protected by Dynamics AX code access security and we must use the FileIoPermission class to make sure we match the requirements.
Finally, we call CodeAccessPermission::revertAssert() to revert the previous assertion.
Besides data import/export, CSV files can be used for integration between systems. It is probably the most simple integration approach, when one system generates CSV files in some network folder and another one reads those files at specified intervals. Although this is not very sophisticated real-time integration, in most cases it does the job and does not require any additional components, such as Dynamics AX Application Integration Framework or something similar.
Another well-known example is when external companies are hired to manage the payroll. On a periodic basis, they send CSV files to the finance department, which are then loaded into the General journal in Dynamics AX and processed as usual.
In this recipe, we will learn how to read CSV file from code. As an example, we will process the file created in a previous recipe.
Carry out the following steps in order to complete this recipe:
1. In the AOT, create a new class named
ReadCommaFilewith the following code:class ReadCommaFile { } public static client void main(Args _args) { CommaTextIo file; container line; #define.filename(@'C:\Temp\accounts.csv') #File file = new CommaTextIo(#filename, #io_read); if (!file || file.status() != IO_Status::Ok) { throw error("File cannot be opened."); } line = file.read(); while (file.status() == IO_Status::Ok) { info(con2Str(line, ' - ')); line = file.read(); } }2. Run the class to view the file's content, as shown in the following screenshot:

As in the previous recipe, we first create a new file object using the CommaTextIo class. This time we use #io_read as the mode to make sure that the existing file is read only. We also perform the same validations to make sure that the file object is correctly created, otherwise we show an error message.
Finally, we read the file line by line until we reach the end of the file. Here we use the while loop until the file status becomes not IO_Status::OK, meaning we have reached the file end. Inside the loop, we call the read() method on the file object, which returns the current line as a container and moves the internal file cursor to the next line. File data is then simply output to the screen using the standard global info() function in conjunction with the con2Str() function, which converts a container to a string for displaying.
The last element of code, where the data is output, should normally be replaced by proper code that processes the incoming data.
File reading, could also be executed in a similar way as file writing on a server to improve performance. The modifier client has to be changed to server, and code with the FileIoPermission class has to be added to fulfil the code access security requirements. The modified class should look similar to the following code:
class ReadCommaFileServer
{
}
public static server void main(Args _args)
{
CommaTextIo file;
container line;
FileIoPermission perm;
#define.filename('C:\\Temp\\accounts.csv')
#File
perm = new FileIoPermission(#filename, #io_read);
perm.assert();
file = new CommaTextIo(#filename, #io_read);
if (!file || file.status() != IO_Status::Ok)
{
throw error("File cannot be opened.");
}
line = file.read();
while (file.status() == IO_Status::Ok)
{
info(con2Str(line, ' - '));
line = file.read();
}
CodeAccessPermission::revertAssert();
}
Date effectiveness is a new feature in Dynamics AX 2012 allowing developers to easily create date range fields. Date ranges are used for defining record validity between the specified dates, for example, defining employee contract dates.
This feature significantly reduces the amount of time that developers spend writing code and also provides a consistent approach to implement data range fields.
This recipe will demonstrate the basics of date effectiveness. We will implement date range validation on the standard E-mail templates form.
Carry out the following steps in order to complete this recipe:
1. In the AOT, find the SysEmailTable table and change its property as shown in the following table:
Property
Value
ValidTimeStateFieldTypeDate2. Notice the two new fields that are automatically added to the table:

3. Add the newly created ValidFrom and ValidTo fields to the existing emailIdIdx index and change the properties shown in the following table:
Property
Value
AlternateKeyYesValidTimeStateKeyYesValidTimeStateModeNoGap4. The index should look similar to the following screenshot:

5. Next, add the ValidFrom and ValidTo fields to the table's Identification group:

6. In the AOT, find the SysEmailTable form, refresh it using the Restore command which can be found in the form's right-click context menu. Then, locate its data source named SysEmailTable and change its properties as follows:
Property
Value
ValidTimeStateAutoQueryDateRangeValidTimeStateUpdateCorrection7. In order to test the results, navigate to Organization administration | Setup | E-mail templates and notice the newly created fields: Effective and Expiration columns. Try creating records with the same E-mail ID and overlapping date ranges—you will notice how the system is proposing to maintain valid date ranges:

We start the recipe by setting the ValidTimeStateFieldType property to Date on the SysEmailTable table. This automatically creates two new fields: ValidFrom and ValidTo that are used to define a date range.
Next, we add the created fields to the primary index where the EmailId field is used and adjust the following index's properties:
We set the AlternateKey property to Yes to ensure that this index is a part of an alternate key.
We set the ValidTimeStateKey property to Yes to specify that the index is used to determine the valid date ranges.
We also set the ValidTimeStateMode property to NoGap to ensure that e-mail templates with the same identification number can be created within continuous periods. The property can also be set to Gap allowing non-continuous date ranges.
Finally, we adjust the SysEmailTable form to reflect the changes. We add the newly created ValidFrom and ValidTo fields to the SysEmailTable table's Identification group so that they automatically appear on the form's Overview grid. We also change a few properties of the SysEmailTable data source:
Set the ValidTimeStateAutoQuery property to DateRange to ensure that all records are visible. The default AsOfDate value could be used if we want to display only the records for the current period.
Set the ValidTimeStateUpdate property to Correction, allowing the user to modify the dates.
Forms with date effective records can be enhanced with an automatically-generated toolbar for filtering the records. This can be done with the help of the DateEffectivenessPaneController application class.
In order to demonstrate that, let's modify the previously used SysEmailTable form and add the following code to the bottom of the form's init() method:
DateEffectivenessPaneController::constructWithForm(
this,
SysEmailTable_ds);
Now when you open the form, it contains an automatically-generated date effectiveness filter at the top: