


 Download code from GitHub
Getting Started with Cloud-Native
In this chapter, the following recipes will be covered:
- Creating a stack
- Creating a function and working with metrics and logs
- Creating an event stream and publishing an event
- Creating a stream processor
- Creating an API Gateway
- Deploying a single-page application
Introduction
Cloud-native is lean. Companies today must continuously experiment with new product ideas so that they can adapt to changing market demands; otherwise, they risk falling behind their competition. To operate at this pace, they must leverage fully managed cloud services and fully-automated deployments to minimize time to market, mitigate operating risks, and empower self-sufficient, full-stack teams to accomplish far more with much less effort.
The recipes in this cookbook demonstrate how to use fully managed, serverless cloud services to develop and deploy lean and autonomous services. This chapter contains bare-boned recipes with no clutter in order to focus on the core aspects of deploying cloud-native components and to establish a solid foundation for the remainder of this cookbook.
Creating a stack
Each autonomous cloud-native service and all its resources are provisioned as a cohesive and self-contained group called a stack. On AWS, these are CloudFormation stacks. In this recipe, we will use the Serverless Framework to create and manage a bare-bones stack to highlight the steps involved in deploying a cloud-native service.
Getting ready
Before starting this recipe, you will need to follow the instructions in the Preface for configuring your development environment with Node.js, the Serverless Framework, and AWS account credentials.
How to do it...
- Create the project from the following template:
$ sls create --template-url https://github.com/danteinc/js-cloud-native-cookbook/tree/master/ch1/create-stack --path cncb-create-stack
- Navigate to the cncb-create-stack directory with cd cncb-create-stack.
- Review the file named serverless.yml with the following content:
service: cncb-create-stack

provider:
  name: aws
- Review the file named package.json with the following content:
{
  "name": "cncb-create-stack",
  "version": "1.0.0",
  "private": true,
  "scripts": {
    "test": "sls package -r us-east-1 -s test",
    "dp:lcl": "sls deploy -r us-east-1",
    "rm:lcl": "sls remove -r us-east-1"
  },
  "devDependencies": {
    "serverless": "1.26.0"
  }
}
- Install the dependencies with npm install.
- Run the tests with npm test.
- Review the contents generated in the .serverless directory.
- Deploy the stack:
$ npm run dp:lcl -- -s $MY_STAGE

> cncb-create-stack@1.0.0 dp:lcl <path-to-your-workspace>/cncb-create-stack
> sls deploy -r us-east-1 "-s" "john"

Serverless: Packaging service...
Serverless: Creating Stack...
Serverless: Checking Stack create progress...
.....
Serverless: Stack create finished...
Serverless: Uploading CloudFormation file to S3...
Serverless: Uploading artifacts...
Serverless: Validating template...
Serverless: Updating Stack...
Service Information
service: cncb-create-stack
stage: john
region: us-east-1
stack: cncb-create-stack-john
api keys:
 None
endpoints:
 None
functions:
 None
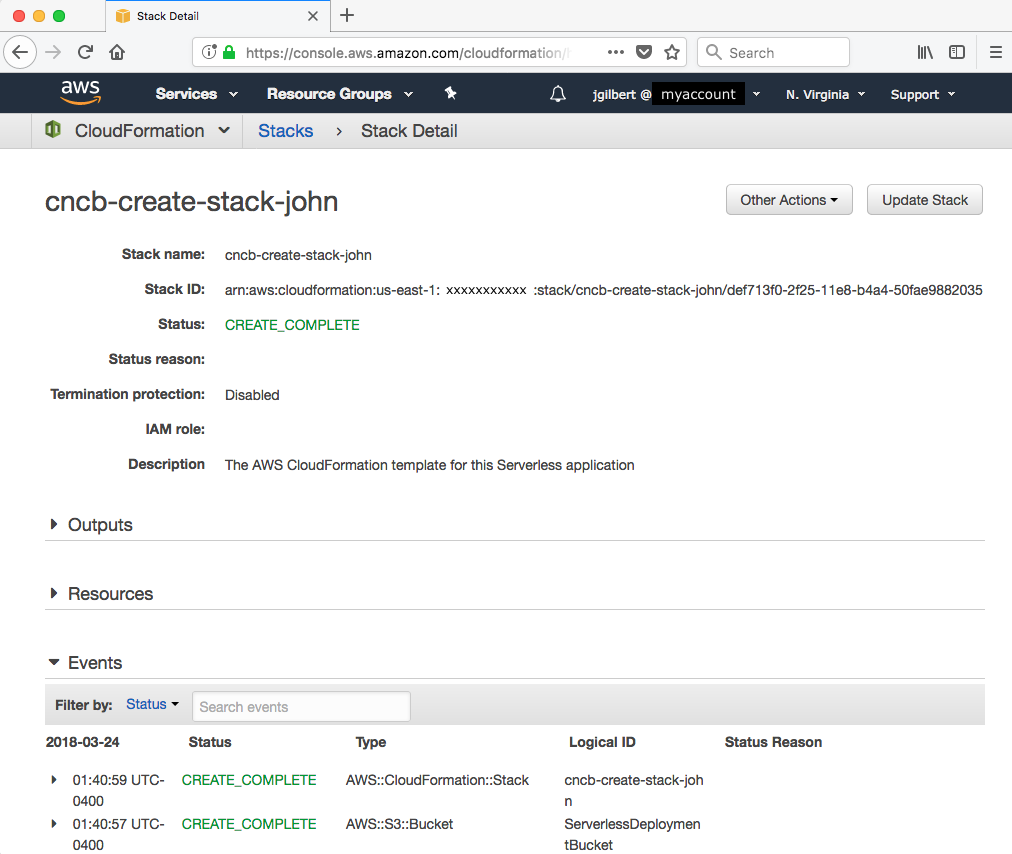
- Review the stack in the AWS Console:
- Remove the stack once you have finished with npm run rm:lcl -- -s $MY_STAGE.
How it works...
The Serverless Framework (SLS) (https://serverless.com/framework/docs) is my tool of choice for deploying cloud resources, regardless of whether or not I am deploying serverless resources, such as functions. SLS is essentially an abstraction layer on top of infrastructure as code tools, such as AWS CloudFormation, with extensibility features such as plugins and dynamic variables. We will use SLS in all of our recipes. Each recipe starts by using the SLS feature to create a new project by cloning a template. You will ultimately want to create your own templates for jump-starting your own projects.
This first project is as bare bones as we can get. It essentially creates an empty CloudFormation stack. In the serverless.yml file, we define the service name and the provider. The service name will be combined with the stage, which we will discuss shortly, to create a unique stack name within your account and region. I have prefixed all the stacks in our recipes with cncb to make it easy to filter for these stacks in the AWS Console if you are using a shared account, such as your development or sandbox account at work.
Our next most important tool is Node Package Manager (NPM) (https://docs.npmjs.com/). We will not be packaging any Node modules (also known as libraries), but we will be leveraging NPM's dependency management and scripting features. In the package.json file, we declared a development dependency on the Serverless Framework and three custom scripts to test, deploy, and remove our stack. The first command we execute is npm install, which will install all the declared dependencies into the project's node_modules directory.
Next, we execute the npm test script. This is one of several standard scripts for which NPM provides a shortcut alias. We have defined the test script to invoke the sls package command to assert that everything is configured properly and help us see what is going on under the covers. This command processes the serverless.yml file and generates a CloudFormation template in the .serverless directory. One of the advantages of the Serverless Framework is that it embodies best practices and uses a configuration by exception approach to take a small amount of declaration in the serverless.yml files and expand it into a much more verbose CloudFormation template.
Now, we are ready to deploy the stack. As developers, we need to be able to deploy a stack and work on it in isolation from other developers and other environments, such as production. To support this requirement, SLS uses the concept of a stage. Stage (-s $MY_STAGE) and region (-r us-east-1) are two required command-line options when invoking an SLS command. A stack is deployed into a specific region and the stage is used as a prefix in the stack name to make it unique within an account and region. Using this feature, each developer can deploy (dp) what I refer to as a local (lcl) stack with their name as the stage with npm run dp:lcl -- -s $MY_STAGE. In the examples, I use my name for the stage. We declared the $MY_STAGE environment variable in the Getting ready section. The double dash (--) is NPM's way of letting us pass additional options to a custom script. In Chapter 6, Building a Continuous Deployment Pipeline, we will discuss deploying stacks to shared environments, such as staging and production.
CloudFormation has a limit regarding the template body size in a request to the API. Typical templates easily surpass this limit and must be uploaded to S3 instead. The Serverless Framework handles this complexity for us. In the .serverless directory, you will notice that there is a cloudformation-template-create-stack.json file that declares a ServerlessDeploymentBucket. In the sls deploy output, you can see that SLS uses this template first and then it uploads the cloudformation-template-update-stack.json file to the bucket and updates the stack. It's nice to have this problem already solved for us because it is typical to learn about this limit the hard way.
At first glance, creating an empty stack may seem like a silly idea, but in practice it is actually quite useful. In a sense, you can think of CloudFormation as a CRUD tool for cloud resources. CloudFormation keeps track of the state of all the resources in a stack. It knows when a resource is new to a stack and must be created, when a resource has been removed from a stack and must be deleted, and when a resource has changed and must be updated. It also manages the dependencies and ordering between resources. Furthermore, when an update to a stack fails, it rolls back all the changes.
Unfortunately, when deploying a large number of changes, these rollbacks can be very time-consuming and painful when the error is in one of the last resources to be changed. Therefore, it is best to make changes to a stack in small increments. In Chapter 6, Building a Continuous Deployment Pipeline, we will discuss the practices of small batch sizes, task branch workflow, and decoupling deployment from release. For now, if you are creating a new service from a proven template, then initialize the new project and deploy the stack with all the template defaults all the way to production with your first pull request. Then, create a new branch for each incremental change. However, if you are working on an experimental service with no proven starting point, then an empty stack is perfectly reasonable for your first deployment to production.
In your daily development routine, it is important to clean up your local stacks when you have completed work on a task or story. The cost of a development account can creep surprisingly high when orphaned stacks accumulate and are rarely removed. The npm run rm:lcl -- -s $MY_STAGE script serves this purpose.
Creating a function and working with metrics and logs
Function-as-a-Service is the cornerstone of cloud-native architecture. Functions enable self-sufficient, full-stack teams to focus on delivering lean business solutions without being weighed down by the complexity of running cloud infrastructure. There are no servers to manage, and functions implicitly scale to meet demand. They are integrated with other value-added cloud services, such as streams, databases, API gateways, logging, and metrics, to further accelerate development. Functions are disposable architecture, which empower teams to experiment with different solutions. This recipe demonstrates how straightforward it is to deploy a function.
How to do it...
- Create the project from the following template:
$ sls create --template-url https://github.com/danteinc/js-cloud-native-cookbook/tree/master/ch1/create-function --path cncb-create-function
- Navigate to the cncb-create-function directory with cd cncb-create-function.
- Review the file named serverless.yml with the following content:
service: cncb-create-function

provider:
  name: aws
  runtime: nodejs8.10
  environment:
    V1: value1

functions:
  hello:
    handler: handler.hello
- Review the file named handler.js with the following content:
module.exports.hello = (event, context, callback) => {
  console.log('event: %j', event);
  console.log('context: %j', context);
  console.log('env: %j', process.env);

  callback(null, 'success');
};
- Install the dependencies with npm install.
- Run the tests with npm test.
- Review the contents generated in the .serverless directory.
- Deploy the stack:
$ npm run dp:lcl -- -s $MY_STAGE

> cncb-create-function@1.0.0 dp:lcl <path-to-your-workspace>/cncb-create-function
> sls deploy -r us-east-1 "-s" "john"

Serverless: Packaging service...
Serverless: Excluding development dependencies...
Serverless: Creating Stack...
Serverless: Checking Stack create progress...
.....
Serverless: Stack create finished...
Serverless: Uploading CloudFormation file to S3...
Serverless: Uploading artifacts...
Serverless: Uploading service .zip file to S3 (881 B)...
Serverless: Validating template...
Serverless: Updating Stack...
Serverless: Checking Stack update progress...
.................
Serverless: Stack update finished...
Service Information
service: cncb-create-function
stage: john
region: us-east-1
stack: cncb-create-function-john
api keys:
 None
endpoints:
 None
functions:
 hello: cncb-create-function-john-hello
- Review the stack and function in the AWS Console.
- Invoke the function with the following command:
$ sls invoke -r us-east-1 -f hello -s $MY_STAGE -d '{"hello":"world"}'
"success"
- Review the function metrics in the AWS Console:

- Review the function logs in the AWS Console:

- Take a look at the logs locally:
$ sls logs -f hello -r us-east-1 -s $MY_STAGE
START RequestId: ... Version: $LATEST
2018-03-24 15:48:45 ... event: {"hello":"world"}
2018-03-24 15:48:45 ... context: {"functionName":"cncb-create-function-john-hello","memoryLimitInMB":"1024", ...}
2018-03-24 15:48:45 ... env: {"V1":"value1","TZ":":UTC","AWS_REGION":"us-east-1", "AWS_ACCESS_KEY_ID":"...", ...}
END RequestId: ...
REPORT ... Duration: 3.64 ms Billed Duration: 100 ms ... Max Memory Used: 20 MB
- Remove the stack once you have finished with npm run rm:lcl -- -s $MY_STAGE.
How it works...
The Serverless Framework handles the heavy lifting, which allows us to focus on writing the actual function code. The first thing to note is that we must define the runtime: nodejs8.10 in the serverless.yml file. Next, we define a function in the functions section with a name and a handler. All other settings have defaulted, following the configuration by exception approach. When you look at the generated CloudFormation template, you will see that over 100 lines were generated from just a handful of lines declared in the serverless.yml file. A large portion of the generated template is dedicated to defining boilerplate security policies. Dig into the .serverless/cloudformation-template-update-stack.json file to see the details.
We also define environment variables in the serverless.yml. This allows the functions to be parameterized per deployment stage. We will cover this in more detail in Chapter 6, Building a Continuous Deployment Pipeline. This also allows settings, such as the debug level, to be temporarily tweaked without redeploying the function.
When we deploy the project, the Serverless Framework packages the function along with its runtime dependencies, as specified in the package.json file, into a ZIP file. Then, it uploads the ZIP file to the ServerlessDeploymentBucket so that it can be accessed by CloudFormation. The output of the deployment command shows when this is happening. You can look at the content of the ZIP file in the .serverless directory or download it from the deployment bucket. We will cover advanced packaging options in Chapter 9, Optimizing Performance.
The signature of an AWS Lambda function is straightforward. It must export a function that accepts three arguments: an event object, a context object, and a callback function. Our first function will just log the event, content, and the environment variables so that we can peer into the execution environment a little bit. Finally, we must invoke the callback. It is a standard JavaScript callback. We pass an error to the first argument or the successful result to the second argument.
Logging is an important standard feature of Function as a Service (FaaS). Due to the ephemeral nature of cloud resources, logging in the cloud can be tedious, to put it lightly. In AWS Lambda, console logging is performed asynchronously and recorded in CloudWatch logs. It's a fully-managed logging solution built right in. Take the time to look at the details in the log statements that this function writes. The environment variables are particularly interesting. For example, we can see that each invocation of a function gets a new temporary access key.
Functions also provide a standard set of metrics out-of-the-box, such as invocation count, duration, errors, throttling, and so forth. We will cover this in detail in Chapter 7, Optimizing Observability.
Creating an event stream and publishing an event
Cloud-native services are autonomous. Each service is completely self-sufficient and runs in isolation to minimize the blast radius when any given service experiences a failure. To achieve this isolation, bulkheads must be established between the services. Event streaming is one mechanism that is used to create these bulkheads. Autonomous cloud-native services perform all inter-service communication asynchronously via streams to decouple upstream services from downstream services. In Chapter 2, Applying The Event Sourcing and CQRS Patterns, we will dive deeper into how we create bounded, isolated, and autonomous cloud-native services. This recipe creates the event stream that we will use throughout this cookbook and provides a function for publishing events to the stream.
How to do it...
- Create the project from the following template:
$ sls create --template-url https://github.com/danteinc/js-cloud-native-cookbook/tree/master/ch1/event-stream --path cncb-event-stream
- Navigate to the cncb-event-stream directory with cd cncb-event-stream.
- Review the file named serverless.yml with the following content:
service: cncb-event-stream

provider:
  name: aws
  runtime: nodejs8.10
  iamRoleStatements:
    - Effect: Allow
      Action:
        - kinesis:PutRecord
      Resource:
        Fn::GetAtt: [ Stream, Arn ]

functions:
  publish:
    handler: handler.publish
    environment:
      STREAM_NAME:
        Ref: Stream

resources:
  Resources:
    Stream:
      Type: AWS::Kinesis::Stream
      Properties:
        Name: ${opt:stage}-${self:service}-s1
        RetentionPeriodHours: 24
        ShardCount: 1

  Outputs:
    streamName:
      Value:
        Ref: Stream
    streamArn:
      Value:
        Fn::GetAtt: [ Stream, Arn ]
- Review the file named handler.js with the following content:
const aws = require('aws-sdk');
const uuid = require('uuid');

module.exports.publish = (event, context, callback) => {
  const e = {
    id: uuid.v1(),
    partitionKey: event.partitionKey || uuid.v4(),
    timestamp: Date.now(),
    tags: {
      region: process.env.AWS_REGION,
    },
    ...event,
  }

  const params = {
    StreamName: process.env.STREAM_NAME,
    PartitionKey: e.partitionKey,
    Data: Buffer.from(JSON.stringify(e)),
  };

  const kinesis = new aws.Kinesis();
  kinesis.putRecord(params, callback);
};
- Install the dependencies with npm install.
- Run the tests with npm test.
- Review the contents generated in the .serverless directory.
- Deploy the stack:
$ npm run dp:lcl -- -s $MY_STAGE

> cncb-create-stream@1.0.0 dp:lcl <path-to-your-workspace>/cncb-create-stream
> sls deploy -v -r us-east-1 "-s" "john"

Serverless: Packaging service...
...
Serverless: Stack update finished...
Service Information
service: cncb-event-stream
stage: john
region: us-east-1
stack: cncb-event-stream-john
...
functions:
 publish: cncb-event-stream-john-publish

Stack Outputs
PublishLambdaFunctionQualifiedArn: arn:aws:lambda:us-east-1:999999999999:function:cncb-event-stream-john-publish:3
streamArn: arn:aws:kinesis:us-east-1:999999999999:stream/john-cncb-event-stream-s1
streamName: john-cncb-event-stream-s1
...
- Review the stack, stream, and function in the AWS Console.
- Invoke the function with the following command:
$ sls invoke -r us-east-1 -f publish -s $MY_STAGE -d '{"type":"thing-created"}'
{
    "ShardId": "shardId-000000000000",
    "SequenceNumber": "49582906351415672136958521359460531895314381358803976194"
}
- Take a look at the logs:
$ sls logs -f publish -r us-east-1 -s $MY_STAGE
START ...
2018-03-24 23:20:46 ... event: {"type":"thing-created"}
2018-03-24 23:20:46 ... event:
{
  "type":"thing-created",
  "id":"81fd8920-2fdb-11e8-b749-0d2c43ec73d0",
  "partitionKey":"6f4f9a38-61f7-41c9-a3ad-b8c16e42db7c",
  "timestamp":1521948046003,
  "tags":{
    "region":"us-east-1"
  }
}
2018-03-24 23:20:46 ... params: {"StreamName":"john-cncb-event-stream-s1","PartitionKey":"6f4f9a38-61f7-41c9-a3ad-b8c16e42db7c","Data":{"type":"Buffer","data":[...]}}
END ...
REPORT ... Duration: 153.47 ms    Billed Duration: 200 ms ... Max Memory Used: 39 MB
- Remove the stack once you have finished with npm run rm:lcl -- -s $MY_STAGE.
How it works...
The resources section of the serverless.yml file is used to create cloud resources that are used by services. These resources are defined using standard AWS CloudFormation resource types. In this recipe, we are creating an AWS Kinesis stream. We give the stream a name, define the retention period, and specify the number of shards. The Serverless Framework provides a robust mechanism for dynamically replacing variables.
Here, we use the ${opt:stage} option passed in on the command line and the ${self:service} name defined in the serverless.yml file to create a unique stream name. The standard retention period is 24 hours and the maximum is seven days. For our recipes, one shard will be more than sufficient. We will discuss shards shortly and again in Chapter 7, Optimizing Observability, and Chapter 9, Optimizing Performance.
The Outputs section of the serverless.yml file is where we define values, such as generated IDs and names, that we want to use outside of the stack. We output the Amazon Resource Names (ARNs) streamName and streamArn so that we can reference them with Serverless Framework variables in other projects. These values are also displayed on the Terminal when a deployment is complete.
The publish function defined in the serverless.yml file is used to demonstrate how to publish an event to the stream. We are passing the STREAM_NAME to the function as an environment variable. In the iamRoleStatements section, we give the function kinesis: PutRecord permission to allow it to publish events to this specific stream.
The function handler.js file has runtime dependencies on two external libraries—aws-sdk and uuid. The Serverless Framework will automatically include the runtime dependencies, as defined in the package.json file. Take a look inside the generated .serverless/cncb-event-stream.zip file. The aws-sdk is a special case. It is already available in the AWS Lambda Node.js runtime, and therefore is not included. This is important because aws-sdk is a large library and the ZIP file size impacts cold start times. We will discuss this in more detail in Chapter 9, Optimizing Performance.
The publish function expects to receive an event object as input, such as {"type":"thing-created"}. We then adorn the event with additional information to conform to our standard event format, which we will discuss shortly. Finally, the function creates the required params object and then calls kinesis.putRecord from the aws-sdk. We will be using this function in this and other recipes to simulate event traffic.
All events in our cloud-native systems will conform to the following Event structure to allow for consistent handling across all services. Additional fields are event-type-specific:
interface Event {
    id: string;
    type: string;
    timestamp: number;
    partitionKey: string;
    tags: { [key: string]: string };
}
- type describes the event, such as thing-created
- timestamp is an epoch value, as returned from Date.now()
- id should be a V1 UUID, which is time-based
- partitionKey should be a V4 UUID, which is random number-based
- tags is a hashmap of useful data values that are leveraged for content-based routing and aggregating event metrics
It is important to use a V4 UUID for the partitionKey to avoid hot shards and maximize concurrency. If a V1 UUID were used, then all events produced at the same time would go to the same shard. The partitionKey will typically be the ID of the domain entity that produced the event, which should use a V4 UUID for the same reason. This has the added benefit of ensuring that all events for the same domain entity are processed through the same shard in the order received.
Creating a stream processor
Stream processors do most of the heavy lifting in cloud-native services. Autonomous cloud-native services perform all inter-service communication asynchronously via event streaming to decouple upstream services from downstream services. Upstream services publish events to a stream, with no knowledge of the specific downstream services that will eventually consume the events. Downstream services deploy stream-processing functions to consume events of interest. Stream processors will be covered extensively throughout this cookbook. This recipe demonstrates how to create a function that listens for events from an AWS Kinesis stream and provides a quick introduction to using the functional reactive programming paradigm for implementing stream processing.
Getting ready
Before starting this recipe, you will need an AWS Kinesis Stream, such as the one created in the Creating an event stream recipe.
How to do it...
- Create the project from the following template:
$ sls create --template-url https://github.com/danteinc/js-cloud-native-cookbook/tree/master/ch1/create-stream-processor --path cncb-create-stream-processor
- Navigate to the cncb-create-stream-processor directory with cd cncb-create-stream-processor.
- Review the file named serverless.yml with the following content:
service: cncb-create-stream-processor

provider:
  name: aws
  runtime: nodejs8.10

functions:
  listener:
    handler: handler.listener
    events:
      - stream:
          type: kinesis
          arn: ${cf:cncb-event-stream-${opt:stage}.streamArn}
          batchSize: 100
          startingPosition: TRIM_HORIZON
- Review the file named handler.js with the following content:
const _ = require('highland');

module.exports.listener = (event, context, cb) => {
  _(event.Records)
    .map(recordToEvent)
    .tap(printEvent)
    .filter(forThingCreated)
    .collect()
    .tap(printCount)
    .toCallback(cb);
};

const recordToEvent = r => JSON.parse(Buffer.from(r.kinesis.data, 'base64'));
const forThingCreated = e => e.type === 'thing-created';

const printEvent = e => console.log('event: %j', e);
const printCount = events => console.log('count: %d', events.length);
- Install the dependencies with npm install.
- Run the tests with npm test -- -s $MY_STAGE.
- Review the contents generated in the .serverless directory.
- Deploy the stack:
$ npm run dp:lcl -- -s $MY_STAGE

> cncb-create-stream-processor@1.0.0 dp:lcl <path-to-your-workspace>/cncb-create-stream-processor
> sls deploy -r us-east-1 "-s" "john"

Serverless: Packaging service...
...
Serverless: Stack update finished...
Service Information
service: cncb-create-stream-processor
stage: john
region: us-east-1
stack: cncb-create-stream-processor-john
...
functions:
  listener: cncb-create-stream-processor-john-listener
- Review the stack and function in the AWS Console.
- Publish an event from a separate Terminal with the following commands:
$ cd <path-to-your-workspace>/cncb-event-stream
$ sls invoke -r us-east-1 -f publish -s $MY_STAGE -d '{"type":"thing-created"}'
{
    "ShardId": "shardId-000000000000",
    "SequenceNumber": "49582906351415672136958521360120605392824155736450793474"
}
- Take a look at the logs from the original Terminal:
$ sls logs -f listener -r us-east-1 -s $MY_STAGE
START ...
2018-03-25 00:16:32 ... event:
{
  "type":"thing-created",
  "id":"81fd8920-2fdb-11e8-b749-0d2c43ec73d0",
  "partitionKey":"6f4f9a38-61f7-41c9-a3ad-b8c16e42db7c",
  "timestamp":1521948046003,
  "tags":{
    "region":"us-east-1"
  }
}
2018-03-25 00:16:32 ... event:
{
  "type":"thing-created",
  "id":"c6f60550-2fdd-11e8-b749-0d2c43ec73d0",
  ...
}
2018-03-25 00:16:32 ... count: 2
END ...
REPORT ... Duration: 7.73 ms    Billed Duration: 100 ms ... Max Memory Used: 22 MB

START ...
2018-03-25 00:22:22 ... event:
{
  "type":"thing-created",
  "id":"1c2b5150-2fe4-11e8-b749-0d2c43ec73d0",
  ...
}
2018-03-25 00:22:22 ... count: 1
END ...
REPORT ... Duration: 1.34 ms    Billed Duration: 100 ms ... Max Memory Used: 22 MB
- Remove the stack once you are finished with npm run rm:lcl -- -s $MY_STAGE.
How it works...
Stream processors listen for data from a streaming service such as Kinesis or DynamoDB Streams. Deploying a stream processor is completely declarative. We configure a function with the stream event type and the pertinent settings, such as the type, arn, batchSize, and startingPosition. The arn is set dynamically using a CloudFormation variable, ${cf:cncb-event-stream-${opt:stage}.streamArn}, that references the output value of the cnbc-event-stream stack.
Streams are the only resources that are shared between autonomous cloud-native services.
We will discuss batch size and starting position in detail in both Chapter 8, Designing for Failure, and Chapter 9, Optimizing Performance. For now, you may have noticed that the new stream processor logged all the events that were published to the stream in the last 24 hours. This is because the startingPosition is set to TRIM_HORIZON. If it was set to LATEST, then it would only receive events that were published after the function was created.
Stream processing is a perfect match for functional reactive programming with Node.js streams. The terminology can be a little confusing because the word stream is overloaded. I like to think of streams as either macro or micro. For example, Kinesis is the macro stream and the code in our stream processor function is the micro stream. My favorite library for implementing the micro stream is Highland.js (https://highlandjs.org). A popular alternative is RxJS (https://rxjs-dev.firebaseapp.com). As you can see in this recipe, functional reactive programming is very descriptive and readable. One of the reasons for this is that there are no loops. If you try to implement a stream processor with imperative programming, you will find that it quickly gets very messy. You also lose backpressure, which we will discuss in Chapter 8, Designing for Failure.
The code in the listener function creates a pipeline of steps that the data from the Kinesis stream will ultimately flow through. The first step, _(event.Records), converts the array of Kinesis records into a Highland.js stream object that will allow each element in the array to be pulled through the stream in turn as the downstream steps are ready to receive the next element. The .map(recordToEvent) step decodes the Base64 encoded data from the Kinesis record and parses the JSON into an event object. The next step, .tap(printEvent), simply logs the event so that we can see what is happening in the recipe.
Kinesis and event streaming, in general, is a member of the high performance, dumb-pipe-smart-endpoints generation of messaging middleware. This means that Kinesis, the dumb pipe, does not waste its processing power on filtering data for the endpoints. Instead, all that logic is spread out across the processing power of the smart endpoints. Our stream processor function is the smart endpoint. To that end, the .filter(forThingCreated) step is responsible for filtering out the events that the processor is not interested in. All the remaining steps can assume that they are receiving the expected event types.
Our bare-boned stream processor needs something somewhat interesting but simple to do. So, we count and print the number of thing-created events in the batch. We have filtered out all other event types, so the .collect() step collects all the remaining events into an array. Then, the .tap(printCount) step logs the length of the array. Finally, the .toCallback(cb) step will invoke the callback function once all the data in the batch has been processed. At this point, the Kinesis checkpoint is advanced and the next batch of events is processed. We will cover error handling and how it relates to batches and checkpoints in Chapter 8, Designing for Failure.
Creating an API Gateway
An API Gateway is an essential element of cloud-native architecture. It provides a secure and performant perimeter at the boundaries of our cloud-native systems. The boundaries are where the system interacts with everything that is external to the system, including humans and other systems. We will leverage an API Gateway in the recipes that create boundary components such as a Backend For Frontend (BFF) or an External Service Gateway. This recipe demonstrates how straightforward it is to deploy an API Gateway.
How to do it...
- Create the project from the following template:
$ sls create --template-url https://github.com/danteinc/js-cloud-native-cookbook/tree/master/ch1/create-api-gateway --path cncb-create-api-gateway
- Navigate to the cncb-create-api-gateway directory with cd cncb-create-api-gateway.
- Review the file named serverless.yml with the following content:
service: cncb-create-api-gateway

provider:
  name: aws
  runtime: nodejs8.10

functions:
  hello:
    handler: handler.hello
    events:
      - http:
          path: hello
          method: get
          cors: true
- Review the file named handler.js with the following content:
module.exports.hello = (event, context, callback) => {
  console.log('event: %j', event);

  const response = {
    statusCode: 200,
    headers: {
      'Access-Control-Allow-Origin': '*',
    },
    body: JSON.stringify({
      message: 'JavaScript Cloud Native Development Cookbook! Your function executed successfully!',
      input: event,
    }),
  };

  callback(null, response);
};
- Install the dependencies with npm install.
- Run the tests with npm test.
- Review the contents generated in the .serverless directory.
- Deploy the stack:
$ npm run dp:lcl -- -s $MY_STAGE

> cncb-create-api-gateway@1.0.0 dp:lcl <path-to-your-workspace>/cncb-create-api-gateway
> sls deploy -r us-east-1 "-s" "john"

Serverless: Packaging service...
.....
Serverless: Stack update finished...
Service Information
service: cncb-create-api-gateway
stage: john
region: us-east-1
stack: cncb-create-api-gateway-john
api keys:
  None
endpoints:
  GET - https://k1ro5oasm6.execute-api.us-east-1.amazonaws.com/john/hello
functions:
  hello: cncb-create-api-gateway-john-hello
- Review the stack, API, and function in the AWS Console.
- Invoke the endpoint shown in the stack output in the following commands:
$ curl -v https://k1ro5oasm6.execute-api.us-east-1.amazonaws.com/john/hello | json_pp

{
   "input" : {
      "body" : null,
      "pathParameters" : null,
      "requestContext" : { ... },
      "resource" : "/hello",
      "headers" : { ... },
      "queryStringParameters" : null,
      "httpMethod" : "GET",
      "stageVariables" : null,
      "isBase64Encoded" : false,
      "path" : "/hello"
   },
   "message" : "JavaScript Cloud Native Development Cookbook! Your function executed successfully!"
}
- Take a look at the logs:
$ sls logs -f hello -r us-east-1 -s $MY_STAGE

START ...
2018-03-25 01:04:47 ... event: {"resource":"/hello","path":"/hello","httpMethod":"GET","headers":{ ... },"requestContext":{ ... },"body":null,"isBase64Encoded":false}
END
REPORT ... Duration: 2.82 ms    Billed Duration: 100 ms ... Max Memory Used: 20 MB
- Remove the stack once you are finished with npm run rm:lcl -- -s $MY_STAGE.
How it works...
Creating an API Gateway is completely declarative. We just configure a function with the http event type and the pertinent settings, such as the path and method. All other settings have defaulted following the configuration by exception approach. When you look at the generated .serverless/cloudformation-template-update-stack.json file, you will see that over 100 lines were generated from just a handful of lines declared in the serverless.yml file. The API name is calculated based on the combination of the service name declared at the top of the serverless.yml file and the specified stage. There is a one-to-one mapping between a serverless project and an API Gateway. All the functions in the project declared with an http event are included in the API.
The signature of the function is the same as all others; however, the contents of the event and the expected response format are specific to the API Gateway service. The event contains the full contents of the HTTP request including the path, parameters, header, body, and more. The response requires a statusCode and options headers and body. The body must be a string, and the header must be an object. I declared the function with the cors: true setting so that the recipe could include a legitimate set of response headers. We will cover security in detail in Chapter 5, Securing Cloud-Native Systems. For now, know that security features such as SSL, throttling, and DDoS protection are default features of the AWS API Gateway.
The endpoint for the API Gateway is declared as a stack output and displayed after the stack is deployed. We will see ways to customize the endpoint in Chapter 4, Leveraging the Edge of the Cloud, and in Chapter 10, Deploying to Multiple Regions. Once you invoke the service, you will be able to see the details of the inputs and outputs, both in the HTTP response as it was coded and then in the function's logs. Take a look at the API Gateway in the AWS Console as well. However, the goal of automation and the Serverless Framework is to eliminate the need to make changes in the console. I looked at the API in the console while writing this book, but other than that I can't remember the last time I actually needed to go into the API Gateway console.
Deploying a single-page application
The cloud-native light bulb first turned on in my head when I realized I could deploy a single page application, such as Angular, to an S3 bucket and serve it up globally with no need for servers and load balancers whatsoever. This was my first cloud-native Wow! moment. It was the moment when I began to understand that cloud-native plays by an entirely different set of rules. The combination of S3 and a JavaScript-based UI delivers a web presentation tier with virtually limitless scalability, virtually no cost, and essentially no operation headaches. This recipe demonstrates how straightforward it is to deploy a single-page application.
How to do it...
- Create the project from the following template:
$ sls create --template-url https://github.com/danteinc/js-cloud-native-cookbook/tree/master/ch1/deploy-spa --path cncb-deploy-spa
- Navigate to the cncb-deploy-spa directory with cd cncb-deploy-spa.
- Review the file named serverless.yml with the following content:
service: cncb-deploy-spa

provider:
  name: aws

plugins:
  - serverless-spa-deploy

custom:
  spa:
    files:
      - source: ./build
        globs: '**/*'
        headers:
          CacheControl: max-age=300

resources:
  Resources:
    WebsiteBucket:
      Type: AWS::S3::Bucket
      Properties:
        AccessControl: PublicRead
        WebsiteConfiguration:
          IndexDocument: index.html
          ErrorDocument: index.html

  Outputs:
    WebsiteBucketName:
      Value:
        Ref: WebsiteBucket
    WebsiteURL:
      Value:
        Fn::GetAtt: [ WebsiteBucket, WebsiteURL ]
- Review the file named package.json with the following content:
{
  "name": "cncb-deploy-spa",
  "version": "1.0.0",
  "private": true,
  "scripts": {
    "start": "react-scripts start",
    "build": "react-scripts build",
    "test": "sls package -r us-east-1 -s test",
    "dp:lcl": "sls deploy -v -r us-east-1",
    "rm:lcl": "sls remove -r us-east-1"
  },
  "dependencies": {
    "react": "16.2.0",
    "react-dom": "16.2.0"
  },
  "devDependencies": {
    "react-scripts": "1.1.1",
    "serverless": "1.26.0",
    "serverless-spa-deploy": "^1.0.0"
  }
}
- Install the dependencies with npm install.
- Run the app locally with npm start.
- Run the tests with npm test.
- Review the contents generated in the .serverless directory.
- Build the app with npm run build.
- Review the contents generated in the build directory.
- Deploy the stack:
$ npm run dp:lcl -- -s $MY_STAGE

> cncb-deploy-spa@1.0.0 dp:lcl <path-to-your-workspace>/cncb-deploy-spa
> sls deploy -v -r us-east-1 "-s" "john"

Serverless: Packaging service...
...
Serverless: Stack update finished...
...
Stack Outputs
WebsiteBucketName: cncb-deploy-spa-john-websitebucket-1s8hgqtof7la7
WebsiteURL: http://cncb-deploy-spa-john-websitebucket-1s8hgqtof7la7.s3-website-us-east-1.amazonaws.com
...
Serverless: Path: ./build
Serverless: File: asset-manifest.json (application/json)
Serverless: File: favicon.ico (image/x-icon)
Serverless: File: index.html (text/html)
Serverless: File: manifest.json (application/json)
Serverless: File: service-worker.js (application/javascript)
Serverless: File: static/css/main.c17080f1.css (text/css)
Serverless: File: static/css/main.c17080f1.css.map (application/json)
Serverless: File: static/js/main.ee7b2412.js (application/javascript)
Serverless: File: static/js/main.ee7b2412.js.map (application/json)
Serverless: File: static/media/logo.5d5d9eef.svg (image/svg+xml)
- Review the stack and bucket in the AWS Console
- Browse to the WebsiteURL shown in the stack output:

- Remove the stack once you have finished with npm run rm:lcl -- -s $MY_STAGE
How it works...
The first thing to notice is that we are using all the same development tools for the full stack. This is one of many advantages of using JavaScript for backend development. A single, self-sufficient, full-stack team can develop the frontend application and the BFF service with the same programming language. This can allow for more efficient utilization of team resources.
There are two new standard scripts—start and build. npm start will run the frontend app locally using Node.js as the web server. npm run build will prepare the application for deployment. I used the react-scripts library so as not to clutter the example with a detailed ReactJS build process. This recipe uses a small, canned ReactJS example for the same reason. I wanted an app that was just large enough to have something to deploy. ReactJS is not the focus of this recipe or cookbook. There are volumes already written on ReactJS and similar frameworks.
We are creating an S3 bucket, WebsiteBucket, and configuring it as a website. The stack output displays the WebsiteUrl used to access the SPA. The SPA will be served from a bucket with no need for servers whatsoever. In this context, we can think of S3 as a global web server.
We are using a Serverless plugin for the first time in this recipe. The serverless-spa-deploy plugin will upload the SPA files from the ./build directory after the stack is deployed. Note that we are not explicitly naming the bucket. CloudFormation will generate the name with a random suffix. This is important because bucket names must be globally unique. The plugin infers the generated bucket name. The plugin has sensible defaults that can be customized, such as to change the CacheControl headers for different files. The plugin also empties the bucket, before stack removal.