The time has come; we can begin to discover the magic of the non-linear Session View, the linear Arrangement View (Figure 1.14), and their relationship in Live.
Figure 1.14 – Arrangement View
Session View
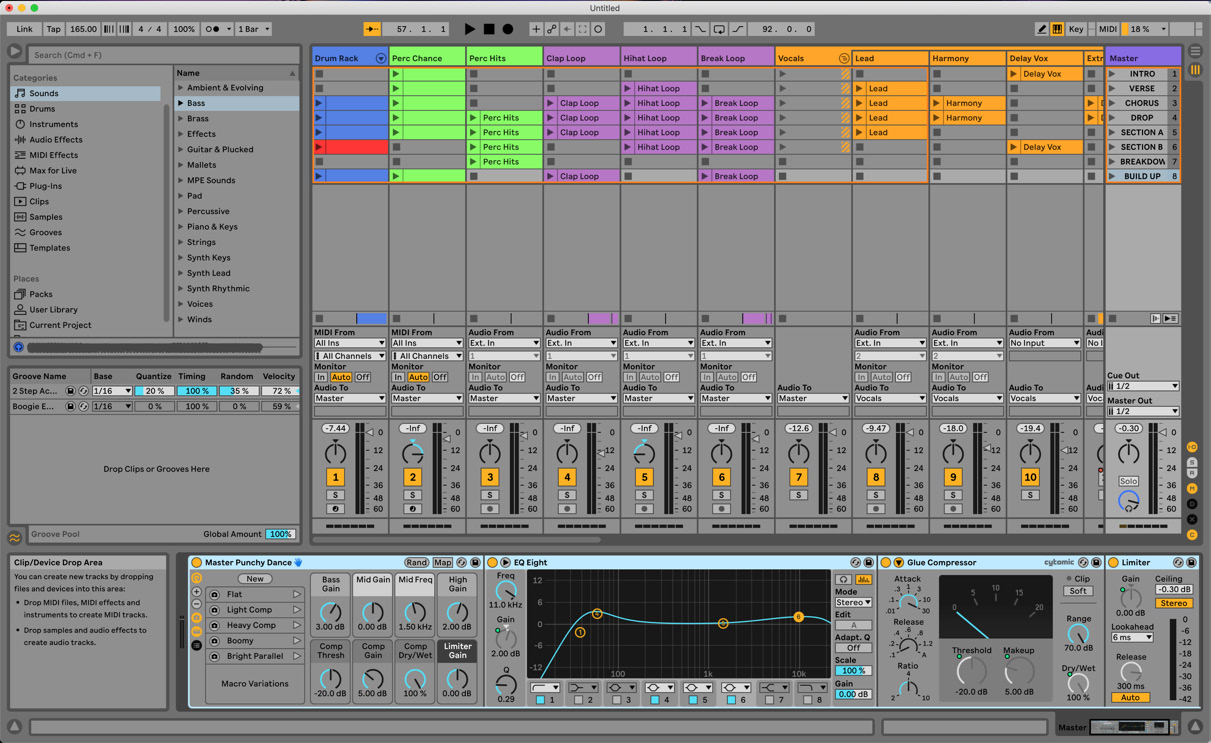
Let’s quickly take a tour of Session View!
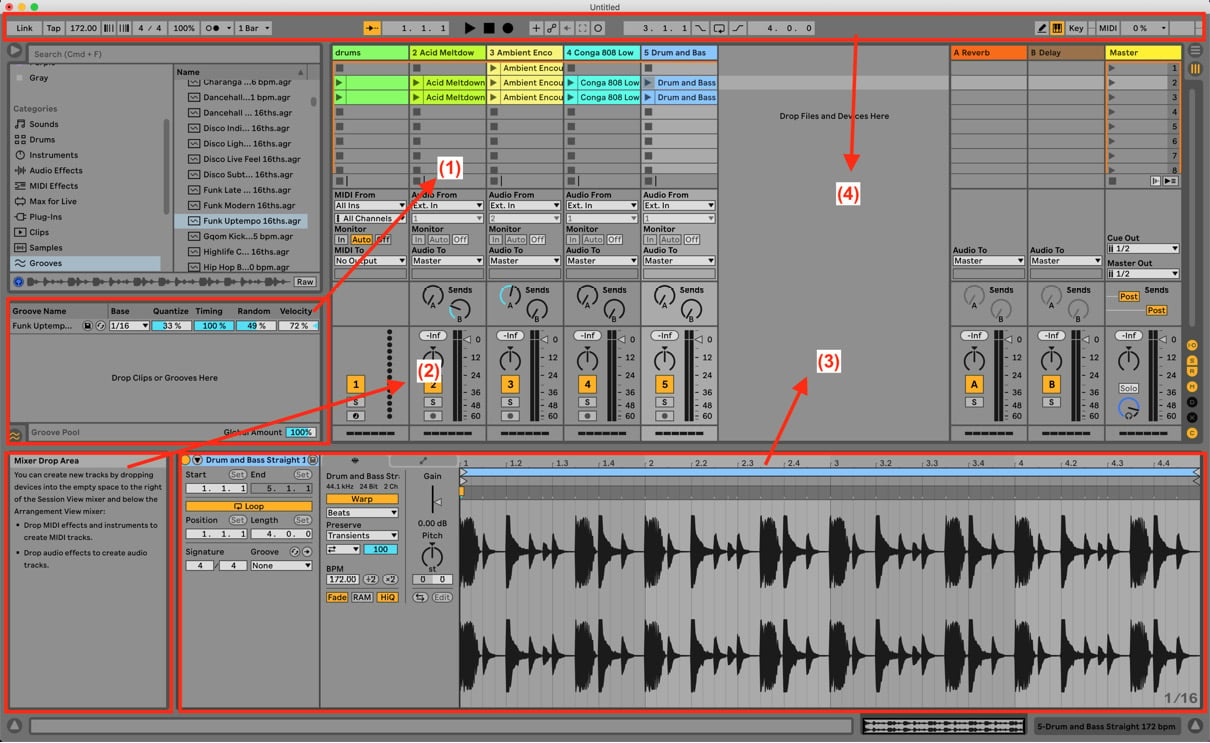
Figure 1.15 – Session View
Track Title Bar and clip slots
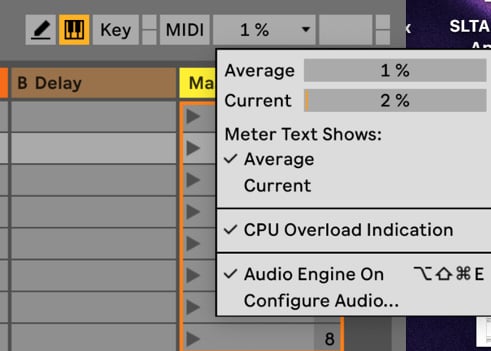
In Figure 1.15, for example, under the Ambient Enco track, there are three clips that belong to the track and will play back Ambient Enco. These clips can be triggered by the small launch button with the play symbol on it. Each track can have one clip triggered at a time. So, for instance, if you’d like the Ambient Enco track to play two different clips at the same time, you would have to duplicate the track so the two clips are placed on two different tracks. How the clips will be launched timing-wise will be defined by the Global Quantize settings. If Global Quantize is set to 1 Bar, as in Figure 1.16, then Live will always wait for the next bar before it triggers the clip and plays it back.
This way, you can’t fall out of time and clips will stay in sync within Session View.
Figure 1.16 – Global Quantize is set to 1 Bar
Each clip slot without a clip has a small square symbol instead of the launch (play) button. These squares are small “stop” buttons, so when you press on one of them, the clip that is currently playing on that track will stop. The timing of the clip-stopping during playback will also be defined by the global quantize settings, so even this will happen “on time.”
Give this a try:
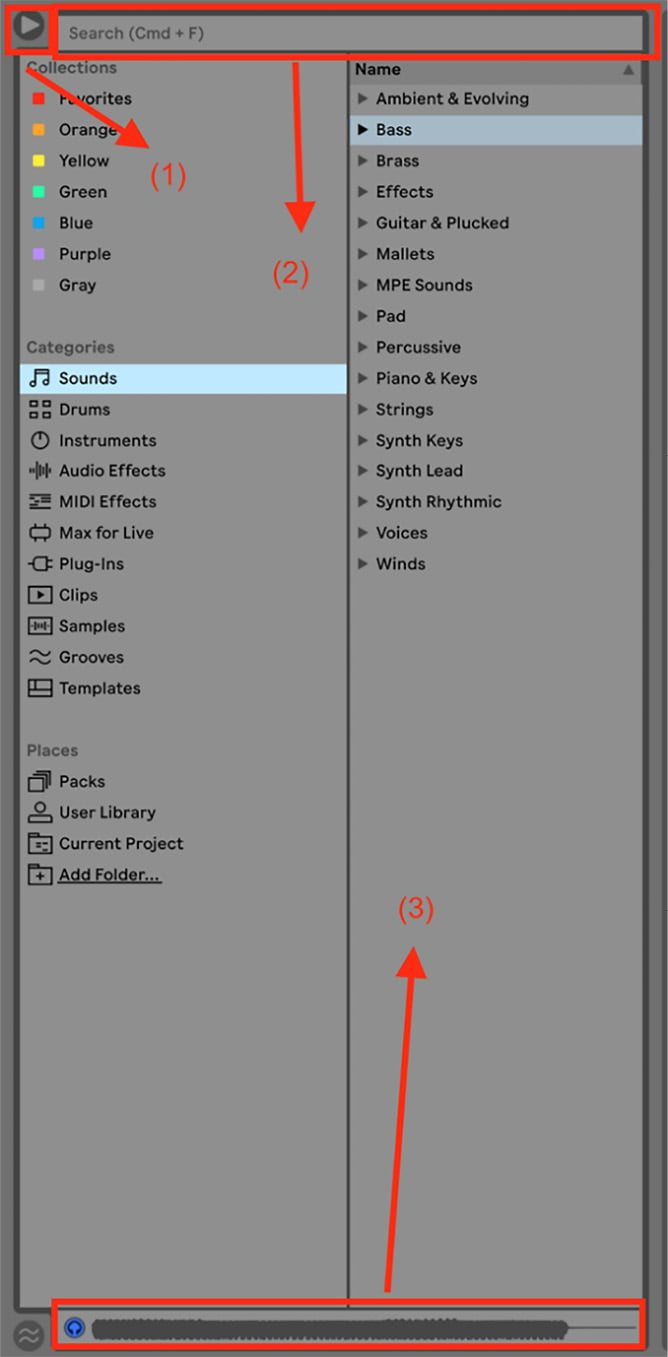
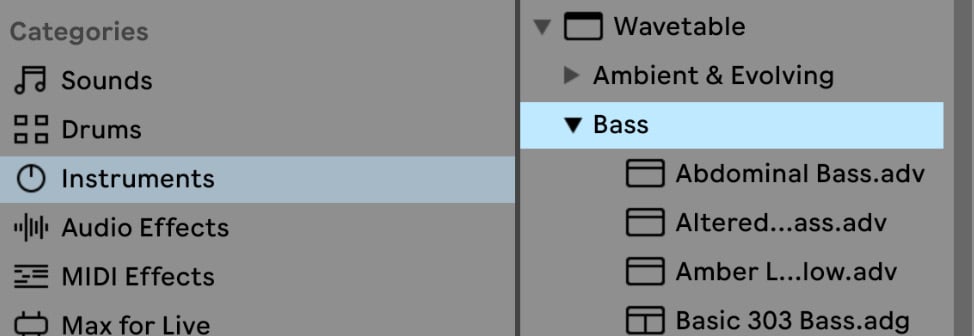
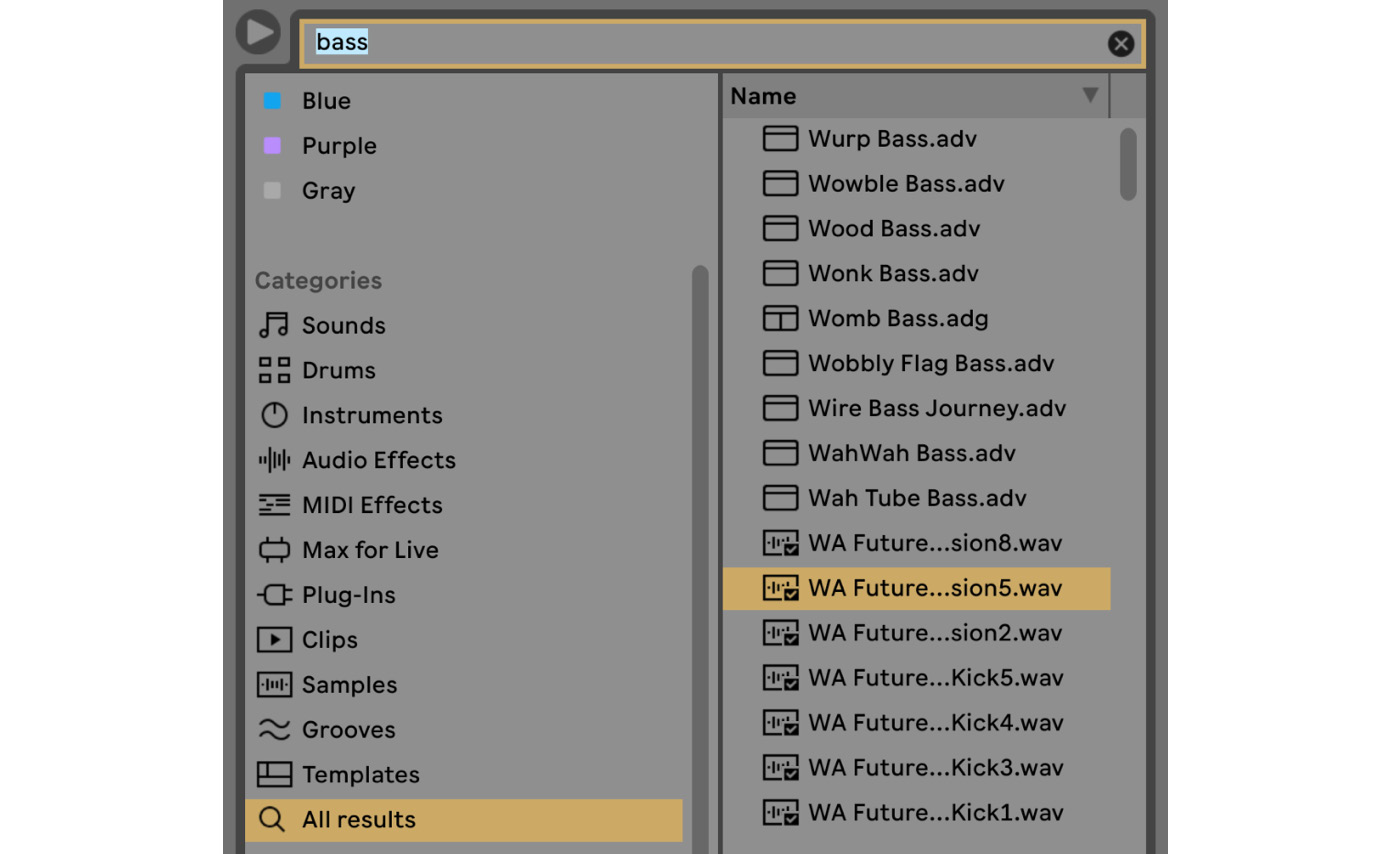
- Go to the browser and navigate to Samples.
- Type
drum into the search bar and find a drum loop.
- Preview a few loops until you find something decent.
- Drag and drop a drum loop from the browser to an empty clip slot on an empty audio track.
- Make sure the Global Quantize setting is set to 1 Bar.
- Now, launch the clip with the launch button on the clip slot.
- Once you have heard it play through, at any time, press on the stop button underneath an empty clip slot.
You should hear that the loop playback stopping is synced to your tempo at the next bar.
Clip Stop button and Track Status Display
Here, you will also find another Clip Stop button, which if you press will stop the playback of the currently triggered clip of the track (Figure 1.15(2)). Now, if you’re wondering why we need multiple stop buttons, well, just imagine a simple scenario. What if there are no more empty clip slots displayed in Session View? You might still need to stop the playback on that track. So, you can use this Clip Stop button, which is always displayed and available.
The Track Status Display will show you the status of your currently triggered clip.
This is super useful as you will be able to see when the clip that you triggered is about to end so you can trigger the next clip at the right time.
In and Out section
This is where you can route your inputs and outputs for both MIDI and audio on the tracks (Figure 1.15(3)). This is also where you can set up input monitoring. There's more on this in Chapter 2, Recording Audio in Ableton Live 11.
Sends section
You can use this section to send the signal to a return track for parallel processing. We will come back to this in later chapters of this book (Figure 1.15(4)).
Mixer section
Here, you will find the Track Volume Fader, the Meter, Track Pan, the Track Activator (which you might know as “mute”), the Solo button, and the Arm (record enable) button (Figure 1.15(5)).
Track Delay, Crossfade Assign, and CPU Load Meter
Track Delay (Figure 1.15(6)) allows you to pre-delay or delay the track output.
With Crossfade Assign, you You could actually set up Live for Djing, mimicking two decks. You could have one track that you assign as Deck A and another track that you assign as Deck B. The crossfade setting to transition between the two “decks” can be found in the same section but on the Master track. If the track isn’t assigned to any “decks,” the crossfade has no effect.
CPU Load Meter allows you to display how much CPU an individual track is consuming. This is super useful when you start experiencing audio dropouts due to CPU overload as you can easily find which track is contributing most to the dropouts and deal with it.
Hide Show section
You can customize what you are displaying by hiding some of the previously listed controls (Figure 1.15.(7)). You can hide and show the I/O, sends, returns, the mixer, Track Delay, crossfade, and track CPU metering.
Return Tracks
You can have up to 16 Return Tracks in Live Suite (Figure 1.15(8)). When you create a new Return Track, the corresponding Send will be created on the tracks. This is a concept that you might come across in other DAWs, Return Tracks popularly being called as AUXes and the Sends “Buses.”
I/O on the Master track
Let’s look at Figure 1.15(9). I wanted to talk about this separately so we can discuss the Cue. Again, this is something that can be extremely useful for performing. We will come back to this when we look at live performances later in this book, but since you use the Cue to control the output of the browser’s Preview function, it is important to know about it. You can route out the Master to, for example, your speakers, which are your main outputs, but you can also route out the Cue to a separate pair of outputs. Besides the Preview of the browser, you can decide whether you want to hear other tracks in the Cue too. Once you have sorted the routing, then you can click on the Cue button. This will turn the Solo buttons on the tracks into little headphone buttons, which will send the tracks into the Cue when you select them. You can then switch it back to Solo when you want to. See Figure 1.17. We will come back to Cue again in Chapter 15, Playing Live.
Figure 1.17 – Cue and Solo buttons
Scenes, Scene Tempo, and Scene Time Signature
Let’s look at Figure 1.15(10). Scenes represent a selection of clips across all the tracks. Take a look at Figure 1.18.
Figure 1.18 – Scene
You will see that we have three different scenes. The first one was renamed Intro (you can right-click (Ctrl + click for Windows) on a Scene and choose the Rename option, or select the Scene and press (Cmd + R (Ctrl + R for Windows) and type in the name) and it only has one clip to play back on the Ambient Enco track. The next Scene, named Intro pt2, has three different clips across three different tracks to be played back, and the Verse Scene has even more. When you press the Launch button on the Scene, it will launch all the clips that are part of that Scene. This is how you will be able to progress your ideas into some sort of structure before moving to Arrangement View. Or you can structure a live performance where you will be launching clips, scenes to have a little jam session.
But how do we create these Scenes?
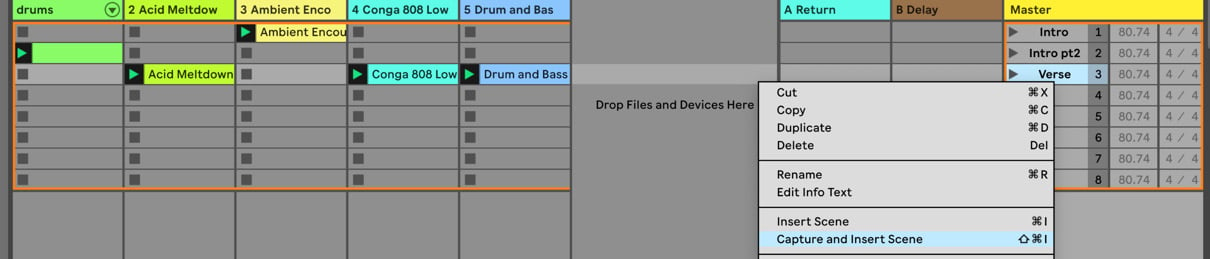
Well, you can use a simple copy-paste technique to insert the clips into the clip slots to form scenes, or you can do the following. If you have clips in Session View that you you have launched and you would like to form a Scene out of these triggered clips you can simply Ctrl + click (right-click for Windows) on the last engaged Scene and chose Capture and Insert Scene from the contextual menu (Figure 1.19):
Figure 1.19 – Capture and Insert Scene
This will form a brand-new Scene, including all the clips that were launched across multiple Scenes (Figure 1.20).
Figure 1.20 – Brand-new Scene formed after selecting the Capture and Insert Scene option
You can always copy and paste or duplicate previous Scenes (see from the contextual menu in Figure 1.19) in order to add a new clip from an additional track to the copied or duplicated Scene to progress your ideas/track.
We will be working in Session View quite a bit throughout this book, so you will get to understand the full potential of this workflow!
Scenes can represent a part of your track, but when you are preparing a Set for a live performance, sometimes a Scene will represent full tracks. For example, Scene 1 will hold all the elements of Track 1, and Scene 2 will hold all the elements of Track 2. The two tracks you are performing might have totally different tempos. Obviously, you wouldn’t want to spend time on stage typing in the tempo of the next Scene/track. You would essentially want the Scene to switch to the appropriate tempo for the track when you trigger it. This is exactly why there is the option to enter the tempo separately for each Scene. This works the same for time signature changes too; each Scene can have its own Scene Time Signature.
Even in production, sometimes you might want to switch things up with a cheeky tempo change, such as dropping to half-time after the breakdown and then going back to the original tempo in the next section, or having a lovely middle-8 with a time signature change. Being able to change the tempo for each Scene will enable you to do these kinds of things.
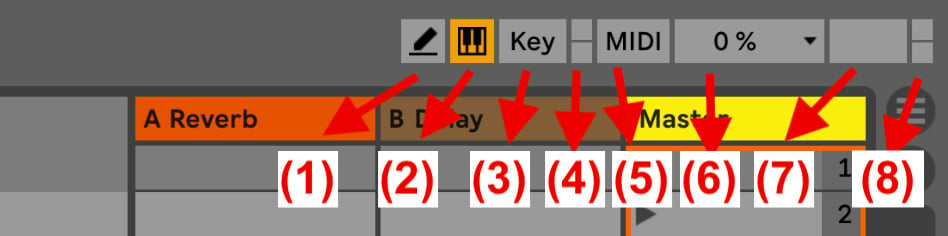
Stop All Clips, Enable Follow Actions Globally, and Back to Arrangement
Let’s have a look at what functions we can access on Figure 1.15(11).
The Stop All Clips button will globally stop playing back all clips in Session View.
The Enable Follow Action Globally button allows you to enable Follow Action. Follow Action is a rather large topic. We will be looking at it in Chapter 13, Exploring Tempo Follower, Follow Action, Max for Live, Working with Video, and Ableton Note.
We then have the Back to Arrangement button. This is the right time to start talking about Arrangement View. A pretty standard workflow can be that you start laying down your ideas in Session View’s non-linear loop-based environment, where you can focus on playing live and quickly capturing your idea without worrying abot the timline.. But eventually, you will want to move into Arrangement View to form a full arrangement in a linear environment where you can just press play at the beginning of the track and it will play through from left to right. The Arrangement View is also where you would do your micro-edits and add additional ear candy. Once you’ve done that, move your clips to Arrangement View; the original clips you started out with will still remain in Session View too. When any clips in Session View are triggered, the Back to Arrangement button will light up to indicate that you aren’t playing back your arrangement in Arrangement View (Figure 1.21). If you press this orange button, Live will only play back whatever is supposed to be playing in Arrangement View. So, you can only play back a given track in either Arrangement View or Session View; otherwise, you would have some serious chaos.
Figure 1.21 – Back to Arrangement button
If you don’t know already, I am sure you are dying to know how to get the clips and Scenes from Session View into Arrangement View. Hold your horses; we will get to that a little later!
Arrangement View and Session View selectors
Let’s have a look at the preceding functions shown in Figure 1.15(12).
So, you have probably figured out by now that the Ableton logo is actually made out of the symbols of Session View and Arrangement View. Pretty amazing, eh?
If you press one of these buttons (in the top-right corner of the screen below the CPU Load Meter), it will switch between the two views. There is another, perhaps more convenient, way to toggle between the views, by simply pressing the Tab key on your computer keyboard.
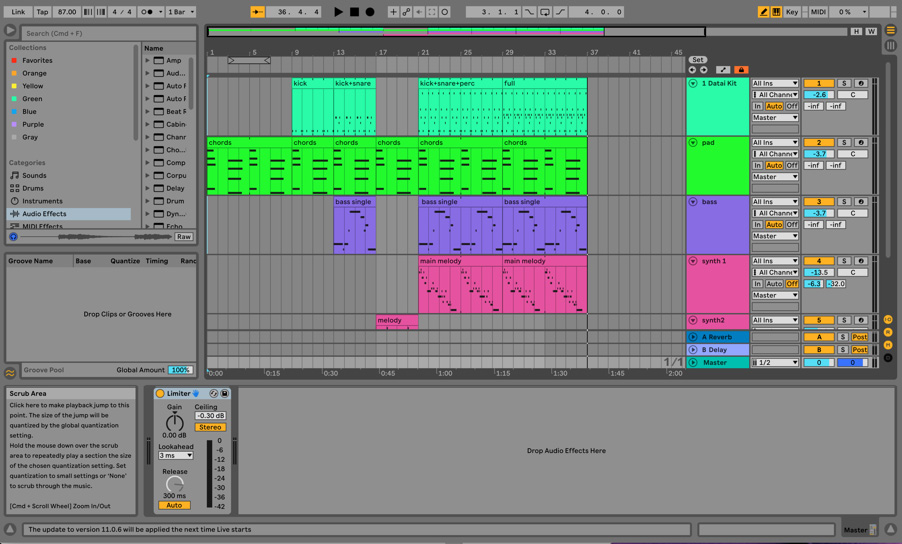
So, let’s click the Arrangement View selector and take a look at Arrangement View (Figure 1.22)!
Figure 1.22 – Arrangement View
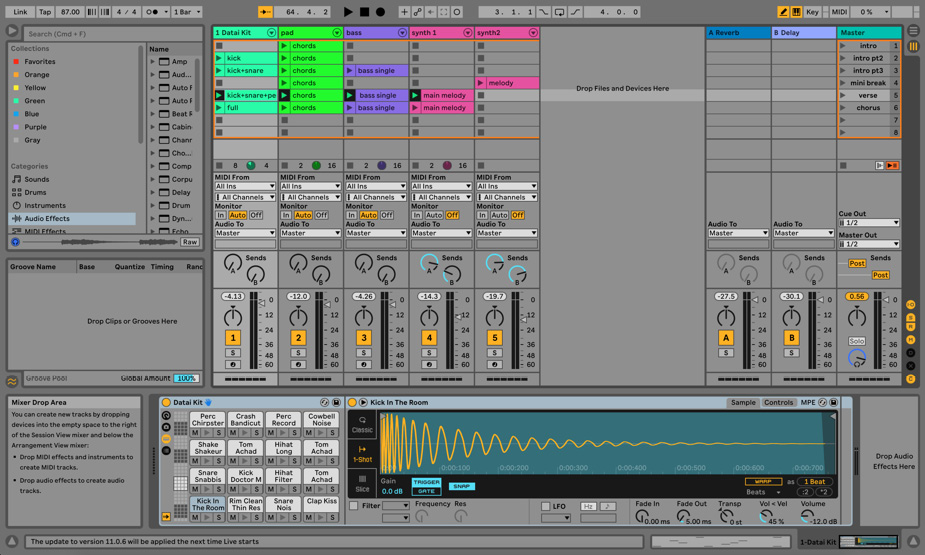
Now, I want you to look at Figure 1.22 and Figure 1.23. Hopefully, you have clocked that the tracks are the same in both views, just in a non-linear manner and a linear manner. The elements of this track were composed in Session View and then the Scenes were transferred into Arrangement View, where the idea can be further developed.
Figure 1.23 – Session View
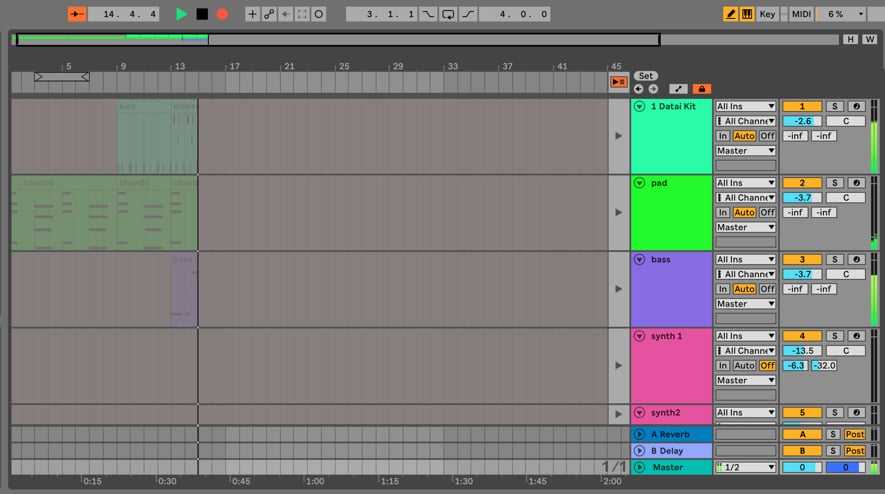
You can get your clips and Scenes into Arrangement View from Session View by either simply copy-pasting them or actually recording them in real time into Arrangement View by pressing the Arrangement Record button in the Control Bar and launching the Scenes or clips. You are basically jamming out your arrangement and capturing it in real time (Figure 1.24)!
Figure 1.24 – Capturing an arrangement in real time
This is something that we are going to cover in depth in Chapter 10, Utilizing Arrangement and Organization Techniques in Our Ableton Live Project.
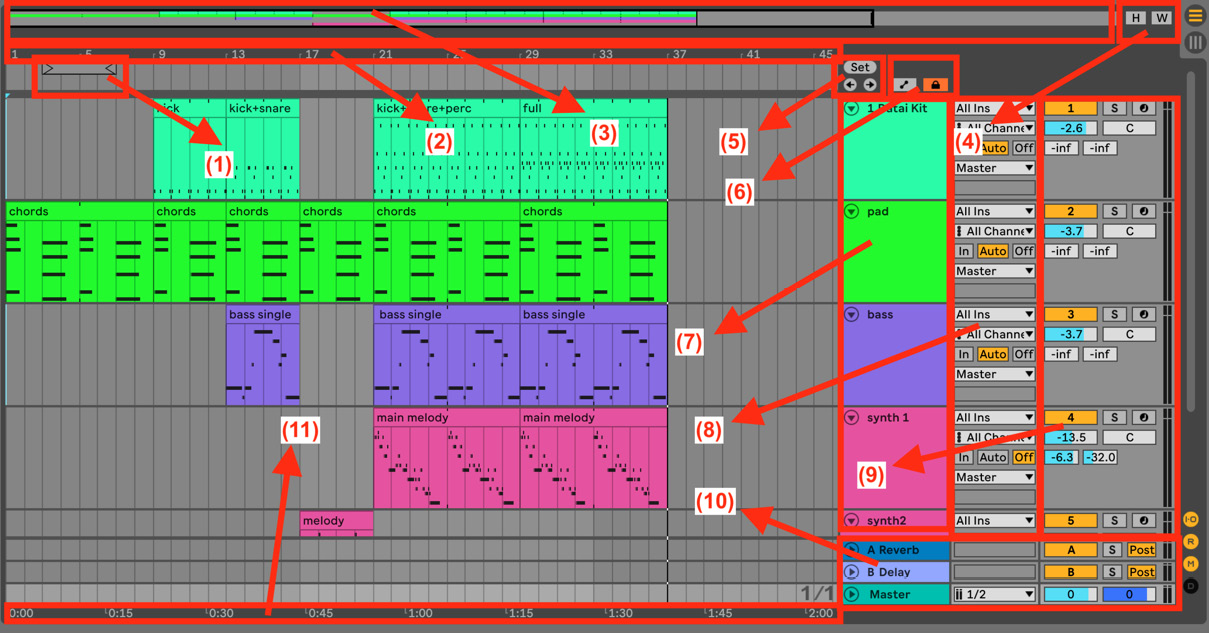
Arrangement View
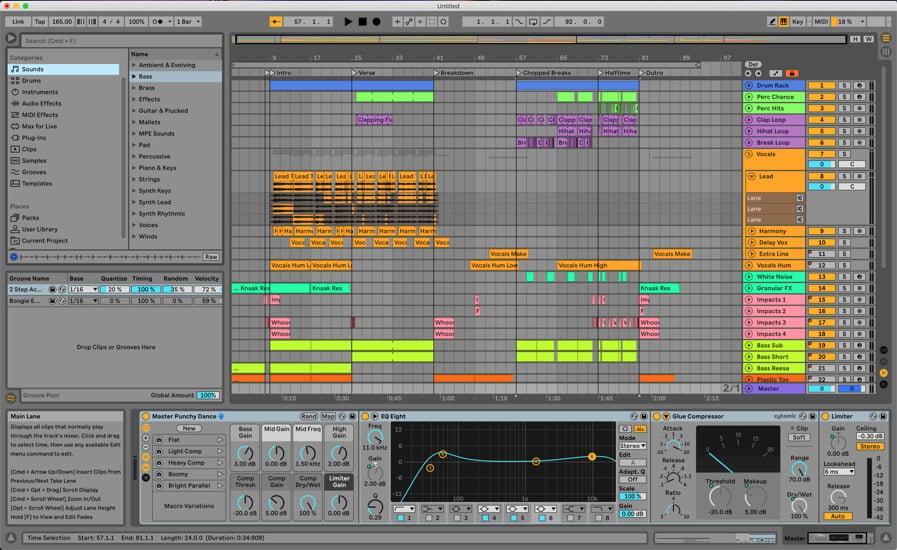
Figure 1.25 – Arrangement View
For now, we are going to quickly explore the controls in Arrangement View.
- Figure 1.25(1) shows Loop/Punch-Recording Region. You can drag left and right to extend this selection.
- Figure 1.25(2) shows Beat-Time Ruler. If you hover your mouse over this area and start dragging up and down, it will allow you to zoom in and out. Alternatively, if you click into the clip area, you can use the - and + symbols to zoom in and out. You can also move your mouse left and right over this area in order to scroll over the timeline.
- Figure 1.25(3) shows Clip Overview/Zooming Hot-Spot. You can resize this view by dragging the view’s edge up and down, just like the majority of the areas in Live. This view will give you an overview of the clips in your timeline.
- Figure 1.25(4) shows Optimize Arrangement Height and Width. If you click on these, the tracks’ height and width will be optimized so they can fit into Arrangement View.
- Figure 1.25(5) shows Set/Delete Locator, Previous, and Next Locator. These buttons will allow you to create and delete locators to organize your arrangement’s structure, and also navigate between them.
- Figure 1.25(6) shows Automation Mode and Lock Envelopes. These switches will enable you to display the automation lanes for all tracks or the track content, as well as be able to copy clips without or with their automation.
- Figure 1.25(7) shows Track Name.
- Figure 1.25(8) shows In/Out Section. This is the same as in Session View; here is where you can perform signal routing and choose monitoring options.
- Figure 1.25(9) shows Mixer Section. Again, the same as in Session View, the only difference being the design of the parameter controls. Instead of a pan pot, fader, and send pots, you can see sliders here, but they control the same parameters.
- Figure 1.25(10) shows Return Tracks and Master. Once again, they are the same tracks that you see in Session View, but they will always be placed at the bottom of the screen permanently.
- Figure 1.25(11) shows Time Ruler.
Of course, there will be times when you go straight to Arrangement View to start a project and do not use Session View. In this case, just like in Session View, you can drag and drop media from the browser to the appropriate track, but this time not to a clip slot but into the timeline.
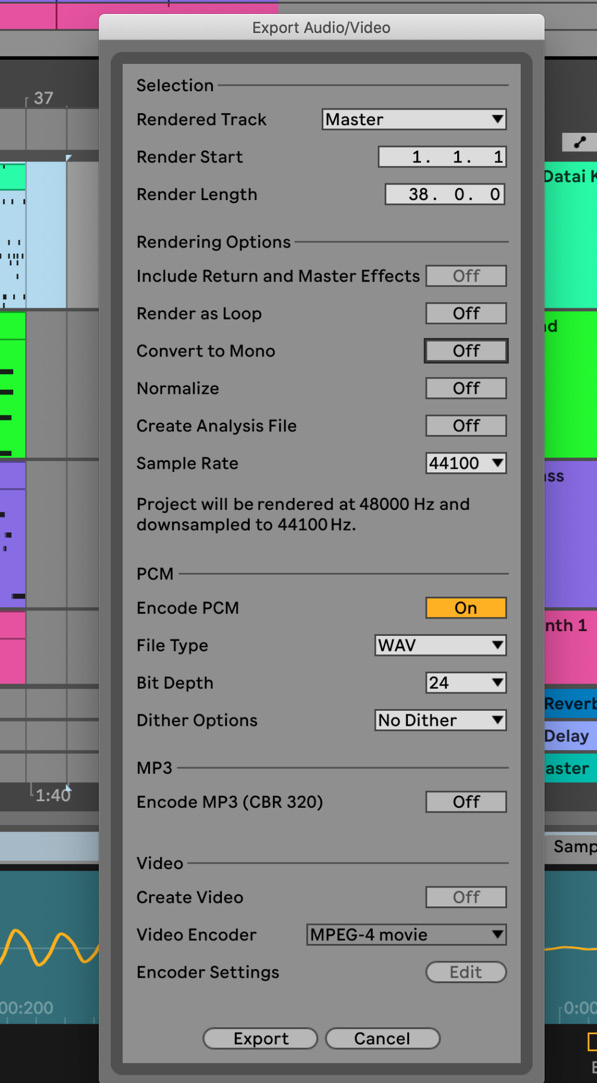
Now, you should feel more comfortable with Live 11’s interface. In the next section, we are going to look at how we can export audio out of Live, save our work, and use templates before we can dive in and start making music.
 Argentina
 Australia
 Austria
 Belgium
 Brazil
 Bulgaria
 Canada
 Chile
Chile
 Colombia
 Cyprus
 Czechia
 Denmark
 Ecuador
 Egypt
Egypt
 Estonia
 Finland
 France
 Germany
 Great Britain
 Greece
 Hungary
 India
India
 Indonesia
 Ireland
 Italy
Italy
 Japan
Japan
 Latvia
 Lithuania
 Luxembourg
 Malaysia
 Malta
Malta
 Mexico
 Netherlands
 New Zealand
 Norway
 Philippines
 Poland
 Portugal
 Romania
 Russia
 Singapore
 Slovakia
 Slovenia
 South Africa
 South Korea
 Spain
Spain
 Sweden
 Switzerland
 Taiwan
 Thailand
 Turkey
 Ukraine
 United States