


Working with animations
Animation is essential for adding life and richness to a game. Superb animations are one of the major factors that differentiate average games from the good and the great from the best. Visual fidelity is what keeps gamers excited and immersed in games, and hence animations are a core part of all games and experiences created in Unreal Engine.
Note
This chapter seeks to cover animation basics. A more in-depth approach to animation will be taken in Chapter 11, Working with Blend Space 1D, Key Bindings, and State Machines
Animation Blueprints
An Animation Blueprint is a specific kind of blueprint that allows you to control the animation of a Skeletal Mesh. It provides users with a graph specifically for animation-related tasks. Here, you can define the logic for computing the poses of a skeleton.
Note
A Skeletal Mesh is a skeleton-based mesh that contains bones, all of which come together to give form to the mesh, whereas a Static Mesh (as the name suggests) is an un-animatable mesh. Skeletal Meshes are normally used for characters and life-like objects (for example, a player hero), whereas Static Meshes are used for basic or lifeless objects (for example, a wall).
Animation Blueprints provide two kinds of graphs: EventGraph and AnimGraph.
Event Graph
The Event Graph within an Animation Blueprint provides setup events related to animations, as we learned in Chapter 1, Introduction to Unreal Engine, that can be used for variable manipulation and logic. Event graphs are mostly used within Animation Blueprints to update Blend Space values, which, in turn, drive the animations within AnimGraph. The most common events that are used here are as follows:
Event Blueprint Initialize Animation: Used to initialize the animation.Event Blueprint Update Animation: This event is executed every frame, allowing developers to perform calculations and update its values as required:
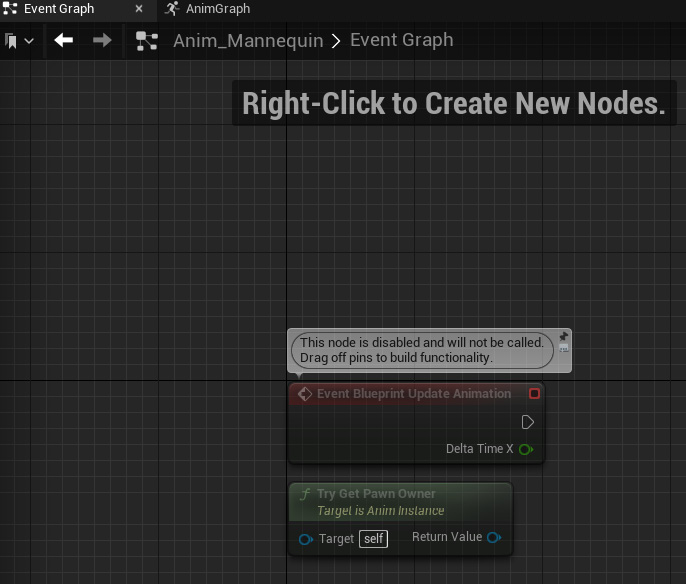
Figure 2.23 – Animation Event Graph
In the preceding screenshot, you can see the default Event Graph. The Event Blueprint Update Animation and Try Get Pawn Owner nodes are here. You created new nodes and appended them to a graph to complete some meaningful tasks in Exercise 2.04 – setting up the Game Mode, Player Controller, and Pawn classes.
The Anim Graph
The Anim Graph is dedicated to and responsible for playing animations and outputting the final pose of the skeleton on a per-frame basis. It provides developers with special nodes to execute different logic. For example, the Blend node takes in multiple inputs and is used to decide which input is currently being used in the execution. This decision is usually dependent on some external input (such as an alpha value).
The Anim Graph works by evaluating nodes by following the flow of execution between the exec pins on the nodes being used.
In the following screenshot, you can see a single Output Pose node on the graph. This is the final pose output of the animation that will be visible on the relevant Skeletal Mesh within the game. We will be using this in Exercise 2.05 – creating a mannequin animation:
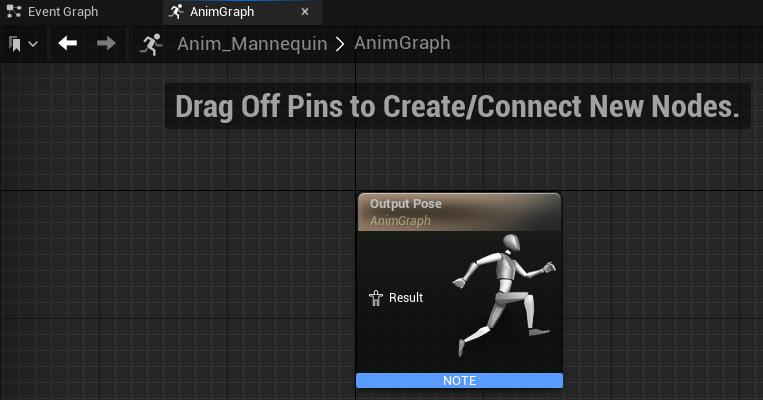
Figure 2.24 – Animation AnimGraph
State Machines
You have already learned how animation nodes and logic can be set up, but one essential component is missing. Who decides when a particular animation or piece of logic should play or execute? This is where State Machines come into the picture. For example, a player may need to shift from crouching to a standing pose, so the animation needs to be updated. The code will call the Animation Blueprint, access the State Machine, and let it know that the state of the animation needs to be changed, resulting in a smooth animation transition.
A State Machine consists of states and rules that can be thought of as depicting the state of an animation. A State Machine can always be in one state at a particular time. A transition from one state to another is carried out when certain conditions (which are defined by rules) are met.
Transition Rules
Each Transition Rule contains a Boolean node called Result. If the Boolean is true, the transition can occur and vice versa:
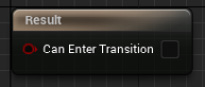
Figure 2.25 – Transition Rules
Blend Spaces
When you’re provided with a bunch of animations, you can create a State Machine and run those animations. However, a problem is presented when you need to transition from one animation to another. If you simply switch the animation, it will glitch since the new animation’s starting pose might be different from the old animation’s ending pose.
Blend Spaces are special assets that are used to interpolate between different animations based on their alpha values. This, in turn, removes the glitch issue and interpolates between the two animations, causing a swift and smooth change in animation.
Blend Spaces are created either in one dimension, known as a Blend Space 1D, or two dimensions, known as a Blend Space. These blend any number of animations based on one or two input(s), respectively.
Exercise 2.05 – creating a mannequin animation
Now that you’ve gone through most of the concepts related to animations, we’ll be diving in hands-on by adding some animation logic to the default mannequin. We’ll be creating a Blend Space 1D, a State Machine, and Animation logic.
Our goal here is to create a running animation of our characters and thus gain insight into how animations work, as well as the way they are bound to the actual character in a 3D world.
Follow these steps to complete this exercise:
- Download and extract all the contents of the
Chapter02|Exercise2.05|ExerciseFilesdirectory, which can be found on GitHub. You can extract this to any directory you’re comfortable with using on your machine.
Note
The ExerciseFiles directory can be found on GitHub at the following link: https://github.com/PacktPublishing/Elevating-Game-Experiences-with-Unreal-Engine-5/tree/main/Chapter02/Exercise2.05.
- Double-click the
CharAnim.uprojectfile to start the project. - Press Play. Use the keyboard’s W, A, S, and D keys to move and the spacebar to jump. Notice that, currently, there are no animations on the mannequin.
- In the
Contentfolder, browse toContent|Mannequin|Animations. - Right-click the
Contentfolder and, from theAnimationsection, selectBlend Space 1D. - Select
UE4_Mannequin_Skeleton. - Rename the newly created file
BS_IdleRun. - Double-click
BS_IdleRunto open it. - Under the Asset Details tab, inside the Axis Settings section, expand the Horizontal Axis section and set Name to
Speedand Maximum Axis Value to375.0:
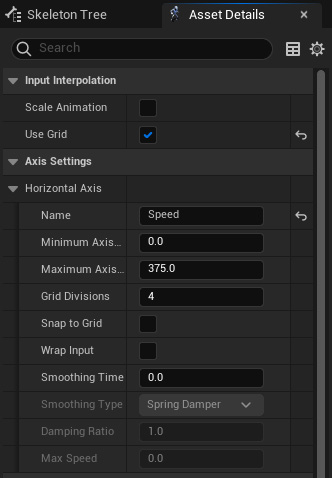
Figure 2.26 – Blend Space 1D – Axis Settings
- Go to the Sample Interpolation section and set Target Weight Interpolation Speed Per Sec to
5.0. - Drag and drop the
ThirdPersonIdle,ThirdPersonWalk, andThirdPersonRunanimations into the graph separately:
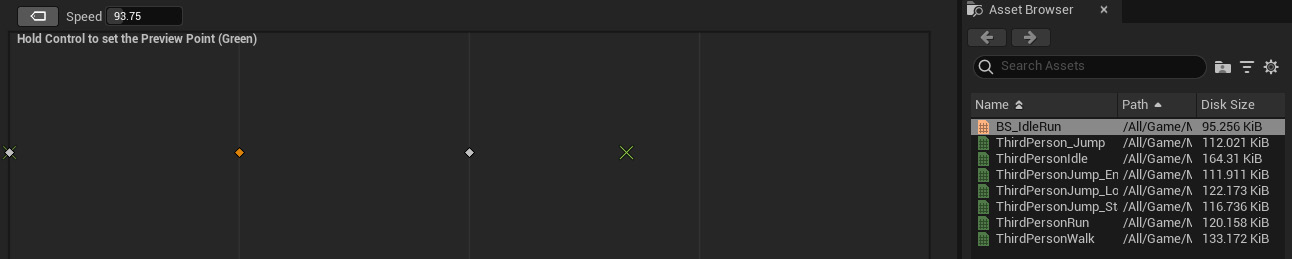
Figure 2.27 – Blend Space previewer
- In the Asset Details tab, under Blend Samples, set the following variable values:
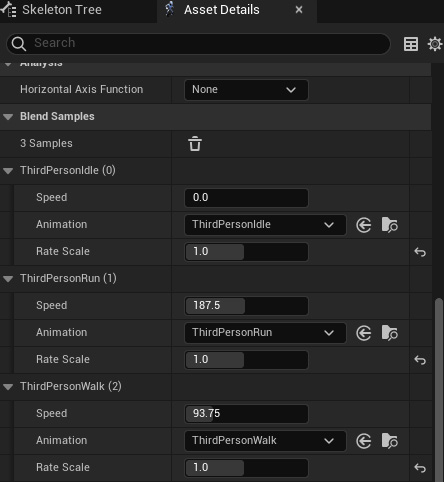
Figure 2.28 – Blend Samples
- Click Save and close this Asset.
- Right-click inside the
Contentfolder and, from the Animation section, selectAnimation Blueprint. - In the Target Skeleton section, select
UE4_Mannequin_Skeletonand then click the OK button:
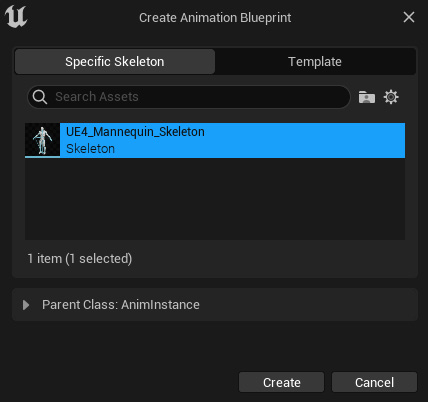
Figure 2.29 – Creating the Animation Blueprint asset
- Name the file
Anim_Mannequinand press Enter. - Double-click the newly created
Anim_Mannequinfile. - Next, go to the Event Graph tab.
- Create a
booleanvariable calledIsInAir?by clicking the + icon in the variable section on the bottom left-hand side. Be sure to assign the proper type:
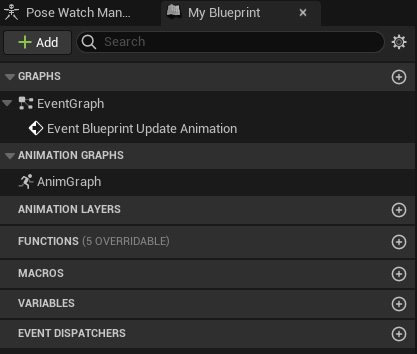
Figure 2.30 – Adding variables
- Create a float variable called
Speed. - Drag off the
Try Get Pawn Ownerreturn value node and typeIs Valid. Select the bottom one:
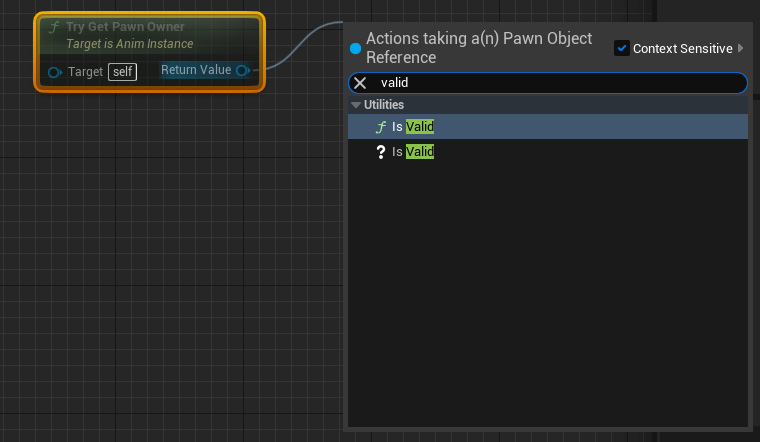
Figure 2.31 – Event Graph Is Valid node
- Connect the
Execpin from theEvent Blueprint Update Animationnode to theIs Validnode:
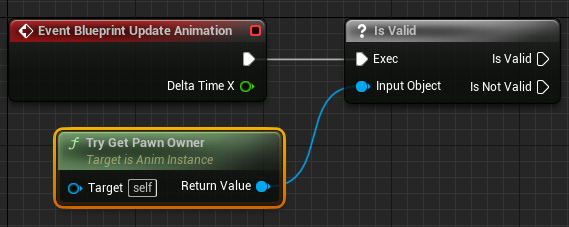
Figure 2.32 – Connecting nodes
- From the
Try Get Pawn Ownernode, use theGet Movement Componentnode. - From the node obtained in step 22, get the
Is Fallingnode and connect the Boolean return value to a set node for theIs in Air?Boolean. Connect theSETnode exec pin to theIs Validexec pin:

Figure 2.33 – Is in Air Boolean setup
- From the
Try Get Pawn Ownernode, use theGet Velocitynode, get itsVectorLength, and connect the output to theA Variable Setnode ofSpeed:
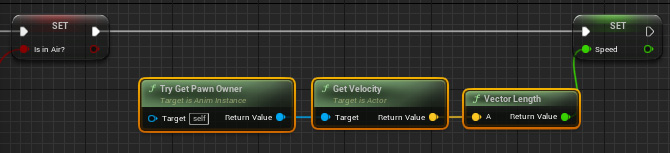
Figure 2.34 – Speed Boolean setup
- Next, go to the Anim Graph tab.
- Right-click anywhere inside Anim Graph, type
state machine, and click on Add New State Machine:
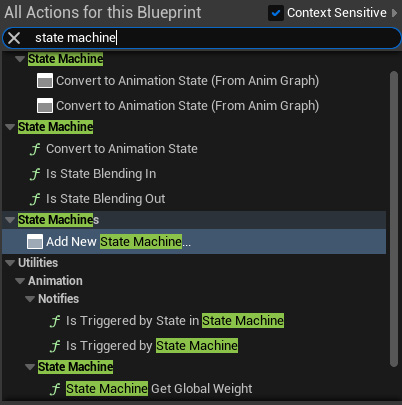
Figure 2.35 – The Add New State Machine option
- Make sure that the node is selected and press F2 to rename it
MannequinStateMachine. - Connect the output pin of
MannequinStateMachineto the input pin of theOutput Posenode and click the compile button on the top bar:
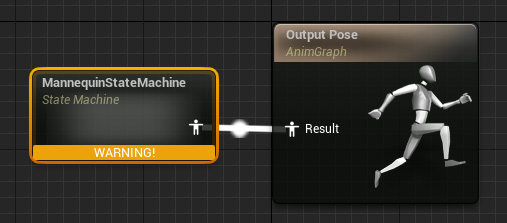
Figure 2.36 – Configuring the State Machine result in the Output Pose node
- Double-click the
MannequinstateMachinenode to enter the State Machine. You will see anEntrynode. The state that will be connected to it will become the default state of the mannequin. In this exercise, this will be ourIdle Animation. - Right-click on an empty area inside the State Machine and, from the menu, select Add State. Press F2 to rename it
Idle/Run. - Drag from the icon next to the
Entrytext, point it inside theIdle/Runnode, and then release it to connect it:
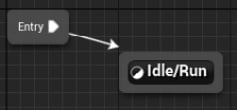
Figure 2.37 – Connecting Added State to Entry
- Double-click on the
Idle/Runstate to open it. - From the Asset Browser menu in the bottom-right corner, select and drag the
BS_IdleRunanimation onto the graph. Get theSpeedvariable from the Variable section on the left and connect it, as shown here:
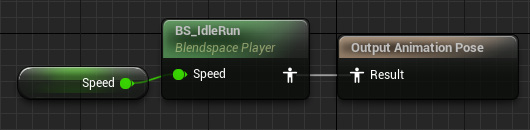
Figure 2.38 – Idle/Run state setup
- Head back to
MannequinStateMachineby clicking on its breadcrumb in the top banner:

Figure 2.39 – State Machine navigation breadcrumb
- From the Asset Browser menu, drag and drop the
ThirdPersonJump_Startanimation into the graph. Rename itJump_Start. - Repeat step 35 for
ThirdPersonJump_LoopandThirdPerson_Jumpand rename themJump_LoopandJump_End, respectively:
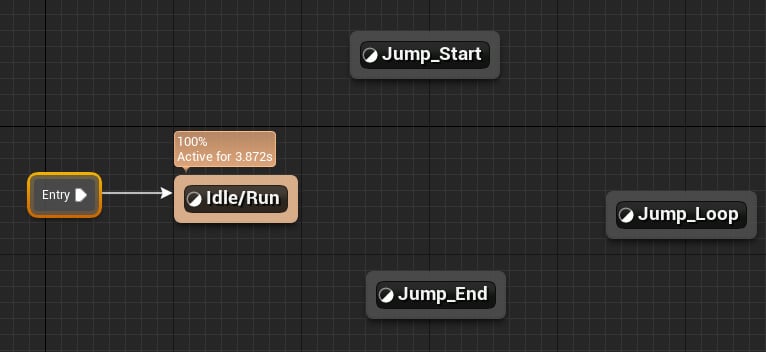
Figure 2.40 – State setup
- Open the
Jump_Startstate. Click on thePlay ThirdPersonJump_Startnode. UncheckLoop Animationin theSettingssection. - Open the
Jump_Loopstate and click on thePlay ThirdPersonJump_Loopnode. SetPlay Rateto0.75. - Open the
Jump_Endstate and click on thePlay ThirdPerson_Jumpnode. Uncheck theLoop AnimationBoolean. - Since we can shift from
Idle/RuntoJump_Start, drag from theIdle/Runstate and drop it to theJump_Startstate. Similarly,Jump_Startleads toJump_Loop, then toJump_End, and finally back toIdle/Run.
Drag and drop the arrows to set up the State Machine, as follows:
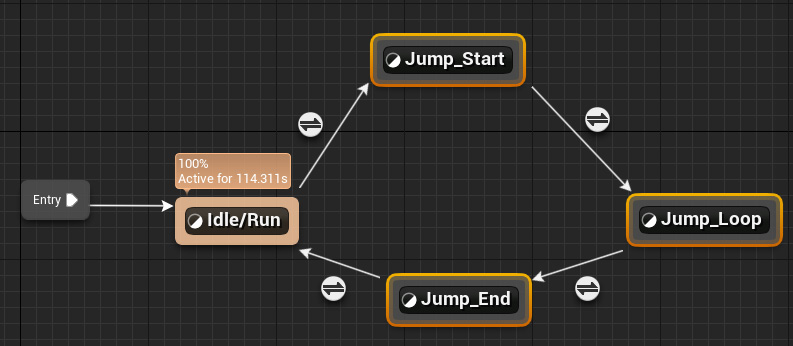
Figure 2.41 – State connections
- Double-click the
Idle/RuntoJump_Starttransition rule icon and connect the output of theIs in Air?variable to the result:
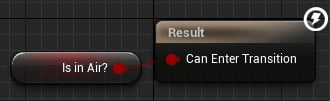
Figure 2.42 – Idle/Run to Jump_Start transition rule setup
- Open the
Jump_StarttoJump_Looptransition rule. Get theTime Remaining (ratio)node forThirdPersonJump_Startand check whether it is less than0.1. Connect the resulting bool to the result:

Figure 2.43 – Jump_Start to Jump_End transition rule setup
- Open the
Jump_LooptoJump_Endtransition rule. Connect the output of the inverse of theIs in Air?variable to the result:

Figure 2.44 – Jump_Loop to Jump_End transition rule setup
- Open the
Jump_EndtoIdle/Runtransition rule. Get theTime Remaining (ratio)node forThirdPerson_Jumpand check whether it is less than0.1. Connect the resulting bool to the result:

Figure 2.45 – Jump_End to Idle/Run transition rule setup
- Close the Animation Blueprint.
- In the
Contentfolder, browse toContent|ThirdPersonBP|Blueprintsand open theThirdPersonCharacterBlueprint. - Select
Meshin the Components tab:
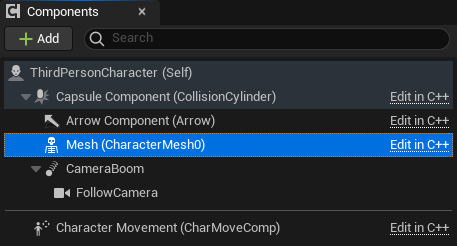
Figure 2.46 – The Mesh component
- In the Details tab, set Anim Class to the
Animation Blueprintclass that you created:
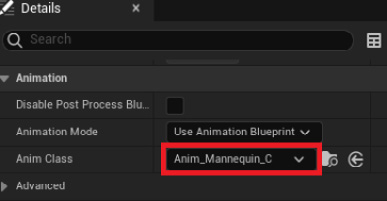
Figure 2.47 – Specifying the Animation Blueprint in the Skeletal Mesh component
- Close the Blueprint.
- Play the game again and notice the animations.
You should have achieved the following output. As you can see, our character is running, and the running animation is being shown:
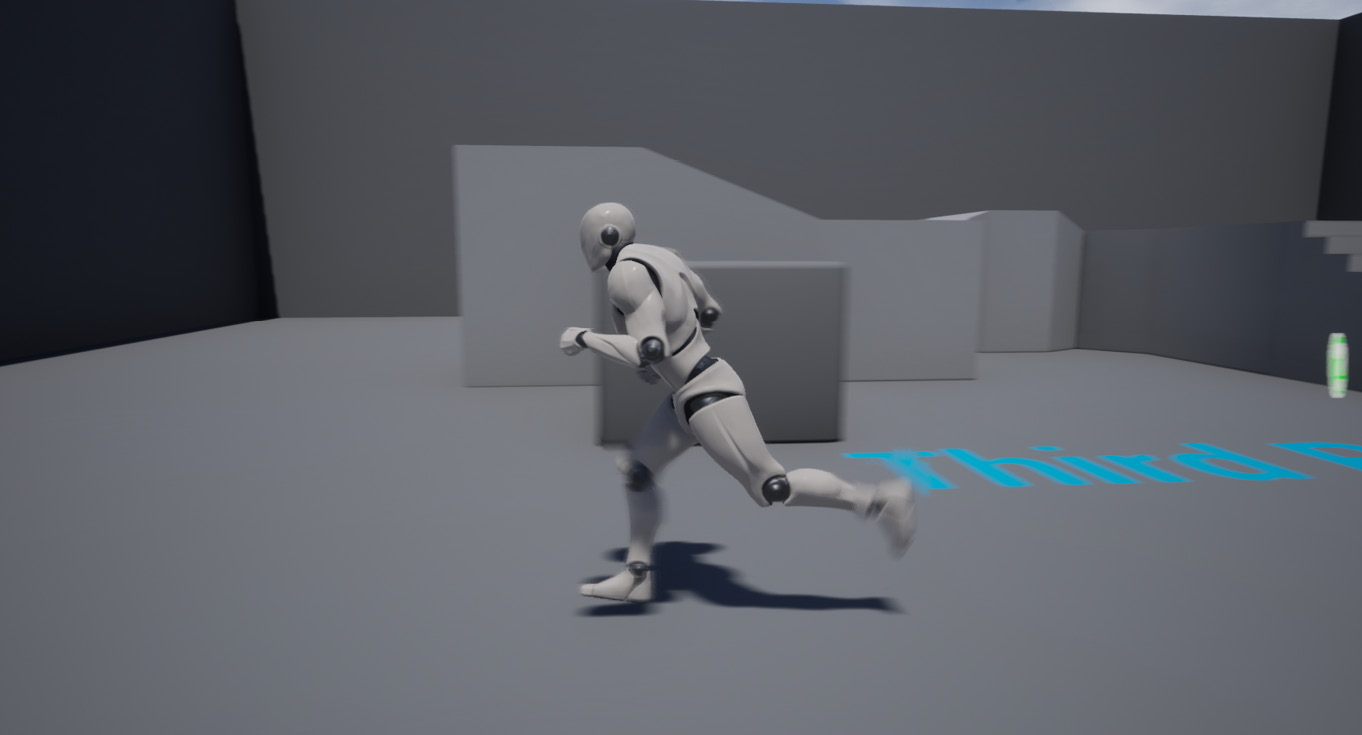
Figure 2.48 – Character running animation
Note
You can find the complete exercise code files on GitHub, in the Chapter02 | Exercise2.05 | Ex2.05-Completed.rar directory at https://packt.live/3kdIlSL.
After extracting the .rar file, double-click the .uproject file. You will see a prompt asking Would you like to rebuild now?. Click Yes on that prompt so that it can build the necessary intermediate files, after which it should open the project in Unreal Editor automatically.
By completing this exercise, you’ve understood how to create State Machines, a Blend Space 1D, an Animation Blueprint, and how to tie it all together with the Skeletal Mesh of a character. You’ve also worked on play rates, transitional speed, and the transitional states, helping you understand how the world of animation intricately ties in together.
We kicked off this section by understanding how State Machines are used to represent and transition in-between Animation States. Next, we learned how a Blend Space 1D gives us blending in-between those transitions. All this is used by the Animation Blueprint to decide what the current animation of the character is. Now, let’s combine all these concepts in an activity.
Activity 2.01 – linking animations to a character
Let’s say, as an Unreal games developer, you’ve been provided with a character Skeletal Mesh and its animations, and you’ve been tasked with integrating them inside a project. To do that, in this activity, you’ll be creating an Animation Blueprint, State Machines, and a Blend Space 1D of a new character. By completing this activity, you should be able to work with animations in Unreal Engine and link them to Skeletal Meshes.
This activity’s project folder contains a Third Person template project, along with a new character, Ganfault.
Note
This character and its animations were downloaded from mixamo.com. These have been placed in the Content |Ganfault folder of this book’s GitHub repository: https://packt.live/35eCGrk.
Mixamo.com is a website that sells 3D characters with animations and is sort of an asset marketplace for 3D models. It also contains a library of free models, alongside the paid ones.
Follow these steps to complete this activity:
- Create a Blend Space 1D for the Walking/Running animation and set up the Animation Blueprint.
- Next, go to
Content|ThirdPersonBP|Blueprintsand open theThirdPersonCharacterBlueprint. - Click the Skeletal Mesh component on the left and, inside the Details tab on the right, replace the
SkeletalMeshreference withGanfault. - Similarly, update the Animations Blueprint section of the Skeletal Mesh component with the Animation Blueprint you created for
Ganfault.
Note
For the State Machine, only implement Idle/Run and Jump State.
Once you’ve completed this activity, the Walk/Run and Jump animations should be working properly, as shown in the following output:
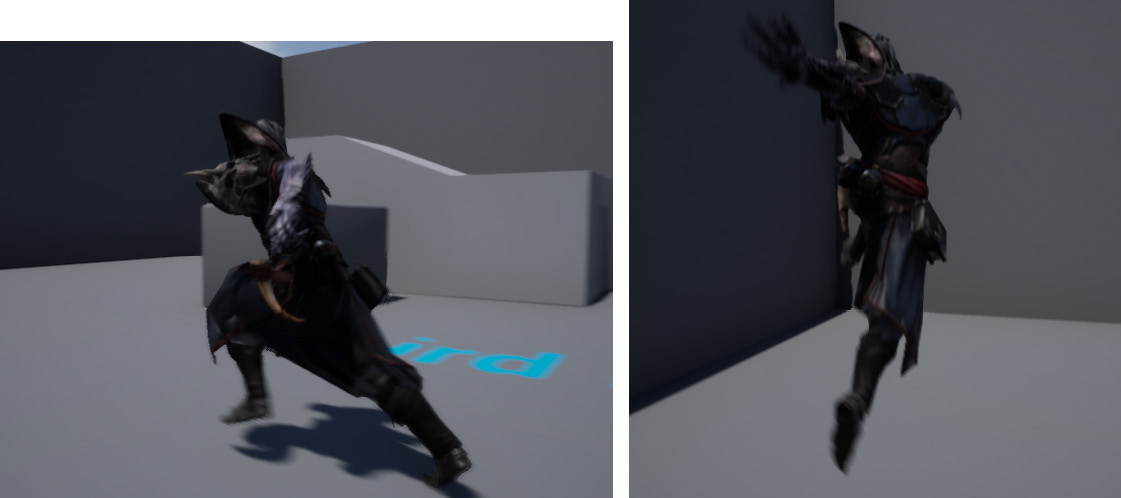
Figure 2.49 – Activity 2.01 expected output (left: Run; right: Jump)
Note
The solution to this activity can be found on GitHub here: https://github.com/PacktPublishing/Elevating-Game-Experiences-with-Unreal-Engine-5/tree/main/Chapter02/Activity2.01.
By completing this activity, you now know how to navigate Unreal Engine for the project, debug code, and work with animations. You also understand State Machines, which represent transitions between the Animation States and the Blend Spaces 1D that are used in that transition. You can now add animation to 3D models based on gameplay events and inputs.


