


Creating a portfolio in React
In this section, we will learn how to create a new React project using Create React App and add reusable React components and routing with react-router.
Creating a portfolio with Create React App
Having to configure Webpack and Babel every time we create a new React project can be quite time-consuming. Also, the settings for every project can change, and it becomes hard to manage all of these configurations when we want to add new features to our project.
Therefore, the React core team introduced a starter kit known as Create React App, which is currently at version 5. By using Create React App, we no longer have to worry about managing compile and build configurations, even when newer versions of React are released, which means we can focus on coding instead of configurations.
This section will show us how to create a React application with Create React App.
Before anything else, let's see how to install Create React App.
Installing Create React App
Create React App doesn't have to be installed globally. Instead, we can use npx, a tool that comes preinstalled with npm (v5.2.0 or higher) and simplifies the way that we execute npm packages:
npx create-react-app chapter-2
This will start the installation process for Create React App, which can take several minutes, depending on your hardware. Although we're only executing one command, the installer for Create React App will install the packages we need to run our React application. Therefore, it will install react, react-dom, and react-scripts, where the last package includes all the configurations for compiling, running, and building React applications.
If we move into the project's root directory, which is named after our project name, we will see that it has the following structure:
chapter-2
  |- node_modules
  |- package.json
  |- public
     |- index.html
  |- src
     |- App.css
     |- App.test.js
     |- App.js
     |- index.css
     |- index.js
Note
Not all files that were created by Create React App are listed; instead, only the ones used in this chapter are listed.
This structure looks a lot like the one we set up in the first chapter, although there are some slight differences. The public directory includes all the files that shouldn't be included in the compile and build process, and the files inside this directory are the only files that can be directly used inside the index.html file.
In the other directory, called src, we will find all the files that will be compiled and built when we execute any of the scripts inside the package.json file. There is a component called App, which is defined by the App.js, App.test.js, and App.css files, and a file called index.js, which is the entry point for Create React App.
If we open the package.json file, we'll see that four scripts have been defined: start, build, test, and eject. Since the last two aren't handled at this point, we can ignore these two scripts for now. To be able to open the project in the browser, we can simply type the following command into the command line, which runs package react-scripts in development mode:
npm start
Note
Instead of npm start, we can also run yarn start, as using Yarn is recommended by Create React App.
If we visit http://localhost:3000/, the default Create React App page will look as follows:

Figure 2.1 – The default Create React App boilerplate
Since react-scripts supports hot reloading by default, any changes we make to the code will result in a page reload. If we run the build script, a new directory called build will be created in the project's root directory, where the minified bundle of our application can be found.
With the basic installation of Create React App in place, we will start looking at creating the components for our project and styling them.
Building reusable React components
Creating React components with JSX was briefly discussed in the previous chapter, but in this chapter, we'll explore this topic further by creating components that we can reuse throughout our application. First, let's look at how to structure our application, which builds upon the contents of the previous chapter.
Structuring our application
Our project still consists of only one component, which doesn't make it very reusable. To begin, we'll need to structure our application in the same way that we did in the first chapter. This means that we need to split up the App component into multiple smaller components. If we look at the source code for this component in App.js, we'll see that there's already a CSS header element in the return function. Let's change that header element into a React component:
- First, create a new file called
Header.cssinside a new directory calledcomponentswithinsrcand copy the styling forclassNames,App-header,App-logo, andApp-linkinto it:.App-logo { height: 40vmin; pointer-events: none; } @media (prefers-reduced-motion: no-preference) { .App-logo { animation: App-logo-spin infinite 20s linear; } } .App-header { background-color: #282c34; min-height: 100vh; display: flex; flex-direction: column; align-items: center; justify-content: center; font-size: calc(10px + 2vmin); color: white; } .App-link { color: #61dafb; } @keyframes App-logo-spin { from { transform: rotate(0deg); } to { transform: rotate(360deg); } } - Now, create a file called
Header.jsinside this directory. This file should return the same content as the<header>element:import './Header.css'; function Header() { return ( <header className='App-header'> <img src={logo} className='App-logo' alt='logo' /> <p>Edit <code>src/App.js</code> and save to reload. </p> <a className='App-link' href='https://reactjs.org' target='_blank' rel='noopener noreferrer' > Learn React </a> </header> ); } export default Header; - Import this
Headercomponent inside yourAppcomponent and add it to thereturnfunction:+ import Header from './components/Header'; import './App.css'; import logo from './logo.svg'; function App() { return ( <div className="App"> - <header className='App-header'> - <img src={logo} className='App-logo' alt='logo' /> - <p>Edit <code>src/App.js</code> and save to reload. </p> - <a - className='App-link' - href='https://reactjs.org' - target='_blank' - rel='noopener noreferrer' - > - Learn React - <a> - </header> + <Header /> </div> ); } export default App;
The styles for the header need to be deleted from App.css. This file should only contain the following style definitions:
.App {
  text-align: center;
}
.App-link {
  color: #61dafb;
}
When we visit our project in the browser again, we'll see an error saying that the value for the logo is undefined. This is because the new Header component can't reach the logo constant that's been defined inside the App component. From what we learned in the first chapter, we know that this logo constant should be added as a prop to the Header component so that it can be displayed. Let's do this now:
- Send the
logoconstant as a prop to theHeadercomponent insrc/App.js:// ... function App() { return ( <div className='App'> - <Header /> + <Header logo={logo} /> </div> ); } } export default App; - Get the
logoprop so that it can be used by theimgelement as ansrcattribute insrc/components/Header.js:import './Header.css'; - function Header() { + function Header({ logo }) { return ( <header className='App-header'> // ...
Here, we won't see any visible changes when we open the project in the browser. But if we open up the React Developer Tools, we will see that the project is now divided into an App component and a Header component. This component receives the logo prop in the form of a .svg file, as shown in the following screenshot:
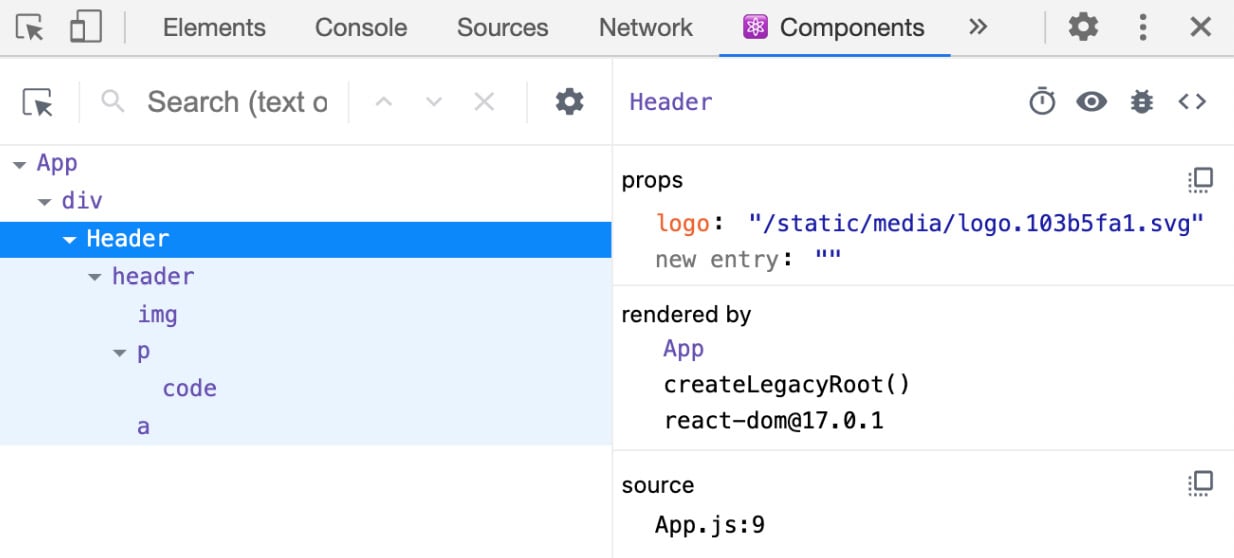
Figure 2.2 – The React Developer Tools
The Header component is still divided into multiple elements that can be split into separate components. Looking at the img and p elements, they look pretty simple already. However, the a element looks more complicated and takes attributes such as url, title, and className. To change this a element into a component we can reuse, it needs to be moved to a different location in our project.
To do this, create a new file called Link.js inside the components directory. This file should return the same a element that we've already got inside our Header component. Also, we can send both url and title to this component as a prop. Let's do this now:
- Delete the styling for the
App-linkclass fromsrc/components/Header.cssand place this inside a file calledLink.css:.App-link { color: #61dafb; } - Create a new component called
Linkthat takes theurlandtitleprops. This component adds these props as attributes to the<a>element insrc/components/Link.js:import './Link.css'; function Link({ url, title }) { return ( <a className='App-link' href={url} target='_blank' rel='noopener noreferrer' > {title} </a> ); }; export default Link; - Import this
Linkcomponent and place it inside theHeadercomponent insrc/components/Header.js:+ import Link from './Link.js'; import './Header.css'; function Header({ logo }) { return ( <header className='App-header'> <img src={logo} className='App-logo' alt='logo' /> <p>Edit <code>src/App.js</code> and save to reload. </p> - <a - className='App-link' - href='https://reactjs.org' - target='_blank' - rel='noopener noreferrer' - > - Learn React - <a> + <Link + url='https://reactjs.org' + title='Learn React' + /> </header> ); } export default Header; - Our code should now look like the following, meaning that we've successfully split the
Appcomponent into different files in thecomponentsdirectory. Also, thelogo.svgfile can be moved to a new directory calledassets:chapter-2 |- node_modules |- package.json |- public |- index.html |- src |- assets |- logo.svg |- components |- Header.css |- Header.js |- Link.css |- Link.js |- App.css |- App.js |- index.css |- index.js
- Don't forget to also change the
importstatement in thesrc/App.jsfile, where thelogo.svgfile is imported as a component:import Header from './components/Header'; import './App.css'; - import logo from './logo.svg'; + import logo from './assets/logo.svg'; function App() { return ( // ...
However, if we take a look at the project in the browser, no visible changes are present. In the React Developer Tools, however, the structure of our application has already taken shape. The App component is shown as the parent component in the component tree, while the Header component is a child component that has Link as a child.
In the next part of this section, we'll add more components to the component tree of this application and make these reusable throughout the application.
Reusing components in React
The project we're building in this chapter is a portfolio page; it will show our public information and a list of public repositories. Therefore, we need to fetch the official GitHub REST API (v3) and pull information from two endpoints. Fetching data is something we did in the first chapter, but this time, the information won't come from a local JSON file. The method to retrieve the information is almost the same. We'll use the fetch API to do this.
We can retrieve our public GitHub information from GitHub by executing the following command (replace username at the end of the bold section of code with your own username):
curl 'https://api.github.com/users/username'
Note
If you don't have a GitHub profile or haven't filled out all the necessary information, you can also use the octocat username. This is the username of the GitHub mascotte and is already filled with sample data.
This request will return the following output:
{
  "login": "octocat",
  "id": 583231,
  "node_id": "MDQ6VXNlcjU4MzIzMQ==",
  "avatar_url":
    "https://avatars.githubusercontent.com/u/583231?v=4",
  "gravatar_id": "",
  "url": "https://api.github.com/users/octocat",
  "html_url": "https://github.com/octocat",
  "followers_url":
    "https://api.github.com/users/octocat/followers",
  "following_url":
    "https://api.github.com/users/octocat/following{
      /other_user}",
  "gists_url":
    "https://api.github.com/users/octocat/gists{/gist_id}",
  "starred_url":
    "https://api.github.com/users/octocat/starred{/owner}{
      /repo}",
  "subscriptions_url":
    "https://api.github.com/users/octocat/subscriptions",
  "organizations_url":
    "https://api.github.com/users/octocat/orgs",
  "repos_url":
    "https://api.github.com/users/octocat/repos",
  "type": "User",
  "site_admin": false,
  "name": "The Octocat",
  "company": "@github",
  "blog": "https://github.blog",
  "location": "San Francisco",
  "email": null,
  "hireable": null,
  "bio": null,
  "twitter_username": null,
  "public_repos": 8,
  "public_gists": 8,
  "followers": 3555,
  "following": 9
}
Multiple fields in the JSON output are highlighted, since these are the fields we'll use in the application. These are avatar_url, html_url, repos_url, name, company, location, email, and bio, where the value of the repos_url field is actually another API endpoint that we need to call to retrieve all the repositories of this user. This is something we'll do later in this chapter.
Since we want to display this result in the application, we need to do the following:
- To retrieve this public information from GitHub, create a new component called
Profileinside a new directory calledpages. This directory will hold all the components that represent a page in our application later on. In this file, add the following code tosrc/pages/Profile.js:import { useState, useEffect } from 'react'; function Profile({ userName }) { const [loading, setLoading] = useState(false); const [profile, setProfile] = useState({}); useEffect(() => { async function fetchData() { const profile = await fetch( 'https://api.github.com/users/${userName}'); const result = await profile.json(); if (result) { setProfile(result); setLoading(false); } } fetchData(); }, [userName]); return ( <div> <h2>About me</h2> {loading ? ( <span>Loading...</span> ) : ( <ul></ul> )} </div> ); } export default Profile;
This new component imports two Hooks from React, which are used to handle state management and life cycles. We've already used a useState Hook in the previous chapter, and it's used to create a state for loading and profile. Inside the second Hook, which is the useEffect Hook, we do the asynchronous data fetching from the GitHub API. No result has been rendered yet, since we still need to create new components to display the data.
- Now, import this new component into the
Appcomponent and pass theuserNameprop to it. If you don't have a GitHub account, you can use the usernameoctocat:import Header from './Header'; + import Profile from './pages/Profile'; import './App.css'; function App() { return ( <div className='App'> <Header logo={logo} /> + <Profile userName="octocat" /> </div> ); } } export default App; - A quick look at the browser where our project is running shows that this new
Profilecomponent isn't visible yet. This is because theHeader.cssfile has aheightattribute with aview-heightvalue of100, meaning that the component will take up the entire height of the page. To change this, open thesrc/components/Header.cssfile and change the following highlighted lines:.App-logo { - height: 40vmin; + height: 60px; pointer-events: none; } // ... .App-header { background-color: #282c34; - min-height: 100vh; + min-height: 100%; display: flex; flex-direction: column; align-items: center; justify-content: center; font-size: calc(10px + 2vmin); color: white; } - There should be enough free space on our page to display the
Profilecomponent, so we can open thescr/pages/Profile.jsfile once more and display theavatar_url,html_url,repos_url,name,company,location,email, andbiofields that were returned by the GitHub API:// ... return ( <div> <h2>About me</h2> {loading ? ( <span>Loading...</span> ) : ( <ul> + <li><span>avatar_url: </span> {profile.avatar_url}</li> + <li><span>html_url: </span> {profile.html_url}</li> + <li><span>repos_url: </span> {profile.repos_url}</li> + <li><span>name: </span> {profile.name}</li> + <li><span>company: </span> {profile.company}</li> + <li><span>location: </span> {profile.location}</li> + <li><span>email: </span> {profile.email}</li> + <li><span>bio: </span> {profile.bio}</li> </ul> )} </div> ); } export default Profile;
Once we've saved this file and visited our project in the browser, we will see a bullet list of the GitHub information being displayed.
Since this doesn't look very pretty and the header doesn't match the content of the page, let's make some changes to the styling files for these two components:
- Change the code for the
Headercomponent so that it will display a different title for the page. Also, theLinkcomponent can be deleted from here, as we'll be using it in aProfilecomponent later on:import './Header.css'; - import Link from './Link'; function Header({ logo }) { return ( <header className='App-header'> <img src={logo} className='App-logo' alt='logo' /> - <p> - Edit <code>src/App.js</code> and save to reload. - </p> - <Link url='https://reactjs.org' title='Learn React' /> + <h1>My Portfolio</h1> </header> ); } export default Header; - Before changing the styling of the
Profilecomponent, we first need to create a CSS file that will hold the styling rules for the component. To do so, create theProfile.cssfile in thepagesdirectory and add the following content:.Profile-container { width: 50%; margin: 10px auto; } .Profile-avatar { width: 150px; } .Profile-container > ul { list-style: none; padding: 0; text-align: left; } .Profile-container > ul > li { display: flex; justify-content: space-between; } .Profile-container > ul > li > span { font-weight: 600; } - In
src/pages/Profile.js, we need to import this file to apply the styling. Remember theLinkcomponent we created previously? We also import this file, as it will be used to create a link to our profile and a list of repositories on the GitHub website:import { useState, useEffect } from 'react'; + import Link from '../components/Link'; + import './Profile.css'; function Profile({ userName }) { // .. - In the
returnstatement, we'll add theclassNamesfunction that we defined in the styling and separate the avatar image from the bullet list. By doing that, we also need to wrap the bullet list with an extradiv:// ... return ( - <div> + <div className='Profile-container'> <h2>About me</h2> {loading ? ( <span>Loading...</span> ) : ( + <div> + <img + className='Profile-avatar' + src={profile.avatar_url} + alt={profile.name} + /> <ul> - <li><span>avatar_url: </span> {profile.avatar_url}</li> - <li><span>html_url: </span> {profile.html_url}</li> - <li><span>repos_url: </span> {profile.repos_url}</li> + <li> + <span>html_url: </span> + <Link url={profile.html_url} title={profile.html_url} /> + </li> + <li> + <span>repos_url: </span> + <Link url={profile.repos_url} title={profile.repos_url} /> + </li> <li><span>name: </span> {profile.name}</li> <li><span>company: </span> {profile.company}</li> <li><span>location: </span> {profile.location}</li> <li><span>email: </span> {profile.email}</li> <li><span>bio: </span> {profile.bio}</li> </ul> + </div> ); } // ..
Finally, we can see that the application is starting to look like a portfolio page loading your GitHub information, including your avatar and a list of the public information. This results in an application that looks similar to what's shown in the following screenshot:
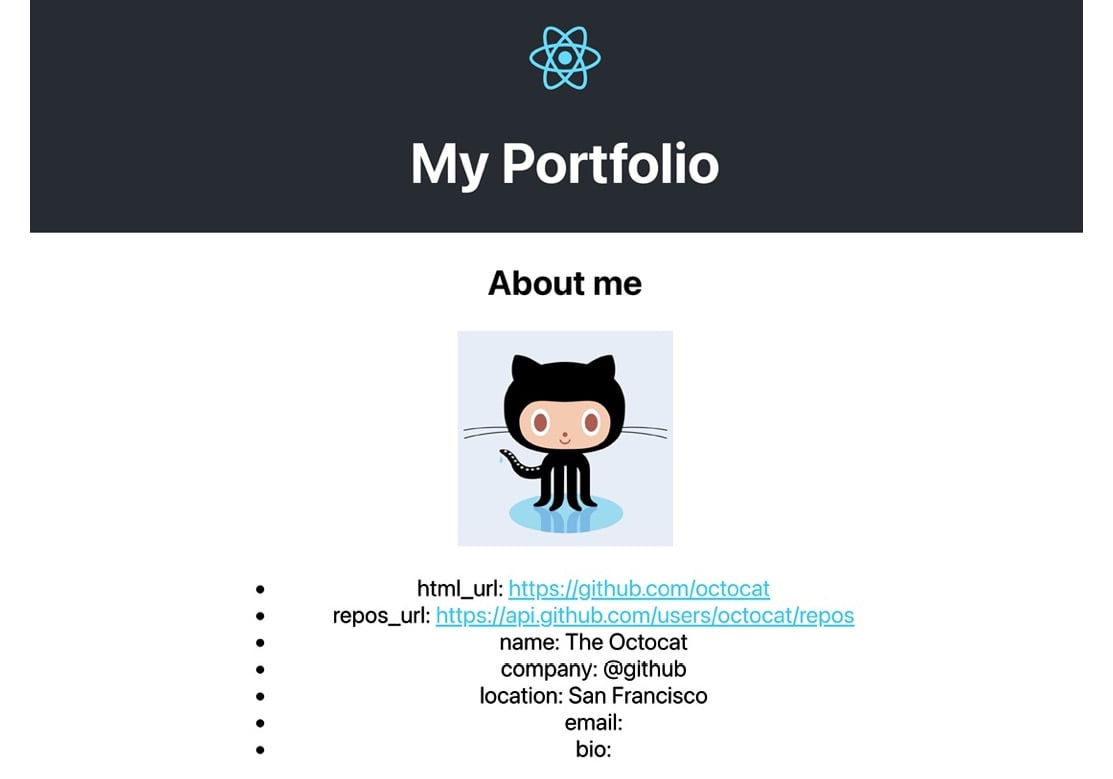
Figure 2.3 – Our styled portfolio application
If we take a look at the code in the Profile component, we'll see that there is a lot of duplicate code, so we need to transform the list that's displaying our public information into a separate component. Let's get started:
- Create a new file called
List.jsinside thecomponentsdirectory, which will take a prop calleditems:function List({ items }) { return ( <ul></ul> ); } export default List; - In the
Profilecomponent, we can import this newListcomponent. A new variable calleditemsshould be created, which is an array containing all the items we want to display inside this list:import { useState, useEffect } from 'react'; + import List from '../components/List'; import Link from '../components/Link'; import './Profile.css'; function Profile({ userName }) { // … + const items = [ + { + field: 'html_url', + value: <Link url={profile.html_url} title={profile.html_url} />, + }, + { + field: 'repos_url', + value: <Link url={profile.repos_url} title={profile.repos_url} />, + }, + { field: 'name', value: profile.name }, + { field: 'company', value: profile.company }, + { field: 'location', value: profile.location }, + { field: 'email', value: profile.email }, + { field: 'bio', value: profile.bio }, + ]; // ... - This will be sent as a prop to the
Listcomponent, so these items can be rendered from that component instead. This means that you can remove theulelement and all thelielements inside:// ... return ( <div className='Profile-container'> <h2>About me</h2> {loading ? ( <span>Loading...</span> ) : ( <div> <img className='Profile-avatar' src={profile.avatar_url} alt={profile.name} /> - <ul> - // ... - </ul> + <List items={items} /> </div> )} </div> ); } export default Profile;
You can see that for the list item with the html_url and repos_url fields, we'll be sending the Link component as a value instead of the value that was returned from the GitHub API. In React, you can also send complete components as a prop to a different component, as props can be anything.
- In the
Listcomponent, we can now map over theitemsprop and return the list items:// ... function List({ items }) { return ( <ul> + {items.map((item) => ( + <li key={item.field}> + <span>{item.field}: </span> + {item.value} + </li> + ))} </ul> ); } export default List;
The styling is inherited from the Profile component, as the List component is a child component. To structure your application better, you can move the styling for the list of information to a separate List.css file and import it inside the List component.
Assuming we executed the preceding steps correctly, your application shouldn't have changed aesthetically. However, if we take a look at the React Developer Tools, we will see that some changes have been made to the component tree.
In the next section, we'll add routing with react-router and display repositories that are linked to our GitHub account.
Routing with react-router
react-router v6 is the most popular library in React for routing, and it supports lots of features to help you get the most out of it. With this library, you can add declarative routing to a React application, just by adding components. These components can be divided into three types: router components, route matching components, and navigation components.
Setting up routing with react-router consists of multiple steps:
- To use these components, you need to install the
react-routerweb package, calledreact-router-dom, by executing the following:npm install react-router-dom
- After installing
react-router-dom, the next step is to import the routing and route matching components from this package into the container component of your application. In this case, that is theAppcomponent, which is inside the src directory:import React from 'react'; + import { BrowserRouter, Routes, Route } from 'react-router-dom'; import logo from './assets/logo.svg'; import './App.css'; import Header from './components/Header'; import Profile from './pages/Profile'; function App() { // … - The actual routes must be added to the
returnstatement of this component, where all of the route matching components (Route) must be wrapped in a routing component, calledRouter. When your URL matches a route defined in any of the iterations ofRoute, this component will render the React component that passed as a child:// ... function App() { return ( <div className='App'> + <BrowserRouter> <Header logo={logo} /> - <Profile userName='octocat' /> + <Routes> + <Route + path='/' + element={<Profile userName='octocat' />} + /> + </Routes> + </BrowserRouter> </div> ); } export default App;
If you now visit the project in the browser again at http://localhost:3000, the Profile component will be rendered.
Besides our GitHub profile, we also want to showcase the projects we've been working on. Let's add a new route to the application, which will render all the repositories of our GitHub account:
- This new component will use the endpoint to get all your repositories, which you can try out by executing the following command (replace
usernameat the end of the bold section of code with your own username):curl 'https://api.github.com/users/username/repos'
The output of calling this endpoint will look something like this:
[
  {
    "id": 132935648,
    "node_id": "MDEwOlJlcG9zaXRvcnkxMzI5MzU2NDg=",
    "name": "boysenberry-repo-1",
    "full_name": "octocat/boysenberry-repo-1",
    "private": false,
    "html_url":
      "https://github.com/octocat/boysenberry-repo-1",
    "description": "Testing",
    "fork": true,
    "created_at": "2018-05-10T17:51:29Z",
    "updated_at": "2021-01-13T19:56:01Z",
    "pushed_at": "2018-05-10T17:52:17Z",
    "stargazers_count": 9,
    "watchers_count": 9,
    "forks": 6,
    "open_issues": 0,
    "watchers": 9,
    "default_branch": "master"
  },
  // ...
]
As you can see from the preceding sample response, the repositories data is an array with objects. We'll be using the preceding highlighted fields to display our repositories on the /projects route.
- First, we need to create a new component called
Projectsin thepagesdirectory. This component will have almost the same logic for state management and data fetching as theProfilecomponent, but it will call a different endpoint to get the repositories instead:import { useState, useEffect } from 'react'; import Link from '../components/Link'; import List from '../components/List; function Projects({ userName }) { const [loading, setLoading] = useState(true); const [projects, setProjects] = useState({}); useEffect(() => { async function fetchData() { const data = await fetch( 'https://api.github.com/users/${ userName}/repos', ); const result = await data.json(); if (result) { setProjects(result); setLoading(false); } } fetchData(); }, [userName]); // ... - After putting the information from the endpoint to the local state variable projects, we'll use the same
Listcomponent to render the information about the repositories:// ... return ( <div className='Projects-container'> <h2>Projects</h2> {loading ? ( <span>Loading...</span> ) : ( <div> <List items={projects.map((project) => ({ field: project.name, value: <Link url={project.html_url} title={project.html_url} />, }))} /> </div> )} </div> ); } export default Projects; - To have this component render when we visit the
/profileroute, we need to add it to theAppcomponent using aRoutecomponent:import React from 'react'; import { BrowserRouter, Routes, Route } from 'react-router-dom'; import logo from './assets/logo.svg'; import './App.css'; import Header from './components/Header'; import Profile from './pages/Profile'; + import Projects from './pages/Projects'; function App() { return ( <div className='App'> <Header logo={logo} /> <BrowserRouter> <Routes> <Route path='/' element={ <Profile userName='octocat' />} /> + <Route path='/projects' element= {<Projects userName='octocat' />} /> </Routes> </BrowserRouter> // ...
The Profile component will now only be rendered if you visit the / route, and the Projects component when you visit the /projects route. No component will be rendered besides the Header component if you visit any other route.
Note
You can set a component that will be displayed when no route can be matched by passing * as a path to the Route component.
Although we have two routes set up, the only way to visit these routes is by changing the URL in the browser. With react-router, we can also create dynamic links to visit these routes from any component. In our Header component, we can add a navigation bar that renders links to these routes:
  import './Header.css';
+ import { Link as RouterLink } from 'react-router-dom';
  function Header({ logo }) {
    return (
      <header className='App-header'>
        <img src={logo} className='App-logo' alt='logo' />
        <h1>My Portfolio</h1>
+       <nav>
+         <RouterLink to='/' className='App-link'>
+           About me
+         </RouterLink>
+         <RouterLink to='/projects' className='App-link'>
+           Projects
+         </RouterLink>
+       </nav>
      </header>
    );
  }
  export default Header;
As we already have a Link component defined ourselves, we're importing the Link component from react-router-dom as RouterLink. This will prevent confusion if you make any changes later on, or when you're using an autocomplete feature in your IDE.
Finally, we can add some styling to Header.css so that the links to our routes are displayed nicely:
  .App-header {
    background-color: #282c34;
    min-height: 100%;
    display: flex;
    flex-direction: column;
    align-items: center;
    justify-content: center;
    font-size: calc(10px + 2vmin);
    color: white;
  }
+ .App-header > nav {
+   margin-bottom: 10px;
+ }
+ .App-header > nav > .App-link {
+   margin-right: 10px;
+ }
If you now visit the application in the browser at http://localhost:3000/projects, it should look something like the following screenshot. Clicking on the links in the header will navigate you between the two different routes:
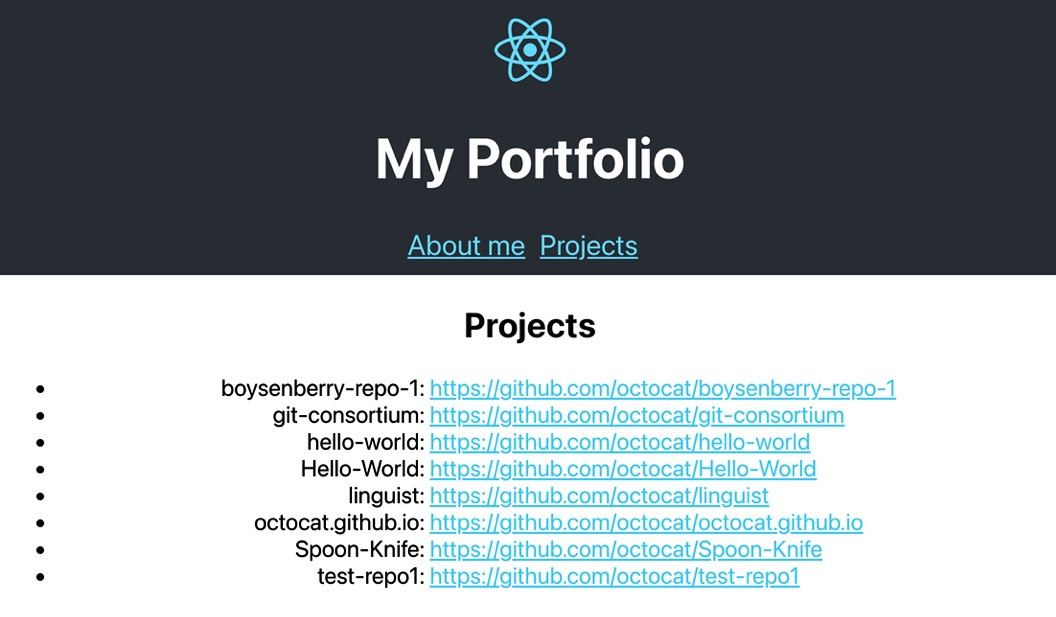
Figure 2.4 – The Projects route in our application
With these routes in place, even more routes can be added to the router component. A logical one is having a route for individual projects, which has an extra parameter that specifies which projects should be displayed. Therefore, we have a new component called the ProjectDetailpages directory, which contains the logic for fetching an individual repository from GitHub API. This component is rendered when the path matches /projects/:name, where name stands for the name of the repository that is clicked on on the projects page:
- This route uses a new component in a file called
ProjectDetail.js, which is similar to theProjectscomponent. You can also create this file in thepagesdirectory, except that it will be fetching data from the https://api.github.com/repos/userName/repo endpoint, whereuserNameandreposhould be replaced with your own username and the name of the repository that you want to display:import { useState, useEffect } from 'react'; Import { useParams } from 'react-router-dom'; function Project({ userName }) { const [loading, setLoading] = useState(false); const [project, setProject] = useState([]); const { name } = useParams(); useEffect(() => { async function fetchData() { const data = await fetch( 'https://api.github.com/repos/${ userName}/${name}', ); const result = await data.json(); if (result) { setProject(result); setLoading(false); } } if (userName && name) { fetchData(); } }, [userName, name]); // ...
In the preceding section, you can see how the data is retrieved from the GitHub API, using both your username and the name of the repository. The name of the repository comes from the useParams Hook from react-router-dom, which gets the name variable from the URL for you.
- With the repository data retrieved from GitHub, you can create the
itemsvariable that is used to render information about this project using theListcomponent that we also used in the previous routes. The fields that are added to items are coming from GitHub and can also be seen in the response of thehttps://api.github.com/users/username/reposendpoint that we inspected previously. Also, the name of the repository is listed previously:// ... return ( <div className='Project-container'> <h2>Project: {project.name}</h2> {loading ? ( <span>Loading...</span> ) : ( <div></div> )} </div> ); } export default Project; - To render this component on the
/projects/:nameroute, we need to add this component within theRoutercomponent insideApp.js:// ... + import ProjectDetail from './pages/ProjectDetail'; function App() { return ( <div className='App'> <BrowserRouter> <Header logo={logo} /> <Routes> <Route exact path='/' element= {<Profile userName='octocat' />} /> <Route path='/projects' elements= {<Projects userName='octocat' />} /> + <Route path='/projects/:name' element= {<ProjectDetail userName='octocat' />} /> </Routes> </BrowserRouter> ); } - You can already navigate to this route by changing the URL in the browser, but you also want to add a link to this page in the
Projectscomponent. Therefore, you need to make changes that will importRouterLinkfromreact-router-domand use it instead of your ownLinkcomponent:import { useState, useEffect } from 'react'; + import { Link as RouterLink } from 'react-router-dom' import List from '../components/List'; - import Link from '../components/Link'; // ... return ( <div className='Projects-container'> <h2>Projects</h2> {loading ? ( <span>Loading...</span> ) : ( <div> <List items={projects.map((project) => ({ field: project.name, - value: <Link url={project.html_url} title={project.html_url} />, }))items} /> + value: <RouterLink url={project.html_url} title={project.html_url} />, }))items} /> </div> )} </div> ); } export default Projects;
If you now visit the http://localhost:3000/projects page in the browser, you can click on the projects and move on to a new page that shows all the information for a specific project.
With these last changes, you've created a portfolio application that uses react-router for dynamic routing.


