


Setting up a Vite-powered Vue application
A Vue project is structured similarly to a lot of modern node-based apps and contains the following:
- A
package.jsonfile - A
node_modulesfolder in the root of your project - Various other configuration files are usually contained at the root level, such as
vite.config.jsand.eslintrc.js, since they will generally have an effect across your whole project.
The following screenshot displays a default Vue app folder structure:
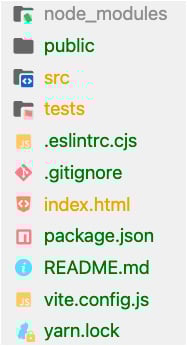
Figure 1.2 – Default Vue application folder structure
By default, there is an index.html file at the root level that serves as a placeholder for loading the Vue application. You can modify this file to include header and footer scripts, such as Google Fonts or third-party JavaScript libraries that are not included as a part of your bundle.
The Vue project structure follows a pattern where you manage most of your source code within the /src directory. You can subdivide your Vue files into various folders, for example, using a components folder to store reusable Vue components. By default, Vite will create assets and components folders to code-split the default files. For beginners, it is good to follow this pattern until you get more comfortable:
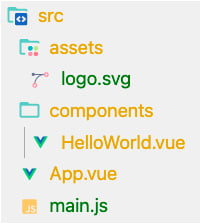
Figure 1.3 – Default Vue application src folder structure
The public folder is a special directory containing files that need to be transferred directly to the output location. The following screenshot displays how this folder will look:

Figure 1.4 – Default Vue application public folder
At this point, you should be somewhat familiar with how a Vue project structure looks. Next, we discuss Vue’s unique pattern – the SFC architecture.
Vue’s SFC architecture
Components are the building blocks of most modern frameworks. In general, splitting your code into component-specific chunks ensures code readability and facilitates the Don’t Repeat Yourself (DRY) principle. Vue’s SFC pattern follows this approach closely.
The SFC architecture centralizes the responsibility of both appearance and behavior into a single file, thus simplifying the architecture of your project. You now can refer to your HTML, CSS, and JavaScript logic without switching files. Your default .vue file structure will be as follows:
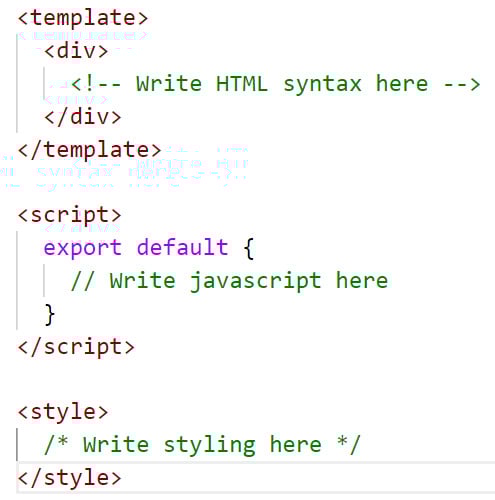
Figure 1.5 – Default .vue file structure
A general good practice is to ensure your components file doesn’t contain more than 500 lines of code. If you encounter this situation, it’s recommended to split them into smaller reusable components. For example, in the header of your application, you may have a logo element that is reused on other pages. You would create a component such as logo.vue:
// logo.vue
<template>
  <img src="myLogo.png" />
</template>
In header.vue, you import the logo component into the script section and then include it as a nested component of the header component. You can achieve this by declaring it as a property of the components field:
// header.vue
<script>
    import logo from 'components/logo.vue'
    export default {
        components: {
          logo
        }
    }
</script>
In the template section, you can use the logo as a normal HTML element, as shown here:
<template>
    <header>
      <a href="mywebsite.com">
        <logo />
      </a>
    </header>
</template>
The output will be a header with the logo image rendered – and you can reuse the logo component in any other component when needed.
Very soon, you will have lots of these semantically structured files, which use small chunks of a reusable syntax that your team can implement across various application areas.
In the next exercise, you will practice creating your first Vue component and displaying it in another component.
Exercise 1.01 – building your first component
We are going to build our first component, Exercise1.01, inside of a Vue project and import it to use it in the App.vue component using ES6 module syntax.
To access the code file for this exercise, refer to https://github.com/PacktPublishing/Front-End-Development-Projects-with-Vue.js/tree/v2-edition/Chapter01/Exercise1.01.
Note
Your app will hot-reload when you save new changes, so you can see them instantly.
To get started, execute the following steps:
- Use the application generated with
npm init vue@3as a starting point, or within the root folder of the code repository, navigate into theChapter01/Exercise1.01folder by using the following commands in order:> cd Chapter01/Exercise1.01/ > yarn
- Run the application using the following command:
yarn dev
- Go to
https://localhost:3000. - Open the exercise project in VS Code (by using the
code .command within the project directory) or your preferred IDE. - Open the
src/App.vuefile, delete everything in that file, and save. - In your browser, everything should be a blank, clean state to start working from.
- The three primary components that make up a single-file component are the
<template>,<script>, and<style>blocks. Add the following code blocks as our scaffolding for a Vue component:/** src/App.vue **/ <template> </template> <script> export default { } </script> <style> </style> - Create another file in the
componentsfolder calledExercise1-01.vueand repeat the same step for scaffolding the Vue component:// src/components/Exercise1-01.vue <template> </template> <script> export default { } </script> <style> </style> - Within our
Exercise1-01.vuecomponent, compose a set of<div>tags, with an<h1>element and a heading inside the<template>tags:<template> <div> <h1>My first component!</h1> </div> </template>
- Inside the
<style>block, add some styling as follows:<style> h1 { font-family: 'Avenir', Helvetica, Arial, sans-serif; text-align: center; color: #2c3e50; margin-top: 60px; } </style> - Import our component into
App.vueby using the ES6importmethod and defining the component inside thecomponentsobject in the<script>block. We can now reference this component inside the HTML by using its name in camelCase or kebab-case (both will work):<template> <Exercise /> </template> <script> import Exercise from './components/Exercise1-01' export default { components: { Exercise, } } </script>
When you press Ctrl + S (or Cmd + S on macOS), https://localhost:3000 should reload and look amazing:

Figure 1.6 – localhost output for Exercise 1.01
In this exercise, we saw how to structure Vue components using template tags, and scaffold basic Vue components using Vetur. We also created a new Vue component and reuse it in App.vue using ES6 syntax and property field components.
In the next section, we will gain an understanding of how to define the local state data of a component using data properties.


