


Using attribute directives to handle the appearance of elements
In this recipe, you’ll work with an Angular attribute directive named highlight. With this directive, you’ll be able to search words and phrases within a paragraph and highlight them on the go. The whole paragraph’s container background will also be changed when we have a search in action. For example, by using the following code:
<p class="text-content max-w-2xl m-auto" appHighlight
  [highlightText]="'de'">
  <!--text here -->
The result will appear as an output as shown in Figure 2.1:
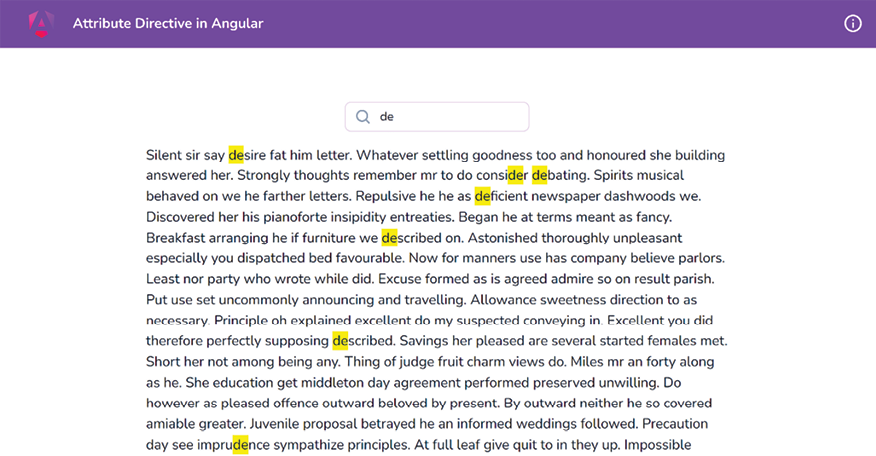
Figure 2.1: The result when using the highlight directive
Getting ready
The app that we are going to work with resides in start/apps/chapter02/ng-attribute-directive inside the cloned repository:
- Open the code repository in your code editor.
- Open the terminal, navigate to the code repository directory, and run the following command to serve the project:
npm run serve ng-attribute-directiveThis should open the app in a new browser tab, and you should see the following:

Figure 2.2: ng-attribute-directive app running on http://localhost:4200
How to do it…
The application has a search input and a paragraph of text. We want to be able to type a search query in the input so that we can highlight and find all the matching occurrences in the paragraph. Here are the steps to achieve this:
- We’ll create a property named
searchTextin theapp.component.tsfile that we’ll use as amodelfor the search-text input:... export class AppComponent { searchText = ''; } - Then, we use the
searchTextproperty in the template, i.e., in theapp.component.htmlfile, with the search input as anngModel, as follows:... <div class="content" role="main"> ... <input [(ngModel)]="searchText" type="text" placeholder="Quick Search..." class="pr-4 !pl-10 py-2"> </div> - You will notice that
ngModeldoesn’t work yet. This is because we’re missing theFormsModulein our application. Let’s import it into theapp.component.tsfile as follows:... import { FormsModule } from '@angular/forms'; @Component({ selector: 'app-root', templateUrl: './app.component.html', standalone: true, styleUrls: ['./app.component.scss'], imports: [CommonModule, RouterModule, FormsModule], }) export class AppComponent { searchText = ''; } - Now, we’ll create an attribute directive named
highlightby using the following command from the workspace root:cd start && nx g directive highlight --directory apps/chapter02/ng-attribute-directive/src/app --standaloneIf asked, choose the
@nx/angular:directive schematicsand choose the “As provided” action. The preceding command generates a standalone directive that has a selector calledappHighlight. See the How it works… section for why that happens, and for a brief explanation of the standalone API.
- Now that we have the directive in place, we’ll create two inputs for the directive to be passed from
AppComponent(fromapp.component.html)—one for the search text and another for the highlight color. The code should look like this in thehighlight.directive.tsfile:import { Directive, Input } from '@angular/core'; @Directive({ selector: '[appHighlight]', standalone: true }) export class HighlightDirective { @Input() highlightText = ''; @Input() highlightColor = 'yellow'; } - Let’s use the
appHighlightdirective inapp.component.htmland pass thesearchTextmodel from there to theappHighlightdirective as follows:<div class="content" role="main"> ... <p class="text-content" appHighlight [highlightText]="searchText"> ... </p> </div> - We’ll listen to the input changes now for the
searchTextinput, usingngOnChanges. Please see the Using ngOnChanges to intercept input property changes recipe in Chapter 1, Winning Component Communication, for how to listen to input changes. For now, we’ll only do aconsole.logwhen the input changes. Let’s update thehighlight.directive.tsas follows:import { Directive, Input, OnChanges, SimpleChanges } from '@angular/core'; ... export class HighlightDirective implements OnChanges { @Input() highlightText = ''; @Input() highlightColor = 'yellow'; ngOnChanges(changes: SimpleChanges) { if (changes['highlightText']?.firstChange) { return; } const { currentValue } = changes['highlightText']; console.log({ currentValue }); } }If you type in the search input and see the console logs, you’ll see the new value being logged whenever you change the value.
- Now, we’ll write the logic for highlighting the search text. We’ll first import the
ElementRefservice so that we can get access to the template element on which our directive is applied. Here’s how we’ll do this:import { Directive, Input, SimpleChanges, OnChanges, ElementRef } from '@angular/core'; @Directive({ selector: '[appHighlight]' }) export class HighlightDirective implements OnChanges { @Input() highlightText = ''; @Input() highlightColor = 'yellow'; constructor(private el: ElementRef) { } ... } - Now we’ll replace every matching text in our
elelement with a custom<span>tag with some hardcoded styles. Update yourngOnChangescode inhighlight.directive.tsas follows, and see the result:ngOnChanges(changes: SimpleChanges) { if (changes.highlightText.firstChange) { return; } const { currentValue } = changes.highlightText; if (currentValue) { const regExp = new RegExp(`(${currentValue})`,'gi') this.el.nativeElement.innerHTML = this.el .nativeElement.innerHTML.replace(regExp, `<span style="background-color: ${this.highlightColor}" >\$1</span>`) } }TIP
You’ll notice that if you type a word, it will still show only one letter highlighted. That’s because whenever we replace the
innerHTMLproperty, we end up changing the original text. Let’s fix that in the next step.
- To keep the original text intact, let’s create a property named
originalHTMLand assign an initial value to it on the first change. We’ll also use theoriginalHTMLproperty while replacing the values:... export class HighlightDirective implements OnChanges { @Input() highlightText = ''; @Input() highlightColor = 'yellow'; originalHTML = ''; constructor(private el: ElementRef) { } ngOnChanges(changes: SimpleChanges) { if (changes.highlightText.firstChange) { this.originalHTML = this.el .nativeElement.innerHTML; return; } const { currentValue } = changes.highlightText; if (currentValue) { const regExp = new RegExp(`(${currentValue})`,'gi') this.el.nativeElement.innerHTML = this.originalHTML .replace(regExp, `<span style="background-color: ${this.highlightColor}">\$1</span>`) } } } - Now, we’ll write some logic to reset everything back to the
originalHTMLproperty when we remove our search query (when the search text is empty). In order to do so, let’s add anelsecondition, as follows:... export class HighlightDirective implements OnChanges { ... ngOnChanges(changes: SimpleChanges) { ... if (currentValue) { const regExp = new RegExp(`(${currentValue})`,'gi') this.el.nativeElement.innerHTML = this.originalHTML .replace(regExp, `<span style="background- color: ${this.highlightColor}">\$1</span>`) } else { this.el.nativeElement.innerHTML = this.originalHTML; } } }
How it works…
We created an attribute directive named highlight (appHighlight) that takes two inputs: highlightText and highlightColor. The directive listens to the input changes for the highlightText input using the SimpleChanges from the ngOnChanges life cycle hook by Angular. Every property in this SimpleChanges object is a SimpleChange object that contains the following properties:
previousValue: anycurrentValue: anyfirstChange: booleanisFirstChange(): boolean
First, we make sure to save the original content of the target element by getting the attached element using the ElementRef service. We get it using the .nativeElement.innerHTML property on the element we apply the directive to. We save the initial value to the originalHTML property of the directive.
Whenever the input changes, we assign a replaced version of the originalHTML by replacing all the instances of the searched term in the paragraph with an additional HTML element (a <span> element). We also add the background color to this <span> element. The background color applied comes from the highlightColor input. You can modify it to highlight using a different color. Play around and make this example your own.
See also
- Testing Attribute Directives official documentation: https://angular.io/guide/testing-attribute-directives
- Angular
SimpleChangedocs: https://angular.io/api/core/SimpleChange


