Now that we've touched on what virtualization is, the next step is to build the backbone of our lab by installing VMware Fusion, a VMware ESXi server, and four VMs to simulate a SCADA environment. This is more of a conversation starter or a full disclosure for me to say this, but if the first two sections were a struggle, then it only gets harder from here, and there are many well-written resources out there you can reference or read prior to tackling this subject matter.
With that said, let's get started by standing up the virtual portion of our lab. I don't want to pull a "digital chad" and get lost in pontificating about processors, RAM, storage, and shenanigans. However, talking about hardware is inevitable – in other words, the more cores and the more RAM we have, the better it is. I have found it possible to run Fusion on a Mac with 8 GB of ram, but it was very limiting, and if you open Google Chrome to research anything, then consider your system as hitting a wall and starting to page (see the following note to see what this means).
Important note
When a computer runs out of RAM, the system will move pages of memory out of RAM and into the disk space in an attempt to free up memory for the computer to keep functioning. This process is called paging. One major culprit of this is Google Chrome.
With this being a painful personal experience, I would suggest a minimum of 16 GB of RAM with 4 cores. Most systems these days come with this by default. I would be lying if I did not say I was looking at the new PowerBook, which can handle 64 GB of RAM with 8 cores. Now, spinning up ESXi requires a bit of a beefier system. I first started my lab with a Dell PowerEdge R710. I hunted around for legacy (or decommissioned) equipment that I could pick up for a minimal cost and found some great deals. Since then, I have migrated to Gigabyte Brix and Intel NUCs, of which the sheer size devolves from that of a kitchen table to the size of a cell phone and the noise ratio from that of a hair dryer to a pin dropping in a library, are hands down the reasons for making the Brix or NUC a logical choice for running VMware ESXi on. I do have to say that I have been looking at the SuperMicro IOT server, which allows for Server Class memory but maintains the small form factor and noise ratio of the Gigabyte Brix and NUC. Going forward with the ESXi setup, I will be using a reclaimed crypto mining rig to build my server on, as I have a few kicking around that allow me to add more memory to the system.
The quick specifications are as follows:
- AMD Ryzen 7 3800X
- 128 GB RAM
- 2 TB or disk
These are not by any means the requirements that you must adhere to. They're simply what I have pieced together from leftover parts. I personally recommend any of the Intel NUC products that carry 16 GB or more of RAM, and a minimum of two network interfaces.
Here is a link that you can go to in order to browse their product line: https://simplynuc.com/9i9vx/.
In this section, we will be covering the following subtopics:
- How to install Fusion
- How to install Hypervisor
- Spinning up Ubuntu as a pseudo-Programmable Logic Controller (PLC)
- Spinning up Ubuntu as a pseudo-SCADA
- Spinning up Windows Engineering Workstation
- Spinning up Kali Linux
- Setting up network segmentation to mimic a model similar to Purdue
Let's get started!
How to install Fusion
The first step to installing Fusion will be to download Fusion from the following link:
https://www.vmware.com/products/fusion/fusion-evaluation.html
The process should be straightforward because you have the option of using either Fusion Player or Fusion Pro. I personally use Fusion Pro as out of all the tools that I utilize, it has proven to be the most effective one.
Once you have installed Fusion, we will move on to installing ESXi Hypervisor. We will discuss setting up the networking side of the lab a little later in this chapter. For now, continue by downloading Hypervisor.
How to install ESXi
The first step to installing ESXi will be to download ESXi from the following link: https://my.vmware.com/en/web/vmware/evalcenter?p=free-esxi7.
Note that I will be using Version 6.7 as I ran into hardware compatibility issues with what I pieced together for my lab.
How to install Hypervisor
You will need to perform the following steps:
- Unlike Workstation or Fusion, you are required to create a VMware account. Once you have created your account and verified you are who you say you are, you can continue with the download. You will arrive at the following page. You will be presented with four options: one for ISO, a second ISO package with VMware Tools included, a local package in ZIP form, and a README file:
Figure 1.2 – Hypervisor download list
Downloading the ISO allows you to burn it onto a USB key and then use that USB key to boot from and perform a bare-metal install on your system. The real difference between the two formats is that the ZIP format allows the user to fine-tune and add third-party drivers to publish and build custom ISOs.
Important note
A bare-metal install refers to a machine devoid of any operating system, and this is the first time an operating system will be installed on the hard drive inside the machine.
This is important if you are looking to bare metal a consumer-based PC, as not all network drivers are covered in the standard packaged ISO and need to be added to a base package prior to publishing. We will not cover this in this book.
- Once you've selected the ISO file, you will be directed to a link that provides you with a list of hashes. This is good security hygiene as it provides users with a list of hashes to verify the validity of the downloaded package:
Figure 1.3 – File integrity check
We wouldn't be good security practitioners if we didn't confirm the file's integrity by running a hash check. This is very important to ensure that the file hasn't been tampered with mid-stream. Now, some of you who have been following the news would say that supply chain attacks circumvent this type of verification. An example of a supply chain attack is SolarWinds Orion, where it was suspected that an APT group, dubbed Cozy Bear, updated Orion's code repository and made a hash check useless as a developer published code. This generated a hash that encapsulated malware and clean code, before validating that it was the source of truth. Regardless, it is still a good practice to always check the file hash, thus preventing Script Kiddies from getting a foothold inside your lab.
Important note
Typically, Script Kiddies are inexperienced hackers that have downloaded a piece of software where they don't completely understand the outcome of what they are about to run, but simply run it anyway as they don't really care what the results or impact of their attacks are, as long as it does something.
- Proceed by running your hash check on your newly downloaded ISO file. As shown in the following screenshot, I performed a
SHA-1 check and compared it to the SHA1SUM check that VMware supplies:Figure 1.4 – SHA-1 checksum
- Now that we have confirmed that the hashes match, we will want to burn this to a USB key so that we can boot from the USB key and install ESXi on our server. I have come to rely heavily on balenaEtcher for creating bootable USB keys. Once you have manually built hundreds, if not thousands, of USB keys, the simplicity that comes with Etcher is a godsend.
- Navigate to balenaEtcher's website and download the software by following the link here: https://www.balena.io/etcher/.
- Download balenaEtcher and launch the tool. You will encounter the following screen. You need to click on Select image and choose the hypervisor image:
Figure 1.5 – Selecting an image to burn
The following warning will be raised because balena searches the ISO for a GPT or MBR partition table and warns the user if it cannot find one. You can proceed by flashing your USB key, as there shouldn't be any issues booting from the key:
Figure 1.6 – Missing partition table warning
- Once you've clicked on Continue, the tool will take you to the following screen, and it will take only a few minutes to complete. Take a break and go top up your coffee or preferred vice, and by the time you return, it will be completed. Once it has finished, remove the USB key and insert it into the machine that you will bare-metal build on top of:
Figure 1.7 – Flashing USB key
In the past, I have built out various hypervisor servers on the Intel NUC, Gigabyte Brix, Supermicro IoT, and Dell PowerEdge servers. For demonstration purposes, I have decided to repurpose some old equipment that was used for crypto mining, but that is a whole other topic, possibly for another book. Depending on your budget for a lab, I have had great success finding some good equipment on eBay. I just did a quick search and found some great 1U servers for around $150.00 USD.
- Going forward, I am assuming that you have suitable gear that can boot off the USB key and bare-metal install hypervisor. Once you've powered on the system, your system will boot off your newly minted USB key. You must then set up your User name and Password, as shown in the following screenshot, and then set the IP address to either dynamic via DHCP or set a static address. Once you have set your management IP address, you can open a web browser and navigate to the GUI:
Figure 1.8 – VMware ESXi login
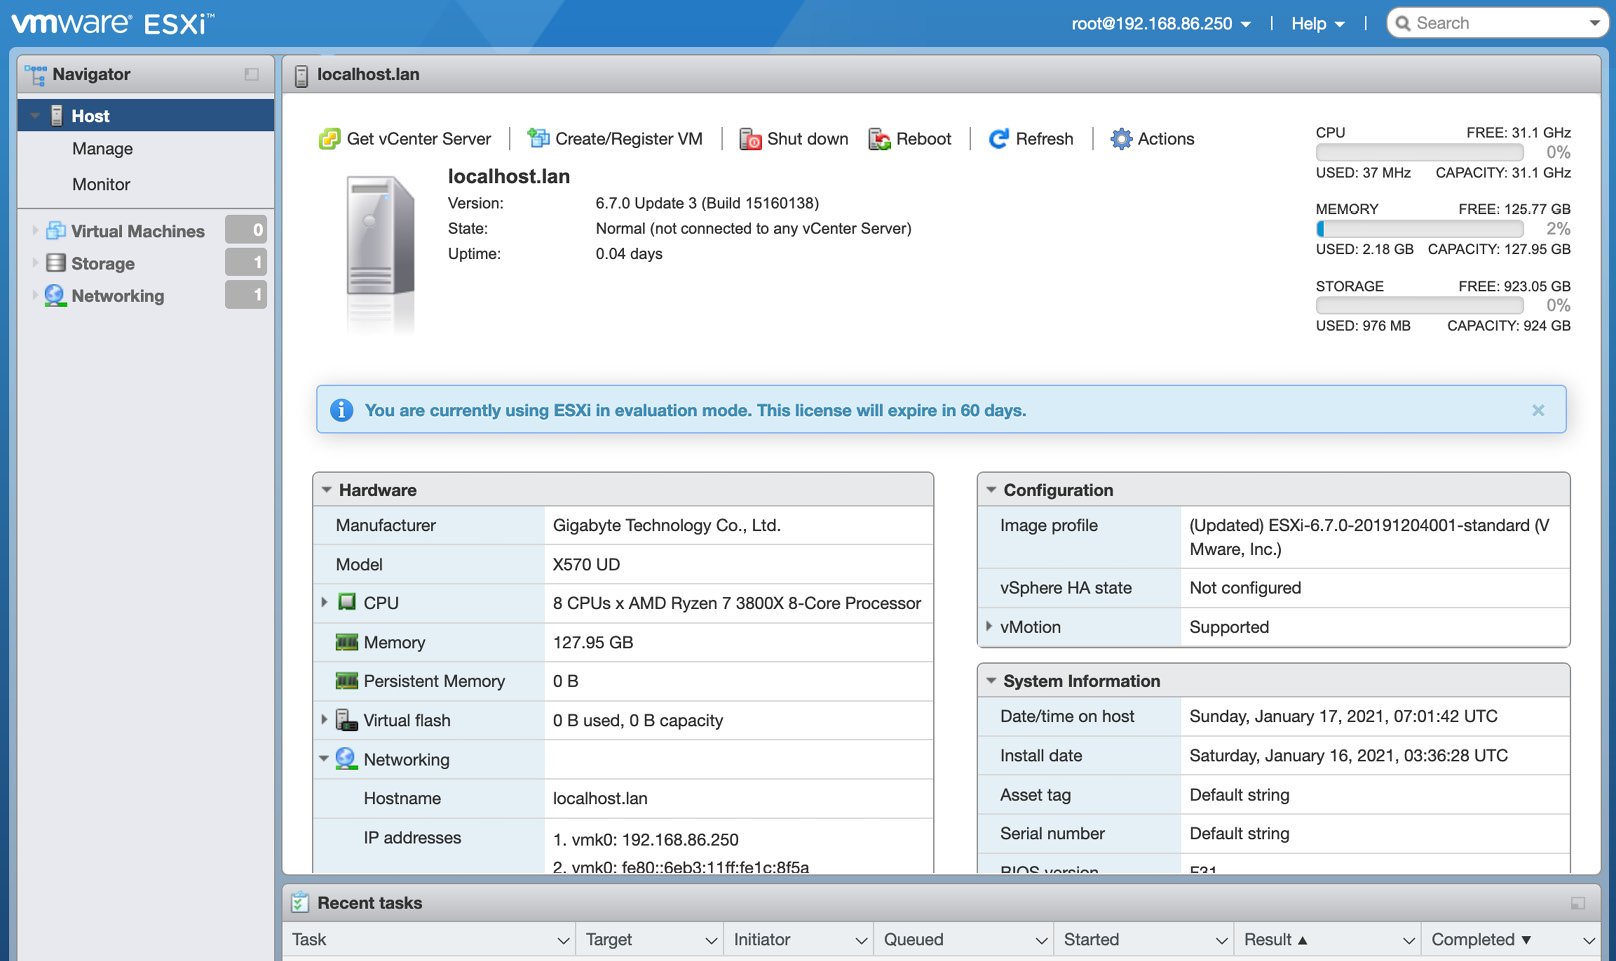
- Log in with the User name and Password details that you configured during installation. Once authenticated, you will be presented with the host management page for ESXi, as shown in the following screenshot:
Figure 1.9 – VMware ESXi dashboard
If you have arrived here with minimal effort, then you are in good shape. With that, we have successfully installed VMware Fusion and VMware ESXi on hardware in our lab. We are now one step closer to having a fully working Industrial Control System (ICS) lab. We will be installing the VMs on top of our new server in the next section.
Spinning up Ubuntu as a pseudo-PLC/SCADA
We are going to simulate a virtual Programmable Logic Controller (PLC) and SCADA combination to build a test bench that will help shape our approach as we progress through this book. A PLC is typically a small, ruggedized computer used to control industrial processes. These processes can range from people movers at an airport to devices controlling SpaceX's Falcon 9; from very simple discrete on-and-off tasks to very complex cascading control tasks. We can find automation systems in oil and gas, energy generation, transmission and distribution so that we can charge our iPhones and Android devices, food and beverage production such as Coca Cola, chemical mixing and bottling, pharmaceutical manufacturing such as Pfizer vaccine generation, transportation with avionics for controlling airplane flight systems, hospitals for monitoring patients, and many more industries. PLCs are everywhere, and these devices control everything around us that we take for granted as we go about our daily lives. SCADA is an overarching system that's used to control a larger set of defined processes. Taking the first case example of people movers, you can have a single PLC controlling the local physical on-and-off behavior and the speed of a people mover. This data is then published and controlled by a SCADA system, which allows an operator to have remote control of how this process operates. This combination of PLC and SCADA would be overkill for a single process, so where SCADA really shines is when you want to control all the people movers in an airport, mall, or even the strip in Vegas. The SCADA system can start and stop individual processes or all processes all at once. It's powerful in the sense that protecting this system should be of utmost importance when you're designing a security posture.
Now that this brief introduction is out of the way, I have chosen to use Ubuntu as my Linux distro. It is developed by Canonical and it is a well-maintained distro. Getting familiar with it will help you move forward as Canonical has built UbuntuCore, which is an operating system powering the Internet of Things (IoT) ecosystem. The reason why I am mentioning this is because the Operational Technology (OT) industry is slowly moving toward adopting IoT technology to replace legacy equipment. There are many examples of big vendors innovating in this space to round out their portfolio of product offerings. OK, that's enough small talk about the future; let's get to the downloading stage:
- First, navigate to the following link to start your download: https://ubuntu.com/download/desktop.
This will take you to a web page that looks like this:
Figure 1.10 – Ubuntu software download
- Click the Download button, and then sit back and wait for it to complete. Depending on your connection, it could take a bit of time to download.
Once it has completed, we can proceed to installing the OS. There are multiple ways of doing this. One method is to install on Fusion, then connect to the server and upload the VM from Fusion to ESXi. Another option is to transfer the ISO to ESXi's datastore and, from there, configure a new VM with the Ubuntu ISO mounted on the virtual DVD drive. We are going to use the datastore method as we want to keep as little local as possible as we don't want to consume our local machines resources by hosting multiple VMs. We are going to log into the GUI and, when presented with the host management screen, click on the Datastores option under Storage, as shown in the following screenshot:
Figure 1.11 – Storage datastore
Depending on your setup, you may have a single disk or multiple disks. The configuration for this is outside the scope of this book, but ultimately, it is up to your own personal preference.
- Next, we are going to click on the Datastore browser button. A modal will pop up on the screen, as shown here:
Figure 1.12 – Upload browser
- From here, you want to select the datastore that you will upload the ISO file to. Then, what I like to do is create a directory where I will house all my ISOs for quick recall later. You can see an example of creating a directory called
iso_folder in the following screenshot: Figure 1.13 – Creating a new directory
- Now, you need to select the newly created directory and click the Upload button. This will open a Finder/Explorer window, where you will be able to select your newly downloaded
ISO file. Once selected, you will see a progress bar that indicates the file's completion, as shown in the following screenshot: Figure 1.14 – Upload in progress
Once the file has been uploaded, you will see your newly uploaded VM in iso_folder:
Figure 1.15 – Uploaded ISO
- The next step will be to select Virtual Machines from the Navigator menu on the left-hand side of the screen. Click the Create / Register VM button on the right-hand side of the screen, as shown in the following screenshot:
Figure 1.16 – Virtual Machines dashboard
- Once clicked, this will bring up a modal with three distinct options:
a. Create a new virtual machine
b. Deploy a virtual machine from an OVF or OVA file
c. Register an existing virtual machine
You can see this in the following screenshot:
Figure 1.17 – Creating a virtual machine
We are going to choose the Create a new virtual machine option here. This will create another pop-up window. From here, we want to fill out the Name, Compatibility, Guest OS family, and Guest OS version options. Compatibility is an option that allows the VM to have access to version-specific virtual hardware. We can see what this looks like in the following screenshot:
Figure 1.18 – Compatibility selection
- Click Next. You will be brought to a new screen where you can select which datastore you would like to spin your new PLC VM up on. I have selected VM-Storage and clicked Next:
Figure 1.19 – Select storage page
The next screen allows you to customize the VM that we are loading up. Since this VM is going to simulate a PLC, we want to keep the resources like that of a real off-the-shelf device's. The keynote will be the Datastore ISO file that we loaded into CD/DVD Drive 1.
As shown in the following screenshot, the specifications I've chosen are 1 for CPU, 1 GB RAM, 40 GB disk space, VM network, and Datastore ISO (Ubuntu ISO):
Figure 1.20 – Customize settings page
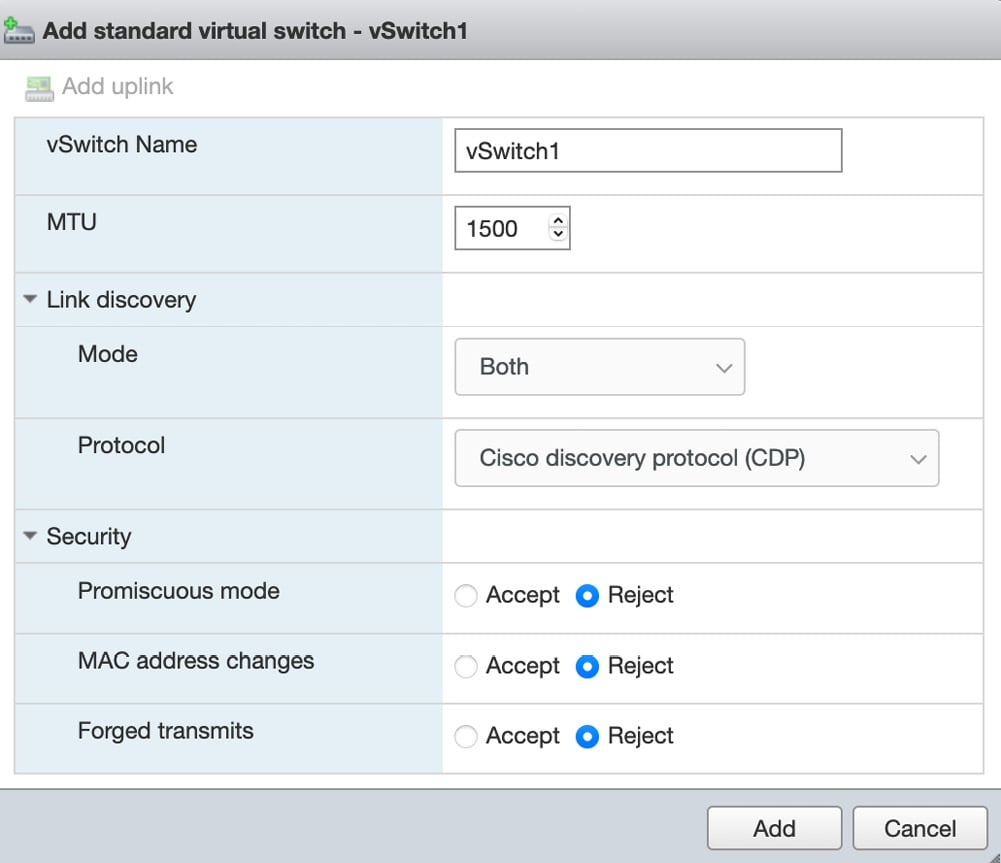
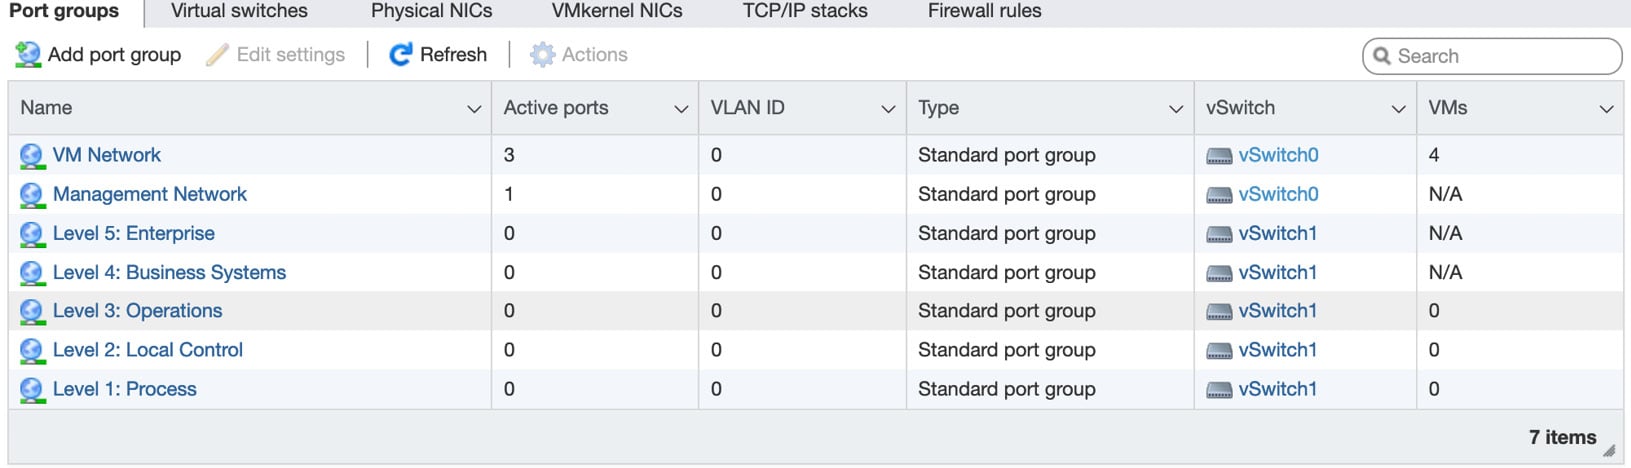
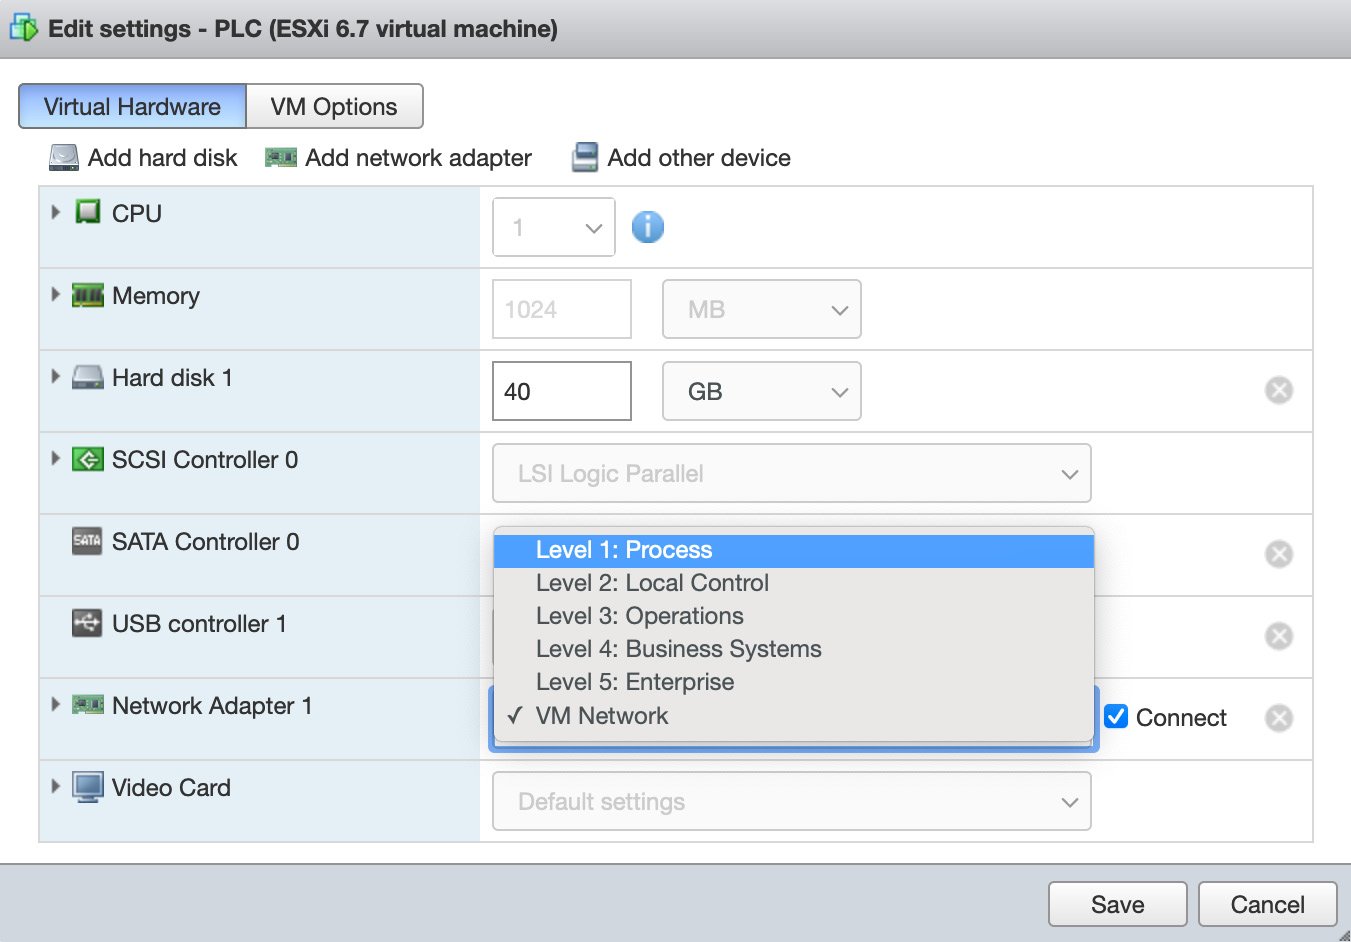
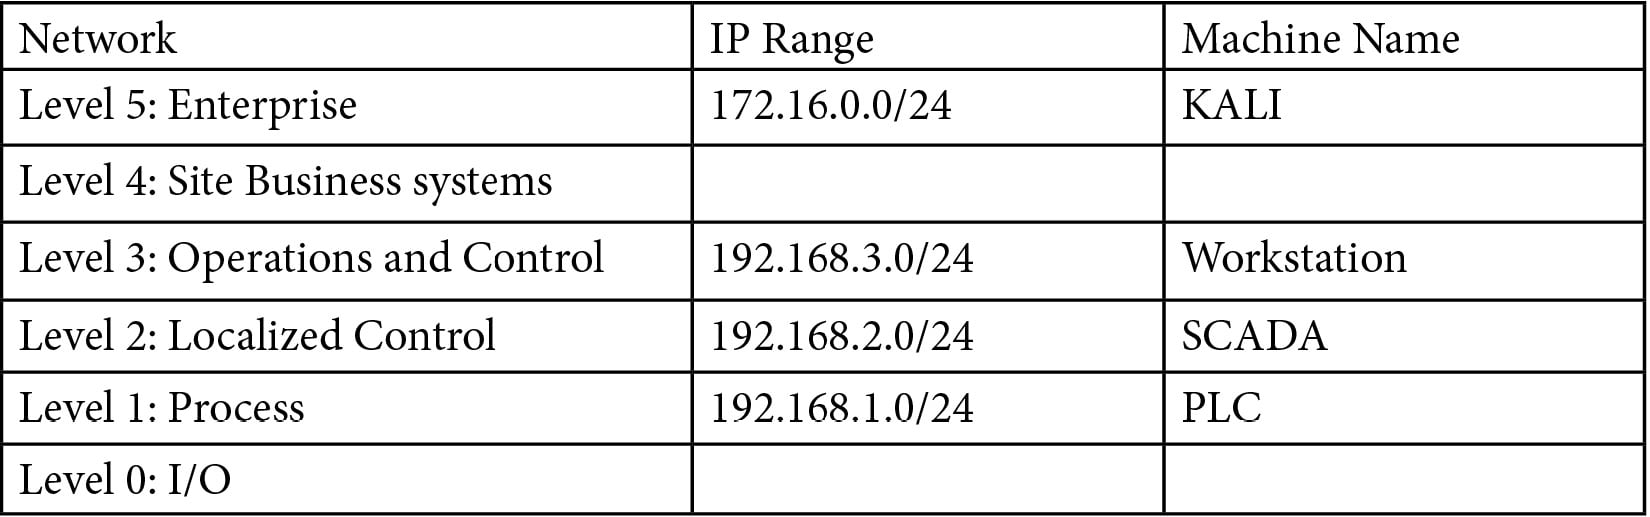
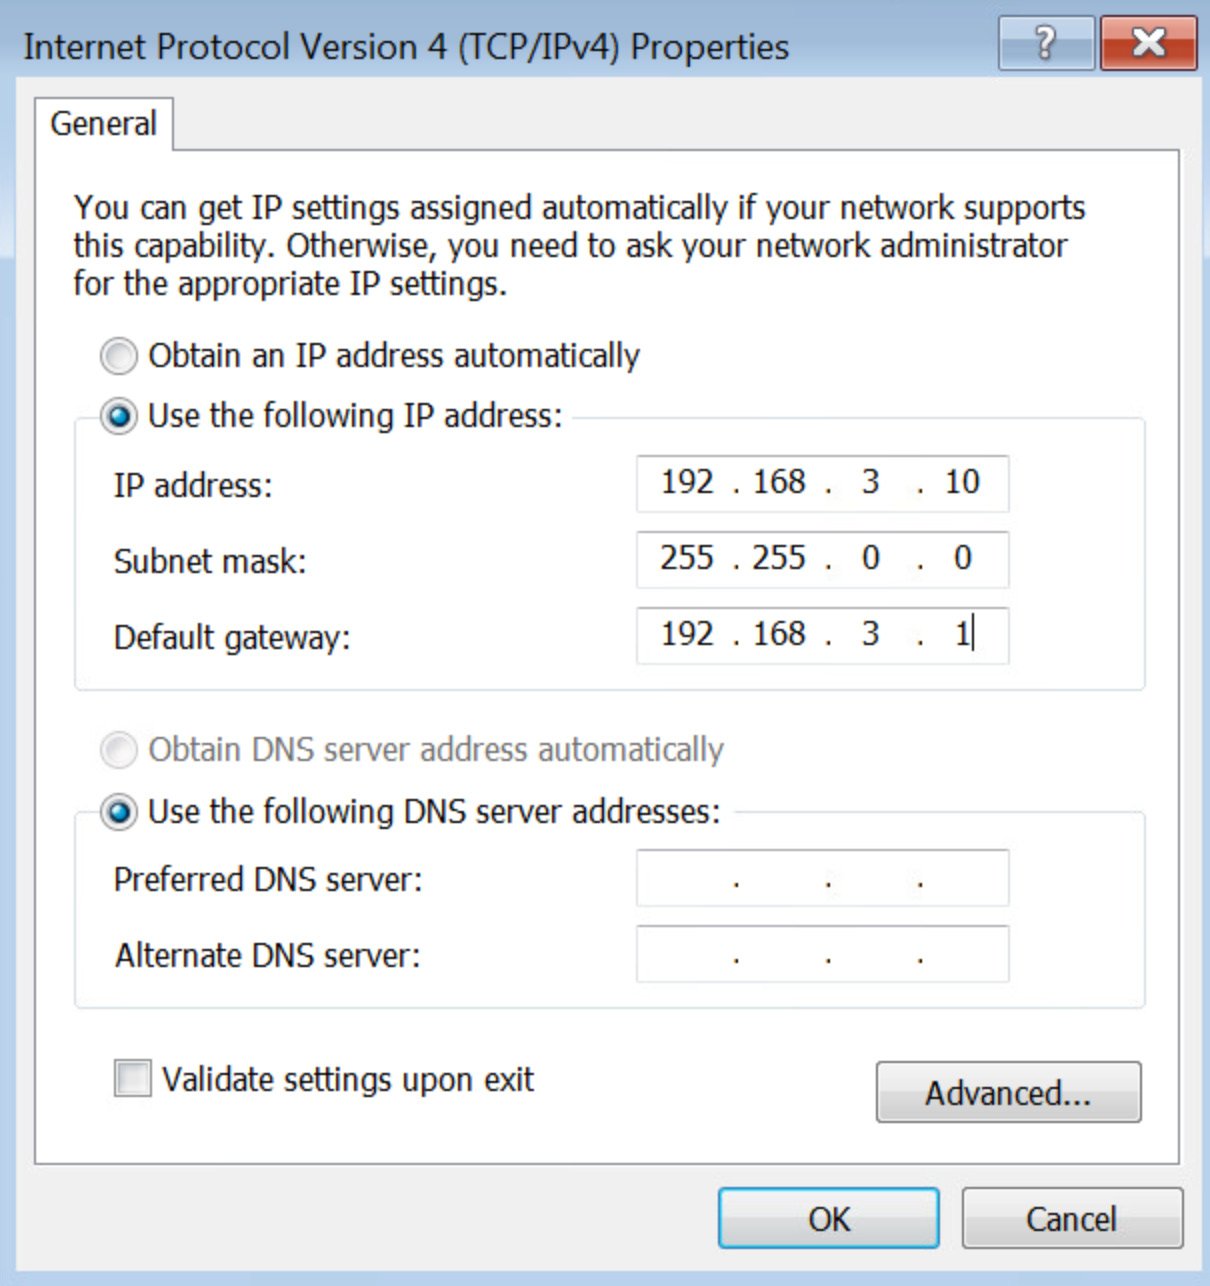
We will configure the network so that it follows a quasi-Purdue model in the next section. The Purdue model is a theoretical framework for segmenting industrial networks. Many books have been published documenting the usefulness of modeling a network after the Purdue model, so I strongly recommend grabbing one and having a read. The Purdue model is one way of applying a standard to segmentation, though there are many other standards that have been created, and many are industry-specific. In North America for the Utility industry North American Reliability Corporation Critical Infrastructure Protection (NERC CIP), is a set of reliability standards that are used to adhere to security best practices. Chemical Facility Anti-Terrorism Standards (CFATS) has been developed specifically for the chemical industry, but there is a lot of overlap between these standards. The International Organization for Standardization (ISO/IEC) 27000 series and specifically ISO-27002 have been adopted outside North America, along with International Society of Automation (ISA) 99 or ISA 62443, which is where the Purdue model is ultimately derived from.
- Now, click Finish. This will place the provisioned VM inside the datastore. We will then want to run the VM, which will boot us into the Ubuntu installation process. We can do this by clicking the green power on button shown in the following screenshot:
Figure 1.21 – PLC virtual machine
- After clicking the power on button, you will get a page that looks like this:
Figure 1.22 – Powering on the virtual machine
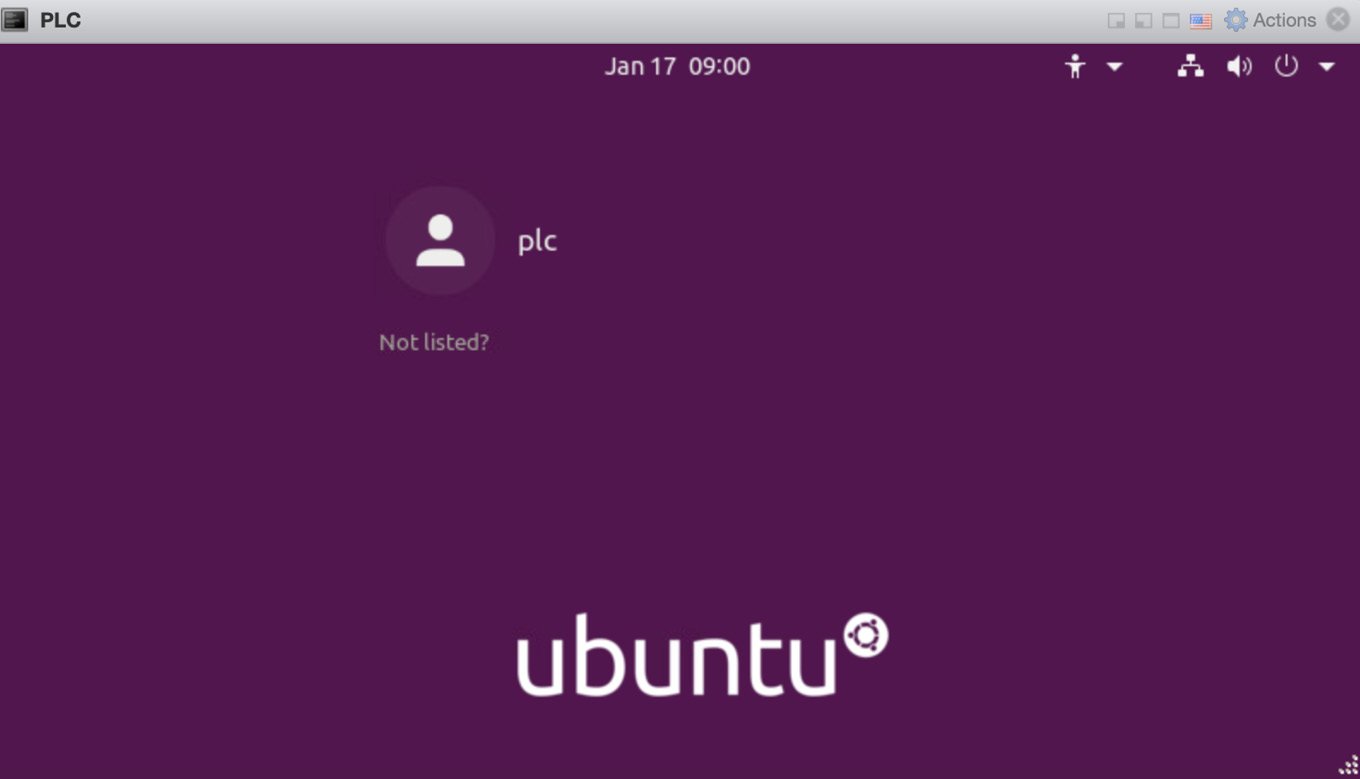
- Install Ubuntu as you would normally install any Linux distro. After installation, you should be sitting at a login screen, as shown in the following screenshot:
Figure 1.23 – Login screen for PLC VM
We are going to repeat all the steps we performed to create the virtual machine named PLC:
- Create a new VM.
- Load the DVD with the Ubuntu ISO located in the datastore.
- Choose 1 CPU, 4 GB of RAM, a 40 GB hard disk, and a VM network for the interface.
- Click the power on button.
- Install as you did previously.
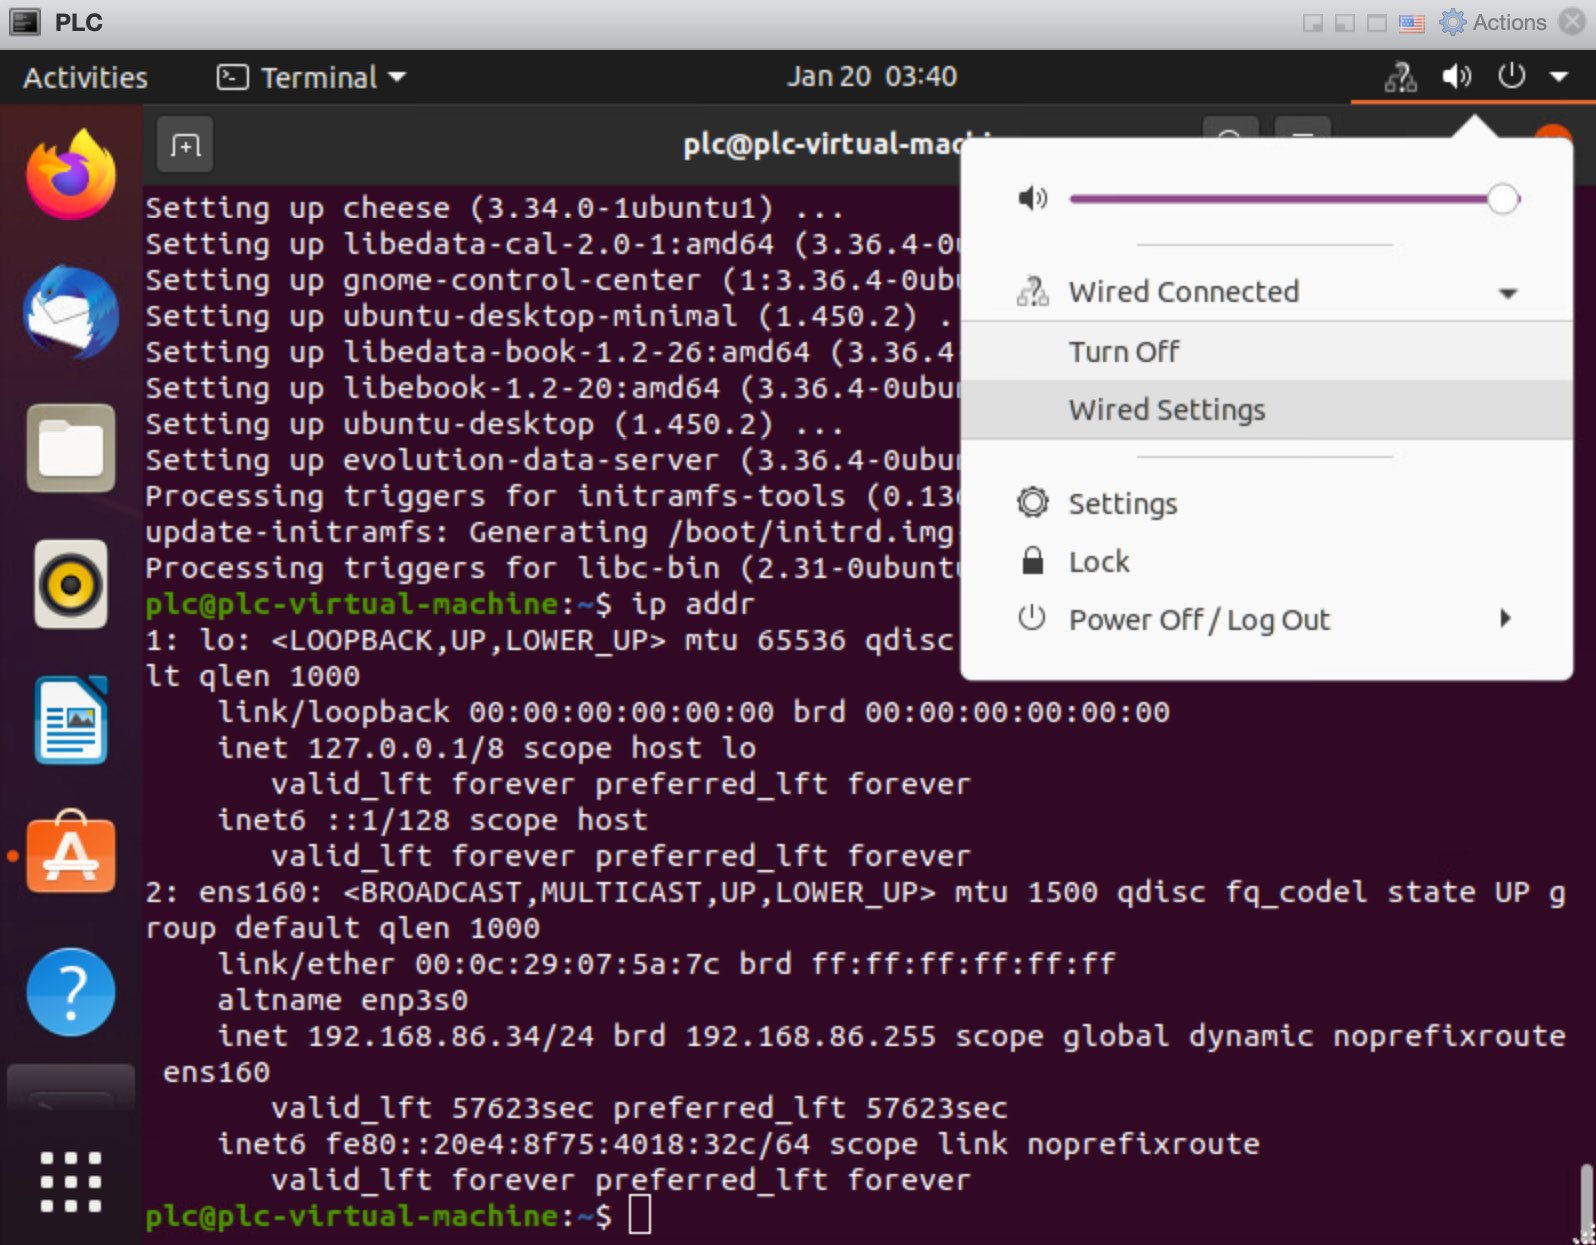
Now, call the VM SCADA. Now that you have two Ubuntu VMs – one named PLC and another named SCADA – the next step will be updating the VM and adding key packages that we want to use to simulate a virtual PLC.
First, log into the PLC and SCADA VMs and run the following commands:
sudo apt update
sudo apt upgrade
This will make sure that you have the latest versions of the core packages that make up your Ubuntu machines. Next, we are going to install specific packages so that we can create a virtual OT lab.
The key packages to install are as follows:
sudo apt install git
sudo apt install vsftpd
sudo apt install telnetd
sudo apt install openssh-server
sudo apt install php7.4-cli
sudo apt install python3-pip
pip3 install twisted
pip3 install testresources
pip3 install pytest
pip3 install cpppo
pip3 install pymodbus
The next thing we must do is clone a specific tool.
Run the following commands:
git clone https://github.com/sourceperl/mbtget.git
cd mbtget
perl Makefile.PL
make
sudo make install
Almost each package could have independent books written about them, so instead of going into too much detail here, I am going to cover the reasonings behind each package.
They are as follows:
- git: We are going to use this to clone a simple Modbus client that is written in Perl called
mbtget.
- vsftpd: This is a very simple FTP daemon that allows us to simulate config file transfers on the network.
- telnetd: This is a
Telnet daemon that will also allow us to simulate config file transfers on the network.
- openssh-server: This allows us to run a
ssh connection to the PLC for command and control.
- php7.4-cli: This will allow us to simulate PLC interfaces later in this book.
- python3-pip: This is a package manager that's specific for Python 3.
The next packages are Python-specific:
- twisted: A networking engine and a dependency of pymodbus.
- testresources: A unit testing package and a dependency of pymodbus.
- pytest: A testing engine and a dependency of Cpppo.
- cpppo: A useful engine for testing various industrial protocols. We will focus on Ethernet/IP in this book.
- pymodbus: This is a
modbus engine that can be used as a client/server.
The next package is known as mtbget, and it is Perl-specific. It is a modbus client, and it is very useful for testing equipment in the field.
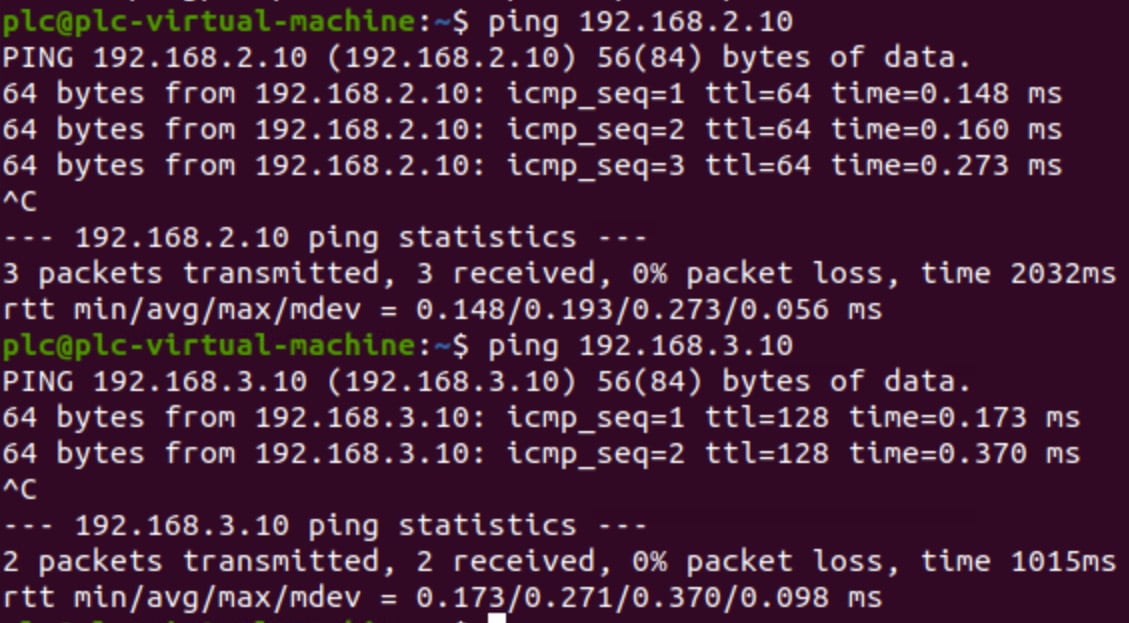
We now have two fully updated Ubuntu machines running inside our ESXi server. We have also installed various packages that will allow us to simulate a PLC to SCADA relationship. We can also generate remote connections over various protocols that will come in handy in later chapters. Next, we will build an Engineering Workstation and a Kali Linux attack box.
Spinning up Windows Engineering Workstation
If you were able to get through the installation without any issues, then we are one step closer to having a well-rounded virtual lab. Next, we want to get our hands on a Windows 7 image. This is important as much of the software that we require for configuring and communicating with the physical hardware was built for Windows. Well, technically speaking, it was built for Windows XP and then later upgraded to Windows 7.
Following the steps that we used to build the Ubuntu VMs, we will create our Windows 7 machine:
- Create a new VM.
- Load a DVD with the Windows7 ISO located in the datastore.
- Choose 1 CPU, 4 GB of RAM, a 40 GB hard disk, and a VM network for the interface.
- Click the power on button.
- Install Windows.
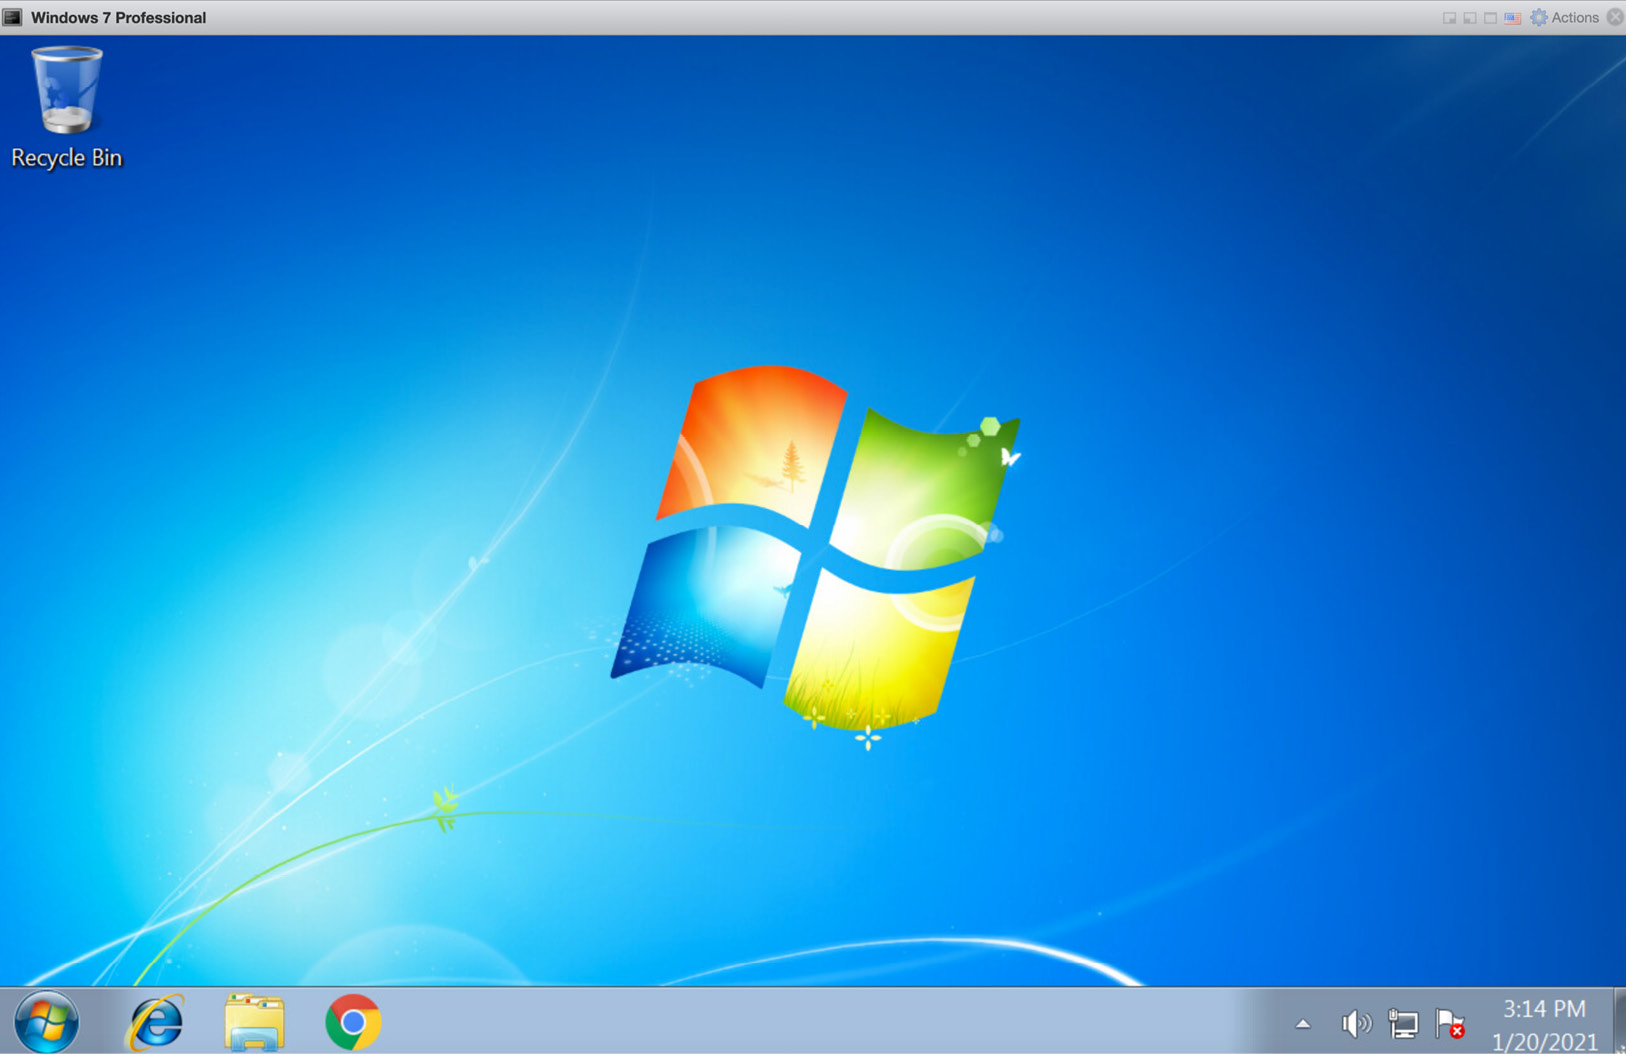
Once you have installed Windows and logged in, you should see a screen similar to the following:
Figure 1.24 – Windows 7 virtual machine
Now that we have our Windows 7 VM running, we are going to push forward with the installation of Kali Linux.
Spinning up Kali Linux
Kali Linux is a Linux distribution specifically designed for security research, assessments, and pentesting, to name a few. The name has changed since the package was inspected, but true to form, it still remains one of the most widely used security tools on the market.
Follow this link to download your copy of Kali Linux: https://www.kali.org/downloads/.
We are going to use Kali Linux to perform tests on the equipment in the lab, both virtual and physical. It is a well-rounded platform and includes gpg signed packages and has a large development community. There are many other notable pentesting frameworks out there that specialize in a similar nature, such as SamuraiSTFU, now known as controlthings.io. ControlThings provides a wide range of focused tools specific to the ICS/OT environment, along with pcaps for the ability of replaying inside your environment for testing purposes. On top of all this, they also provide countless emulators so that you can really hone your assessment skills. Parrot OS is a security platform that has grown in popularity, due to its user-friendly interface, low memory consumption, and anonymous surfing as a default function. It is a great framework to have in your pentesting arsenal.
Kali Linux has a straightforward installation process.
You need to follow the same steps you followed for Ubuntu and Windows 7 previously by uploading the Kali ISO to the datastore, and then mounting the ISO on the DVD drive and booting the VM.
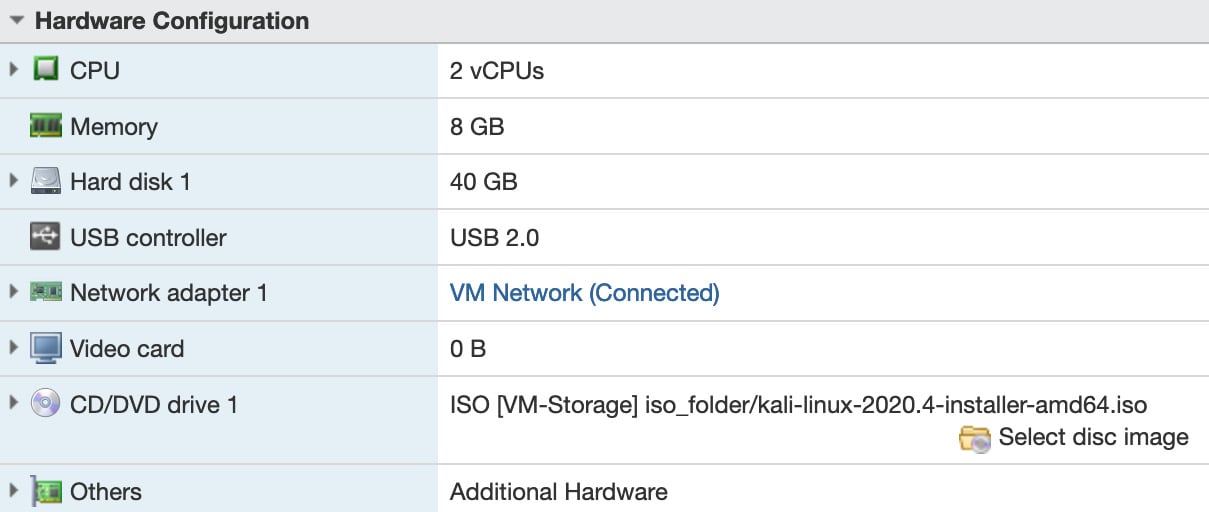
Next, go through the options for installing based on your region. The great part of a virtual lab is that you can adjust the hardware settings of a machine once it has been stood up. The following screenshot shows the Hardware Configuration settings that I started with:
Figure 1.25 – Kali Linux configuration
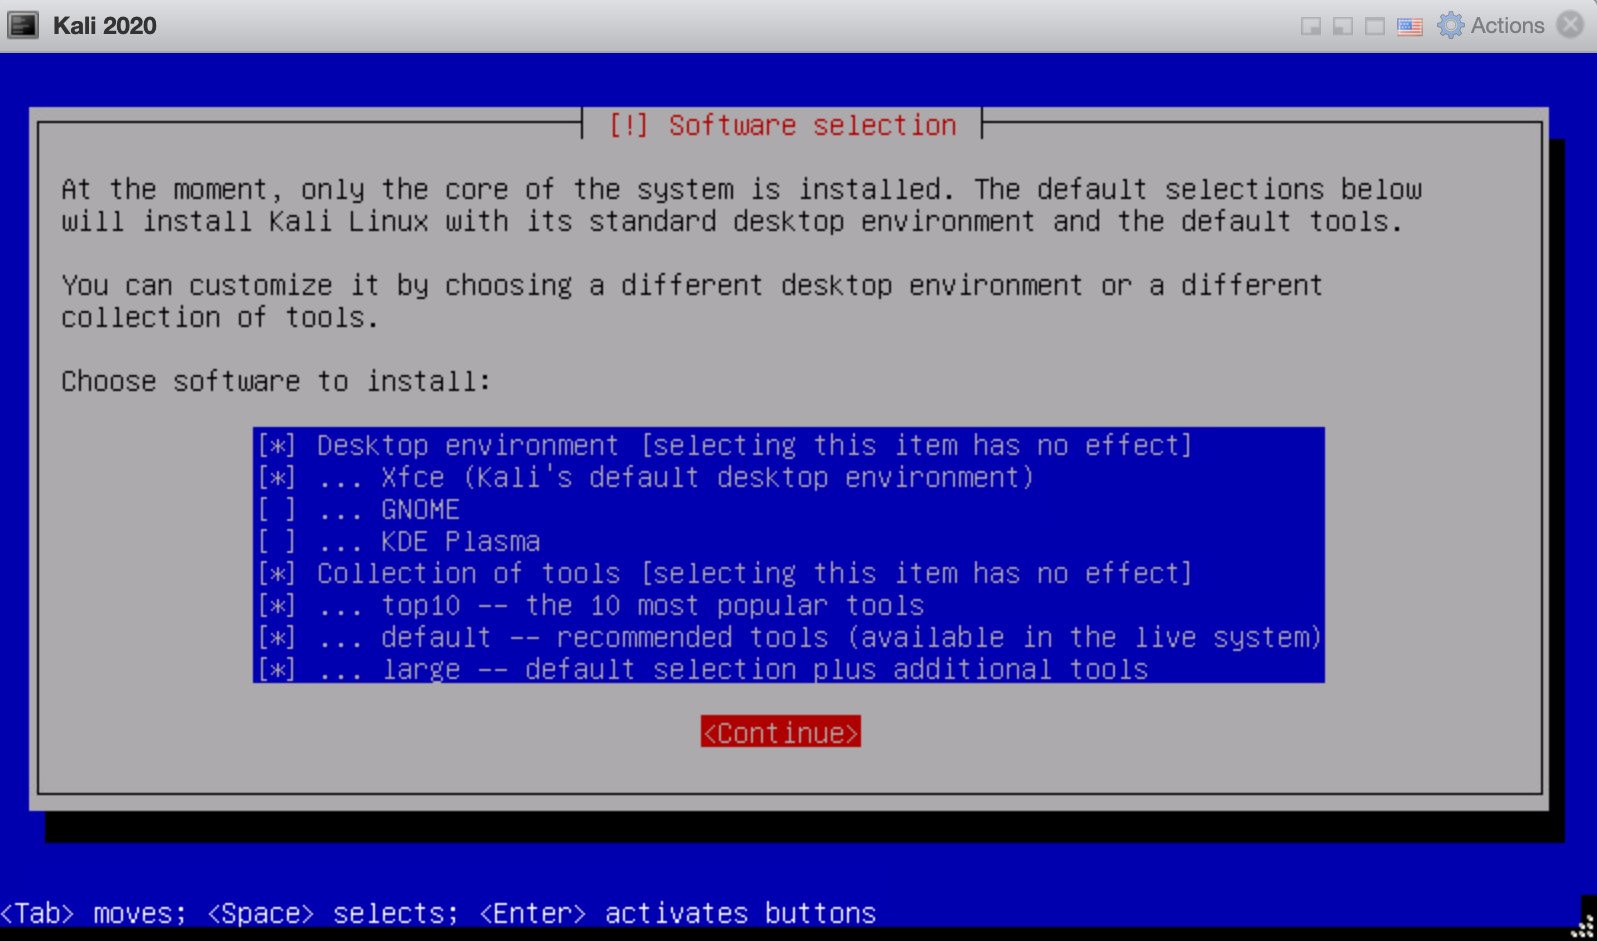
The last step of the installation process is selecting the software to install. Personally, I selected the large version to pre-load more tools. This selection is shown in the following screenshot:
Figure 1.26 – Software selection
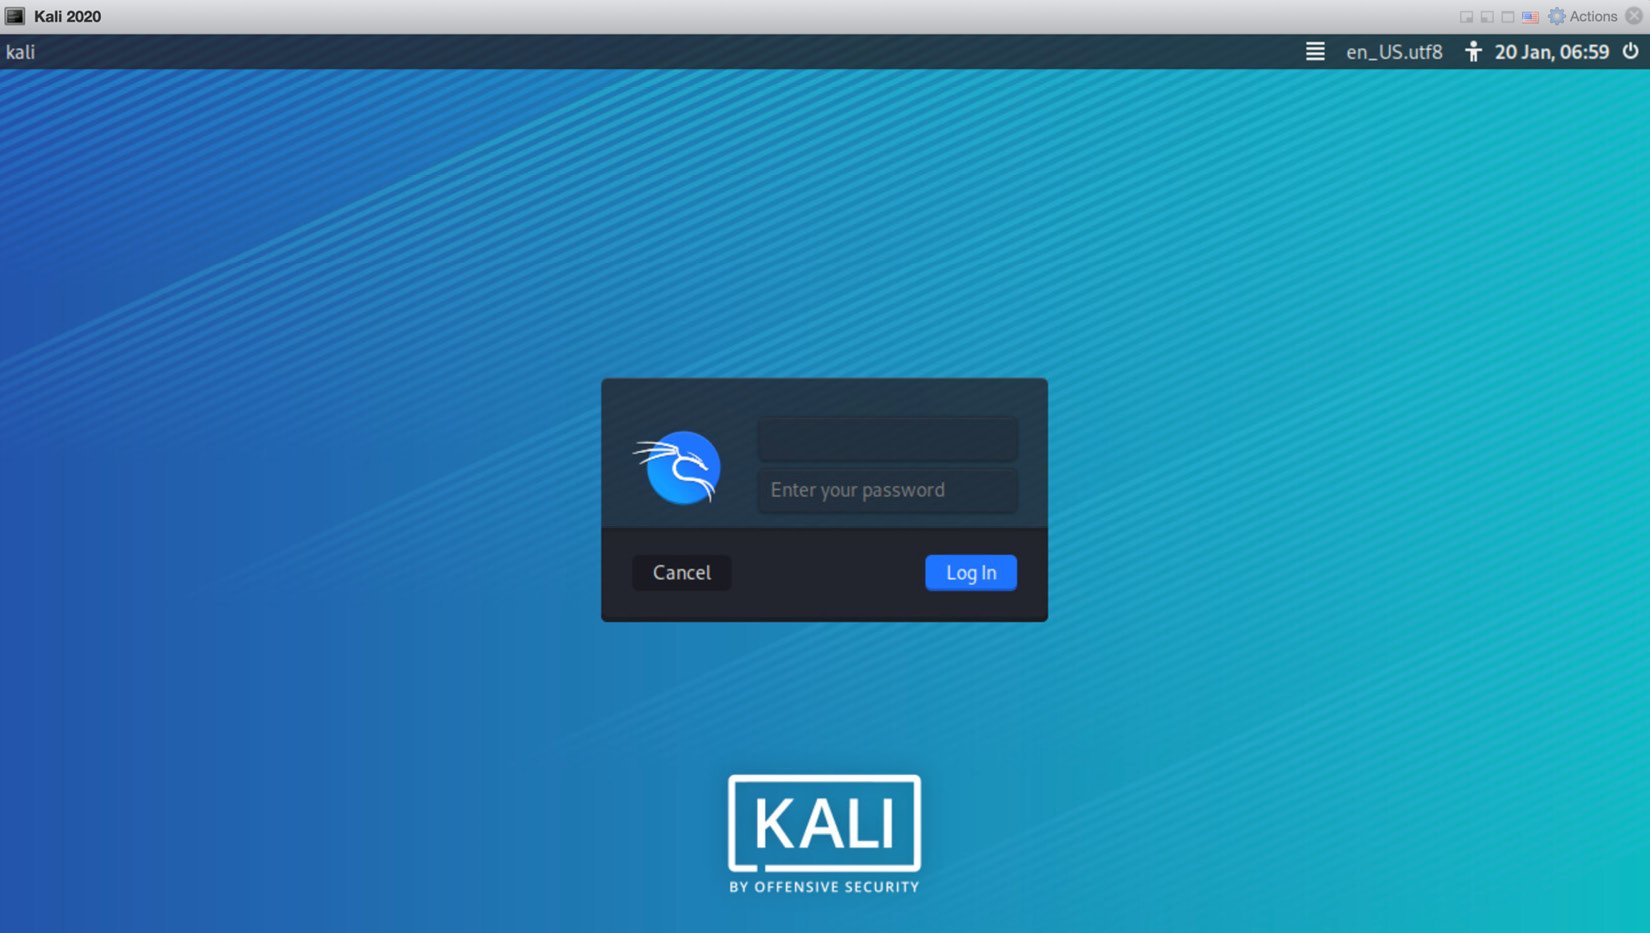
Next, log into the Kali box with the user that you set up during the initial installation.
Tip
Some quick history on the BackTrack/Kali credentials is that root:toor have been the default credentials ever since I started on BackTrack 4. Now, they have moved to kali:kali. So, if you happen to be on the Blue Team side of things, make sure to build out an Intrusion Detection Rule (IDR) for these known credentials.
You will be presented with a login screen, as shown in the following screenshot:
Figure 1.27 – Kali Linux login screen
Next, we will update Kali as we did with Ubuntu, and we will install similar packages to what we installed previously.
The key packages are installed using the following commands:
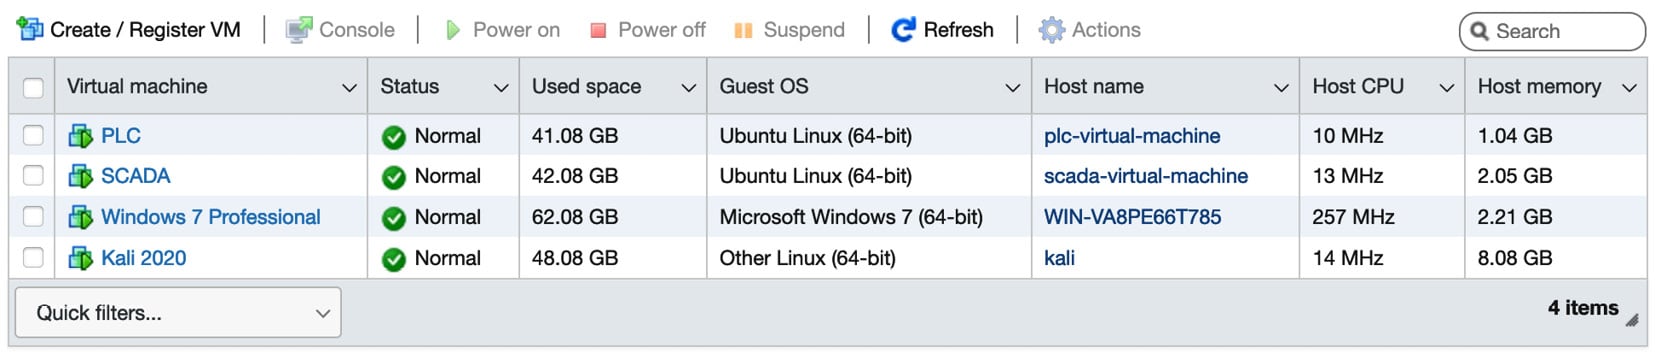
Now, if no errors occur, you should have four VMs installed on your hypervisor, as shown in the following screenshot:
Figure 1.28 – Virtual machines
In this section, we installed a Windows 7 Engineering Workstation and a Kali Linux host that will be simulating our attacker in the lab. We will launch various enumerations, exploits, and attacks from here. In the next section, we are going to move on to designing and implementing the networking segmentation by setting up levels that relate to a Purdue model.
 Argentina
 Australia
 Austria
 Belgium
 Brazil
 Bulgaria
 Canada
 Chile
Chile
 Colombia
 Cyprus
 Czechia
 Denmark
 Ecuador
 Egypt
Egypt
 Estonia
 Finland
 France
 Germany
 Great Britain
 Greece
 Hungary
 India
India
 Indonesia
 Ireland
 Italy
Italy
 Japan
Japan
 Latvia
 Lithuania
 Luxembourg
 Malaysia
 Malta
Malta
 Mexico
 Netherlands
 New Zealand
 Norway
 Philippines
 Poland
 Portugal
 Romania
 Russia
 Singapore
 Slovakia
 Slovenia
 South Africa
 South Korea
 Spain
Spain
 Sweden
 Switzerland
 Taiwan
 Thailand
 Turkey
 Ukraine
 United States