This section serves as a quick guide for the basic installation of an arbitrary Linux distribution. For hands-on examples and specific guidelines, we use Ubuntu. We also take a brief look at different environments hosting a Linux installation. There is an emerging trend of hybrid cloud infrastructures, with a mix of on-premises data center and public cloud deployments, where a Linux host can either be a bare-metal system, a hypervisor, a VM, or a Docker container.
In most of these cases, the same principles apply when performing a Linux installation. For detail on Docker-containerized Linux deployments, see Chapter 13.
In the following sections, we will show you how to install Linux on bare metal and on a Windows 11 host using different VM hypervisors, and using WSL. Installing on a macOS host is basically the same as installing on Windows using a VM hypervisor, and we will not cover that.
How to install Linux on bare metal
This section describes the essential steps required for a Linux installation on bare metal. We use this term when referring to hardware such as laptops, desktops, workstations, and servers. In a nutshell, the main steps are downloading the ISO image, creating bootable media, trying out the live mode, and finally, doing the installation.
The steps used here are equally applicable to virtual machine installations, as you will see in the following sections.
Step 1 – Download
We start by downloading our Linux distribution of choice. Most distributions are typically available in ISO format on the distribution’s website. For example, we can download Ubuntu Desktop at https://ubuntu.com/download/desktop.
Using the ISO image, in the next step we can create the bootable media required for the Linux installation. We can also use the ISO image to install Linux in a VM, as shown in the next section.
Step 2 – Create the bootable media
As we install Linux on a PC desktop or workstation (bare-metal) system, the bootable Linux media is generally a CD/DVD or a USB device. With a DVD-writable optical drive at hand, we can simply burn a DVD with our Linux distribution ISO. But because modern-day computers, especially laptops, rarely come equipped with a CD or a DVD unit of any kind, the more common choice for bootable media is a USB drive.
Important note
There’s also a third possibility of using a Preboot eXecution Environment (PXE) boot server. PXE (pronounced pixie) is a client-server environment where a PXE-enabled client (PC/BIOS) loads and boots a software package over a local or wide area network from a PXE-enabled server. PXE eliminates the need for physical boot devices (CD/DVD, USB) and reduces the installation overhead, especially for a large number of clients and operating systems. Probing the depths of PXE internals is beyond the scope of this chapter, but we will give you a short introduction on how it works for Linux installations by the end of this chapter. A good starting point to learn more about PXE is https://en.wikipedia.org/wiki/Preboot_Execution_Environment.
A relatively straightforward way to produce a bootable USB drive with a Linux distribution of our choice is via using tools such a UNetbootin (https://unetbootin.github.io) or Balena Etcher (https://www.balena.io/etcher). Both UNetbootin and Etcher are cross-platform utilities, running on Windows, Linux, and macOS.
We will use Balena Etcher for this example of creating a bootable USB drive in Windows:
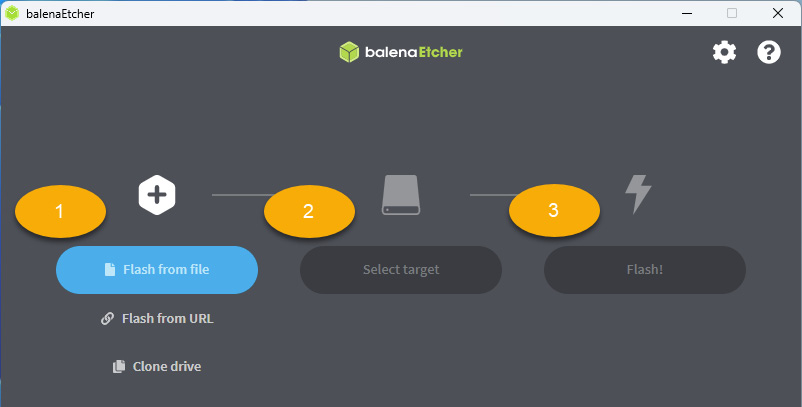
Figure 1.2 – Create a bootable USB drive with Balena Etcher
Here are the basic steps for creating a bootable USB drive with Ubuntu Desktop using Balena Etcher. We assume the Ubuntu Desktop ISO image has been downloaded and Etcher is installed (in our case on Windows 11):
- Choose the ISO file with your Linux distribution of choice.
- Select the USB target destination disk.
- Flash the previously selected disk with the ISO of your choice.
The process should take a couple of minutes and the USB drive will be ready. Now, let’s look at how we can take the bootable media for a spin.
Step 3 – Try it out in live mode
This step is optional.
Most Linux distributions have their ISO image available for download as live media. We say most because not all of them offer this option, at least not by default. Nevertheless, among those who do offer live media by default are Ubuntu and Fedora.
Once we have the bootable media created with our Linux distribution of choice, we can run a live environment of our Linux platform without actually installing it. In other words, we can evaluate and test the Linux distribution before deciding whether we want to install it or not. The live Linux operating system is loaded in the system memory (RAM) of our PC, without using any disk storage. We should make sure the PC has enough RAM to accommodate the minimum required memory of our Linux distribution.
When booting the PC from a bootable media, we need to make sure the boot order in the BIOS is set to read our drive with the highest priority. On a Mac, we need to press the Option key immediately after the reboot start-up chime and select our USB drive to boot from. When on a PC, make sure you access your BIOS interface and select the appropriate device for boot. Depending on your system, you will either have to press one of the F2, F10, F12, or F1 keys after hitting Enter, or the Delete key, as a general rule. In some specific cases, there could be another Function key assigned for this. The keys that you need to press are usually specified at the bottom of the initial bootup screen.
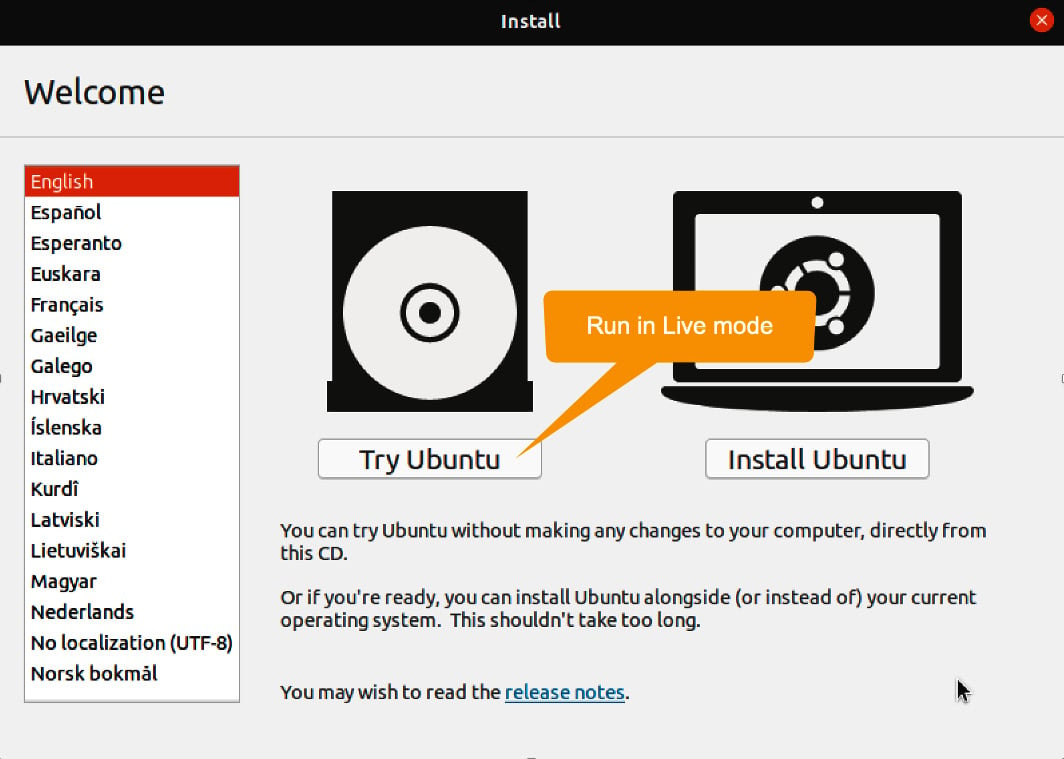
Upon reboot, the first splash screen of our Linux distribution should give us the option of running in live mode, as seen in the following illustration for Ubuntu Desktop (Try Ubuntu):
Figure 1.3 – Choosing live mode for Ubuntu Desktop
Next, let’s take a look at the installation procedure of our Linux distro, using the bootable media.
Step 4 – Perform the installation
We start the installation of our Linux distribution by booting the PC from the bootable media created in step 2. To ensure the system can boot from our external device, we are sometimes required to change the boot order in the BIOS, especially if we boot from a USB drive. Do as specified in the previous paragraph to select the right boot drive.
In the following sections, we showcase the installation process of Ubuntu using its ISO images. We choose the Desktop and Server versions for Ubuntu and highlight the main differences between them. As a comparison, Rocky Linux and CentOS Stream come in a single flavor, in essence, a server platform with an optional graphical user interface. Similar to those, openSUSE offers one installation medium for both desktop and server installs. Fedora, on the other hand, has different installation mediums for desktop and server.
We will now walk you through the process of installing Linux inside a VM.
Linux in a VM
In each of the subsections in the Installing Linux section, we will also provide a brief guide on how to prepare a VM environment for the related Linux platform.
A VM is an isolated software abstraction of a physical machine. VMs are deployed on top of a hypervisor. A hypervisor provides the runtime provisioning and resource management of VMs. A couple of general-purpose hypervisors used are the following:
The first two of these hypervisors are cross-platform virtualization applications and run on both Intel and AMD processor architectures on Windows, macOS, and Linux. The latter is only available on Windows Pro, versions 10 and 11.
Important note
At the time of writing this book, hypervisors for the Apple silicon Macs are provided only by VMware Player and Parallels. Oracle VirtualBox is still in preview for the Advanced RISC Machines (ARM) architecture. Both solutions from VMware and Parallels are paid-for software on macOS, so you will need to purchase them in order to use them.
The difference between installing Linux on a VM compared to a physical machine is minor. The notable distinction is related to the VM sizing and configuration steps, making sure the minimum system requirements of the Linux distribution are met. Thus, in the following sections we will install Ubuntu on VMware Workstation under Windows.
Please take into account that installing Linux on VMware Player under macOS is very similar, and we will not duplicate the process in this edition of the book. macOS functionality was discussed in the first edition of the book, but given the limited availability of hypervisors for the Apple silicon platform, we have decided to skip it in this edition. Regarding Linux availability on bare-metal Apple silicon Macs, you could visit Asahi Linux, a project that aims to bring a fully functional Linux distribution to Apple silicon computers. Asahi Linux is available at https://asahilinux.org/.
In the next section, we briefly illustrate the installation of Ubuntu Server LTS. If we plan to install Ubuntu in a VM, there are some preliminary steps required for provisioning the VM environment. Otherwise, we proceed directly to the Installation section.
VM provisioning using VMware Workstation
In the following steps, we will create a VM based on Ubuntu Server using VMware Workstation on Windows 11. At the time of writing, version 17 of the software is available for both free and commercial use.
- The first step after initializing the hypervisor is to click on Create a New Virtual Machine. This will open a new window with the new virtual machine wizard, where you can select the ISO image for the Linux distribution you want to install.
- Click Browse and then open the image from your hard drive or download destination.
- Click Next and you will have to give a name to the new VM and choose a location on your disk for installation. We will leave the default destination as provided by the hypervisor and name the VM
Ubuntu Server 22.04.1.
- Click Next. In the following window that appears, you have to give the maximum disk size for the VM. By default, it is set to 20 GB as the recommended size for Ubuntu Server. We will leave it as is.
- By clicking Next once more, a window with the VM settings is provided. By default, the hypervisor provides 2 CPU cores and 4 GB of RAM to the VM. You can click on the Customize hardware button to change the defaults, depending on your hardware availability. As a rule, we recommend having at least 16 GB of RAM on your system and an 8-core CPU to be able to create reasonable-sized VMs. When everything is set up as you want, click on the Close button on the lower right side of the window. You are now back to the main wizard window.
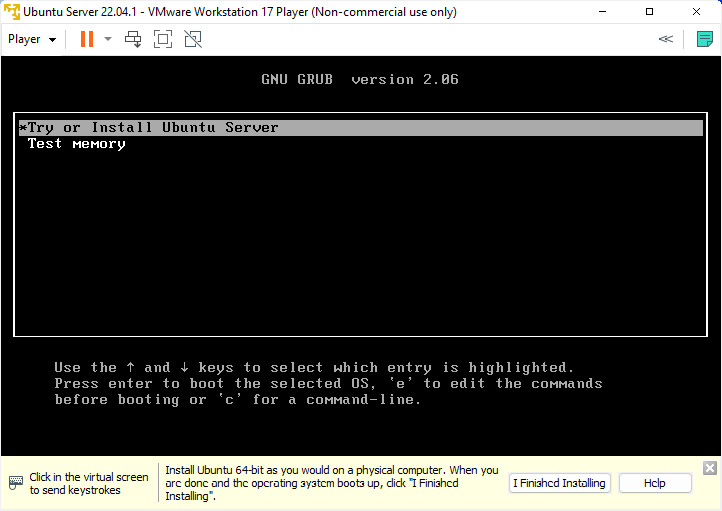
- Click Finish to complete the setup and create and initialize the VM. In the following screenshot you can see the newly created VM, running inside VMware
Figure 1.4 – Power-up and Linux installation on a new VM
Installation process
Here’s the normal installation process for Ubuntu Server LTS, following the initial boot into setup mode:
- The initial welcome screen prompts for the language of your choice. Select the one you prefer and press Enter on your keyboard.
- You might be prompted to apply an installer update if available. You have the options to update the installer or continue without updating. We choose to update the installer if prompted.
- If there is no update available, the next screen prompts you to select your keyboard layout. Select accordingly. In our case, it is English. Select Done and press Enter.
- The next prompt asks you to choose the base for the installation from the following options: Ubuntu Server and Ubuntu Server (minimized). You also have the option to search for third-party drivers. We choose Ubuntu Server and select the third-party driver option. You can make your way around the options on the screen using either Tab or the Arrow keys. To select an option, press the Space key. Select Done and press Enter.
- The next screen will show you the network connections. If the defaults work for you, hit Enter to go to the next setup screen.
- You will be asked about proxy configuration. If you don’t require this, just hit Enter to go to the next screen.
- You will now be asked to configure the default Ubuntu mirror for the repository archives. Edit this according to your location, or just leave the defaults provided by the installer. Press Enter.
- The next screen prompts you to configure storage and partitioning. We will just use the entire 20 GB disk with the default settings, so select Done and press Enter.
- A storage configuration summary is provided. If everything is according to your requirements, just hit Enter.
- A warning will pop up, asking whether you are definitely happy with the settings and willing to continue with the installation. Hit Enter.
- The next screen asks for your profile information, including your name, the server’s name, the username, and password. Set those up and go to the next screen.
- You will be asked to choose whether to install an openSSH server or not. Select the option to install openSSH. If you have any SSH key(s) you would like to import, you can provide them here. Once finished, go to the next screen.
- You will be prompted to select and install specific snap packages for your new server installation. Depending on your requirements, you can install these now, or choose to manually install them later on. Among the provided packages are
docker, microk8s, powershell, nextcloud, and livepatch. Select what you need to meet your requirements and continue to the next screen.
- The installation process begins. This could take a couple of minutes. Be patient and wait for the reboot option to appear once the operating system is installed.
After you reboot, the login screen appears and you will be able to use your new Ubuntu Server VM from inside Windows 11 using VMware Workstation. We have now completed the Ubuntu Server installation.
Installing any other distribution is very similar to installing Ubuntu. When installing desktop variants, a graphical user interface will be available. In the preceding example, as we installed a server-specific operating system, the graphical user interface was missing, having just a minimal text-based interface.
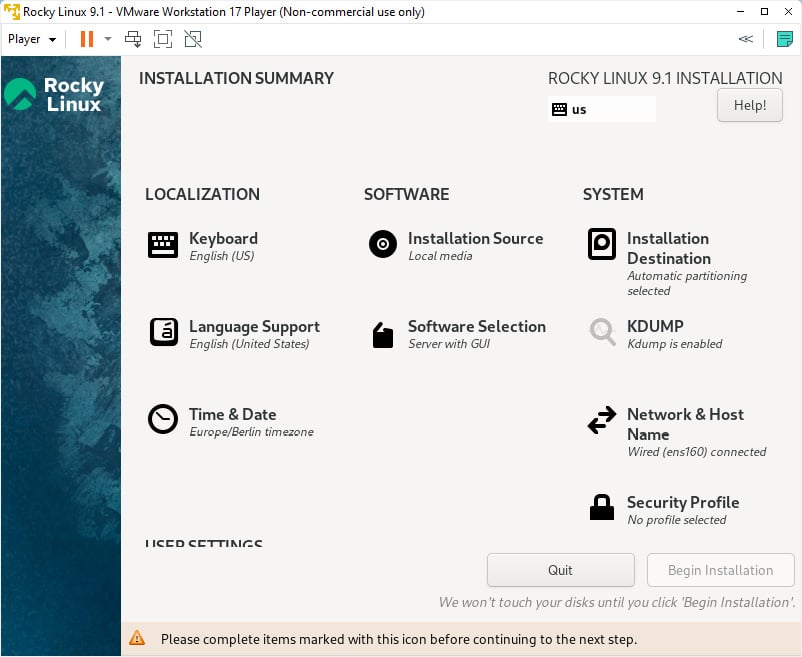
We will not walk you through the installation process of any other distribution, but we will show you the Rocky Linux installation interface:
Figure 1.5 – The Rocky Linux installation GUI
So far, we have learned how to perform a basic installation of Linux. Along the way, we created a bootable USB flash drive for our installation media, most commonly used for Linux PC platform installations. We briefly covered VM-specific Linux environments using the VMware Workstation hypervisor for Windows 11.
In the following section, we’ll learn how to install and run a Linux distribution on the Windows platform without the use of a standalone hypervisor by using the Windows Subsystem for Linux.
VM provisioning using Hyper-V
In the following steps, we will create a VM based on Ubuntu Server, using Microsoft’s Hyper-V solution available on Windows 11 Pro.
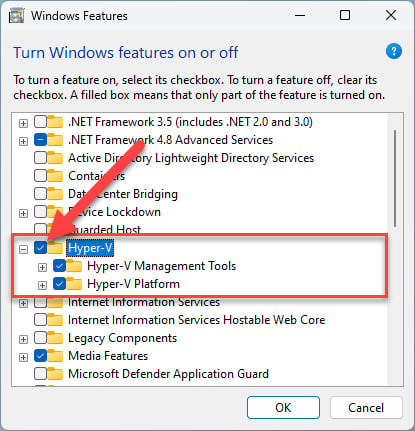
The first step is to activate the Hyper-V hypervisor, as it is not activated by default. For this, we will need to go to Windows Features and select the Hyper-V checkbox, as shown in the following figure. After activation, a restart is required.
Figure 1.6 – Activating Hyper-V on Windows 11 Pro
To create a new VM, you will have to start Hyper-V Manager. The application has a three-pane interface. In the Actions pane on the right, you should see the New option. Click on it and select the Virtual Machine… option. This will open a new window where you can configure the new VM with the following steps:
- Set the name and location; we will give it the name
Ubuntu and leave the default location as is. Click Next.
- Set the generation of the VM. You have two options, Generation 1 and Generation 2. The second option will be suitable for UEFI-based BIOS and Network installation (PXE). We will select Generation 1 and click Next.
- Specify the amount of RAM. By default, this is set to 4 GB minimum, with the option of dynamic memory selected. We will leave the default as is. Click Next.
- Configure networking by selecting the appropriate option from the dropdown. You have three options: Not Connected, Default Switch, WSL; we will select Default Switch and click Next.
- Configure a virtual hard drive by setting the size and location. Click Next.
- In the following window, you have the option to install an operating system now or at a later time. We will select the Ubuntu Desktop ISO image from our location of choice and click Next.
- The following window shows the summary of the VM’s configuration. You can change any of it by going back from here. Once done, click the Finish button and the VM will be created.
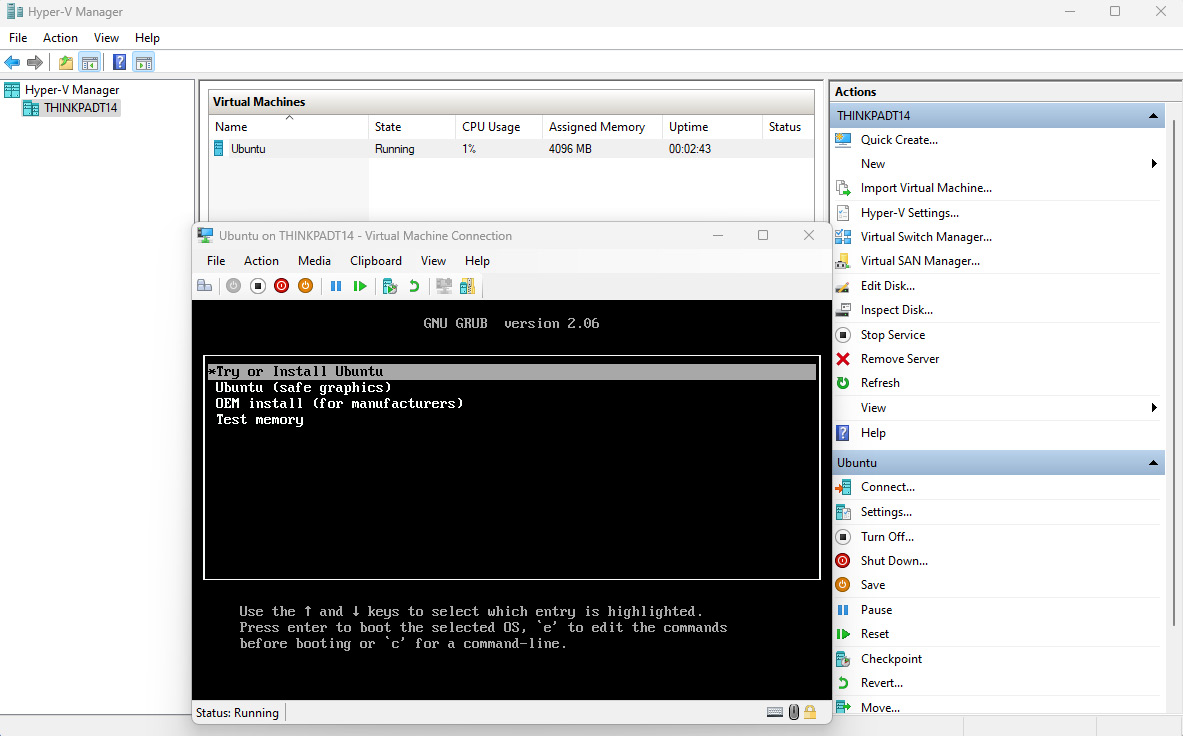
The following screenshot shows the new Ubuntu VM running inside Hyper-V:
Figure 1.7 – New Ubuntu VM using Hyper-V
The installation process is similar to the one shown in the previous section, thus we will not reproduce it here again. In the next section, we will use another hypervisor, this time from Oracle.
VM provisioning using Oracle’s VirtualBox
Oracle’s VirtualBox is a free-to-use piece of software that is multi-platform, available on Windows, macOS and Linux. We will show you how to create a Linux VM from Windows 11. We assume that you have VirtualBox already installed. Once you start it, a user-friendly interface is available. The following steps are used to create a new VM. We will use Fedora Workstation for our example:
- Click on the New icon to start the process of creating a new VM. This will open a new window where information about the VM’s name and operating system type and ISO location need to be provided. This new window is in Guided Mode by default. You have the option on the lower right side of the window to choose the Expert Mode. This will give you more control over the creation process.
- Provide all the needed information. In our case, we will use Fedora, so we will give it the name
Fedora. Point to the ISO file’s location and the type of the operating system will change automatically. If you are in Expert Mode, you will have some more auto-hidden sections for Unattended Install, Hardware, and Hard Disk options.
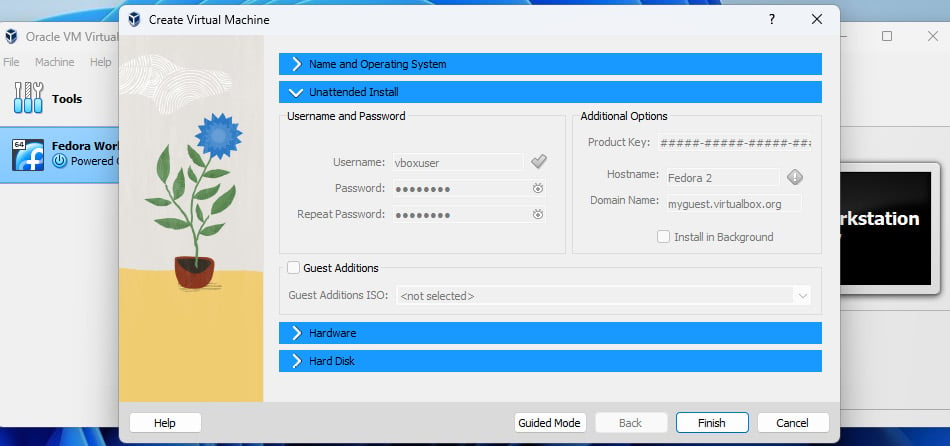
- Because we are installing Fedora, the Unattended Install section is grayed out (see Figure 1.11). This option is supported by only a few operating systems (Ubuntu, RHEL, Oracle Linux, and Windows).
- In the Hardware section, we will provide the amount of system memory and processors we want the new VM to have. Choose according to your hardware resources, but keep in mind that each operating system has specific system requirements. In our case, we will choose 4 GB of RAM and 2 vCPUs.
- The Hard Disk section is where you choose the amount of disk space for the VM’s hard disk. Again, choose according to your resources, but keep in mind that a minimal amount is required to meet specific system requirements. In our opinion, a minimum of 20 GB of hard disk space should be provided. Choose the location of the virtual hard drive and click Finish.
- The VM will be created and the window will close, bringing you back to the initial VirtualBox window. Here, you will see all the relevant information about the VM. To power it on, just click on the Start button (the one with a big green right arrow).
- A new window with the VM will appear.
The following screenshot shows the VM creation window inside VirtualBox:
Figure 1.8 – VirtualBox interface
As you can see, creating Linux VMs with all three major hypervisors available (from VMware, Oracle, and Microsoft) is very straightforward and relatively easy to do. No matter which solution you use, the process of installing Linux in a VM is the same.
Aside from VM provisioning, Microsoft Windows offers a relatively new way to run Linux, and this is by using the Windows Subsystem for Linux. We will show you how in the next section.
 Argentina
 Australia
 Austria
 Belgium
 Brazil
 Bulgaria
 Canada
 Chile
Chile
 Colombia
 Cyprus
 Czechia
 Denmark
 Ecuador
 Egypt
Egypt
 Estonia
 Finland
 France
 Germany
 Great Britain
 Greece
 Hungary
 India
India
 Indonesia
 Ireland
 Italy
Italy
 Japan
Japan
 Latvia
 Lithuania
 Luxembourg
 Malaysia
 Malta
Malta
 Mexico
 Netherlands
 New Zealand
 Norway
 Philippines
 Poland
 Portugal
 Romania
 Russia
 Singapore
 Slovakia
 Slovenia
 South Africa
 South Korea
 Spain
Spain
 Sweden
 Switzerland
 Taiwan
 Thailand
 Turkey
 Ukraine
 United States