


 Download code from GitHub
Building an Image Viewer
Computer vision is the technology that enables computers to achieve a high-level understanding of digital images and videos, rather than only treating them as bytes or pixels. It is widely used for scene reconstruction, event detection, video tracking, object recognition, 3D pose estimation, motion estimation, and image restoration.
OpenCV (open source computer vision) is a library that implements almost all computer vision methods and algorithms. Qt is a cross-platform application framework and widget toolkit for creating applications with graphical user interfaces that can run on all major desktop platforms, most embedded platforms, and even mobile platforms.
These two powerful libraries are used together by many developers to create professional software with a solid GUI in industries that benefit from computer vision technology. In this book, we will demonstrate how to build these types of functional application with Qt 5 and OpenCV 4, which has friendly graphical user interfaces and several functions associated with computer vision technology.
In this first chapter, we will start by building a simple GUI application for image viewing with Qt 5.
The following topics will be covered in this chapter as follows:
- Designing the user interface
- Reading and displaying images with Qt
- Zooming in and out of images
- Saving a copy of images in any supported format
- Responding to hotkeys in a Qt application
Technical requirements
Ensure that you at least have Qt version 5 installed and have some basic knowledge of C++ and Qt programming. A compatible C++ compiler is also required, that is, GCC 5 or later on Linux, Clang 7.0 or later on macOS, and MSVC 2015 or later on Microsoft Windows.
Since some pertinent basic knowledge is required as a prerequisite, the Qt installation and compiler environment setup are not included in this book. There are many books, online documents, or tutorials available (for example, GUI Programming with C++ and Qt5, by Lee Zhi Eng, as well as the official Qt library documentation) to help teach these basic configuration processes step by step; users can refer to these by themselves if necessary.
With all of these prerequisites in place, let's start the development of our first application—the simple image viewer.
All the code for this chapter can be found in our code repository at https://github.com/PacktPublishing/Qt-5-and-OpenCV-4-Computer-Vision-Projects/tree/master/Chapter-01.
Check out the following video to see the code in action: http://bit.ly/2KoYWFx
Designing the user interface
The first part of building an application is to define what the application will do. In this chapter, we will develop an image viewer app. The features it should have are as follows:
- Open an image from our hard disk
- Zoom in/out
- View the previous or next image within the same folder
- Save a copy of the current image as another file (with a different path or filename) in another format
There are many image viewer applications that we can follow, such as gThumb on Linux and Preview app on macOS. However, our application will be simpler than those in that we have undertaken some preplanning. This involved the use of Pencil to draw the wireframe of the application prototype.
The following is a wireframe showing our application prototype:
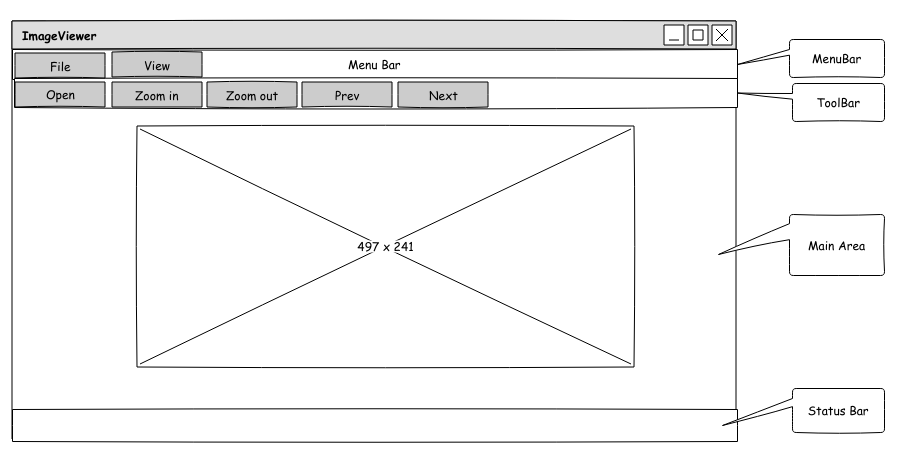
As you can see in the preceding diagram, we have four areas in the main window: the MenuBar, the ToolBar, the Main Area, and the Status Bar.
The menu bar has two menu options on it—the File and View menus. Each menu will have its own set of actions. The File menu consists of the following three actions as follows:
- Open: This option opens an image from the hard disk.
- Save as: This option saves a copy of the current image as another file (with a different path or filename) in any supported format.
- Exit: This option exits the application.
The View menu consists of four actions as follows:
- Zoom in: This option zooms in to the image.
- Zoom out: This option zooms out of the image.
- Prev: This option opens the previous image in the current folder.
- Next: This option opens the next image in the current folder.
The toolbar consists of several buttons that can also be found in the menu options. We place them on the toolbar to give the users shortcuts to trigger these actions. So, it is necessary to include all frequently used actions, including the following:
- Open
- Zoom in
- Zoom out
- Previous image
- Next image
The main area is used to show the image that is opened by the application.
The status bar is used to show some information pertaining to the image that we are viewing, such as its path, dimensions, and its size in bytes.
You can find the source file for this design in our code repository on GitHub: https://github.com/PacktPublishing/Qt-5-and-OpenCV-4-Computer-Vision-Projects. The file merely resides in the root directory of the repository, named WireFrames.epgz. Don't forget that it should be opened using the Pencil application.
Starting the project from scratch
In this section, we will build the image viewer application from scratch. No assumptions are made as to what integrated development environment (IDE) or editor you are using. We will just focus on the code itself and how to build the application using qmake in a Terminal.
First, let's create a new directory for our project, named ImageViewer. I use Linux and execute this in a Terminal, as follows:
$ pwd
/home/kdr2/Work/Books/Qt5-And-OpenCV4-Computer-Vision-Projects/Chapter-01
$ mkdir ImageViewer
$
Then, we create a C++ source file named main.cpp in that directory with the following content:
    #include <QApplication>
    #include <QMainWindow>

    int main(int argc, char *argv[])
    {
        QApplication app(argc, argv);
        QMainWindow window;
        window.setWindowTitle("ImageViewer");
        window.show();
        return app.exec();
    }
This file will be the gateway to our application. In this file, we first include dedicated header files for a GUI-based Qt application provided by the Qt library. Then, we define the main function, as most C++ applications do. In the main function, we define an instance of the QApplication class, which represents our image viewer application while it is running, and an instance of QMainWindow, which will be the main UI window, and which we designed in the preceding section. After creating the QMainWindow instance, we call some methods of it: setWindowTitle to set the title of the window and show to let the window emerge. Finally, we call the exec method of the application instance to enter the main event loop of the Qt application. This will make the application wait until exit() is called, and then return the value that was set to exit().
Once the main.cpp file is saved in our project directory, we enter the directory in the Terminal and run qmake -project to generate the Qt project file, as follows:
    $ cd ImageViewer/
    $ ls
    main.cpp
    $ qmake -project
    $ ls
    ImageViewer.pro main.cpp
    $
As you can see, a file named ImageViewer.pro is generated. This file contains
many directives and configurations of the Qt project and qmake will use this
ImageViewer.pro file to generate a makefile later. Let's examine that project file. Its content is listed in the following snippet after we omit all the comment lines that start with #, as follows:
    TEMPLATE = app
    TARGET = ImageViewer
    INCLUDEPATH += .

    DEFINES += QT_DEPRECATED_WARNINGS

    SOURCES += main.cpp
Let's go through this line by line.
The first line, TEMPLATE = app, specifies app as the template to use when generating the project. Many other values are allowed here, for example, lib and subdirs. We are building an application that can be run directly, so the value app is the proper one for us. Using other values are beyond the scope of this chapter; you can refer to the qmake manual at http://doc.qt.io/qt-5/qmake-manual.html yourself to explore them.
The second line, TARGET = ImageViewer, specifies the name of the executable for the application. So, we will get an executable file named ImageViewer once the project is built.
The remaining lines define several options for the compiler, such as the include path, macro definitions, and input source files. You can easily ascertain which line does what based on the variable names in these lines.
Now, let's build the project, run qmake -makefile to generate the makefile, and then run make to build the project, that is, compile the source to our target executable:
    $ qmake -makefile
    $ ls
    ImageViewer.pro main.cpp Makefile
    $ make
    g++ -c -pipe -O2 -Wall -W -D_REENTRANT -fPIC -DQT_DEPRECATED_WARNINGS -DQT_NO_DEBUG -DQT_GUI_LIB -DQT_CORE_LIB -I. -I. -isystem /usr/include/x86_64-linux-gnu/qt5 -isystem /usr/include/x86_64-linux-gnu/qt5/QtGui -isystem /usr/include/x86_64-linux-gnu/qt5/QtCore -I. -isystem /usr/include/libdrm -I/usr/lib/x86_64-linux-gnu/qt5/mkspecs/linux-g++
    -o main.o main.cpp
    main.cpp:1:10: fatal error: QApplication: No such file or directory
     #include <QApplication>
              ^~~~~~~~~~~~~~
    compilation terminated.
    make: *** [Makefile:395: main.o] Error 1
    $
Oops! We get a big error. This is because, with effect from Qt version 5, all the native GUI features have been moved from the core module to a separate module, the widgets module. We should tell qmake that our application depends on that module by adding the line greaterThan(QT_MAJOR_VERSION, 4): QT += widgets to the project file. Following this modification, the content of ImageViewer.pro appears as follows:
    TEMPLATE = app
    TARGET = ImageViewer
    greaterThan(QT_MAJOR_VERSION, 4): QT += widgets

    INCLUDEPATH += .

    DEFINES += QT_DEPRECATED_WARNINGS

    SOURCES += main.cpp
Now, let's build the application again by issuing the qmake -makefile and make commands in the Terminal as follows:
    $ qmake -makefile
    $ make
    g++ -c -pipe -O2 -Wall -W -D_REENTRANT -fPIC -DQT_DEPRECATED_WARNINGS -DQT_NO_DEBUG -DQT_WIDGETS_LIB -DQT_GUI_LIB -DQT_CORE_LIB -I. -I. -isystem /usr/include/x86_64-linux-gnu/qt5 -isystem /usr/include/x86_64-linux-gnu/qt5/QtWidgets -isystem /usr/include/x86_64-linux-gnu/qt5/QtGui -isystem /usr/include/x86_64-linux-gnu/qt5/QtCore -I. -isystem /usr/include/libdrm -I/usr/lib/x86_64-linux-gnu/qt5/mkspecs/linux-g++ -o main.o main.cpp
    g++ -Wl,-O1 -o ImageViewer main.o -lQt5Widgets -lQt5Gui -lQt5Core -lGL -lpthread
    $ ls
    ImageViewer ImageViewer.pro main.cpp main.o Makefile
    $
Hooray! We finally get the executable file, ImageViewer, in the project directory. Now, let's execute it and see what the window looks like:

As we can see, it's just a blank window. We will implement the full user interface as per our designed wireframe in the next section, Setting up the full user interface.
Setting up the full user interface
Let's proceed with the development. In the preceding section, we built a blank window and now we are going to add the menu bar, toolbar, image display component, and the status bar to the window.
First, instead of using the QMainWindow class, we will define a class ourselves, named MainWindow, which extends the QMainWindow class. Let's see its declaration in mainwindow.h:
    class MainWindow : public QMainWindow
    {
        Q_OBJECT

    public:
        explicit MainWindow(QWidget *parent = nullptr);
        ~MainWindow();

    private:
        void initUI();

    private:
        QMenu *fileMenu;
        QMenu *viewMenu;

        QToolBar *fileToolBar;
        QToolBar *viewToolBar;

        QGraphicsScene *imageScene;
        QGraphicsView *imageView;

        QStatusBar *mainStatusBar;
        QLabel *mainStatusLabel;
    };
Everything is straightforward. Q_OBJECT is a crucial macro provided by the Qt library. If we want to declare a class that has customized signals and slots of its own, or that uses any other facility from the Qt meta-object system, we must incorporate this crucial macro in our class declaration, or, more precisely, in the private section of our class, like we just did. The initUI method initializes all widgets that are declared in the private section. The imageScene and imageView widgets will be placed in the main area of the window to display images. Other widgets are self-explanatory from their type and name, so I will not say too much about them in order to keep the chapter concise.
Another key aspect is the implementation of the initUI method in mainwindow.cpp as follows:
    void MainWindow::initUI()
    {
        this->resize(800, 600);
        // setup menubar
        fileMenu = menuBar()->addMenu("&File");
        viewMenu = menuBar()->addMenu("&View");

        // setup toolbar
        fileToolBar = addToolBar("File");
        viewToolBar = addToolBar("View");

        // main area for image display
        imageScene = new QGraphicsScene(this);
        imageView = new QGraphicsView(imageScene);
        setCentralWidget(imageView);

        // setup status bar
        mainStatusBar = statusBar();
        mainStatusLabel = new QLabel(mainStatusBar);
        mainStatusBar->addPermanentWidget(mainStatusLabel);
        mainStatusLabel->setText("Image Information will be here!");
    }
As you can see, at this stage, we don't create every item and button for the menu and toolbar; we just set up the main skeleton. In the preceding code, the imageScene variable is a QGraphicsSence instance. Such an instance is a container for 2D graphical items. According to its design, it only manages graphics items but doesn't have a visual appearance. In order to visualize it, we should create an instance of the QGraphicsView class with it, which is why the imageView variable is there. In our application, we use these two classes to display images.
After implementing all the methods of the MainWindow class, it's time to compile the sources. Before doing this, a number of changes need to be made to the ImageViewer.pro project file, as follows:
- We just write a new source file, and it should be known by qmake:
     # in ImageViewer.pro
     SOURCES += main.cpp mainwindow.cpp
- The header file, mainwindow.h, has a special macro, Q_OBJECT, which indicates that it has something that cannot be dealt with by a standard C++ preprocessor. That header file should be correctly handled by a Qt-provided preprocessor named moc, the Meta-Object Compiler, to generate a C++ source file that contains some code relating to the Qt meta-object system. So, we should tell qmake to check this header file by adding the following line to ImageViewer.pro:
HEADERS += mainwindow.h
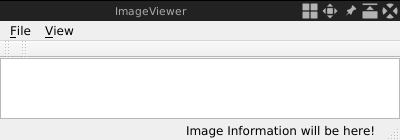
OK. Now that all of that is complete, let's run qmake -makefile and make again, and then run the new executable. You should see the following window:
Well, so far so good. Now, let's go on to add the items that should appear in the menus as we intended. In Qt, each item in a menu is represented by an instance of QAction. Here, we take the action, which is to open a new image as an example. First, we declare a pointer to a QAction instance as a private member of our MainWindow class:
QAction *openAction;
Then, in the body of the initUI method, we create the action as a child widget of the main window by calling the new operator, and add it to the File menu as follows:
    openAction = new QAction("&Open", this);
    fileMenu->addAction(openAction);
Fortunately, buttons on the toolbar can also be represented by QAction, so we can add openAction directly to the file toolbar:
fileToolBar->addAction(openAction);
As mentioned previously, we have seven actions to create: open, save as, exit, zoom in, zoom out, previous image, and next image. All of them can be added in the same way as we added the open action. Also, given that many lines of code are required to add these actions, we can do a little refactoring of the code—create a new private method named createActions, insert all the code of the action into that method, and then call it in initUI.
All actions are now created in a separate method, createActions, after the refactoring. Let's compile the sources and see what the window looks like now:
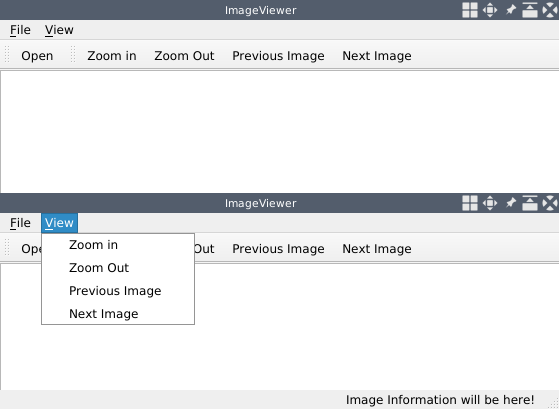
Great! The window looks just like the wireframe we designed, and we can now expand the menu by clicking on the items on the menu bar!
Implementing the functions for the actions
In the previous section, we added several actions to the menu and toolbar. However, if we click on these actions, nothing happens. That's because we have not written any handler for them yet. Qt uses a signal and slot connection mechanism to establish the relationship between events and their handlers. When users perform an operation on a widget, a signal of that widget will be emitted. Then, Qt will ascertain whether there is any slot connected with that signal. The slot will be called if it is found. In this section, we will create slots for the actions we have created in the preceding sections and make connections between the signals of the actions to these slots respectively. Also, we will set up some hotkeys for frequently used actions.
The Exit action
Take Exit action as an example. If users click it from the File menu, a signal named triggered will be emitted. So, let's connect this signal to a slot of our application instance in the MainWindow class's member function, createActions:
connect(exitAction, SIGNAL(triggered(bool)), QApplication::instance(), SLOT(quit()));
The connect method takes four parameters: the signal sender, the signal, the receiver, and the slot. Once the connection is made, the slot on the receiver will be called as soon as the signal of the sender is emitted. Here, we connect the triggered signal of the Exit action with the quit slot of the application instance to enable the application to exit when we click on the Exit action.
Now, to compile and run, click the Exit item from the File menu. The application will exit as we expect if everything goes well.
Opening an image
The quit slot of QApplication is provided by Qt, but if we want to open an image when clicking on the open action, which slot should we use? In this scenario, there's no slot built-in for this kind of customized task. We should write a slot on our own.
To write a slot, first we should declare a function in the body of the class, MainWindow, and place it in a slots section. As this function is not used by other classes, we put it in a private slots section, as follows:
     private slots:
         void openImage();
Then, we give this slot (also a member function) a simple definition for testing:
     void MainWindow::openImage()
     {
         qDebug() << "slot openImage is called.";
     }
Now, we connect the triggered signal of the open action to the openImage slot of the main window in the body of the createActions method:
connect(openAction, SIGNAL(triggered(bool)), this, SLOT(openImage()));
Now, let's compile and run it again. Click the Open item from the File menu, or the Open button on the toolbar, and the slot openImage is called. message will be printed in the Terminal.
We now have a testing slot that works well with the open action. Let's change its body, as shown in the following code, to implement the function of opening an image from disk:
         QFileDialog dialog(this);
         dialog.setWindowTitle("Open Image");
         dialog.setFileMode(QFileDialog::ExistingFile);
         dialog.setNameFilter(tr("Images (*.png *.bmp *.jpg)"));
         QStringList filePaths;
         if (dialog.exec()) {
             filePaths = dialog.selectedFiles();
             showImage(filePaths.at(0));
         }
Let's go through this code block line by line. In the first line, we create an instance of QFileDialog, whose name is dialog. Then, we set many properties of the dialog. This dialog is used to select an image file locally from the disk, so we set its title as Open Image, and set its file mode to QFileDialog::ExistingFile to make sure that it can only select one existing file, rather than many files or a file that doesn't exist. The name filter Images (*.png *.bmp *.jpg) ensures that only files with the extension mentioned (that is, .png, .bmp, and .jpg) can be selected. After these settings, we call the exec method of dialog to open it. This appears as follows:
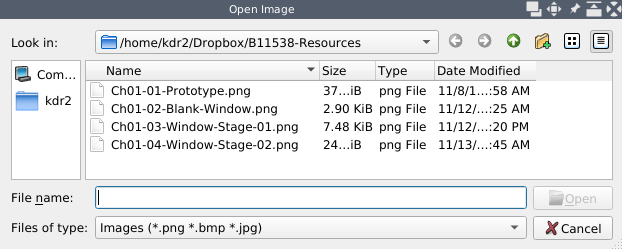
If the user selects a file and clicks the Open button, a non-zero value will be returned by dialog.exec. Then, we call dialog.selectedFiles to get the path of the files that are selected as an instance of QStringList. Here, only one selection is allowed; hence, there's only one element in the resulting list: the path of the image that we want to open. So, we call the showImage method of our MainWindow class with the only element to display the image. If the user clicks the Cancel button, a zero value will be returned by the exec method, and we can just ignore that branch because that means the user has given up on opening an image.
The showImage method is another private member function we just added to the MainWindow class. It is implemented as follows:
     void MainWindow::showImage(QString path)
     {
         imageScene->clear();
         imageView->resetMatrix();
         QPixmap image(path);
         imageScene->addPixmap(image);
         imageScene->update();
         imageView->setSceneRect(image.rect());
         QString status = QString("%1, %2x%3, %4 Bytes").arg(path).arg(image.width())
             .arg(image.height()).arg(QFile(path).size());
         mainStatusLabel->setText(status);
     }
In the process of displaying the image, we add the image to imageScene and then update the scene. Afterward, the scene is visualized by imageView. Given the possibility that there is already an image opened by our application when we open and display another one, we should remove the old image, and reset any transformation (for example, scaling or rotating) of the view before showing the new one. This work is done in the first two lines. After this, we construct a new instance of QPixmap with the file path we selected, and then we add it to the scene and update the scene. Next, we call setSceneRect on imageView to tell it the new extent of the scene—it is the same size as the image.
At this point, we have shown the target image in its original size in the center of the main area. The last thing to do is display the information pertaining to the image on the status bar. We construct a string containing its path, dimensions, and size in bytes, and then set it as the text of mainStatusLabel, which had been added to the status bar.
Let's see how this image appears when it's opened:
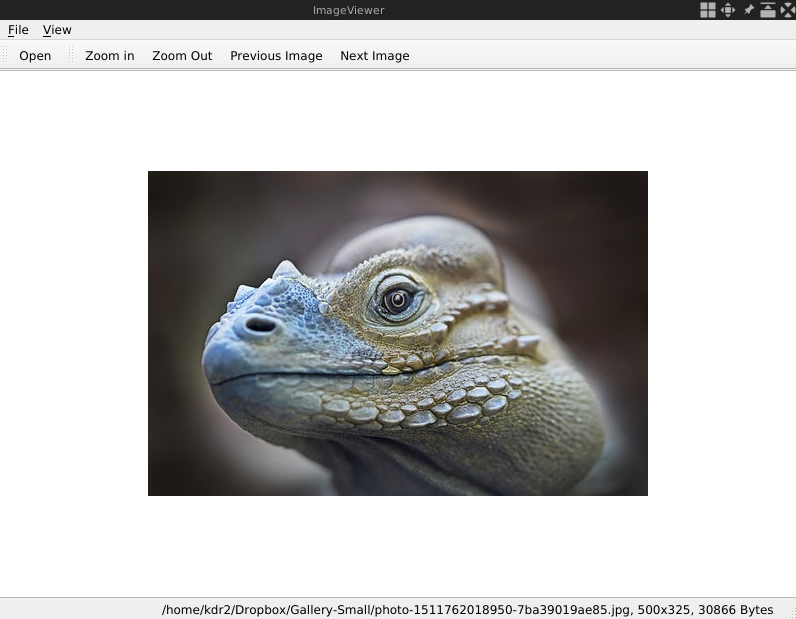
Not bad! The application now looks like a genuine image viewer, so let's go on to implement all of its intended features.
Zooming in and out
OK. We have successfully displayed the image. Now, let's scale it. Here, we take zooming in as an example. With the experience from the preceding actions, we should have a clear idea as to how to do that. First, we declare a private slot, which is named zoomIn, and give its implementation as shown in the following code:
     void MainWindow::zoomIn()
     {
         imageView->scale(1.2, 1.2);
     }
Easy, right? Just call the scale method of imageView with a scale rate for the width and a scale rate for the height. Then, we connect the triggered signal of zoomInAction to this slot in the createActions method of the MainWindow class:
connect(zoomInAction, SIGNAL(triggered(bool)), this, SLOT(zoomIn()));
Compile and run the application, open an image with it, and click on the Zoom in button on the toolbar. You will find that the image enlarges to 120% of its current size on each click.
Zooming out just entails scaling the imageView with a rate of less than 1.0. Please try to implement it by yourself. If you find it difficult, you can refer to our code repository on GitHub (https://github.com/PacktPublishing/Qt-5-and-OpenCV-4-Computer-Vision-Projects/tree/master/Chapter-01).
With our application, we can now open an image and scale it for viewing. Next, we will implement the function of the saveAsAction action.
Saving a copy
Let's look back at the showImage method of MainWindow. In that method, we created an instance of QPixmap from the image and then added it to imageScene by calling imageScene->addPixmap. We didn't hold any handler of the image out of that function; hence, now we don't have a convenient way to get the QPixmap instance in the new slot, which we will implement for saveAsAction.
To solve this, we add a new private member field, QGraphicsPixmapItem *currentImage, to MainWindow to hold the return value of imageScene->addPixmap and initialize it with nullptr in the constructor of MainWindow. Then, we find the line of code in the body of MainWindow::showImage:
imageScene->addPixmap(image);
To save the returned value, we replace this line with the following one:
currentImage = imageScene->addPixmap(image);
Now, we are ready to create a new slot for saveAsAction. The declaration in the private slot section is straightforward, as follows:
void saveAs();
The definition is also straightforward:
     void MainWindow::saveAs()
     {
         if (currentImage == nullptr) {
             QMessageBox::information(this, "Information", "Nothing to save.");
             return;
         }
         QFileDialog dialog(this);
         dialog.setWindowTitle("Save Image As ...");
         dialog.setFileMode(QFileDialog::AnyFile);
         dialog.setAcceptMode(QFileDialog::AcceptSave);
         dialog.setNameFilter(tr("Images (*.png *.bmp *.jpg)"));
         QStringList fileNames;
         if (dialog.exec()) {
             fileNames = dialog.selectedFiles();
             if(QRegExp(".+\\.(png|bmp|jpg)").exactMatch(fileNames.at(0))) {
                 currentImage->pixmap().save(fileNames.at(0));
             } else {
                 QMessageBox::information(this, "Information", "Save error: bad format or filename.");
             }
         }
     }
First, we check whether currentImage is nullptr. If true, it means we haven't opened any image yet. So, we open a QMessageBox to tell the user there's nothing to save. Otherwise, we create a QFileDialog, set the relevant properties for it, and open it by calling its exec method. If the user gives the dialog a filename and clicks the open button on it, we will get a list of file paths that have only one element in it as our last usage of QFileDialog. Then, we check whether the file path ends with the extensions we support using a regexp matching. If everything goes well, we get the QPixmap instance of the current image from currentImage->pixmap() and save it to the specified path. Once the slot is ready, we connect it to the signal in createActions:
connect(saveAsAction, SIGNAL(triggered(bool)), this, SLOT(saveAs()));
To test this feature, we can open a PNG image and save it as a JPG image by giving a filename that ends with .jpg in the Save Image As... file dialog. Then, we open the new JPG image we just saved, using another image view application to check whether the image has been correctly saved.
Navigating in the folder
Now that we have completed all of the actions in relation to a single image, let's go further and navigate all the images that reside in the directory in which the current image resides, that is, prevAction and nextAction.
To know what constitutes the previous or next image, we should be aware of two things as follows:
- Which is the current one
- The order in which we count them
So, first we add a new member field, QString currentImagePath, to the MainWindow class to save the path of the current image. Then, we save the image's path while showing it in showImage by adding the following line to the method:
currentImagePath = path;
Then, we decide to count the images in alphabetical order according to their names. With these two pieces of information, we can now determine which is the previous or next image. Let's see how we define the slot for prevAction:
     void MainWindow::prevImage()
     {
         QFileInfo current(currentImagePath);
         QDir dir = current.absoluteDir();
         QStringList nameFilters;
         nameFilters << "*.png" << "*.bmp" << "*.jpg";
         QStringList fileNames = dir.entryList(nameFilters, QDir::Files, QDir::Name);
         int idx = fileNames.indexOf(QRegExp(QRegExp::escape(current.fileName())));
         if(idx > 0) {
             showImage(dir.absoluteFilePath(fileNames.at(idx - 1)));
         } else {
             QMessageBox::information(this, "Information", "Current image is the first one.");
         }
     }
First, we get the directory in which the current image resides as an instance of QDir, and then we list the directory with name filters to ensure that only PNG, BMP, and JPG files are returned. While listing the directory, we use QDir::Name as the third argument to make sure the returned list is sorted by filename in alphabetical order. Since the current image we are viewing is also in this directory, its filename must be in the filename list. We find its index by calling indexOf on the list with a regexp, which is generated by QRegExp::escape, so that it can exactly match its filename. If the index is zero, this means the current image is the first one in this directory. A message box pops up to give the user this information. Otherwise, we show the image whose filename is at the position of index - 1 to complete the operation.
Before you test whether prevAction works, don't forget to connect the signal and the slot by adding the following line to the body of the createActions method:
connect(prevAction, SIGNAL(triggered(bool)), this, SLOT(prevImage()));
Well, it's not too hard, so attempt the work of nextAction yourself or just read the code for it in our code repository on GitHub.
Responding to hotkeys
At this point, almost all of the features are implemented as we intended. Now, let's add some hotkeys for frequently used actions to make our application much easier to use.
You may have noticed that, when we create the actions, we occasionally add a strange & to their text, such as &File and E&xit. Actually, this is a way of setting shortcuts in Qt. In certain Qt widgets, using & in front of a character will automatically create a mnemonic (a shortcut) for that character. Hence, in our application, if you press Alt + F, the File menu will be triggered, and while the File menu is expanded, we can see the Exit action on it. At this time, you press Alt + X, and the Exit action will be triggered to let the application exit.
Now, let's give the most frequently used actions some single key shortcuts to make using them more convenient and faster as follows:
- Plus (+) or equal (=) for zooming in
- Minus (-) or underscore (_) for zooming out
- Up or left for the previous image
- Down or right for the next image
To achieve this, we add a new private method named setupShortcuts in the MainWindow class and implement it as follows:
     void MainWindow::setupShortcuts()
     {
         QList<QKeySequence> shortcuts;
         shortcuts << Qt::Key_Plus << Qt::Key_Equal;
         zoomInAction->setShortcuts(shortcuts);

         shortcuts.clear();
         shortcuts << Qt::Key_Minus << Qt::Key_Underscore;
         zoomOutAction->setShortcuts(shortcuts);

         shortcuts.clear();
         shortcuts << Qt::Key_Up << Qt::Key_Left;
         prevAction->setShortcuts(shortcuts);

         shortcuts.clear();
         shortcuts << Qt::Key_Down << Qt::Key_Right;
         nextAction->setShortcuts(shortcuts);
     }
To support multiple shortcuts for one action, for example, + and = for zooming in, for each action we make an empty QList of QKeySequence, and then add each shortcut key sequence to the list. In Qt, QKeySequence encapsulates a key sequence as used by shortcuts. Because QKeySequence has a non-explicit constructor with int arguments, we can add Qt::Key values directly to the list and they will be converted to instances of QKeySequence implicitly. After the list is filled, we call the setShortcuts method on each action with the filled list, and this way setting shortcuts will be easier.
Add the setupShortcuts() method call at the end of the body of the createActions method, then compile and run; now you can test the shortcuts in your application and they should work well.
Summary
In this chapter, we used Qt to build a desktop application for image viewing, from scratch. We learned how to design the user interface, create a Qt project from scratch, build the user interface, open and display images, respond to hotkeys, and save a copy of images.
In the next chapter, we will add more actions to the application to allow the user to edit the image with the functions provided by OpenCV. Also, we will add these editing actions in a more flexible way by using the Qt plugin mechanism.
Questions
Try these questions to test your knowledge of this chapter:
- We use a message box to tell users that they are already viewing the first or last image while they are trying to see the previous one before the first image, or the next one after the last image. But there is another way to deal with this situation—disable prevAction when users are viewing the first image, and disable nextAction when users are viewing the last image. How is this implemented?
- Our menu items or tool buttons only contain text. How could we add an icon image to them?
- We use QGraphicsView.scale to zoom in or out of an image view, but how do you rotate an image view?
- What does moc do? What actions do the SIGNAL and SLOT macros perform?


